
All Microsoft Office programs can check spelling, and most can check grammar.
Using Microsoft 365? You may be interested in checking out the powerful new Editor feature in Word! See Editor — your writing assistant for more information.
Run the spelling and grammar checker
To start a check of the spelling and grammar in your document, just press F7.
Click a heading below for more information
Most Office programs automatically check for potential spelling and grammatical errors as you type, so you don’t need to do anything to show errors while you work.
Notes:
-
Automatic spelling and grammar checking is not available in Access, Excel, or Project. You can manually start a spell check by pressing F7.
-
Automatic grammar checking is available only in Outlook, Word, and PowerPoint 2013 (or newer).
Office marks potential spelling errors with a red squiggly line, and potential grammatical errors are marked with a blue squiggly line.
If spelling or grammatical errors aren’t marked, automatic checking might be turned off. You can turn on the automatic spelling and grammar checker.
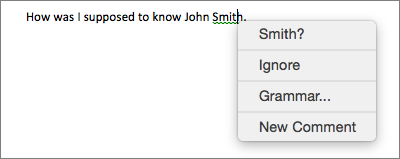
When you see a spelling or grammatical error that you want assistance fixing, right-click on the underlined word or phrase and choose one of the options to fix the error.
If Office is flagging words as misspelled but you have it spelled the way you want it, select Add to Dictionary to teach Office not to flag that word as misspelled in the future. For more information on this see: Add or edit words in a spell check dictionary.
If you don’t want Office to mark potential errors with squiggly lines while you are working, you can turn automatic spelling and grammar checking off:
-
Open the spelling and grammar options:
-
In OneNote, PowerPoint, Publisher, Visio, and Word: On the File menu, click Options, and then click Proofing.
-
In InfoPath: On the Home tab, click the arrow next to or under Spelling, and then click Spelling Options.
-
In Outlook: On the File menu, click Options, and click Mail, and then click Spelling and Autocorrect.
-
-
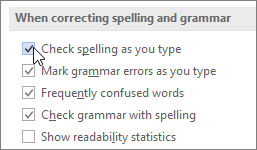
Select or clear the Check spelling as you type check box. In programs that have automatic grammar checking, you may also select or clear the Mark grammar errors as you type check box.

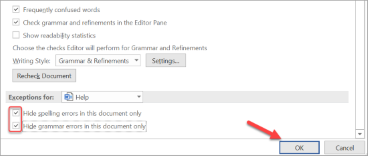
Note: In Word, you can turn the spelling checker on or off for only the document you’re currently working with or for all new documents. Select an option in the Exceptions for list, and then select or clear the Hide spelling errors in this document only and Hide grammar errors in this document only check boxes.
If you don’t want Office to check grammar at all (either when running a spell check or automatically as you type), you can turn it off:
-
Open the spelling and grammar options:
-
In OneNote, PowerPoint, Publisher, Visio, and Word: On the File menu, click Options, and then click Proofing.
-
In InfoPath: On the Home tab, click the arrow next to or under Spelling, and then click Spelling Options.
-
In Outlook: On the File menu, click Options, and click Mail, and then click Spelling and Autocorrect.
-
-
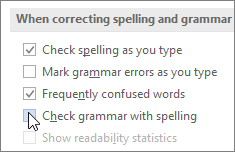
Clear the Mark grammar errors as you type and Check grammar with spelling check boxes.
Note: Not every Office program will have both of these options.
In Word, Outlook, PowerPoint 2013 (or newer), you can force a recheck of the words and grammar that you previously skipped by doing the following:
-
Open the document or item that you want to check.
-
On the File menu, click Options > Proofing> Recheck Document. In Outlook you’ll find this under File > Options > Mail > Spelling and Autocorrect
-
Click Yes when you see the warning message about resetting the spelling and grammar checker.
-
Click OK in the dialog box to get back to the document, and then run the spelling and grammar checker again.
See Also
Check spelling and grammar in a different language.
Test your document’s readability
The spelling and grammar checker isn’t working as expected
Select grammar and writing style options in Office 2013 and earlier
Add words to your spell check dictionary
The spelling or grammar checker isn’t checking words in a different language correctly
Choose AutoCorrect options for capitalization, spelling, and symbols
Check spelling before sending a message in Outlook
Learn how to get more from Editor with Microsoft 365
Office for Mac applications automatically check for potential spelling and grammatical errors as you type. If you’d rather wait to check spelling and grammar until you’re done writing, you can turn off automatic checking, or you can check spelling and grammar all at once.
Word
Check spelling and grammar automatically as you type
Word marks potential spelling errors with a red squiggly line, and potential grammatical errors are marked with a green squiggly line.
Tip: If spelling or grammatical errors aren’t marked, you might need to turn on automatic spelling and grammar checking, which is explained in the next procedure.
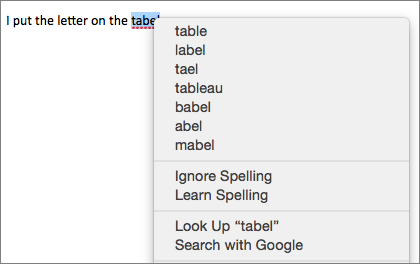
When you see a spelling or grammatical error, Control click the word or phrase and choose one of the options.
If Word has incorrectly flagged a word as misspelled and you want to add that word to your dictionary so that Word will properly recognize it in the future see Add or edit words in a spell check dictionary
-
On the Word menu, click Preferences > Spelling & Grammar.
-
In the Spelling & Grammar dialog box, under Spelling, check or clear the Check spelling as you type box.
-
Under Grammar, check or clear the Check grammar as you type box.
-
Close the dialog box to save your changes.
-
On the Review tab, click Spelling & Grammar.
-
If Word finds a potential error, the Spelling & Grammar dialog box will open, spelling errors will be shown as red text, and grammatical errors will be shown as green text.
-
To fix an error, do one of the following:
-
Type the correction in the box and then click Change.
-
Under Suggestions, click the word you want to use, and then click Change.
To skip the error, do one of the following:
-
Click Ignore to skip only that instance of the error.
-
Click Ignore All to skip all instances of the error.
-
For a grammatical error, click Next Sentence to skip that instance of the error and move to the next error.
To skip a misspelled word in all documents, click Add to add it to the dictionary. This only works for misspelled words. You can’t add custom grammar to the dictionary.
-
-
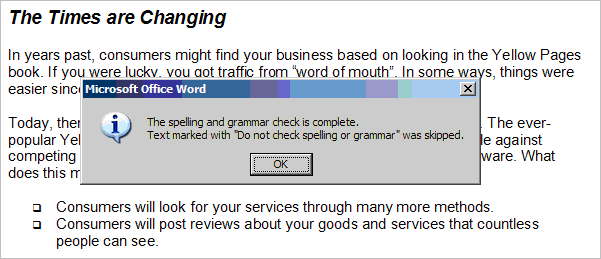
After you correct, ignore, or skip an error, Word moves to the next one. When Word finishes reviewing the document, you’ll see a message that the spelling and grammar check is complete.
-
Click OK to return to your document.
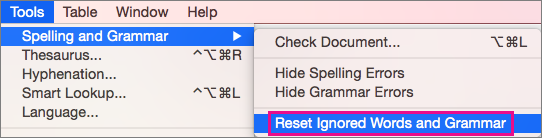
You can clear or reset the list of Ignored Words and Grammar so Word will check for spelling and grammar issues you previously told it to ignore.
Note: When you reset the list of Ignored Words and Grammar, the list is cleared only for the currently open document. Any spelling or grammar issues you told Word to ignore in other documents won’t be affected.
-
Open the document that needs to be checked.
-
On the Tools menu, point to Spelling and Grammar, and then click Reset Ignored Words and Grammar.
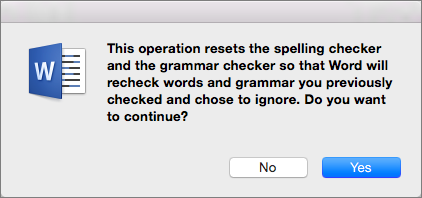
Word displays a warning about the operation resetting the spelling checker and the grammar checker.
-
Click Yes to proceed.
-
Click the Review tab, and then click Spelling & Grammar to check spelling and grammar.
Outlook
Check spelling and grammar automatically as you type
By default, Outlook checks for spelling errors as you type. Outlook uses a dashed red underline to indicate possible spelling errors and a dashed green line to indicate possible grammatical errors.
-
When you see a word with a dashed underline, Control click the word or phrase and choose one of the options.
-
On the shortcut menu, do one of the following:
-
Click one of the guesses at the top of the shortcut menu.
-
Click Ignore Spelling to ignore one instance of the word.
-
Click Learn Spelling to add the word to the spelling dictionary.
-
After opening an email message:
-
To have Outlook correct spelling mistakes automatically, on the Outlook menu, click Preferences. Click on Spelling and Grammar under Personal Settings. Click box next to Checkspelling as you type.
-
To turn automatic grammar checking on or off, on the Outlook menu, click Preferences. Click on Spelling and Grammar under Personal Settings. Click box next to Check grammar as you type.

You can correct all the spelling and grammar issues at the same time after you finish composing a message or other items.
-
On the Edit menu, point to Spelling and Grammar, and then click Spelling and Grammar…
-
Do any of the following:
-
In the list of suggestions, click the word that you want to use, or enter a new spelling in the box at the top, and then click Change.
-
Click Ignore to ignore this word and move on to the next misspelled word.
-
Click Add to add the word to the spelling dictionary.
-
Tip: The keyboard shortcut for skipping to the next spelling or grammar error is  + ; .
+ ; .
PowerPoint
You can check spelling in PowerPoint, but you can’t check grammar.
Check spelling automatically as you type
PowerPoint automatically checks for and marks potential spelling errors with a wavy, red underline.
Tip: If spelling errors aren’t marked, you might need to turn on automatic spell checking, which is explained in the next procedure.
When you see a spelling error, Ctrl+click or right-click the word or phrase and choose one of the suggested options.
-
On the PowerPoint menu, click Preferences > Spelling.
-
In the Spelling dialog box, select or clear the Check spelling as you type box.
-
On the Review tab, click Spelling.
-
If PowerPoint finds a potential error, the Spelling pane opens and spelling errors are shown.
-
To fix an error, do one of the following:
-
Correct the error on your slide.
-
Click one of the suggested words in the Spelling pane, and then click Change.
To skip the error, do one of the following:
-
Click Ignore to skip only that instance of the error.
-
Click Ignore All to skip all instances of the error.
-
click Add to skip a misspelled word in all documents and add it to the dictionary.
-
-
After you correct, ignore, or skip an error, PowerPoint moves to the next one. When PowerPoint finishes reviewing the presentation, you’ll see a message that the spelling check is complete.
-
Click OK to return to your presentation.
Excel
You can check spelling in Excel, but you can’t check grammar.
Check spelling all at once
-
On the Review tab, click Spelling.
Note: The Spelling dialog box will not open if no spelling errors are detected, or if the word you are trying to add already exists in the dictionary.
-
Do any of the following.
To
Do this
Change the word
Under Suggestions, click the word that you want to use, and then click Change.
Change every occurrence of this word in this document
Under Suggestions, click the word that you want to use, and then click Change All.
Ignore this word and move on to the next misspelled word
Click Ignore Once.
Ignore every occurrence of this word in this document and move on to the next misspelled word
Click Ignore All.
See also
Check spelling and grammar in a different language
Have you ever had one of those days where you’re finishing an important document, but the spell check in Microsoft Word isn’t working correctly? Sometimes you can’t check one document, and other times you can’t spell-check any document. And sometimes, it’s several words. In this troubleshooting tutorial, I’ll show several fixes.
I’ve encountered this annoyance many times. Usually, I can solve the issue with the steps below unless it’s a protected Microsoft Word document. However, one reason you want to correct this issue is that it may interfere with calculating your Word readability statistics.
Spell Check Not Working – (1 Document)
Sometimes Word’s spell check will only work for one document. However, you can open other Microsoft Word documents, and spell check works. The problem is probably with the preferred languages or formatting settings.
Verify Your Language & Check Spelling Options
- Open the problem document.
- Press the Ctrl + A keys to select the entire text.
- From the Review tab, select Language then Set Proofing Language…
- In the Language dialog box make sure the correct default language is selected.
- Verify the checkbox Do not check spelling or grammar is unchecked.
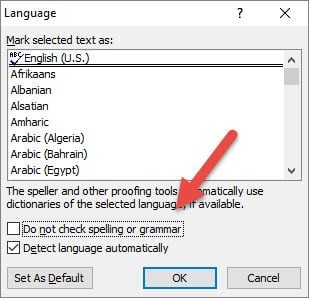
- Click OK.
- Recheck your document
I wish the above method were foolproof. Highlighting the entire document would overwrite all paragraph settings throughout. On older versions of Microsoft Word, I would get the following message as shown below. However, in Microsoft 365, I no longer get this alert even if I have spelling errors.
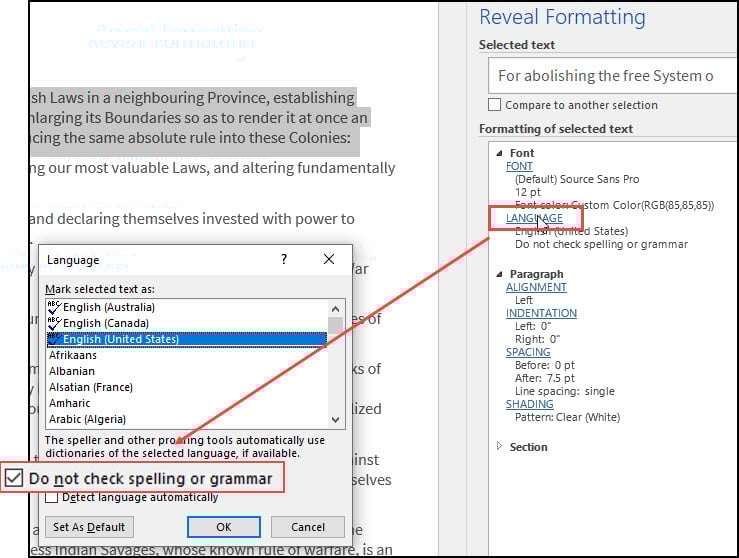
This alert message suggests that your document has a section marked “Do not check spelling or grammar.” Unfortunately, I don’t know any easy way to find these marks. So instead, I find a paragraph with a spelling mistake, highlight it, and press Shift + F1.
This opens the Reveal Formatting pane, where you can verify that your correct language is what you expect and if the paragraph has spell check turned off. In the example below, the highlighted paragraph is coded not to check for spelling.
Tip: If you don’t see the pane, you may have some sort of Function lock on your keyboard. Generally, these keyboards have an F Lock key on the top row because there are other functions mapped. Other keyboards may use an Fn key.

In the above example, I misspelled the word “government”. Word did not flag this instance because the paragraph was marked not to do spelling or grammar checks.
To fix the issue, highlight your paragraph and click the Language link in the Reveal Formatting dialog. This will open the Language dialog box, and you can deselect the check spelling or grammar option checkbox.
Are Multiple Proofing Languages Set
Looking at the screen print above, you’ll notice that I have three proofing languages above the double line. They are variations of English for Australia, Canada, United States. Word can get confused if you don’t enable “Detect language automatically“.
According to this support page, Microsoft noted several suggestions:
- Automatic language detection requires that a sentence of text be written in that language. Depending on the length of your sentences, you might need to type several sentences before Word has enough contextual information to automatically detect the language and apply the correct dictionary.
- Words that are spelled the same way in several languages, such as “centre” in English (United Kingdom) and French (France) might cause the Detect language automatically check box to incorrectly identify the language of text. To solve this problem, type more words in the language you want, or clear the Detect language automatically check box.
Review Your Proofing Exception Options
You should check another setting, as there is a Word option where you can elect to hide spelling errors. You can set this option on an individual file.
- Click the File tab.
- From the left panel, select Options.
- In the Word Options dialog, click Proofing.
- Scroll to the bottom area called Exceptions for:
- Check to see if the Hide spelling errors in this document only check box is enabled.

Spell Check Not Working – (All Documents)
This second problem can be a real annoyance with many variations. The suggestions range from easy to a Microsoft Windows registry change.
Option 1: Verify the “check spelling as you type” Feature
This feature is an option to see your mistakes as they happen. In some cases, I’ve seen toggling this check box “on” and “off” fix the problem. Additionally, those red squiggly underlines might be from the Word Exclusion Dictionary.
To verify Spelling and Grammar Checkers are on,
- Click the File tab.
- From the left menu, select Options at the bottom.
- In the Word Options dialog, click Proofing.
- Check the boxes for Check spelling as you type and Mark grammar errors as you type. (See picture above.)
- Click OK.
![]() Note: For older versions of Word, use the Check Document feature on your Review tab.
Note: For older versions of Word, use the Check Document feature on your Review tab.
Option 2: Check for Conflicting Word Add-in
Still, your problem may be caused by a combination of factors such as another Word add-in. The way to verify this is to see if the spellchecker works in “safe mode”. Safe Mode is a reduced functionality state where Microsoft Word loads without add-ins.
- Hold down your Ctrl key and then press the icon or menu option for Microsoft Word.
- Click Yes when the Safe Mode dialog appears.

- Open up your document.
- Press F7 to run spell-check.
If the spellchecker works, you need to figure out which add-in is causing the problem. There are two areas where you may see these.
The first is from the Insert tab.

If you click My Add-ins, you will see your installed items. If you hover over an item, a 3-dot menu will appear where you can remove the item.

Additionally, you can access this area from the Word Options dialog box under Add-ins. Hopefully, you recognize an add-in name such as Grammarly. Then you can press the Go button.
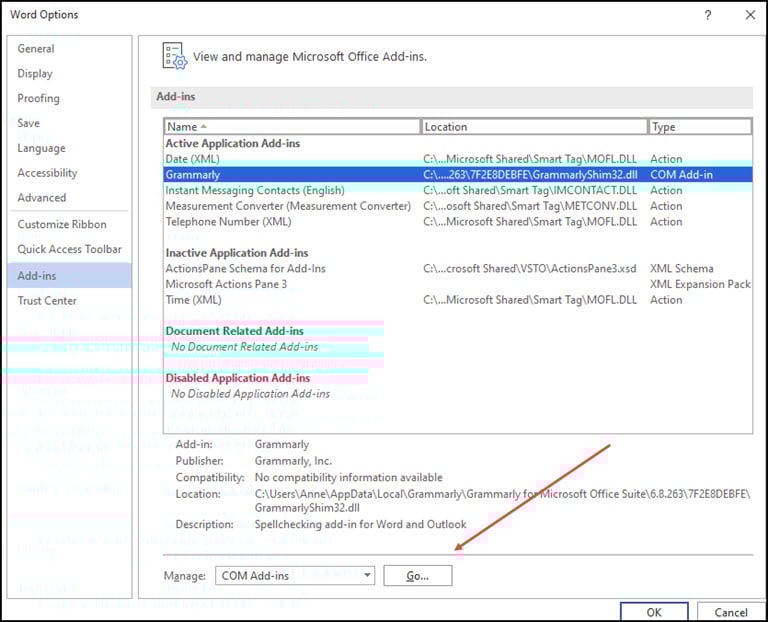
You’ll then get a COM Add-ins dialog where you can uncheck the box so it won’t load or remove it.

I’d suggest closing Word and reopening your document before checking again.
Option 3: Rename Your Word Template
Your Microsoft Word document template, which is either normal.dot or normal.dotm, might also be causing an issue. You can find these files in your Microsoft Templates folder. When you rename the template, Word will reset to the default settings.
Because your global template file has your settings, I would recommend renaming the file to something like normalPRV.dot or normalPRV.dotm so you can change the name if this suggestion doesn’t work.
Tip: If you need to confirm the location of your template you can press your Windows key ![]() + r. This will open the Run dialog, where you can copy and paste the command below.
+ r. This will open the Run dialog, where you can copy and paste the command below.
%appdata%MicrosoftTemplates

Option 4: Try Detect and Repair
Now and then, I have the spell-check feature go wonky after some other software update or hardware change. For example, a registry entry has become corrupted. In these rare cases, you may have to repair your installation.
Option 5: Rename a Windows Registry Folder
I don’t like giving instructions on using the Windows registry. But sometimes, this online repair works. If you’re unfamiliar with this area, I strongly recommend reading Microsoft’s https://docs.microsoft.com/en-US/troubleshoot/windows-server/performance/windows-registry-advanced-users.
As with an earlier suggestion, I rename the folder rather than deleting it. Some people rely on third-party dictionaries that may use some of these entries. If you find after renaming the folder, your 3rd party dictionary doesn’t work; you can revert the changes.
To rename the Proofing Tools folder,
- Close Word.
- Press the Windows key + R.
- In the Run dialog box type regedit.
- Click the OK button.
- Expand the left pane to HKEY_CURRENT_USER | Software | Microsoft | Shared Tools| Proofing Tools
- Right-click the folder named 1.0
- Select Rename from the menu.

- Rename folder to 1PRV.0
- Close regedit.
- Restart Microsoft Word.
Specific Word Isn’t Flagged as Misspelled
Sometimes, you’ve run through the steps above and Word still doesn’t flag an item that is misspelled. This can be frustrating, but sometimes the problem is us. Yes, I have misspelled words when adding them to Word’s custom spell check dictionary. That’s why I also created an exclude dictionary for Word.
Check Your Custom Dictionary
- Click the File tab.
- From the left menu, select Options at the bottom.
- In the Word Options dialog, click Proofing.
- Scroll down to When correcting spelling in Microsoft Office program section.
- Click the Custom Dictionaries… button.
- Click the Edit Word List… button.

- Find your misspelled word and delete it.
- Add correct variation if needed.
- Click OK.
Try Another Online Option & Then Fix
This isn’t a fix for the problem, but it buys you time if you’ve got a deliverable. In the interim, you can save your document and try to open or copy it to another online word processor such as Google Docs or Microsoft Word Online. You will need to have an online account. Once you’ve imported your document, use that system’s spell-checker.
Hopefully, these solutions helped you isolate why spell-check wasn’t working. Now, you can continue to write your great novel, business proposal, letter, or tutorial.
- How to Make Symbols with a Keyboard
- How to Make a Letterhead Template with Word
- How to Add Watermark in Word
- How to Compress a Word Document
- Video: How to Make a Letterhead in Word
Is your Microsoft Word spell checker not working suddenly and isn’t detecting any spelling and writing mistakes?
Microsoft Word is a special word-processing software released by the namesake company that many people are familiar with and continue to use today. Almost everyone is familiar with Microsoft Word and how it helps us complete everything from school assignments to comprehensive reports that help us get through our jobs.
The software is equipped with several tools that you can use to simplify your documents while making them easier to read and understand. A spell checker is a nifty tool that many users find helpful as it helps you fix any spelling and grammatical mistakes.
Despite this usefulness, the tool has limitations and is prone to suddenly stop working altogether while you are still writing or editing your documents. Microsoft Word might be unable to detect any spelling and grammar mistakes if you encounter this issue which can take a toll on your productivity.
Types of Microsoft Word Spell Checker Errors
Several users who frequently use Microsoft Word have reported problems with the spell-checker function. This problem usually manifests in the software’s inability to detect any wrongly spelled words through its red underlines and offer suggestions to correct them. Another example of this problem is Word failing to automatically correct any wrongly spelled words and incorrect syntax and capitalization in the document.
Both instances of the spell checker misbehaving all boil down to a malfunction with the feature itself. This can be caused by something going wrong with the software or the system you are typing it on.
With everything in mind, we prepared this guide that will cover 5 common reasons why your spell checker might not be working as well as 8 fixes that you can try out that will try to fix and improve the situation.
All the fixes you find here will cover simple and basic troubleshooting fixes to more complicated and complex fixes you need to make with your system. With that out, let’s get down to fixing your spell checker!
Why is the Spell Check Feature in Microsoft Word Not Working?
1. The Spell Checkers Weren’t Installed into Your Microsoft Word
You might not be able to use the spell checker feature because the feature wasn’t installed in your Microsoft Word. While the Office installer ensures that your installations will be clean, it might not always be able to catch and fix all errors which can lead to this happening.
This happens during the installation process as Microsoft Word (and Office in general) supports “Add-ins” from their official site and third-party applications that can make your encoding process significantly easier. The spell checker function is considered an “Add-in” and might’ve not been added to your Microsoft Word during installation.
If you can’t access your spell check using the Review tab or shortcut button (F7, for example), the feature might not be installed. You can quickly resolve this problem by installing the proofing tools (Step 1) or repairing your Microsoft Office software lineup altogether (Step 2).
2. The Language You Are Typing in is Disabled in Add-ins
Recent versions of Microsoft Word tend to have more lenient and comprehensive spell checkers in contrast to the older versions, like 2003 and lower. Typing in different languages in newer versions is made more accessible by changing your speller language to that specified language.
Following the language you are typing in is essential for the spell checker. The feature tends to stop working entirely if you have too many spelling/grammar errors resulting from typing in another language.
In either scenario, you want to enable the language you are typing in (Step 3) so that you cannot only catch any spelling and grammar mistakes but also have your spell checker working and ready to go when you are ready to do any more encoding.
3. Spell Checker Feature was Disabled
Similar to the first reason, the spell checker feature might not work because you have the function disabled. It is possible for the spell checker feature to be installed but disabled either by you or your system automatically.
Microsoft Word’s spell checker functions in 2 ways. You can manually activate it and check for any errors after you have finished typing your document, or you can have it work alongside you to make any edits on the fly as you encode.
Regardless of how you prefer your spell checker to function, in either situation, you’d want to double-check your spell checker feature and re-enable it (Step 4), mainly if you are used to the latter version of the way spell checker functions.
4. Another Language was Set as your Default Option
Continuing from the second reason, your spell checker might not be working because you might’ve selected another language as your default one for the document you are working on. This situation would rarely pose a problem with your spell checker but can become very problematic and confusing when it does happen.
If this happens, you want to re-select the language option that your spell checker will use (Step 5) to ensure that it is following the right one to base its spelling and grammar.
5. Your Computer blocked the Feature
The last reason your feature might not be functioning at all might be a combination of several things that can lead it to get blocked 🛑 and falsely flagged🏳️ as malicious by your computer.
Microsoft Word can run and function almost as well, even if your spell checker is blocked, provided that no key features are also blocked. Since the spell checker feature is considered an add-on, the software can continue running, albeit without the feature working.
There are several workarounds and fixes that you can take to address this problem, with the first workaround being opening your document (and by extension Microsoft Word) in Safe mode (Step 6), with the following fix being to unblock and whitelist Microsoft Word from your Security (Step 7). Finally, you can modify your computer registers related to the spell checker feature and Microsoft Word (Step 8).
1. Installing Proofing Tools for Microsoft Word
Typically, Microsoft Office installs all the essential features you might need with Microsoft Word when you first install it. In some cases, however, the features might not be installed due to a bug or glitch.
Luckily, you can still fix this problem by manually installing the feature by following these steps:
- Open your Control Panel by searching it on your Computer.
- Select “Uninstall a Program” found underneath the Programs category.
- Select “Microsoft Office Professional….” from the program list.
- Click on “Change” from the top of the program list or “Uninstall” if the former option is unavailable.
- Select “Add or Remove Feature” in the installation window of your Microsoft Office. If you selected Uninstall, cancel it and select the appropriate action before continuing.
- Scroll down the Installation Options list until you find “Office Shared Features” then expand it. Select “Run all from my Computer” underneath the “Proofing Tools” option.
The steps above will reinstall and activate your spell checker in your Microsoft Word. We recommend restarting your computer after installation to ensure everything is properly functioning the next time you open Microsoft Word.
2. Repair Microsoft Office
Suppose you are experiencing problems with other Microsoft Office programs outside of Microsoft Word. In that case, repairing your Microsoft Office will solve your spell checker issues and any additional issues with your Microsoft Office.
Here’s how you can repair your Microsoft Office:
- Open “Settings” ⚙️ on your computer by searching it on your system.
- Select “Apps” from among the categories in your Settings.
- In the App List in the bottom portion of the window, scroll down until you find “Microsoft Office Professional….” and select it. Click on “Modify” and continue with any system permission requests.
- In the Microsoft windows that pop up, select “Quick Repair”🔧. You can also opt to choose “Online Repair” albeit it will take a longer time to finish.
Please wait for the repair request to be finished and for the prompt that it was successful. Once the repair is finished, restart your computer and launch Microsoft Word to see if the problem is fixed.
Note: As the name suggests, Online Repair will require a stable internet connection to proceed as it will attempt to redownload any broken files. We only recommend choosing this if you have access to stable internet and as a last resort.
3. Re-Enable the Language you are Typing in (e.g., EN-US)
There are some instances of the spell checker language getting randomly disabled due to a bug or glitch with Microsoft Word. This rarely gets fixed automatically unless you reinstall the program, which is why you would want to check if it was disabled entirely.
Here’s what you can do to be able to do just that:
- Launch Microsoft Word and Select “File” from the menu.
- Select “Options” found in the bottom left corner of the File tab.
- In the Word Options popup window, select “Add-ins”.
- On the bottom portion of the window, expand the “Manage” dropbox and select “Disabled Items” and then “Go”.
- A “Disabled Items” popup window will appear that will contain any disabled feature/s in Microsoft Word. check to see if “Speller EN-US (nlsdata0009.dll)” is listed here.
- If something is listed in the list that you are using, select it and click on “Enable”
After following the steps above, we recommend you restart your Microsoft Word to ensure that any changes you make will be applied.
4. Enable the Spell Checker Feature in Microsoft Word
Similar to the previous fix, you also want to check the spell-checking and proofing function entirely in your Microsoft Word to see if it was enabled correctly and running. If it was disabled in the last step, there’s a high chance that you need to re-enable it.
Here’s how you can do it:
- Launch Microsoft Word and Select “File” from the menu.
- Click on “Options” found in the bottom left corner of the File tab.
- In the Word Options popup window, select “Proofing.”
- Underneath “When Correcting Spelling and Grammar in Word,” check ☑️ both “Check Spelling as you type” and “Check Grammar with Spelling.”
- Click on “OK” in the window’s bottom right corner.
The first option allows Microsoft Word to check your spelling and grammar as you type in the document. The second option essentially enables the spell-checker feature to work.
5. Set Your Proofing Language for Microsoft Word
Many Microsoft Word languages are set to your system’s default language. In most cases, the software will default back to “English – US,” and if this happens not to be the language you are typing in, you might want to manually set it by following these steps:
- Select “Review” from the top menu in the Microsoft Word software window.
- Click on “Language” and then select “Set Proofing Language”.
- Select the Language you will be typing in (E.G, English (United States)).
- Uncheck “Do not check spelling or grammar.” You can also opt to uncheck “Detect language automatically”.
- If you frequently type in the language, you set your Microsoft Word as we recommend by clicking on “Set as Default.” Otherwise, having English as your default and selecting another language is better overall.
- Click on “Ok” to apply the changes and start typing away.
6. Run Microsoft Word in Safe Mode
Safe Mode is a way for Microsoft Office to open documents without running the risk of unwanted malware overrunning your computer. The spell checker function is also available in Safe Mode and can be accessed by simply launching Word in Safe Mode in these 2 methods.
You can start with the First Method by following these steps:
- Open the “Run” Command by either searching it or pressing Windows Key+R on your keyboard.
- In your Run window, type in “winword /safe” and click “OK”.
- This will open your Microsoft Word in Safe Mode automatically.
Second Method
- Find Microsoft Word on your Computer either through the app or its shortcut. Searching for it works the best.
- Open the application WHILE HOLDING CTRL, and don’t let go until you see a popup from Microsoft Word.
- Select “Yes” from the popup to launch Microsoft Word in Safe Mode. Clicking “No” will launch it as normal.
Both methods above also work for opening other Microsoft Office applications in safe mode with a slight variation to match the app (such as using excel /safe for the first method).
7. Whitelist Microsoft Office From Your Security
Microsoft Word (and Office) can run even if it gets blocked by your system. However, if they are running, certain features will become unavailable, such as the spell-checker. Whitelisting Office will fix any issues related to this, and it can be done through these steps:
- Open “Windows Security” or something similar to that feature/function in your System.
- Select “Virus & Threat Detection” from the Action list or in the left-side pane of the Windows Security window.
- Click on “Manage Settings” found below “Virus & Threat Protection Settings” in the Virus & Threat Protection window.
- Scroll down until you find the “Exclusions” category in the window. Click on “Add or Remove Exclusions” underneath the category.
- Click on “Add an Exclusion”➕ and then select the “Folder”📁 option in the succeeding menu that appears.
- In the popup window, please navigate to the folder where you have Microsoft Office and its files installed. The default installation location should be in “C:Program Files (x86)Microsoft Office”. “Program Files” can be used to replace “Program Files (x86)” if the option isn’t available.
- Click on “Select Folder” after selecting the folder.
- The folder path you selected for Microsoft office will appear on the Exclusions list in the previous window. Once you confirm that it’s here, you can close the window.
After finishing all the steps above, we recommend that you restart your computer before launching Microsoft Word to ensure that Windows will adequately apply the changes and whitelist not only Microsoft Word but also the entire Microsoft Office apps.
8. Modify Your Computer’s Registry
Your registry is what holds all the software and its respective features that are installed on your computer. Your spell checker might not be working in Microsoft Word due to an incorrect value in your registry that you would need to fix manually.
This might seem complicated at a glance, but we have broken the steps down to make it easier to follow. Here’s where you can start:
- Open the “Run” Command by either searching it or pressing Windows Key+R on your keyboard.
- Type “regedit” in the Run Command window and press “OK.” Continue with any app permissions that you might prompt.
- Select the “HK_CURRENT_USER” folder and expand it.
- Underneath the “HK_Current_USER” folder, find “Software” and expand it like before.
- Underneath the “Software” folder are different apps installed on your PC. Look for “Microsoft” from among them and select it.
- In the “Microsoft” folder, look for the “Shared Tools” folder and open it like before.
- Continuing from the previous step, select “Proofing Tools” then “1.0” and finally, “Office”.
- Click on “WordSpellingOptions” from the Regedit menu on the right.
- In the Edit window, set the Value data to “5” and the base to “Hexadecimal”. This is the default option for Microsoft Office.
- Right-click your “1.0” folder and select “Rename” from the options.
- Rename the folder to “1PRV.0” and then exit your Register Editor.
After following the steps above, you can relaunch your Microsoft Word after a quick reboot. If you are still experiencing problems with your spell checker, you can follow the steps to access the same folder and rename “1PRV.0” back to “1.0”.
For anyone curious, the entire file path you need to access in your Registry Editor is: “HKEY_CURRENT_USERSoftwareMicrosoftShared ToolsProofing Tools1.0”
Conclusion
Anyone who has used Microsoft Word at any point can agree with the simplicity and versatility offered by this word-processing software compared to similar apps. Many are familiar with the layout of Microsoft Word and the application’s ease of use with the number of features you have at your disposal.
The spell checker is an integral feature of Microsoft Word as it shaves off a good chunk of time when working with the application. It makes proofreading significantly easier while taking care of our little mistakes when writing down anything. We understand how frustrating it can get for those who rely on the feature, which is why we prepared this guide.
The 5 reasons and 8 fixes we have researched and prepared are geared toward helping you solve any issues you might encounter while using your spell checker when it’s not working correctly so you can get back into writing without any inconvenience. Always take your time when solving these kinds of issues, as you can make the situation more difficult if you rush into it.
Let us know down below 👇 in the comments:
- Is this guide helpful and informative with Microsoft Word’s Spell Checker?
- Which of the following fixes worked best for you and your problem?
- Any additional fixes we missed and can try out to add to this list?
- What do you like the most about Microsoft Word compared to other Word Processing Apps and Software?
Please don’t be shy to share this article with any friend, family member, or co-worker you find is having difficulties with their spell checker feature in Microsoft Word not working as expected.
Get your automatic editor back in action
Updated on April 20, 2022
While Word’s spell check works well most of the time, sometimes it can appear to stop operating. Some simple troubleshooting steps will quickly get Word’s spelling and grammar-checking tool back up and running. These solutions apply to Word for Microsoft 365, Word 2019, Word 2016, Word 2013, Word 2010, and Word for Mac.
Causes of Word’s Spell Check Not Working
There are several reasons Word’s spelling and grammar-checking tool might not be working. You might have changed a simple setting, or the language settings may be off. Exceptions may have been placed on the document or the spell-check tool, or the Word template may have an issue.
Whatever the reason, some easy fixes are likely to have Word back to pointing out mistakes in your documents soon.
The spelling and grammar checker may return an error message about the default language or say «Spelling and grammar check is complete» without flagging any errors. You may not receive any message but may notice the tool isn’t functioning.
Add Grammarly to Word: Learn How Now
How to Fix Word’s Spell Checker Not Working
Follow these troubleshooting steps in the order we present, from the simplest solution to the most complex.
-
Make sure Word spell check is turned on, the most likely culprit and most straightforward solution. If you haven’t enabled automatic spell-checking, the tool won’t function as you expect. Also, select the Mark grammar errors as you type and Check grammar with spelling check boxes.
On a Mac, select Word > Preferences > Spelling & Grammar, and select the Check spelling as you type and Check grammar as you type check boxes.
-
Check Word’s proofing language. Word may be set to the wrong proofing language, causing it to miss errors. Make sure Word is proofing in the correct language, and see if this solves the problem.
-
Check for proofing exceptions. A setting for Hide proofing errors, or other exceptions, may have been enabled in the document. The spell-check tool might not work as expected if a user has made exceptions for checking the spelling or grammar.
-
Open Word in Safe Mode. A Word add-in can interfere with the spelling and grammar-checking tool, causing it to work sporadically or not at all. If you start Word in Safe Mode, add-ins aren’t enabled. See if the spelling and grammar-checking tool works. If it does, move on to step 5.
-
Disable add-ins one at a time. An add-in might be the problem if the spelling and grammar-checking tool worked in Safe Mode. Disable add-ins one at a time to isolate the one causing the issue. When you find the culprit, permanently disable it.
-
Rename the default template. If the issue still isn’t resolved, there could be something wrong with Word’s global template, which is called normal.dotm. Renaming the template could fix the problem. Word will generate a new default document without any customizations.
When you rename the normal.dotm template, you lose the default settings you established, including styles, toolbars, AutoText entries, and macros.
-
Repair Word. If all your efforts haven’t resolved the spell-check problem, use the built-in Office Repair utility to fix Word. This tool repairs the entire Office suite even if there’s only one application you want to fix.
This tool is only available for Windows versions of Office.
-
Contact Microsoft Word. If you still can’t fix the problem with Word’s spelling and grammar-checking tool not working, visit the Microsoft Word help page. With a searchable knowledge base, community forums, and contact information, you’ll find additional help.
FAQ
-
Why is Grammarly not working in Word?
If Grammarly in Word isn’t working, you may be working in a password-protected document, you may have opened the document in Protected View, or the document is stored on a network. To solve the problem, save your document to a local drive and open it from there.
-
How do I turn off spell check in Word?
To turn off spell check in Word on a PC, go to File > Options > Proofing. Uncheck the box next to Check spelling as you type. On a Mac, go to Tools > Spelling & Grammar and select Hide Spelling Errors.
-
How do I reset spell check in Word?
To reset Word’s spell check on a PC, go to the Tools menu and select Spelling & Grammar > Options. In the Proofing Tools section, select Recheck Document. On a Mac, go to Tools > Spelling & Grammar and select Reset Ignored Words and Grammar.
Thanks for letting us know!
Get the Latest Tech News Delivered Every Day
Subscribe
Many users rely on their word processing software to automatically check spelling and grammar. Over the years, Microsoft’s Office applications have become better and better at detecting spelling and grammar errors. But what do you do if the feature stops working?
If spell check is not working in Word, incorrect language settings are usually the problem. There can be several reasons for this. When spell check isn’t working properly, almost every word is flagged as a spelling error or nothing is highlighted even though words are misspelled.
Contents
- Word marks almost every word as misspelled
- Incorrect highlighting reappears in new paragraphs
- Word does not mark errors at all
- Word reports too many spelling errors but does not mark them
$1 Domain Names
Register great TLDs for less than $1 for the first year.
Why wait? Grab your favorite domain name today!
![]() Matching email
Matching email
![]() SSL certificate
SSL certificate
![]() 24/7/365 support
24/7/365 support
Word marks almost every word as misspelled
If Word underlines almost every word as incorrect, this is a clear indication that the program is set to the wrong language. For example, if Word is set to French, it will highlight all but a few English words as incorrect. If that is why spell check is not working, you first have to set the right language for the text.
- Use the keyboard shortcut Ctrl + A to select the entire text and click the language displayed in the status bar at the bottom of the screen.
2. In the next dialog box, select the language you’re using in the text.

- Make sure that the “Do not check spelling or grammar” option is turned off. If this box is selected, spelling and grammar will not be checked.
- It’s best to leave the “Detect language automatically” option disabled because language recognition can easily cause errors if foreign words occasionally appear in the text.
- Choose “OK” to save your settings.
Incorrect highlighting reappears in new paragraphs
If you’re using a style, the spelling checker may incorrectly highlight words in new paragraphs, even though you already set English as the language for the entire text. This is because Word saves a separate language setting for each paragraph in the text. If you use a style that is incorrectly formatted because it uses a different language in certain formats, each new paragraph will be formatted in this different language. As a result, the spelling checker in Word will not work properly and display errors.
How to fix an incorrect style:
- On the “Home” ribbon, go to the “Styles” section and right-click the style you want to change. Select “Modify” in the context menu.

2. In the next dialog box, click the “Format” button at the bottom left. In the menu that appears, select “Language”.

- You’ll now see a dialog box for selecting the language. Choose the desired language for this style and make sure that “Do not check spelling or grammar” is disabled.

4. Choose “OK” to save your settings. If you now type a new paragraph with the modified style, Word will not mark errors incorrectly because the text is set to the correct language.
Word does not mark errors at all
If Word does not mark any misspelled words, including proper nouns or abbreviations that would normally be marked as spelling mistakes, it means the spelling checker is turned off. In this case, you can turn on spell check in Word.
How to turn on spell check in Word:
- Click “File” on the ribbon and select “Options”. In the next dialog box, open the “Proofing” section.
- Select the “Check spelling as you type” checkbox. Spelling mistakes will then be displayed with wavy red lines.
- Also check the box next to “Mark grammar errors as you type”. These errors will be highlighted with wavy blue lines.

Word reports too many spelling errors but does not mark them
Occasionally, you’ll get an error message saying that the text contains too many spelling errors to continue displaying them. This message is misleading because Word can detect almost any number of errors in a document.
Word allows you to format different passages of text in different languages. The automatic spelling checker in Word won’t work if the language changes too many times in the text, for example if styles were incorrectly formatted.
Here’s how to fix the problem:
- First, select the entire text by pressing Ctrl + A. Then click the language displayed in the status bar.
- In the next dialog box, select “English” or the language used in the text.
- Disable the options “Do not check spelling or grammar” and “Detect language automatically”.
- Save your changes by choosing “OK”.
- In most cases, spelling and grammar errors will now be displayed again. If this is not the case, the “Check spelling as you type” option was automatically disabled. In that case, simply check this box again.
Tip
Microsoft 365 (formerly known as “Microsoft Office 365”) is a server-based Office solution for personal users and small businesses that includes the popular Office applications Word, Excel, and PowerPoint. Thanks to cloud functions and mobile apps, you can work on your documents, spreadsheets, and presentations from anywhere.

How to delete a blank page in Word
Word sometimes has weird quirks: suddenly a blank page appears in the middle of the document for no reason and cannot be removed. You can quickly reach your (stress) limits in this kind of situation, at least when trying conventional means. But you can delete a page in Word easily, if you know how. The problem usually lies in invisible control characters.
How to delete a blank page in Word

Inserting footnotes and endnotes in Word
When you insert footnotes and endnotes in Microsoft Word, you’re able to provide supplemental context by explaining technical terms, commenting on paragraphs or adding citations to sources. These comments don’t disrupt the flow of the text because they are separate sections within a document. At the same time, they allow the reader to look up a respective passage where necessary. We’ll show you…
Inserting footnotes and endnotes in Word

How to turn spell check on and off in Word
In this guide, you’ll learn how to turn spell check on and off in Word. If you want to check your spelling in Word, you can set the application to automatically display misspelled words and grammatical errors. Word can also suggest corrections, which you can accept or ignore. You can show or hide these highlighted errors at any time.
How to turn spell check on and off in Word

Word is not responding: What to do when Microsoft Word has stopped working
Word is not responding: For many users, Microsoft Word is the most important program on their computer, making it all the more frustrating when Word freezes. There are many reasons why Word might suddenly stop responding. Add-in problems are a frequent cause. Other times, Word itself is not the source of the problem: Printer settings or antivirus software can also interfere with Word.
Word is not responding: What to do when Microsoft Word has stopped working

How to change the language in Word
How do you change the language in Microsoft Word? You can set different languages for the user interface and the spell check in Microsoft Word regardless of the language of your Windows operating system. This is especially useful when working with documents in other languages. In this article, you’ll learn how to change the display and editing language in Word.
How to change the language in Word