
- You can use speech-to-text on Microsoft Word through the «Dictate» feature.
- With Microsoft Word’s «Dictate» feature, you can write using a microphone and your own voice.
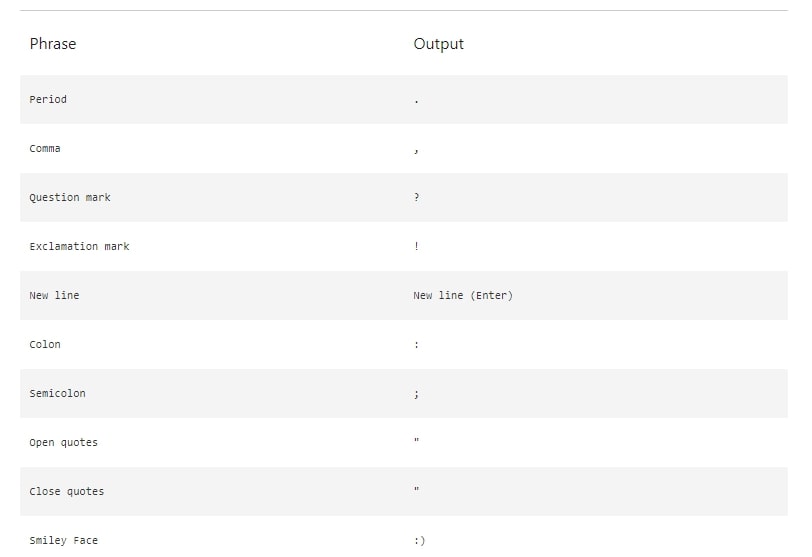
- When you use Dictate, you can say «new line» to create a new paragraph and add punctuation simply by saying the punctuation aloud.
- If you’re not satisfied with Word’s built-in speech-to-text feature, you can use a third-party program like Dragon Home.
- Visit Business Insider’s Tech Reference library for more stories.
While typing is certainly the most common way to create and edit documents in Microsoft Word, you’re not limited to using a keyboard.
Word supports speech-to-text, which lets you dictate your writing using voice recognition.
Speech-to-text in Word is convenient and surprisingly accurate, and can help anyone who has issues typing with a typical keyboard.
You can use speech-to-text in Microsoft Word in the same way on both Mac and PC.
Check out the products mentioned in this article:
Apple Macbook Pro (From $1,299.00 at Apple)
Acer Chromebook 15 (From $179.99 at Walmart)
How to use speech-to-text on Word using Dictate
Make sure you have a microphone connected to your computer. This can be built-in, like on a laptop, or a separate mic that you plug into the USB or audio jack.
It doesn’t matter which type you use, though the best kind of mic to use is a headset, as it won’t need to compete with as much background noise as a built-in microphone.
1. In Microsoft Word, make sure you’re in the «Home» tab at the top of the screen, and then click «Dictate.»
Dave Johnson/Business Insider
2. You should hear a beep, and the dictate button will change to include a red recording light. It’s now listening for your dictation.
Dave Johnson/Business Insider
3. Speak clearly, and Word should transcribe everything you say in the current document. Speak punctuation aloud as you go. You can also say «New line,» which has the same effect as pressing the Enter or Return key on the keyboard.
4. When you’re done dictating, click «Dictate» a second time or turn it off using your voice by saying, «Turn the dictate feature off.»
You can still type with the keyboard while Dictate is on, but if you click outside of Word or switch to another program, Dictate will turn itself off.
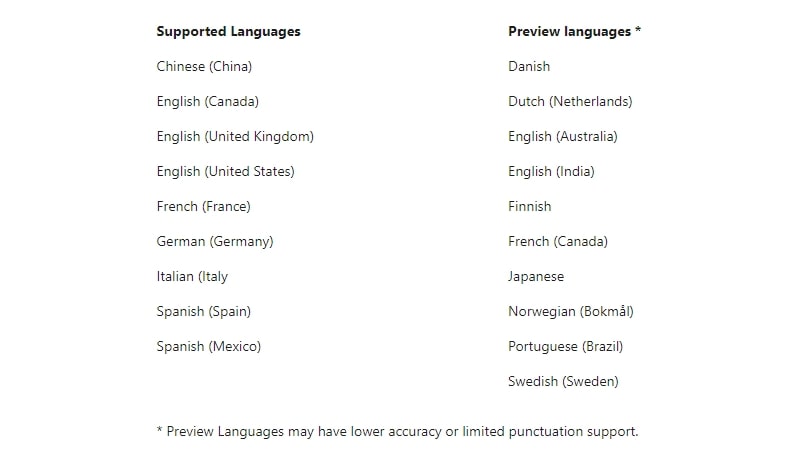
Want to change languages? You can click the downward arrow on the Dictate button to choose which of nine or so languages you want to speak. You might also see additional «Preview Languages,» which are still in beta and may have lower accuracy.
Dave Johnson/Business Insider
Speech-to-text alternatives
You’re not limited to using the Dictate feature built into Word. While not as popular as they once were, there are several commercial speech-to-text apps available which you can use with Word.
The most popular of these, Dragon Home, performs the same kind of voice recognition as Word’s Dictate, but it also lets you control Word, format text, and make edits to your text using your voice. It works with nearly any program, not just Word.

Related coverage from Tech Reference:
-
How to use speech-to-text on a Windows computer to quickly dictate text without typing
-
You can use text-to-speech in the Kindle app on an iPad using an accessibility feature— here’s how to turn it on
-
How to use text-to-speech on Discord, and have the desktop app read your messages aloud
-
How to use Google text-to-speech on your Android phone to hear text instead of reading it
-
2 ways to lock a Windows computer from your keyboard and quickly secure your data
Dave Johnson
Freelance Writer
Dave Johnson is a technology journalist who writes about consumer tech and how the industry is transforming the speculative world of science fiction into modern-day real life. Dave grew up in New Jersey before entering the Air Force to operate satellites, teach space operations, and do space launch planning. He then spent eight years as a content lead on the Windows team at Microsoft. As a photographer, Dave has photographed wolves in their natural environment; he’s also a scuba instructor and co-host of several podcasts. Dave is the author of more than two dozen books and has contributed to many sites and publications including CNET, Forbes, PC World, How To Geek, and Insider.
Read more
Read less
There are many reasons to listen to a document, such as proofreading, multitasking, or increased comprehension and learning. Word makes listening possible by using the text-to-speech (TTS) ability of your device to play back written text as spoken words.
Listen with Read Aloud
 Read Aloud is only available for Office 2019, Office 2021, and Microsoft 365.
-
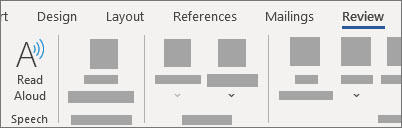
On the Review tab, select Read Aloud.
-
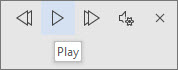
To play Read Aloud, select Play in in the controls.
-
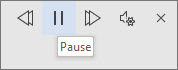
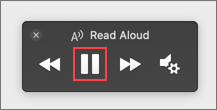
To pause Read Aloud, select Pause.
-
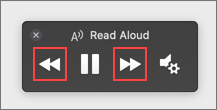
To move from one paragraph to another, select Previous or Next.
-
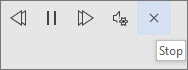
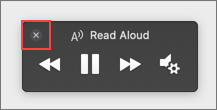
To exit Read Aloud, select Stop (x).

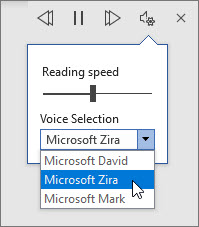
Change Read Aloud settings
-
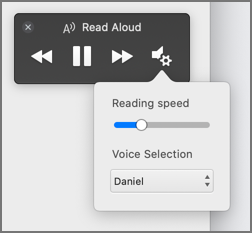
Select the gear icon in the controls at the top right.
-
Use the Reading speed slider to change the reading speed.
-
Under Voice Selection, select the voice you want.
-
Listen to selected text with Read Aloud.
Select the text to be read aloud.
Start Read Aloud from Review tab or shortcut or select play on Read Aloud UI.
Keyboard shortcuts
You can easily control Read Aloud using the following keyboard shortcuts in Windows:
|
CTRL + Alt + Space |
Start Read Aloud |
|
CTRL + Space |
Play or pause Read Aloud |
|
CTRL + Left Arrow |
Skip to start of current paragraph |
|
CTRL + Left Arrow + Left Arrow |
Skip to start of previous paragraph |
|
CTRL + Right Arrow |
Skip forward to start of next paragraph |
|
Alt + Left Arrow |
Decrease reading speed |
|
Alt + Right Arrow |
Increase reading speed |
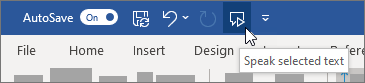
Listen to your documents with Speak
Speak is a built-in feature of Word, Outlook, PowerPoint, and OneNote. Speak reads aloud only the text you select. Read Aloud reads the entire document starting from your cursor location like an audiobook.
To use Speak:
-
Select a word or block of text in your document.
-
In the Quick Access Toolbar, select the Speak selected text icon.
Supported languages
Read Aloud uses the proofing language set for the document. To change the language, see the help article Fix text-to-speech reading in wrong language.
Voices
Depending on your platform, text-to-speech (TTS) uses software that comes built into your device or through a Microsoft service. The voices available will differ between TTS services. If you’re using Immersive Reader, see the help article Download voices for Immersive Reader, Read Mode, and Read Aloud for more information.
Our team is working on making voices sound more natural, so keep looking for improvements.
Troubleshooting
If you don’t see Read Aloud available, make sure that you’re signed into your Microsoft 365 account, and then try restarting the Word app or logging out and back in.
If you are unable to access Neural Voices, make sure you have a stable internet connection and are signed into your Microsoft 365 account.
Privacy
Read Aloud doesn’t store your content or audio data. Microsoft uses your content only to provide you with audio results. For more information about experiences that analyze your content, see Connected Experiences in Office.
In MacOS you can listen to documents using Read Aloud or Speech.
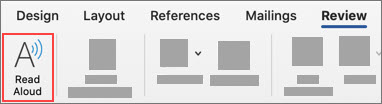
Listen with Read Aloud for MacOS
Read Aloud is only available for Office 2019, Office 2021, and Microsoft 365.
-
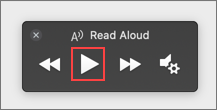
On the Review tab, select Read Aloud.
-
To play Read Aloud, select Play in in the controls.
-
To pause Read Aloud, select Pause.
-
To skip from one paragraph to another, select Previous or Next.
-
To exit Read Aloud, select Stop (x).
Change Read Aloud settings
-
Select the gear icon in the controls to open the settings.
-
Use the Reading speed slider to change the voice speed.
-
Under Voice Selection, select the voice you want.
-
Listen to selected text with Read Aloud.
Select the text to be read aloud.
Start Read Aloud from Review tab or shortcut or select play on Read Aloud UI.
Keyboard shortcuts
You can easily control Read Aloud using the following keyboard shortcuts in MacOS:
|
CTRL + Option + Space |
Start Read Aloud |
|
Option + Space |
Play or pause Read Aloud |
|
Option + up arrow |
Skip to start of previous paragraph |
|
Option + down arrow |
Skip forward to start of next paragraph |
Listen to your documents with Speech
Speech is a built-in accessibility feature of MacOS. After you activate Speech for your Mac, you can select text and have it read by pressing a keyboard combination you’ve defined.
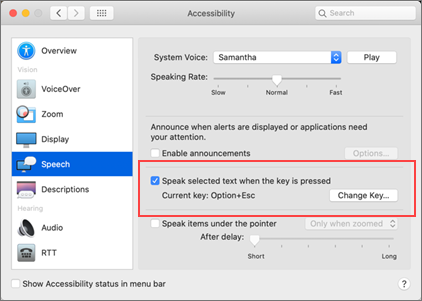
To activate Speech, do the following:
-
On the Apple menu, select System Preferences.
-
In the System Preferences window, select Accessibility.
-
In the list, select Speech, and then select the check box next to Speak selected text when the key is pressed.
In the Speech settings, you can also change the keyboard combination, select a different system voice, and adjust the speaking rate.

Supported languages
Read Aloud uses the proofing language set for the document. To change the language, see the help article Fix text-to-speech reading in wrong language.
Voices
Depending on your platform, text-to-speech (TTS) uses software that comes built into your device or by a Microsoft service. The voices available will differ between TTS services. If you’re using Immersive Reader, see the help article Download voices for Immersive Reader, Read Mode, and Read Aloud for more information.
Our team is working on making voices sound more natural, so keep looking for improvements.
Troubleshooting
If you don’t see Read Aloud available, make sure that you’re signed in to your Microsoft 365 account, and then try restarting the Word app or logging out and back in.
If you are unable to access neural voices, please make sure you have a stable internet connections and are signed in to your Microsoft 365 account.
Privacy
Read Aloud doesn’t store your content or audio data. Microsoft uses your content only to provide you with audio results. For more information about experiences that analyze your content, see Connected Experiences in Office.
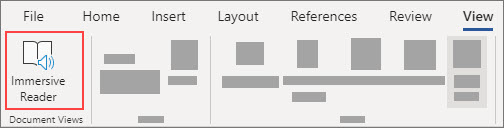
In Word for the Web, you can listen to your documents using Immersive Reader.
Using Immersive Reader
-
On the View tab, go to Document Views and select Immersive Reader.
-
In Immersive Reader, select the Play button at the bottom.
-
To pause reading, select the Pause button at the bottom.
-
To exit Immersive Reader, select the arrow at the top left.


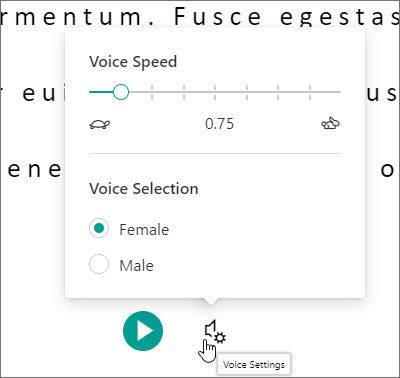
Change Immersive Reader settings
You can change the voice speed and selection for Immersive Reader.
-
Select the gear icon at the bottom to open Voice Settings.
-
Use the Voice Speed slide to change the voice speed.
-
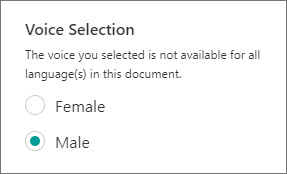
Select Female or Male for the voice. Note that some languages will be available in only one voice.
Voices
Depending on your platform, text-to-speech (TTS) uses software that comes built into your device or through a Microsoft service. The voices available will differ between TTS services. If you’re using Immersive Reader, see the help article Download voices for Immersive Reader, Read Mode, and Read Aloud for more information.
Our team is working on making voices sound more natural, so keep looking for improvements.
Troubleshooting
If you don’t see Read Aloud available, make sure that you’re signed in to your Microsoft 365 account, and then try restarting the Word app or logging out and back in.
Privacy
Read Aloud doesn’t store your content or audio data. Microsoft uses your content only to provide you with audio results. For more information about experiences that analyze your content, see Connected Experiences in Office.
Listen with Read Aloud in Word for iPad
-
Tap the menu icon at the top.
-
To play Read Aloud, tap Play in in the controls.
-
To pause Read Aloud, tap Pause.
-
To move from one paragraph to another, tap Previous or Next.
-
To exit Read Aloud, tap Stop (x).
-
Listen to selected text with Read Aloud.
Select the text to be read aloud.
Start Read Aloud from Review tab or overflow menu or select play on Read Aloud UI.


Change Read Aloud settings for iPad
-
In the Read Aloud controls, tap the gear icon.
-
Use the slider to increase or decrease the reading speed.
Listen with Read Aloud in Word for iPhone
-
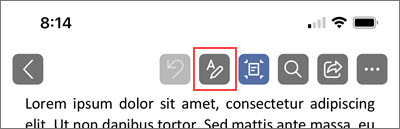
Tap the pen icon at the top to open the ribbon.
-
Tap the Review tab.
-
Tap the gear icon, and then tap Read Aloud.
-
To play Read Aloud, tap Play.
-
To pause Read Aloud, tap Pause.
-
To move from one paragraph to another, tap Previous or Next.
-
To exit Read Aloud, tap Stop (x).


Change Read Aloud settings for iPhone
-
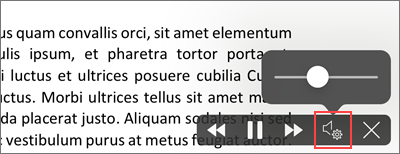
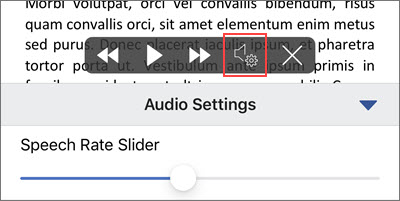
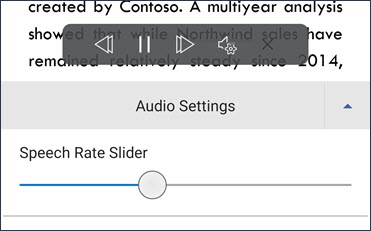
To change the speech rate, in the Read Aloud controls, tap the gear icon.
-
Under Audio Settings, user the Speech Rate Slider to increase or decrease the reading speed.
Supported languages
When you’re online, Read Aloud tries to detect the language of the text and can support multiple languages in a single document. For the full list of supported languages, see the help article Language and voice support for the Speech service.
Voices
Depending on your platform, text-to-speech (TTS) uses software that comes built into your device or through a Microsoft service. The voices available will differ between TTS services. If you’re using Immersive Reader, see the help article Download voices for Immersive Reader, Read Mode, and Read Aloud for more information.
Our team is working on making voices sound more natural, so keep looking for improvements.
Troubleshooting
If you don’t see Read Aloud available, make sure that you’re signed in to your Microsoft 365 account, and then try restarting the Word app or logging out and back in.
Privacy
Read Aloud doesn’t store your content or audio data. Microsoft uses your content only to provide you with audio results. For more information about experiences that analyze your content, see Connected Experiences in Office.
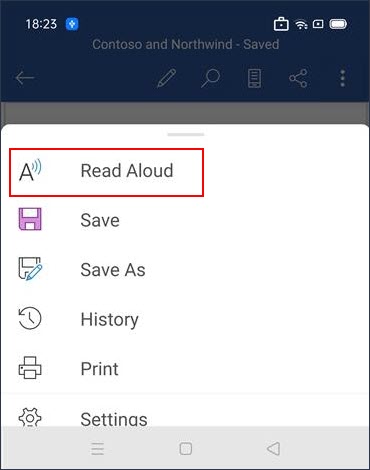
Listen with Read Aloud in Word for Android phone
-
At the top, tap the menu icon.
-
Tap Read Aloud.
-
To play Read Aloud, tap Play.
-
To pause Read Aloud, tap Pause.
-
To move from one paragraph to another, tap Previous or Next.
-
To exit Read Aloud, tap Stop (x).
-
Listen to selected text with Read Aloud.
Select the text to be read aloud.
Start Read Aloud from Review tab or overflow menu or select play on Read Aloud UI.


Change Read Aloud settings for Android phone
-
To change the speech rate, in the Read Aloud controls, tap the gear icon.
-
Under Audio Settings, adjust the Speech Rate Slider to increase or decrease the reading speed.
Supported languages
For the full list of supported languages, see the help article Language and voice support for the Speech service.
Voices
Depending on your platform, text-to-speech (TTS) uses software that comes built into your device or through a Microsoft service. The voices available will differ between TTS services. If you’re using Immersive Reader, see the help article Download voices for Immersive Reader, Read Mode, and Read Aloud for more information.
Our team is working on making voices sound more natural, so keep looking for improvements.
Troubleshooting
If you don’t see Read Aloud available, make sure that you’re signed in to your Microsoft 365 account, and then try restarting the Word app or logging out and back in.
Privacy
Read Aloud doesn’t store your content or audio data. Microsoft uses your content only to provide you with audio results. For more information about experiences that analyze your content, see Connected Experiences in Office.
Learn how Microsoft Word and its speech-to-text feature can help you get more work done on your documents.

While many of us use both Siri and Alexa, the keyboard still reigns supreme when writing. Even if we usually speak faster than type, we think better with keys on our fingers.
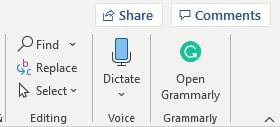
However, when Google Doc’s voice typing feature came out, many were curious if Word offered the same innovation. We checked it out: we opened Word, and there it was in the top right corner of the ribbon.
So to help you eke out the most out of Word, we’ll share how to get started with Dictate, the most common English commands you should know, and the languages the speech-to-text feature supports.
How to Use Dictation on Microsoft Word
Microsoft Word is available in five different platforms—Windows, macOS, iOS, Android, and Web. Whatever platform you’re using, you have to either log in or create a free Microsoft account to use the dictate feature.
If you’re planning to use this feature on your computer, make sure you have a microphone installed on your computer. If you don’t have one yet, you can check out our guide to the best microphones. Alternatively, you can also use your Android device as a mic.
Using Dictate on Windows, macOS, and Web
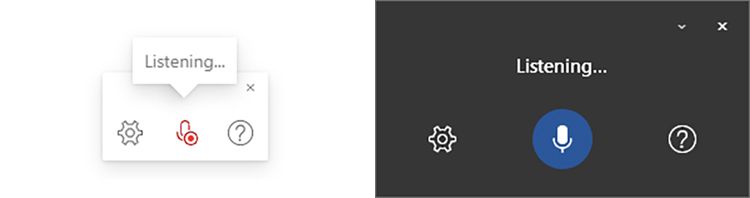
Once logged in, all you have to do is to press the Dictate button on the ribbon, and voila! You’re good to go! You should see a small recording window with a Settings button, a Mic icon, and a question mark for Help. When Dictate starts, you should either see a «Listening» prompt or a red Mic icon.
Using Dictate on iOS and Android
If you’re using the Dictate feature on your iOS or Android device, the procedure is a bit different. Instead of looking for the dictate button on the ribbon, you’ll spot it right on the screen at the upper right of the formatting menu.
As soon as you click the button, it will start recording your input immediately.
Using Dictate on iPad
On your iPad, the dictate feature is embedded directly in your on-screen keyboard. You’ll find the microphone icon to the left of your spacebar. As soon as you press that, you’ll get a spectrogram view of your voice recording.

Before you start speaking, allow the Microsoft Word app to use the microphone when you’re using it for the first time!
Writing with Your Voice: Essential Commands
Using Microsoft Word’s dictate feature is as simple as speaking into your mic. However, it cannot read intonation, punctuation, and intent (yet), so we have to say it out loud.
Here’s a list of some commands that you can give while dictating.
Basic Commands
- Next line: enter
- undo: reverses the last action or command
- delete: removes the last word or punctuation
- delete that: removes the last spoken phrase
- delete [word/phrase]: removes the latest instance of [word/phrase]
Punctuations
- period/full stop: » . »
- comma: » , »
- question mark: » ? »
- exclamation mark/point: » ! »
- apostrophe: » ‘s »
- colon: » : »
- semicolon: » ; »
Formatting
- bold
- italics
- underline
- strikethrough
- superscript
- subscript
You can use the above commands on any word or phrase you’ve previously dictated. For example, if you say «the quick brown fox jumps over the lazy dog», then you can follow it up by saying «underline jumps» to get the same sentence with the word «jumps» underlined.
The following formatting commands are also available, although you cannot apply them to specific words or phrases.
- indent
- decrease indent
- alight [left/center/right]
- clear all formatting
Making Lists
If you want to dictate a bulleted or numbered list, you can use the following commands:
- start list
- start numbered list
- next line
- exit list
Mathematics and Finance
If you want to do some heavy writing, Microsoft Word allows you to insert math and currency symbols using dictate.
- plus sign: » + »
- minus sign: » — »
- multiplication sign: » x »
- division sign: » ÷ »
- equal sign: » = »
- percent sign: » % »
- number/pound sign: » # »
- plus or minus sign: » ± »
- less than sign/left angle bracket: » < »
- greater than sign/right angle bracket: » > »
Other Symbols
Microsoft Word also allows you to use other signs and symbols for dictation. These make it easier for you to dictate email addresses, website URLs, and others.
- asterisk: » * »
- forward slash: » / »
- backslash — » »
- vertical bar sign/pipe character: » | »
- underscore: » _ »
- em-dash: » —»
- en-dash: » — »
- at-sign: » @ »
- ampersand/and sign: » & »
Emojis
You can also have a little bit of fun with Word’s emoji commands.
- smiley face: » »
- frowny face: » »
- winky face: » »
- heart emoji: » <3 »
 »
»  »
»  »
» Dictation Commands
You can use these commands if you want to access the menu icons on the dictation window without using your mouse.
- show help
- pause dictation
- exit dictation
How to Change Word’s Dictation Settings

You can change Word’s dictation settings by selecting the gear icon on the dictation window. Here, you can change the following options:
- Auto punctuation: It allows Word to automatically place punctuation in your document if supported in your dictation language.
- Profanity filter: Marks offensive words and phrases with **** instead of the spoken word.
- Spoken language: This lets you choose the dictation language in the drop-down menu.
Supported Languages
Aside from English, Microsoft Word also supports the following languages for dictation:
- Chinese
- Spanish
- French
- German
- Italian
- Portuguese
- Japanese
- Norwegian
- Swedish
- Danish
- Dutch
- Finnish
- Hindi
- Korean
Each of these languages has its own set of commands you can use to dictate in the app effectively. Visit Microsoft Support for the complete list.
Microsoft Word Dictation: More Than Just a Nifty Feature
Although the most common use of voice-typing is for taking notes when we’re on the go, Microsoft Word’s dictation tool is powerful enough for us to write complete papers. We can even use it to create a full-fledged document, with proper formatting and spacing.
Although, it’s difficult to get used to the first time, it’s a breeze to work with once you get the hang of it. Also, it’s not just a nifty tool to improve your productivity, the dictate function is an excellent accessibility innovation for users with injuries or disabilities.
So whether you’re suffering from repetitive stress injury or a gaming-related cramp, or have limited use of your hands, voice-typing is available to help you accomplish your writing tasks in Microsoft Word.
Master the skill of speech to text in Microsoft Word and you’ll be dictating documents with ease before you know it. Developed and refined over many years, Microsoft’s speech recognition and voice typing technology is an efficient way to get your thoughts out, create drafts and make notes.
Just like the best speech to text apps that make life easier for us when we’re using our phones, Microsoft’s offering is ideal for those of us who spend a lot of time using Word and don’t want to wear out our fingers or the keyboard with all that typing. While speech to text in Microsoft Word used to be prone to errors which you’d then have to go back and correct, the technology has come a long way in recent years and is now amongst the best text-to-speech software.
Regardless of whether you have the best computer or the best Windows laptop, speech to text in Microsoft Word is easy to access and a breeze to use. From connecting your microphone to inserting punctuation, you’ll find everything you need to know right here in this guide. Let’s take a look…
How to use speech to text in Microsoft Word: Preparation
The most important thing to check is whether you have a valid Microsoft 365 (opens in new tab) subscription, as voice typing is only available to paying customers. If you’re reading this article, it’s likely your business already has a Microsoft 365 enterprise subscription. If you don’t, however, find out more about Microsoft 365 for business via this link (opens in new tab).
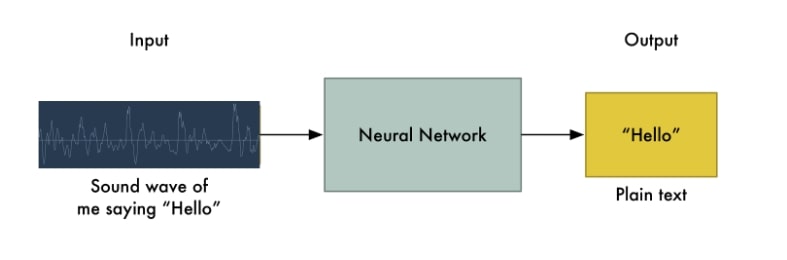
The second thing you’ll need before you start voice typing is a stable internet connection. This is because Microsoft Word’s dictation software processes your speech on external servers. These huge servers and lighting-fast processors use vast amounts of speech data to transcribe your text. In fact, they make use of advanced neural networks and deep learning technology, which enables the software to learn about human speech and continuously improve its accuracy.
These two technologies are the key reason why voice typing technology has improved so much in recent years, and why you should be happy that Microsoft dictation software requires an internet connection.
Once you’ve got a valid Microsoft 365 subscription and an internet connection, you’re ready to go!
Step 1: Open Microsoft Word
Simple but crucial. Open the Microsoft Word (opens in new tab) application on your device and create a new, blank document. We named our test document “How to use speech to text in Microsoft Word — Test” and saved it to the desktop so we could easily find it later.

Step 2: Click on the Dictate button
Once you’ve created a blank document, you’ll see a Dictate button and drop-down menu on the top right-hand corner of the Home menu. It has a microphone symbol above it. From here, open the drop-down menu and double-check that the language is set to English.
One of the best parts of Microsoft Word’s speech to text software is its support for multiple languages. At the time of writing, nine languages were supported, with several others listed as preview languages. Preview languages have lower accuracy and limited punctuation support.
Step 3: Allow Microsoft Word access to the Microphone
If you haven’t used Microsoft Word’s speech to text software before, you’ll need to grant the application access to your microphone. This can be done at the click of a button when prompted.
It’s worth considering using an external microphone for your dictation, particularly if you plan on regularly using voice to text software within your organization. While built-in microphones will suffice for most general purposes, an external microphone can improve accuracy due to higher quality components and optimized placement of the microphone itself.
Step 4: Begin voice typing
Now we get to the fun stuff. After completing all of the above steps, click once again on the dictate button. The blue symbol will change to white, and a red recording symbol will appear. This means Microsoft Word has begun listening for your voice. If you have your sound turned up, a chime will also indicate that transcription has started.
Using voice typing is as simple as saying aloud the words you would like Microsoft to transcribe. It might seem a little strange at first, but you’ll soon develop a bit of flow, and everyone finds their strategies and style for getting the most out of the software.
These four steps alone will allow you to begin transcribing your voice to text. However, if you want to elevate your speech to text software skills, our fifth step is for you.
Step 5: Incorporate punctuation commands
Microsoft Word’s speech to text software goes well beyond simply converting spoken words to text. With the introduction and improvement of artificial neural networks, Microsoft’s voice typing technology listens not only to single words but to the phrase as a whole. This has enabled the company to introduce an extensive list of voice commands that allow you to insert punctuation marks and other formatting effects while speaking.
We can’t mention all of the punctuation commands here, but we’ll name some of the most useful. Saying the command “period” will insert a period, while the command “comma” will insert, unsurprisingly, a comma. The same rule applies for exclamation marks, colons, and quotations. If you’d like to finish a paragraph and leave a line break, you can say the command “new line.”
These tools are easy to use. In our testing, the software was consistently accurate in discerning words versus punctuation commands.
Summary
Microsoft’s speech to text software is powerful. Having tested most of the major platforms, we can say that Microsoft offers arguably the best product when balancing cost versus performance. This is because the software is built directly into Microsoft 365, which many businesses already use. If this applies to your business, you can begin using Microsoft’s voice typing technology straight away, with no additional costs.
We hope this article has taught you how to use speech to text software in Microsoft Word, and that you’ll now be able to apply these skills within your organization.
The speakwrite is a recording device Winston Smith uses at the Ministry of Truth. It records what Smith says and converts it to text on the telescreen at his desk. The speakwrite types as Smith dictates into it. The only time he uses it is when he’s at work.
Speakwrite Definition
The speakwrite is an important device within the Ministry of Truth. Orwell describes Winston Smith’s work environment with the following line:
In the long, windowless hall, with its double row of cubicles and its endless rustle of papers and hum of voices murmuring into speakwrites […]
Everyone has a similar job to Winston Smith’s. He even suggests at one point that other people are likely being assigned the same tasks that he is. It’s Winston’s job to alter documents given to him by the ministry. He has to make the changes they request.
He disposes of the messages he’s given as work assignments as soon as he finishes each job. Sometimes he consults the Newspeak dictionary on the shelf. He uses the “speakwrite” to write with, and he describes his job as the “greatest pleasure in [his] life.” It was “tedious,” but it had a routine that he enjoyed, one that he could lose himself in.
Orwell provides the following description of Winston Smith starting his “main job” on one particular day:
Winston thought for a moment, then pulled the speakwrite towards him and began dictating in Big Brother’s familiar style: a style at once military and pedantic, and, because of a trick of asking questions and then promptly answering them (’What lessons do we learn from this fact, comrades? The lesson—which is also one of the fundamental principles of Ingsoc—that,’ etc., etc.), easy to imitate.
Examples of the Speakwrite in 1984
Winston’s Job at The Ministry of Truth
The first time the speakwrite appeared in 1984 is in Chapter 4. Winston Smith is at work at the Ministry of Truth. Like the memory hole, the speak write is in easy reach of Winston’s desk. The passage reads:
With the deep, unconscious sigh which not even the nearness of the telescreen could prevent him from uttering when his day’s work started, Winston pulled the speakwrite towards him, blew the dust from its mouthpiece, and put on his spectacles. Then he unrolled and clipped together four small cylinders of paper which had already flopped out of the pneumatic tube on the right-hand side of his desk.
The speakwrite is a standard device found within the Ministry of Truth and presumably within the other ministries. It prevents the workers from having any need to write themselves and perhaps find themselves thinking about writing something that they shouldn’t. When all their spoken words are recorded as writing, there is no way to hide anything.
Also around Winston’s desk are:
a small pneumatic tube for written messages, to the left, a larger one for newspapers; and in the side wall, within easy reach of Winston’s arm, a large oblong slit protected by a wire grating. This last was for the disposal of waste paper.
The Ministry of Truth has provided the necessary things Smith needs in order to complete his job but nothing else.
Tillotson at the Ministry of Truth
When describing the use of the speakwrite, Orwell writes about Tillotson, one of Winston’s work colleagues. He works across the hall into the corresponding “cubicle on the other side.” He notes how Tillotson had:
his mouth very close to the mouthpiece of the speakwrite. He had the air of trying to keep what he was saying a secret between himself and the telescreen. He looked up, and his spectacles darted a hostile flash in Winston’s direction.
He takes his job far more seriously, it appears, than Winston does. Or, he is simply suspicious that Winston is thinking something he shouldn’t be when he looks over.
FAQs
What is a speakwrite in 1984?
The speakwrite is a microphone used in various ministries by workers like Winston Smith. It is an essential piece of machinery that converts speech into text. This means that anything Smith says into the mouthpiece will appear as text on the screen. He has to be precise.
How is the speakwrite used in 1984?
Workers talk into the speakwrite, converting those words into text on a telescreen. It is a simple process that allows the workers to move efficiently from task to task.
What does “speakwrite” mean?
The word “speakwrite” is a Newspeak term. It combines the word “speak” and “write” to create a new noun, one given to a microphone. It is used for the express purpose its name suggests.
Are speakwrites real?
There are many different contemporary devices that convert text to speak, although none are quite the same as that described by Orwell in his novel, particularly because the speakwrite is used in order to prevent the works from accessing the potentially creative outlet of pens and paper or a keyboard.
- Big Brother: the leader of Oceania and the face of the Party. He’s desired as a war hero, inventor, and more. He may also not be real.
- INGSOC: newspeak for English Socialism, the governing system used throughout Oceania.
- Syme: a character in 1984 and the man responsible for the newest addition of the Newspeak dictionary.
- Doublethink: cognitive dissonce. Or the act of thinking two contradictory things at once. Or believing that the two things are true.
- Newspeak: the language used to diminish the range of thought in Oceania.
- Ministry of Love: responsible for brainwashing the citizens of Oceania.
Other Resources
- Watch: 1984 Video Summary
- Watch: Winston Smith Character Analysis
- Read: 1984 by George Orwell