
Word for Microsoft 365 Outlook for Microsoft 365 Word 2021 Outlook 2021 Word 2019 Outlook 2019 Word 2016 Outlook 2016 Word 2013 Outlook 2013 Word 2010 Outlook 2010 Word 2007 Outlook 2007 More…Less
You can change the spacing between characters of text for selected text or for particular characters. In addition, you can stretch or compress an entire paragraph to make it fit and look the way that you want it to.
Change the spacing between characters
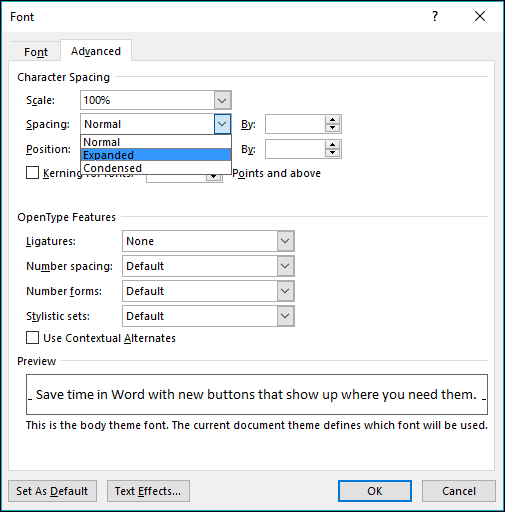
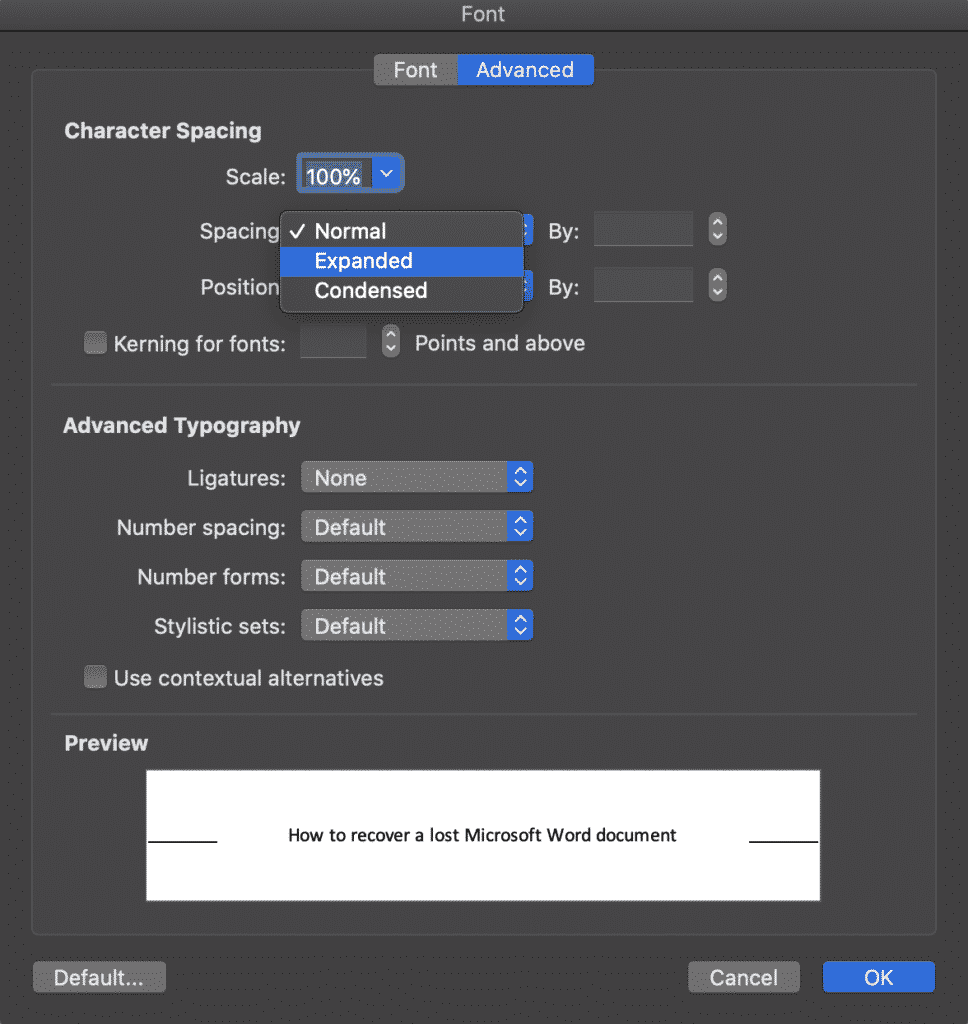
Selecting Expanded or Condensed alters the spacing between all selected letters by the same amount. Kerning alters the spacing between particular pairs of letters — in some cases reducing and in other cases expanding the space depending upon the letters.
Expand or condense the space evenly between all the selected characters
-
Select the text that you want to change.
-
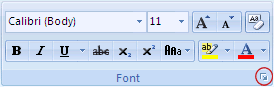
On the Home tab, click the Font Dialog Box Launcher, and then click the Advanced tab.

Note: If you’re using Word 2007 the tab is called Character Spacing.
-
In the Spacing box, click Expanded or Condensed, and then specify how much space you want in the By box.
Kern the characters that are above a particular size
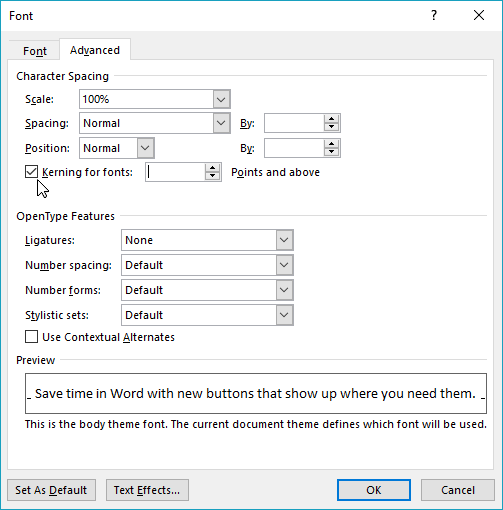
Kerning refers to the way spacing between two specific characters is adjusted. The idea is to give a better looking result by reducing the spacing between characters that fit together nicely (such as «A» and «V») and increasing the spacing between characters that don’t.
-
Select the text that you want to change.
-
On the Home tab, click the Font Dialog Box Launcher, and then click the Advanced tab.
Note: If you’re using Word 2007 the tab is called Character Spacing.
-
Select the Kerning for fonts check box, and then enter the point size in the Points and above box.
Stretch or scale the text horizontally
When you scale the text, you change the shapes of the characters by percentages. You can scale text by stretching it or by compressing it.
-
Select the text that you want to stretch or compress.
-
On the Home tab, click the Font Dialog Box Launcher, and then click the Advanced tab.
Note: If you’re using Word 2007 the tab is called Character Spacing.
-
In the Scale box, enter the percentage that you want.
Percentages above 100 percent stretch the text. Percentages below 100 percent compress the text.
Change the line spacing
To increase or decrease the amount of vertical space between lines of text within a paragraph, the best method is to modify the style the paragraph uses.
-
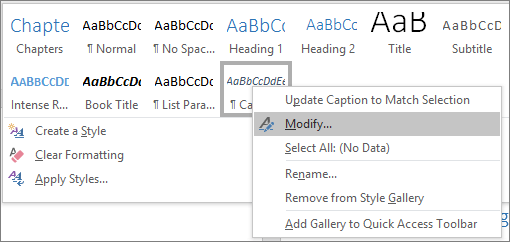
Find the style you’re using in the Styles gallery on the Home tab.
-
Right-click the style you want to change and select Modify.
-
Near the center of the dialog box you’ll find the line spacing buttons that let you select single, 1.5x or double spaced. Choose the spacing you want to apply and click OK.
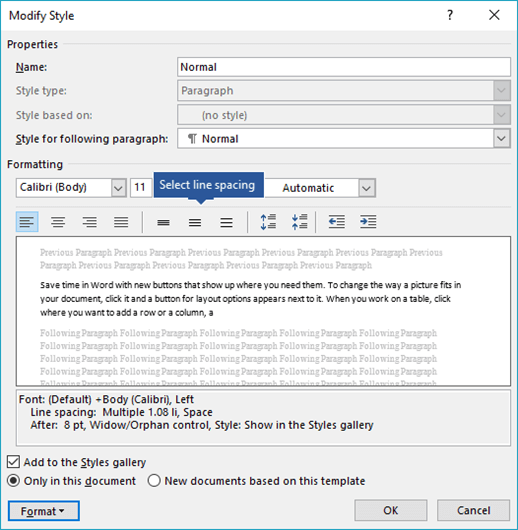
If you’d like to apply more specific line spacing to the style, clickthe Format button at the bottom left corner of the Modify Style dialog box and select Paragraph. The Line spacing drop-down lets you select or set more specific line spacing.
For more information on modifying styles in Word, see: Customize styles in Word.
See also
-
Using Styles in Word — a free, 10-minute video training course.
-
Change the font size
-
Set page margins
-
Align text left or right, center text, or justify text on a page
-
Change the line spacing in Word
Do you have a question about Word that we didn’t answer here?
Post a question in the Word Answers Community.
Help us improve Word
Do you have suggestions about how we can improve Word? Let us know by providing us feedback. See How do I give feedback on Microsoft 365? for more information.
Need more help?
Want more options?
Explore subscription benefits, browse training courses, learn how to secure your device, and more.
Communities help you ask and answer questions, give feedback, and hear from experts with rich knowledge.
From Wikipedia, the free encyclopedia
This article is about the typographic concept. For the practice of writing with spaces between words, see Interword separation.
Word spacing in typography is space between words, as contrasted with letter-spacing (space between letters of words) and sentence spacing (space between sentences). Typographers may modify the spacing of letters or words in a body of type to aid readability and copy fit, or for aesthetic effect. In web browsers and standardized digital typography, word spacing is controlled by the CSS1 word-spacing property.
History[edit]
Most classical Latin texts were written in scriptio continua, a continuous string of characters without spaces to mark word boundaries. However, some early Greek and Roman texts used interpuncts, small dots, to separate words. Word spacing begun much later. Irish scribes first started to add word spacing to texts in the late 7th century, creating what Paul Sänger, in his book The Spaces between the Words, refers to as aerated text. By the 11th century, scribes in northern Europe were separating Latin text canonically, that is, with spaces between words, just as we do today in standard written text.[1]
Effect on readability[edit]
Word spacing is crucial for the written form because it illustrates the sound of speech where audible gaps or pauses take place.[2] With typography, word spacing shows this unspoken aspect of speech.[2] Otherwise, it would be difficult for people to read one long continuous line of letters.[2] It is hard to determine how much spacing should be put in between words, but a good typographer is able to determine proper spacing.[3] When text and spacing are consistent, this makes it easier to read.[3]
Geoffrey Dowding describes the nature of spacing since the invention of printing from moveable type in the fifteenth century. Since the fifteenth century, the best work shows that text is to be read smoothly and efficiently.[4] This is because they should always be closely spaced and “not en or em quadded!”[4] The convention of having close spacing has lasted for two reasons: because it is easier to read than text which has wider spaces and because it looks better.[5] For the first reason, adult readers take in words as units, and it would be unsuitable for “compositors, in settings not intended for young children, to break the eye’s track by introducing great gaps of white between words”.[5] Words must flow smoothly into lines.[6] For the second reason, the colour or “blackness” of the line looks better when it has close word-spacing, otherwise a widely-spaced line of text will appear grey.[5]
Language can also be a factor that typographers would take into consideration for word spacing.[7] For a language like Latin, “most boundaries are marked by grammatical tags, and a smaller space is therefore sufficient”.[8] In English, the ability to read a line easily, instead of needing to make sense of it first, is also attributed by good word spacing.[8]
Word spacing has the ability to express the meaning and idea behind a word, which typographers consider when working on design works and text.[9] With a written piece of text, the designer has to remember to make sure they do not add too much or too little space between words; otherwise it could ruin the texture and tone.[6]
Views
Jan Tschichold’s rule is that “spacing should be about a middle space or the thickness of an ‘i’ in the type size used. Wide spaces should be strictly avoided.”[10] For Tschichold, it was better for words to be broken up in order avoid wide spacing.[10] Other views on this issue of wide spacing include that it could depend on the typeface to determine word spacing, so long as it does not look overspaced.[10] The perfect word space is affected by the circumstance; “at larger sizes, when letterfit is tightened, the spacing of words can be tightened as well.”[8] Two other gentlemen have expressed different opinions on what the space between words should be. Aaron Burns, a typographer, suggested that the lowercase “r” was the best size for spaces between words.[11] Edward Johnston, a noted calligrapher, supported that the lowercase “o” was the more appropriate size of measurement for spacing.[11]
See also[edit]
- Letter spacing
- Kerning
- Leading
References[edit]
- ^ Saenger, Paul (1997). Space Between Words. Stanford University Press.
- ^ a b c Lupton, Ellen (2004). Thinking with Type. Princeton Architectural Press. p. 67.
- ^ a b Carter, R.; Day, B.; Meggs, P. (2002). Typographic Design: Form and Communication (3rd ed.). John Wiley & Sons, Inc. p. 92.
- ^ a b Dowding, Geoffrey (1995). Finer Points in the Spacing & Arrangement of Type. Hartley & Marks Publishers Inc. p. 3.
- ^ a b c Dowding 1995, p. 5.
- ^ a b Carter, Day & Meggs 2002, p. 91.
- ^ Bringhurst, Robert (1997). The Elements of Typographic Style. Hartley & Marks Publishers, Inc. p. 26.
- ^ a b c Bringhurst 1997, p. 26.
- ^ Lupton 2004, p. 104.
- ^ a b c Dowding 1995, p. 8.
- ^ a b Carter, Day & Meggs 2002, p. 92.
External links[edit]
- «The School of Close Spacing», excerpt from Book Typography, by Ari Rafaeli
External references[edit]
- Finer Points in the Spacing & Arrangement of Type, Geoffrey Dowding
Spruce up the formatting in your Word docs
What to Know
- To fix spacing between words, go to Find and Replace. Enter a space in both fields, then go to More > Format > Font and choose a font size.
- To adjust spacing between characters, go to Home, select Expand (the down-arrow) next to Font, and select the Advanced tab.
- To change spacing between lines, go to Home and select Expand (the down-arrow) next to Paragraph and adjust the Spacing options.
This article explains how to fix spacing in Word 2021, 2019, 2016, and Word for Microsoft 365.
How to Fix Spacing Between Words in Word
Using different fonts or font sizes in your document can lead to inconsistent spacing between words. Follow these steps to adjust the spacing between words without affecting the space between letters:
To show paragraph breaks and spaces, go to the Home tab and select the Show/Hide icon (¶) in the Paragraph group.
-
Highlight the text you want to change and select the Home tab. Press Ctrl+A (Windows) or Cmd+A (Mac) to highlight the entire document.
-
Select Replace in the Editing group.
On Mac, go to Edit > Find > Advanced Find and Replace, then select the Replace tab.
-
Click in the Find what text field and press your spacebar to create a space.
-
Click in the Replace with field and press your spacebar to create a space.
-
Select More to expand the window.
-
Select Format and choose Font.
-
Under Size, choose the font size you use most consistently throughout the document, then select OK.
-
Select Replace All.
-
In a new window, Word will report the number of replacements. Select Yes to apply changes to the entire document, or select No to change only the highlighted text.
The spacing between words should now be consistent. You can now close the Find and Replace window.
Don’t add multiple spaces between words because it makes formatting the entire document more difficult.
You can justify text in Word if you want to expand word spacing so the right margin is always straight (like a newspaper column).
How Do I Fix Spacing Between Characters?
To adjust the spacing between characters (letters, numbers, symbols, etc.), follow these steps:
-
Highlight the text you want to change and select the Home tab.
-
Next to Font, select Expand (the down-arrow).
-
Go to the Advanced tab. To stretch or compress the text, increase or decrease Scaling. For Spacing, choose Expanded or Condensed to adjust the spacing between all characters.
Select Kerning for fonts to enable text kerning. This feature automatically adjusts the spacing between characters to be more aesthetically pleasing. You can choose to kern characters above a certain size.
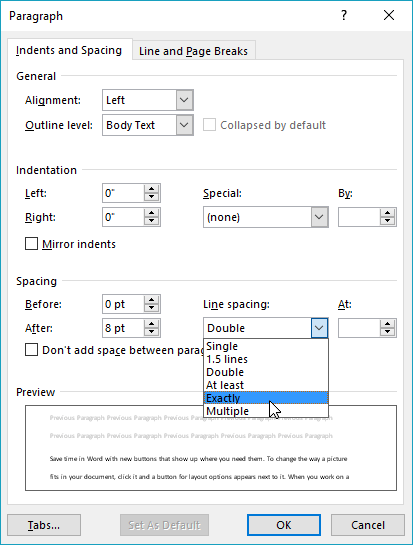
How to Fix Line Spacing in Word
Follow these steps to change the amount of space between lines within a paragraph:
To adjust the spacing between paragraphs, go to the Design tab, select Paragraph Spacing and choose from the options. For single spacing, choose No Paragraph Space.
-
Highlight the text you want to change and select the Home tab.
-
Next to Paragraph, select Expand (the down-arrow).
-
In the Spacing section, manually set the amount of space before and after line breaks, or choose one of the options under Line spacing. Select the Line and Page Breaks tab for more advanced options like text wrapping and pagination settings.
When you’re done, select OK to save changes.
FAQ
-
How do I change the tab spacing in Word?
The quickest way to set tab stops is to click the ruler where you want a tab. Alternatively, go to the Home tab and select Paragraph Settings in the Paragraph group. Next, select the Tabs button. Finally, set the desired Tab stop position, click Set, and click OK.
-
How do I fix the spacing between bullet points in Word?
To change line spacing between bullets in a list, select the list and then click the Paragraph Dialog Box Launcher. On the Indents and Spacing tab, under Spacing, clear the Don’t add space between paragraphs of the same style check box.
Thanks for letting us know!
Get the Latest Tech News Delivered Every Day
Subscribe
Are you searching for a more subtle way to make a heading or paragraph stand out, without using bold or enlarged text?
Expanding the characters may be the perfect solution for you.
Changing the spacing between the characters will make your text look bigger and bolder without actually increasing their size.
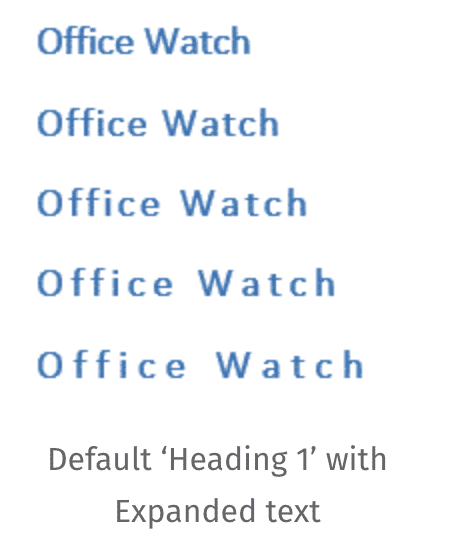
Alternatively, condensing the text will compress your text to fit into a smaller space. If you are trying to find a way to make your text fit on a single page, without reducing the text size to an un-readable size 8 font, reducing the space between the characters may be the solution you have been searching for.
Maybe you just want to reduce or expand the spacing between your characters to make your Word document more aesthetically pleasing.
Whatever your reason is for trying to change the spacing between your text characters in Word, in this post, we will show you how!
Changing the line spacing between letters in Microsoft Word
- Open your Word Document
- Highlight the text you want to change the spacing between
- Right-click on your highlighted text
- Click Font
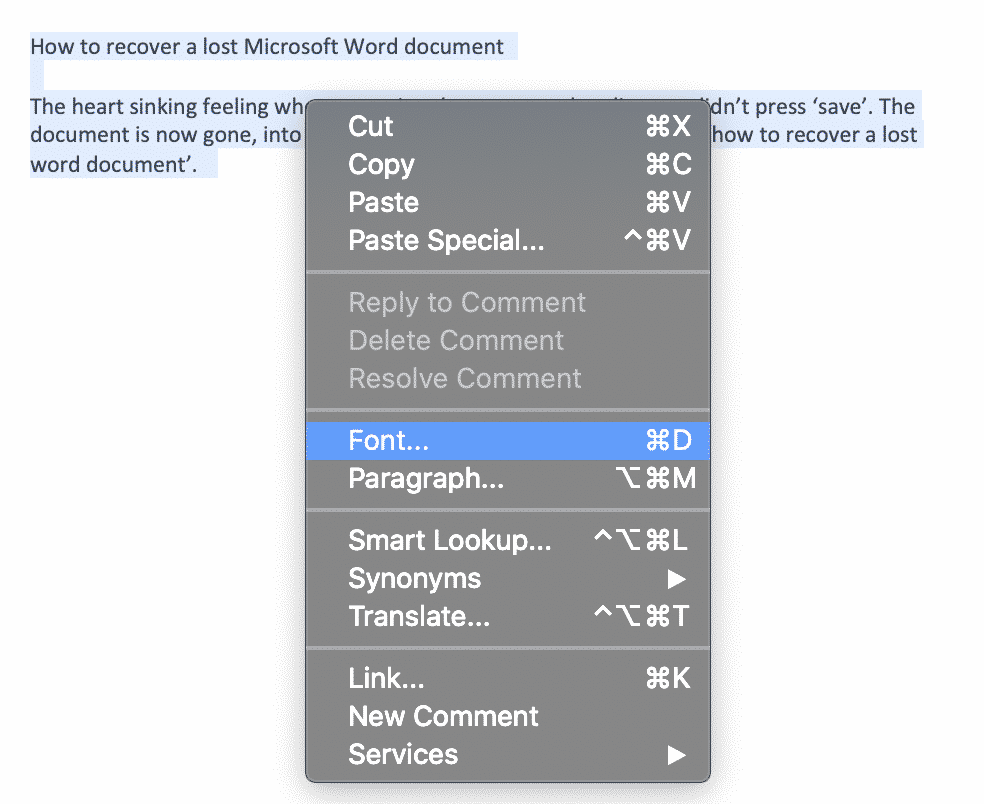
- Under Font, find and click Advanced

- Click Spacing
- Select Expanded to increase the spacing between your characters, or Condensed to reduce the size of the spacing between your characters
- Press OK
You have now successfully adjusted the spacing between each character selected.
If you would like to expand or condense the spacing throughout your entire Microsoft Word document you can do so by highlighting the full text body and following the steps above.
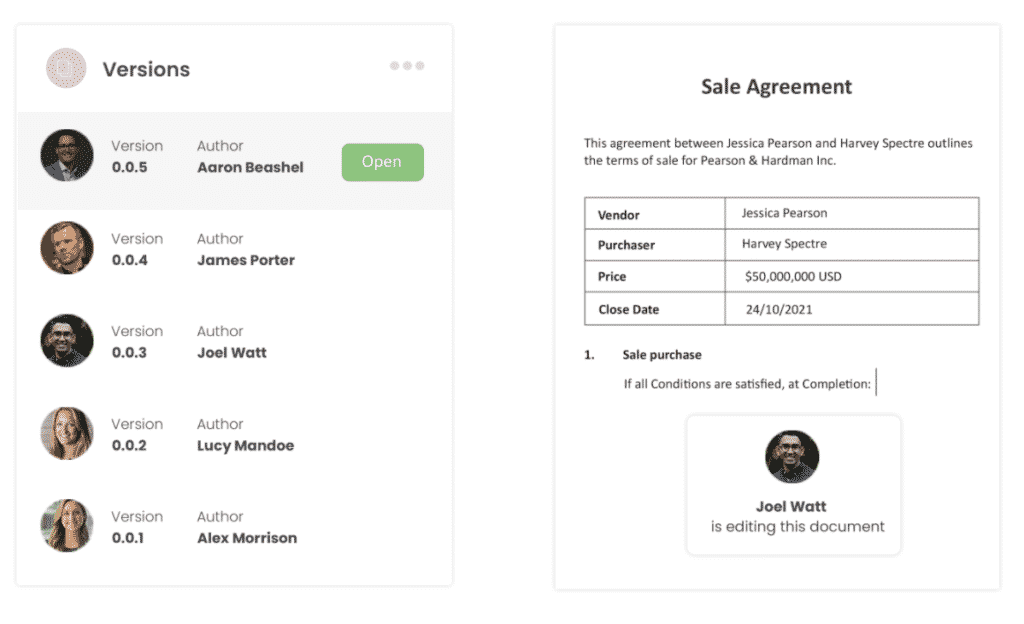
Searching for a Better Way to Manage Version Control?
We’ve all been there when you are looking for the most recent version of a particular document to send onto your boss, client or team members and just can’t find it anywhere.
I swear it was saved in the client folder last week, but since then John from Legal has taken a look, made some changes and moved the file. Leaving you with 25 different versions in your folder, but a sneaking suspicion that presentation_updated_v5final_UPDATED still isn’t the most recent one.
With no easy way to name files and everyone on the team taking a different approach version control is a problem almost all of us face.
It makes sense to use the _v1 addition on the end of a document, adding the next subsequent number next to the _v but then someone adds the word _final on the end. Honestly thinking this is the final version before another team member makes some more edits leaving you with something along the lines of _v8_final_v4 and the list goes on…
Do you think this is a frustration we have faced since the start of time?

Wonder no more, because it is not a frustration of your future.
With more than enough of us facing the same version control frustrations, the amazing team at Simul Docs decided to create a simple and perfect (we might be biased, but it’s pretty damn perfect) solution to version control in Microsoft Word.
Simul Docs manages version control for you.
When a document is created, or edited with Simul, the purpose-built tool will automatically take over your version control. A new document is created and given the version number 0.0.1, that’s easy.
Then one of your colleagues open the document, make a few changes and press save, this version automatically becomes version 0.0.2 without your colleague even thinking about a file name or where it needs to be saved.
Simul takes care of your storage as well.
Each new version is neatly stored in the file’s version list, visible to any co-authors, making it easy for you to refer back to an old version anytime, or at a glance see who made edits each version and when they were done.
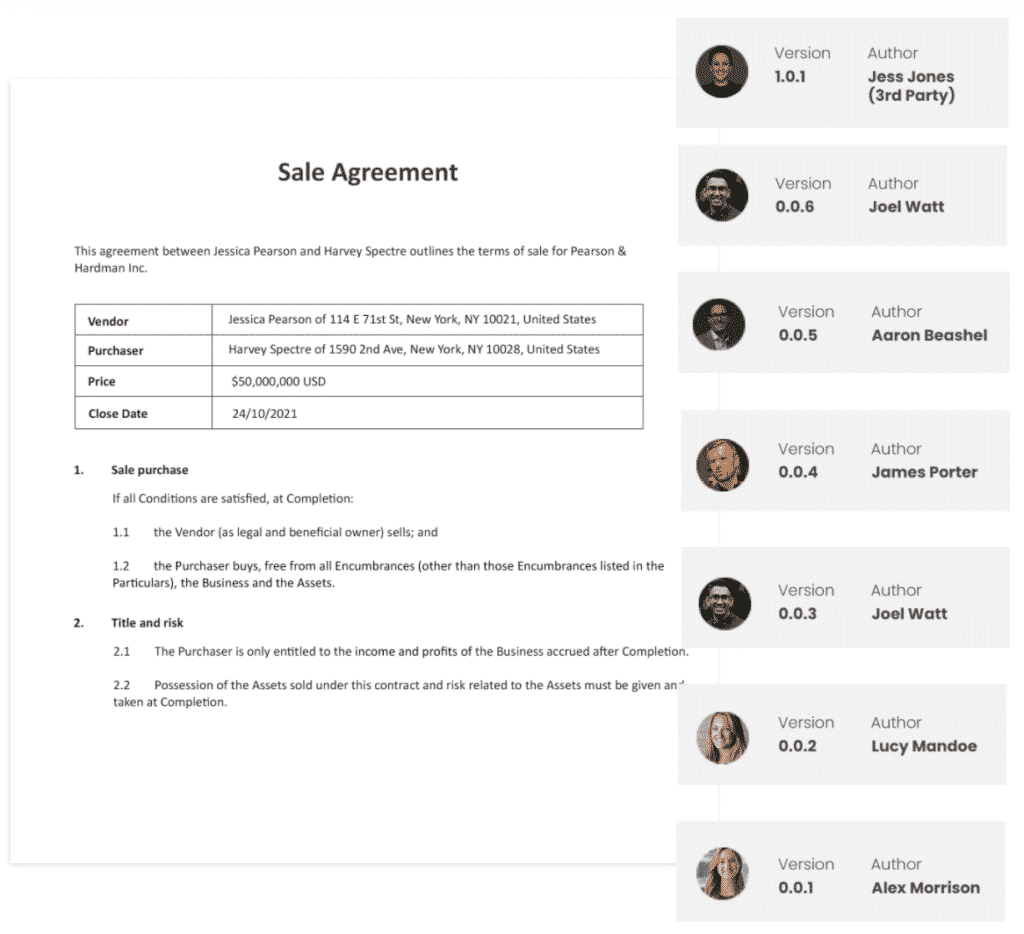
So, with Simul you can rest easy knowing your version control is under control and all of your documents are neatly stored away together, no matter who edits them opens them or requests to make a change.
Simul has you covered when it comes to version control, so why not try it out?
Currently offering a free trial, you have nothing to lose and you’ll never have to look at another document named _v4updated_FINAL-V2 again.
Simul Docs is a win win!
In my last Microsoft Word tutorial, we adjusted the space between letters. Today, we’re going to adjust the space between words in Microsoft Word without altering the letter spacing.
A Word of Caution: You may be tempted to increase the space between words by adding multiple spaces. I strongly advise against this practice because adding unnecessary spaces (rather than making individual spaces bigger, as shown in this tutorial) can disturb other formatting in your document.
This tutorial is available as a YouTube video showing all the steps in real time.
Watch more than 200 other writing-related software tutorials on my YouTube channel.
The images below are from Word for Microsoft 365. These steps will also work in Word 2021, Word 2019, Word 2016, and Word 2013.
- Select the Home tab in the ribbon.

- (Optional) Select the Show/Hide button in the Paragraph group to reveal your document’s formatting.

- Select the part of the text you want to change. (Pro Tip: Press Ctrl + A to select the entire document.)

- Take note of your current font size in the Font Size menu. The default space between words is based on your current font size.

- Select the Replace button in the Editing group to open the Find and Replace dialog box.

- Place your cursor in the Find what text box and then press your spacebar once to create one space.

- Place your cursor in the Replace with text box and then press your spacebar once to create one space.

- Select the More button to expand the dialog box. (Disregard this step if your dialog box is already expanded.)

- Select the Format button.

- Select Font in the Format menu.

- Select a larger or smaller font size in the Size menu in the Replace Font dialog box. Alternatively, you can type a specific size into the text box at the top of the menu.

- Select the OK button.

- Select the Replace All button.

- A dialog box will report the number of replacements.
-
- Select Yes if you want to expand the replacements to your whole document.
- Select No if you only want the replacements in the text you selected in step 3.

- Select the Close button.

The spacing between words should now be changed in your selected text.

- (Optional) Reselect the Show/Hide button to hide your formatting (see figure 2).
Related Resources
How to Adjust Line Spacing in Microsoft Word
How to Adjust Page Margins in Microsoft Word
Updated February 16, 2023