
Word for Microsoft 365 Word for Microsoft 365 for Mac Word for the web Word 2021 Word 2021 for Mac Word 2019 Word 2019 for Mac Word 2016 Word 2016 for Mac Word 2013 Word 2010 Word for Mac 2011 More…Less
You can control the vertical space between the lines of text in your document by setting the line spacing. Or, you can change the vertical space between paragraphs in your document by setting the spacing before or spacing after paragraphs. You can also choose to keep lines of text together or keep paragraphs together on a page.
Change the line spacing in an entire document
-
Go to Design > Paragraph Spacing.
-
Choose an option. To single space your document, select No Paragraph Space.
To return to the original settings later, go to Design > Paragraph Spacing and choose the option under Style Set. This may be Default or the name of style you’re currently using.
Change the line spacing in a portion of the document
-
Select one or more paragraphs to update. Press Ctrl + A to select all.
-
Go to Home > Line and Paragraph Spacing

-
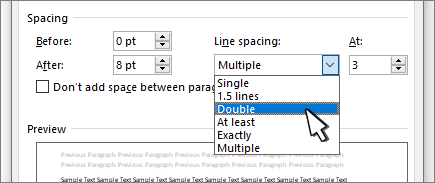
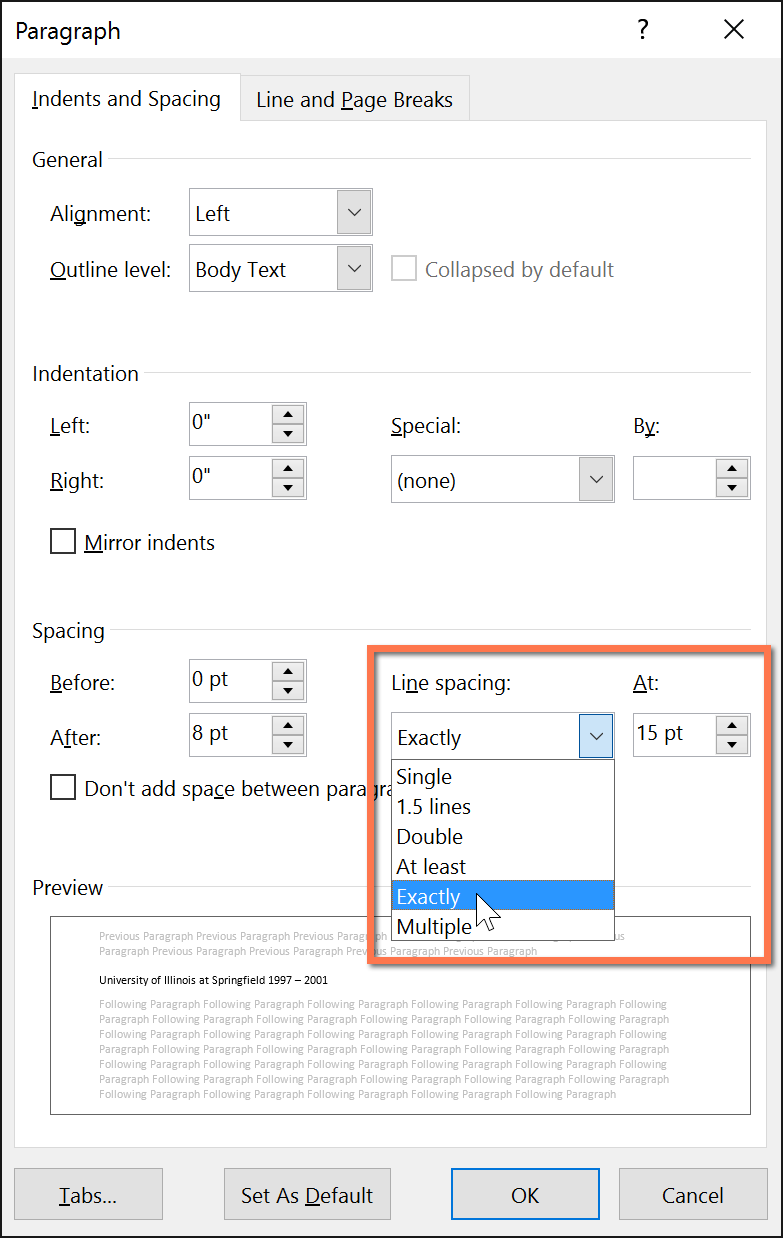
Select Line Spacing Options and choose an option in the Line spacing box.
-
Adjust the Before and After settings to change spacing between paragraphs.
-
Select OK.

For more info, see Adjust indents and spacing.
Change the line spacing in an entire document
-
Go to Design > Paragraph Spacing.
-
Choose the option you want. If you want to single space your document, choose No Paragraph Space.

This overrides the settings of the style you’re currently using. If you decide later to return to the original settings, go to Design > Paragraph Spacing and choose the option under Style Set. The option might be Default, as shown above, or it will show the name of style you’re currently using.
Change the line spacing in a portion of the document
-
Select the paragraphs you want to change.
-
Go to Home > Line and Paragraph Spacing.
-
Choose the number of line spaces you want or select Line Spacing Options, and then select the options you want under Spacing.
-
To change the spacing before or after each of the paragraphs in the text you selected, click the arrow next to Before or After and enter the amount of space that you want.
-
Select OK.

-
Select the paragraph whose lines you want to keep together.
-
Go to Format > Paragraph >Line and Page Breaks.
-
Select Keep lines together.
-
Select the first of the two paragraphs that you want to keep together.
Tip: If you want to keep more than two paragraphs together, select all but the last paragraph.
-
Go to Format > Paragraph.
-
Go to Line and Page Breaks.
-
Select Keep with next.
-
Select OK.
-
Select the paragraphs you want to change, or press Ctrl+A to select everything.
-
Go to Home > Line Spacing.
-
Choose the number of line spaces you want, or select Line Spacing Options and then select the options you want in the Paragraph dialog box under Spacing:
Tip: If you want to change the spacing before or after the selected paragraphs, select the arrows in the Before or After boxes, or type a number directly.
Need more help?
The default line spacing in Word is 1.15. By default, paragraphs are followed by a blank line and headings have a space above them.
-
Go to Home > Line and Paragraph Spacing
, and then choose Line Spacing Options. -
Under Spacing, choose an option in the Line spacing box.
-
Adjust the Before and After settings if you want to change spacing between paragraphs.
-
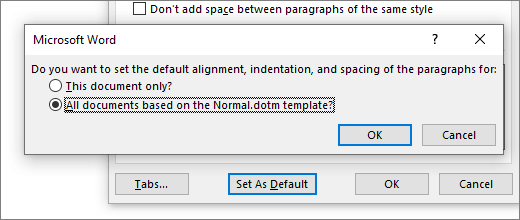
Select Set as Default.
-
Choose All documents based on the Normal template.
-
Select OK.

For more info, see Adjust indents and spacing.
The default line spacing in Word is 1.15. By default, paragraphs are followed by a blank line and headings have a space above them.
-
Go to Home > Line and Paragraph Spacing.
-
Select Line Spacing Options, and then choose the options you want under Spacing.
-
To change the spacing before or after the selected paragraphs, select the arrow next to Before or After and enter the amount of space that you want.
-
Select Set as Default.
-
Choose All documents based on the Normal template.
-
Select OK.
For more info, see Adjust indents and spacing.
You can change the line spacing, but the next time you create a new document, Word for the web reverts back to 1.15 line spacing.
Change spacing between paragraphs
- Click anywhere in the paragraph you want to change.
- Go to Layout, and under Spacing, click the up or down arrows to adjust the distance before or after the paragraph. You can also type a number directly.
Contents
- 1 What is the default spacing before and after a paragraph?
- 2 What is the correct spacing after a paragraph?
- 3 How a line spacing different from space before or after a paragraph?
- 4 How do you double space after paragraphs?
- 5 How do you add 72 pt before paragraph spacing?
- 6 How do you insert 1.5 spacing in Word?
- 7 How do you do 24 point spacing before paragraph?
- 8 What does 12 point spacing after paragraphs mean?
- 9 How do you make a space at the beginning of a paragraph?
- 10 How do you add a space after a paragraph in Word?
- 11 What is the space before a paragraph called?
- 12 Do you put a space between paragraphs in an essay?
- 13 How do you do paragraph spacing?
- 14 How many PT is 1.5 line spacing?
- 15 Should I add space before or after paragraph?
- 16 Why can’t I Add space after paragraph?
- 17 How do you insert a space after paragraph in Word Mac?
- 18 What is paragraph spacing in computer?
- 19 How do I reduce paragraph spacing in Word?
- 20 What is the shortcut key for 1.5 line spacing?
What is the default spacing before and after a paragraph?
The default line spacing in Word is 1.15. By default, paragraphs are followed by a blank line and headings have a space above them. , and then choose Line Spacing Options.
What is the correct spacing after a paragraph?
A space equal to 50–100% of the body text size will usually suffice. The larger the point size, the more space you’ll need between paragraphs to make a visible difference. Word Right-click in the text and select Paragraph → Indents and Spacing . Under Spacing , in the box next to After , enter the measurement.
How a line spacing different from space before or after a paragraph?
Line spacing determines the amount of vertical space between lines of text in a paragraph. By default, lines are single-spaced, meaning that the spacing accommodates the largest font in that line, plus a small amount of extra space. Paragraph spacing determines the amount of space above or below a paragraph.
How do you double space after paragraphs?
To double-space, press Ctrl+2. This setting formats the paragraph with one blank line below each line of text. To use 1-1/2-space lines, press Ctrl+5.
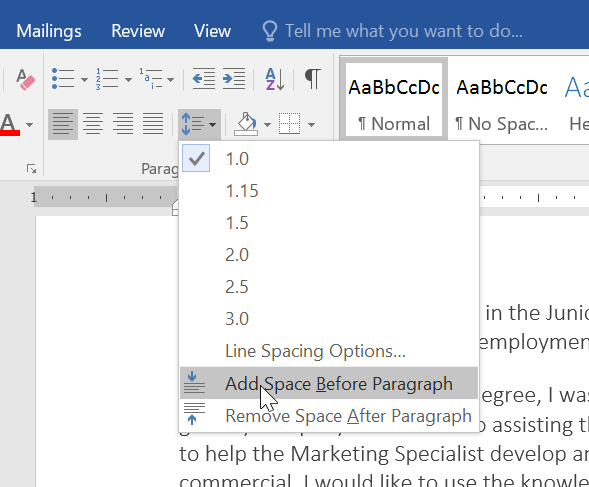
How do you add 72 pt before paragraph spacing?
To format paragraph spacing:
- Select the paragraph or paragraphs you want to format.
- On the Home tab, click the Line and Paragraph Spacing command. Click Add Space Before Paragraph or Remove Space After Paragraph from the drop-down menu.
- The paragraph spacing will change in the document.
How do you insert 1.5 spacing in Word?
To format line spacing:
- Click Format on the menu bar.
- Select Paragraph. The Paragraph dialog box appears.
- Click the Indents and Spacing tab.
- In the line spacing drop-down menu, you can select single, 1.5, or double spacing. The default is single spacing.
- Click OK.
How do you do 24 point spacing before paragraph?
Change the line spacing in a portion of the document
Press Ctrl + A to select all. Select Line Spacing Options and choose an option in the Line spacing box. Adjust the Before and After settings to change spacing between paragraphs. Select OK.
What does 12 point spacing after paragraphs mean?
In Word, line spacing is most commonly measured in multiples of whatever font size the paragraph is using. For example, say you’re using a 12 point font for the text in your paragraph. If you choose single line spacing, the space between lines will be 12 points.
How do you make a space at the beginning of a paragraph?
If you always want first-line indentation, modify the Normal style:
- Put the cursor anywhere in the paragraph.
- On the Home tab, right-click the Normal style, and choose Modify.
- Select Format, and then choose Paragraph.
- On the Indents and Spacing tab, under Indentation, select First line.
- Select OK.
- Select OK again.
How do you add a space after a paragraph in Word?
Select the paragraph or paragraphs you want to format. On the Home tab, click the Line and Paragraph Spacing command. Click Add Space Before Paragraph or Remove Space After Paragraph from the drop-down menu.
What is the space before a paragraph called?
A first-line indent is the most common way to signal the start of a new paragraph. The other common way is with space between paragraphs. First-line indents and space between paragraphs have the same relationship as belts and suspenders.
Do you put a space between paragraphs in an essay?
Double space: Your entire essay should be double spaced, with no single spacing anywhere and no extra spacing anywhere. There should not be extra spaces between paragraphs.Indentation: The first line of each paragraph should be indented.
How do you do paragraph spacing?
Change spacing between paragraphs
- Click anywhere in the paragraph you want to change.
- Go to Layout, and under Spacing, click the up or down arrows to adjust the distance before or after the paragraph. You can also type a number directly.
How many PT is 1.5 line spacing?
The first is set to “1.5 lines” (which is 21 points per line).
Should I add space before or after paragraph?
Space Before sets the amount of space before the paragraph. Space After sets the amount of space after the paragraph. Following are the sample paragraphs with Space After set to 12 pt.
Why can’t I Add space after paragraph?
A couple of things to check: For the style in question, look at the paragraph formatting and make sure that “Don’t add space between paragraphs of the same style” is not checked. At Tools | Options | Compatibility, make sure that “Don’t use HTML paragraph auto spacing” is checked.
How do you insert a space after paragraph in Word Mac?
Set paragraph spacing
- Click to place the insertion point in the paragraph you want to adjust, or drag to select multiple paragraphs.
- In the Format sidebar, click the Style button near the top.
- Click the disclosure arrow next to Spacing, then click the arrows for Before Paragraph and After Paragraph.
What is paragraph spacing in computer?
Paragraph spacing determines the amount of space above or below a paragraph. When you press Enter to start a new paragraph, the spacing is carried over to the next paragraph, but you can change the settings for each paragraph.
How do I reduce paragraph spacing in Word?
Change spacing between paragraphs
- Select the paragraphs you want to change.
- Click the Page Layout tab, and under Spacing, in the Before and After boxes, click the up or down arrows to adjust the distance before or after each paragraph:
What is the shortcut key for 1.5 line spacing?
Ctrl+5
Pressing Ctrl+5 changes to 1.5 line spacing.
Space Before sets the amount of space before the paragraph. Space After sets the amount of space after the paragraph. Following are the sample paragraphs with Space After set to 12 pt.
Do you change the spacing before or after a paragraph?
Click anywhere in the paragraph you want to change. Go to Layout, and under Spacing, click the up or down arrows to adjust the distance before or after the paragraph. You can also type a number directly.
How do I change the spacing before and after a paragraph in Word?
Change the line spacing in a portion of the document
- Select one or more paragraphs to update.
- Go to Home > Line and Paragraph Spacing.
- Select Line Spacing Options and choose an option in the Line spacing box.
- Adjust the Before and After settings to change spacing between paragraphs.
- Select OK.
How do you do a manual line break?
Insert a manual line break
- Click where you want to break a line.
- Press SHIFT + RETURN . Word inserts a manual line break ( ). Tip: To view manual line breaks, on the Standard toolbar, click .
How do you fix line breaks in Word?
If you need to remove line breaks from text in MS Word you can do the next simple actions:
- Ctrl+A to select all text.
- Ctrl+H to open the Find & Replace dialog box.
- Click on “Replace All”.
- Do another search and replace.
- Finally, we will replace the replacement above for two consecutive hard line breaks.
How do you show spacing in Word?
Fortunately, Word allows you to easily see where spaces occur in your documents….Displaying Spaces in a Document
- Display the Word Options dialog box.
- Click Display at the left side of the dialog box.
- Make sure the Spaces check box is selected.
- Click on OK.
How do I get rid of large gaps in text in Word?
I’m not sure what’s going on, but here’s how I fixed it:
- Highlight the region of the document that has a problem.
- Right click.
- Select “Paragraph”
- Go to “Line and Page Breaks” tab.
- Uncheck “Keep with next” and also uncheck “Keep lines together”
- OK.
How do you show formatting changes?
Word for Windows Select Display from the listing at the left. In the section titled “Always show these formatting marks on the screen”, check or uncheck the appropriate boxes to view the marks of your choice. To show or hide them all, select Show all formatting marks. To save your changes, click OK.
How do you show the formatting marks in a document?
If you always want to see the formatting marks in your Word documents, there’s a setting for that.
- Click File.
- Click Options.
- Click Display.
- Check the formatting marks you want always shown.
- Click OK.
 Please Note:
This article is written for users of the following Microsoft Word versions: 2007, 2010, 2013, 2016, 2019, and Word in Microsoft 365. If you are using an earlier version (Word 2003 or earlier), this tip may not work for you. For a version of this tip written specifically for earlier versions of Word, click here: Put Your Space Before or After?.
![]()
Written by Allen Wyatt (last updated September 12, 2020)
This tip applies to Word 2007, 2010, 2013, 2016, 2019, and Word in Microsoft 365
It is not uncommon for page layout designs to call for extra spacing between paragraphs. Word allows you to add extra space either before or after a paragraph. The one you choose is up to you. Remember, however, that the spacing is cumulative. For example, if you have a paragraph that is formatted for 12 points of space after it, followed by a paragraph formatted for 15 points of space before it, then there will be 27 points of space between the paragraphs. You will make your design and layout work much easier if you are consistent in where you add the extra space—either before or after a paragraph.
There is a caveat to my statement that «spacing is cumulative.» Word has a configuration option which, under certain circumstances, can turn off the cumulative nature of spacing. This option is actually part of the style definitions you can create within Word. To see this option, follow these steps:
- Display the Home tab of the ribbon.
- Click the small down-arrow at the lower-right corner of the Styles group. Word displays the Styles pane.
- 3 Hover the mouse pointer over a style you want to modify. (As an example, hover over the Normal style.) A down-arrow appears at the right side of the style name.
- Click the arrow to display some options and then choose the Modify option. Word displays the Modify Style dialog box. (See Figure 1.)
- Click the Format button at the bottom-left of the dialog box. Word displays some categories of things you can specify in the style.
- Choose Paragraph. Word displays the Paragraph dialog box.
- Make sure the Indents and Spacing tab is displayed. (See Figure 2.)
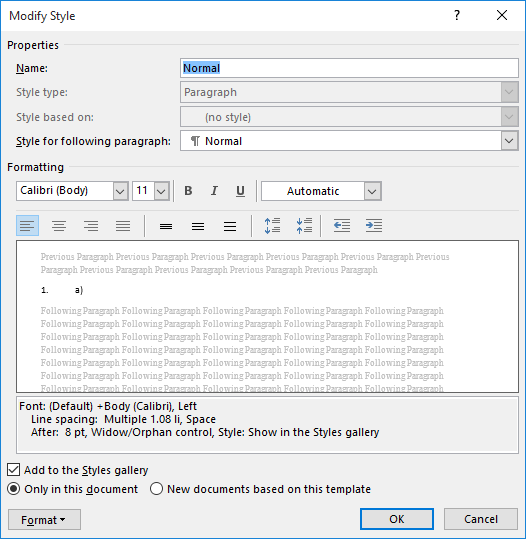
Figure 1. The Modify Style dialog box.
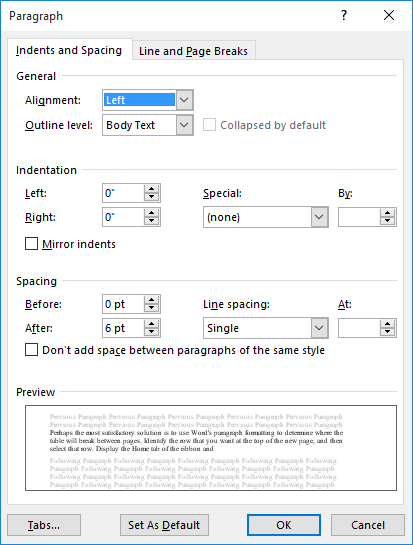
Figure 2. The Indents and Spacing tab of the Paragraph dialog box.
Note the checkbox about two-thirds of the way down the dialog box entitled, «Don’t Add Space between paragraphs of the Same Style.» This setting controls whether spacing is cumulative between any two given paragraphs if the two paragraphs use the same style. You can set the option as desired for any of your styles.
WordTips is your source for cost-effective Microsoft Word training.
(Microsoft Word is the most popular word processing software in the world.)
This tip (9358) applies to Microsoft Word 2007, 2010, 2013, 2016, 2019, and Word in Microsoft 365. You can find a version of this tip for the older menu interface of Word here: Put Your Space Before or After?.
Author Bio
With more than 50 non-fiction books and numerous magazine articles to his credit, Allen Wyatt is an internationally recognized author. He is president of Sharon Parq Associates, a computer and publishing services company. Learn more about Allen…
MORE FROM ALLEN
Inserting Rows
Need to insert rows in your worksheet? Excel provides a few techniques you can use to do this. Here are some ideas you …
Discover More
Excel Refuses to Put Page Breaks between Subtotal Groups
Page breaks not appearing where you expect them in your subtotaled data? It could be because of a setting you made in …
Discover More
What is a Desktop.ini File?
When browsing through your system, you might see several files named Desktop.ini. This tip explains what these files are …
Discover More
More WordTips (ribbon)
Format Painter Messes Up Ordinals
The Format Painter is a handy tool for quickly copying formatting from one place to another. Used incorrectly, though, …
Discover More
Hanging Indent Shortcut
You can use the tools on the ribbon to adjust the indent applied to a paragraph. If you want to format a hanging indent, …
Discover More
Quickly Adjusting Paragraph Spacing
Need to easily adjust the vertical spacing that follows a paragraph? You can do it using dialog boxes or you can create …
Discover More

There are several ways to adjust line spacing in Microsoft Word. Today’s tutorial explains the basic method using the ribbon and a more advanced method using the Paragraph dialog box.
See the Quick Tip at the bottom of this tutorial to learn how to single-space an entire document from the Paragraph dialog box.
This tutorial is available as a YouTube video showing all the steps in real time.
Watch more than 150 other document software tutorials on my YouTube channel.
The images below are from Word for Microsoft 365.The steps are the same in Word 2021, Word 2019, and Word 2016, and similar for Word 2013 and Word 2010. However, your interface may look slightly different in those older versions of the software.
Basic Method: Adjust Line Spacing from the Ribbon
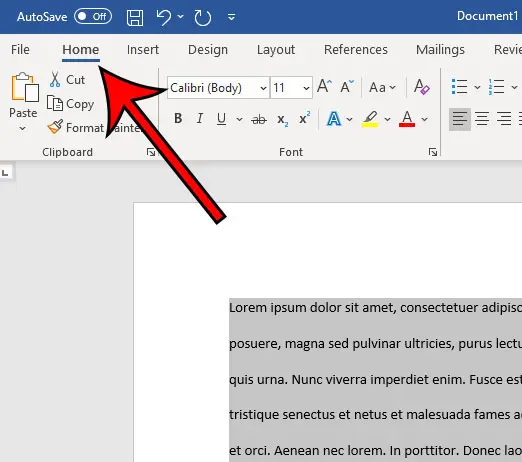
- Select the Home tab in the ribbon.

- (Optional Step) Select the Show/Hide button in the Paragraph group to show paragraph break symbols and other formatting that may affect line spacing.

- Select the text with the line spacing that needs to be changed.

- Select the Line and Paragraph Spacing button in the Paragraph group.

- Select an option from the drop-down menu:
A. Numbers 1.0 through 3.0 add space between lines.
B. Add Space Before Paragraph adds space before paragraphs but not before the lines within them.
C. Remove Space After Paragraph removes space after paragraphs but not after the lines within them.
These three options are based on your current font size with 1.0 being the equivalent of single-spacing.

Your changes will be applied immediately.

Note that you can apply the individual line spacing (the numbers 1.0 through 3.0) and the paragraph spacing to the same text to further customize your results.
- (Optional Step) Select the Show/Hide button again to hide paragraph symbols and other formatting (see figure 2).
Now, let’s move on to an advanced method offering additional spacing options.
Advanced Method: Adjust Line Spacing from the Paragraph Dialog Box
- Select the Home tab in the ribbon (see figure 1).
- (Optional Step) Select the Show/Hide button in the Paragraph group to show paragraph break symbols and other formatting that may affect line spacing (see figure 2).
- Select the text with the line spacing that needs to be changed (see figure 3).
Pro Tip: PC users can press Ctrl + A to select the entire document if all the line spacing needs to be changed. However, this includes items you may not want to alter, including headings, tables, table titles, figure captions, tables of contents, footnotes, endnotes, and reference lists.
- Select the dialog box launcher in the Paragraph group.

- Make changes in the Spacing section of the Paragraph dialog box:
A. The Before and After boxes represent the spaces before and after paragraphs measured in points with one point being 1/72 of an inch tall. Use the increment arrows to choose a whole number or enter a number with a decimal (e.g., 2.75) directly into the box.
B. The Line spacing drop-down menu offers six options:
1. Single—Creates single-spacing based on your current font size.
2. 1.5 Lines—Creates a space and a half as large as your current font size.
3. Double—Creates double-spacing based on your current font size.
4. At Least—Determines the minimum amount of space between lines based on the number of points entered in the At box.
5. Exactly—Creates space between lines based on the number of points entered in the At box.
6. Multiple—Creates spacing multiplied by the number entered in the At box. For example, if you enter four in the At box, your spacing will be four times as large as your current single-spacing.
C. Don’t add space between paragraphs of the same style—For many users, this will remove spaces between all paragraphs because general documents commonly have only one paragraph style.

Note that the Preview box updates as you make adjustments in the Spacing section.
- Select the OK button to close the Paragraph dialog box.

- (Optional Step) Select the Show/Hide button again to hide paragraph symbols and other formatting (see figure 2).
Quick Tip: Single-Space an Entire Document from the Paragraph Dialog Box
- Select the Home tab in the ribbon (see figure 1).
- Select the entire document. (PC users can press Ctrl + A.)
- Select the dialog box launcher in the Paragraph group (see figure 7).
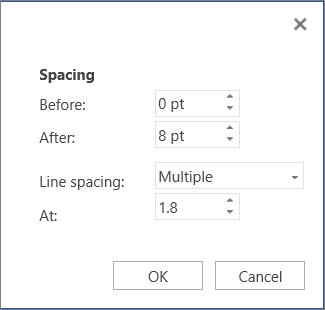
- Enter 0 in the Before box in the Paragraph dialog box (see figure 8).
- Enter 0 in the After box in the Paragraph dialog box (see figure 8).
- Select Single in the Line spacing drop-down menu (see figure 8).
- Select the OK button (see figure 9).
Related Resources
How to Adjust Letter Spacing in Microsoft Word (PC & Mac)
How to Adjust the Space between Words in Microsoft Word
How to Adjust Page Margins in Microsoft Word
Updated June 25, 2022
Lesson 9: Line and Paragraph Spacing
/en/word2016/indents-and-tabs/content/
Introduction
As you design your document and make formatting decisions, you will need to consider line and paragraph spacing. You can increase spacing to improve readability and reduce it to fit more text on the page.
Optional: Download our practice document.
Watch the video below to learn how to fine tune line and paragraph spacing in your documents.
About line spacing
Line spacing is the space between each line in a paragraph. Word allows you to customize the line spacing to be single spaced (one line high), double spaced (two lines high), or any other amount you want. The default spacing in Word is 1.08 lines, which is slightly larger than single spaced.
In the images below, you can compare different types of line spacing. From left to right, these images show default line spacing, single spacing, and double spacing.

Line spacing is also known as leading (pronounced to rhyme with wedding).
To format line spacing
- Select the text you want to format.

- On the Home tab, click the Line and Paragraph Spacing command, then select the desired line spacing.

- The line spacing will change in the document.


Fine tuning line spacing
Your line spacing options aren’t limited to the ones in the Line and Paragraph Spacing menu. To adjust spacing with more precision, select Line Spacing Options from the menu to access the Paragraph dialog box. You’ll then have a few additional options you can use to customize spacing.
- Exactly: When you choose this option, the line spacing is measured in points, just like font size. For example, if you’re using 12-point text, you could use 15-point spacing.
- At least: Like the the Exactly option, this lets you choose how many points of spacing you want. However, if you have different sizes of text on the same line, the spacing will expand to fit the larger text.
- Multiple: This option lets you type the number of lines of spacing you want. For example, choosing Multiple and changing the spacing to 1.2 will make the text slightly more spread out than single-spaced text. If you want the lines to be closer together, you can choose a smaller value, like 0.9.

Paragraph spacing
Just as you can format spacing between lines in your document, you can adjust spacing before and after paragraphs. This is useful for separating paragraphs, headings, and subheadings.
To format paragraph spacing:
In our example, we’ll increase the space before each paragraph to separate them a bit more. This will make it a little easier to read.
- Select the paragraph or paragraphs you want to format.

- On the Home tab, click the Line and Paragraph Spacing command. Click Add Space Before Paragraph or Remove Space After Paragraph from the drop-down menu. In our example, we’ll select Add Space Before Paragraph.

- The paragraph spacing will change in the document.


From the drop-down menu, you can also select Line Spacing Options to open the Paragraph dialog box. From here, you can control how much space there is before and after the paragraph.

You can use Word’s convenient Set as Default feature to save all of the formatting changes you’ve made and automatically apply them to new documents. To learn how to do this, read our article on Changing Your Default Settings in Word.
Challenge!
- Open our practice document.
- Select the the date and the address block. This starts with April 13, 2016, and ends with Trenton, NJ 08601.
- Change the spacing before the paragraph to 12 pt and the spacing after the paragraph to 30 pt.
- Select the body of the letter. This starts with I am exceedingly and ends with your consideration.
- Change the line spacing to 1.15.
- When you’re finished, your page should look like this:


/en/word2016/lists/content/

There are lots of reasons you might want to change the amount of space between lines in a paragraph, or between paragraphs themselves. Word offers some handy preset values to use, but you can also take full control by specifying exact spacing. Here’s how.
Changing the line or paragraph spacing in a document is not something you might need to do very often. But as anyone who’s had to turn in a paper with mandatory double spacing knows, it can be the difference between passing and failing. Outside of college, you still might be faced with line spacing guidelines by employers, clients, or publishers. And even in your own documents, the right spacing can make your document more readable or highlight parts of the documents on which you want your readers to focus . If the default spacing in Word doesn’t quite hit the spot for you, Word makes it easy to change.

They are both pretty much what they sound like. Line spacing is the amount of white space between two lines of text. Paragraph spacing is the amount of white space between two paragraphs. And like using the right font or proper margins, controlling spacing is an important part of document formatting.
RELATED: How to Embed Fonts in a Microsoft Word Document
And weird as it might sound at first, both line and paragraph spacing are applied at the paragraph level. Line spacing controls how all lines of a paragraph are spaced. Paragraph spacing controls how much space comes before and after the paragraph.
In Word, line spacing is most commonly measured in multiples of whatever font size the paragraph is using. For example, say you’re using a 12 point font for the text in your paragraph. If you choose single line spacing, the space between lines will be 12 points. If you choose double spacing, that space between lines will be 24 points. However, if you want to fine tune things, you can also specify an exact point size to use.
Paragraphs work a bit differently. By default, Word adds eight points of space after a paragraph and no additional space before the paragraph, and you can change both of those values however you like.
Let’s take a closer look at how to do all this.
Use Quick Presets for Easy Changes
Word has some common preset options for you to choose from. Remember that line and paragraph spacing are both applied at the paragraph level. If you place your insertion point in a paragraph, you’ll change things for that paragraph. If you select text from multiple paragraphs, you’ll change things for all those paragraphs.
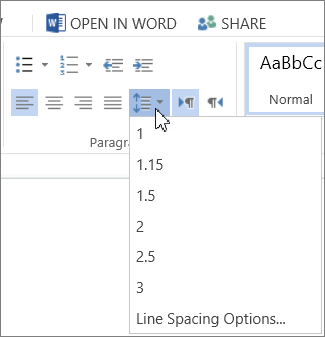
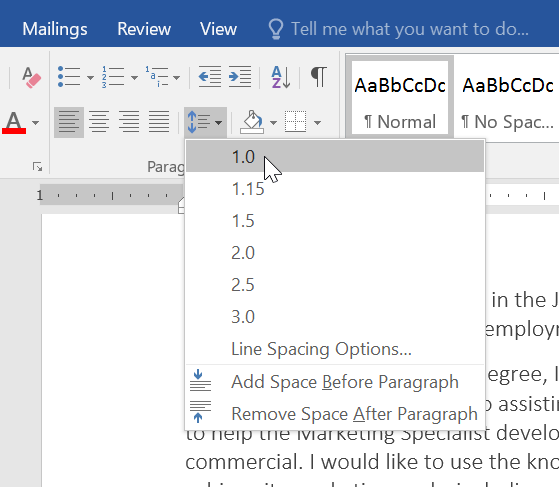
Select all of the paragraphs you want to change (or place your insertion point anywhere in a single paragraph you want to change). On the Home tab, click the “Line and Paragraph Spacing” button.
This opens a dropdown menu with presets for line spacing (at the top) and paragraph spacing (at the bottom).
The line spacing is shown in multiples. “2.0” is double spacing, “3.0” is triple spacing, and so on. Select the multiple you want, and Word applies it to the selected paragraphs. If you want to choose another spacing, or revert to the original spacing, click the “Line and Paragraph Spacing” option again and select a different multiple.
The paragraph spacing only lets you add or remove a preset spacing before the paragraph or after the paragraph. And it’s kind of weird the way it works. If you currently have no spacing before or after a paragraph, the menu shows commands for adding spacing in both locations (as shown in the previous image). If you add a space in one location, that command changes to let you remove that spacing.
So, you can only ever add or remove one level of preset spacing with the menu commands. And what are those presets? 12 points for the spacing before the paragraph and 8 points for the spacing after.
These presets work well enough for simple changes to a few paragraphs. But what if you want to change the spacing on the whole document? You could select everything (Ctrl+A) and then use these same commands, but there are some better presets available if you want to change the whole document.
Use Additional Spacing Presets for Your Whole Document
Switch over to the “Design” tab, and then click the “Paragraph Spacing” button.
Now, even though that button is labeled “Paragraph Spacing,” the changes here can apply to both paragraph and line spacing for your document. As you hover your pointer over each preset, you can see the changes reflected in your document. You’ll also see a little text bubble pop up that lets you know exactly what line and paragraph spacing options that preset will apply.
This is an “all or nothing” option, so it’ll only work for the whole document, or not at all. Here’s what the Compact, Open, and Double presets look like on identical text.
At the bottom of that “Paragraph Spacing” dropdown menu, you can also click the “Custom Paragraph Spacing” command to open the Manage Styles window.
On the “Set Defaults” tab, the tools in the “Paragraph Spacing” section let you fine tune spacing for your document. You can also choose at the bottom whether to apply your changes only in the current document, or to all new documents based on the same template.
Apply Finer Control to Paragraph and Line Spacing
If you want a little more finesse than any of these presets we’ve covered offer, you do have another option (this is Word, after all).
First, place your insertion point in the paragraph you want to change (or select multiple paragraphs, or the whole document with Ctrl+A). On the “Home” tab, click the small arrow at the bottom right of the Paragraph group.
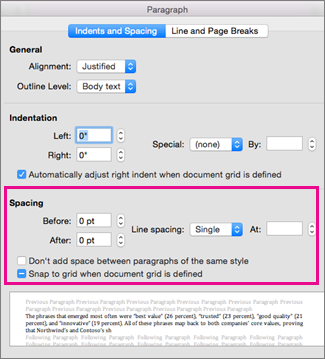
This opens the Paragraph window. On the “Indents and Spacing” tab, in the “Spacing” section, you can apply specific adjustments to both paragraph and line spacing.
On the left, you can use the “Before” and “After” controls to specify how much space you want before and after paragraphs. You’ve also got the option to keep your paragraph spacing from affecting blocks of text that are in different styles by switching on the “Don’t add space between paragraphs of the same style” checkbox. (If you’re not sure whether you’re using different styles then you probably aren’t.)
On the right in that section, the “Line Spacing” dropdown lets you choose all those same line spacing presets we looked at before, along with some other options.
These additional options include:
- At least: This option lets you specify a minimum point size to use for line spacing and is only useful in very specific circumstances. For example, say you had one line in a paragraph that for whatever reason used a smaller font size than the other lines. Regular spacing options might make it look weird. Choose a minimum spacing can help.
- Exactly: This option lets you specify an exact point size to use between lines of the selected paragraphs.
- Multiple: This options lets you dial in a specific multiple to use for spacing. For example, if 1.5 spacing seems too tight and 2.0 seems too wide, you could try something like 1.75.
Between these three options you’ve got complete control of all your document spacing, so now you can confidently double space that term paper or wow your colleagues with a perfectly formatted report.
READ NEXT
- › 8 Microsoft Word Tips for Professional Looking Documents
- › How to Add, Edit, and Remove Tab Stops in Microsoft Word
- › How to Remove Section and Page Breaks in Microsoft Word
- › How to Change Kerning in Microsoft Word
- › What Does Shift+Enter Do in Word?
- › How to Find and Replace Formatting in Microsoft Word
- › How to Number Paragraphs in Microsoft Word
- › Spotify Is Shutting Down Its Free Online Game
While creating a document in MS Word Office application, the space is often used for clearly identifying where each paragraph starts and ends. By default, MS Word places somewhat more space between two paragraphs than it places between two lines in a paragraph. It is possible to increase or decrease this amount of space that shows before and after paragraphs. This can be done entering amounts in the ‘Before’ and ‘After’ fields in the ‘Paragraph’ section of the ‘Page Layout’ tab. For increasing the amount of space before or after each paragraph, one can use the up arrows next to the ‘Before’ and ‘After’ fields. Down arrows can be used for decreasing the amount of space before or after each paragraph.
How to Add Space Before or After Paragraphs?
- First of all, one has to place the cursor anywhere in the second paragraph
- Now, choose the ‘Page Layout’ tab
- The default spacing will appear in the ‘Spacing Before’ field
- User has to click the up arrow next to the ‘Spacing Before’ field for increasing the space before the paragraph
- User has to click the up arrow next to the ‘Spacing After’ field for increasing the amount of space after the paragraph
Docx Repair application is the globally repair and recover corrupted Docx files which is recover all corrupted Docx files.
For any kind of word recovery – Try Docx Repair Tool
Try Demo version to get back corrupt word data. You can efficiently save the recovered word file using licensed version of Docx Repair.


While you might have experience changing the formatting for your Word documents to meet the requirements for your school or job, you might encounter a situation where you need to use different settings.
Microsoft Word is full of different tools and menus that let you customize your document, and line spacing is something that you can adjust.
Our tutorial below will show you how to single space in Word, even if you have already written and edited the entire document.
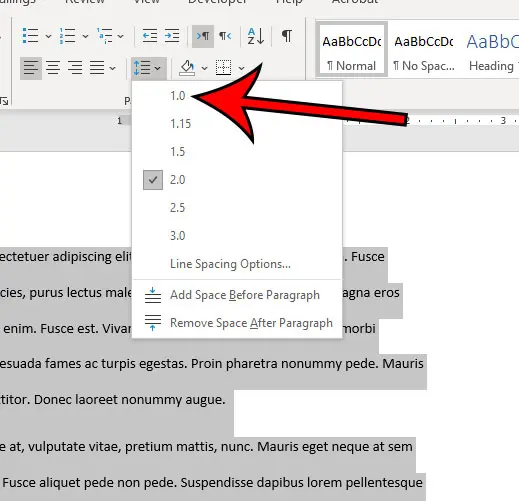
How to Make a Word Single Space Document
- Open the document.
- Click inside the document and press Ctrl + A to select everything.
- Select the Home tab at the top of the window.
- Click the Line and Paragraph Spacing button.
- Choose the 1.0 option.
Our guide continues below with additional information on how to make a document single space instead of double space in Microsoft Word, including pictures of these steps.
Last update on 2023-04-13 / Affiliate links / Images from Amazon Product Advertising API
| As an Amazon Associate, I earn from qualifying purchases.
Document spacing can impact several things, including the number of pages in the document. Microsoft Word includes several different options from which you can select to control the amount of space between the lines in your document.
Many schools and organizations have their own rules and preferences when it comes to the amount of line spacing that you have in your documents. Often they want you to use double spacing, but it’s entirely possible that they might want single spacing to reduce the number of pages in documents.
A document in Microsoft Word can have a lot of different formatting options, including the amount of space between lines.
If your current document is double spaced, or if it appears to have more or less spacing than the single spacing you need, you may be looking for a way to adjust that.
You can make a Microsoft Word single space document by opening the document, selecting all of the text, choosing the Home tab, clicking the Line and Paragraph Spacing button, then choosing the 1.0 option from the drop down menu.
Our guide below will show you how to single space in Word by selecting all of the text in the document and adjusting the line spacing setting.
You can also check out our tutorial on how to select all in Word if you would like to know more about using that option.
How to Use Single Spacing in Word for Office 365 (Guide with Pictures)
The steps in this article were performed in the Microsoft Word for Office 365 version of the application but will work in most other versions as well.
Step 1: Open your document in Microsoft Word.
Step 2: Click inside the document, then press Ctrl + A on your keyboard to select everything.
If this is a new, blank document, you can skip this step.

Step 3: Select the Home tab at the top of the window.
Step 4: Click the Line & Paragraph Spacing button in the Paragraph section of the ribbon.
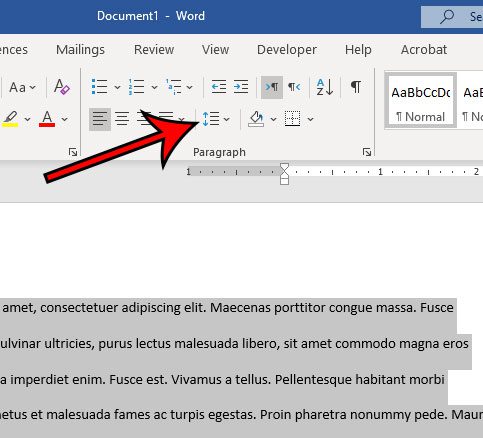
Step 5: Choose the 1.0 option from the dropdown menu to switch the document to single spacing.
Note that there is a Line Spacing Options button at the bottom of that dropdown menu.
If you select that option, you will be able to customize your document spacing further and set a new default spacing option if you would like.
Our tutorial continues below with additional discussion about how to make a document single spaced in Word.
You can also read our article on how to double space in Word for additional information about Microsoft Word line spacing.
How to Change Default Line Spacing in Microsoft Word
While you can change line spacing in every document that you create or edit in Microsoft Word, you might not want to adjust spacing every time.
But if your Word Normal template is defaulting to double spacing and you need to have single spacing more often, then constantly switching the line spaces can not only be tedious, it can be something that you forget to do.
Fortunately, among all of the different formatting adjustments that you can make for your document, there is a way to set the default line spacing.
- Open Microsoft Word.
- Select the Home tab.
- Click Line and Paragraph Spacing.
- Choose Line Spacing Options.
- Click the Line spacing drop down.
- Select your default line spacing preference.
- Click Set as Default.
- Choose All documents based on the Normal template.
- Click OK.
Now any new documents that you create in Microsoft Word that use the Normal template will have the line spacing that you just chose.
this will not affect the line spacing in any of your existing documents.
More Information on How to Apply Single Line Spacing in Word
While we have focused on changing the line spacing setting in an MS Word document, for the entire document, you can also format a document so that only some of it is single spaced.
Rather than selecting the whole document, simply use your mouse to select the part of the document for which you want to change the spacing, then follow the steps above to apply a new line spacing setting to that selection.
Another thing that you can adjust that relates to line spacing is the paragraph space setting. This affects the amount of line spacing that appears before and after your paragraphs.
You can find the paragraph spacing settings by clicking the Home tab, then clicking the small Paragraph Settings button at the bottom-right corner of the Paragraph group in the ribbon. This will open the Paragraph dialog box.
There you can select line spacing options in the “Spacing” section so that you can choose the amount of space before and after a paragraph, as well as determine the line spacing type.
Frequently Asked Questions About How to Make a Document Single Spaced in Word
How do I get to the paragraph spacing menu in Word?
While this document has focused on using the Line and Paragraph Spacing drop down menu to change document spacing, you might want to adjust some other spacing options, too.
if you select the Home tab, then click the Paragraph Spacing button at the bottom-right of the Paragraph group, it will open a Paragraph dialog box.
At the top of the Paragraph dialog box, you will see Indents and Spacing, as well as Line and Page Breaks tabs.
Here you can customize the spacing before and after your paragraphs, as well as select line spacing options.
What is the Set as Default button at the bottom of the Paragraph dialog box?
If you have made a lot of changes in this dialog box and want them to apply to new documents that you create in the future, you have the option of using these settings as the default for future documents.
Simply click the Set as Default button at the bottom of the Paragraph menu, then confirm that you want to make this change.
Can I have single spaced text in just part of my Microsoft Word document?
Yes, you can have a mixture of different types of spacing in a single document.
Simply follow the steps above, but rather than selecting the entire document, select only the part of the document that you want to single space.
Then when you click the Line and Paragraph Spacing button in the Paragraph group and choose the 1.0 option, it will only affect the part of the document that’s currently highlighted.

Matthew Burleigh has been writing tech tutorials since 2008. His writing has appeared on dozens of different websites and been read over 50 million times.
After receiving his Bachelor’s and Master’s degrees in Computer Science he spent several years working in IT management for small businesses. However, he now works full time writing content online and creating websites.
His main writing topics include iPhones, Microsoft Office, Google Apps, Android, and Photoshop, but he has also written about many other tech topics as well.
Read his full bio here.