Word for Microsoft 365 Word for Microsoft 365 for Mac Word for the web Word 2021 Word 2021 for Mac Word 2019 Word 2019 for Mac Word 2016 Word 2016 for Mac Word 2013 Word 2010 Word for Mac 2011 More…Less
You can control the vertical space between the lines of text in your document by setting the line spacing. Or, you can change the vertical space between paragraphs in your document by setting the spacing before or spacing after paragraphs. You can also choose to keep lines of text together or keep paragraphs together on a page.
Change the line spacing in an entire document
-
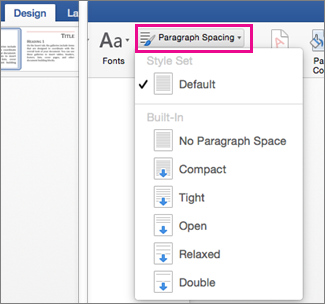
Go to Design > Paragraph Spacing.
-
Choose an option. To single space your document, select No Paragraph Space.
To return to the original settings later, go to Design > Paragraph Spacing and choose the option under Style Set. This may be Default or the name of style you’re currently using.
Change the line spacing in a portion of the document
-
Select one or more paragraphs to update. Press Ctrl + A to select all.
-
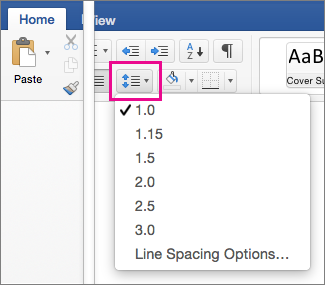
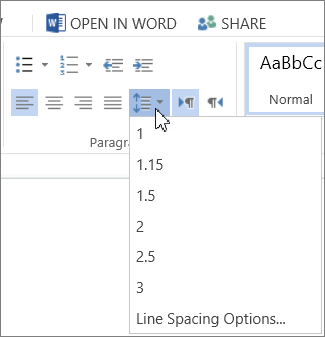
Go to Home > Line and Paragraph Spacing
-
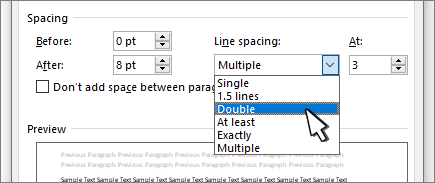
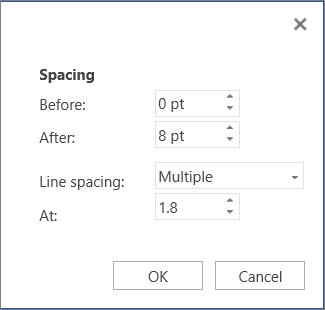
Select Line Spacing Options and choose an option in the Line spacing box.
-
Adjust the Before and After settings to change spacing between paragraphs.
-
Select OK.
For more info, see Adjust indents and spacing.
Change the line spacing in an entire document
-
Go to Design > Paragraph Spacing.
-
Choose the option you want. If you want to single space your document, choose No Paragraph Space.
This overrides the settings of the style you’re currently using. If you decide later to return to the original settings, go to Design > Paragraph Spacing and choose the option under Style Set. The option might be Default, as shown above, or it will show the name of style you’re currently using.
Change the line spacing in a portion of the document
-
Select the paragraphs you want to change.
-
Go to Home > Line and Paragraph Spacing.
-
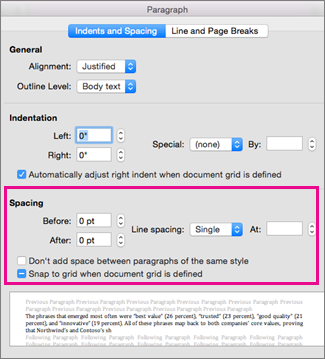
Choose the number of line spaces you want or select Line Spacing Options, and then select the options you want under Spacing.
-
To change the spacing before or after each of the paragraphs in the text you selected, click the arrow next to Before or After and enter the amount of space that you want.
-
Select OK.
-
Select the paragraph whose lines you want to keep together.
-
Go to Format > Paragraph >Line and Page Breaks.
-
Select Keep lines together.
-
Select the first of the two paragraphs that you want to keep together.
Tip: If you want to keep more than two paragraphs together, select all but the last paragraph.
-
Go to Format > Paragraph.
-
Go to Line and Page Breaks.
-
Select Keep with next.
-
Select OK.
-
Select the paragraphs you want to change, or press Ctrl+A to select everything.
-
Go to Home > Line Spacing.
-
Choose the number of line spaces you want, or select Line Spacing Options and then select the options you want in the Paragraph dialog box under Spacing:
Tip: If you want to change the spacing before or after the selected paragraphs, select the arrows in the Before or After boxes, or type a number directly.
Need more help?
There are several ways to adjust line spacing in Microsoft Word. Today’s tutorial explains the basic method using the ribbon and a more advanced method using the Paragraph dialog box.
See the Quick Tip at the bottom of this tutorial to learn how to single-space an entire document from the Paragraph dialog box.
This tutorial is available as a YouTube video showing all the steps in real time.
Watch more than 150 other document software tutorials on my YouTube channel.
The images below are from Word for Microsoft 365.The steps are the same in Word 2021, Word 2019, and Word 2016, and similar for Word 2013 and Word 2010. However, your interface may look slightly different in those older versions of the software.
Basic Method: Adjust Line Spacing from the Ribbon
- Select the Home tab in the ribbon.
- (Optional Step) Select the Show/Hide button in the Paragraph group to show paragraph break symbols and other formatting that may affect line spacing.
- Select the text with the line spacing that needs to be changed.
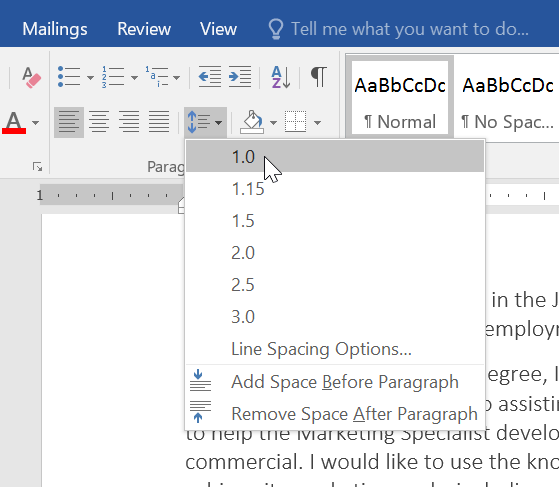
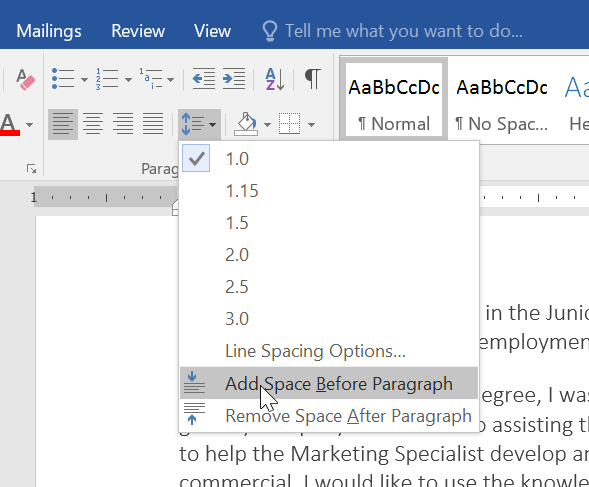
- Select the Line and Paragraph Spacing button in the Paragraph group.
- Select an option from the drop-down menu:
A. Numbers 1.0 through 3.0 add space between lines.
B. Add Space Before Paragraph adds space before paragraphs but not before the lines within them.
C. Remove Space After Paragraph removes space after paragraphs but not after the lines within them.
These three options are based on your current font size with 1.0 being the equivalent of single-spacing.
Your changes will be applied immediately.
Note that you can apply the individual line spacing (the numbers 1.0 through 3.0) and the paragraph spacing to the same text to further customize your results.
- (Optional Step) Select the Show/Hide button again to hide paragraph symbols and other formatting (see figure 2).
Now, let’s move on to an advanced method offering additional spacing options.
Advanced Method: Adjust Line Spacing from the Paragraph Dialog Box
- Select the Home tab in the ribbon (see figure 1).
- (Optional Step) Select the Show/Hide button in the Paragraph group to show paragraph break symbols and other formatting that may affect line spacing (see figure 2).
- Select the text with the line spacing that needs to be changed (see figure 3).
Pro Tip: PC users can press Ctrl + A to select the entire document if all the line spacing needs to be changed. However, this includes items you may not want to alter, including headings, tables, table titles, figure captions, tables of contents, footnotes, endnotes, and reference lists.
- Select the dialog box launcher in the Paragraph group.
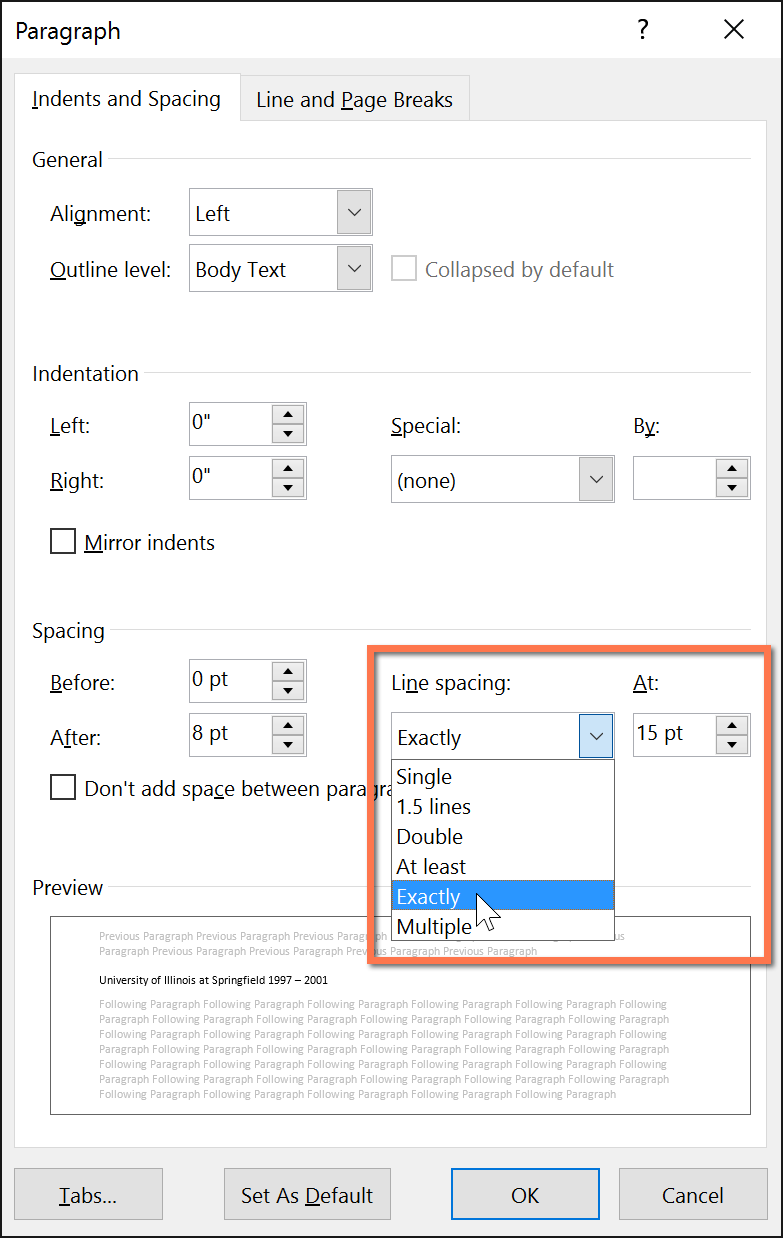
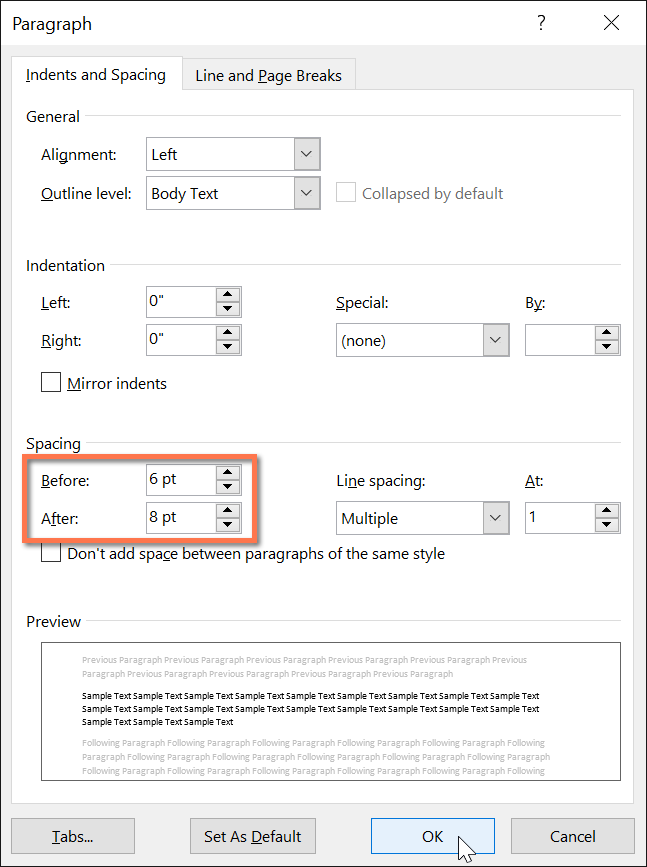
- Make changes in the Spacing section of the Paragraph dialog box:
A. The Before and After boxes represent the spaces before and after paragraphs measured in points with one point being 1/72 of an inch tall. Use the increment arrows to choose a whole number or enter a number with a decimal (e.g., 2.75) directly into the box.
B. The Line spacing drop-down menu offers six options:
1. Single—Creates single-spacing based on your current font size.
2. 1.5 Lines—Creates a space and a half as large as your current font size.
3. Double—Creates double-spacing based on your current font size.
4. At Least—Determines the minimum amount of space between lines based on the number of points entered in the At box.
5. Exactly—Creates space between lines based on the number of points entered in the At box.
6. Multiple—Creates spacing multiplied by the number entered in the At box. For example, if you enter four in the At box, your spacing will be four times as large as your current single-spacing.
C. Don’t add space between paragraphs of the same style—For many users, this will remove spaces between all paragraphs because general documents commonly have only one paragraph style.
Note that the Preview box updates as you make adjustments in the Spacing section.
- Select the OK button to close the Paragraph dialog box.
- (Optional Step) Select the Show/Hide button again to hide paragraph symbols and other formatting (see figure 2).
Quick Tip: Single-Space an Entire Document from the Paragraph Dialog Box
- Select the Home tab in the ribbon (see figure 1).
- Select the entire document. (PC users can press Ctrl + A.)
- Select the dialog box launcher in the Paragraph group (see figure 7).
- Enter 0 in the Before box in the Paragraph dialog box (see figure 8).
- Enter 0 in the After box in the Paragraph dialog box (see figure 8).
- Select Single in the Line spacing drop-down menu (see figure 8).
- Select the OK button (see figure 9).
Related Resources
How to Adjust Letter Spacing in Microsoft Word (PC & Mac)
How to Adjust the Space between Words in Microsoft Word
How to Adjust Page Margins in Microsoft Word
Updated June 25, 2022
Are you needing to reduce the space between lines in Word?
In this post we will cover how to reduce the space between the lines in a paragraph (e.g., set it back to single spacing) and how to reduce the amount of space entered every time you press ENTER to create a new paragraph.
I will also guide you in how to change the default spacing settings in Word so that all new blank documents are created with your required spacing settings already set-up.
Topics covered:
- How to change line spacing in Word
- Change Line spacing in Word (selected paragraphs only)
- Paragraph Spacing in Word
- Change paragraph spacing in Word (selected paragraphs only)
- How to change paragraph spacing in Word (whole document)
- Create a single-spaced blank Word document
- How to change default spacing in Word for ALL NEW documents
[For a super quick overview check out my YouTube video below]
How to change Line Spacing in Word
In Word, the amount of space placed between each line is controlled by the Paragraph Line spacing settings.
The image below shows the Paragraph dialog box with a Line spacing setting of Multiple at 1.08.
This means the line spacing will increase by 8% percent. The 1 = 100%, the 0.8 = 8%. An At setting of 2.5 increases the space by 250 percent (2.5 spacing).
As you type your paragraph Word will place the amount of space set in the Line
Spacing options between each line in the paragraph.
You may have expected that the gap between each paragraph line would only be single spacing in Word.
However, if the Paragraph Line Spacing settings are set to any option other than Single Spacing the paragraph will have a set amount of space between each line.
Thankfully this is very easy to fix.
Let’s use the example of changing the Line spacing in Word to Single Spacing.
The steps below cover how to change the line spacing for selected paragraphs only.
However, I’ve also included at the bottom of this article steps on how to
Create a single-spaced blank Word document.
Change Line spacing in Word (selected paragraphs only)
Step 1: Select the paragraph (or paragraphs) of text where you are wanting to change the line spacing. If you want to change the entire document press Ctrl + A (select all text) first.
Step 2: From the Home tab select Line and Paragraph Spacing. Select the spacing option you require from the list. For single spacing select 1.0 from the list.
Your selected paragraphs will now have the new line spacing setting applied.
Paragraph Spacing in Word
In Word, the amount of space placed between each paragraph is controlled by the Paragraph Before and After Settings.
These settings are applied each time you press ENTER.
Pressing Enter inserts a new paragraph AND inserts a set amount of space above and/or below the new paragraph.
However, many times this space is much bigger than you require.
You may have expected that when the ENTER key is pressed the insertion point would move directly to the paragraph below with no spacing in between.
However if, for example, the Paragraph Spacing setting is set to 8pt After, this will insert an 8pt space below every new paragraph.
So not great if you’re under pressure to get a report finished or submit a paper at Uni and you now have extremely ‘unwelcome’ gaps!
Let me guide you through how to change paragraph spacing in Word so that the gaps disappear.
Below we will cover how to remove the spacing between selected paragraphs.
I’ve also included at the bottom of this article steps on How to change paragraph spacing in Word (whole document) and how to Create a single-spaced blank Word document.
Change paragraph spacing in Word (selected paragraphs only)
If you would like to change the spacing between paragraphs for selected paragraphs only, follow the steps below.
Step 1: In the Microsoft Word document, select the paragraph (or paragraphs) where you are wanting to change the spacing.
Step 2: On the Home tab click the dialog box launcher arrow in the right corner of the Paragraph group.
Note: You can also right-click the selected paragraphs and select Paragraph from the shortcut menu.
The Paragraph dialog box will be displayed. The Spacing setting for After is most likely 8pt or 10pt. This setting is causing a gap of 8 to 10pts between each paragraph, each time ENTER is pressed.
Step 3: From the Spacing options in the After box set the value back to 0pt.
Step 4: Click OK.
You will have now updated the paragraph spacing settings for the selected paragraphs only.
Extra tip: You can also adjust the paragraph settings in the Layout tab.
How to change paragraph spacing in Word (whole document)
If you would like to change the spacing between ALL paragraphs in your document follow the steps below. This option will change your line spacing too. (see Note below).
Step 1: Press CTRL + HOME on your keyboard to ensure your insertion point (cursor) is at the very top of your document.
Step 2: From the Design tab select Paragraph Spacing.
Step 3: Select No Paragraph Space from the list.
Note: This option will modify the Normal Style in your document to be single line spacing and 0 paragraph spacing. This could impact other Styles in your document. If this option doesn’t work for you try pressing Ctrl + A (select whole document) then follow the steps for Change paragraph spacing in Word (selected paragraphs only)
Create a single-spaced blank Word document
Probably the easiest way to create a new blank document with single line spacing and no paragraph spacing in Word is to create the document using Microsoft’s Single spaced (blank) template.
You can download a copy of the template here Single spaced (blank) (office.com) or follow the steps below to access the template from within Word.
Step 1: From the File tab click New.
Step 2: n the search box type ‘single spacing’ and then click the magnifying glass to search for the Single spaced (Blank) Word template.
Step 3: Once the Single Spaced (blank) template has been found, Word will display the template on the screen. Click the template name to download it.
Step 4: On the next screen click Create.
You will now have a new blank document with the paragraph spacing and line spacing settings already set to single.
How to change default spacing in Word for ALL NEW documents
If you would like to apply new paragraph spacing and line spacing settings to ALL new documents you create, follow the steps below.
In this example we will change the defaults so that all new documents are created with single line spacing and no paragraph spacing.
Step 1: On the Home tab click the dialog box launcher arrow in the right corner of the Paragraph group.
Step 2: In the Paragraph dialog box, check that your paragraph Spacing for Before and After is set to 0pt.
Step 3: In the Line spacing area select the drop-down arrow.
Step 4: Select Single from the drop-down list.
Step 5: Once your paragraph and line spacing options are set to 0pt and Single, click Set As Default.
Step 6: Select the option All documents based on the Normal.dotm template.
This will now ensure all new documents you create from this point forward inherit your updated paragraph spacing and line spacing settings.
Step 7: Click OK and then OK again. Now you can relax and know that all new documents will now behave as you want them to.
Note: This does not change the paragraph or line spacing settings for any existing documents.
The steps above are ‘version-friendly’ and work for Word 2016, Word 2019 and Word for Microsoft Office 365.
To Sum up
Even though your Word document may have pre-set spacing between your lines and paragraphs, just follow the steps above on how to adjust line spacing in Word and how to change paragraph spacing in Word and you will have the spacing as you want it in no time.
Was this blog helpful? Let us know in the Comments below.
If you enjoyed this post check out the related posts below.
Elevate your Excel game and become a pro with our exclusive Insider Group.
Be the first to know about new tutorials, videos, and tips for Microsoft 365 products. Join us now and claim your exclusive bonus today!
Reducing the line spacing or vertical gap between lines in Word paragraphs can be done in six different ways depending on your needs.
Adjusting line spacing to put lines very close isn’t usually necessary for regular text. It becomes useful when trying some design tricks for headings, for example the title in our Millennium poster.
Here’s an example of standard line spacing (left) and very close spacing (right).

The left example has selected the top line. Selecting a line shows the amount of space Word has allocated above and below the line. That’s a clue to what needs adjustment.
There’s no one setting to check. Instead a few options to try and adjust until you get what you want.
Paragraph Break vs Line Break
A simple way to reduce the line spacing is to switch from the usual Paragraph Break (pressing Enter) for a Line Break (Shift + Enter)
A Line Break will usually make a smaller gap between two lines.
Turn ‘Show all’ on (Home | Paragraph | Show All) to see both Paragraph marks (the reverse P or pilcrow, left) and line breaks (angled arrow, right).

Change line space before/after
Open the paragraph spacing dialog from the little button at bottom right of the Paragraph section of the ribbon.
Check the Spacing, Before or After settings.
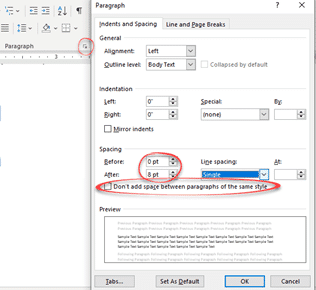
Maybe all you need to do is reduce one or both of those.
Don’t add space between paragraphs of the same style
Just below those choices is “Don’t add space between paragraphs of the same style”.
Checking that box will remove the before and after spacing, assuming both lines have the same style.
Less than single line space
If those options don’t work, it’s time to break out the major nerd tricks. Reducing below single line spacing.
To set less than 1 line space go to Paragraph | Line Spacing and choose ‘Multiple’ – yes ‘Multiple’. Sounds screwy but it works.
Set the Multiple line spacing value to less than one eg 0.7
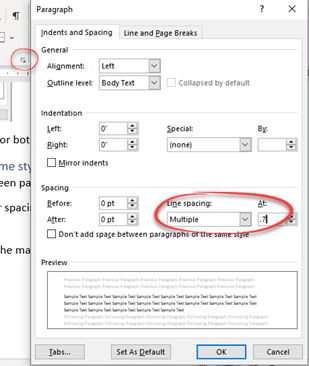
Try out various line spacing fractions until you get what you need.
There’s a catch. Reduce the line spacing too much and the letters will be cut off. Here’s an example with 0.5 line spacing.

We usually settle for something in the 0.7 to 0.8 range to get the lines close together without clipping the tops of letters.
Tables – the Word formatting friend
Tables are the secret trick for all Word nerds.
Put each line in a cell then adjust the row heights until they are as close as you need. Turn the table gridlines off and it appears as two lines of closely formatted text.

Close line spacing with a table (left, gridlines showing) and how it appears in the final document (right).
Text Box
The ultimate in line positioning is using a text box. Put one or both of the lines in a text box. Set the text box to Shape Fill | No Fill (ie transparent), no border and positioning in front of text. Drag the text box until it’s exactly where you want it. Because the box is transparent and ‘floating’ it can be overlaid on the rest of the document to give exact positioning.

Make a Word text box with rounded corners
Hidden Text, Images and objects in Word
Two ways to circle text in Word documents
Using Text Boundaries view in Word – how and why
There are lots of reasons you might want to change the amount of space between lines in a paragraph, or between paragraphs themselves. Word offers some handy preset values to use, but you can also take full control by specifying exact spacing. Here’s how.
Changing the line or paragraph spacing in a document is not something you might need to do very often. But as anyone who’s had to turn in a paper with mandatory double spacing knows, it can be the difference between passing and failing. Outside of college, you still might be faced with line spacing guidelines by employers, clients, or publishers. And even in your own documents, the right spacing can make your document more readable or highlight parts of the documents on which you want your readers to focus . If the default spacing in Word doesn’t quite hit the spot for you, Word makes it easy to change.
They are both pretty much what they sound like. Line spacing is the amount of white space between two lines of text. Paragraph spacing is the amount of white space between two paragraphs. And like using the right font or proper margins, controlling spacing is an important part of document formatting.
RELATED: How to Embed Fonts in a Microsoft Word Document
And weird as it might sound at first, both line and paragraph spacing are applied at the paragraph level. Line spacing controls how all lines of a paragraph are spaced. Paragraph spacing controls how much space comes before and after the paragraph.
In Word, line spacing is most commonly measured in multiples of whatever font size the paragraph is using. For example, say you’re using a 12 point font for the text in your paragraph. If you choose single line spacing, the space between lines will be 12 points. If you choose double spacing, that space between lines will be 24 points. However, if you want to fine tune things, you can also specify an exact point size to use.
Paragraphs work a bit differently. By default, Word adds eight points of space after a paragraph and no additional space before the paragraph, and you can change both of those values however you like.
Let’s take a closer look at how to do all this.
Use Quick Presets for Easy Changes
Word has some common preset options for you to choose from. Remember that line and paragraph spacing are both applied at the paragraph level. If you place your insertion point in a paragraph, you’ll change things for that paragraph. If you select text from multiple paragraphs, you’ll change things for all those paragraphs.
Select all of the paragraphs you want to change (or place your insertion point anywhere in a single paragraph you want to change). On the Home tab, click the “Line and Paragraph Spacing” button.
This opens a dropdown menu with presets for line spacing (at the top) and paragraph spacing (at the bottom).
The line spacing is shown in multiples. “2.0” is double spacing, “3.0” is triple spacing, and so on. Select the multiple you want, and Word applies it to the selected paragraphs. If you want to choose another spacing, or revert to the original spacing, click the “Line and Paragraph Spacing” option again and select a different multiple.
The paragraph spacing only lets you add or remove a preset spacing before the paragraph or after the paragraph. And it’s kind of weird the way it works. If you currently have no spacing before or after a paragraph, the menu shows commands for adding spacing in both locations (as shown in the previous image). If you add a space in one location, that command changes to let you remove that spacing.
So, you can only ever add or remove one level of preset spacing with the menu commands. And what are those presets? 12 points for the spacing before the paragraph and 8 points for the spacing after.
These presets work well enough for simple changes to a few paragraphs. But what if you want to change the spacing on the whole document? You could select everything (Ctrl+A) and then use these same commands, but there are some better presets available if you want to change the whole document.
Use Additional Spacing Presets for Your Whole Document
Switch over to the “Design” tab, and then click the “Paragraph Spacing” button.
Now, even though that button is labeled “Paragraph Spacing,” the changes here can apply to both paragraph and line spacing for your document. As you hover your pointer over each preset, you can see the changes reflected in your document. You’ll also see a little text bubble pop up that lets you know exactly what line and paragraph spacing options that preset will apply.
This is an “all or nothing” option, so it’ll only work for the whole document, or not at all. Here’s what the Compact, Open, and Double presets look like on identical text.
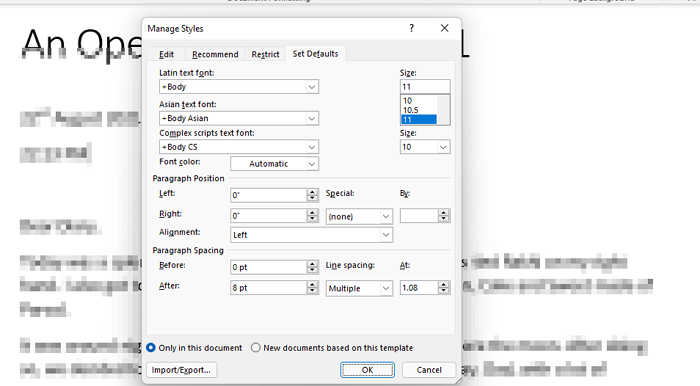
At the bottom of that “Paragraph Spacing” dropdown menu, you can also click the “Custom Paragraph Spacing” command to open the Manage Styles window.
On the “Set Defaults” tab, the tools in the “Paragraph Spacing” section let you fine tune spacing for your document. You can also choose at the bottom whether to apply your changes only in the current document, or to all new documents based on the same template.
Apply Finer Control to Paragraph and Line Spacing
If you want a little more finesse than any of these presets we’ve covered offer, you do have another option (this is Word, after all).
First, place your insertion point in the paragraph you want to change (or select multiple paragraphs, or the whole document with Ctrl+A). On the “Home” tab, click the small arrow at the bottom right of the Paragraph group.
This opens the Paragraph window. On the “Indents and Spacing” tab, in the “Spacing” section, you can apply specific adjustments to both paragraph and line spacing.
On the left, you can use the “Before” and “After” controls to specify how much space you want before and after paragraphs. You’ve also got the option to keep your paragraph spacing from affecting blocks of text that are in different styles by switching on the “Don’t add space between paragraphs of the same style” checkbox. (If you’re not sure whether you’re using different styles then you probably aren’t.)
On the right in that section, the “Line Spacing” dropdown lets you choose all those same line spacing presets we looked at before, along with some other options.
These additional options include:
- At least: This option lets you specify a minimum point size to use for line spacing and is only useful in very specific circumstances. For example, say you had one line in a paragraph that for whatever reason used a smaller font size than the other lines. Regular spacing options might make it look weird. Choose a minimum spacing can help.
- Exactly: This option lets you specify an exact point size to use between lines of the selected paragraphs.
- Multiple: This options lets you dial in a specific multiple to use for spacing. For example, if 1.5 spacing seems too tight and 2.0 seems too wide, you could try something like 1.75.
Between these three options you’ve got complete control of all your document spacing, so now you can confidently double space that term paper or wow your colleagues with a perfectly formatted report.
READ NEXT
- › How to Find and Replace Formatting in Microsoft Word
- › 8 Microsoft Word Tips for Professional Looking Documents
- › How to Remove Section and Page Breaks in Microsoft Word
- › How to Add, Edit, and Remove Tab Stops in Microsoft Word
- › How to Change Kerning in Microsoft Word
- › How to Number Paragraphs in Microsoft Word
- › What Does Shift+Enter Do in Word?
- › Windows 11 Has a New Photo Gallery in the File Explorer
To format line spacing:
- Click Format on the menu bar.
- Select Paragraph. The Paragraph dialog box appears.
- Click the Indents and Spacing tab.
- In the line spacing drop-down menu, you can select single, 1.5, or double spacing. The default is single spacing.
- Click OK.
Contents
- 1 How many points is 1.5 line spacing?
- 2 How do you do 1.5 spacing on pages?
- 3 What is the shortcut key for 1.5 line spacing?
- 4 Is 1.5 the same as double spacing?
- 5 How do you do spacing on Microsoft Word?
- 6 How do you do spacing on Word?
- 7 How do I change spacing in Word app?
- 8 How do you add a space after a paragraph in Word?
- 9 What is single spacing in Word?
- 10 What is L Ctrl?
- 11 What does Ctrl tab do in Word?
- 12 How do I make 1.5 spacing in InDesign?
- 13 How do I create a custom line spacing?
- 14 What is APA line spacing?
- 15 Is 1.0 single spacing?
- 16 How do you change line spacing in Word 2007?
- 17 How do I fix the spacing between words in Word justified?
- 18 How do I fix the spacing between words in Word for Mac?
- 19 How do you put a space between two words in CSS?
- 20 What is justified in Word?
How many points is 1.5 line spacing?
The first is set to “1.5 lines” (which is 21 points per line). The other is set to “Exactly” 21.
How do you do 1.5 spacing on pages?
Set line and paragraph spacing in Pages on Mac
- Select one or more paragraphs, or click the text box or shape with the text you want to change.
- In the Format sidebar, click the Style button near the top.
- Click the pop-up menu to the right of Spacing, then choose an option.
What is the shortcut key for 1.5 line spacing?
Ctrl+5
Align and format paragraphs
| To do this | Press |
|---|---|
| Apply 1.5-line spacing to the paragraph. | Ctrl+5 |
| Add or remove space before the paragraph. | Ctrl+0 (zero) |
| Enable AutoFormat. | Ctrl+Alt+K |
| Apply the Normal style. | Ctrl+Shift+N |
Is 1.5 the same as double spacing?
Word Right-click in the text and select Paragraph from the menu. Go to the menu under Line spacing . Exactly is best—enter a fixed measurement. Single , 1.5 lines , and Double are equivalent to about 117%, 175%, and 233% line spacing, contrary to what their names suggest.
How do you do spacing on Microsoft Word?
Go to Home > Line and Paragraph Spacing. Select Line Spacing Options, and then choose the options you want under Spacing. To change the spacing before or after the selected paragraphs, select the arrow next to Before or After and enter the amount of space that you want. Select Set as Default.
Change the spacing between characters
- Select the text that you want to change.
- On the Home tab, click the Font Dialog Box Launcher, and then click the Advanced tab.
- In the Spacing box, click Expanded or Condensed, and then specify how much space you want in the By box.
How do I change spacing in Word app?
Change the spacing in a Word document on a mobile device
- In your Word document, select the text you want to change.
- On your iPad, tap the Home tab, and then tap the Line Spacing icon.
- Tap the Line Spacing menu and choose the line spacing you want, from 1.0 to 3.0.
How do you add a space after a paragraph in Word?
Select the paragraph or paragraphs you want to format. On the Home tab, click the Line and Paragraph Spacing command. Click Add Space Before Paragraph or Remove Space After Paragraph from the drop-down menu.
What is single spacing in Word?
Word allows you to customize the line spacing to be single spaced (one line high), double spaced (two lines high), or any other amount you want. The default spacing in Word is 1.08 lines, which is slightly larger than single spaced.
What is L Ctrl?
Alternatively referred to as Control+L and C-l, Ctrl+L is a keyboard shortcut whose function differs depending on the program being. For example, in Microsoft Word, Ctrl+L is used to align text with the left edge of a document (margin).Ctrl+L in Excel and other spreadsheet programs.
What does Ctrl tab do in Word?
Alternatively referred to as Control+Tab and C-tab, Ctrl+Tab is a keyboard shortcut most often used to switch between open tabs in a browser.
How do I make 1.5 spacing in InDesign?
Thus, 12/14.4 (point size/leading) default of Adobe InDesign is what is commonly accepted as single spacing. 1.5x spacing would be 12/21.6 (point size/leading) and 2x spacing would be 12/28.8 (point size/leading).
How do I create a custom line spacing?
Change the line spacing in a portion of the document
- Select one or more paragraphs to update.
- Go to Home > Line and Paragraph Spacing.
- Select Line Spacing Options and choose an option in the Line spacing box.
- Adjust the Before and After settings to change spacing between paragraphs.
- Select OK.
What is APA line spacing?
In general, double-space all parts of an APA Style paper, including the abstract; text; block quotations; table and figure numbers, titles, and notes; and reference list (including between and within entries). Do not add extra space before or after paragraphs. Double-space the rest of the title page.
Is 1.0 single spacing?
Line spacing is the distance between lines. In earlier versions of Word, the default line spacing distance is “1.0,” or single-spacing, which stacks lines closely together with minimal space between. The amount of that space varies depending on the font used.
How do you change line spacing in Word 2007?
Select the text you want to format. Click the Line spacing command in the Paragraph group on the Home tab. Select a spacing option.
The Paragraph dialog box appears.
- Use the Line spacing drop-down menu to select a spacing option.
- Modify the before and after points to adjust line spacing as needed.
- Click OK.
How do I fix the spacing between words in Word justified?
Click the “Home” tab and then select the “Distributed” button in the Paragraph group. Alternatively, press “Ctrl-Shift-J.” This applies a full justification effect that evenly distributes spaces in both words and characters.
How do I fix the spacing between words in Word for Mac?
Change Default Font and Spacing in Mac Word
- Click on File and Style….
- Select Normal and click Modify….
- Change your font, pt, line spacing, etc. (i.e. I changed the Font to Times New Roman, 12 pt, and line spacing to single.) Click OK when done.
- Click Yes when prompted.
How do you put a space between two words in CSS?
You can wrap your text in a p tag, and you can add a margin to that after making it inline-block. Alternatively, you can make the container a flexbox, and use justify-content: space-between; but you’ll need to group each icon with its respective text inside another div or span.
What is justified in Word?
When you justify text in Word, you give your text straight edges on both sides of the paragraph. Justifying extends each line of your text to the left and right margins.
Lesson 9: Line and Paragraph Spacing
/en/word/indents-and-tabs/content/
Introduction
As you design your document and make formatting decisions, you will need to consider line and paragraph spacing. You can increase spacing to improve readability and reduce it to fit more text on the page.
Optional: Download our practice document.
Watch the video below to learn how to adjust line and paragraph spacing in your document.
Line spacing
Line spacing is the space between each line in a paragraph. Word allows you to customize the line spacing to be single spaced (one line high), double spaced (two lines high), or any other amount you want. The default spacing in Word is 1.08 lines, which is slightly larger than single spaced.
In the images below, you can compare different types of line spacing. From left to right, these images show default line spacing, single spacing, and double spacing.
Line spacing is also known as leading (pronounced to rhyme with wedding).
To format line spacing:
- Select the text you want to format.
- On the Home tab, click the Line and Paragraph Spacing command, then select the desired line spacing.
- The line spacing will change in the document.
Adjusting line spacing
Your line spacing options aren’t limited to the ones in the Line and Paragraph Spacing menu. To adjust spacing with more precision, select Line Spacing Options from the menu to access the Paragraph dialog box. You’ll then have a few additional options you can use to customize spacing.
- Exactly: When you choose this option, the line spacing is measured in points, just like font size. For example, if you’re using 12-point text, you could use 15-point spacing.
- At least: Like the the Exactly option, this lets you choose how many points of spacing you want. However, if you have different sizes of text on the same line, the spacing will expand to fit the larger text.
- Multiple: This option lets you type the number of lines of spacing you want. For example, choosing Multiple and changing the spacing to 1.2 will make the text slightly more spread out than single-spaced text. If you want the lines to be closer together, you can choose a smaller value, like 0.9.
Paragraph spacing
Just as you can format spacing between lines in your document, you can adjust spacing before and after paragraphs. This is useful for separating paragraphs, headings, and subheadings.
To format paragraph spacing:
In our example, we’ll increase the space before each paragraph to separate them a bit more. This will make it a little easier to read.
- Select the paragraph or paragraphs you want to format.
- On the Home tab, click the Line and Paragraph Spacing command. Click Add Space Before Paragraph or Remove Space After Paragraph from the drop-down menu. In our example, we’ll select Add Space Before Paragraph.
- The paragraph spacing will change in the document.
From the drop-down menu, you can also select Line Spacing Options to open the Paragraph dialog box. From here, you can control how much space there is before and after the paragraph.
You can use Word’s convenient Set as Default feature to save all of the formatting changes you’ve made and automatically apply them to new documents. To learn how to do this, read our article on Changing Your Default Settings in Word.
Challenge!
- Open our practice document.
- Select the the date and the address block. This starts with April 13, 2016, and ends with Trenton, NJ 08601.
- Change the spacing before the paragraph to 12 pt and the spacing after the paragraph to 30 pt.
- Select the body of the letter. This starts with I am exceedingly and ends with your consideration.
- Change the line spacing to 1.15.
- When you’re finished, your page should look like this:
/en/word/lists/content/
In the old days, getting a document written up neatly involved having a medieval monk painstakingly copy everything out by hand in elaborate illuminated script.
Thankfully, now we have word processors, which makes life much simpler. As well as eliminating the need to hire a scribe, programs like Microsoft Word provide a range of formatting options to make sure your work is easy to read.
In this post, for example, we take a look at how to set line spacing in Microsoft Word.
What is Line Spacing? Why Does it Matter?
Line spacing is the gap between lines of text in your document. College students are often told to use double spacing (i.e., a gap twice the height of the font) to enhance the clarity of their written work and so markers have space to leave feedback on a paper.
How to Set Line Spacing
Adjusting the spacing in a document is reassuringly easy thanks to the pre-defined settings in Microsoft Word (instructions apply to Word 2007 onwards):
- Select the text you want to adjust
- Find the “Paragraph” section on the “Home” tab
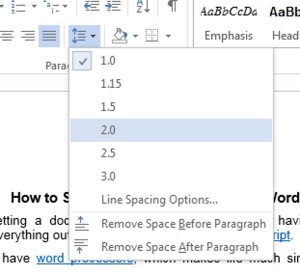
- Click on the line and paragraph spacing button to open the dropdown menu
- Select the desired line spacing (standard options range from 1.0 to 3.0)
Taking Shortcuts
If you find yourself regularly adjusting the spacing in your work, you could save time by using the keyboard shortcuts in Microsoft Word. For line spacing, these are:
|
Line Spacing |
PC |
Mac |
|
1.0 |
Ctrl + 1 |
Command + 1 |
|
1.5 |
Ctrl + 5 |
Command + 5 |
|
2.0 |
Ctrl + 2 |
Command + 2 |
To set the spacing in your document this way, simply select the passage(s) you want to modify and use the shortcut for the spacing desired. To select all text in the document, use “Ctrl + A” on PC or “Command + A” on Mac.
Find this useful?
Subscribe to our newsletter and get writing tips from our editors straight to your inbox.
Download PC Repair Tool to quickly find & fix Windows errors automatically
Readability is a crucial factor when it comes to preparing documents. If the space between two lines, aka Line Spacing, is too less, it will be hard to read. If it’s too much, there will be too much distraction. When reading the newspaper, you must have noticed that space between lines is way too little than what you read online. Saving space is crucial for newspapers because of the cost, while it is not so much when it comes to online reading. That said, in this post, we will share how you can change line spacing in Microsoft Word.
What is Double Spacing?
Along with other options, one popular way to increase space is Double Spacing. It instantly doubles the space between the lines of the document. In simple words, with Double Spacing, you add a full line of space between each line of writing. Depending on the amount of text, it definitely helps you to increase readability.
In Microsoft Office 365, you can instantly increase the line space with predefined options.
- Open the Word document
- Click on the Design tab
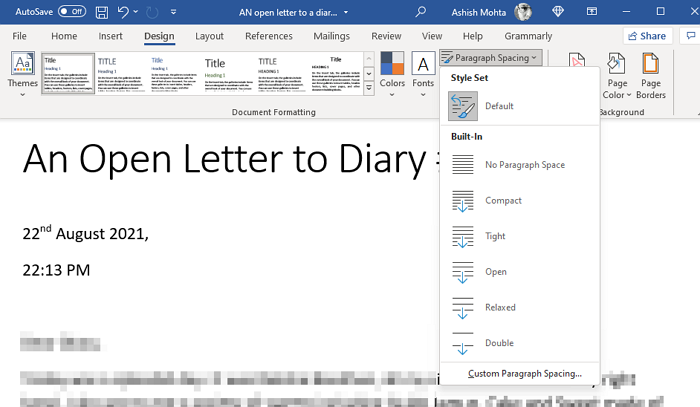
- Locate Paragraph Spacing under Document formatting, and click on it.
- You have the following options
- Default,
- No Paragraph Space,
- Compact,
- Tight,
- Open,
- Relaxed, and
- Double Space
- Select one.
When you choose any of the options, it is applied to the entire document. If you want to apply only to a certain paragraph, you can select it and apply the change.
Custom Line Spacing
If the default line spacing doesn’t work, you can create your line spacing. It is specifically useful when you need to print or when that’s how you need the document to be. It can specifically be helpful when there is a lot of text, and you do not want many pages, even if they are going to be used on the computer.
Go to Design > Paragraph Spacing > Custom Paragraph Spacing. It will open the Manage Styles windows where you can change the spacing for before and after fir paragraphs, and then you can also change line spacing as well.
You can then choose to apply the setting for the current document or new documents for the current template.
Office 2007-2010
If you are using an older version of Office, then you need to follow these steps:
Double-space the entire document
- On the Home tab, in the Styles group, right-click Normal and then click Modify.
- Under Formatting, click the Double Space button, and then click OK.
- Formatting for the entire document changes to double spacing.
Double-space the selected text
- Select the text that you want to change.
- On the Home tab, in the Paragraph group, click Line and Paragraph Spacing (Line Spacing in Word 2007)
- Click 2.0 and apply the changes.
What Is Standard Double Spacing in Word?
Microsoft Word defaults to a spacing of 1.08 lines, which is slightly larger than single-spaced. Within paragraphs, a space-and-a-half is best for line spacing, according to UX standards. Approximately 150 percent is 1.5 times the size of the font.
I hope the post was easy to follow, and you were able to clearly understand the concept of Line Spacing and how to use it in your document.
Ashish holds a Bachelor’s in Computer Engineering and is a veteran Windows and Xbox user. He has work experience as a Database and Microsoft.NET Developer. He has been a Microsoft MVP (2008-2010) and excels in writing tutorials to improve the day-to-day experience with your devices.


