
Word for Microsoft 365 Word 2021 Word 2019 Word 2016 Word 2013 Word 2010 Word 2007 More…Less
You can often improve the look of your document by keeping certain words and paragraphs together on the page or across page breaks. Also, you can use hyphenation to improve overall readability.
Word automatically breaks the text at a space or a hyphen at the end of a line. To keep two words or a hyphenated word together on one line, you can use a nonbreaking space or nonbreaking hyphen instead of a regular space or hyphen.
-
Click where you want to insert the nonbreaking space.
-
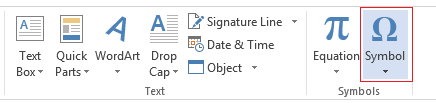
On the Insert tab, in the Symbols group, click Symbol.

-
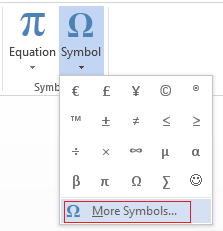
In the box that opens, click More Symbols.
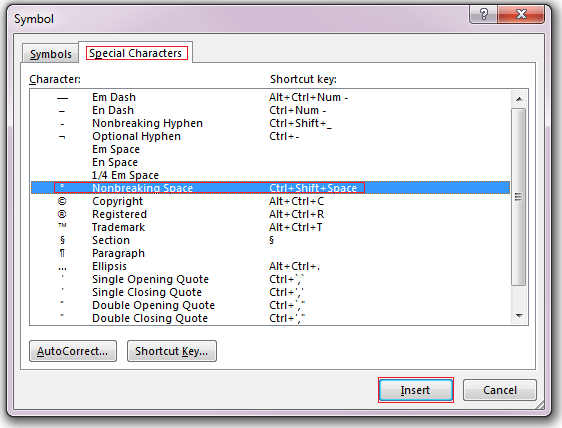
-
In the Symbol dialog box, on the Special Characters tab, click the Nonbreaking Space row to highlight it, and then click Insert.
-
Click Close.
Tip: You can also use the keyboard shortcut. Click where you want to insert the nonbreaking space, and press Ctrl+Shift+Spacebar.
Sometimes you want a hyphenated word to stay together on one line, without it breaking across lines.
-
Click where you want to insert the nonbreaking hyphen.
-
On the Insert tab, in the Symbols group, click Symbol.
-
In the box that opens, click More Symbols.
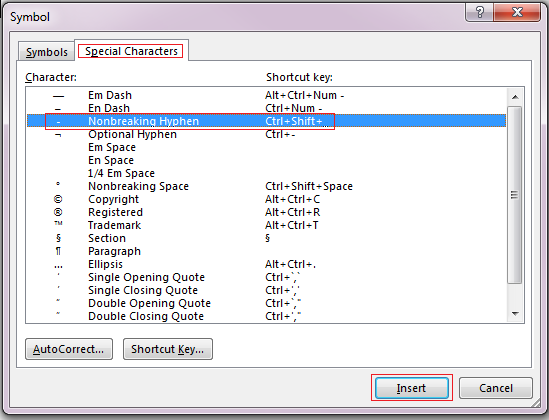
-
In the Symbol dialog box, on the Special Characters tab, click the Nonbreaking Hyphen row to highlight it, and then click Insert.
-
Click Close.
Tip: You can also use the keyboard shortcut. Click where you want to insert the nonbreaking hyphen, and press Ctrl+Shift+Minus Sign.
Word automatically breaks paragraphs at the end of a page, so a paragraph that started on one page continues on to the next page. To keep the whole paragraph on the same page, follow these steps.
-
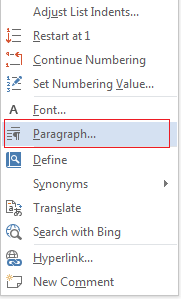
Right-click the paragraph that you want to keep together. In the box that opens, select Paragraph.
-
In the Paragraph dialog box, click the Line and Page Breaks tab.
-
In the Pagination section, select the Keep lines together check box, and click OK.
If two consecutive paragraphs or a subhead and a paragraph are closely related, you might want to keep them on the same page.
-
Right-click the paragraph or subhead that you want to keep with the content that follows it. In the box that opens, select Paragraph.
-
In the Paragraph dialog box, click the Line and Page Breaks tab.
-
In the Pagination section, select the Keep with next check box, and click OK.
Tip: It’s best not to add additional line breaks between your paragraphs because Word interprets each line break as a beginning of a new paragraph, and page breaks might not occur properly. If you want spaces between paragraphs, use the Paragraph Spacing controls. For more information, see Change spacing between paragraphs.
If a paragraph has a page break in the middle so that only the last line appears at the top of the following page, this lonely line is called a “widow.” If, on the other hand, a paragraph has a page break in the middle so that only the first line appears at the bottom of a page while the rest of the paragraph appears on the next page, this lonely line is called an “orphan.”
If you want to avoid widow and orphan lines in your document, follow these steps.
-
Right-click the paragraph in which you want to avoid widows and orphans. In the box that opens, select Paragraph.
-
Click the Line and page breaks tab.
-
In the Pagination section, select the Widow/Orphan control check box.
-
Click OK.
If a word is too long to fit at the end of a line, Microsoft Office Word 2007 moves the word to the beginning of the next line instead of hyphenating it. However, you can use the Hyphenation feature to automatically or manually hyphenate the text, insert optional or nonbreaking hyphens, and set the maximum amount of space allowed between a word and the right margin without hyphenating the word.
With automatic hyphenation, Office Word 2007 automatically inserts hyphens where they are needed. If you edit the document later and change line breaks, Office Word 2007 will re-hyphenate the document.
-
Make sure that no text is selected.
-
On the Page Layout tab, in the Page Setup group, click Hyphenation, and then click Automatic.
An optional hyphen is a hyphen that is used to control where a word or phrase breaks if it falls at the end of a line. For example, you can specify that the word «nonprinting» breaks as «non-printing» instead of «nonprint-ing.» When you insert an optional hyphen in a word that is not at the end of a line, the hyphen will be visible only if you turn on Show/Hide.
-
On the Home tab, in the Paragraph group, click Show/Hide.
-
Click in the word where you want to insert the optional hyphen.
-
Press CTRL+HYPHEN.

To automatically hyphenate part of a document, do the following:
-
Select the text that you want to hyphenate.
-
On the Page Layout tab, in the Page Setup group, click Hyphenation, and then click Automatic.
When you manually hyphenate text, Office Word 2007 searches for text to hyphenate. After you indicate where you want to hyphenate the text, Word inserts an optional hyphen. If you later edit the document and change line breaks, Office Word 2007 displays and prints only the optional hyphens that still fall at the end of lines. Word doesn’t re-hyphenate the document.
-
Select the text you want to hyphenate.
-
On the Page Layout tab, in the Page Setup group, click Hyphenation, and then click Manual.
-
If Office Word identifies a word or phrase to hyphenate, do one of the following:
-
To insert an optional hyphen in the location that Office Word proposes, click Yes.
-
To insert an optional hyphen in another part of the word, move the insertion point to that location, and then click Yes.
-
Nonbreaking hyphens prevent hyphenated words, numbers, or phrases from breaking if they fall at the end of a line of text. For example, you can prevent 555-0123 from breaking; instead, the entire item will move to the beginning of the next line.
-
Click where you want to insert a nonbreaking hyphen.
-
Press CTRL+SHIFT+HYPHEN.
The hyphenation zone is the maximum amount of space Office Word 2007 allows between a word and the right margin without hyphenating the word. You can change the hyphenation zone to make it wider or narrower. To reduce the number of hyphens, make the hyphenation zone wide. To reduce the raggedness of the right margin, make the hyphenation zone narrower.
-
On the Page Layout tab, in the Page Setup group, click Hyphenation, and then click Hyphenation Options.
-
In the Hyphenation zone, type the amount of space you want.
You can remove all automatic hyphenation and each instance of manual hyphenation, such as optional and nonbreaking hyphens.
-
To remove automatic hyphenation, on the Page Layout tab, in the Page Setup group, click Hyphenation, and then click None.

-
To remove manual hyphenation, on the Home tab, in the Editing group, click Replace.
-
If you don’t see the Special button, click More.
-
Click Special, and then click either Optional Hyphen to remove manual hyphens, or Nonbreaking Hyphen to remove nonbreaking hyphens.
-
Leave the Replace box empty.
-
Click Fix Next, Replace, or Replace All.
See Also
Line and page breaks
Insert a page break
Change spacing between paragraphs
Need more help?
Asked
8 years, 3 months ago
Viewed
3k times
While copying from Outlook and then trying to paste it in MS Word, the pasted email in MS Word appeared detestably as follows, with the trailing blank spaces:
(I just took some arbitrary text bookmarked in my browser; the following isn’t the actual email)
So, as usual, there is a tradeoff: With leasing, you will pay a
premium over your lifetime in exchange for a lower monthly payment and very
few concerns about reliability. With an outright
purchase, you’re going to come out ahead if you can commit to proper
maintenance and resist the urge to constantly upgrade.
How can I easily and swiftly delete the blank spaces so that each line is filled completely? Manual deletion of the ensuing blank space, line by line, is unproductive. The above should appear as such:
So, as usual, there is a tradeoff: With leasing, you will pay a premium over your lifetime in exchange for a lower monthly payment and very few concerns about reliability. With an outright purchase, you’re going to come out ahead if you can commit to proper maintenance and resist the urge to constantly upgrade.
asked Jan 12, 2015 at 22:30
2
Search and replace.
1) First replace all paragraph marks with tildes.
Search:
^p
Replace:~
2) Next, change two sequential tildes to a paragraph mark.
Search:
~~
Replace:^p
3) Last, change remaining tildes to spaces.
Search:
~
Replace:
(type a single space in the Replace field)
All done!
If you have a single paragraph, you can skip step 2.
![]()
answered Jan 12, 2015 at 23:04
![]()
yosh myosh m
2,2163 gold badges25 silver badges26 bronze badges
6
Stop Words from Breaking Across Lines or Pages in Microsoft Word
by Avantix Learning Team | Updated March 14, 2021
Applies to: Microsoft® Word® 2010, 2013, 2016, 2019 and 365 (Windows)
There are many ways to stop words from splitting across lines in Microsoft Word. If Word is inserting hyphens in a word you don’t want to break across lines, you can turn off automatic hyphenation for the paragraph. You can also keep words or characters (numbers or letters) together in Microsoft Word using nonbreaking spaces or nonbreaking hyphens.
To view nonbreaking spaces, nonbreaking hyphens and paragraph marks:
- Click the Home tab in the Ribbon.
- Click the Show/Hide ¶ in the Paragraph group.
You can turn off the symbols by clicking on the same button.
Recommended article: 14 Timesaving Microsoft Word Selection Shortcuts to Quickly Select Text
Do you want to learn more about Microsoft Word? Check out our virtual classroom or live classroom Word courses >
Turning off automatic hyphenation
In Microsoft Word, automatic hyphenation is turned on by default for normal paragraphs (using the Normal style) so Word may insert hyphens and break words across lines.
To stop words from splitting across lines in a paragraph or paragraphs by turning off automatic hyphenation:
- Select the paragraph or paragraphs.
- Click the Home tab in the Ribbon.
- Click the dialog box launcher on the bottom right corner of the Paragraph group. The Paragraph dialog box appears.
- Click Line and Page Breaks.
- Select or check Don’t Hyphenate.
- Click OK.
Below is the Paragraph dialog box with the option to turn off hyphenation:

You can also turn off automatic hyphenation for multiple paragraphs by editing the style for those paragraphs (for example, the Normal style).
Turning off automatic hyphenation for all new documents
If you prefer to turn off automatic hyphenation for new documents, you can change the default settings.
To turn off automatic hyphenation for new documents based on the default Normal template:
- Create a new blank document (this should be based on the Normal template)..
- Click the Home tab in the Ribbon.
- Click the dialog box launcher on the bottom right corner of the Paragraph group. The Paragraph dialog box appears.
- Click Line and Page Breaks.
- Select or check Don’t Hyphenate.
- Click Set As Default. A dialog box appears.
- Select All documents based on the Normal.dotm template. Note that you can select the current document only.
- Click OK twice.
Stop words from breaking across lines using nonbreaking spaces
If you want words or characters to stay together on the same line, you can use nonbreaking spaces instead of standard spaces.
For example, it is unlikely that you would want the following to break across lines or pages:
416 736 2288
3 M
To insert a nonbreaking space between two words or characters using a keyboard shortcut:
- Position the cursor between the two words or characters you want to keep together (there should be no space between these characters).
- Press Ctrl + Shift + Spacebar. Word inserts a nonbreaking space.
To insert a nonbreaking space between two words or letters using the Insert Symbol dialog box:
- Position the cursor between the two words or characters you want to keep together (there should be no space between these characters).
- Click the Insert tab in the Ribbon.
- Click Insert Symbol and then More Symbols in the drop-down menu. A dialog box appears.
- Select the Special Characters tab.
- Select Nonbreaking space and click Insert.
- Click Close. Word inserts a nonbreaking space.
The Insert Symbol dialog box has two tabs (a tab for Symbols and a tab for Special Characters):

Stop words from breaking across lines using nonbreaking hyphens or dashes
You can also use nonbreaking hyphens or dashes to keep words or characters together.
For example, it is unlikely that you would want the following to break across lines or pages:
co-ordinator
416-736-9943
To insert a nonbreaking hyphen between two words or characters using a keyboard shortcut:
- Position the cursor between the two words or characters you want to keep together (there should be no space between these characters).
- Press Ctrl + Shift + Underscore (_). Word inserts a nonbreaking hyphen.
To insert a nonbreaking hyphen between two words or characters using the Insert Symbol dialog box:
- Position the cursor between the two words or characters you want to keep together (there should be no space between these characters).
- Click the Insert tab in the Ribbon.
- Click Insert Symbol and then More Symbols in the drop-down menu. A dialog box appears.
- Select the Special Characters tab.
- Select Nonbreaking hyphen and click Insert.
- Click Close. Word inserts a nonbreaking hyphen.
It’s common to use nonbreaking spaces and hyphens to keep words or characters together in Microsoft Word and in documents in other programs.
Subscribe to get more articles like this one
Did you find this article helpful? If you would like to receive new articles, join our email list.
More resources
How to Insert an Em or En Dash in Microsoft Word
How to View Word Count in Microsoft Word (4 Ways)
How to Find and Replace in Word (and Use Wildcards)
How to Insert a Check Mark or Tick Mark in Word (5 Ways)
Microsoft Word Tricks to Keep Text Together (Paragraphs, Lines or Words)
Related courses
Microsoft Word: Intermediate / Advanced
Microsoft Excel: Intermediate / Advanced
Microsoft PowerPoint: Intermediate / Advanced
Microsoft Visio: Introduction
VIEW MORE COURSES >
Our instructor-led courses are delivered in virtual classroom format or at our downtown Toronto location at 18 King Street East, Suite 1400, Toronto, Ontario, Canada (some in-person classroom courses may also be delivered at an alternate downtown Toronto location). Contact us at info@avantixlearning.ca if you’d like to arrange custom instructor-led virtual classroom or onsite training on a date that’s convenient for you.
Copyright 2023 Avantix® Learning
Microsoft, the Microsoft logo, Microsoft Office and related Microsoft applications and logos are registered trademarks of Microsoft Corporation in Canada, US and other countries. All other trademarks are the property of the registered owners.
Avantix Learning |18 King Street East, Suite 1400, Toronto, Ontario, Canada M5C 1C4 | Contact us at info@avantixlearning.ca
While typing word documents, you usually separate words and sentences by pressing the Space key (also known as Spacebar), which inserts a regular general-purpose space character. However, some Microsoft Word documents may contain other kinds of spaces. You can discover those white-space symbols during editing the document but not on printing.
To show non-printable and white-space symbols in Microsoft Word, click the button button Show/Hide ¶ (or pressing Ctrl+* or Ctrl+Shift+8):

You will be able to see the following marks for white-space characters:
1) A little dot between words represents a normal space (also called word space):

A general rule of publishing is to use only one normal space between words (the only exception is a pre-formatted text, e.g., code listings). If you need to align text at fixed positions of the line, use
tabs and tab stops.
2) A degree symbols between word represents a nonbreaking space (also called non-breaking space, no-break space, non-breakable space (NBSP), hard space, or fixed space) that prevents text wrapping at the end of the line. A Nonbreaking space in the Word document looks like:
![]()
A general rule of publishing is to use non-breaking spaces between words of
organization and person names, postal addresses, etc.
Some popular rules:
- Insert a nonbreaking space between the copyright symbol and the following year(s) to ensure they will not end up on different lines or pages. For example:

- Insert a nonbreaking space before and after ellipses (also called a suspension point, points of ellipsis, periods of ellipsis, or even «dot-dot-dot» is a sequence of three dots used to indicate an omission in quoted material). For example:

3) A little dot with varying gaps before and after the dot represents Em Space and En Space. These spaces have different widths on printing:
- Em space is a space with the width of the lowercase m character.
- En space is a space with the width of the lowercase n character.
4) A vertical bar between words represents a ¼ Em space (also known as mid-space) is a space with the ¼ width of the lowercase m character:
![]()
If you want to see only space marks and no other non-printable symbols, do the following:
1. On the File tab, click the Options button:

2. In the Word Options dialog box, on the Display tab, under Always show these formatting marks on the screen, check or uncheck the Spaces option:

See also this tip in French:
Types d’espaces spéciaux dans les documents Word.
 Please Note:
This article is written for users of the following Microsoft Word versions: 2007, 2010, 2013, 2016, 2019, and Word in Microsoft 365. If you are using an earlier version (Word 2003 or earlier), this tip may not work for you. For a version of this tip written specifically for earlier versions of Word, click here: Inserting a Non-Breaking Space.
![]()
Written by Allen Wyatt (last updated May 22, 2021)
This tip applies to Word 2007, 2010, 2013, 2016, 2019, and Word in Microsoft 365
When Word calculates line width and wraps text to the next line, it tries to break the line at either a space or a hyphen. Sometimes, however, you may not want Word to break a line at a certain space. For instance, you may want to make sure that two adjacent words appear on the same line as each other.
The answer is to use non-breaking spaces instead of regular spaces when you don’t want Word to break a line at a certain space. To do this, hold down the Ctrl and Shift keys as you press the Spacebar. Word will then not break the line at that point.
An alternative way of inserting a non-breaking space is to follow these steps:
- Display the Insert tab of the ribbon.
- 2 At the very right side of the ribbon, in the Symbols group, click Symbol and then More Symbols. Word displays the Symbol dialog box.
- Click on the Special Characters tab. (See Figure 1.)
- Highlight the Nonbreaking Space character.
- Click on Insert.
- Close the dialog box by clicking on Cancel.
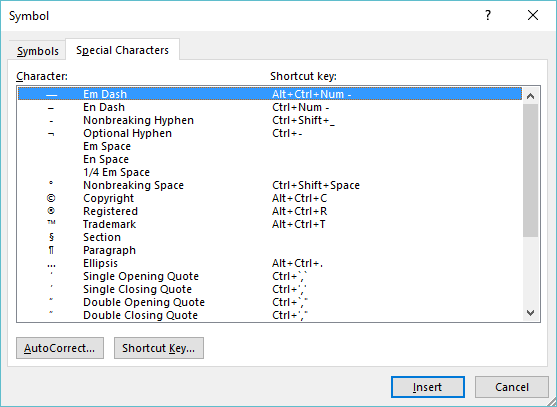
Figure 1. The Special Characters tab of the Symbol dialog box.
WordTips is your source for cost-effective Microsoft Word training.
(Microsoft Word is the most popular word processing software in the world.)
This tip (13071) applies to Microsoft Word 2007, 2010, 2013, 2016, 2019, and Word in Microsoft 365. You can find a version of this tip for the older menu interface of Word here: Inserting a Non-Breaking Space.
Author Bio
With more than 50 non-fiction books and numerous magazine articles to his credit, Allen Wyatt is an internationally recognized author. He is president of Sharon Parq Associates, a computer and publishing services company. Learn more about Allen…
MORE FROM ALLEN
Identifying Missing Numbers in a Consecutive Series
If you have a series of consecutive numbers in a column, you may want to know if it really is consecutive. (In other …
Discover More
Randomly Resetting Numbering
Have you ever been frustrated by the automatic numbering feature in Word? You are not alone. Fortunately, there are a few …
Discover More
Including Section Numbers in an Index
When you use Word to create your index, you’ll normally only include a page number in the index. If you want to create an …
Discover More
More WordTips (ribbon)
Easily Changing Username and Initials
Word uses usernames and initials to mark changes made while Track Changes is turned on. If you want to change those …
Discover More
Inserting Dashes between Letters in Words
Sometimes typing isn’t straight typing. Sometimes you need to perform special tasks, such as putting dashes between …
Discover More
Adding Hyphens to Phrases
Editing text to turn regular words into hyphenated phrases can be a real bother. The chore can become a breeze if you …
Discover More

on
August 6, 2018, 6:00 AM PDT
Office Q&A: How to handle end-of-sentence spacing in Microsoft Word
Whether you prefer one space or two at the end of sentences, Word can help you apply that preference consistently.

Most of us no longer include two spaces following the period that denotes the end of a sentence. Whether printing or displaying a document online, the two spaces are no longer necessary for readability. Graham likes two spaces, and Microsoft Word can accommodate him, to an extent. In this article, I’ll show you Word’s grammar alert that visually identifies the wrong number of spaces. Then, I’ll show you how to replace the one space with two or two spaces with one using Word’s Replace feature.
I’m using Office 365 (Word 2016 desktop), but this article applies to older versions. You won’t need a demonstration file; type a few sentences if you want to follow along. You can’t set options in the browser, nor does it support the grammar space option. I won’t discuss whether the one- or two-space decision is right or wrong; in my opinion, it’s up to the document’s creator.
Use grammar alert
There are two grammar settings you might want to know about if the spacing after the period character matters to you:
- one space
- two spaces
These are self-explanatory, but they might not work as expected. A third option, don’t check, needs no further explanation.
SEE: Windows spotlight: 30 tips and tricks for power users (Tech Pro Research)
The settings don’t undo or redo anything; instead, the two settings display a grammar error when you don’t type the expected number, as shown in Figure A. As you can see, when the number of spaces doesn’t match the setting, Word displays a red dotted line below the spaces. (To see the space and paragraph characters, click Show/Hide in the Paragraph group on the Home tab.) This setting is a visual alert, not an automated fix.
Figure A

Word alerts you to the spacing error.
To access this setting, do the following:
- Click the File tab.
- Choose Options in the left pane.
- Choose Proofing in the left pane.
- Thumb down to the When correcting spelling and grammar in Word section.
- Click the Settings button to the right of Grammar & Refinements.
- In the resulting dialog, thumb down to the Punctuation Conventions section.
- Use the Space Between Sentences dropdown to choose a setting (Figure B).
- Click OK twice to return to your document.
Figure B

Choose a space setting.
The alert is helpful, but you still have to fix the spacing yourself. Fortunately, you can use Word’s Replace feature to do so quickly and consistently.
Use Replace
Graham could use Replace to replace all single space characters following a period with two spaces, or vice versa, but it’s not a silver bullet. If you have a period followed by a single space in the middle of a sentence, the Replace feature will catch this instance, too. If you click Replace All, Word will replace the single space with two–even though that’s not what you want. So, be careful.
The best way to illustrate these settings is with a quick example:
- Click Replace in the Editing group on the Home tab. Or, click Ctrl+h.
- Enter ([.?!]) {1,}in the Find what control. There’s a space between the () and {} components. If you don’t type this space, the replace task won’t work as expected.
- Enter1in the Replace with control. There are two space characters following the 1 component. If you don’t type these spaces, the replace task won’t work as expected.
- Click the More button (if necessary), and make sure the Use wildcards option is checked (Figure C).
- Click Find Next and Replace to work through the document. Or Replace All (if you’re sure the settings won’t catch anything other than what you intend).
Figure C

Use these settings to replace one space with two.
If you want one space but still find yourself typing two out of habit, use Replace with the following settings:
Find what: ([.?!]) {2,}
Replace with: 1
There’s only one space following the 1 component in the Replace with string this time.
You could skip the wildcards, but doing so will catch all instances of one or two spaces, instead of only those instances following punctuation. It’s terribly inefficient.
Wildcards
The wildcards need a bit of explanation; they look complicated, but if you know what all the characters represent, you can do a lot with this feature. Table A explains the wildcards used.
Table A
| Wildcard | Description |
| ? | Represents any single character. |
| [ ] | Square brackets identify specific characters or ranges of characters. |
| { } | Curly brackets count the previous character; the comma instructs Word to find at least the specified number. Without the comma, Word finds exactly the number. |
| Allows you to express a literal character when it’s also a wildcard character. Otherwise, it indicates the position of a bracketed component. |
The Find what string, ([.?!]) {1,} finds a period, question mark, or exclamation point. Graham mentioned periods, but some sentences end with one of the other two characters. The {1,} component finds one of those characters followed by at least one space. This character works with the previous character and although you can’t see it, there’s a space between the () and {} elements. The Replace what string, 1 with the appropriate number of spaces following, represents the original character–., ? or !–in the Find what string’s square brackets. For example, when finding a period, the Replace what string includes a period followed by the literal space characters.
If you think AutoCorrect would be easier, it would–if it worked. The space character triggers this feature, so the feature doesn’t evaluate literal spaces. You could create an entry that replaces every period with a period and two spaces (or one), but trust me, you don’t want to. It will drive you nuts.
Send me your question about Office
I answer readers’ questions when I can, but there’s no guarantee. Don’t send files unless requested; initial requests for help that arrive with attached files will be deleted unread. You can send screenshots of your data to help clarify your question. When contacting me, be as specific as possible. For example, “Please troubleshoot my workbook and fix what’s wrong” probably won’t get a response, but “Can you tell me why this formula isn’t returning the expected results?” might. Please mention the app and version that you’re using. I’m not reimbursed by TechRepublic for my time or expertise when helping readers, nor do I ask for a fee from readers I help. You can contact me at susansalesharkins@gmail.com.
-
Microsoft
-
Software
[Edit] complete code added to bottom, with corrections to original snippets
Your desire then, as I understand it is to take an existing line of some length, and rewrite it to a new line of the same length as the original, but filling in spaces as evenly distributed as possible, with no space after the last word: For example:
«This is my original sentence » (four spaces at end — string length is 32)
|T|h|i|s| |i|s| |m|y| |o|r|i|g|i|n|a|l| |s|e|n|t|e|n|c|e| | | | |
You would like to redistribute the spaces such that the original length, 32, is preserved:
|T|h|i|s| | |i|s| | |m|y| | |o|r|i|g|i|n|a|l| | |s|e|n|t|e|n|c|e|.
The following should provide a set of steps you can implement in your code to distribute your words evenly across a line maintaining its original length.
First, store original line length:
int origLen = strlen(line);
Parse the string a first time using strtok() with space, " " as the delimiter, for the purpose of collecting the following:
1) the number of words
2) the cumulative length of all the words:
char *buf;
char temp[80];
char lineKeep[80];
int accumLen=0;
int wordCount=0;
int numSpaces;

strcpy(lineKeep, line);

buf = strtok(lineKeep, " ");
while(buf)
{
    strcpy(temp, buf);
    accumLen += strlen(temp)+1;//+1 because each word includes one following space
    wordCount++;
    buf = strtok(NULL, " ");
}
accumLen--; //remove last space
Now you can repeat the parse, but this time you have the information you need to re-construct the string as it is parsed:
numSpaces = (origLen - accumLen)+1;//determine number of trailing spaces after last word
                                   //+1 to compensate for space at end of last word.

//parse line, place words and extra spaces
int spcToAdd;  //number spaces added to every word except last
int extraSpc;  //remainder spaces to distribute

spcToAdd = numSpaces/(wordCount - 1);
extraSpc = numSpaces%(wordCount - 1);

memset(lineKeep, 0, 80);

buf = strtok(line, " ");
while(buf)
{
    strcat(lineKeep, buf);
    for(i=0;i<spcToAdd;i++) strcat(lineKeep, " ");
    if(extraSpc > 0) strcat(lineKeep, " "), extraSpc--;
    buf = strtok(NULL, " ");
}
That should do it.
[EDIT]
Complete code, with corrections to original snippets:
#include <ansi_c.h>
int main(void)
{
    char line[]="this is my original line      ";
    char *buf;
    char temp[80];
    char lineKeep[80];
    int accumLen=0;
    int wordCount=0, count;
    int numSpaces;
    int i;
    int origLen = strlen(line);

    strcpy(lineKeep, line);
    printf("Original with "*" to demark spaces :*%s*n", lineKeep);
    buf = strtok(lineKeep, " ");
    while(buf)
    {
        strcpy(temp, buf);
        accumLen += strlen(temp)+1;//+1 because each word includes one following space
        wordCount++;
        buf = strtok(NULL, " ");
    }
    accumLen--; //remove last space

    //second part
    numSpaces = (origLen - accumLen);//determine number of trailing spaces after last word
                                       //+1 to compensate for space at end of last word.
    //parse line, place words and extra spaces
    int spcToAdd;  //number spaces added to every word except last
    int extraSpc;  //remainder spaces to distribute

    spcToAdd = numSpaces/(wordCount - 1); //Add one extra space
    extraSpc = numSpaces%(wordCount - 1); //while they last add additional space

    memset(lineKeep, 0, 80);

    count = 0;
    buf = strtok(line, " ");
    while(buf)
    {
        count++;
        strcat(lineKeep, buf);
        if(count < wordCount)
        {
            strcat(lineKeep, " "); //normally occuring space
            for(i=0;i<spcToAdd;i++) strcat(lineKeep, " ");
            if(extraSpc > 0) strcat(lineKeep, " "), extraSpc--;
        }
        buf = strtok(NULL, " ");
    }
    lineKeep[strlen(lineKeep)]=0;
    printf("modified with "*" to demark spaces :*%s*n", lineKeep);
    getchar();
    return 0;
}
Image of results from this code:

[EDIT] OP original code with comments, and some edits (not fully debugged)
int add_space(char *line, int remain, int word_count)
{
    int line_width;  //added

    if (remain == 0.0)
        return 0; // Don't need to operate.

    line_width = strlen(line);

    int ret;
    char arr[word_count][line_width]; //line width not originally defined,
    memset(arr, 0, word_count * line_width * sizeof(char));

    char *blank = calloc(line_width, sizeof(char));
    if (blank == NULL)
    {
        fprintf(stderr, "calloc for arr error!n");
        return -1;
    }

    for (int i = 0; i < word_count; i++)
    {
        ret = sscanf(line, "%s", arr[i]); // gdb shows somehow it won't read in.
        if (ret != 1)                     // each time this loops around, "this" is placed into arr[i];
        {                                 // "line" is not changing, strtok will traverse line
            fprintf(stderr, "Error occured!n");
            return -1;
        }
        //arr[i] = strcat(arr[i], " ");      // won't compile.
        strcpy(arr[i],strcat(arr[i], " ")); // assignment of char array to char array uses strcpy, or sprintf, et. al.
        //each loop now adds " " -> "this "
                                            // Note: you can assign char to char using =, but not char arrays
    }
    size_t spaces = remain / (word_count * 1.0); //size_t == uint, mult by float is set back into uint.
    memset(blank, ' ', spaces + 1);
    for (int i = 0; i < word_count - 1; i++)
    {
        //arr[0] = strcat(arr[i], blank);     // won't compile.
        strcpy(arr[i],strcat(arr[i], blank)); // Same as above. and index of arr[] should be i
    }

    memset(blank, ' ', spaces);
    //arr[word_count-1] = strcat(arr[word_count-1], blank); //same
    strcpy(arr[word_count-1],strcat(arr[word_count-1], blank));  //at this point, each arr[i]
                                                                 //contains "test   " (3 spaces and NULL)
    for (int i = 1; i < word_count; i++)
    {
        //arr[0] = strcat(arr[0], arr[i]); //same
        strcpy(arr[0], strcat(arr[0], arr[i]));
    } //at this point arr[0] contains "test   test   test   test   t"
      //ran out of room, note there is no NULL terminator '' at end.
    free(blank);
    return 0;
}