
Solution 1
You’ve loaded the titlesec package- it provides the command titlespacing which has the format
titlespacing{command}{left spacing}{before spacing}{after spacing}[right]
From the titlesec package
% spacing: how to read {12pt plus 4pt minus 2pt}
%           12pt is what we would like the spacing to be
%           plus 4pt means that TeX can stretch it by at most 4pt
%           minus 2pt means that TeX can shrink it by at most 2pt
%       This is one example of the concept of, 'glue', in TeX
A complete MWE follows
documentclass{article}
usepackage{lipsum}
usepackage{titlesec}

titlespacingsection{0pt}{12pt plus 4pt minus 2pt}{0pt plus 2pt minus 2pt}
titlespacingsubsection{0pt}{12pt plus 4pt minus 2pt}{0pt plus 2pt minus 2pt}
titlespacingsubsubsection{0pt}{12pt plus 4pt minus 2pt}{0pt plus 2pt minus 2pt}

begin{document}
section{Section}
lipsum[1]

end{document}
Solution 2
You can use the titlespacing command from the titlesec package. For example:
titlespacing{section}{0pt}{parskip}{-parskip}
titlespacing{subsection}{0pt}{parskip}{-parskip}
titlespacing{subsubsection}{0pt}{parskip}{-parskip}
See titlesec.pdf for more options.
Solution 3
If you are using setspace, then mixing it with your own linespread{1.5} is probably not a good idea.
Try to delete the line about linespread and use instead
usepackage{setspace}
onehalfspacing
The package documentation says that it does more than just change line spread: it also take care of skips before and after headings, displays, etc. — the things you say you need.
Solution 4
To control each space individually, it is possible to use vspace{-5mm} or vspace{-1em} or vspace{-1cm}.
Follow a working example:
    documentclass{article}
    usepackage[utf8]{inputenc}
    usepackage{geometry}
     geometry{a4paper,
     total={170mm,257mm},
     left=20mm, top=20mm, }

    title{Space handling in LaTeX}
    author{Yuri Gelsleichter}
    date{December 2020}

    begin{document}

    maketitle

    section{huge Increase Large space between headings and text}

    subsection{Using (texttt{textbackslash vspace{5mm}})}
    vspace{5mm}

Lorem ipsum dolor sit amet, consectetur adipiscing elit, sed do eiusmod tempor incididunt.

    subsection{Using (texttt{textbackslash vspace{1em}})}
    vspace{1em}

Lorem ipsum dolor sit amet, consectetur adipiscing elit, sed do eiusmod tempor incididunt.

    subsection{Using (texttt{textbackslash vspace{0.7cm}})}
    vspace{0.7cm}

Lorem ipsum dolor sit amet, consectetur adipiscing elit, sed do eiusmod tempor incididunt.

    vspace{2cm}
    hrulefill
    vspace{2cm}

    section{huge Decrease Large space between headings and text}

    subsection{Using (texttt{textbackslash vspace{-4mm}})}
    vspace{-4mm}

Ut enim ad minim veniam, quis nostrud exercitation ullamco laboris nisi ut aliquip ex ea commodo consequat.

    subsection{Using (texttt{textbackslash vspace{-1em}})}
    vspace{-1em}

Ut enim ad minim veniam, quis nostrud exercitation ullamco laboris nisi ut aliquip ex ea commodo consequat.

    subsection{Using (texttt{textbackslash vspace{-0.4cm}})}
    vspace{-0.4cm}

Ut enim ad minim veniam, quis nostrud exercitation ullamco laboris nisi ut aliquip ex ea commodo consequat.

    end{document}

Related videos on Youtube

02 : 23
Word: Line and Paragraph Spacing

07 : 05
How to Adjust Line Spacing in Microsoft Word

04 : 29
How to remove the odd extra spacing around Squarespace headings (7.0 & 7.1)

03 : 06
Microsoft Word Tips — Adjust Header Margins in a Word Document

01 : 57
How to add space after heading in Word (and how to modify existing heading settings in 5 seconds)
Comments
-
I’ve searched many sites but I couldn’t get any answer. Here is this mystical question:
How can i reduce the spacing after headings?
Here is my code.
documentclass[12pt,a4paper]{article}
usepackage[utf8]{inputenc}
usepackage[T1]{fontenc}
usepackage[turkish]{babel}
usepackage[left=3.50cm, right=2.50cm, top=3.00cm, bottom=3.00cm,nohead,nofoot]{geometry}
 usepackage[overload]{textcase}
usepackage{graphicx}
usepackage{amsmath}
usepackage{amsfonts}
usepackage{amssymb}
usepackage{pslatex}
usepackage[explicit]{titlesec}
linespread{1.5}

usepackage{setspace}
setlength{parindent}{0pt}
setlength{parskip}{baselineskip}

addtoextrasturkish{uccode`i=string"9D lccode`I=string"19 }
addtonoextrasturkish{uccode`i=`I lccode`I=`i }

titleformat{section}
  {normalfontnormalsizebfseries}{thesection}{1em}{MakeTextUppercase{#1}}
titleformat{subsection}
  {normalfontnormalsizebfseries}{thesubsection}{1em}{#1}
titleformat{subsubsection}
  {normalfontnormalsizebfseriesitshape}{thesubsubsection}{1em}{#1}

usepackage{chngcntr}
My actual purpose is to set line spacing 1.5 lines. This is a MS Word template that I must use for my project report. When I use
setlength{parskip}{baselineskip}withlinespread{1.5}the gap between section headings and paragraphs are huge, so huge it is funny. If I don’t uselinespread{1.5}the lines are not spreading as expected. If I don’t usesetlength{parskip}{baselineskip}this time there is no spacing between paragraphs. -
Thank you. Good explanation and good answer. I’ve changed 0pt to -5 pt and this really looks good.
-
Do you know how the gap between «1» and «Section» is set? The
titlespacingparameters don’t seem to adjust that. -
@steven: I believe that titlespacing is vertical space only; not sure of the official way to tweak the gap you describe, but I usually use an ugly hack involving titleformat and hspace
-
Found it. In the definition of
@sect, one will findbegingroup #6{@hangfrom {hskip #3relax@svsec}interlinepenalty@M #8@@par}endgroup. A kern can be added after@svsec… Actually, that’s close, but it’s more complicated than that, to account for * sections. But I’ll get there. -
But even better,
@seccntformatis defined as{csname the#1endcsnamequad}Thequadrepresents the gap of interest and can be changed. -
Nice one. Works fine. But it removes the numbering of the section headings. Is there any way to bring back the section numbers ?
-
I found this suggestion work the best for markdown with YMAL header rendered by pandoc
-
I never understood what is the use of
plusandminusin such commands could you kindly give a link where to understand their purpose? -
Does
parskipinclude the «glue» that the author oftitlesecdescribes? There’s no mention of ± anything in the documentation. Why would you useparskipinstead of the more specific lengths that @cmhughes advocates? -
Hi, and welcome to TeX.SE. Can you provide to a complete full code starting from
documentclass ..(packages)...begin{document} ....end{document}. -
@YuriGelsleichter I added an image of the output. For next time, it can easily be done when editing the post by clicking on the image icon. If you’re not sure how to do it when you write or edit a post, you can click on the question mark on the upper right corner of the box, and more details will appear.
-
Hi @Sebastiano, thanks very much! I was not aware that I could add image yet
-
@YuriGelsleichter Welcome into the TeX.SE. community again and all the best.
-
That is great but it does not change the space between section title and the starting point when I change first number (12)
-
it might be worth noting that the
titlesecpackage must be loaded after thesectstypackage (the latter can be used to change the color of section titles) otherwise it has no effect.
Recents
Proper text spacing is incredibly important. Get it right and your posts will be more readable and skimmable which leads to a better UX and longer session times.
Get it wrong, and your visitors will quickly hit the back button, raising bounce rates and killing your conversions (and harming Google rankings).
Out of the box, WordPress gives you very little control over the spacing of your text elements, such as headings, paragraphs and lists. Instead, spacing is mostly handled by your theme (or custom CSS).
In this guide you’ll learn: How to adjust text spacing in WordPress.
We’ll cover:
- Line height vs. Margin
- Spacing Units (px & em)
- Adjusting line-height
- Spacing between paragraphs
- Spacing between list items
- Spacing after headings
- Advanced text spacing
Line-height vs. Margin
The two most common types of spacing you’ll want to control in WordPress are line-height and margin. All text blocks utilize both these properties when determining white space.
Here’s an example:
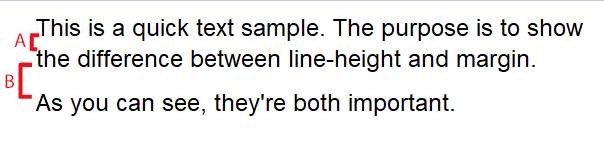
Above you can see two short blocks of paragraph text.
Gap A is controlled by line-height, which is the line spacing within a block of text.
Gap B is controlled by Margin which is the spacing between elements.
Adjusting Line Height in WordPress
All text elements have a line-height property that can be adjusted using CSS. This includes Headings, Paragraphs and Lists. Your theme likely already has default line-height affecting these elements.
Recommended Setting: 1.6 is good line-height for most websites. This makes your line-height 1.6 times the font size (gap is 60% of font size).
To adjust it you can either:
- Control it in your theme settings (if available)
- Change it with CSS
Changing line-height with your theme
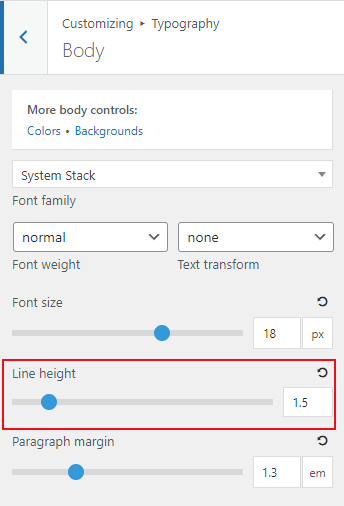
Check your theme’s typography settings which can be usually be found inside the WordPress customizer. For example, in my GeneratePress Premium theme I can control line-height, margin, and font-size for all my text elements.
Adjust line-height with CSS
You can easily add custom CSS to the WordPress customizer and override your theme’s defaults, but first we need to know what rule is currently setting the line-height so we can override it.
To do this, you’ll need to inspect the front-end CSS to find the correct selector.
For example, when I inspect a paragraph tag on my site I can see the line-height is being set by this rule:
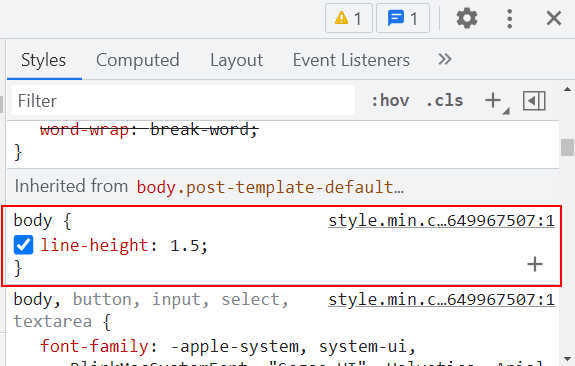
My theme is setting a default line-height for any element inside the <body> tag (which is everything visible). To create more specific rules tailored to exact elements, we can use a more specific selector.
For example:
body {
    line-height: 1.5;
}

p {
    line-height: 1.6;
}

h2 {
    line-height: 1.4;
}Code language: CSS (css)
However this is an unusual example. 1.6 is a pretty good default line-height for most text blocks. But you can adjust this as needed.
Why line-height matters
A well-chosen line-height makes your content easier to read. You want enough gap that users can easily find the next line when looking back to the left edge of the text. You also don’t want it too large, which can require extra effort for the eyes, and can muddy the distinction between a new line and a new paragraph.
Spacing between Paragraphs
You want a clear break between paragraphs. This white space serves as a visual cue that each block contains a distinct idea. It also helps up break up a wall of text and makes your content less intimidating.
Spacing between paragraphs is controlled by margin. I prefer to use bottom-margin, but some theme developers use to top margin instead. Either is fine.
As with line-height, it’s good to check if your theme has a built-in paragraph spacing setting. Mine does:
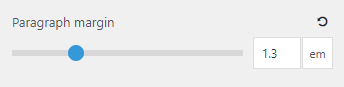
My paragraph spacing is set to 1.3em, which works out to 23.4px (font-size of 18px).
You have a lot of flexibility regarding how much white-space to use between paragraphs. Just make sure it’s at least as big as your font-size, and ideally twice as big as the gap between lines (controlled by line-height).
Change paragraph spacing with CSS
Like with line-height, you’ll want to inspect your front-end using Chrome Dev Tools or Firefox DevTools to see which rule is setting your paragraph margin.
In my case, the rule is:
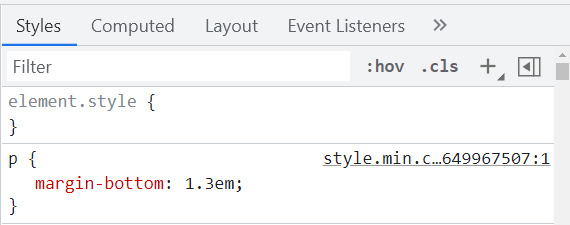
So I can override this by placing the exact same rule in customizer > additional CSS and changing the margin-bottom value:
For example:
/* Even more paragraph spacing */
p {
    margin-bottom: 1.5em;
}Code language: CSS (css)
The Customizer CSS gets loaded after your theme’s stylesheet, which lets you override the styles even when using the exact same selector.
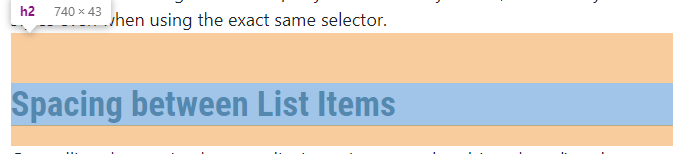
Spacing between List Items
Controlling the spacing between list items in your ordered (numbered) and unordered (bulleted) lists can be a bit tricky.
Best Practice: Use margin, not line-height to control spacing.
To adjust the gap between list items, you should use margin. Changing line-height seems to work fine for single-line items, but causes issues if your list item wraps to multiple lines.
Try the toggle-switch below to see an example list with different margin-bottom values:
- Normal
- Extra Space
- No Space
- This is a an example list item
- Here is another list item
- And a third list item
- A fourth for good measure
/* Normal spacing */
ol li, ul li {
    margin-bottom: 8px;
}Code language: CSS (css)
/* Extra spacing */
ol li, ul li {
margin-bottom: 20px;
}Code language: CSS (css)/* No Spacing */
ol li, ul li {
margin-bottom: 0;
}Code language: CSS (css)Spacing for Heading Tags (H2, H3, H4)
Heading Tags need sufficient white-space to give visual separation between the sections of your content. This is especially important for H2 tags (major headings) and H3 tags (sub-headings).
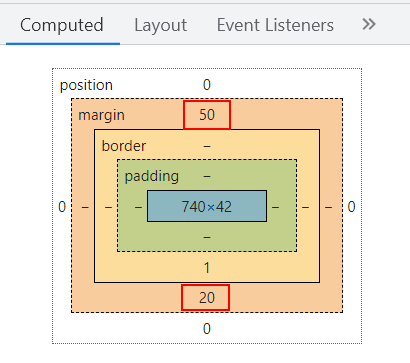
You want extra margin above your heading tags to provide a clear break from the text above, and enough bottom margin that it doesn’t crowd the text below. A good rule of thumb is a 2:1 ratio of space above/below your headings.
Using Chrome DevTools, here’s the spacing used here at BTW (shown in orange). I’m using a margin-top of 50 and margin-bottom of 20 (2.5/1 ratio).
Use CSS to change white-space for Headings
We can target our CSS rules using the appropriate H tag for each heading level. Depending on your theme, you may want to add the class of the content container for more specificity in your rules.
Here are some example values:
h2 {
    margin-top: 50px;
    margin-bottom: 20px;
}

h3, h4 {
    margin-top: 36px;
    margin-bottom: 18px;
}Code language: CSS (css)
To target these rules to only your content container (exclude sidebars and footer), you’d need the CSS class of your content container. You can find this by locating the parent container that holds all of your content. On my theme it’s .entry-content (yours will likely be different).
Then we can reformulate our CSS rules like this:
.entry-content h2 {
    margin-top: 50px;
    margin-bottom: 20px;
}

.entry-content h3, .entry-content h4 {
    margin-top: 36px;
    margin-bottom: 18px;
}Code language: CSS (css)
Learn more: How to properly use heading tags in WordPress
Advanced Text Spacing
We’ve already covered the most common white-space settings, which are line-height and margin. But you have even more CSS properties at your disposal:
Word spacing
You can adjust the gap between words by using the word-spacing property.
Example Usage:
p {
    word-spacing: 5px;)
}
Demo: word-spacing example
Letter Spacing
You can even tweak the spacing between individual letters. This is typically measured in fractions of a pixel, but you can make the value as large as you want.
p {
     letter-spacing: .5px;
}Code language: CSS (css)
Example: CSS letter spacing
White-Space
The less-known white-space property lets you control how white-space is handled within an element. For example, if you find that your buttons break on small screens (words wrap to multiple lines), you just need to adjust this property.
For example, you could target a specific button by its class-name to prevent wrapping.
a.button-name {
    white-space: nowrap;
}Code language: CSS (css)
Learn more: white-space CSS property
Single Line Breaks in WordPress
By default, WordPress creates a new block of text each time you hit the enter key. But what if you want to start a new line without creating a line-break gap?
You can just hit shift+enter to jump to a new line without a full line-break.
Like this:
See, no gap between lines!
Just hit shift + enter
Wrapup
Text spacing is incredibly important, and it’s worth putting the extra effort to customize it for a better user experience.
While WordPress has very few built-in text spacing controls, its easy enough to customize with a bit of CSS.
There are also several excellent themes with built-in text spacing controls.
Recommended Themes:
- GeneratePress (pro)
- Astra (pro)
- Blocksy (free or pro)
When using CSS to customize your text spacing, I recommend using the devtools feature in your browser to see which rules are setting the margin and line-height for your text elements.
For a crash-course in how to use Chrome DevTools for CSS, watch this video:
MS Word
How to Make Letterhead in Microsoft Word
![]()
Published
1 year ago
on
November 18, 2021
How to make a letterhead in Word correctly and neatly is actually easy, but surely there are still many of you who don’t know how to make it.
In an official letter, of course, there is a letterhead and there is always a line at the bottom right. Well, it turned out to be quite easy to make you know.
Apart from being the introduction to a letter, letterhead is also commonly used as a place to write the identity of the letter, such as the identity of the sender and recipient.
For those of you who want to know how to make it, here we explain in full the steps to make a letterhead in Word for you.
HOW TO MAKE LETTERHEAD IN WORD
You should know how to make a letterhead in Word this time, guys, especially when you want to send letters between agencies.
Although not all agencies use it, it doesn’t hurt you to try and find out how to make this letterhead, here are the steps!
- First, open your Word.
- Place the cursor at the back of the last word of the letterhead
- Then select the menu Borders – Borders and Shading.
- After the border menu appears, all you have to do is select the line you want on the menu with a sign like this.
Don’t rush to click Ok, because there’s one more thing you have to do to make it, guys. In the section below, remove it or set it like this to make the line only exist at the bottom, and then Ok.
Yeah, you have successfully drawn the line, Guys, it’s easy and fast, right, how to make a letterhead in Word?
You don’t need to be confused anymore about how to make it. For beginners, making letterhead or letterhead does sound quite difficult.
In fact, how to make a letterhead in Word is fairly easy as long as you already know the procedure. After all, the letterhead cannot be made casually because it is an official identity.
The letterhead contains the official identity of an institution, agency, or company. Well, you can create an official identity on the letterhead in Microsoft Word.
MS Word
How to Create a Background in Microsoft Word
![]()
Published
1 year ago
on
November 18, 2021
This way of making a background in Word aims to beautify the appearance of the document and make it more attractive Guys.
Usually, this is often found in the use of proposals, certificates, covers, and not infrequently in job applications.
With this function, how do you make it? It’s so easy. Yes, although there are several ways you can do this, you can follow this tutorial in full.
HOW TO MAKE A BACKGROUND IN WORD
This background function is very useful if you want to create a document that upholds the originality of Guys, for example, a thesis.
In addition to having to know how to create a table of contents in Microsoft Word, you may also need to know how to create a background in your thesis document, especially in showing the results of the tests you did.
How to make this background is also needed if you want to make an official letter from the agency. Besides needing to know how to make letterhead lines in Word, you also need to know how to add a background to the letter. Here’s how:
- The first thing you can do is change the color.
- Go to Design – Page Color – and immediately choose a color like this.
That is the easiest way and you can change the color according to your needs or tastes, guys. In addition to this method, you can also replace it with an image that you have.
The method is almost the same, guys, pay attention to the following rare:
- Go to the Design menu.
- Click Page Color.
- Select Fill Effects.
- Next, select the tab Picture – Select Picture – From a File.
- Then find the image you have and press Ok
- Finished! The background will change.
But, you also need to remember that both methods will not appear when you print either color or image.
To make it appear when printing, then you need to go to the File menu – Options – Display – and check the Print background colors and Image.
Well, after you go through these few steps, the background will change and also enter when you print, GRATZ!!! It’s easy to make a background in Word.
MS Word
How to Create a Signature in Word
![]()
Published
1 year ago
on
November 11, 2021
There are several ways to make a signature in Microsoft Word. And the method is really easy, just follow the steps below, guys!
Making a signature is really needed, especially in the digital era like now, right? Of course, you need a signature in your Word file, so from that our Team will provide this tutorial in detail.
Actually, you can also use a third application or additional devices such as pens that support your PC or laptop. But this is the easiest way without using other devices and applications Guys.
HOW TO CREATE A SIGNATURE IN WORD
You need to sign first, Guys on a piece of white paper. Make sure the paper is really white and the pen has colour ink that you can really see clearly.
This function is for later photos or files the resolution will be smaller Guys. Not only that, but the customized color saturation will also reduce the thickness of the pen color, you know.
So make sure you give a signature with a clear enough emphasis. Here’s how to create a signature in Word:
- Prepare a white paper with a signature on it. Photos using a smartphone or you can directly scan the signature through a scanner.

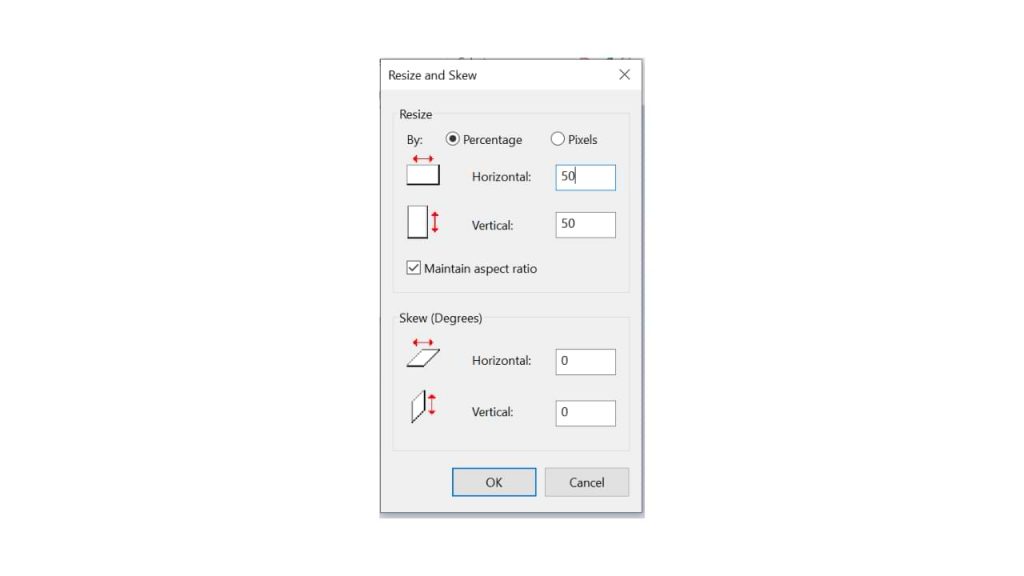
- You can reduce the resolution and crop it so that the photo focuses on the signature. For convenience, click the image file > Edit.
- On the Paint menu, you can resize to reduce the resolution. Choose 50 per cent resolution, fill Horizontal 50 and Vertical 50
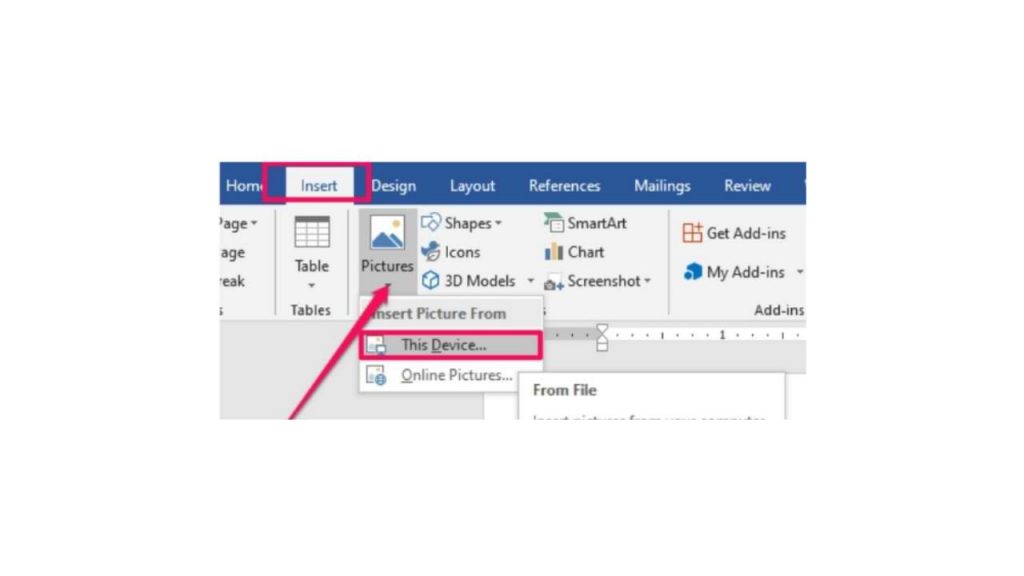
- Hover over the exact position of the word you want to add a signature to. Click Insert > Picture > insert the previous signature image file.
- After you insert the image, reduce the size again using the cursor for more precision.
- Double click on the image.
- On the Format menu, select the Color > Recolor > Black and White 50 per cent submenu.
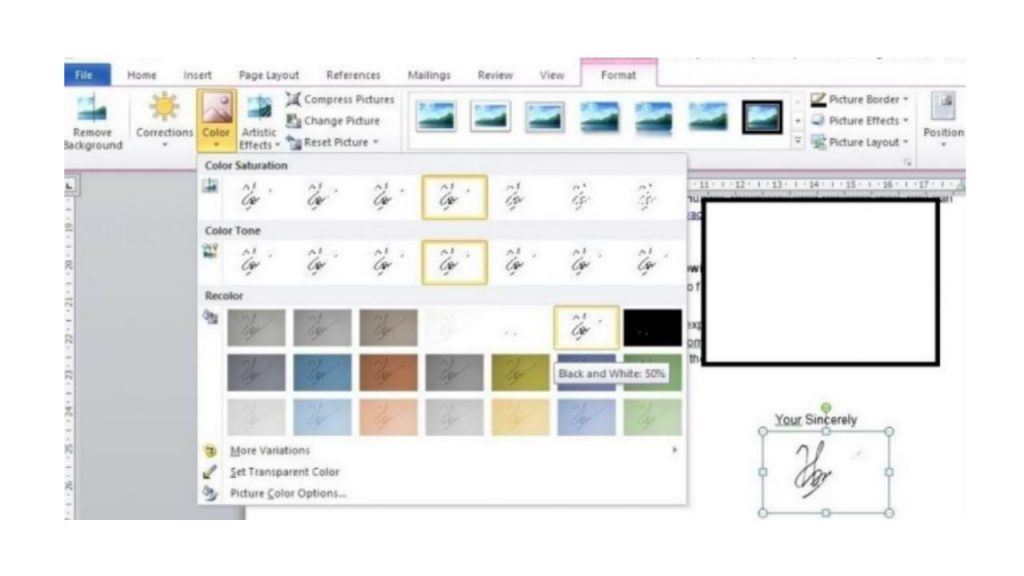
- if your signature is not clear, double click on the image, select menu Correction > Brightness 0 per cent (Normal) Contrast 40 per cent.
You can change the last two steps depending on the contrast and color saturation you want, guys. So you can at the same time adjust the thickness of your signature that has entered the word, so guys.
I also said what Guys, how easy it is to make a signature in Microsoft Word! The most important thing is to make sure your signature is clear enough, and the photos are of high enough quality. Obviously, so that later your signature looks good, it doesn’t break.
I have a header at the top of the page. There is an image at the top of a page body. The problem is that I need 8 pts of space between that image and the header. I defined a style for that.
The paragraph below the image works fine, but the one before the image doesn’t. I do not want to add an empty line before the image.
Desired output:
How can I resolve this?
![]()
CharlieRB
22.5k5 gold badges55 silver badges104 bronze badges
asked Apr 15, 2016 at 7:46
![]()
This is normal behavior for Word. You just need to make some adjustments to your paragraph properties.
- Make sure your picture properties are set to
In Line with Text. - Place your cursor to the left of the picture and type your
paragraph. The text should appear above the picture. - At the end of the paragraph press Enter once (this does not enter a blank line).
- Highlight the paragraph and set
Spacingto8pt(you will have to
type the value).
You should now have 8pt spacing after the paragraph.
answered Apr 15, 2016 at 13:43
![]()
2
If your picture is at the top of the body and you need 8pt between the header text and the picture, then you need to adjust the paragraph properties of the header.
- Open the header for editing
- Select the header text
- Open the paragraph properties
- Highlight the paragraph and set Spacing to 8pt (you will have to
type the value).

This will result in a spacing of 8pt after the header text, leaving the desired space before the picture.
answered Apr 15, 2016 at 15:04
![]()
CharlieRBCharlieRB
22.5k5 gold badges55 silver badges104 bronze badges
You can set the format for your Header Style to have certain space after.
This has been explained in other answers.
When you want certain space before something in the body, you can normally set that in the paragraph style or formatting. However, for something at the top of a page that is not at the beginning of a section, the page-before spacing has been ignored since Word 2010.
To have that spacing obeyed, you can add a Frame to the paragraph formatting or style. This is my writing on using a Frame for Space-Before at the top of a page.
By design, Word ignores the space setting for the paragraph without
the Frame. The same thing happens with a column break. Word ignores
the Space-before formatting of a paragraph style (or just paragraph
formatting) when the paragraph is the first one on a page following a
page break (or at the top of a column following a column break). You
can use a Frame to get around this. The simplest method is to modify
the Style:
You would want a borderless frame and to have the space-before
paragraph formatting that you need.
Another workaround for this problem is to get your document into
compatibility mode and check the option to allow space before. See
Suzanne Barnhill’s response in this thread.


answered Mar 24, 2021 at 21:03
![]()
Charles KenyonCharles Kenyon
4,0202 gold badges8 silver badges19 bronze badges
The OP’s initial question was very clear to anyone.
The answer still doesn’t answer the question. The issue isn’t inside the header, it’s in the body of the document. This happens to me a lot and there are various ways to deal with it, such as adding space above the topmost content (text or graphic, makes no difference) via the Paragraph…Spacing Before (expressed in points).
answered Mar 24, 2021 at 19:23
![]()
2
![]()
Unable to decrease spacing after heading
Hi,I had fiddled with word styles so that i could number my ‘heading 1’ as chapters. Now, somehow all the headings have space between the headings and the next normal paragraph (so it looks as if the heading and next paragraph are detached). But when i checked the settings, the ‘space after’ is set to zero. I am going mad. Please help. I have posted the settings of ‘heading 2’ below as an example.
Font: (Default) +Headings (Cambria), 13 pt, Bold, Font color: Accent 1, Keep with next, Keep lines together, Level 2
Tab stops: 1.18″, Left, Outline numbered + Level: 2 + Aligned at: 0″ + Indent at: 0″, Style: Linked, Hide until used, Quick Style, Priority: 10
Based on: Normal
Following style: Normal

You have this great header in your document, but is so close to the main text, you wish there was some more space in between. There is no obvious way to do it, not even if you resort to the ruler, which you shouldn’t do any way.
Here is how you increase –or decrease– the empty space between your header and the main text. Open the Page Setup dialogue (from the Page Layout menu) and go to the third tab (Layout), where you see Header settings, referring to the distance of your header from the edge of the paper.
Please note: your header will keep this distance whatever the size of your margin may be. For example,
[sociallocker message=”Share, and read the example!”]
if you set your header to be 2 cm away from the edge, and your margin as tall as 1 cm, then your margin will seem like it were 2 cm, since Word will add automatically the space required in order to avoid putting your body text at the top of your header!
Therefore, to increase the distance between header and body text, first decide where your header should be, then increase your margin until it passes your header distance as much as you need: the header remains unmovable to its predefined distance, while extra margin height is actually added below the header!
In the previous example, if I wanted the main text to have a 5cm distance from the header (not from the edge of the page), I should set my margin to 7cm, adding 5cm to the 2cm distance of the header from the edge.
To decrease the distance between header and body, just decrease the height of the margin, getting it closer to the height of your header.
[/sociallocker]

![]()
The same way you can increase or decrease the distance between footer and body text.
* Check also the best free MS Word productivity macros, and these posts about Creating different headers or footers for odd and even pages, what to do If Word adds blank space above a heading, even at the top of a page, how to Use the StyleRef field to insert in headers your Chapter Title automatically
Enjoy!
Lesson 9: Line and Paragraph Spacing
/en/word2016/indents-and-tabs/content/
Introduction
As you design your document and make formatting decisions, you will need to consider line and paragraph spacing. You can increase spacing to improve readability and reduce it to fit more text on the page.
Optional: Download our practice document.
Watch the video below to learn how to fine tune line and paragraph spacing in your documents.
About line spacing
Line spacing is the space between each line in a paragraph. Word allows you to customize the line spacing to be single spaced (one line high), double spaced (two lines high), or any other amount you want. The default spacing in Word is 1.08 lines, which is slightly larger than single spaced.
In the images below, you can compare different types of line spacing. From left to right, these images show default line spacing, single spacing, and double spacing.

Line spacing is also known as leading (pronounced to rhyme with wedding).
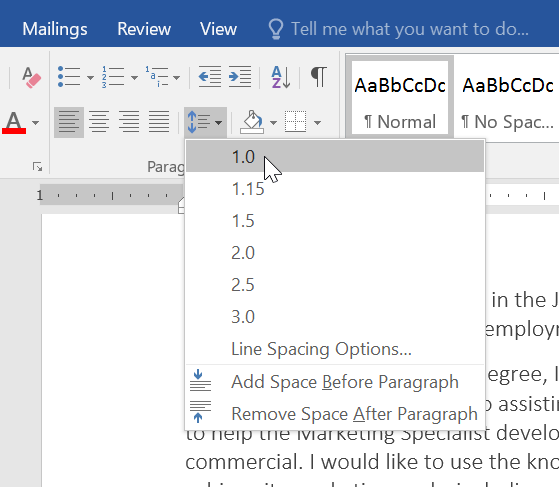
To format line spacing
- Select the text you want to format.

- On the Home tab, click the Line and Paragraph Spacing command, then select the desired line spacing.

- The line spacing will change in the document.


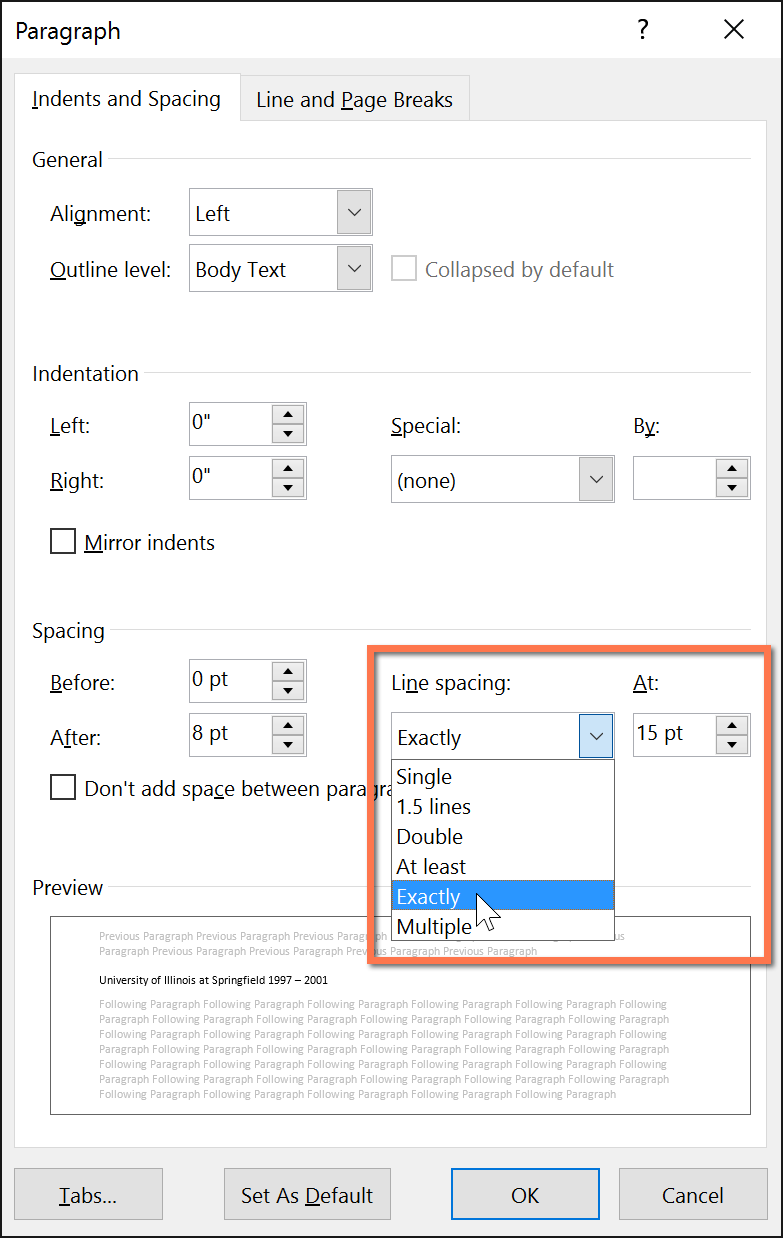
Fine tuning line spacing
Your line spacing options aren’t limited to the ones in the Line and Paragraph Spacing menu. To adjust spacing with more precision, select Line Spacing Options from the menu to access the Paragraph dialog box. You’ll then have a few additional options you can use to customize spacing.
- Exactly: When you choose this option, the line spacing is measured in points, just like font size. For example, if you’re using 12-point text, you could use 15-point spacing.
- At least: Like the the Exactly option, this lets you choose how many points of spacing you want. However, if you have different sizes of text on the same line, the spacing will expand to fit the larger text.
- Multiple: This option lets you type the number of lines of spacing you want. For example, choosing Multiple and changing the spacing to 1.2 will make the text slightly more spread out than single-spaced text. If you want the lines to be closer together, you can choose a smaller value, like 0.9.

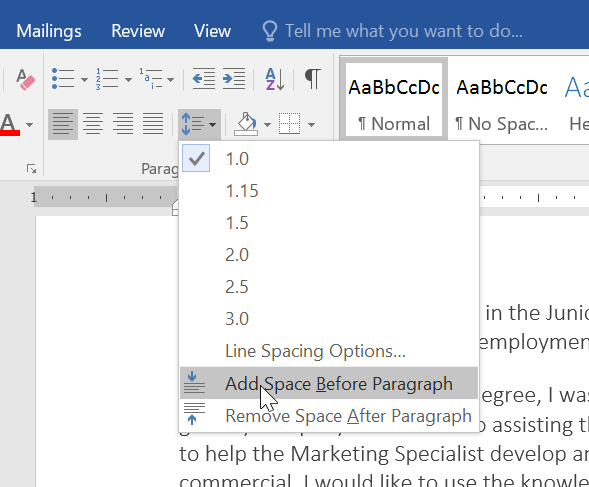
Paragraph spacing
Just as you can format spacing between lines in your document, you can adjust spacing before and after paragraphs. This is useful for separating paragraphs, headings, and subheadings.
To format paragraph spacing:
In our example, we’ll increase the space before each paragraph to separate them a bit more. This will make it a little easier to read.
- Select the paragraph or paragraphs you want to format.

- On the Home tab, click the Line and Paragraph Spacing command. Click Add Space Before Paragraph or Remove Space After Paragraph from the drop-down menu. In our example, we’ll select Add Space Before Paragraph.

- The paragraph spacing will change in the document.


From the drop-down menu, you can also select Line Spacing Options to open the Paragraph dialog box. From here, you can control how much space there is before and after the paragraph.

You can use Word’s convenient Set as Default feature to save all of the formatting changes you’ve made and automatically apply them to new documents. To learn how to do this, read our article on Changing Your Default Settings in Word.
Challenge!
- Open our practice document.
- Select the the date and the address block. This starts with April 13, 2016, and ends with Trenton, NJ 08601.
- Change the spacing before the paragraph to 12 pt and the spacing after the paragraph to 30 pt.
- Select the body of the letter. This starts with I am exceedingly and ends with your consideration.
- Change the line spacing to 1.15.
- When you’re finished, your page should look like this:


/en/word2016/lists/content/