
Your handwritten signature gives your document a personal touch. You can scan your signature and store it as a picture to insert in the document.
You can also insert a signature line to indicate where a signature should be written.
Create and insert a handwritten signature
You need a scanner to do this.
-
Write your signature on a piece of paper.
-
Scan the page and save it on your computer in a common file format: .bmp, .jpg, or .png.
For information on how to use your scanner, use the manufacturer’s manual or Web site.
-
Open the image file in Word.
-
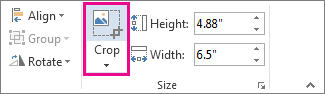
Select the image and on the Picture Format tab, click Crop and use the handles to crop the image.

-
Right-click the image, and choose Save as Picture to save as a separate file.
-
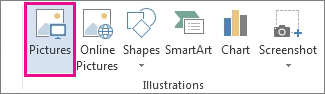
To add the signature to a document, click Insert > Picture s.
Include typewritten text with your reusable signature
If you want information like your job title, phone number, or email address to be part of your signature, save it along with the picture as AutoText.
-
Type the text you want under the inserted picture.
-
Select the picture and the typed text.
-
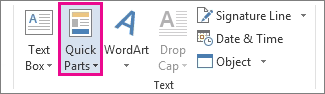
Click Insert > Quick Parts.
-
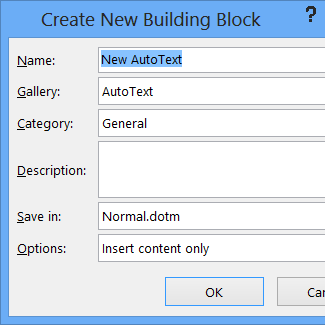
Click Save Selection to Quick Part Gallery. The Create New Building Block box opens.
-
In the Name box, type a name for your signature block.
-
In the Gallery box, select AutoText.
-
Click OK.
-
When you want to use this signature, place the insertion point where you want to insert the signature block.
-
Click Insert > Quick Parts > AutoText, and then click the name of your signature block.
Insert a signature line
Use the Signature Line command to insert a signature line with an X by it to show where to sign a document.
-
Click where you want the line.
-
Click Insert > Signature Line.
-
Click Microsoft Office Signature Line.
-
In the Signature Setup box, you can type a name in the Suggested signerbox. You can also add a title in the Suggested signer’s title box.
-
Click OK. The signature line appears in your document.


Your handwritten signature gives your document a personal touch. You can scan your signature, store it as a picture, and then insert your signature in Word documents.
Scan and insert a picture of your handwritten signature
You need a scanner to do this.
-
Write your signature on a piece of paper.
-
Scan the page and save it on your computer in a common file format: .BMP, .GIF, .JPG, or .PNG.
Tip: For information on how to use your scanner, use the manufacturer’s manual or Web site.
-
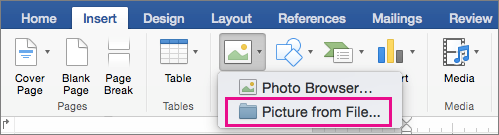
On the Insert tab, click Pictures > Picture from File.
-
Browse to the picture you want to insert, select it, and then click Insert.
-
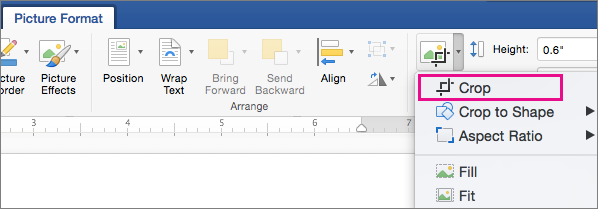
Click the picture to show the Picture Format tab.
-
On the Picture Format tab, click Crop, and then crop the signature.
-
Right-click the picture, and then click Save as Picture to save it as a separate file you can use in other documents.
Include text with your reusable signature
If you want information, such as your job title, phone number, or email address to be part of your signature, save it along with the picture as AutoText.
-
Type the text you want under the inserted picture.
-
Select the picture and the typed text.
-
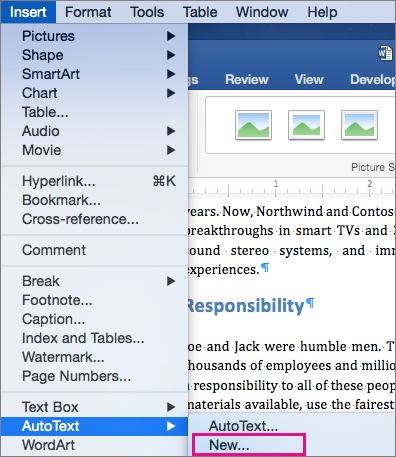
On the Insert menu, click AutoText > New.
-
The Create New AutoText box opens.
Next to Name, type a name for your signature block and click OK.
-
When you want to use this signature, place the insertion point where you want to insert the signature block.
-
On the Insert menu, click AutoText > AutoText, and then click the name of your signature block.

![]()
Download Article
Digitally sign your Microsoft Word documents with this easy-to-use guide
![]()
Download Article
A digital signature can refer to two different things—using a simple electronic version of your regular hand-written signature, or using a digital signing certificate to add an encrypted stamp of authentication to a document. If you need to add your handwritten signature to a Microsoft Word document, we’ll show you the easiest ways to do so in Windows and macOS. We’ll also show you how to use your digital ID (issued by a certificate authority) to digitally sign a Word document in Windows.
-
1
Open the document in Microsoft Word. Double-click the Word document you want to sign digitally.
- DocuSign allows you to create and use a digital ID at no cost for personal use. Creating an account with DocuSign makes it easy to sign Word documents if you haven’t purchased a certificate from a certificate authority.
- When you sign a document with DocuSign, the signed version of the document will be converted to the PDF format.
-
2
Install the DocuSign add-in. To install DocuSign, do the following:
- Click the Insert tab.
- Click Get Add-ins on the toolbar. You may have to click Add-ins first.[1]
- On a Mac, you’ll click Store…
- Click the search bar in the upper-left side of the window.
- Search for docusign and click Add.
- Follow the on-screen instructions to add the DocuSign add-in.
Advertisement
-
3
Click the DocuSign tab. It’s at the top of the Word window.
-
4
Click Sign Document. You’ll find this in the DocuSign toolbar.
-
5
Click CREATE ACCOUNT. It’s in the DocuSign menu.
- If you already have a DocuSign account, click LOG IN to sign in.
-
6
Sign up for DocuSign. Follow the on-screen instructions to create a DocuSign account. Once you have an account, you’ll be able to use it to sign in.
- During the sign-up process, you’ll have to verify your email address. Click the link in the email from DocuSign and follow the on-screen instructions to verify.
-
7
Log into DocuSign in Microsoft Word. Once you have an account, click Sign Document again and log in with your new DocuSign account in the right panel.
-
8
Click Signature. It’s on the left side of the page. If you already have a DocuSign signature on file, this displays a thumbnail image of your signature next to your mouse cursor. If you do not have a signature on file, this displays a yellow image that says «Sign» next to your mouse cursor.
-
9
Click the spot into which you want to insert your signature. If you already have a signature on file through DocuSign, this places your signature where you clicked. If you do not have a signature on file, this displays a window you can use to create a new signature.
- If you need to create a new signature, follow the on-screen instructions and select Adopt and Sign when prompted.
-
10
Click FINISH. It’s a yellow button near the top of the page. A pop-up window will appear.
-
11
Send the document (optional). If you want to send the document to someone right now, use the first two bars at the top of the window to type the name and email address of the person you want to send the signed document to,
- You can also add recipients by clicking Add Recipient below the bar. Then type the name and email address of the new recipient.
- To skip this section, click NO THANKS. This will simply upload the document to your DocuSign account without emailing it to anyone.
-
12
Click Download document. It’s in the right panel. This redownloads the signed Word document as a PDF file that contains your signature. You can now share this signed version of your document with anyone you wish.


Advertisement
-
1
Create a digital certificate if you don’t already have one. Signing with a digital signature is different than typing or signing your name on a document. When you sign with a digital certificate, you’re including a unique encryption code that validates your identity. Digital certificates are usually assigned by certificate authorities and cost money, but you can create one yourself for personal use.[2]
If you don’t already have a digital certificate and just need a digital ID for personal use, here’s how to create one:- Right-click the Windows Start menu and select File Explorer.
- Navigate to C:Program FilesMicrosoft OfficerootOffice16. If that directory doesn’t exist, try C:Program Files (x86)Microsoft Officeroot instead.
- If Office is installed on another hard drive, replace «C» with the correct drive letter.
- Double-click the SELFCERT.EXE app.
- Type a name for your certificate (such as your full name) and click OK.
- Click OK to confirm.
-
2
Open the document you want to sign in Microsoft Word. Double-click the Word document to open it now.
- If you were sent a document that includes a signature line you need to sign, skip to step 8 to learn how to sign it with your digital certificate.
-
3
Click the Insert tab. It’s at the top of the window. If you need to add a signature line for yourself or someone else to sign, you’ll find the option(s) here.
-
4
Click Signature Line. You’ll see this on the «Text» panel on the right side of the toolbar.
- If you don’t see this, click the icon of a sheet of paper with a pencil instead.
- If your window is not maximized, you might have to click a menu called Text with a blue «A» on the toolbar to see the Signature Line option.
-
5
Add the signature details. The information you type here will vary depending on whether you’re signing the document or creating a signature line that someone else should sign.
- Check the «Show sign date in signature line» box if you’d like the date of the signature to be inserted automatically.
- Check the «Allow the signer to add a comment in the Sign dialog box» box if you’d like to enable comments from whoever signs the document.
-
6
Click OK. It’s at the bottom of the window. This will insert a signature box.
-
7
Right-click the signature line and select Sign. This opens a window you can use to sign on the signature line.
-
8
Type your name or select a signature image. If you want to use an image that contains your actual signature, you can select Select image and choose that image from your computer. Otherwise, just type your name on the line next to the «X.»
- If you’re using a tablet PC, you can use the inking feature to sign with your finger or stylus.
-
9
Click Sign. The «Signature» badge will appear at the bottom of the document next to the word count, indicating that the document has been signed.


Advertisement
-
1
Write your signature on a piece of white paper. If you want to add an image of your own signature to your document, the easiest way is to sign your name on a sheet of paper and scan it into your computer.[3]
Writing with dark ink on a white background will give you the best results. -
2
Scan your signature into your computer. When scanning your signature, save the photo in a common file format like JPG, PNG, or BMP.
-
3
Open the document you want to sign in Microsoft Word. You can do this by double-clicking the Word document on your computer.
-
4
Click the Insert tab. It’s at the top of Word.
-
5
Select Pictures on the toolbar. A brief menu will expand.
-
6
Click This Device (PC) or Picture from File (Mac). Now you’ll be able to browse for your scanned signature.
-
7
Select your signature image and click Insert. This imports your signature into the document.
-
8
Crop the image (optional). If the signature isn’t already cropped, click the image once to open the Picture Format tab, and then click the Crop tool on the toolbar. Drag the black guides in to select just the part of the image you want to keep, and then press Enter or Return to crop.
- After cropping, save the cropped version of the signature so you can easily reuse it in other documents. To do so, right-click the image, select Save as Picture and give the image a name you’ll remember.
-
9
Move your signature to the desired location. If your signature is too large or small, you can drag the corners in or out to resize it.
- Now that you’ve added your signature, click File > Save to save the file with your signature included.


Advertisement
-
1
Export the Word document as a PDF file. If you just want to add a signature to an existing Word document on your Mac, the easiest way to do so is to export the document to the PDF format so you can sign it in Preview. Here’s how:
- Open the document in Word and go to File > Save as.[4]
- Type a name for the file and chose PDF as the file format.
- Click Export.
- Open the document in Word and go to File > Save as.[4]
-
2
Open the PDF file in Preview. Now that you have a PDF version of your document, double-click the file to open it in Preview.
-
3
Click the marker icon to show the Markup toolbar. It’s the icon that looks like a felt tip marker at the top of the Preview window.[5]
-
4
Click the Signature icon. It’s the icon that looks like a cursive signature at the top of the window.
-
5
Choose an option for signing the document. You can create a signature in a few different ways:
- Click Trackpad to create a signature using the trackpad on your MacBook (if applicable). If you choose this option, you can use your finger to create your signature. Press any key after signing and then tap Done.
- Click Camera to take a photo of your actual signature on a sheet of paper. Sign a piece of white paper, align it in the camera when prompted, and then click Done.
- Click Select Device if you want to sign on your iPhone or iPad. This option lets you use your Apple Pencil (if using an iPad) or your finger to sign your phone or tablet. After signing, tap Done and it will magically appear on your Mac.
-
6
Click the signature you just created. It’s in the signature drop-down menu. This will place your signature into the center of the document.
- You may first have to click the «Signature» icon again.
-
7
Drag your signature to reposition it. Click and hold in the center of your signature and drag it to the area you want to place it in.
-
8
Save the file. Once you’ve signed the PDF, click the File menu and select Save to save the version that includes your signature. This saves the document with your electronic signature attached.


Advertisement
Add New Question
-
Question
When I try to save a copy of a digitally signed Word 2007 document, it invalidates the signature. Is there a way of saving without invalidating the signature?

You need to save the document first, and then sign digitally. There is no need to save it again.
-
Question
Our forms have sections with a signature required in each section. But when you complete the next section, it invalidates the signature for the previous section. Is there a way around that?
Then it’s some digital signature issue. You may need to seek technical assistance for that.
Ask a Question
200 characters left
Include your email address to get a message when this question is answered.
Submit
Advertisement
-
One way to add an informal signature to a Word document is by drawing your signature in a program such as Paint, saving it as an image, and then inserting it as image from the Word Insert menu.
Thanks for submitting a tip for review!
Advertisement
About This Article
Article SummaryX
1. Install the DocuSign add-in for Word.
2. Click the DocuSign tab.
3. Click Sign Document.
4. Create and activate your account.
5. Scroll to the place you must sign.
6. Click Signature.
7. Click Adopt and Sign.
8. Click Finish.
Did this summary help you?
Thanks to all authors for creating a page that has been read 783,099 times.
Is this article up to date?
Easily create and insert a signature for your documents
Updated on December 23, 2022
What to Know
- Scan and insert a signature image into a new Word document. Type your information beneath it.
- Select the signature block. Go to Insert > Quick Parts > Save Selection to Quick Part Gallery. Name the signature. Select AutoText > OK.
- Add the saved signature to any document by going to Insert > Quick Parts > AutoText > Name of signature.
This article explains how to insert a signature in Word using the AutoText feature in Word 2019, 2016, 2013, 2010, and Word for Microsoft 365. It also includes information on adding a blank signature line and on inserting an encrypted digital signature.
How to Insert a Signature in Word Using AutoText
Use Word’s Quick Parts and AutoText feature to create a complete signature that includes your handwritten signature and typed text, such as your job title, email address, and phone number. Here’s how.
-
Begin by scanning and inserting a handwritten signature in a new Word document
-
Type the information you want to use directly beneath the inserted signature image. Format the text as you want it to appear when you insert the signature block in documents.
-
Drag your mouse over the image and text to select and highlight it.
-
Go to the Insert tab and select Quick Parts in the Text group.
-
Choose Save Selection to Quick Part Gallery. The Create New Building Block dialog box opens.
-
Type a name for the signature block.
-
Choose AutoText in the Gallery Box and select OK to save the signature block.
-
Any time you want to add the signature in Word, go to the Insert tab, select Quick Parts, point to AutoText, and select the name of the signature block.
How to Add a Blank Signature Line
To add a blank signature line to allow someone to sign a printed document, insert a normal signature line but without any contextual data.
-
Select a space in the Word document.
-
Go to the Insert tab and select Signature Line.
-
Select any options you want and choose OK. Selecting few or no options leaves a blank line.
-
A signature line appears ion the document where you placed your cursor.
How to Add an Encrypted Digital Signature
Use built-in tools to digitally sign a Word document. A digital signature is an encrypted, electronic form of authentication that confirms that a document hasn’t been altered.
To create a digital signature:
-
Place the cursor where you want to create a signature line in your document.
-
Go to the Insert tab.
-
Select Signature Line in the Text group and select Microsoft Office Signature Line.
-
In the dialog box, type the relevant information, including the signer’s full name, title, email address, and instructions.
-
Select Allow the Signer to Add Comments in the Sign Dialog to allow the signer to insert his or her purpose for signing.
-
Select Show Sign Date in Signature Line if you want the date the document was signed to appear.
-
When you’re finished making your selections, click OK and the signature is inserted into your document where you placed the cursor.
-
Right-click the signature line and select Sign to add your signature.
-
In the Sign dialog box that appears, type your name in the box provided, or if you prefer, you can select an image of your handwritten signature. After you’ve made your choices, click Sign.
FAQ
-
How do I insert a footnote in Word?
To insert footnotes in a Word document, place the cursor in the text where you want the footnote and select References. In the Footnotes group, select Insert Footnote. You’ll see a superscript number in the text; the cursor will move to the bottom of the page. Type and format your footnote.
-
How do I insert a checkbox in Word?
To insert a checkbox in Word, place the cursor in the text where you want the checkbox and go to the Home tab. Select the Bullets dropdown; when you see the Bullet Library pop-out, select Define New Bullet > Symbol. Choose a suitable symbol for your checkbox and select OK.
-
How do I insert page numbers in Word?
To add page numbers in Word, place your cursor where you want page numbers to begin and select the Insert tab. Select Page Number > Page Number; choose the position and alignment you want. Click OK. Select Header or Footer on the toolbar to choose your formatting for the page numbering.
Thanks for letting us know!
Get the Latest Tech News Delivered Every Day
Subscribe
![]()
To insert a signature line into a Word document, click Insert > Signature, and fill out the «Signature Setup» box. You can also insert a digital signature, or use Insert > Pictures to insert signature from an image.
Adding your signature to a Microsoft Word document is the ultimate way to personalize it as your own, especially for documents like letters or contracts. If you want to add a signature to a Word document, here’s how.
There are several ways to add your signature to a Word document. You can add a signature line for a post-print signature, add a digital signature, or insert your own handwritten signature as a picture.
RELATED: How to Electronically Sign PDF Documents Without Printing and Scanning Them
How to Add a Signature Line in Word
A signature line provides you, or somebody else, with a location to sign a printed document. If you’re planning on printing your Word document, adding a signature line is probably the easiest way for you to add a signature.
To add a signature line to your Word document, click Insert > Signature Line. This icon is usually included in the “Text” section of your Word ribbon menu bar.

In the “Signature Setup” box that appears, fill out your signature details. You can include the name, title, and email address of the signer. This can be you or somebody else.
You can also provide instructions for the signer. Once you’re ready, click “OK” to insert your signature line.
Once you’ve confirmed your signature options, a signature line is inserted with a cross and a line to signify where to sign.
You can now place this into an appropriate position within your Word document. The document can then be signed at this position after printing or, if you’ve saved your Word document into the DOCX file format, you can insert a digital signature into your document at this point.
RELATED: What Is a .DOCX File, and How Is It Different from a .DOC File in Microsoft Word?
To add a digital signature to your Word document, you’ll need to have followed the above instructions and inserted a signature line first.
You’ll also need to install a security certificate for your signature. If you don’t have one, Word will ask you if you’d like to acquire one from a “Microsoft Partner” like GlobalSign.
As an alternative, you can create your own digital certificate using the “Selfcert” tool, included in your Microsoft Office installation folder.
Find “Selfcert.exe” in your Office installation folder and double-click it to open it.
In the Selfcert tool, type a name for your security certificate in the “Your Certificate Name” box and then click “OK” to create it.
Once you have a digital certificate installed, return to your Word document and double-click on your signature line.
In the “Sign” box that appears, type your name or click “Select Image” to insert a picture of your handwritten signature.
Click “Sign” to insert your digital signature into the Word document.
Once signed, Word will confirm that the signature has been added.
If you edit the document after signing it, the digital signature will become invalid, and you’ll need to sign it again.
How to Add a Picture Signature in Word
If you’d prefer to use your handwritten signature, you can take a picture or scan a copy of it and then upload it to your computer. You can then insert a picture of your signature into the Word document.
RELATED: How to Insert a Picture or Other Object in Microsoft Office
Click Insert > Pictures to insert the image into your document manually. Alternatively, double-click on your signature line and choose “Select Image” to insert it on your signature line.
In the “Insert Pictures” menu box, click “From a File” and select your signature image file. From there, click “Sign” to place the image onto your signature line.
Once inserted, the image file containing your signature will be inserted above your signature line.
READ NEXT
- › How to Insert a Handwritten Signature in Google Docs
- › How to Insert and Customize a Signature Line in Microsoft Excel
- › 7 Awesome Microsoft Word Features You Should Be Using
- › How to Insert a Line in Microsoft Word
- › Five Types of Phone Damage That Aren’t Covered by Your Free Warranty
- › Save Hundreds on Elegoo’s New PHECDA Laser Engraver Through Kickstarter
- › Why Your Phone Charging Cable Needs a USB Condom
- › Spotify Is Shutting Down Its Free Online Game
Today, many documents are exchanged in digital format – even official ones. You may need to have some documents signed before sending them on their way. The good news is that the popular text editor, Microsoft Word, offers options to add a signature. Learn how to use it to sign your documents digitally.
You can also convert a PDF to Word and make it editable before signing.
Content
- How to Add a Handwritten Signature in Word
- How to Save a Signature With Text for Later Use
- How to Add a Signature Line in Word
- How to Export a Signed Document
- Bonus: Add a Signature to Word With an Add-In
- Frequently Asked Questions
How to Add a Handwritten Signature in Word
It’s easy to add your handwritten signature to Word to make the document look more professional. You don’t even need an image of your signature beforehand, as you can create it on the spot.
Note: you can’t add a signature from the mobile Word app – only from your PC.
PC
- Open the document in question and click where you want to add the signature.
- Select “Insert” from the ribbon at the top, then “Pictures.”

- Click “This device” or “Online Pictures.” Use the latter option to import from OneDrive or another online location, such as your website.
Tip: if OneDrive is experiencing syncing issues, learn how to troubleshoot it.
- If you don’t have the signature image at hand and use Word Office 2019 (or later), you can use the Draw tab (next to Insert) to draw the signature in Word. Alternatively, you can open Paint (so that you don’t have to install another program on your PC) to draw your signature.

- Select the kind of pen at the top that you want to write with, the color you wish to write in, and the thickness of the line.
- Click on “Drawing Canvas” to insert a box where you can write your signature, then use your mouse to write it by hand.

- It’s possible to resize the signature as a whole or enlarge or shrink certain parts of your signature.

Web
- Open Word in your web browser.
- Select “Insert -> Picture” from the ribbon.

- Find a picture showing your signature, if you have one at hand.
- If not, click “Insert -> Drawing.”

- In the overlay that appears, switch to the “Draw” tab and select the type of pen you’d like to write with. Alternatively, select “Draw with touch” (the last icon in the menu bar) and draw your signature.

- Press “Save and Close” to insert the drawing into your document.

Working on a document after sundown? Turn Word dark mode on to give your eyes a break.
How to Save a Signature With Text for Later Use
If you wish to add a few more details to your signature, such as your email, address, or title, you can save the entire block of information for later use with the steps below.
- Type the information that you need underneath the image containing your signature.
- Select the text and image, then “Insert -> Quick Parts.”
- Select “Save selection to Quick Part Gallery” from the options that appear.

- Name your selection in the pop-up that appears and hit “OK.”

- Go back to “Quick Parts” to find your signature and additional information waiting for you. Click on the block to insert it anywhere in the document.

Another Word option will add a signature line to your document so that you can print the document and sign it (or get it signed) or digitally sign it using the options in Word.
- Open your document and click where you want the line to appear.
- Click on “Insert -> Signature Line.”

- In the pop-up window that appears, input additional details, such as “Suggested signer” and “Suggested signer’s title.”

- The signature line should appear in the spot indicated.

Tip: make your documents more interactive by adding videos in Word.
Obtain a Digital Certificate
You’ll need to create a digital certificate to add a digital signature to your document. Fortunately, Word has a tool for that.
- Navigate to the program’s installation folder and access the “root” subfolder. In our case, it’s “C:Program FilesMicrosoft OfficerootOffice16.”

- Scroll down double-click the “Selfcert.exe” file to launch it.
- Name your certificate in the pop-up window that appears.

- Go back to your Word document and double-click the “X” in the signature line.
- A new pop-up window will appear.

- Type in the name of the signer. Alternatively, click on “Select image” and find the visual in question. You can either use an image or sign your document by typing in the signer’s name.

- Add additional info about the signer from the same pop-up, such as an address, ZIP code, and city of origin, by clicking on “Details.”
Once the digital signature has been added to the document, the receiver can’t edit the document, as the signature will be removed.
Another aspect that should be highlighted here is that the people you send the document to can’t verify the authenticity of your digital signature; their only option is to trust your self-signed certificate. Therefore, if the document you want to send is official in nature, you may have to purchase a digital certificate from a third-party certificate authority.
How to Export a Signed Document
Exporting a document that you’ve signed using a written signature or a signature line as a PDF is pretty simple.
- Open Word and select “File” from the ribbon.

- Select “Export” from the menu on the left.

- Select “Create PDF/XPS Document.”

- Give the document a name and select where you want to save it.
- If you’ve added the written signature from Word for the Web, you’ll need to go to “File -> Print” to export it to .pdf.

Ready for another Word tip? Learn how to insert the degree symbol in Microsoft Word.
Bonus: Add a Signature to Word With an Add-In
You can also opt for an add-in (similar to extensions in browsers) to add a handwritten signature.
- Go to “Insert -> Get Add-ins.”
- A new pop-up will appear. Use it to search for “Impression Add-in,” then press the “Add” button to bring the Impression Signatures add-in to Word.
- A new “Impression” option will appear in the ribbon. Tap it and select “Sign my documents” in the upper-left corner.
- A new window will show up on the right. Opt for the “Free Trial” option, sign in with an account, then proceed to “Sign your document” in a separate window.
- Once you’ve created and added the signature to the document, you’ll be able to save it to your PC.
Frequently Asked Questions
Is my handwritten electronic signature the same as a digital signature?
No. Unlike a handwritten signature – even one that’s inserted digitally – a digital (or invisible) signature will not add marks or text within the document and will only add metadata to the document file to protect the integrity of the document. The signature is used to ensure the document’s authenticity without altering its content. You can add an invisible signature in Word by going to “File -> Info -> Protect Document -> Add a Digital Signature.”
The background of my signature image is visible against the document background. How can I fix this?
You should remove the background of your signature to make the signature completely blend into the background of your Word document, assuming it has been set to white, which it should be by default. To remove an image background quickly and painlessly, use remove.bg. You can also use Photoshop to remove an image background.
Image credit: Unsplash. All screenshots by Alexandra Arici.

Alexandra Arici
Alexandra is passionate about mobile tech and can be often found fiddling with a smartphone from some obscure company. She kick-started her career in tech journalism in 2013, after working a few years as a middle-school teacher. Constantly driven by curiosity, Alexandra likes to know how things work and to share that knowledge with everyone.
Subscribe to our newsletter!
Our latest tutorials delivered straight to your inbox