
Word for Microsoft 365 Word 2021 Word 2019 Word 2016 Word 2013 Word 2010 Word 2007 More…Less
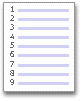
Word can automatically count the lines in a document and display the appropriate number beside each line of text. This is useful when you need to refer to specific lines in a document, such as a script or a legal contract.
By default, Word numbers every line in a document (except those in tables, footnotes, endnotes, text boxes, and headers and footers). However, you can choose which line numbers to display. For example, you can display line numbers in all or part of the document. Or you can display line numbers at intervals, such as every tenth line (10, 20, 30, and so on).
What do you want to do?
-
Add line numbers
-
Remove line numbers
Add line numbers
You can add line numbers to all or part of a document. To view line numbers, you must be in Print Layout view (click the View tab to check).
Notes:
-
A table is counted as one line.
-
A figure is counted as one line.
-
A text box is counted as one line if it is positioned inline with the text on the page. If text on the page wraps around the text box, the lines of text on the page are counted. Lines of text inside a text box are not counted.
Add line numbers to an entire document
-
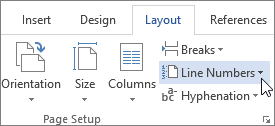
On the Layout tab, in the Page Setup group, click Line Numbers.

Note: If your document is divided into sections and you want to add line numbers to the entire document, you first need to select the document. Click Select in the Editing group on the Home tab, and then click Select All. Or press CTRL+A.
-
Do one of the following:
-
To number consecutively throughout the document, click Continuous.
-
To start with number 1 on each page, click Restart Each Page.
-
To start with number 1 after each section break, click Restart Each Section.
-
For more advanced line numbering options, such as numbering at different intervals, click Line Numbering Options, and then click Line Numbers on the Layout tab.
-
Add line numbers to a section or to multiple sections
-
Click in a section or select multiple sections.
-
On the Layout tab, in the Page Setup group, click Line Numbers.
-
Click Line Numbering Options, and then click the Layout tab.
-
In the Apply to list, click Selected sections.
-
Click Line Numbers.
-
Select the Add line numbering check box, and then select the options that you want.
Top of Page
Remove line numbers
You can remove line numbers from the entire document, from a section, or from a paragraph.
-
Click in the document, or click in the section or paragraph from which you want to remove line numbers. If you want to remove line numbers from multiple sections, select the sections.
-
On the Layout tab, in the Page Setup group, click Line Numbers.
-
Do one of the following:
-
To remove line numbers from the entire document or section, click None.
-
To remove line numbers from a single paragraph, click Suppress for Current Paragraph.
-
Top of Page
What do you want to do?
-
Add line numbers
-
Remove line numbers
Add line numbers
You can add line numbers to all or part of a document. To view line numbers, you must be in Print Layout view (click the View tab to check).
Notes:
-
A table is counted as one line.
-
A figure is counted as one line.
-
A text box is counted as one line if it is positioned inline with the text on the page. If text on the page wraps around the text box, the lines of text on the page are counted. Lines of text inside a text box are not counted.
Add line numbers to an entire document
-
On the Page Layout tab, in the Page Setup group, click Line Numbers.
Note: If your document is divided into sections and you want to add line numbers to the entire document, you first need to select the document. Click Select in the Editing group on the Home tab, and then click Select All. Or press CTRL+A.
-
Do one of the following:
-
To number consecutively throughout the document, click Continuous.
-
To start with number 1 on each page, click Restart Each Page.
-
To start with number 1 after each section break, click Restart Each Section.
-
For more advanced line numbering options, such as numbering at different intervals, click Line Numbering Options, and then click Line Numbers on the Layout tab.
-

Add line numbers to a section or to multiple sections
-
Click in a section or select multiple sections.
-
On the Page Layout tab, in the Page Setup group, click Line Numbers.
-
Click Line Numbering Options, and then click the Layout tab.
-
In the Apply to list, click Selected sections.
-
Click Line Numbers.
-
Select the Add line numbering check box, and then select the options that you want.
Top of Page
Remove line numbers
You can remove line numbers from the entire document, from a section, or from a paragraph.
-
Click in the document, or click in the section or paragraph from which you want to remove line numbers. If you want to remove line numbers from multiple sections, select the sections.
-
On the Page Layout tab, in the Page Setup group, click Line Numbers.
-
Do one of the following:
-
To remove line numbers from the entire document or section, click None.
-
To remove line numbers from a single paragraph, click Suppress for Current Paragraph.
-
Top of Page
Need more help?
Word for Microsoft 365 Word 2021 Word 2019 Word 2016 Word 2013 Word 2010 Word 2007 More…Less
Word can automatically count the lines in a document and display the appropriate number beside each line of text. This is useful when you need to refer to specific lines in a document, such as a script or a legal contract.
By default, Word numbers every line in a document (except those in tables, footnotes, endnotes, text boxes, and headers and footers). However, you can choose which line numbers to display. For example, you can display line numbers in all or part of the document. Or you can display line numbers at intervals, such as every tenth line (10, 20, 30, and so on).
What do you want to do?
-
Add line numbers
-
Remove line numbers
Add line numbers
You can add line numbers to all or part of a document. To view line numbers, you must be in Print Layout view (click the View tab to check).
Notes:
-
A table is counted as one line.
-
A figure is counted as one line.
-
A text box is counted as one line if it is positioned inline with the text on the page. If text on the page wraps around the text box, the lines of text on the page are counted. Lines of text inside a text box are not counted.
Add line numbers to an entire document
-
On the Layout tab, in the Page Setup group, click Line Numbers.
Note: If your document is divided into sections and you want to add line numbers to the entire document, you first need to select the document. Click Select in the Editing group on the Home tab, and then click Select All. Or press CTRL+A.
-
Do one of the following:
-
To number consecutively throughout the document, click Continuous.
-
To start with number 1 on each page, click Restart Each Page.
-
To start with number 1 after each section break, click Restart Each Section.
-
For more advanced line numbering options, such as numbering at different intervals, click Line Numbering Options, and then click Line Numbers on the Layout tab.
-
Add line numbers to a section or to multiple sections
-
Click in a section or select multiple sections.
-
On the Layout tab, in the Page Setup group, click Line Numbers.
-
Click Line Numbering Options, and then click the Layout tab.
-
In the Apply to list, click Selected sections.
-
Click Line Numbers.
-
Select the Add line numbering check box, and then select the options that you want.
Top of Page
Remove line numbers
You can remove line numbers from the entire document, from a section, or from a paragraph.
-
Click in the document, or click in the section or paragraph from which you want to remove line numbers. If you want to remove line numbers from multiple sections, select the sections.
-
On the Layout tab, in the Page Setup group, click Line Numbers.
-
Do one of the following:
-
To remove line numbers from the entire document or section, click None.
-
To remove line numbers from a single paragraph, click Suppress for Current Paragraph.
-
Top of Page
What do you want to do?
-
Add line numbers
-
Remove line numbers
Add line numbers
You can add line numbers to all or part of a document. To view line numbers, you must be in Print Layout view (click the View tab to check).
Notes:
-
A table is counted as one line.
-
A figure is counted as one line.
-
A text box is counted as one line if it is positioned inline with the text on the page. If text on the page wraps around the text box, the lines of text on the page are counted. Lines of text inside a text box are not counted.
Add line numbers to an entire document
-
On the Page Layout tab, in the Page Setup group, click Line Numbers.
Note: If your document is divided into sections and you want to add line numbers to the entire document, you first need to select the document. Click Select in the Editing group on the Home tab, and then click Select All. Or press CTRL+A.
-
Do one of the following:
-
To number consecutively throughout the document, click Continuous.
-
To start with number 1 on each page, click Restart Each Page.
-
To start with number 1 after each section break, click Restart Each Section.
-
For more advanced line numbering options, such as numbering at different intervals, click Line Numbering Options, and then click Line Numbers on the Layout tab.
-
Add line numbers to a section or to multiple sections
-
Click in a section or select multiple sections.
-
On the Page Layout tab, in the Page Setup group, click Line Numbers.
-
Click Line Numbering Options, and then click the Layout tab.
-
In the Apply to list, click Selected sections.
-
Click Line Numbers.
-
Select the Add line numbering check box, and then select the options that you want.
Top of Page
Remove line numbers
You can remove line numbers from the entire document, from a section, or from a paragraph.
-
Click in the document, or click in the section or paragraph from which you want to remove line numbers. If you want to remove line numbers from multiple sections, select the sections.
-
On the Page Layout tab, in the Page Setup group, click Line Numbers.
-
Do one of the following:
-
To remove line numbers from the entire document or section, click None.
-
To remove line numbers from a single paragraph, click Suppress for Current Paragraph.
-
Top of Page
Need more help?
Organize your documents by numbering them
What to Know
- Select Layout > Page Setup > Line Numbers > choose option > select Apply to drop-down > Selected sections.
- Next, select Line Numbers > Add line numbering > OK.
This article explains how to add line numbers to documents in Word for Microsoft 365, Word 2019, 2016, 2013, 2010, and 2007.
How to Add Line Numbers to a Word Document
To include line numbers in a document:
-
Go to Layout > Page Setup > Line Numbers.
If the document is divided into sections and you want to add line numbers to the entire document, press Ctrl+A to select the entire document.
-
Choose one of the following options:
- Continuous: Allows consecutive numbering throughout the document.
- Restart Each Page: Starts each page with the number 1.
- Restart Each Section: Starts with number 1 after each section break.
- Line Numbering Options: Allows more advanced line numbering options, for example, to number at different intervals.
-
To add line numbers to a specific section or to multiple sections, choose Line Numbering Options to open the Page Setup dialog box, then select the Layout tab.
-
Select the Apply to drop-down arrow and choose Selected sections.
-
Select Line Numbers.
-
Select the Add line numbering check box.
-
Select any other options you want, then select OK to close the window.
-
Select OK to save your changes.
All About Line Numbers
Microsoft Word automatically numbers all lines except for a select few. It counts an entire table as one line. It also skips text boxes, headers and footers, and footnotes and endnotes.
Microsoft Word does count figures as one line, as well as a text box that has inline with text wrapping applied. However, the lines of text within the text box are not counted.
You decide how Word handles line numbers. For example, apply line numbers to specific sections, or number lines in increments such as every tenth line.
Then, when it’s time to finalize the document, remove the line numbers and you’re ready to go.
Thanks for letting us know!
Get the Latest Tech News Delivered Every Day
Subscribe

Adding line numbers to a Microsoft Word document can help you point others to exact positions within it, especially in documents with multiple pages. Here’s how to quickly add line numbers in Word.
These instructions should work for recent Office versions (from 2010 onwards). Before you begin, note that Word will treat tables and text boxes as if they’re on a single line, regardless of how large they are.
Adding Line Numbers to an Entire Document
To start adding line numbers, you’ll need to open your Word document. In the ribbon bar at the top, click on the “Layout” tab. From here, click the “Line Numbers” button.
A drop-down menu offers several potential options. To have line numbers that run through your document continuously, rather than restarting on each new page, click on the “Continuous” option.

To have the line numbers restart on each new page, select “Restart Each Page” instead.
Once selected, the line numbers will appear on the left side of the document page.
Line numbers will appear only in the print view mode, so if you have another viewing mode selected, click on the “Print Layout” button in the bottom-right corner of your Word document window.
Adding Line Numbers to Individual Sections
It’s possible to separate pages of a Word document into individual sections using section breaks. You can set Word to restart the sequence of line numbers with each new section break.
RELATED: How to Find Section Breaks in a Word Document
In your Word document, click the “Layout” tab in the ribbon bar and then click on the “Line Numbers” button. Select “Restart Each Section” from the drop-down menu.
If you want to add a new section break, click the “Breaks” button. This is just above the “Line Numbers” button in the “Layout” tab.
From there, click “Continuous” to add a new section break without shifting the Word cursor to a new page.
A new set of line numbers will begin immediately underneath the newly-inserted section break.
Removing Line Numbers
If you’d prefer to remove line numbers from your document, in whole or in part, you can also do this from the “Line Numbers” menu (Layout > Line Numbers).
To remove them from your document entirely, click “None” in the “Line Numbers” drop-down menu.
If you want to hide them from a particular paragraph, click on the paragraph and then select “Suppress for Current Paragraph” from the “Line Numbers” drop-down menu instead.
This will completely remove the paragraph from the line numbers sequence. The sequence will restart with the following number on the next line immediately underneath the paragraph.
Line Number Formatting
By default, your line numbers will appear with the same font, size, and color as specified by the default “Line Number” style in Word. To modify the appearance of your line numbers, you’ll need to modify this text style, although Word hides it by default.
First, click on the “Home” tab in your ribbon bar. Click the vertical arrow menu button in the lower-right corner of the “Styles” section. This will bring up an extra pop-up “Styles” menu.
From there, click the “Options” button.
In the “Select Styles to Show” drop-down menu, select “All Styles” before clicking the “OK” button to save.
You’ll now be able to edit the “Line Number” font style.
In the pop-up “Styles” menu, find the “Line Number” option. Click on the side menu arrow next to the listing and then click on the “Modify” button.
In the “Modify Style” menu, edit the formatting options for your line number style, as appropriate.
Click “OK” to apply the new style to your line numbers.
Once applied, your new font style will be applied to all of the line numbers in your Word document.
READ NEXT
- › How to Number Paragraphs in Microsoft Word
- › Android’s Nearby Share Has (Unofficially) Arrived on Mac
- › How to Get a Refund on the PlayStation Store
- › Discord Direct Message Won’t Go Away? Here’s the Fix
- › The New Winamp Is Here, but It’s Not What You’d Expect
- › Windows 11 Has a New Photo Gallery in the File Explorer
- › Save Hundreds on Elegoo’s New PHECDA Laser Engraver Through Kickstarter
By default, Word keeps track of every line, word, and character in a document, and displays their numbers when the user demands.
Although Word normally does not display line numbers automatically, you can choose to do so.
For instance, you can ask Word to display line numbers in the entire document or only in some part.
You can also choose to display line numbers at certain intervals, say, at every tenth line as 10, 20, 30, 40, and so on.
Adding line numbers to a document has its advantages, especially for large documents with multiple pages.
This is useful when referring to a specific line or word in a document—like 254th line, or 4th word in the 50th line, and so on.
Just a note before we begin.
If you have tables, figures, or text boxes in your document, Word will count them as single line entities, regardless of how large they are.
Moreover, Word will display line numbers for documents only in the Print Layout, and not in Read Mode or Web Layout.
Let us start adding line numbers to our Word document.
Step #1: Open the Word document
Open the Word document where you want to add line numbers. On the top menu bar click on Layout to change the ribbon.

In the Page Setup section, click on Line numbers. Word opens a drop down menu with several choices:
- None
- Continuous
- Restart Each Page
- Restart Each Section
- Suppress for Current Paragraph
- Line Numbering Options
None—this is the default choice, where Word does not display any line numbering. This is also the choice if you want Word to stop displaying any line number.
Continuous—this choice allows Word to display a continuously incrementing line number on the left side of all lines throughout the document. Note that Word treats tables, images, and text boxes embedded in the document as a single line and numbers them as such.

Restart Each Page—as the choice suggests, Word restarts the numbering for each page.

Restart Each Section—If your document is divided into sections with a section break, Word will restart the numbering on each section, but you must turn on the numbering for each section separately. Additionally, as Word treats formatting of each section separately, you can have different numbering schemes for each of them. Note that Word attaches a line number to the blank line as well.

Suppress for Current Paragraph—If you have already adorned the document with line numbers regardless of page or section, this choice allows Word to remove line numbering from the paragraph immediately after the cursor, and arrange the line numbering for the following paragraphs accordingly.

Line Numbering Options—this option allows setting the defaults for line numbering options in a Word document. Clicking on this option opens a dialog box for Page Setup.

Click on the Layout tab. Click on the down arrow mark on the right of Apply to, to open the choices for where you would like to apply the selections. Word offers three options:
- This Section
- This Point Forward
- Whole Document

This section—the choices you make will apply only to the current section defined by the cursor location.
This point forward—the choices you make will apply to the section immediately following the cursor location.
Whole document—the choices you make will apply to the entire document.
Once you have made your selection, click on Line Numbers to open the next dialog box for Line Numbers. Word offers a number of choices here for adding line numbering and for placement of line numbers:

Add line numbering— Click on this option and ensure a tick-mark is present in the square on the left to allow making further choices.
Start at—this number tells Word how to start line numbering. For instance, setting Start at to 10, tells Word to start line numbering from 10, rather than from the customary 1.
From text—this setting defines the gap in inches or centimeters between the line number and the text in the line. Auto allows Word to make automatic adjustments.
Count by—this setting defines the increment Word uses when numbering lines. Default is 1, implying continuous numbering.
Restart each page—choosing this option sets the default for line numbering to restart on each page.
Restart each section—choosing this option sets the default for line numbering to restart on each section.
Continuous—Choosing this option sets the default for a continuously incrementing line numbering for the document.
Step #2: Close dialog box for line numbers
Once you have made your choices, click on Ok to close the dialog box and return to Page Setup dialog,

Step #3: Return to document
Close this by clicking on Ok to return to the document. By now, Word would have applied your choices of line numbering to your document.

Conclusion
It is easy to display line numbering in a Word document—once you know what type of line numbering you want. Just follow the simple three-step method we have outlined above.
Here is how you can add line number in a google doc.