
Мы довольно много писали о том, как в MS Word добавлять различные объекты, в том числе изображения и фигуры. Последние, к слову, можно смело использовать для простого рисования в программе, которая на деле ориентирована на работу с текстом. Об этом мы тоже писали, а в данной статье мы расскажем о том, как совместить текст и фигуру, точнее, как вставить текст в фигуру.
Урок: Основы рисования в Ворде
Предположим, что фигура, как и текст который в нее нужно вставить, у вас пока находятся на стадии идеи, поэтому и действовать будем соответственно, то есть, по порядку.
Урок: Как нарисовать линию в Word
Вставка фигуры
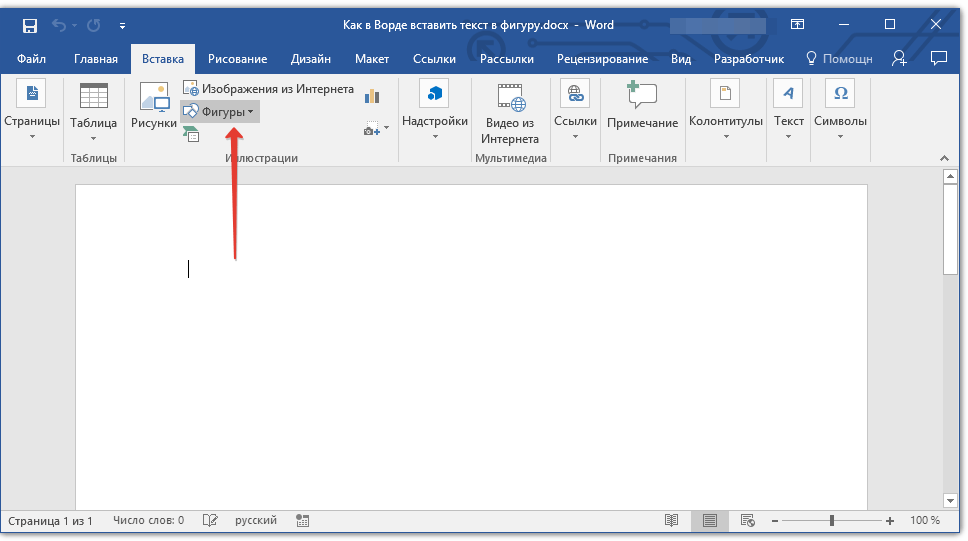
1. Перейдите во вкладку «Вставка» и нажмите там кнопку «Фигуры», расположенную в группе «Иллюстрации».
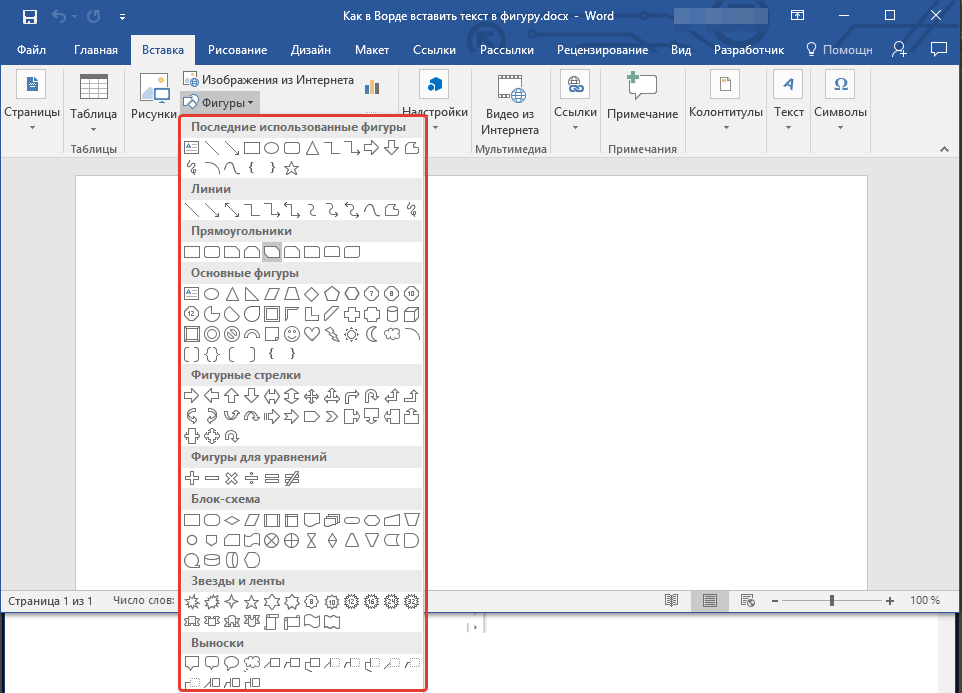
2. Выберите подходящую фигуру и нарисуйте ее, используя мышку.
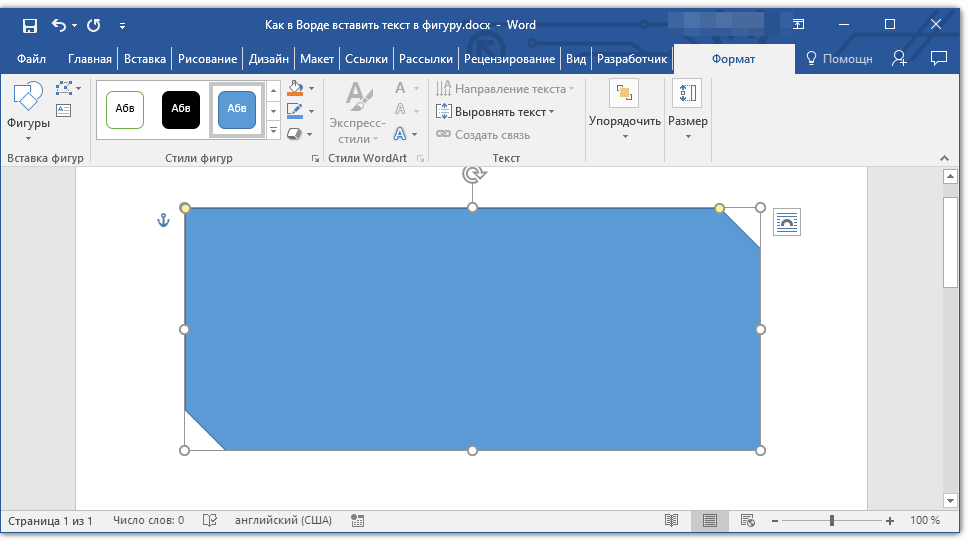
3. При необходимости, измените размеры и внешний вид фигуры, воспользовавшись инструментами вкладки «Формат».
Урок: Как нарисовать стрелку в Ворде

Так как фигура готова, можно смело переходить к добавлению надписи.
Урок: Как в Word написать текст поверх картинки

Вставка надписи
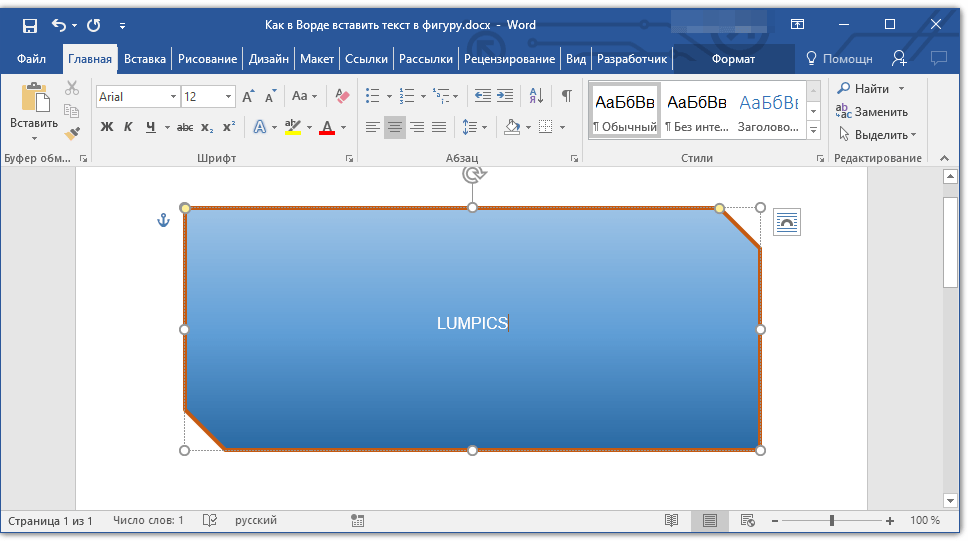
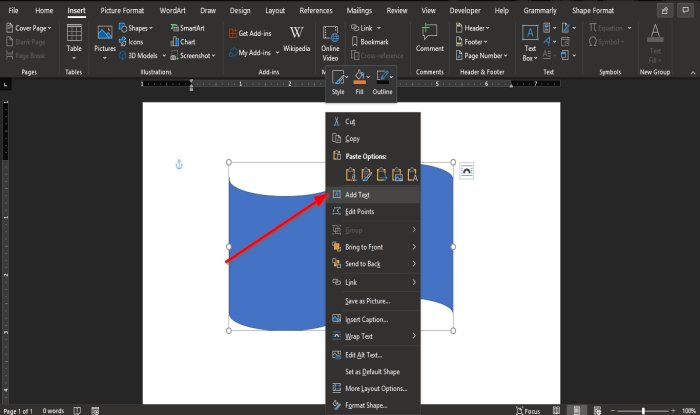
1. Правой кнопкой мышки кликните по добавленной фигуре и выберите пункт «Добавить текст».

2. Введите необходимую надпись.
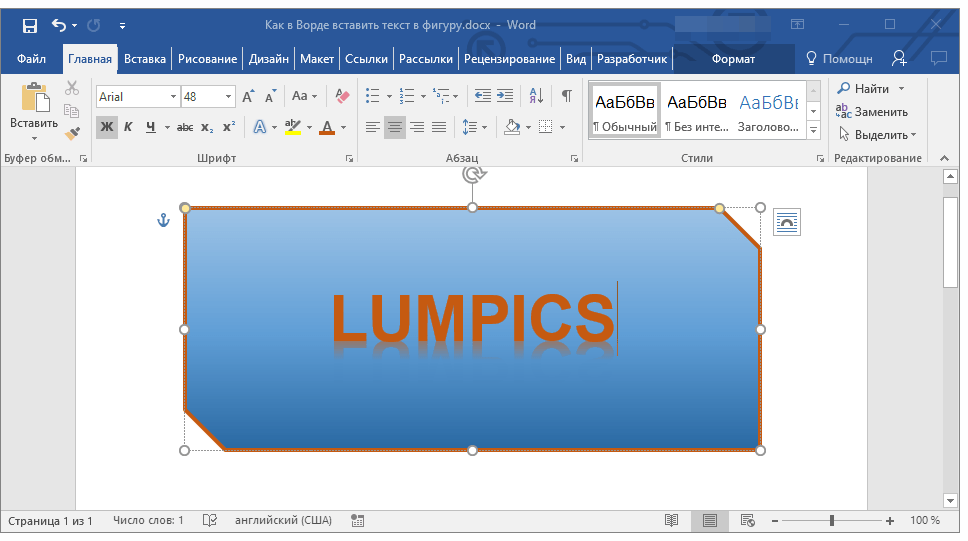
3. Используя инструменты для изменения шрифта и форматирования, придайте добавленному тексту желаемый стиль. При необходимости, вы всегда можете обратиться к нашим инструкциям.
Уроки по работе в Ворд:
Как изменить шрифт
Как отформатировать текст
Изменение текста в фигуре осуществляется точно таким же образом, как и в любом другом месте документа.
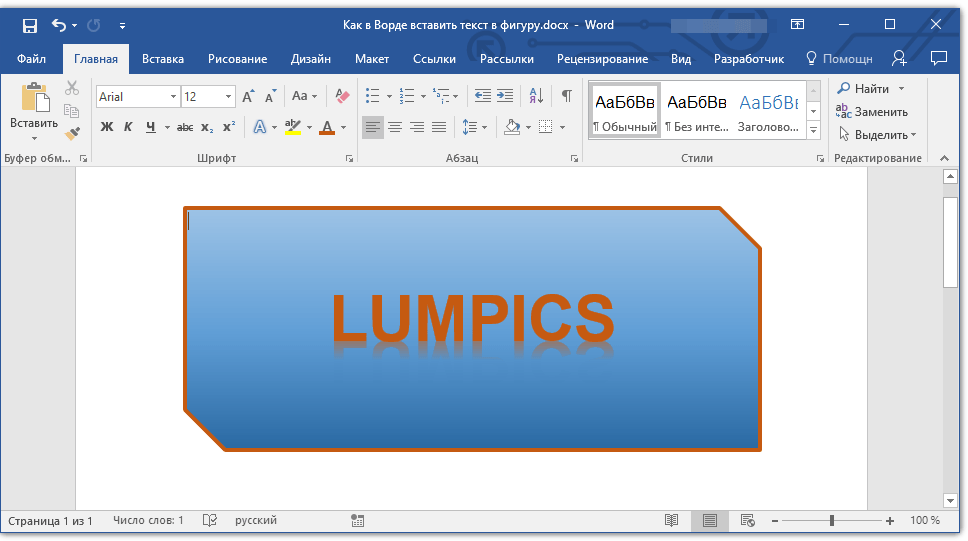
4. Кликните в пустом месте документа или нажмите клавишу «ESC», чтобы выйти из режима редактирования.
Урок: Как нарисовать круг в Word
Схожий метод используется и для того, чтобы сделать надпись по кругу. Более подробно об этом вы можете прочесть в нашей статье.
Урок: Как сделать надпись по кругу в Ворде
Как видите, в том, чтобы вставить текст в любую фигуру в MS Word нет ничего сложного. Продолжайте осваивать возможности этого офисного продукта, а мы будем вам в этом помогать.
Урок: Как сгруппировать фигуры в Ворде
Еще статьи по данной теме:
Помогла ли Вам статья?
Publisher for Microsoft 365 Publisher 2021 Publisher 2019 Publisher 2016 Publisher 2013 Publisher 2010 More…Less
-
In your publication, click a shape, or click Insert > Shape to add a new shape to the publication.
-
Type the text you want inside the shape.
Note: Some shapes such as lines, connectors, and some freeform drawings, have no room for text. While you can’t add text to the shape, you can place it near the shape. Just add a text box, place it close to the shape, and then type your text in the text box.
How?
-
Click Insert > Draw Text Box
 .
. -
Draw a text box close to the shape.
-
Click inside the text box, and start typing.
 .
.Note: The text box will not move when you move the shape unless you group the text box and shape.
How?
Group objects
-
Select the objects you want to group; in this case the text box and the shape.
Tip: Hold down the SHIFT key, and click each of the objects you want to group.
-
Click Home > Group
.
 .
.Ungroup objects
-
Select the grouped objects you want to ungroup.
-
Click Home > Ungroup
.
 .
.Tip: You can select one object in a grouped object without ungrouping it. Hold down the SHIFT key while clicking on the object you want to select.
Need more help?

Microsoft Word makes it easy to add geometric shapes (and a whole lot more) to your document. You can also add text into these shapes, which is handy when you’re creating flowcharts, network diagrams, mind maps, and so on. This being Word, there are plenty of options for doing this, so let’s take a look.
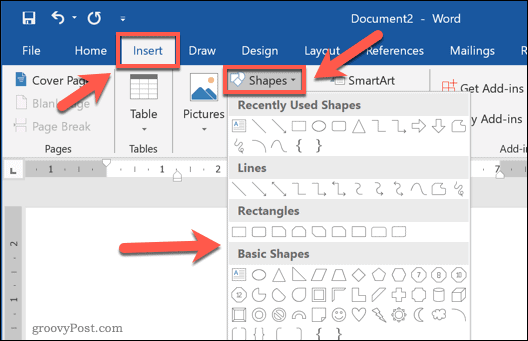
First, you’ll need to insert a shape by going to Insert > Shapes. We’re going to use a nice rounded rectangle, which by default will be filled in with blue.

Right-click anywhere in your shape and click the “Add Text” command.
This places an insertion point in the shape where you can type your text. Once you’ve added whatever you want to write, the “Format” tab has tools you can use to give your text a little pop with things like text styles and shading.
You can also select the text and use the standard Font, Paragraph and Styles tools on the Home tab to format your text, just as if it were a normal part of the document. When you right click your text, you’ll find the usual quick options as well.
RELATED: How to Position Images and Other Objects in Microsoft Word
If you’d like a little more control over the placement and boundaries of your text, you can add a text box inside your shape instead. When you insert a new image or select an existing image, Word automatically switches you to the “Format” tab. You’ll see two ways here to insert a text box, both of which add a text box in the same way.
Select one of the options and move the cursor over your image. A yellow “+” mark will replace your pointer. Hold down the left mouse button and drag the “+” mark to create a text box. When the box looks about right, release the left click (don’t worry if the text box isn’t exactly the right size or location, you can change it afterward), and your text box will be created.
You can use the handles (the little squares) around the text box to resize it or select the whole text box to move it around within your shape. Add your text and format it in whatever way you want.
There are also text boxes with preset formatting that you can add by selecting your shape and then clicking Insert > Text Box. We’ve only scratched the surface of what you can do with text boxes here, so if you want to know more check out our guide to text boxes and all the things you can do with them.
RELATED: How to Create and Format a Text Box in Microsoft Word
READ NEXT
- › How to Link Text Boxes in Microsoft Word
- › How to Circle Text in Microsoft Word
- › How to Remove Borders in Microsoft Word
- › How to Get a Refund on the PlayStation Store
- › Windows 11 Has a New Photo Gallery in the File Explorer
- › The New Winamp Is Here, but It’s Not What You’d Expect
- › Android’s Nearby Share Has (Unofficially) Arrived on Mac
- › Save Hundreds on Elegoo’s New PHECDA Laser Engraver Through Kickstarter
How-To Geek is where you turn when you want experts to explain technology. Since we launched in 2006, our articles have been read billions of times. Want to know more?
Download PC Repair Tool to quickly find & fix Windows errors automatically
The Shape feature in Microsoft Word allows users to add ready-made shapes to the document, such as Circles, rectangles, and arrows. When the shape is selected, the color and body can be customized to the look you want.
Adding a shape in a Microsoft Word document is easy, but what if you want the text to be inside it. Microsoft Word has a feature that can fit text inside a shape. The text fill shape is like a textbox where you can format the text inside the shape; you can increase and decrease the size of the text, Underline, Bold, italic, and change the font and color of the text. Placing a text into shape is useful when creating flowcharts, network diagrams, and mind maps.
To insert Text into a Shape in Word, follow these steps:
- Open Word document
- Insert Shape
- Right-click and click Add text
- Type or paste the text into the shape
- Click outside the shape
- Save document and exit.
In this tutorial, we will explain how to insert text into a shape; follow the steps below.
Launch Microsoft Word.
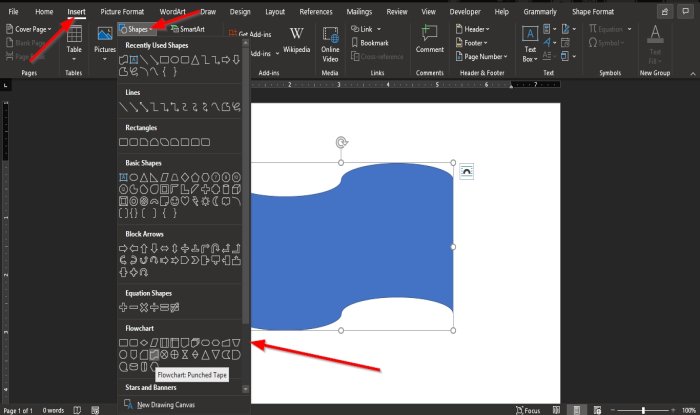
Click the Insert tab and click the Shapes button in the Illustration group.
Choose a shape from the list.
Please draw the shape into the document by dragging the mouse and release it when you reach the size you want.
Right-click the shape and click Add text from the context menu.

Enter the text into the shape.
Click outside the shape.
Now, we have a text inside the shape.
You can also format the text inside the shape by changing the font, increasing and decreasing the size, changing the style to underline, italic and bold, and change the color to what you want.
We hope this tutorial helps you understand how to insert text into a shape in Microsoft Word.
Now read: Best Invoice Templates for Word Online to create Business Invoices for free.

Shantel has studied Data Operations, Records Management, and Computer Information Systems. She is quite proficient in using Office software. Her goal is to become a Database Administrator or a System Administrator.
Introduction: How to Fill a Shape (Word 2013) With Text
Step 1:
1. Open Word, and create a document of text.
For my example I used =rand(1,10) to create a page of random text. Format the text any way you like, I chose a script font size 28 and colored some of the text red. Select all of the text, CTRL+A and copy the text, CTRL+C.
2. Open an art program, such as Pixie, make a text box, and paste (CTRL+V) the text from the Word document into the text box. Resize the textbox so it covers the entire page. Save or Export the Pixie document (picture file) as a .PNG with a transparent background.
Step 2:
3. Now go back to Word and either delete your text or open an new blank document. Choose Insert, shape, and select your shape, such as a heart. Create your shape making it as large as possible.
How to format your shape…
a) While the shape is selected, notice that the drawing tools menu is open. Choose Shape Fill then «from picture». Navigate to «from a file», and browse to the folder where you saved the .png picture of the text (Pixie file)
b) Click on the file then click on insert.
c) In drawing tools, choose «shape outline» and select «no outline».
Adjust your new text filled shape, save it and print it.
Be the First to Share
Recommendations

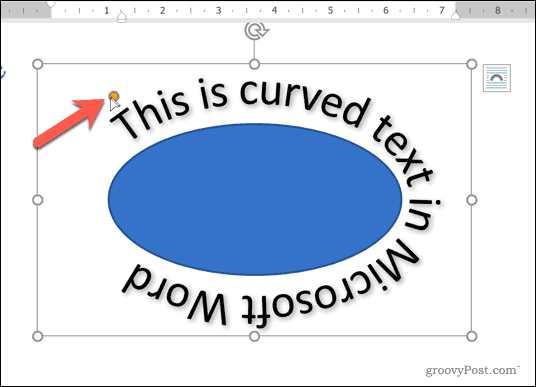
If you want to customize text in Word, you might want to try curving the text using WordArt. Here’s how.
A typical Word document has a standard layout, where the text itself is the most essential element, regardless of the formatting. Of course, if you want to create more varied types of documents, you can format the text by changing fonts or by changing the layout with text indents and more.
If you want some of your text to stand out against the rest, however, you may want to add special effects. WordArt is one way to do this, allowing you to curve some of your text in Word. If you want to know how to curve text in Word, here’s what you’ll need to do.
Adding Curves to Text in Word
There are a couple of ways you can add curves to text in Word. The first method is too add a preset curved effect to your text, with various curving effects that follow different paths. These effects curve the text upwards, downwards, or create a circle-like effect.
To add curved text to a Word document, open your document and press the Insert tab on the ribbon bar. From there, press the Wordart option, listed under the Text category.

From the WordArt drop-down menu, select the style of WordArt text you wish to use.

Clicking any of the available effects will insert a text box into your document using that WordArt effect. You’ll need to replace the placeholder text with your own at this point.
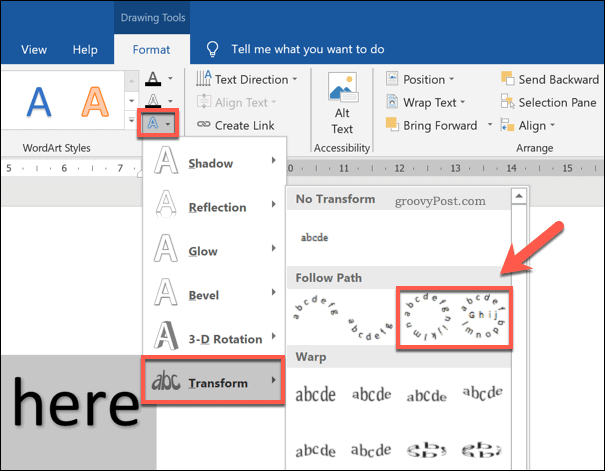
Once you’ve replaced the placeholder text, you’ll need to set WordArt to use a curve. To do this, and with the text box active, press the Drawing Tools – Format tab on the ribbon bar.
From there, press the Text Effects button, listed under the WordArt Styles category.

From the WordArt Styles drop-down menu, click Transform to view various curved styles to apply.
In the Follow Path section, you can select an effect that will curve the text upwards, downwards, or to create a full circle. Select one of these effects to apply it to your WordArt text box.
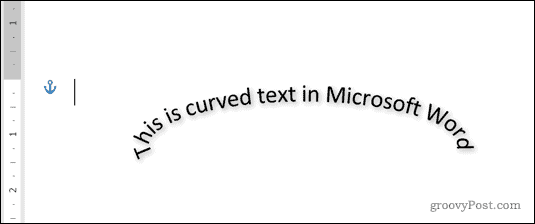
With the WordArt text box style changed, the effect will become visible in the document.
If you want to increase or decrease the curvature of the text, however, you’ll need to first select the text box. With the text box selected, use your mouse or trackpad to move the orange dot icon.
As you move the icon, a trace line showing the future shape of the curve will become visible. The visible shape will depend on the text effect you selected.

Once you’re happy with the curve, release your mouse cursor. This will drop the text into the new position.
Curving Text to a Custom Shape in Word
Using the WordArt text effect, you can curve text using a preset shape and design. If you want, however, you can wrap WordArt text around a custom shape.
If the shape is invisible (or has the same background as your document background), you can wrap the text without the shape of the curve being visible. This allows you to curve text in Word using various custom shapes and designs.
To do this, insert a new WordArt text box by pressing Insert > WordArt.
Replace the placeholder text in the WordArt text box with your own. With the text box inserted and the placeholder text changed, select the text box, then press Drawing Tools – Format > Text Effects.
From the drop-down menu, press Transform, then select Circle from the options provided.

With the circular text effect added to the WordArt text box, you’ll need to wrap the WordArt text around a new shape.
To insert a new shape, press Insert > Shapes and select a shape from the drop-down menu. Shapes with rounded edges are best here, as the path of the WordArt text can be changed to follow the shape.
With the shape inserted, select the text box and resize it so that the text surrounds the outside path of the shape. Press the orange dot icon and reshape the WordArt path to surround the outside shape edge.
Release your mouse cursor once the WordArt path surrounds the shape as a whole.

If you want to wrap text around shapes with harder edges (for instance, a square or rectangle), you’ll need to create multiple WordArt text boxes.
Once inserted, you’ll then need to position them on each side of the shape manually. You may need to rotate the text boxes to ensure that the text is positioned correctly on each side of the shape.

Removing Curves From Text in Word
If you want to remove a curved text effect from a WordArt text box in Microsoft Word, the process is easy.
To start, select the WordArt text box in your document. From the ribbon bar, press Drawing Tools – Format > Text Effects. From the drop-down menu, select Transform > No Transform.
This will disable any curved text effects and return your WordArt text to normal.

With the text effect removed, the WordArt text will appear horizontally. You may need to take additional steps (for example, removing a shape) to restore your document layout.
Other Word Formatting Options
Curving text in Word using WordArt is just one potential way to add custom formatting to your document. It’s great for emphasis, but it isn’t something you can add to every document, with WordArt better suited to documents like flyers.
There are other types of formatting you can try, however. For instance, you can find and replace formatting in Word to quickly customize your document, or change the default font for consistent text formatting across different files. You may even decide to draw in Microsoft Word, allowing you to add diagrams and basic drawings to your documents.
![]()
Microsoft 365, Microsoft Word, Office 2007, Office 2010, Office 2013, Office 2016, Office 2019, Office 2021 / Office LTSC, Office 365 /
5 August 2022
How to put text around an object; image, chart, shape or other Microsoft Word object.
Continuing from our look at putting Word text vertically, at an angle or curved
Text around a Box
Putting text around a box requires four separate text boxes, positioned and grouped around the object.
Here’s a chart with four text boxes around it.

Use the Insert | Text Box | Draw Text Box option to roughly place the four boxes around the object. Then drag each box to its exact position.

Smart users will make just two boxes (top and left), position and format them then copy those two for the matching bottom and right boxes.
Tip: group the four text boxes together in the selection pane to make management easier. If you’ll be editing the document regularly, rename the objects to clearer names then just ‘Text Box …’ etc.

Text around a Circle
For a circular object, make a curved text box with a ‘No Fill’ or transparent background.

‘No Fill’ transparency will let you place the text box over the object without hiding the object underneath.

As you can see, the text curve doesn’t exactly match the smiley face curve. You can try adjusting the curve but you might find that Word doesn’t have enough fine control to get the exact effect you’d like.

How to set text on its side, an angle or a curve in Word
Two ways to add Gradient or Rainbow text or background effects in Word
See more with Selection Pane in Excel, PowerPoint and Word
Доброго времени суток всем читателям и подписчикам блога scriptcoding.ru. В этой статье мы рассмотрим работу с коллекцией Shapes, которая позволяет добавлять различные графические объекты в Word документ.
По сути, используя методы данной коллекции, мы можем делать вставку таких графических объектов в Word как авто-фигуры, выноски, рисунки, диаграммы, полотна и многое другое. Также стоит уточнить, что по ходу статьи, под словом «фигура» будут подразумеваться все графические Word объекты (полотно, WordArt, SmartArtи так далее). Я не привожу примеров программного кода, самим программированием мы займемся, когда будет изучать по отдельности работу с каждым графическим объектом Word, которые создаются с помощью коллекции Shapes.
Содержание
- Коллекция Shapes – графические объекты в Word
- Shapes – свойства, работа с графическими объектами Word
- Shapes — методы, создание графических объектов в Word
Коллекция Shapes – графические объекты в Word
Shapes – свойства, работа с графическими объектами Word
Count— Возвращает количество фигур в коллекции.
Shapes — методы, создание графических объектов в Word

Основной функционал коллекции заключается в ее методах, большинство из которых будут возвращать класс Shape, а тот в свою очередь, будет предоставлять нужные свойства для конкретной фигуры. Например, мы добавили новое полотно в документ, для обработки данного полотна используется свойство CanvasItems, которое хранит ссылку на CanvasShapes. При добавлении новой линии в документ, нам нужно обратиться к свойству Line, которое хранит ссылку на класс LineFormat, который отвечает за обработку линий. И так далее, это логично, так как у каждого графического объекта в Word, например, выноски и WordArt есть различные возможности.
AddCanvas(Left, Top, Width, Height, Anchor) — Добавляет новое полотно в документ.
Anchor – Содержит ссылку на класс Range, который представляет текст, к которому нужно привязать полотно.
AddSmartArt(Layout, Left, Top, Width, Height, Anchor) – Вставка таких графических объектов Word в активный документ, как рисунок SmartArt. Начиная с версии Word 2010.
Layout – Ссылка на класс SmartArtLayout.
AddCallout(Type, Left, Top, Width, Height) – Добавляет текстовую выноску с линиями.
Type – Данный параметр определяет тип линии. Значения константы MsoCalloutType:
- msoCalloutOne — 1 – Горизонтальная линия слева.
- msoCalloutTwo — 2 – Горизонтальна линия с наклоном лева.
- msoCalloutThree — 3 – Линия состоит из двух отрезков слева (один отрезок с наклоном, а другой горизонтальный).
- msoCalloutFour — 4 — Линия состоит из трех отрезков справа (один отрезок с наклоном, другой горизонтальный и третий вертикальный).
AddLine(BeginX, BeginY, EndX, EndY) – Рисует линию с указанными начальными и конечными координатами.
AddConnector(Type, Left, Top, Width, Height) – Рисует соединительную линию.
Type – Тип линии, значение константы MsoConnectorType:
- msoConnectorStraight — 1 — Прямая линия.
- msoConnectorElbow — 2 – Прямое колено.
- msoConnectorCurve — 3 – Изогнутое колено.
- msoConnectorTypeMixed — -2 – Смешанные значения.
AddShape(Type, Left, Top, Width, Height) – Вставка графических объектов в Word, которые представляют указанную автофигуру.
Type – Определяет тип фигуры, значение константы MsoAutoShapeType.
AddPicture(FileName, LinkToFile, SaveWithDocument, Left, Top, Width, Height) — Добавляет изображения. Возвращает класс Shape, представляющий картинку и добавляет ее в коллекцию CanvasShapes. Обязательный только первый параметр.
FileName – Путь к файлу и его имя.
LinkToFile – True – привязать изображение к файлу, из которого он был создан. False – сделать изображение независимым от файла, по умолчанию.
SaveWithDocument – True — сохранить связанный рисунок с документом. Значение по умолчанию False. Если использовать значение False, то может возникнуть ошибка. Работа с графическими Word объектами.

AddLabel(Orientation, Left, Top, Width, Height) — Добавляет текстовую область.
Orientation – Задает ориентацию текста. Значение константы MsoTextOrientation:
- msoTextOrientationHorizontal — 1 — Горизонтальная.
- msoTextOrientationUpward — 2 – Направление вверх.
- msoTextOrientationDownward — 3 – Направление вниз.
- msoTextOrientationVerticalFarEast — 4 – Вертикальное направление для азиатских языков.
- msoTextOrientationVertical — 5 – Направление вниз.
- msoTextOrientationHorizontalRotatedFarEast — 6 — Горизонтальное направление для азиатских языков.
AddTextbox(Orientation, Left, Top, Width, Height) — Добавляет текстовое поле.
AddTextEffect(PresetTextEffect, Text, FontName, FontSize, FontBold, FontItalic, Left, Top) – Создание графического объекта WordArt в Word.
PresetTextEffect – Определяет эффект текста WordArt. Значение константы MsoPresetTextEffect.
Text — Текст в WordArt.
FontName — Название шрифта, используемого в WordArt.
FontSize — Размер шрифта в пунктах.
FontBold – Содержит логическое значение, определяющее, нужно ли сделать шрифт жирным (true) или нет (false).
FontItalic — Содержит логическое значение, определяющее, сделать шрифт курсивом (true) или нет (false).
Item(index) — Возвращает отдельный класс Shape в коллекции Shapes по его индексу.
Range(index) — Возвращает ShapeRange, представляющий графические объекты в Word внутри заданного диапазона. Данный метод позволяет выбрать несколько графических Word объектов для будущей их группировки или обработки.
Index — Указывает, какие графические объекты Word должны быть включены в указанный диапазон. Может быть целое число, указывающее порядковый номер фигуры в коллекции Shapes, строка, которая определяет имя фигуры, или массив, содержащий целые числа или строки. Например:
ActiveDocument.Shapes.Range(Array("Oval 5", "Rectangle 4")).Select
SelectAll() — Выбирает все графические объекты в Word в коллекции Shapes. Этот метод не выбирает классы InlineShape. Вы не можете использовать этот метод, чтобы выбрать более одного полотна.
AddPolyline(SafeArrayOfPoints) — Добавляет открытый или закрытый полигон. Возвращает Shape, который представляет многоугольник и добавляет его в коллекцию CanvasShapes.
SafeArrayOfPoints — Массив с парами координат, которые определяют вершины и контрольные точки кривой.
AddCurve(SafeArrayOfPoints) — Возвращает Shape, который представляет кривую Безье.
BuildFreeform(EditingType, X1, Y1) – Создание свободного графического объекта в Word, вернет класс FreeformBuilder. По сути, данный метод позволяет добавить только первый узел будущей фигуры, а уже далее нужно использовать функционал класса FreeformBuilder.
EditingType – Свойства узла. Значение константы MsoEditingType:
- msoEditingAuto — 0 – Подключение узла.
- msoEditingCorner — 1 — Угловой узел.
- msoEditingSmooth — 2 — Гладкий узел.
- msoEditingSymmetric — 3 — Симметричный узел.
X1 и Y1— Определяют положение узла в пунктах.
AddChart(Style, Type, Left, Top, Width, Height, Anchor, NewLayout) — Добавляет диаграмму в документе.
Style — Стиль диаграммы, целое значение
Type — Тип диаграммы, значение константы XlChartType.
Left – Положение диаграммы в пунктах от левого края.
Top — Положение диаграммы в пунктах от верхнего края.
Width и Height — Ширина и высота в пунктах.
Anchor – Диапазон, который будет связан с графическим объектом в Word.
NewLayout — Если значение true, то график будут вставлен с помощью новых динамические правил форматирования.
AddOLEControl(ClassType, Range) – Добавляет в документ элемент управления ActiveX (ранее известный как элемент управления OLE). Возвращает InlineShape, представляющий новый элемент управления ActiveX. Чтобы изменить свойства элемента управления ActiveX, можно использовать свойство Objectкласса OLEFormat для заданной фигуры.
ClassType — Данный параметр принимает строковое значение, которое содержит имя элемента управления ActiveX. Например:
- CheckBox — «Forms.CheckBox.1».
- ComboBox — «Forms.ComboBox.1».
- CommandButton — «Forms.CommandButton.1».
- Frame — «Forms.Frame.1».
- Image — «Forms.Image.1».
- Label — «Forms.Label.1».
- ListBox — «Forms.ListBox.1».
- MultiPage — «Forms.MultiPage.1».
- OptionButton — «Forms.OptionButton.1».
- ScrollBar — «Forms.ScrollBar.1».
- SpinButton — «Forms.SpinButton.1».
- TabStrip — «Forms.TabStrip.1».
- TextBox — «Forms.TextBox.1».
- ToggleButton — «Forms.ToggleButton.1».
Range — Диапазон, в котором нужно разместить элемент управления ActiveX. Если этот аргумент опущен, то ActiveX размещается автоматически.
close
Creating a Custom Word Shapes Worksheet
Design a worksheet to provide students an opportunity to practice reading and writing words. Use your own words or high frequency words from Starfall’s Kindergarten ELA curriculum.
Choosing a Curriculum Edition & Week
Click the Edition 1 or Edition 2 buttons for a list of high frequency words from one of our ELA curriculum editions. If you are following one of our curriculum plans, click on a week to create the image and high frequency words for that week.
If you are not following one of our curriculum plans, select None to type your own words. The character limit is six characters.
Selecting a Layout
Click the Six or Eight buttons in the Layout menu for a worksheet with up to eight words.
Choosing a Demo Option
The Demo option provides a completed example to show what to do. Click the On and Off buttons to choose the demo.
Customizing Words
Click a word from the High-Frequency Words list to choose from our list. Or click inside the Word box in the Customize menu, type a word, and press Enter to type your own words. There is a limit of 13 characters.
Click the Shuffle Word Order button to reorder the words.
Saving & Printing
Once you are finished customizing the worksheet, click the Create PDF button from the Resource Toolbar.