
Word for Microsoft 365 Word 2021 Word 2019 Word 2016 Word 2013 More…Less
Changing the numbering sequence in a list can cause headaches, but use the following steps and you’ll avoid hassles later:
-
Double-click the numbers in the list. The text won’t appear selected.

-
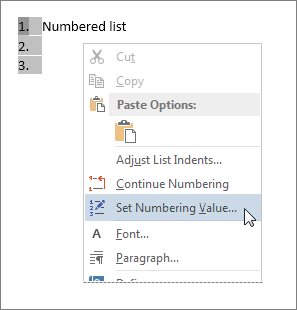
Right-click the number you want to change.
-
Click Set Numbering Value.
-
In the Set value to: box, use the arrows to change the value to the number you want.
Tip: Tempting as it is to manually change the numbers in a list, don’t do it. Always use the command options to make the changes. If Word loses track of what you’ve done, problems can pop up when you want to make other list changes later.
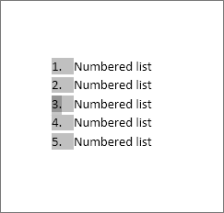
Start with 1.
If you want to change any number in a list to 1, here’s how:
-
Double-click the numbers in the list. The text will not appear selected.
-
Right-click the number you want to start a new list.
-
Click Restart at 1.
More about lists
Change bullet indents
Top of Page
Need more help?
This tutorial shows two ways to create numbered lists in Microsoft Word. We will also look at how to change list levels, start with a different list number, and change the font, size, and color of list numbers.
Do you want to create bulleted lists? Please see my previous tutorial “How to Create Bulleted Lists in Microsoft Word.”
What about Lists Ordered by Letters?
For simplicity, this tutorial refers to “numbered lists” because Word organizes all ordered (hierarchical) list options in the Numbering Library. However, all the steps shown here also apply to lists organized by letters.
If you would like to learn more about ordered and unordered lists, please see “How to Write Vertical Lists (Ordered and Unordered).”
Table of Contents
- How to Create a Numbered List — Basic Method 1
- How to Create a Numbered List — Basic Method 2
- How to Change Numbered List Levels
- How to Start a List with a Different Number
- How to Change the Font, Size, and Color of List Numbers
Watch all the steps shown here in real time!
Explore more than 200 other writing-related software tutorials on my YouTube channel.
The images below are from Word for Microsoft 365. These steps also apply to Word 2021, Word 2019, Word 2016, and Word 2013.
The basic steps are similar in Word for Mac. However, the more advanced steps, such as starting a list with a different number, are different on Mac. So, we will cover this topic for Word for Mac in a separate tutorial.
How to Create a Numbered List — Basic Method 1
This is the basic method to create a numbered list in Word. This method requires you to type each item as you create the list. If you have already typed your list items, see Method Two below.
- Place your cursor where you want to start your list.
- Select the Home tab in the ribbon.

- Select the menu arrow next to the Numbering button.
![]()
- Choose a number style from the Numbering Library.

The number one will appear in your document.

- Type your first list item after the number, and then press the Enter key on your keyboard. The next number will appear.

Continue typing your list items and pressing the Enter key until your list is complete.
- After typing the final item, press the Enter key twice to remove your cursor from the list.
How to Create a Numbered List — Basic Method 2
This method is for existing text formatted vertically as a list.
- Select the text.

- Select the Home tab in the ribbon (see figure 1).
- Select the menu arrow next to the Numbering button (see figure 2).
- Choose a style from the Numbering Library (see figure 3).
Your selected items should become a numbered list.

How to Change Numbered List Levels
Word lets you create numbered lists with up to nine nested levels. Here are two ways to change the level of list items.
Change List Levels — Method 1
Important note: This method won’t work for the first item in your list.
- Select one or more list items (other than the first item).

- Select the Home tab in the ribbon (see figure 1).
- Select the Increase Indent button in the Paragraph group.

Each time you select the Increase Indent button, the item(s) will move one level and take on the appropriate format for that level (e.g., lowercase letters, roman numerals, etc.).

Pro Tip: To return the selected text to a previous level, select the Decrease Indent button to the left of the Increase Indent button.
Change List Levels — Method 2
- Select one or more list items (see figure 8).
- Select the Home tab in the ribbon (see figure 1).
- Select the menu arrow next to the Numbering button (see figure 2).
- Select Change List Level from the drop-down menu.

- Select a list level from the list-level menu.

Your list item(s) should move to the next level.
How to Start a List with a Different Number
You can start a list with a number other than one or continue the numbering from the previous list.
- Select the first list number or place your cursor within the first list item. If you select the list number, all numbers on that level should also be selected.

- Select the Home tab in the ribbon (see figure 1).
- Select the menu arrow next to the Numbering button (see figure 2).
- Select Set Numbering Value from the drop-down menu.

5.a. Enter the number you want to start with in the Set value to text box in the Set Numbering Value dialog box.

5.b. (Alternative Option) Select Continue from previous list if you want to continue the numbering from a previous list in your document.

- Select the OK button.

Your list should be renumbered according to your selections in the Set Numbering Value dialog box.
How to Change the Font, Size, and Color of List Numbers
By default, the font, size, and color of your list numbers will be the same as your normal text style. However, you can manually change the appearance of list numbers by selecting them separately from the text.
- Select one list number. All numbers on that level should also be selected.

- Select the Home tab in the ribbon (see figure 1).
- Select a new font, size, or color from the Font group.

Your list numbers should change to the new formatting. Repeat these steps for each level in your list, as necessary.

Related Resources
How to Write Run-In Lists
How to Create and Update a List of Tables or Figures in Microsoft Word
How to Create Numbered Lists in PowerPoint (PC & Mac)
Updated February 12, 2023
You can tell Word to start from any number you prefer, restart numbering from 1, or continue numbering.
Start numbering from the specified number
To start the list numbering from the number you need, do the following:
1. Double-click the numbers in the list (the text will not
appear selected):

2. Do one of the following:
- Right-click the selected number and choose Set Numbering Value… in the popup menu:

- On the Home tab, in the Paragraph group, click Numbering or from the popup
menu (for more details see Creating numbered
lists) and then choose Set Numbering Value…:

3. In the Set Numbering Value dialog box, on the
Set value to text box, type or choose the appropriate value:

For example, start from number 7 for the third item of the list:

Note: Be careful, the numbering value is set for the item, not for its position in
the list:

Restart numbering from 1
This option is often used to place two numbered lists one after the other. Word will try to continue
the second list with the next number in sequence from the previous list; this option tells it not to.
To restart the numbering in a numbered list, do the following:
1. Double-click the numbers in the list (the text will not
appear selected):

2. Do one of the following:
- Right-click the selected number and choose Restart at 1 in the popup menu:

- On the Home tab, in the Paragraph group, click Numbering or from the popup
menu (for more details see Creating numbered
lists) and then choose Set Numbering Value….In the Set Numbering Value dialog box, on the Set value to text box, type or
choose the value 1 :


Continue numbering for the numbering list
After an operation of copying, moving, etc. list items or information between them, Word can lose the
numbering. Thus, you may need to continue the list numbering.
To continue list numbering, right-click the number for which you need to continue numbering and choose
the Continue Numbering option in the popup menu:

Note: When Word loses the numbering for a list, it “understands” the lost part of the
list as a second list with its own formatting, usually starting from 1. You can copy and paste
the formatting of the first list into the second to continue numbering. See
how to copy paragraph or numbering format.
Note: More details are available
in the Numbered lists section
in the Work with bulleted, numbered and multi-level lists lesson
of the Create basic documents free course.
See also this tip in French:
Comment créer une liste en redémarrant et en continuant la numérotation.
Multilevel numbering in Word is the #1 headache for many people working with large documents.
Believe it or not, it’s not complicated. It just takes somebody to lead the way and point out the pitfalls you need to avoid.
Today that pleasure falls to me!
Before I start, grab your free multilevel numbering troubleshooting guide that shows you the steps to get multilevel numbering working properly first time, every time, together with answers to over 20 FAQs and plenty of real client examples constructed step by step to help you fix what isn’t working with your numbering.

1. What Multi-level Numbering Looks Like
Often used in the legal profession or in large corporate documents, multilevel numbering creates a logical hierarchy and easy navigation within the document. The headings can also be summarised later on in a table of contents. Here is a simple example:

2. How to Set Up Multilevel Numbering
Here is the correct process:
1. Select the text that you want to number (this can be a section of text or the whole document).

2. Select the Home tab.
3. Click the multilevel numbering icon in the Paragraph group.
![]()
4. You can either select an existing layout from the list to use as a starting point, or you can create a new numbering system from scratch. As you hover over each thumbnail image, Word provides a larger image of the numbering system.
5. Choose Define New Multilevel List to display the control dialog.

The dialog box can be broken down as follows:
Step #1 Click level to modify
In the top left is a list of levels. As you select each level, the settings in the rest of the dialog box changes.
Level 1 is the highest level, i.e. the main headings such as chapter or section titles.
Level 2 is subordinate to level 1.
Level 3 is subordinate to level 2.

Step #2 Enter formatting for number
This is where the level number is constructed. If you include a previous level number, it will be displayed with a grey background, as will the number for the current level.
Type anything you wish to put in between the numbers such as dots, dashes, brackets etc.
Clear any text in the ‘Enter formatting for this number’ box.
Step #3 Include level number from
When creating a subordinate level (or child level), you can first specify the level number of the parent.
For example, for section 3.2
- ‘3’ is the parent level (level 1) and
- ‘2’ is the child level (level 2)

Step #4 Number style for this level
Each level can have its own number style. It may be a standalone style, e.g. 1, 2, 3 or a, b, c or continue on from a higher level, e.g. 1.1.1 or 1.a.i.
- When creating 1.1 numbering, this option is 1, 2, 3.
- When creating 1.a numbering, this option is a, b, c

Step #5 Font
Set the font formatting for the selected level, if you want.

Step #6 Position
What position from the left margin do you want items for each level of numbering. For example, level 1 items may be 0cm from the left margin, level 2, 1cm from the left margin and level 3, 2cm from the left margin.
Here’s what they mean:
- The Aligned At determines how far from the left margin the number appears.
- The Text indent at figure determines how far from the left margin the text following the number is.

6. Click OK to save all the settings and close the dialog box.
The text you selected in step 1 now looks like this.

The next part is where the magic happens …
3. How to Apply Multilevel Numbering
Once you have created your numbering system:
1. Position the cursor at the beginning of a line.

2. Press the TAB key to move the text down a level (demote).

3. Press the SHIFT and TAB keys together to move the text up a level (promote).

If you prefer, you can also click the indent icon to demote and the outdent icon to promote between levels.
![]()
4. How to Change Multilevel Settings
Once you have created your numbering system:
1. Reselect all text that is using the multilevel numbering.
2. Click the multilevel numbering icon and select Define New Multilevel List (yes, you choose this option even if you are modifying an existing multilevel list).

The original settings that you defined are redisplayed.
3. In the top-left box select the level that you wish to change, then change your settings.
4. Repeat for the other settings.
5. Click OK to save the settings. Your numbered list should now reflect your new settings.
5. Linking Multilevel Numbering to Styles
Each level of a multilevel numbering system can be linked to a style. This means that as you apply styles throughout the document, the numbering is applied appropriately and automatically. You can either use the built-in Heading 1, Heading 2, Heading 3 styles or use your own custom styles.
1. In the Numbering dialog box, click the MORE button in the bottom-left corner to expand the dialog box.
2. Select level to modify in the top-left box.
3. Open the Link level to style drop-down list and choose the style you wish to connect to the numbering level.

4. Click OK.
5. In the document, apply the Heading 1, Heading 2, Heading 3 styles where needed.
It’s a good idea to create a body text style and apply that where appropriate, so that the body text does not inadvertently get caught up in the multi-level numbering.
6. Select the whole document (or the portion of the document where you want to apply your numbered sections).
7. Click the icon in the Paragraph group (Home tab).
8. Select your custom numbering style from the gallery. The thumbnail image should show the linked styles.

6. How to Use Styles to Set Number Levels
1. Select all the text that you wish to apply the same number level to. Alternatively, if you wish to go line by line, you can place the cursor anywhere in a line of text.
2. In the Styles gallery, click the style that corresponds to the number level you wish to apply. For example, to apply the top level numbering click Heading 1 and for the third level numbering click Heading 3 (assuming those are the styles you assigned).
The numbering and all the numbering settings will be applied to the selected text or the paragraph in which the cursor was positioned.

And that, my friend, is how you do multilevel numbering in Word with no loose ends.
How to set up a dual-multilevel numbering system in Word
7. Two resources to help you
1. Grab your free multilevel numbering troubleshooting guide.

2. Watch over my shoulder as I set up multilevel numbering from scratch.

8. What next?
I hope you found plenty of value in this post. I’d love to hear your biggest takeaway in the comments below together with any questions you may have.
Have a fantastic day.


About the author
Jason Morrell
Jason loves to simplify the hard stuff, cut the fluff and share what actually works. Things that make a difference. Things that slash hours from your daily work tasks. He runs a software training business in Queensland, Australia, lives on the Gold Coast with his wife and 4 kids and often talks about himself in the third person!
SHARE
- Remove From My Forums
-
Question
-
How does this work?
As you can see the ‘set value to’ is all grayed out and cannot be changed.
8.9.1 is incorrect and has previously been used. I need to set to 8.9.5
How ???
Why does the ‘Advance value’ say’ skip numbers’. I want to advance the value but I don’t want to skip numbers. The last number was 8.9.4 so I need 8.9.5.
Why must MS Word make this so difficult. Why can’t it figure out the last number used was 8.9.4?
This is Word 2010.
-
Edited by
Tuesday, January 26, 2016 4:21 AM
-
Edited by
Answers
-
The answer to this thread is that it certain circumstances (mine), the set numbering dialog cannot be used to correct numbering.
You have to erase the misnumbered line, then reinsert the text as normal text, then reapply the style.
Why this works and the renumbering dialog does not is a mystery only Microsoft in its infinite wisdom can answer.
-
Marked as answer by
AllTheGoodNamesWereTaken
Tuesday, January 26, 2016 4:59 PM
-
Marked as answer by
Change the numbering in a numbered list
- Double-click the numbers in the list. The text won’t appear selected.
- Right-click the number you want to change.
- Click Set Numbering Value.
- In the Set value to: box, use the arrows to change the value to the number you want.
Contents
- 1 How do you fix automatic numbering in Word?
- 2 How do I fix multilevel numbering in Word?
- 3 Why is numbering not continuing in Word?
- 4 How do I start numbering from 2.1 in Word?
- 5 How do I get 1.1 Numbering in Word?
- 6 What is multi level numbering?
- 7 What is the difference between Heading 1 and Heading 2 in Word?
- 8 How do I change the numbering format in Word?
- 9 How do I reset heading numbering in Word?
- 10 How do you restart numbering styles?
- 11 How do you update the heading 2 style to match the formatting?
- 12 How do I make heading 3 in Word?
- 13 How do I align a list of numbers in Word?
- 14 Why is there an indent after 10?
- 15 How do you fix bullets in Word?
How do you fix automatic numbering in Word?
Go to File > Options > Proofing. Select AutoCorrect Options, and then select the AutoFormat As You Type tab. Select or clear Automatic bulleted lists or Automatic numbered lists.
How do I fix multilevel numbering in Word?
How to fix Multilevel list in Word
- Select the first heading level and then from the Word Main menu, under the tab Home, within the group Paragraph, click the Multilevel List icon.
- From the drop-down list, click option Define New Multilevel List.
Why is numbering not continuing in Word?
Well, you can try all you want, but sometimes Restart Numbering is grayed out! To fix it, just select the previous number’s paragraph…the whole thing, including the paragraph return at the end. Hit the Format Painter, then select the “bad” paragraph, including the paragraph return at the end.
How do I start numbering from 2.1 in Word?
If you just need the chapter number included in captions, on the On the Home Ribbon, in the Paragraph Group, click the Multilevel List icon and select the one with the words Chapter 1 in it from the List Library section. If you need subsections numbered (for example, 2.1, 2.2, 2.12, etc.)
How do I get 1.1 Numbering in Word?
Click the Home tab, then click the Multilevel List icon. – This opens the List Library. 2. From the drop-down list, select: 1 Heading 1, 1.1 Heading 2, 1.1.
What is multi level numbering?
Multilevel lists allow you to create an outline with multiple levels. In fact, you can turn any bulleted or numbered list into a multilevel list by placing the insertion point at the beginning of a line and pressing the Tab key to change the level for that line.
What is the difference between Heading 1 and Heading 2 in Word?
Usually, the topic heading at the top of your page will be Heading 1. The headings of sections within the document will have Heading 2 styles.Next, give each section of the document a meaningful heading. Assign each of these a Heading 2 style.
How do I change the numbering format in Word?
Define a new number format
- Select the text or numbered list you want to change.
- On the Home tab, in the Paragraph group, click the arrow next to Numbered List.
- To change the style, click the down arrow next to Number style and choose numbers, letters, or another chronological format.
How do I reset heading numbering in Word?
Add a new header and apply Heading 1. Right-click the number and choose Restart at 1 from the resulting submenu (Figure G). As you can see in Figure H, Word retains the number for the original list and restarts it for the new list.
How do you restart numbering styles?
To restart a numbered list: If you want to restart the numbering of a list, Word has a Restart at 1 option. It can be applied to numeric and alphabetical lists. Right-click the list item you want to restart the numbering for, then select Restart at 1 from the menu that appears.
How do you update the heading 2 style to match the formatting?
Alter the Heading to the format you want. Highlight the Heading and right-click on Heading 2 from the Styles Group. Select “Update Heading to match selection” ● Every Heading 2 in the document will update to the new format! Yes, really!
How do I make heading 3 in Word?
When you have the selection where you want to insert a Heading 3 style paragraph, press CTRL+SHIFT+s to display the Apply Styles dialog and in the Style Name control type Heading 3 and then click on Apply. Likewise for Heading 4. Headings 1 and 2 are displayed in the Quick Styles gallery and Styles pane by default.
How do I align a list of numbers in Word?
RECOMMENDED FOR YOU
- Create the numbered list.
- Select the list items you want to realign.
- You’ll find the Numbering tool in the Paragraph group on the Home tab.
- In the resulting dialog box, choose Right from the Alignment drop-down list.
- Click OK.
Why is there an indent after 10?
Re: Numbered List Indents After 10. It happens because Verdana is slightly wider than the default font. The numbers all fit within the tab position with the narrower font, but the two-digit numbers won’t fit when you switch to the wider Verdana font.
How do you fix bullets in Word?
Change bullet indents
- Select the bullets in the list by clicking a bullet.
- Right-click, and then click Adjust List Indents.
Last Update: Jan 03, 2023
This is a question our experts keep getting from time to time. Now, we have got the complete detailed explanation and answer for everyone, who is interested!
Asked by: Mr. Alexie Cartwright
Score: 5/5
(46 votes)
If you want to change any number in a list to 1, here’s how:
- Double-click the numbers in the list. The text will not appear selected.
- Right-click the number you want to start a new list.
- Click Restart at 1.
How do I make a numbered list not starting at 1?
Let’s try to figure out on how to start a numbered list other than 1 or A. Go to the numbered list and select the entire list and do a right click and click on Set Numbering Value. The Set Numbering Value window opens on your screen.
How do you get 1.0 numbering in Word?
Open your document that uses built-in heading styles, and select the first Heading 1. On the Home tab, in the Paragraph group, choose Multilevel List. Under List Library, choose the numbering style you would like to use in your document.
How do I fix sequential numbering in Word?
Numbering with Sequence Fields
- Position the insertion point where you want the sequential number to appear. …
- Press Ctrl+F9 to insert field braces. …
- Type «seq NumList» (without the quote marks).
- Press F9 to update the field information.
Why does my page number start at 2?
If the first page is a cover page, or a title page, then the second page of the document should be page 1, and the first page shouldn‘t be labeled at all. … Under Options, select Different First Page. (This will start page numbering page 2, but the second page will be labeled “2”.
35 related questions found
How do you change page 1 to 2nd in Word?
Start page numbering later in your document
- Go to Insert > Header or Footer > Edit Header or Edit Footer.
- Select Different First Page. …
- In the header or footer area, you should see a label on the first page that says First Page Header. …
- Select Close Header and Footer or press Esc to exit.
How do I start numbering on page 2 in Word?
Beginning page numbers on the second page
- On the Insert tab, in the «Header & Footer» group, click Page Number.
- Click Top of Page, Bottom of Page, or Page Margins, depending on where you want page numbers to appear in your document.
- Choose a page numbering design from the gallery of designs.
How do you change numbering to automatic numbering in Word?
From the Tools menu, choose AutoCorrect. Select the AutoFormat As You Type tab, and check the option for Automatic numbered lists.
How do I make a heading 1.1 in Word?
Microsoft Word heading numbering
Go to Home tab, Click Multilevel List in Paragraph Group. Select the style that includes the word “Heading”, here you can choose the list-icon with 1 Heading 1, 1.1 Heading 2, 1.1.
How do you get heading 2 to follow Heading 1 numbering?
For the Heading 2, In the Define new Multilevel list dialog:
- Click 2 in the left bar under Click level to modify,
- Select Heading 2 from the Link level to style drop down list,
- Select Level 1 from the Level to show in gallery drop down list. See screenshot:
How do you set numbering value in Word?
Right-click the number you want to change. Click Set Numbering Value. In the Set value to: box, use the arrows to change the value to the number you want.
…
Start with 1.
- Double-click the numbers in the list. The text will not appear selected.
- Right-click the number you want to start a new list.
- Click Restart at 1.
How do I start numbered from a different number in Word?
Define a new list style
- Select the text or numbered list you want to change.
- On the Home tab, in the Paragraph group, click the arrow next to Multilevel List. …
- Specify a name for your new list style.
- Choose the number to start the list at. …
- Choose a level in the list to apply your formatting.
How do you start a list with starting and continuing numbering?
Do one of the following:
- Right-click the selected number and choose Restart at 1 in the popup menu:
- On the Home tab, in the Paragraph group, click Numbering or from the popup menu (for more details see Creating numbered lists) and then choose Set Numbering Value….
How do I insert a 1.1 Numbering in Powerpoint?
Insert a bulleted or numbered list
- On the View tab, click Normal.
- Click in the text box or placeholder where you want to add bulleted or numbered text.
- On the Home tab, in the Paragraph group, click Bullets or Numbering. , and begin typing your list. Press Return to create a new list item.
What is a Level 1 heading?
Levels of heading
Level 1 is the highest or main level of heading, Level 2 is a subheading of Level 1, Level 3 is a subheading of Level 2, and so on through Levels 4 and 5. Headings are covered in Sections 2.26 and 2.27 of the APA Publication Manual, Seventh Edition.
How do I turn on automatic numbering?
Turn on or off automatic bullets or numbering
- Go to File > Options > Proofing.
- Select AutoCorrect Options, and then select the AutoFormat As You Type tab.
- Select or clear Automatic bulleted lists or Automatic numbered lists.
- Select OK.
How do I turn off Numbering in Word?
Turning off automatic bullets or numbering
- Click the File tab in the Ribbon.
- Select Options. A dialog box appears.
- In the categories on the left, select Proofing.
- Click AutoCorrect. …
- Select the Autoformat As You Type Tab.
- Deselect on uncheck Automatic bulleted list and / or Automatic numbered lists.
- Select OK twice.
What is multi level numbering?
Multilevel lists allow you to create an outline with multiple levels. In fact, you can turn any bulleted or numbered list into a multilevel list by placing the insertion point at the beginning of a line and pressing the Tab key to change the level for that line.
How can I start numbering on page 3?
Step 2: Insert page numbers
- Put the cursor in the footer of page 3.
- Go to the tab “Insert” and click on the button “Page Number” How to insert a page number (c) Screenshot.
- Choose your preferred design. By default, MS Word inserts page number 3. …
- Click on “Format Page Numbers” …
- Choose “Start at”
How do I start page numbering on the second page?
Insert page numbers
- Select Insert > Page Number, and then choose the location and style you want.
- If you don’t want a page number to appear on the first page, select Different First Page.
- If you want numbering to start with 1 on the second page, go to Page Number > Format Page Numbers, and set Start at to 0.
How do you make a 2 page 1 page on pages?
Move the pointer over the top or bottom of the page until you see the three header or footer fields, then click the field you want to use (left, center, or right). in the toolbar, click the Document tab, then select the Header and Footer checkboxes). Click Insert Page Number, then choose a numbering style.
How do I start page numbers on a specific page in Word?
At the top of the page, before the first line/word, click on the document to place your curser. Then choose Page Layout from the top menu. Next select Breaks — Next Page. Now choose Insert from the top menu and then select Page Numbers and then choose how you want them to appear in the document.
How do I put different page numbers in Word?
To choose a format or to control the starting number, go to Header & Footer > Page Number > Format Page Numbers. To change the numbering style, select a different style in Number format. To change the starting page number of the newly created section, select Start at, and then enter a number. Select OK.
How do you turn Track Changes on in Word?
Turn tracked changes on or off
- Open the document that you want to edit.
- On the Review tab, under Tracking, select the Track Changes switch to turn on track changes. Tips: Each reviewer’s changes are displayed in a different color. If there are more than eight reviewers, Word will reuses colors.
There is a “bug” in Microsoft Word’s numbering styles that may cause the style to change to a black rectangular box. This could effect any heading and appendix style. … dotm file to your document will fix this black rectangular box issue.
Where is set Numbering in Word?
On the Home tab, in the Paragraph group, click Numbering or from the popup menu (for more details see Creating numbered lists) and then choose Set Numbering Value….
Why is automatic numbering not working in Word?
Go to File > Options > Proofing. Select AutoCorrect Options, and then select the AutoFormat As You Type tab. Select or clear Automatic bulleted lists or Automatic numbered lists.
How do I fix numbering problems in Word?
Correct a Word document when lists won’t renumber correctly
- Right-click the numbered list.
- Click Set Numbering Value.
- Select the Start New List button.
- In the Set Value text box, type 1 and then click OK.
How do I fix sequential numbering in Word?
Sequentially Numbering Elements in Your Document
- Position the insertion point where you want the sequential number to appear. …
- Press Ctrl+F9 to insert field brackets. …
- Type “seq ” followed by the name of the element. …
- Press F9 to update the field information.
How do I manually change Numbering in Word?
Change the numbering in a numbered list
- Double-click the numbers in the list. The text won’t appear selected.
- Right-click the number you want to change.
- Click Set Numbering Value.
- In the Set value to: box, use the arrows to change the value to the number you want.
How do you change numbering to automatic numbering in Word?
From the Tools menu, choose AutoCorrect. Select the AutoFormat As You Type tab, and check the option for Automatic numbered lists.
How do you do numbering?
Numbers
- Within your Microsoft document, place your cursor or highlight the text where you wish to insert a numbered list.
- Under the tab in the “Paragraph” section, click the drop-down menu.
- Choose a numbering style or select “Bullets and Numbering” to create a customized numbering style.
How do I fix heading numbers in Word 365?
Open your document that uses built-in heading styles, and select the first Heading 1. On the Home tab, in the Paragraph group, choose Multilevel List. Under List Library, choose the numbering style you would like to use in your document.
How do you fix styles in Word?
On the Home tab, right-click any style in the Styles gallery and click Modify. In the Formatting section, make any formatting changes you want, such as font style, size, or color, alignment, line spacing, or indentation. Choose whether the style change applies to the current document or to all future documents.
How do I restart numbering in footer?
To restart page numbering:
- Place the insertion point at the top of the page you want to restart page numbering for. …
- Select the Layout tab, then click the Breaks command. …
- A section break will be added to the document.
- Double-click the header or footer containing the page number you want to restart.
How do you reset Numbering in Word?
Restart numbering at 1
- Click the item that you want to be the first item in the new list.
- On the Format menu, click Bullets and Numbering, and then click the Numbered tab.
- Under List numbering, click Restart numbering.
Why is my multilevel list not working?
Click on the office button->word options->proofing->auto correct options->auto format as you type and select the check box “set left and first indents with tabs and back spaces” under automatically as you type section at the bottom.
How do you hard code numbering in Word?
This can be done by going to File > Options > Proofing > AutoCorrect Options > AutoFormat As You Type > Under Apply as you type, turn off Automatic numbered lists. I hope that answers your question.
What is bullets and numbering in MS Word?
In bulleted lists, each paragraph begins with a bullet character. In numbered lists, each paragraph begins with an expression that includes a number or letter and a separator such as a period or parenthesis. The numbers in a numbered list are updated automatically when you add or remove paragraphs in the list.
How do you number sections in a legal document?
You can number sections consecutively (i.e. 1., 2., 3. or (1), (2), (3)) or you can number the articles and sections using a multiple-numeration system (i.e. the sections of article 2 being numbered 2.1, 2.2, 2.3). Do not number sections 2.01, 2.02, 2.03, or 2.1., 2.2., 2.3. (with an extra full stop).
How do I reset Bullets and Numbering in Word?
You can do so by following these steps:
- Choose Bullets and Numbering from the Format menu. …
- Make sure the Bulleted tab is displayed. …
- Select one of the seven other formats shown in the gallery.
- If the Reset button becomes available, click it. …
- Click Yes. …
- Repeat steps 3 through 5 for the other gallery formats on the tab.
How do I change the multi level numbering in Word?
Define a new multilevel list
- Select the text or numbered list you want to change.
- On the Home tab, in the Paragraph group, click the arrow next to Multilevel List. …
- Expand the Multilevel list dialog box by clicking More in the lower left corner.
- Choose the list level to modify by selecting it in the list.
Why is numbering in Word so difficult?
Numbering can be difficult to understand because, ironically, Word attempts to make it simple by ‘hiding’ the way it works. Unfortunately, this means that, when it goes wrong, you do not know how to fix it.
What does sequence number mean?
What is a Sequence Number? Number sequence is a progression or an ordered list of numbers governed by a pattern or rule. Numbers in a sequence are called terms. A sequence that continues indefinitely without terminating is an infinite sequence, whereas a sequence with an end is known as a finite sequence.
Which button below is used to apply numbering?
To create a numbered list in Microsoft Word, follow the steps below. Position the cursor where you want to insert the number list. On the Home tab in the Ribbon, click the number list button, as shown at the top of the page. If successful, a number one should appear.
What is sequential number?
Sequential Numbering is a popular feature on custom-printed forms Sequential Numbering, also known as Consecutive Numbering, refers to the printing of ascending or descending identification numbers so that each printed unit receives its own unique number.
When I Restart Numbering in Word the formatting changes?
When you go to restart the numbering (right-click and select “Restart at 1″), Word changes the hanging indent to be . 25″ (we need it to be . 12″). Is .
It’s vexing that the numbering features in Word aren’t all in the one place. Instead they’re spread across different dialog boxes including “Adjust List Indents … ” and “Set Numbering Value…”. Those two bland names hide some useful Word tricks. Numbering can also be set as a style.
The main Numbering Gallery lets you choose a numbering style and the main settings. The other settings are on the right-click menu in the list itself.

Adjust List Indents
Hiding on this relatively obscure dialog is a very useful number formatting option – Follow number with.
Right-click in a list and choose Adjust List indents.

It’s the only way to access these options. They aren’t available via Define New Number Format where they should be.

Number position: The gap between the margin and the start of each number.
Text indent: the position where the following text begins.
Here’s a slightly extreme example with Number Position: 0.5″ and Text indent: 1″

As you can see, the tab markers on the ruler show the two positions. You can use those markers to adjust the positioning.
Follow Number with
Maybe you won’t want tabs between the number and the text? If so, go to Adjust List Indents | Follow Number with.

Tab is the default and the ‘Adjust List Indents’ dialog is so underused that many think all numbering must have a tab after it.
Space is also possible or nothing at all. Space is useful as we’ll see in a moment.
Changing the Adjust List Indent setting to space lets you create numbered lists that look like normal paragraphs.

The intermediate lines are created with a line break (Shift + Enter) with a character style for consistency.
‘Nothing’ can merge the numbering into, say, a serial number.

Set Numbering Value
Another right-click menu which not only sets the starting value of the list but also if it continues numbering from a previous list.

Continue from previous list will use the next number from the end of the previous list.
Advance value (skip numbers) lets you set a different start value for the continued list.
Set Numbering Value is also available from the right-click menu within a list plus quick options for restarting a list at 1 or continue numbering.

You can set any starting number you like up to 32,767.

In our tests, that’s the highest starting value accepted, though the list will count above that.

Style Control
The default list numbering style is List Paragraph but you can change that.

Make different styles for various types of numbering in a document.
All the numbering options are under Format | Numbering.
Word Numbered List tricks
Changing Word numbering
Seven different numbering options in Word
How to Easily Create Numbered or Bullet list in Word without indents
Numbered List with Only Odd or Even Numbers in Word
In today’s article, there are 6 useful tips available to help you make easy use of numbered or bulleted lists in your Word document.
“Bullets” and “Numbering” are 2 useful features in Word, ensuring items in your Word document are organized in a neat way. However, as long as we continue benefiting from this function, there are little problems which can be annoying and ruin our document formatting sometimes. Therefore, here are 6 tips which make it easier to handle bulleted or numbered lists. Let’s take a look at different cases and then see their solutions.
Case 1: Issue of Capitalization
If you have ever used a numbered or bulleted list, you will find the first word of each item is always capitalized automatically, such as below:
This is because Word considers each item as a sentence. Yet, we don’t need such a consideration sometimes. Then here are tips you can take:
Tip 1: Change Case Manually
- Firstly, you should select list contents.
- Next, go to “Font” group under “Home” tab and click “Change Case”.
- On the drop-down list, choose “lowercase”.


Or you can choose to select all the first letter of all items vertically in step 1 and then change their case. As for how to select texts vertically, please refer to this article: 2 Quick Ways to Select Texts Vertically in Your Word Document
Tip 2: Change Word Options
An alternative way is to make change of Word options before creating a numbered or bulleted list.
- Click “File” and then click “Options” to go to “Word Options” dialog box.

- Next, click “Proofing”.
- Then click “AutoCorrect Options”.
- The “AutoCorrect” dialog box shall pop up. Clear the “Capitalize first letter of sentences” box.
- Lastly, click “OK” in both open dialog boxes.


After this, all new lists created in the future will get affected.
Case 2: Issue of Indents
Have you noticed there are always indents before a bulleted or numbered list? This is especially apparent if we show the text boundaries.
To eliminate them, you can take following steps:
- Select the entire list.
- Then go to “Paragraph” group under “Home” tab. And click “Decrease Indent” option.

- Or you can first select a list number then right click on it.
- On the list-menu, click “Adjust List Indents”.

- In the same name dialog box, choose to alter the bullet or number position and indents accordingly.
- Then click “OK”.


You have to know that such a change will affect all the lists afterwards. But if you use first 2 steps to kill the indents, the impact is on the list you selected only.
Case 3: Remaining of Bullets or Numbers
To get only the contents of a numbered list, we often choose to paste by “Keep Text Only” option. The truth is it’s not enough. The numbers or bullets will also come with the text. To address that, additional settings are required.
- Open “Word Options” dialog box first.
- Then click “Advanced” this time.
- Next, go to “Cut, copy and paste” part. Clear the “Keep bullets and numbers when pasting text with Keep Text Only option” box.
- Finally, click “OK”.


This is a once for all modification. Certainly, you can choose to remove the bullets or numbers of a single list. Then in that way, you paste the list with “Keep Text Only” option and selected the numbers or bullets vertically and delete them.
Case 4: Number Awkwardness of Starting New Lists
When you want to start a new numbered list below an existing one, Word will by default generate a number following the previous list. Here are 2 tips for you to deal with that:
Tip 1: Restart at 1
- Firstly, right click on the new list number.
- Then choose “Restart at 1” option, and everything should be fine.


Tip 2: Set Numbering Value
- Right click on the new number, too.
- This time choose “Set Numbering Value” to open the same name dialog box.

- Make sure the “Start new list” option is selected.
- Then set the value to “1”.
- At last, click “OK”.


Work out the File Corruption Issue
In our daily experience of processing words in Word, it’s barely impossible to avoid losing files due to Word crashes or virus attacks. Most of the time, these files are not totally missing but get compromised in some way. To extract the critical information out, you need an excellent Word file corruption recovery tool.
Author Introduction:
Vera Chen is a data recovery expert in DataNumen, Inc., which is the world leader in data recovery technologies, including xls file problem repair tool and pdf repair software products. For more information visit www.datanumen.com