

Try it!
Change margins in your document to change the layout and make sure everything fits.
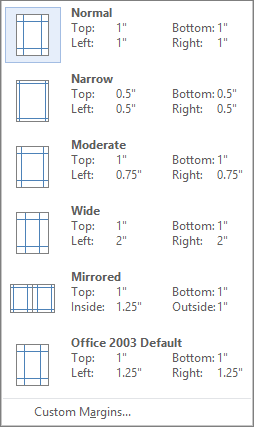
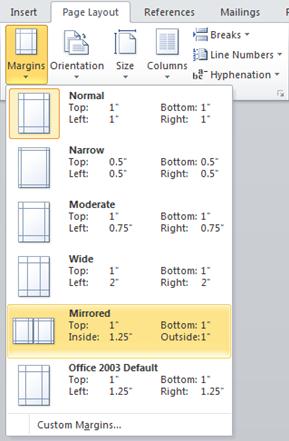
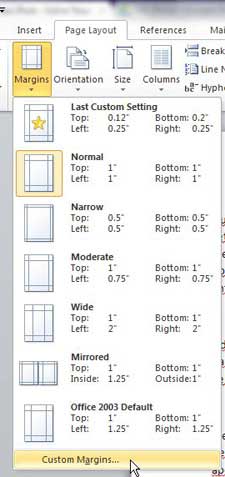
Apply a predefined margin setting
-
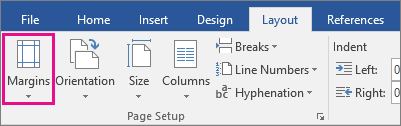
Select Layout > Margins.

-
Select the margin measurements you want.
Note: If your document contains multiple sections, the new margins apply only to the selected sections.
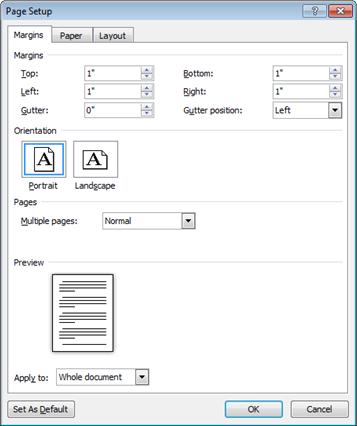
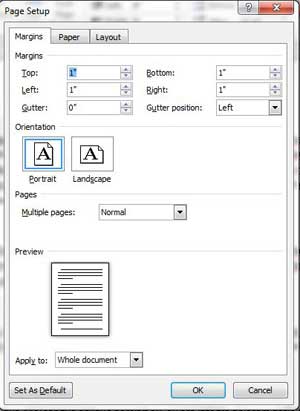
Create a custom margin
-
Select Layout > Margins.
-
Select Custom Margins.
-
In Margins, use the Up and Down arrows to enter the values you want.
-
Select OK when done.
Change default margins
-
Select Layout > Margins > Custom Margins.
-
Set your margins.
-
Select Set As Default.
-
Confirm your selection.
Want more?
Set page margins in Word
Discover more Word training at LinkedIn Learning
Need more help?
Change margins
In Word, each page automatically has a one-inch margin. You can customize or choose predefined margin settings, set margins for facing pages, allow extra margin space to allow for document binding, and change how margins are measured.
-
Select Layout > Margins.
-
Select the margin configuration you want, or select Custom Margins to define your own margins.
Important:
Office 2010 is no longer supported. Upgrade to Microsoft 365 to work anywhere from any device and continue to receive support.
Upgrade now
What would you like to do?
-
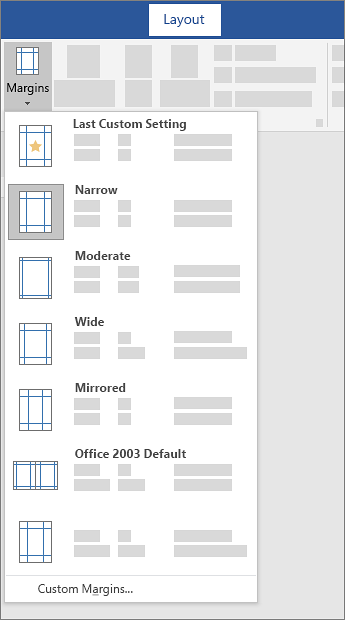
On the Page Layout tab, in the Page Setup group, choose Margins and the Margins gallery appears.
-
Choose the margin type that you want to apply.
Note: If your document contains multiple sections, the new margin type will only be applied to the current section. To apply the new margin type to multiple sections, be sure to select each one.
3. Make your new margin settings the default for your template. Each new document based on that template will automatically use the new margin settings.
-
Choose Margins after you select a new margin, and then choose Custom Margins.
-
In the Page Setup dialog box, choose Set As Default.
-
On the Page Layout tab, in the Page Setup group, choose Margins and the Margins gallery appears.
-
At the bottom of the Margins gallery, choose Custom Margins.
-
In the Page Setup dialog box, enter new values for the margins.
More tips about margins
-
Change the margins for only a section of a document by selecting the text and entering the new margins in the Page Setup dialog box. In the Apply to box, click Selected text. Microsoft Word automatically inserts section breaks before and after the text with new margin settings.
-
Most printers require a minimum width for margin settings. If your settings are too narrow, Microsoft Word displays the message One or more margins are set outside the printable area of the page. Click Fix to automatically increase the margin width. If you ignore the message, Word will display another message asking whether you want to continue.
-
Minimum margin settings for printing depend on your printer, printer driver, and paper size. To learn about your minimum settings, check your printer manual.
Use mirror margins to set up facing pages for double-sided documents, such as books or magazines. When you choose mirror margins, the margins of the left page are a mirror image of those on the right page. The inside margins are the same width, and the outside margins are the same width.
-
On the Page Layout tab, in the Page Setup group, click Margins >Mirrored.
Note: To change margin widths, click Custom Margins at the bottom of the Margins gallery. Enter new values in the Inside and Outside boxes.
A gutter margin adds extra space to the side margin, top margin, or inside margins of a document that you plan to bind to help ensure that text isn’t obscured by binding.
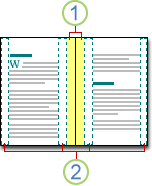
1. Gutter margins for binding
2. Mirror margins for facing pages
To set the gutter margin
-
On the Page Layout tab, in the Page Setup group, click Margins.
-
Click Custom Margins.
-
In the Gutter box, enter a width for the gutter margin.
-
In the Gutter position box, click Left or Top.
Note: The Gutter position box is not available when you use the Mirror margins, 2 pages per sheet, or Book fold option. For those options, the gutter position is determined automatically.
Word can display lines in your document to represent text boundaries.
-
On the File tab, click Options.
-
Click Advanced, and then select the Show text boundaries check box under Show document content.
The page margins appear in your document as dotted lines.
Note: You can view page margins in either Print Layout view or Web Layout view, and the text boundaries don’t appear on the printed page.
Important:
Office 2007 is no longer supported. Upgrade to Microsoft 365 to work anywhere from any device and continue to receive support.
Upgrade now
What would you like to do?
Microsoft Word offers several page margin options. You can use the default page margins or specify your own.
-
Add margins for binding
A gutter margin adds extra space to the side margin, top margin, or inside margins of a document that you plan to bind to help ensure that text isn’t obscured by binding.
1. Gutter margins for binding
2. Mirror margins for facing pages
-
Set margins for facing pages
Use mirror margins to set up facing pages for double-sided documents, such as books or magazines. In this case, the margins of the left page are a mirror image of those of the right page. The inside margins are the same width, and the outside margins are the same width. -
Note: You can set gutter margins for a document that has mirror margins if the document needs extra space for binding.
-
Add a book fold
Using the Book fold option in the Page Setup dialog box, you can create a booklet. Use the same option to create a menu, invitation, event program, or any other type of document with a single center fold.

1. Word inserts a single, center book fold
After you set up a document as a booklet, work with it just as you would any document to insert text, graphics, and other visual elements.
-
Most printers require a minimum width for margin settings. If you try to set margins that are too narrow, Microsoft Word displays the message One or more margins are set outside the printable area of the page. Click Fix to automatically increase the margin width. If you ignore the message, Word will display another message asking whether you want to continue.
-
Minimum margin settings depend on your printer, printer driver, and paper size. To learn about your minimum margin settings, check the printer manual.
-
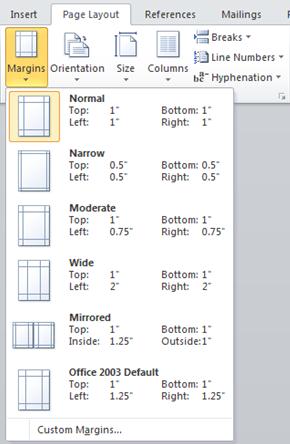
On the Page Layout tab, in the Page Setup group, click Margins.
-
Click the margin type that you want. For the most common margin width, click Normal.
Note: When you click the margin type that you want, your entire document automatically changes to the margin type that you have selected.
-
You can specify your own custom margin settings. Click Margins, click Custom Margins, and then in the Top, Bottom, Left, and Right boxes, enter new values for the margins.

-
To change the default margins, click Margins after you select a new margin, and then click Custom Margins. In the Page Setup dialog box, click the Default button, and then click Yes. The new default settings are saved in the template on which the document is based. Each new document based on that template automatically uses the new margin settings.
-
To restore the original margin settings, click Margins and then click Custom Margins. Change the margins for Top, Bottom, Left, and Right to 1″. Then click the Default button and click Yes.
-
To change the margins for part of a document, select the text, and then set the margins that you want by entering the new margins in the Page Setup dialog box. In the Apply to box, click Selected text. Microsoft Word automatically inserts section breaks before and after the text that has the new margin settings. If your document is already divided into sections, you can click in a section or select multiple sections and then change the margins.
-
Click the Microsoft Office Button
, and then click Word Options. -
Click Advanced, and then click the Show text boundaries check box under Show document content.
The page margins appear in your document as dotted lines.
 , and then click Word Options.
Note: You can view page margins in either Print Layout view or Web Layout view, and the text boundaries do not appear on the printed page.
When you choose mirror margins, the margins of the left page are a mirror image of those on the right page. The inside margins are the same width, and the outside margins are the same width.
-
On the Page Layout tab, in the Page Setup group, click Margins >Mirrored.
-
Click Margins > Custom Margins, and in the Inside and Outside boxes, enter the widths that you want.
A gutter margin setting adds extra space to the side margin or top margin of a document that you plan to bind. A gutter margin helps ensure that text isn’t obscured by the binding.
-
On the Page Layout tab, in the Page Setup group, click Margins >Custom Margins.
-
In the Multiple pages list, click Normal.
-
In the Gutter box, enter a width for the gutter margin.
-
In the Gutter position box, click Left or Top.
Note: The Gutter position box is not available when you use the Mirror margins, 2 pages per sheet, or Book fold option. For those options, the gutter position is determined automatically.
-
Click on the text box you created to highlight it.
-
Click on the Format tab in the ribbon.
-
Click the small button in the lower left of the Size group.
-
In the Format Text Box window, click the Text Box tab.
-
In the Internal margin section, you can customize the margins to your desired size.
-
Click OK.
If this article did not answer your question, you can chat with a Microsoft virtual agent or a person at any time.
Need more help?
Margins are the blank spaces between the main content and the edges of your document. They create a boundary to make sure none of your content is too far or too close from the edge of your document. Ultimately, margins make your document look neat and more professional. MS Word offers various ways to easily change the margins of your document.
However, changing margins on a single page can be a little frustrating sometimes. This is particularly true when you’re dealing with several documents with multiple pages.
Well, we’ve got good news for you! We’ve laid out in this guide down below the steps to easily change the margin on one page in MS Word.

Now, there are about two ways to change the margin on one page in MS Word.
- Using the Page Setup Dialogue Box
- By inserting Section Breaks
Lets get started
Method 1: Using the Page Setup Dialogue Box
In this method, we’ll walk you through the steps of changing your margins by accessing the Page Setup dialogue box in MS Word. This method is the quickest way to get the job done, as this creates section breaks for you automatically.
Step 1: Open up an MS Word file.

Step 2: Select the content.
With your document open, go ahead and select the part of the content you want in different margins. Take note that you can either select an entire page or a single paragraph.
For this example, we’ll select the second paragraph from our main text.

Step 3: Access the Page Setup dialogue box.
Go to the Layout tab on the Ribbon and click on the small box with a down arrow key found at the bottom-right corner of the Page Setup group.
Layout -> Page SetupThis will launch the Page Setup dialogue box right in the middle of your screen.

Alternatively, you can simply double-click the gray part of the Ruler.

Step 4: Change the margin.
On the dialogue box, change the margin format by typing your desired measurements in the Top, Bottom, Left, and Right margin fields.
Then, click the Apply to drop-down menu and select Selected text.

Click on the OK button to save the changes. Otherwise, click on the Cancel button.

Method 2: By Inserting Section Breaks
This method allows you to quickly insert section breaks within your document as you create it. This is often the preferred configuration before setting up the margins for each section.
Here’s how you can insert section breaks in MS Word.
Step 1: Open up an MS Word document.
Before anything else, we’ll need to open up an MS Word document. Feel free to use your own personal documents for this guide if you already have one prepared. Don’t worry about messing up your document, as this method won’t change or delete any of your content.

Step 2: Insert section breaks.
With your document ready, start inserting section breaks before and after the page that you want in a different margin format. For this example, we’ll insert section breaks before and after the second paragraph.

Place your cursor at the start of the page that you want margins changed. Go to the Layout tab and click the Breaks drop-down menu. Then, select Next Page under the Section Breaks group.

If your document has multiple pages, you’ll notice that the rest of the main text has been pushed down the succeeding pages.
Finally, place your cursor at the end of the page and insert another section break. From our example, notice that the second paragraph is now on a single page.

Step 3: Change the margin format.
Once you’ve successfully set up the section breaks, you can start changing the margins for that section already. Go to the Layout tab and click the Margins drop-down menu. Once the different preset margin formats are displayed, select one from the selection that suits your needs.

If what you need is not in the options, select Custom Margins. This will launch the Page Setup dialogue box in the middle of your window.

On the dialogue box, type in your desired measurements for each of the margins.

Voila! You’ve just inserted section breaks to change the margin on one page in MS Word.
Editing Margin on One Page in MS Word
Editing margins is as easy as a-b-c. Microsoft Word offers several ways to edit margins. Even preset margin formats can still be modified to your preference. All these options can be found in the Page Setup dialogue box.
To access the Page Setup dialogue box, simply follow the steps we’ve laid out in Method 1. Once you’ve launched the Page Setup dialogue box, you can just change the Top, Bottom, Left, and Right margin fields to your required measurements.
Conclusion
You’ve finally arrived at the end of this tutorial. We hope we’ve helped you figure out how to change the margin on one page in MS Word. Here’s a quick rundown of what we’ve talked about today.
We’ve covered two different ways to change the margin on one page in MS Word. The first method employs the use of the Page Setup dialogue box. This is the most straightforward and fastest method to get the job done. On the other hand, the second method allows you to insert section breaks in a document. This way, you can easily configure the margin formats of the different sections.
We hope you’ve found this article helpful!
Select Layout > Margins. Select Custom Margins. In Margins, use the Up and Down arrows to enter the values you want.
Change default margins
- Select Layout > Margins > Custom Margins.
- Set your margins.
- Select Set As Default.
- Confirm your selection.
Contents
- 1 How do I set custom margins for one page in Word?
- 2 What are the default margins in Word 2019?
- 3 What is the normal margin size for Microsoft Word?
- 4 How do I set the Margins on the first page only?
- 5 How do I set Margins in Word 2010?
- 6 Why are my Microsoft Word margins messed up?
- 7 How do I change margins in Word 2016?
- 8 How do I set 2.5 cm margins in Word?
- 9 What is margin How do we set the margin?
- 10 What is the right margin in Word?
- 11 How do I change the Margins in Word without moving the header?
- 12 How do I change the Margins on one page in Word 2010?
- 13 How do I set Margins in Word 2007?
- 14 How do I fix the bottom margin in Word?
- 15 How do you change Margins on pages?
- 16 How do I set Margins in cm in Word?
- 17 How do you create margin at the top & bottom 1.1 inch and right & left 1.5 inch?
How do I set custom margins for one page in Word?
Word also allows you to customize the size of your margins in the Page Setup dialog box.
- From the Page Layout tab, click Margins. Select Custom Margins… from the drop-down menu.
- The Page Setup dialog box will appear.
- Adjust the values for each margin, then click OK.
- The margins of the document will be changed.
What are the default margins in Word 2019?
Word’s default margins are 1 inch on each side of the page, but you can change the margins to accommodate the needs of your document.
What is the normal margin size for Microsoft Word?
1-inch
Both the MLA and APA style guides require 1-inch margins on the top, bottom and both sides of the page. In most cases, when you open Microsoft Word, the margins will already be set to 1-inch. To be sure you have the margins set to 1-inch: Click on the Page Layout tab.
How do I set the Margins on the first page only?
Here’s a super easy way.
- Insert a Section Break (Next Page) from Page Layout > Breaks.
- Click on the page you want to expand/narrow the margins.
- Click on Custom Margins from Page Layout > Margins.
- In the Page Setup window put in the custom margin size you want then click OK.
How do I set Margins in Word 2010?
How to Change Page Margins in Microsoft Word 2010
- Open your document in Word 2010.
- Select the Page Layout tab.
- Click the Margins button.
- Choose the desired page margin setting.
Why are my Microsoft Word margins messed up?
If your document is in Print Layout view and the top and bottom margins appear to be cut off, the option for hiding margins has been switched on. Here’s how to switch it off: Point to the top or bottom of a page until the pointer becomes a double-pointed arrow, and then double-click.
How do I change margins in Word 2016?
Word also allows you to customize the size of your margins in the Page Setup dialog box.
- From the Layout tab, click Margins. Select Custom Margins from the drop-down menu.
- The Page Setup dialog box will appear.
- Adjust the values for each margin, then click OK.
- The margins of the document will be changed.
How do I set 2.5 cm margins in Word?
Select Layout > Margins. Select Custom Margins. In Margins, use the Up and Down arrows to enter the values you want. Select OK when done.
Change default margins
- Select Layout > Margins > Custom Margins.
- Set your margins.
- Select Set As Default.
- Confirm your selection.
What is margin How do we set the margin?
A margin is a space separating text or other elements from the edge of the paper commonly adjusted through the page setup.Most programs allow for the top, bottom, left, and right margins to be set. The standard margin settings are 1″ top and bottom and 1.25″ left and right.
What is the right margin in Word?
1 inch
The top, bottom, and right margins are required to be 1 inch, but the left margin can either be 1 inch or 1.25 inches. All body text, tables, figures, appendices content, and any copies of published chapters must fit within the required 1-inch margins on all sides.
The correct way to do this—so that the left margin of the footer is not affected—is to simply indent the paragraphs. In the main body of the text, select the paragraphs to be indented and then adjust the left indent setting for them.
How do I change the Margins on one page in Word 2010?
Question: In Word 2010, how do I change the page margins in a document? Answer:Select the Page Layout tab in the toolbar at the top of the screen. Then in the Page Setup group, click on the Margins button. This will open a popup menu where you can select one of the preset margins or “Custom Margins”.
How do I set Margins in Word 2007?
Follow these steps to make the changes stick:
- In the ribbon, click the Page Layout tab.
- Click the Margins tool in the Page Setup group.
- Click Custom Margins.
- Change your right and left margins to one inch.
- Click the Default button.
- Click Yes.
How do I fix the bottom margin in Word?
Questions and answers
- From the Layout tab, Page Setup group, click on the Margins icon.
- Choose Custom Margins…
- From the Margins tab, set the value for the top, bottom, left and right margins.
- Click OK.
How do you change Margins on pages?
Set margins
- Tap.
- Tap More Options at the bottom of the controls.
- In More Options view, drag the double arrows on the top, bottom, and sides of the document to set the margins.
- When you’re finished, tap Done in the top-left corner to close More Options view and return to the document.
Change units used for margin measurement
- Go to File > Options > Advanced. Scroll down to Display.
- Select the unit you want in Show measurements in units of.
- Select OK.
How do you create margin at the top & bottom 1.1 inch and right & left 1.5 inch?
Click the Page Layout tab. Click Margins, then click Custom Margins. Enter your desired default margins into the Top, Left, Bottom, and Right fields, then click Set as Default. Click Yes to confirm the new default margins.
Is it possible to change the margins for an individual page in Microsoft Word?
asked Oct 22, 2009 at 2:40
![]()
In word 2007: Page Layout / Breaks / Section breaks / Next page (or any of the other …) / Margins / Custom margins / Make sure it says «Apply to this section» / Change margins for every section individually.
May I ask, what kind of a document you’re making that has different margins on every page ?
answered Oct 22, 2009 at 2:56
![]()
RookRook
23.5k32 gold badges125 silver badges212 bronze badges
1
-
On the File menu, click Page Setup, and then click the Margins tab.
Under Margins, select the options you want. -
To change the default margins, click Default after you select new margin settings. The new default settings are saved in the template on which the document is based. Each new document based on that template automatically uses the new margin settings.
-
To change the margins for part of a document, select the text, and then set the margins you want. In the Apply to box, click Selected text. Microsoft Word automatically inserts section breaks before and after the text with the new margin settings. If your document is already divided into sections, you can click in a section or select multiple sections and then change the margins.
![]()
digitxp
14.3k9 gold badges56 silver badges76 bronze badges
answered Aug 23, 2011 at 15:01
![]()
GaneshGanesh
911 silver badge1 bronze badge
An alternative could be to alter the relevant paragraphs so that they have more indentation at left and right, or negative values for «outdentation» (no good for top and bottom margins though)
answered Oct 30, 2009 at 14:10
![]()
AdamVAdamV
6,0281 gold badge22 silver badges38 bronze badges
![]()
Download Article
A user-friendly guide to changing a Word document’s margins to wide, narrow, and more
![]()
Download Article
- Applying Preset Margins (Desktop)
- Creating Custom Margins (Desktop)
- Using the Mobile App
- Q&A
- Warnings
|
|
|
|
Are you trying to adjust your margins in Microsoft Word? The margins are the empty space between the edge of the page and the contents of the document. Depending on your needs, you can change the margins to become wider, narrower, or a mix of both. You’ll be able to select from a few preset options or customize your own. This wikiHow will show you how to fix and change the default 1-inch margins in Microsoft Word using your iPhone, Android, or Windows or Mac computer.
Things You Should Know
- On desktop, click «Layout» → «Margins» → select a margin preset.
- For custom margins, click «Custom Margins…» and enter the values for Top, Left, Bottom, and Right.
- On mobile, tap «•••» → «Home» → «Layout» → «Margins» → select a preset or «Custom Margins». Enter a new value and tap «Done».
-
1
-
2
Click Layout. This will be in the top toolbar, between Design and References.
Advertisement
-
3
Click Margins. You can find this in the upper-left corner of the Layout tab. This looks like a rectangle with blue lining the margins.
- A pop-up menu will open.
-
4
Select a margin type. You’ll see a list of preset margins: Normal, Narrow, Moderate, Wide, Mirrored, and Office 2003 Default. Click a preset margin to apply it to your document. It should be applied immediately.
- If you don’t like how it looks, you can select Normal again, or press CTRL + Z (Windows) or CMD + Z (Mac) to undo the change.
Advertisement
-
1
Click Layout. This will be in the top toolbar, between Design and References.
-
2
Click Margins. You can find this in the upper-left corner of the Layout tab. This looks like a rectangle with blue lining the margins.
- A menu will open.
-
3
Click Custom Margins…. This will be at the bottom of the drop-down menu.
- A new window will open.
-
4
Set your new margins. On the desktop application, you’ll be able to edit the margin sizes for: Top, Left, Bottom, Right, Gutter, and Gutter Positions. On the web version, you’ll only be able to edit the margin sizes for: Top, Left, Bottom, and Right. You’ll see a preview of the document layout at the bottom of the window.
- Click the field and enter your new margin size, or use the up/down arrow to adjust the current margins.
- For Gutter Positions, select Left or Top.
- Only adjust the Gutter margin if you intend to use the document in a bound format, like a book or report, and you need space for the binding. In this case, type a number in Gutter that will allow enough room for the binding and use the drop-down to indicate whether the binding will be on the top or on the left.
- Make sure Apply to is set to Whole document, unless you only want to change the margins from This point forward.
-
5
Set new default margins (optional). If you want to use this margin for all new documents in Microsoft Word, click Set as default in the bottom-left corner. Click Yes to confirm.
- When you create a new document, the margins will reflect the change.
-
6
Click OK when finished. The changes will be applied immediately.
Advertisement
-
1
Open the Microsoft Word app. Microsoft Word is available for iOS in the App Store and for Android in the Google Play Store.
- If you aren’t already logged in to your Microsoft account, enter your email address and password to do so now.
-
2
Open a new or existing project. Tap a recent project on your homepage, or tap the + tab to create a new one.
-
3
Tap ••• . This is the «•••» located at the top of your on-screen keyboard. If you don’t see your keyboard, tap the document to open it.
- A new menu will open at the bottom.
-
4
Tap Home. This is located at the top of the new menu.
- A pop-up menu will open.
-
5
Tap Layout. You can find this between Draw and Review.
-
6
Tap Margins. This is the first listing in the Layout tab.
-
7
Select a margin type. You’ll see a list of preset margins: Normal, Narrow, Moderate, Wide, and Mirrored. Tap a preset margin to apply it to your document. It should be applied immediately.
- If you don’t like how it looks, you can select Normal again, or pick a new preset.
- Be sure to save your document when you’re finished.
-
8
Create a custom margin (optional). Tap Custom Margins at the bottom of the Margins menu. You’ll be able to edit the margin sizes for: Top, Left, Bottom, and Right.
- Tap a margin to edit it.
- Tap the backspace button to erase the existing margin.
- Enter a new margin value.
- Tap Done in the top-right corner.
- Tap Margins → Custom Margins to edit another margin.
- The changes will be applied immediately.
Advertisement
Add New Question
-
Question
I want the page ruler. What can I do?

To get the ruler, go into the View tab (Word 2010 and newer) and select the Ruler checkbox.
-
Question
Can I ever allow one more letter on a line to finish a long word rather than wrap to the next line?
No. The only thing you could possibly do would be to make all the margins wider. Making only one word go to the next line is impossible unless you do the same for all words.
Ask a Question
200 characters left
Include your email address to get a message when this question is answered.
Submit
Advertisement
Thanks for submitting a tip for review!
-
Leaving the margin under .25″ may lead to text being cut off when printed.
Advertisement
About This Article
Article SummaryX
1. Open a Microsoft Word document.
2. Click the Layout tab.
3. Click Margins.
4. Click Custom Margins….
5. Set the margins.
6. Click the Apply to drop-down.
7. Select how to apply the margins.
8. Click OK.
Did this summary help you?
Thanks to all authors for creating a page that has been read 493,303 times.
Is this article up to date?
The page margins in a Microsoft Word document often need to be set or changed depending on your school or organization’s requirements.
Fortunately, this is one of the more commonly-changed settings in Word documents, so Microsoft has made it something fairly simple to adjust.
Our guide continues below with a tutorial on how to set margins in Word 2010, as well as some additional information that you might want to know about document formatting.
How to Change Page Margins in Microsoft Word 2010
- Open your document in Word 2010.
- Select the Page Layout tab.
- Click the Margins button.
- Choose the desired page margin setting.
Our article continues below with additional information on how to set margins in Word 2010, including pictures of these steps.
Learning how to change page margins in Word 2010 is important for anyone that is unable to work with the default settings for that property. Unlike adjusting text formatting options, such as using all small caps in Word, there are a variety of documents that apply to your document’s layout.
If you have ever written a paper for a high school or college teacher, then you know just how rigid many of them can be when it comes to page layout. Their restrictions typically involve preferred settings for title pages and bibliographies, but can also extend to involve the formatting of each page.
Among the page formatting options that many audiences will demand is a specific margin. While their reasoning for keeping margins standard typically involve preventing students from needlessly extending page counts, proper margins can also help in keeping a paper more visually appealing.
Outside of a scholastic setting, however, page margins are also helpful for fitting as much information as possible on one page. This is especially beneficial in situations where a lot can be gained by minimizing the page count of a document, such as when you are creating a resume. You can freely change the margins of your Word 2010 document at any time until you find a setting that you prefer.
If you need to switch the unit of measurement, then check out our guide on how to set 1 inch margins in CM in Microsoft Word.
How to Set Page Margins in Microsoft Word 2010 (Guide with Pictures)
Word 2010 includes several different options for simplifying the setting of your page margins. The default setting is called Normal and features a 1 inch margin on each side of the page. There are also preset options to make the margins smaller or larger and, in most cases, one of these options will be suitable for your needs. However, there is also the option to set custom margins, which can allow you to customize the document as much as is necessary.
Step 1: Begin changing your page margins in Microsoft Word 2010 by double-clicking your document file to open it in Word.
Step 2: Once the document is open, click the Page Layout tab at the top of the window.
At the top of this view is a horizontal bar, called the ribbon, that features most of the options that you will need to modify the layout of your page.
Step 3: Click the Margins drop-down menu in the Page Setup section of the ribbon, then choose the margin option that suits your needs.
If none of the presets offer an option that you prefer, click the Custom Margins option at the bottom of the menu.
Step 4: Verify that the Margins tab at the top of the window is selected, then enter your custom margin settings into the fields at the top of the window.
Note that if you choose a small margin setting (generally anything less than .5 inches) you may receive a warning when you go to print the document that there is a problem with the margins being outside of the print area. Some printers may still be able to print anyway but, if your document does not print correctly, you may need to increase the margin size.
After you have entered margin settings on this menu, click the OK button at the bottom of the window to apply the settings to your document.
Now that you know how to set margins in Word 2010 you will be able to return to this menu and make adjustments when you have a document with incorrect margin settings.
If you decide later that you do not like the layout of your pages with the current margin settings, you can return to this menu to change them.
Note that changing margin settings can affect the page count of your document, as reducing or increasing the margin size will increase or decrease the amount of text that can fit on each page.
Summary – How to Change Word 2010 Document Margins
- Click the Page Layout tab.
- Click the Margins button in the Page Setup section of the ribbon.
- Click your desired margin setting, or click Custom Margins to create your own.
The assorted margin settings available by default provide most of the options needed to set margins or change margins in Word 2010 and comply with common formatting requirements.
But if your situation requires margin settings that can only be set via the Custom Margins menu, then you might want to consider using the Set as Default button at the bottom-left of the Custom Margins menu.
Not only will this make new documents use the margins that you require, it can also help you avoid potential penalties in the future if you accidentally forgot to adjust your margins.
Do you need to change your page orientation a lot, and you are looking for a way to stop? Learn how to set landscape as default in Word 2010 so that every new document you create has the long edge of the paper at the top.
Additional Sources

Matthew Burleigh has been writing tech tutorials since 2008. His writing has appeared on dozens of different websites and been read over 50 million times.
After receiving his Bachelor’s and Master’s degrees in Computer Science he spent several years working in IT management for small businesses. However, he now works full time writing content online and creating websites.
His main writing topics include iPhones, Microsoft Office, Google Apps, Android, and Photoshop, but he has also written about many other tech topics as well.
Read his full bio here.

Word documents open with one-inch margins by default. You can adjust the page margins by choosing one of Word’s predefined options, or you can specify the exact height and width of the margins yourself. Here’s how.
Open Word and head over to the “Layout” tab. Here, select “Margins” in the “Page Setup” group.

Once selected, a drop-down menu will appear. Here, you’ll find Word’s list of predefined margin settings.
Go ahead and choose an option if you see one that matches what you’re needing. Once selected, the page margins will change based on those specifications.
If you weren’t able to find an option that fits what you’re looking for, you can customize the page margins yourself down to the tenth of an inch by selecting “Custom Margins” at the bottom of the drop-down menu.
The “Page Setup” window will now appear, in which you’ll automatically be in the “Margins” tab. Under the “Margins” section, you can adjust the top, bottom, left, and right margins by clicking the up and down arrows next to each option. This increases or decreases the page margins by 0.1-inch increments.
You can also adjust the gutter margin. The gutter margin is generally used in facing-pages layouts (known as “Mirrored” in Word) and refers to the area of the page that is rendered unusable or unviewable due to the binding process.
Setting the gutter margin works the same way as setting the page margin. Simply adjust the margin by selecting the up or down arrow next to the option.
Once you’re done, select “OK” to apply the changes.
Set a Custom Margin as the Default
If you’re finding yourself using the same custom margins over and over, instead of setting the margins each time you open Word, you can just set your custom margins as the default.
To do so, select “Margins” in the “Page Setup” group of the “Layout” tab. In the drop-down menu that appears, select “Custom Margin.”
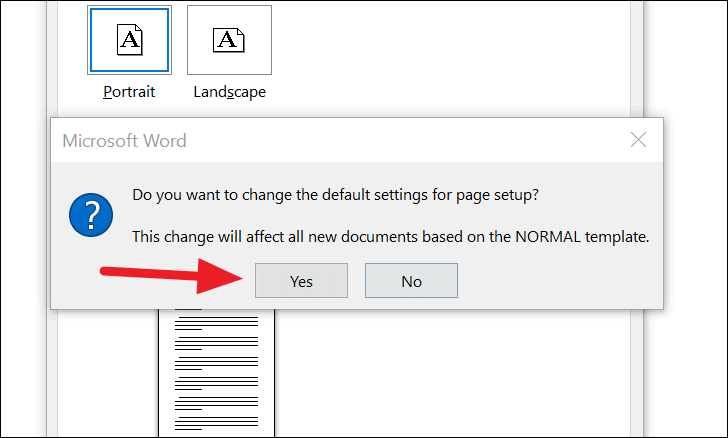
In the “Page Setup” window that appears, customize your margins and then select “Set As Default” in the bottom-left corner of the page.
A dialog box will appear letting you know the changes will affect all new documents based on the NORMAL template. Select the “Yes” button.
Now, next time you open Word, it will automatically open with the set custom margins.
READ NEXT
- › Learn These Microsoft Word Features to Make College Easier
- › How to Put a Border Around Text in Microsoft Word
- › How to Change the Page Color in Microsoft Word
- › 8 Microsoft Word Tips for Professional Looking Documents
- › 8 Default Microsoft Word Settings You Should Change
- › How to Number Paragraphs in Microsoft Word
- › How to Make Only One Page Landscape in a Word Document
- › How to Get a Refund on the PlayStation Store
How-To Geek is where you turn when you want experts to explain technology. Since we launched in 2006, our articles have been read billions of times. Want to know more?
Not all documents fit inside Word’s default one-inch margin between the text and the edge of the page. To change the margins in your Word documents, use one of several choices, from predefined margins that make it easy to apply a different size margin, to the customized margins adjustable to fit your needs.
These directions work with all currently supported desktop versions of Word and Word for Mac, while Word Online offers limited margin capabilities.
Quickly Change Margins in Word
To make the margins in your document smaller or larger, use Word’s Narrow, Moderate, or Wide margins. To print your document on both sides of the paper and put it in a three-ring binder, use the Mirror margin setting.
Mirror margins cannot be set in Word Online. However, if you view a document with mirror margins in Word Online, the mirror margins are preserved.
To apply a predefined margin, select Layout > Margins and choose the predefined margin you want to use.
In Word Online, Word 2010 and Word 2007, the Layout tab is labeled as Page Layout. The steps to change margins remain the same.
Use the Ruler to Adjust Margins in Word
The horizontal ruler displayed below the Word menu provides another way to change the margins in your document.
Before you begin, display the ruler. If the ruler is not displayed above your document, select View and place a checkmark next to Ruler to display the ruler. You’ll also need to work in Print view. Select View > Print Layout to display the document in print view.
The ruler is not available in Word Online.
Here’s how to change the margins using the ruler:
- Change the left margin: Place the cursor over the left indents until it changes to a double-headed arrow. Drag the margin to the right to make it wider or to the left to make it narrower.
- Change the right margin: Place the cursor over the right indent until it changes to a double-headed arrow. Drag the margin to the left to make it wider or to the right to make it narrower.
Create Custom Margins
When you need a certain size margin for a document, use the custom settings.
Here’s how to set a custom margin size:
- Select Layout > Margins > Custom Margins.
- Change the size for the Top, Bottom, Left, and Right margins.
- Select Set As Default to set the new margin settings as the default for the current template. This margin setting will be used in each new document you create based on that template. This feature is not available in Word Online.
- Select OK when you’re finished.
Create Gutter Margins
Documents that will be bound need extra margin space for the binding. This gutter margin ensures the binding doesn’t interfere with the white space around the text.
To add a gutter margin, select Layout > Margins > Custom Margins and type a width in the Gutter box.
You cannot create gutter margins in Word Online. Switch to the desktop version of Word to set gutter margins.
Create Mirror Margins
Documents printed on both sides of the page and bound, such as books and magazines, use a special margin setting. These mirror margins ensure the right and left pages are mirror images of each other.
To create mirror margins, select Layout > Margins and select Mirrored. To change the size of the mirror margins, select Layout > Margins > Custom Margins and change the size of the Inside or Outside margins.
Set Margins for a Section of Your Document
When your document is divided into sections, you can apply different margin sizes to different sections. This feature is not available in Word Online.
To change the margins for a single section:
- Select the section in the document where you want a different margin size.
- Select Layout > Margins > Custom Margins.
- Type new values for the Top, Bottom, Right, and Left margins.
- From the Apply to list, select This Section.
- Select OK when you’re done.
View Page Margins
Word can display boundary lines that show you where the margins are in your document. These boundary lines appear as dotted lines. The margin boundaries cannot be viewed in Word Online.
To view the page margins:
- Select File > Options. In Word 2007, select the Microsoft Office button and select Word Options.
- Select Advanced.
- Scroll down to the Show document content section and select Show text boundaries.
- Select OK.
Thanks for letting us know!
Get the Latest Tech News Delivered Every Day
Subscribe
Change the margins of a document in Word and even set a default margin as per your preference for all documents you create in word using these simple instructions.

Mar 13, 2021
• 3 min read
Margins are the empty spaces between the content of a page and its edge. By default, the Word documents come with 2.54 cm or 1-inch margins.
You can change the default margin according to your need. You can select any of the preset margins or set a margin with custom values.
Change Margins in Word
To get started, open a Word document on your desktop application or on the cloud. Then, click on the ‘Layout’ tab in the main menu.
Selecting the ‘Layout’ tab will open ‘Page Setup’ options like Margins, Orientation, etc. Click on ‘Margins’ to see predefined margins in the drop-down menu. You can select any of them if they suit your need.
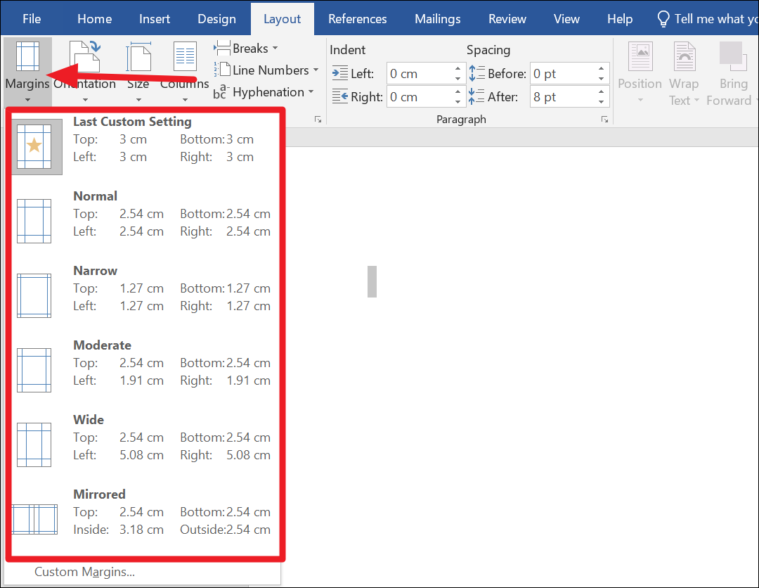
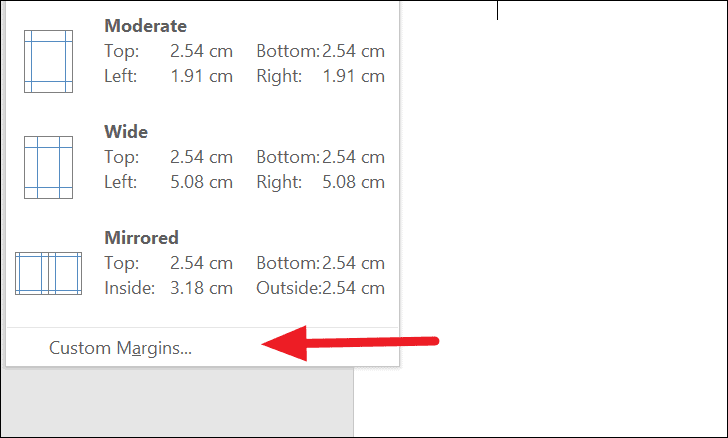
If you don’t find the margins you need, you can set custom margins by entering your own values. To set custom margins, click on ‘Margins’ and then click on ‘Custom Margins…’ at the bottom of the drop-down menu.
It will open the ‘Page Setup’ dialog box with default values (2.54 cm) as page margins. Change them as per your need and click on the ‘OK’ button.
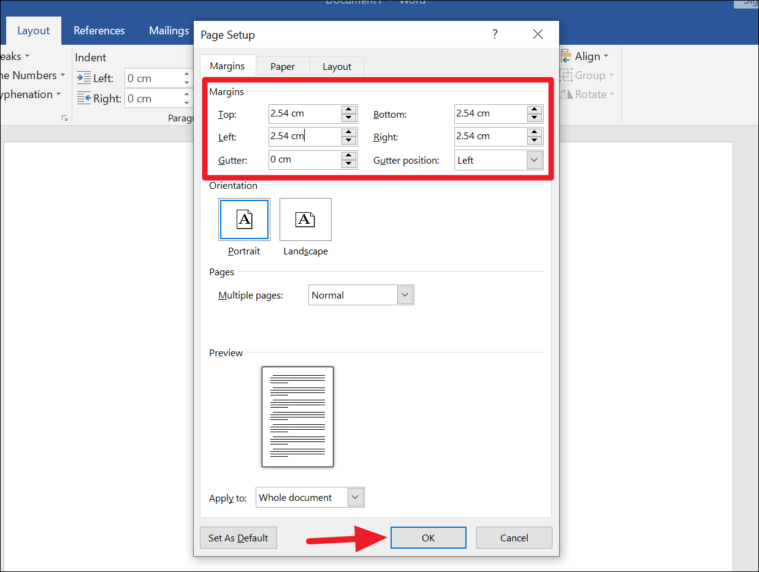
The ‘Gutter’ value in the margins represent the space which is unusable as it goes under binding after the documents are printed. If you need to change ‘Gutter’ value and ‘Gutter position’, you can enter desired value and position.
The page margins will now change according to the values you entered.
How to Set Custom Margins as Default
If you are facing a situation where you need to change page margins for every document you create, you can simply make those custom page margins as default and save time and effort.
Note: You can set custom margins as default only on the Desktop application. You will not find such an option in the cloud document.
The process of setting custom margins as default is similar to changing page margins until you enter the new values in the Page Setup dialog box. Open Word on your PC → Select the ‘Layout’ tab → Click on ‘Custom Margins…’ → Enter your custom values.
After entering the custom values, instead of clicking ‘OK’, Click on ‘Set As Default’.
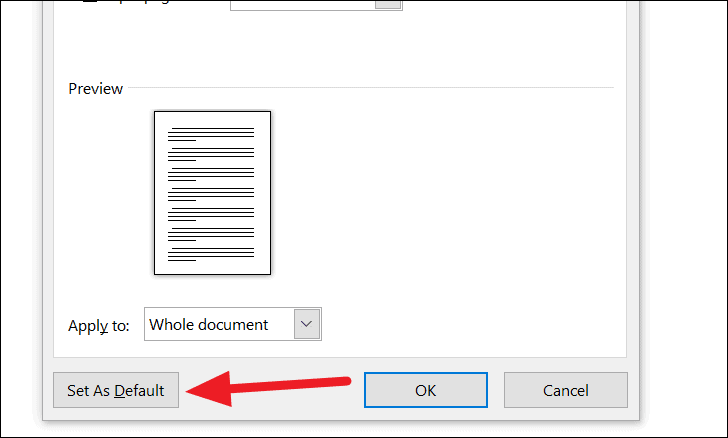
You will see a warning regarding the change of default margins. Click on the ‘Yes’ button.
When you open Word document, you will see the margins with the values you set as default.