
Project Online Desktop Client Publisher for Microsoft 365 Excel 2021 Word 2021 PowerPoint 2021 Project Professional 2021 Project Standard 2021 Publisher 2021 Excel 2019 Word 2019 PowerPoint 2019 Project Professional 2019 Project Standard 2019 Publisher 2019 Excel 2016 Word 2016 PowerPoint 2016 Project Professional 2016 Project Standard 2016 Publisher 2016 Excel 2013 Word 2013 PowerPoint 2013 Project Professional 2013 Project Standard 2013 Publisher 2013 Excel 2010 Word 2010 Project 2010 Project Standard 2010 Publisher 2010 More…Less
If you have Outlook installed as part of Microsoft Office, and set as your default email app, you can send your document as an email attachment. If you are using Excel, Publisher, or Word, you can also send your file as the body of an email message.
If Outlook is not your default email application you’ll need to configure it as the default in order to use this feature. For more information see: Make Outlook the default program for email, contacts, and calendar.
Send as an attachment
Excel, PowerPoint, and Word
-
Click File > Share, and then choose one of the following options:
Note: The options you see will vary depending on the Office program you’re using.
-
Upload to OneDrive Uploads your file to your OneDrive account where you can then share through a direct link or an email message.
-
Attach a copy instead Choose to attach a the file to an email, or attach a PDF of the file.
-
-
Enter the recipients’ aliases, edit the subject line and message body as necessary, and then click Send.
OneNote, Visio, Publisher, and Project
-
Click File > Share, and then choose one of the following options:
Note: The options you see will vary depending on the Office program you’re using.
-
Share with People (OneNote and Visio) Lets you enter name or email address for who you want to send to, set whether you want them to edit, require the user signs in before editing, and an optional message.
This option requires that your file is uploaded to OneDrive.
-
Send a Link (Visio) Allows everyone to work on the same copy of the file, see the latest changes, and keeps your email size small.
To send a link, the file must be saved to a Web server or shared folder.
-
Send as Attachment Opens an email message with a copy of the file in its original file format attached.
-
Send as PDF Opens an email message with a copy of the file in .pdf format attached.
-
Send as XPS Opens an email message with a copy of the file in .xps format attached.
-
-
Enter the recipients’ aliases, edit the subject line and message body as necessary, and then click Send.
Send as the body of an email message
If you are using Excel, Publisher, or Word, you can send your file as the actual email message content — not as an attachment. To do this, first you need to add the Send to Mail Recipient command to the Quick Access Toolbar. See Customize the Quick Access Toolbar to learn how to add commands.
-
Open the file you want to send.
-
In the Quick Access Toolbar, click Send to Mail Recipient to open an email message. Your file will appear in the body of the message.
-
Enter the recipients’ aliases, edit the subject line and message body as necessary, and then click Send.
Send as an attachment
Excel, PowerPoint, Project, Publisher, Visio, and Word
-
Click File > Share > Email, and then choose one of the following options:
-
Send as Attachment Opens an email message with a copy of the file in its original file format attached.
-
Send as PDF Opens an email message with a copy of the file in .pdf format attached.
-
Send as XPS Opens an email message with a copy of the file in .xps format attached.
-
Send as Internet Fax Opens a web page where you can choose from a list of providers that let you send a fax over the Internet.
Note: The options you see will vary depending on the Office program you’re using.
-
-
Enter the recipients’ aliases, edit the subject line and message body as necessary, and then click Send.
OneNote
-
Click File > Send, and then choose one of the following options:
-
Send as Attachment Opens an email message with both a copy of the file in its original file format and a copy of the file as a web page attached.
-
Send as PDF Opens an email message with a copy of the file in .pdf format attached.
-
-
Enter the recipients’ aliases, edit the subject line and message body as necessary, and then click Send.
Send as the body of an email message
If you are using Excel, Publisher, or Word, you can send your file as the actual email message content — not as an attachment. To do this, first you need to add the Send to Mail Recipient command to the Quick Access Toolbar. See Customize the Quick Access Toolbar to learn how to add commands.
-
Open the file you want to send.
-
In the Quick Access Toolbar, click Send to Mail Recipient to open an email message. Your file will appear in the body of the message.
-
Enter the recipients’ aliases, edit the subject line and message body as necessary, and then click Send.
Send as an attachment
The following instructions apply to Excel, PowerPoint, Project, Publisher, Visio, and Word.
-
Click File.
-
Click Save & Send.
-
Select Send Using E-mail, and then choose one of the following options:
-
Send as Attachment Opens an email message with a copy of the file in its original file format attached.
-
Send as PDF Opens an email message with a copy of the file in .pdf format attached.
-
Send as XPS Opens an email message with a copy of the file in .xps format attached.
Note: The PDF and XPS options are not available in Project 2010.
-
-
Enter the recipients’ aliases, edit the subject line and message body as necessary, and then click Send.
The following instructions apply to OneNote 2010:
-
Click File.
-
Click Send, and then choose one of the following options:
-
E-mail Page as Attachment Opens an email message with both a copy of the file in its original file format and a copy of the file as a web page attached.
-
E-mail Page as PDF
Opens an e-mail message with a copy of the file in .
pdf
format attached.
-
-
Enter the recipients’ aliases, edit the subject line and message body as necessary, and then click Send.
Send as the body of an email message
If you are using Excel, Publisher, or Word, you can send your file as the actual email message content — not as an attachment. To do this, first you need to add the Send to Mail Recipient command to the Quick Access Toolbar. See Customize the Quick Access Toolbar to learn how to add commands.
To send your file as the body of an email message, follow these steps:
-
Open the file you want to send.
-
In the Quick Access Toolbar, click Send to Mail Recipient
 to open an email message. Your file will appear in the body of the message.
 -
Enter the recipients’ aliases, edit the subject line and message body as necessary, and then click Send.
 to open an email message. Your file will appear in the body of the message.
See also
Attach files or insert pictures in Outlook email messages
Reduce the size of pictures and attachments
View, open, or save attachments
Need more help?
In this chapter, we will discuss how to email documents using Word 2010. Microsoft Word can be used to send a Word document in an email as an attachment directly at the given email address without opening your email program. This chapter will teach you simple ways of sending email in a variety of formats, including a Word document file (DOC) attachment or a PDF, among others.
Mailing Documents
Following are the simple steps to send a word document as an attachment at the given email address.
Step 1 − Open the document you want to send using e-mail as an attachment.
Step 2 − Click the File tab and then click the Save & Send option from the left most column; this will display a number of options to Save & Send, you will have to select the Send using Email option available in the middle column.
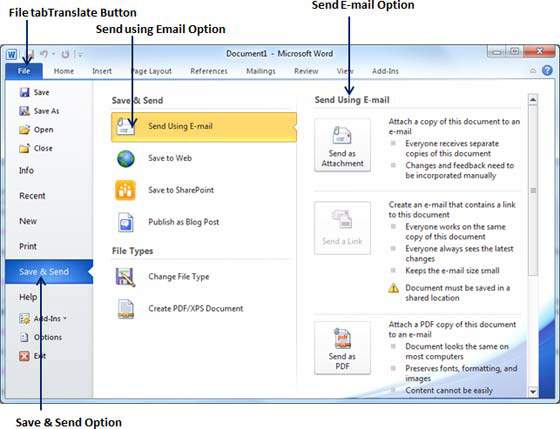
Step 3 − The third column will have various options to send email which allows you to send your document as an attachment in DOC format or you can send your Word document in a PDF format. Click a method to send the document. I’m going to send my document in PDF format.
When you click the Send as PDF option, it displays the following screen where you can type the email address to which you want to send your document, email subject and other additional messages as well. To send email to multiple recipients, separate each e-mail address with a semicolon (;) and a space.
![[Tuts] How to send Emails and attachments right on Word](https://techtipsnreview.com/wp-content/uploads/2022/01/Tuts-How-to-send-Emails-and-attachments-right-on-Word.jpg)
In the last article, I showed you the trick of sending a part of a spreadsheet or an attachment right on Excel without opening Email on a web browser.
To continue that topic, as well as to flexibly use Outlook and Word applications to send attachments faster, in this article I will continue to share with you a small tip in creating Send Email button right on Word file.
Support you to customize the content, and send quick Email to many objects on the same Word file. Sounds very interesting, isn’t it?
Instructions for sending Emails right on Word
To make sure that all the email sending process goes smoothly, first of all, please check that your Outlook has been configured with Email. If not, you can follow this tutorial first: Configure Gmail management on Microsoft Outlook.
Okay, now that we’re fully prepared, let’s get started!
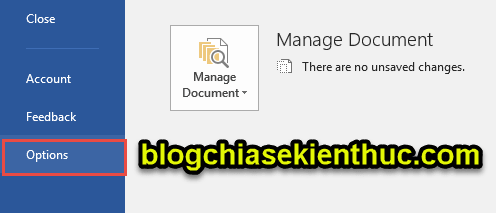
+ Step 1: Open your Word file.
+ Step 2: Here you click on the menu File ![]()
=> choose Options.
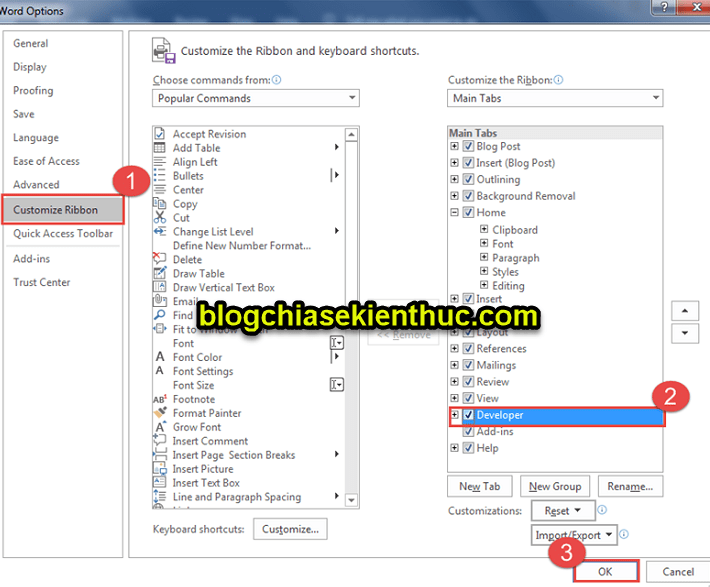
+ Step 3: Dialog box Word Options appears, here you open the tab Custommize Ribbon => then tick Developer => and press OK to add a tab for developers (Developer) on the Word application interface.
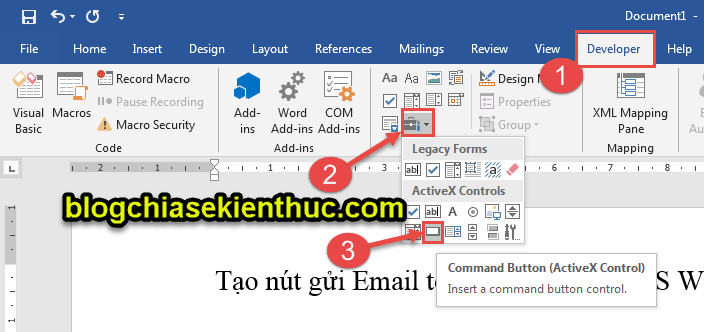
+ Step 4: Next you open the tab Developer out => and choose Legacy Tools => choose next Command Button (ActiveX Control) to create a button Button on Word files.
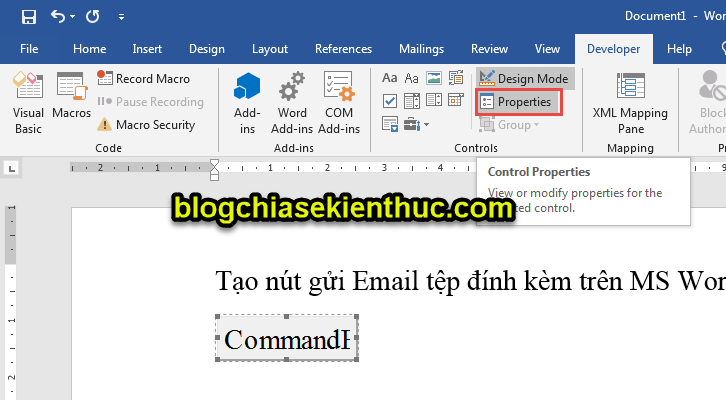
Then choose Properties as shown, let’s set it up a bit.
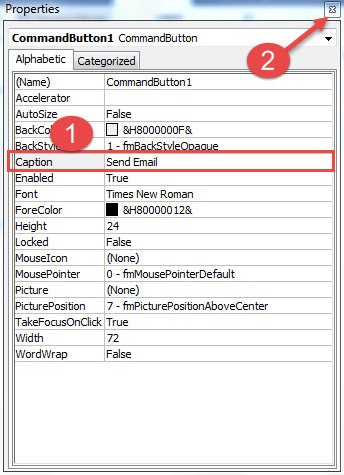
Now you name the button Button in Caption to be Send Email => and close the dialog Properties Go.
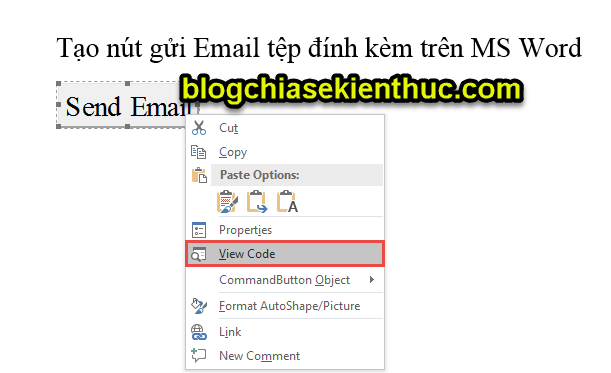
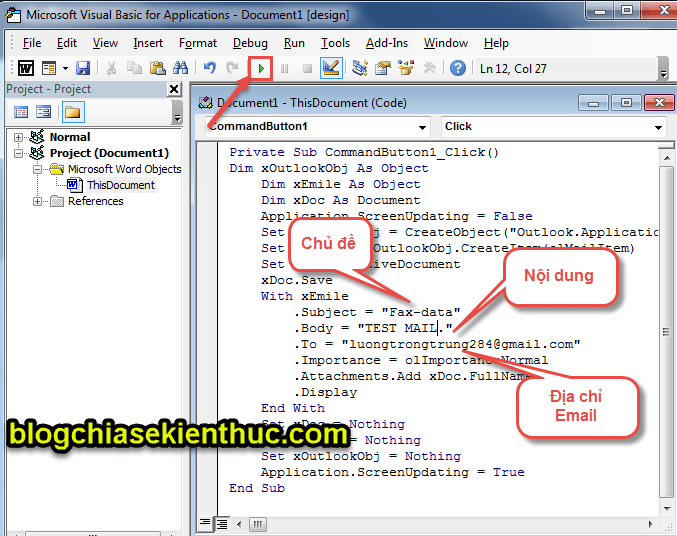
+ Step 5: Then you right click on the button Button => and choose View Code.
+ Step 6: Dialog box Microsoft Visual Basic for Applications open. At the top, you put the mouse pointer between the two Codes => Then copy the following code:

Dim xOutlookObj As Object
Dim xEmile As Object
Dim xDoc As Document
Application.ScreenUpdating = False
Set xOutlookObj = CreateObject(“Outlook.Application”)
Set xEmile = xOutlookObj.CreateItem(olMailItem)
Set xDoc = ActiveDocument
xDoc.Save
With xEmile
.Subject = “Fax-data”
.Body = “TEST MAIL.”
.Big = “[email protected]”
.Importance = olImportanceNormal
.Attachments.Add xDoc.FullName
.Display
End With
Set xDoc = Nothing
Set xEmail = Nothing
Set xOutlookObj = Nothing
Application.ScreenUpdating = True
+ Step 7: Paste into the dialog box ThisDocument (Code). Then please correct the information such as:
- Subject: Email Subject.
- Body: Email Content.
- Big: Receiver.
+ Step 8: Finally press Run to execute the command.
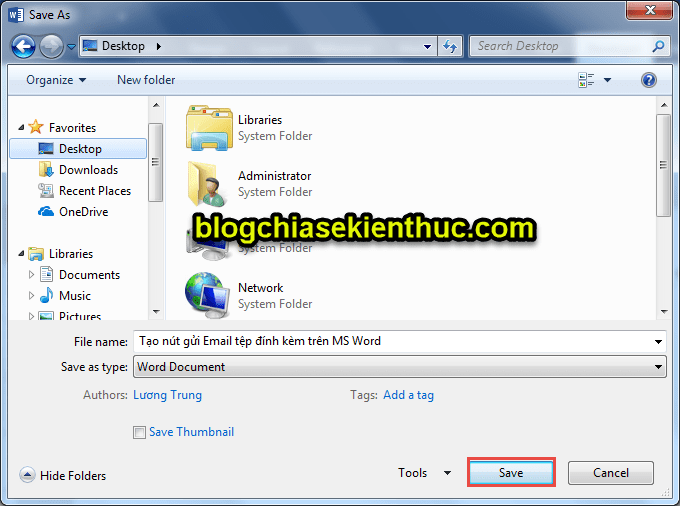
If you have not saved this Word file, the dialog box Save will appear, here you choose the location you want to save => and select Save to save files.
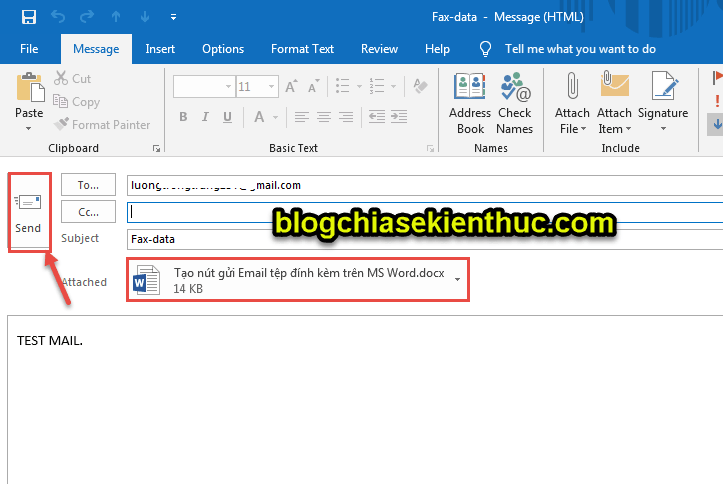
And click the Send button at the Outlook dialog box to send the Email, along with your Word file attachment. Very useful, isn’t it?
Epilogue
Okay that’s it, so I’ve just guided you in detail with the tips create button to send Email and attached Word file right on Wordto be able to send Email more quickly.
At this point, my tutorial on how to send Email (with attachments) on Word application is also paused. Hope this trick will be useful to you.
Good luck !
CTV: Luong Trung – techtipsnreview
The article achieved: 5/5 stars – (There are 3 reviews)
Note: Was this article helpful to you? Don’t forget to rate the article, like and share it with your friends and family!
Source: [Tuts] How to send Emails and attachments right on Word
– TechtipsnReview
![]()
Download Article
![]()
Download Article
No matter your platform, there’s no shortage of ways to send a Microsoft Word document to anyone on the Internet. Most cloud services (such as Google Drive and Dropbox) feature the ability to send documents directly from their desktop and mobile apps. You can also attach a document to an email or Facebook chat. And if you have mail program set up on your computer, you can even send your document without leaving Microsoft Word.
-
1
Sign in to your Gmail or Yahoo! Mail account. You can attach your Word document to a message in Gmail or Yahoo! Mail on a computer or by using either service’s app for mobile devices.
- Most free mail sites and apps are similar. These instructions may also help you use providers other than Gmail and Yahoo.
-
2
Click or tap “Compose”. In both mobile apps, the “Compose” icon is a pencil.[1]
A new message window will appear.Advertisement
-
3
Click or tap the paperclip icon. The file selection box will appear on most platforms.[2]
- If you’re using the Yahoo! Mail app on a mobile device, tap the + sign, and then tap the second icon (a sheet of paper) in the resulting toolbar.[3]
The file selection window should now appear.
- If you’re using the Yahoo! Mail app on a mobile device, tap the + sign, and then tap the second icon (a sheet of paper) in the resulting toolbar.[3]
-
4
Tap “Attach File” or “Insert from Drive”. You can skip this step if you’re not using the Gmail app on a mobile device.
- Choose “Insert from Drive” if the document is saved to your Google Drive.
- Choose “Attach File” if the document is saved to your phone or tablet.
-
5
Navigate to the document you want to attach. Browse to the location of your Word document and double-click (or tap) to attach it.
- If you’re attaching from Google Drive, tap the file you want to attach, and then tap “Select”.
-
6
Address the email to the recipient. Enter the desired recipient’s email address into the “To:” field, then add your subject and message content.
-
7
Click or tap “Send”. When the recipient opens the email, they’ll find the option to open or download the file to their computer or mobile device.


Advertisement
-
1
Open the Mail app on your device. To use this method, make sure Mail is properly configured to send mail from your email account.[4]
- You’ll be able to attach a document that’s on your device or in your iCloud Drive.
- If you have the Dropbox, Google Drive, or OneDrive apps installed on your device, you’ll have the option to attach a document from one of those accounts.
-
2
Tap the “Compose” icon. The icon looks like a square with a pencil.
-
3
Type an email address into the “To:” field. This should be the address of the person to whom you’ll be sending the document.
-
4
Type your message. Enter a subject into the “Subject” field and type a note to the recipient in the main text area.
-
5
Touch and hold your finger in the body of the message. A black bar will appear containing several options from which to choose.[5]
-
6
Tap “Add Attachment”. The file navigator will open to your iCloud drive by default.
-
7
Tap “Locations” to switch to another location. If the document is not located in your iCloud drive, choose it from any of the folders listed (including Google Drive, Dropbox, or OneDrive, if applicable).
- If you don’t see an icon for the cloud service you use, tap “More,” and then select your service. Flip the switch to the “On” position to enable it, and then use the back button to return to the Locations screen.
-
8
Select the file and tap “Add Attachment.” You’ll be returned to the email message you previously composed. This message now has your document attached.
-
9
Tap “Send.” The file will be delivered to the appropriate email account.


Advertisement
-
1
Launch the Mail app on your Apple device. To use this method, you’ll need to have the Mail app configured to send mail through your email account. If you haven’t already done so, do it now.
-
2
Press ⌘ Cmd+N to compose a new message. You could also click the New Message icon (a square with a pencil) or click File > New Message.[6]
-
3
Click the paperclip icon. This icon appears in the upper right area of the New Message Window.
-
4
Select the document and click “Choose File”. You can hold down the ⌘ Cmd key as you click if you want to select multiple files.
-
5
Address the email to the recipient. Type the recipient’s email address into the “To:” field, a subject in the “Subject:” field, and a note in the large text area.
-
6
Send the email. Click the paper airplane icon at the top left corner of the message to send the email and its attached document.


Advertisement
-
1
Open your Google Drive. If your Word document is located in your Google Drive, it’s easy to share it with others. Accessing your Drive is different depending on your platform:[7]
- Mobile: Launch the Google Drive app on your device.
- Desktop: Log in to http://drive.google.com in your web browser.
-
2
Navigate to the document you want to share. If you don’t see it in the main folder, you may have to look in some of the subfolders.
- If you haven’t yet uploaded the document from your computer, click New > File Upload, and then double-click the Word document.[8]
- If you haven’t yet uploaded the document from your computer, click New > File Upload, and then double-click the Word document.[8]
-
3
Click the ⋮ icon and tap “Add People.” Skip this step if you’re using the web version of Drive.
-
4
Right-click the file and select “Share.” Skip this step if you’re using the mobile app.
- Another way to do this is to single-click the document and then click the Share icon (the outline of a person’s head with a plus sign.)
-
5
Type the email address of the person you want to receive your file. If this person is one of your Google contacts, you can just start typing their name and then select the correct person from the search results.
-
6
Control whether the person can edit the copy in your Google Drive. By default, Drive gives the person permission to edit the document in your Google Drive.
- Leave this alone if you’re sharing the document with someone and you both plan to make edits.
-
7
Change “Can Edit” to “Can View” if you want the person to be able to download their own copy but not edit yours.
-
8
Select “Done” or “Share” to share the document. An email will be sent to the recipient containing information on how to access the document. They’ll be able to view it online or download it to their computer.


Advertisement
-
1
Open Dropbox on your computer or mobile device. If you’re a Dropbox user, you can use the service to share documents with anyone on the web. Using this method will send a message to the recipient that includes a link to the document. The recipient will be able to download the document by accessing that link (and they won’t need a Dropbox account).
- You’ll need to have a Dropbox account to use this method.
- You should also have the application installed on your device. If you’re using a computer, you can use the web version by signing in to http://www.dropbox.com.
-
2
Add the document to your Dropbox. If you haven’t uploaded the Word document to your Dropbox, do so now.
- Mobile app: Tap the “+” icon and then select “Upload files.” Navigate to the document you want to upload, and then tap “Upload File.”
- Desktop app: If the folder where the file’s stored is not already synced with Dropbox, drag the file from its current location to the Dropbox folder.
- Dropbox.com: Navigate to the folder where you’d like to store the file, then click the “Upload” icon to select your document.
-
3
Open the “Share” window. This step is a little different depending on your platform:[9]
- Mobile: Tap the downward-pointing arrow next to your Document and select “Share.”
- Desktop: Right-click (or Ctrl+Click) the document in the Dropbox application, then click “Share…”
- Dropbox.com: Hover the mouse over the document file and select “Share” (when the menu appears).
-
4
Select “Can View” from the permissions options. If you’re using a mobile device, you’ll see this option under “These People”.[10]
-
5
Type the email address of the person to whom you’d like to send the file. Enter this into the “To:” field. To add multiple recipients, separate each email address with a comma (,).
-
6
Select the “Invite” or “Send” button. The button name depends on your application.[11]
- If you’re using the Dropbox.com site, the button will say “Share.” An email will now be sent to the email address(es) you provided.


Advertisement
-
1
Log into Facebook. If you have a Word document on your computer that you want to send to someone else, you can do so using the web version of Facebook.[12]
- For this method to work, both you and the person to whom you’d like to send the document need to have Facebook accounts.
- The Facebook Messenger app does not support attaching documents saved to your phone, other than photos or videos
-
2
Open a chat window with the recipient. You will be attaching the document to a chat message.
- Click the mail icon at the top right area of Facebook and select “New Message.”
- Start typing the person’s name into the “To:” field and then click their name when it appears in the search results.
-
3
Click the paperclip icon at the bottom of the chat window. Now you’ll be able to navigate to the Word document on your computer.
-
4
Select the document and click “Open”. If you’re using a Mac, the button will say “Choose File.”
-
5
Press ↵ Enter or ⏎ Return to send the document. The recipient will be able to download the document by double-clicking the icon that appeared in the chat window.


Advertisement
-
1
Open your document in Word Online. If you’re using the free version of Microsoft Word available online, you can share the document right from the program.
- This method is similar to sharing a document from your OneDrive account. If your document is in OneDrive, navigate to the document to open it in Word Online.
-
2
Click the “Share” button. This button is at the top right corner of the screen.
-
3
Select “Invite People.” Here you can enter the email address of the person you’re sharing with.
-
4
Enter the recipient’s email address in the “To:” field. To add multiple recipients, separate each email address with a comma (,).
-
5
Select editing permissions for the document. By default, the recipient of the document will have the ability to make changes to your document. This is noted by the “Recipients can edit” dropdown on the Invite screen.
- If you want to share ongoing access to this document and want everyone on the Invite list to be able to make edits, leave this option alone.
- To share a read-only version of the document (cannot be edited by anyone else), click “Recipients can edit” and select “Recipients can only view.”
-
6
Type a note into the “Note” field. Think of this field as the body of an email. Type something here that will alert the recipient to what the email and document are about.
-
7
Click “Share.” An email will be sent to the recipient that contains a link to the document. With that link, the recipient can make changes to the document on Word Online (if you gave them permission to do so) or download the file to their computer.


Advertisement
-
1
Open your document in Microsoft Word. If you’re using Word 2016 for Windows or Mac, you’ll be able to use the built-in “Share” feature to send your document from the app.
- If you’re using an older version of Word, just click the File menu (or Office button in 2007) and select “Send” or “Send To” to send a Document.
-
2
Save changes to your document. To avoid sending an outdated version of your document, click “File” and then “Save”.
-
3
Click the “Share” icon. You’ll see this icon in the top right corner of Word. It looks like the silhouette of a person with a + sign.[13]
-
4
Click “Save to Cloud” if prompted. If you haven’t saved the document to the cloud, you’ll be prompted to do so. Word attempts to save your document to the cloud in case you want to share the document for editing instead of sending it as an attachment (more on this soon).
-
5
Click “Send as Attachment.” You may have to click “Share” again to see this option. “Send as Attachment” will allow you to email a copy of the document to a recipient.
- If, instead of sending the file to the recipient, you’d like to be able to share online editing access of the document, choose “Invite People” instead.[14]
Type the person’s email address when prompted, then click “Send” to email them an invitation to edit the document.
- If, instead of sending the file to the recipient, you’d like to be able to share online editing access of the document, choose “Invite People” instead.[14]
-
6
Select an attachment type. You have two options from which to choose:[15]
- Send a copy: Choose this option if the person to whom you’re sending the document needs to edit or add to the document.
- Send a PDF: Choose this option if you don’t want the document to be modified.
-
7
Address the email to the recipient. Once you select an attachment option, a new email message will open in your default email program (e.g., Outlook, Apple Mail). Enter the recipient’s email address into the “To:” field, type a subject line, and a description of the file in the body.
- To send the document to multiple people, separate each email addresses with a comma (,).
-
8
Click “Send.” Your document will arrive at its destination in a few moments.


Advertisement
Ask a Question
200 characters left
Include your email address to get a message when this question is answered.
Submit
Advertisement
-
Most cloud services include the ability to send documents via email or mobile applications. The instructions for the majority of cloud services are similar.
-
If you don’t have Microsoft Word, you can use Microsoft Office Online. The service includes a free, up-to-date version of Word accessible only on the web.
Thanks for submitting a tip for review!
Advertisement
About This Article
Thanks to all authors for creating a page that has been read 93,236 times.
Is this article up to date?
Sometimes I write a short document or letter in Word which I like to be reviewed by someone else first.
While I could send it as an attachment, I’d rather send the contents of the document in the email itself as it often allows for quicker review and replies for the reviewer.
Is there a quick way to achieve this?
 There is quite a list of commands in Word which are hidden or otherwise not directly available via a button in the Ribbon layout.
Sending the contents of your current document directly in the body of an email is one of those “hidden” commands.
Add “Send to Mail Recipient” command to the QAT
To use such a hidden command, you can still add it to the Quick Access Toolbar (QAT) the following way;
- Open Word Options; File-> Options.
- On the left, select; Quick Access Toolbar.
- Set the “Choose command from” drop down list to “Commands Not in the Ribbon”.
- Select “Send to Mail Recipient” and click the button “Add > >”
- Press OK to close the dialog.
- The command will now show up in the Quick Access Toolbar at the top of your Word window.
Excel and PowerPoint
Note that both Excel and PowerPoint also have the “Send to Mail Recipient” option available as a “hidden” option and can be added in the same way.

After adding the Send to Mail Recipient command to your QAT…

…you can directly turn a Word document into a mail messages.

Use «BH93RF24» to get a discount when ordering!
An email attachment is a file that is attached to an email message. For example, you may attach a graphic, a spreadsheet, or a word processing document. Sending attachments can be a good way to transfer a copy of a file if the sender and recipient have agreed on a format. This is easy if the same hardware and software are in use. However, differences in the computer platform being used (Windows, Mac) and differences in versions of software can result in a failed message.
The Security Office also has a list of Best Practices for Email Attachments
Tips For Sending Attachments
When you aren’t sure, send «basic» attachments
There are many types of attachments that can be sent via email; however, not all email systems handle attachments in the same way. If you are not sure what types of files your recipient can view, it is a good idea to use one of the following file types to send your attachment.
- Plain text — save your file without formatting options such as bold and underline. All word processors and text editors should be able to read a plain text document.
- PDF — Portable Document Format — is a file format that preserves all of the fonts, formatting, colors, and graphics of a document..
Specify what software and version was used to create the attachment.
If you have communicated ahead of time with your recipient and know the types of files they can view, then it is fine to send a Microsoft Word file, a picture, or a spreadsheet. But, if the person you are sending the attachment to is using an older version of the software, they may not be able to view it, so it is helpful for them to know the version of the software. For example, you receive an Excel spreadsheet that was created with version 2016, but you have Excel 2010 installed on your computer; or you have Word 2016 and the file was created in WordPerfect, you may need to tell your software what to convert from.
Don’t send attachments to email lists.
If you wish to share a file with members of a departmental email list (e.g., abc staff), please do not send it as an attachment. This causes the file to be copied many times (once for each list member), which causes heavy traffic on both the network server (or user’s hard drive) and email server. The best way to share a file within your department is to store one copy of it in the «shared» area on the network server (L:Shared) and refer to it in an email note.
Limit the size of your attachments
When you send an attachment be aware that the recipient may have a limit to the size of the attachment they can receive. Office 365 has a maximum send and receive message size (and optional attachment) set at 150 MB. Also, when you attach a file to a message, the file size of the attachment increases (it can increase as much as 30% in size). Keep in mind that someone’s mailbox on the Office 365 server will be prohibited from receiving messages if they exceed the maximum quota limit.
If you need to send the same document multiple times, change the name each time
Multiple versions of the same document can become confusing and occasionally you might send a different version of the document than what you had expected. A better way to manage multiple iterations of the same document is to change the name each time by adding a revision date and/or time to the filename. That way, each document name will be unique and it is easy to tell by the name, which version is the most recent. Then the older versions can be deleted.
Tips For Receiving Attachments
Do not open an attachment if you don’t know what it is
Use caution when opening attachments that you weren’t expecting or that you don’t know the content. Many computer viruses are sent via email attachments and can damage your computer. If you receive an attachment and you aren’t sure what it is, you should run your updated virus software before opening it.
Clean up your attachments regularly
It is a good idea to clean up your attachments on a regular basis (e.g., once a week, twice a week, etc.). If you don’t, your hard drive, your mail server or your network server will become cluttered with old attachments and take up valuable storage area. Some email programs have options to automatically delete your attachments when you delete the message — check your particular program to see if this is available.
Common Attachment Types and Extensions (note that some of these extensions could be blocked if you try to send them via email)
Document Type Extension
Microsoft Word .doc or .docx
Microsoft Excel .xls or .xlsx
Microsoft Power .ppt or .pps
Word Perfect .wp
Text only .txt
Rich text format .rtf
Portable Document format .pdf
GIF Graphics .gif
JPEG Graphics .jpg
HTML Files .htm or .html
Self-extracting Archive .sea
Executable Files (Windows) .exe (only open if you know what it is)
Visual Basic Script .vbs (only open if you know what it is)