
Once you’ve inserted shapes, text boxes, SmartArt graphics, images, or other objects, you can open the Selection Pane to keep track of them all.
You can launch the Selection pane from the Select item on the Home tab of the ribbon, or by pressing ALT+F10.
Tip: In Excel this is the Find & Select button.
The most recently inserted object is at the top of the list.
If two or more objects overlap then those objects are listed in visual stacking order—top-to-bottom. If you bring an object to the front it will jump to the top of the list. If you send it to the back it will drop to the bottom of the list.
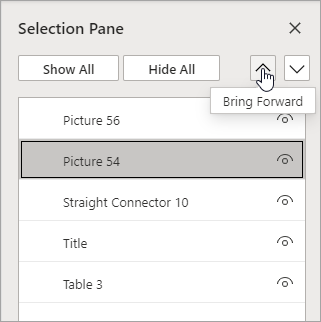
Change the order of the objects
-
Select one or more items in the list. (Use Ctrl+Click to multi-select).
-
Drag the selection upward or downward, or click the up (Bring Forward) or down (Send Backward) arrow
 .
.
 .
.Note: For an object that’s in a group, you can only reorder it within the group.
Group objects
-
In the pane, use Ctrl+Click to select the items you want to group.
-
On the … Format tab at the right end of the ribbon, select Group > Group (or Arrange > Group > Group).
After grouping the objects, you can format them or move or them on the canvas as a single entity. For more information, see Group or ungroup shapes, pictures, or other objects.
You can select multiple objects within a group and the groups within it, but you can’t select objects within groups together with objects not in groups.
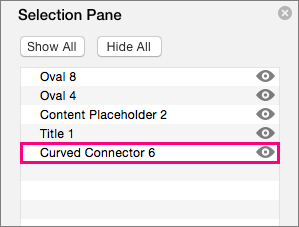
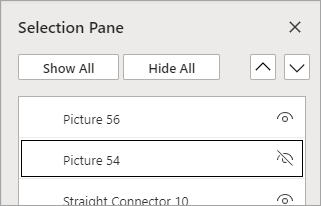
Hide objects
Hiding an object keeps it in the file, but makes it invisible. This feature should be used with caution, because it can be easy to entirely forget about a hidden object.
-
In the pane, select an item in the list.
-
On the right side of the item, click the «open eye» button.
. This action hides the object.To make the object visible again, just click the «closed eye» button
.
 . This action hides the object.
 .
.To see an object that’s under another object, you can hide the object on top temporarily, make the changes you want, and then show the object on top again.
Tips
-
In Word, inline objects are listed in the Selection Pane, but you can’t reorder them, hide them, or multi-select them.
-
After you select an item in the Selection pane, you can click again to change the name of the item. In PowerPoint for Microsoft 365, this ability comes in handy for using the Morph transition. See Morph tips and tricks for details.
Keyboard shortcuts
You can use these keyboard shortcuts in the Selection pane:
|
To do this |
Press |
|---|---|
|
Open the Selection pane |
Alt+F10 |
|
Move the keyboard focus through the major regions until it is in the Selection Pane |
F6 |
|
Navigate by keyboard through the buttons in the pane and then into the list |
Tab |
|
Move the focus among the items in the list |
Up arrow, down arrow |
|
Select an item in the list |
Enter or spacebar |
|
Edit the name of the item in the list that has focus |
F2 |
|
Add/remove the item from the selection (that is, multi-select) |
Shift+Enter or Shift+spacebar |
|
Toggle the visibility of the item that has focus |
Ctrl+Shift+S |
|
Send the selected items backward |
Ctrl+Shift+B |
|
Bring the selected items forward |
Ctrl+Shift+F |
|
Collapse the current group |
Left arrow |
|
Expand the current group |
Right arrow |
|
Collapse all groups |
Alt+Shift+1 |
|
Expand all groups |
Alt+Shift+9 |
Once you’ve inserted shapes, text boxes, SmartArt graphics, images, or other objects, you can open the Selection pane to manage them all.
Note: This feature is available in newer versions of Microsoft 365 for Mac. It isn’t available in Office for Mac 2011.
-
Select one of the objects you want to manage.
-
Select the … Format tab that appears on at the right end of the ribbon when you select the object, and then choose Selection Pane (or Arrange > Selection Pane).
-
The Selection Pane opens with all your objects listed, and you can do any of the following:
-
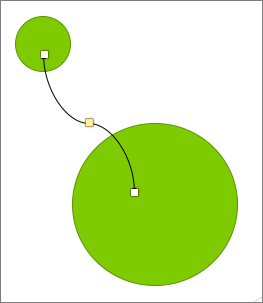
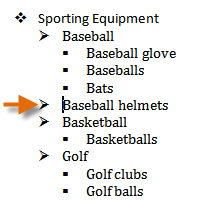
Drag an item up or down in the list to change the order. In the example below from PowerPoint, moving the curved connector to the top of the list also brought it forward in front of the two oval shapes (and everything else on the slide).
In the example pictured, the connector is at the bottom of the list, and is behind the two oval shapes.
After the connector is moved to the top of the list, it appears in front of the two oval shapes.
-
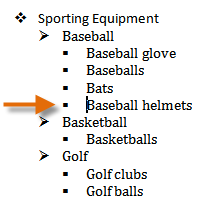
Choose to show or hide objects from the Selection Pane. To hide an object, click the eye icon in the Selection Pane indicating that the object is Showing
. The icon will change to a simple icon indicating that the object is Hidden from view. To show the object once again, simply click the Hidden icon , and the object will reappear.
The connector in the example above is hidden, and does not appear on the slide.
-
Group or ungroup objects listed in the Selection Pane. If you select multiple objects by using ⌘ + Click, you can then group them or ungroup them by selecting Group Objects on the ribbon in the Format tab.
-


 . The icon will change to a simple icon indicating that the object is Hidden
  from view. To show the object once again, simply click the Hidden icon
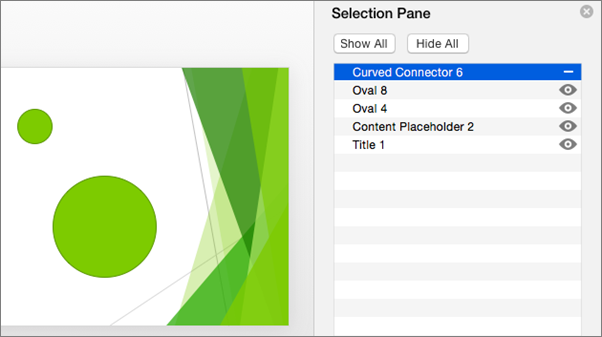

In PowerPoint for the web you can use the Selection pane to show or hide items on the slide or to reorder them. To open the Selection Pane select the Arrange button on the Home tab of the ribbon and then Selection Pane.
The objects are listed in the pane in visual stacking order—top-to-bottom. The most recently inserted object is at the top of the list.
Change the order of the objects
-
Select one or more items in the list (use Ctrl+Click to select multiple items).
-
Drag the selected item up or down, or click the up (Bring Forward) or down (Send Backward) arrows.
Note: If an object is in a group, you can only reorder it within the group.
Show or hide Objects
To hide or show an individual object on your slide, open the Selection Pane and select the show/hide button next to the object you want to hide, or show.
To edit an object that’s under another object, hide the object on top temporarily, make the changes you want, and then show the object on top again.
Group objects
-
Use Ctrl+Click to select the items you want to group.
-
On the Home tab, select Arrange > Group.
After grouping the objects, you can format them or move or them on the canvas as a single entity. For more information, see Group or ungroup shapes, pictures, or other objects.
Note: You can select multiple objects within a group, but you can’t select objects within groups together with objects not in groups.
Tips
-
Double-click an item to rename it. In PowerPoint for Microsoft 365, this ability comes in handy for using the Morph transition. See Morph transition: Tips and tricks for details.
-
By default, the most recently inserted object is at the top of the list in the Selection Pane, and the first object inserted is at the bottom of the list.
Keyboard shortcuts
You can use these keyboard shortcuts in the Selection pane:
|
To do this |
Press |
|---|---|
|
Move the keyboard focus through the major regions until it’s in the Selection Pane |
Ctrl+F6 |
|
Navigate by keyboard through the buttons in the pane and then into the list |
Tab |
|
Move the focus among the items in the list |
Up arrow, down arrow |
|
Select an item in the list |
Enter or spacebar |
|
Edit the name of the item in the list that has focus |
F2 |
|
Add or remove the item from the selection (multi-select) |
Ctrl+Enter |
|
Toggle the visibility of the item that has focus |
Ctrl+Shift+S |
|
Send the selected items backward |
Ctrl+Shift+B |
|
Bring the selected items forward |
Ctrl+Shift+F |
|
Collapse the current group |
Left arrow |
|
Expand the current group |
Right arrow |
|
Collapse all groups |
Alt+Shift+1 |

To add a drop-down list to a Word document, go to Options > Customize Ribbon and enable the Developer tab. Open the Developer tab and click the «Drop-Down List Content Control» button to insert a drop-down button. You can customize the drop-down box by clicking «Properties.»
A drop-down list in a Microsoft Word document lets people select from a predefined items list. Adding this drop-down list is fairly easy, and we’ll show you how to do it.
First, Enable the Developer Menu
The option to add a drop-down list is located in Word’s Developer menu. This menu is hidden by default, so you’ll have to enable it before you can add a list.
Start by opening Word on your Windows or Mac computer. At the lower left of the window, select “Options.” If you already have a document open, select the File menu to reveal the “Options” command.

In the “Word Options” window that opens, on the left sidebar, select “Customize Ribbon.”
In the “Customize Ribbon” pane on the right side of the screen, scroll down the list and enable the “Developer” option.
Click “OK” at the bottom of the window to close it.
After adding the Developer menu, you’re now ready to add a drop-down list to your Word document. To start, either open an existing Word document or create a new document.
RELATED: How to Create a Fillable Form With Microsoft Word
In your document, place your insertion point where you want to add the drop-down list.
Next, select the “Developer” menu.
On the “Developer” menu, in the “Controls” group, click the “Drop-Down List Content Control” icon (It looks like an actual drop-down icon.).
You now have a drop-down list in your document.
Configure Your New Drop-Down List
This drop-down list is not configured and is currently empty. To configure it and add items to it, click the drop-down list to select it. Return to the Developer menu and, in the “Controls” group, click “Properties.”
Word will open the “Content Control Properties” window. Start by entering a title for your list. This will appear at the top of your drop-down list.
Note: Note: Word automatically fills in the “Tag” field to match the Title field. The tag for a content control object is used mostly by other programs to identify content control data in a document’s XML structure. So, unless you’re building some document automation and specifically need to set the tag, just ignore it.
Use the “Color” option to select a color scheme for your drop-down list.
If you want to prevent people from editing your drop-down list, activate the “Content control cannot be deleted” option. Note, though, that unless you lock your document, anyone can go and disable this option.
You’ll now add items to your drop-down list. To add your first item, under the “Drop-Down List Properties” section on the current window, click the “Add” button.
On the “Add Choice” window, type a new item name into the “Display Name” field. The “Value” field automatically fills itself with the data from the first field, so you don’t have to worry about it.
Then, click “OK” to add your item. Repeat this process for each item that you want to add to your drop-down list.
After you have some items added, you can change their order. To change an item’s position in the list, select that item, and then click either “Move Up” or “Move Down” on the right.
Finally, click “OK” to save your changes.
Your drop-down list will now display your added items. Click it to test it for yourself.
Delete a Drop-Down List from Microsoft Word
To remove this drop-down list from your document, select the list. Then, from the “Controls” section at the top, click “Properties.” Disable the “Content control cannot be deleted” option, and then click “OK” at the bottom.
Right-click the drop-down list in your document and select “Remove Content Control.” The list will now be removed.
And that’s how you give people predefined options to select from in your Word documents!
Did you know that you can add checkboxes to your Word documents, too? This is yet another way to let people select items in your documents.
RELATED: How to Add Check Boxes to Word Documents
READ NEXT
- › How to Create a Basic Survey in Microsoft Word
- › How to Create a Fillable Form With Microsoft Word
- › How to Create and Customize a Drop-Down List in Google Docs
- › How to Install Unsupported Versions of macOS on Your Mac
- › The Best Steam Deck Docks of 2023
- › Microsoft Outlook Is Adding a Splash of Personalization
- › Why Your Phone Charging Cable Needs a USB Condom
- › This 64 GB Flash Drive From Samsung Is Just $8 Right Now

- Using the CTRL key and your mouse
- Using the Select Objects tool
- Using the Selection Pane
Method 1: Using the CTRL Key and Your Mouse
Step 1: Open your MS Word document.

Step 2: Click on the text boxes.
Once your document is ready, select a text box in your document. You can do this by clicking on any of the four sides of your text box.
Now, press and hold the CTRL key and click the next one.
Repeat the same steps to go over all of the text boxes in your document.

Method 2: Using the Select Objects Tool
Step 1: Open an MS Word document.

Step 2: Zoom out your document.
To be able to select all text boxes on a page, zoom out your document to view the entire page.
You can do this by clicking the Zoom Out button found at the bottom right corner of your window.
Keep clicking until all your text boxes on a page are visible.

Step 3: Access the Select Objects tool.
Now that your document is ready, go to the Editing group found at the rightmost part of the Home tab.
Click the Select Objects drop-down menu and select the Select Objects tool.

Now, click the upper right portion of your document and drag your cursor to its bottom right.

This will select all the text boxes on the respective page.
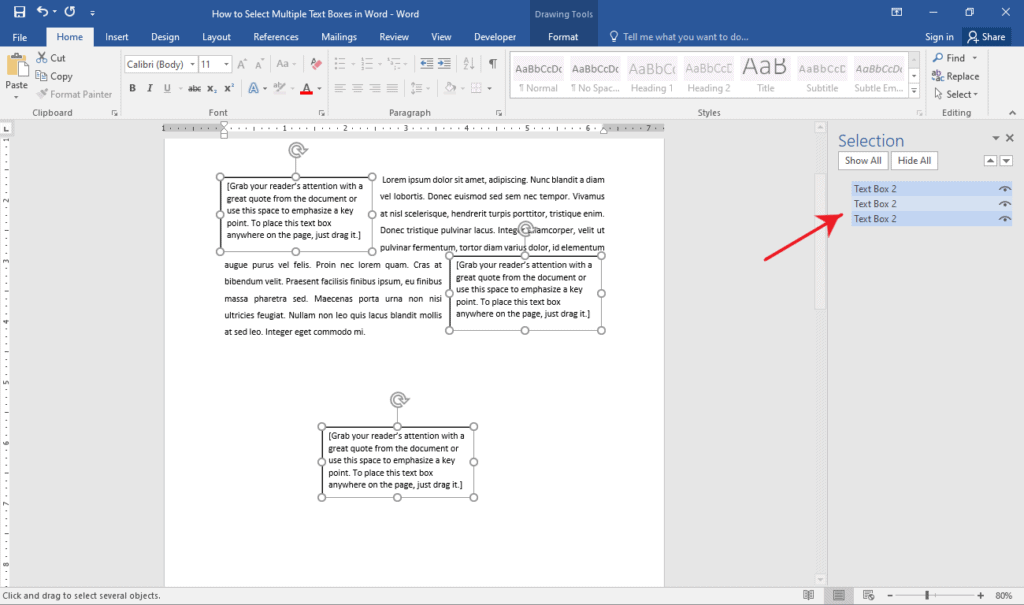
Method 3: Using the Selection Pane
The Selection Pane lists down all objects in your document. This way, you can easily select your text boxes throughout your document from the list.
The disadvantage though is that this method requires the text boxes to be in a different text wrapping format other than the default.
Step 1: Open up a Word document.

Step 2: Display the Selection Pane.
Click the Select drop-down menu found at the rightmost part of the Home tab. On the list of options, select the Selection Pane.
This will display the Selection Pane on the right side of your window.
You should see a list of text boxes you have in your document.

Step 3: Select your text boxes.
On the Selection Pane, press and hold the CTRL key while clicking each text box that you want to select.
Conclusion
We hope you’ve found this article helpful!
On the whole, it’s preferable to work with Range objects instead of Selection. There can be only one selection, but code can work with as many Ranges as necessary. I’ve altered the original code accordingly. I also changed the Find.Wrap to wdFindStop so that the code searches the entire document, then stops.
The Range object has a ListParagraphs property that will return the ListParagraph object(s) of the Range. In this case, that would be paragraph in which the Find term is located if it belongs to a numbered list. If it does, the Count will be greater than 0 and the code continues to get the Paragraph.Range, from which it’s possible to extract all paragraphs that belong to the list using Rnage.ListFormat.List.ListParagraphs.
In order to select the entire list it’s necessary to get the Start point of the first list entry and the End point of the last list entry. In the code below, the range of the paragraph in which «Figure Id» was found is extended to these points so that it covers the entire list. Note that it’s not clear what you want to do with this, once you have it, since the code loops. It may be that it should not be selected at all but that the action should be performed on the Range object, instead…
Sub Find_Text_withList_in_table()
    Dim rngFind As Word.Range, rngFigureList As Word.Range
    Dim lstParas As Word.ListParagraphs
    Dim lFindCounter As Long 'for testing / debugging

    Set rngFind = ActiveDocument.content
    rngFind.Find.ClearFormatting
    With rngFind.Find
        .Text = "figure id:"
        .Replacement.Text = ""
        .Forward = True
        .wrap = wdFindStop
        .Format = False
        .MatchCase = False
        .MatchWholeWord = False
        .MatchWildcards = False
        .MatchSoundsLike = False
        .MatchAllWordForms = False
    End With

    Do While rngFind.Find.Execute
        lFindCounter = lFindCounter + 1
        If rngFind.Information(wdWithInTable) Then
            Debug.Print "Figure ID Found in Table"
            Set lstParas = rngFind.ListParagraphs
            If lstParas.Count > 0 Then
                Set rngFigureList = lstParas.Item(1).Range
                Set lstAllParas = rngFigureList.ListFormat.List.ListParagraphs
                Debug.Print "Nr paragraphs in the list: " & lstAllParas.Count
                rngFigureList.Start = lstAllParas(1).Range.Start
                rngFigureList.End = lstAllParas(lstAllParas.Count).Range.End
                rngFigureList.Select
                MsgBox "Figure Id is in a numbered list, in a table"
            End If
        End If
    Loop
    Debug.Print "Nr Figure ID found: " & lFindCounter
    Application.ScreenUpdating = True
End Sub
Lesson 10: Working with Lists
/en/word2010/line-and-paragraph-spacing/content/
Introduction
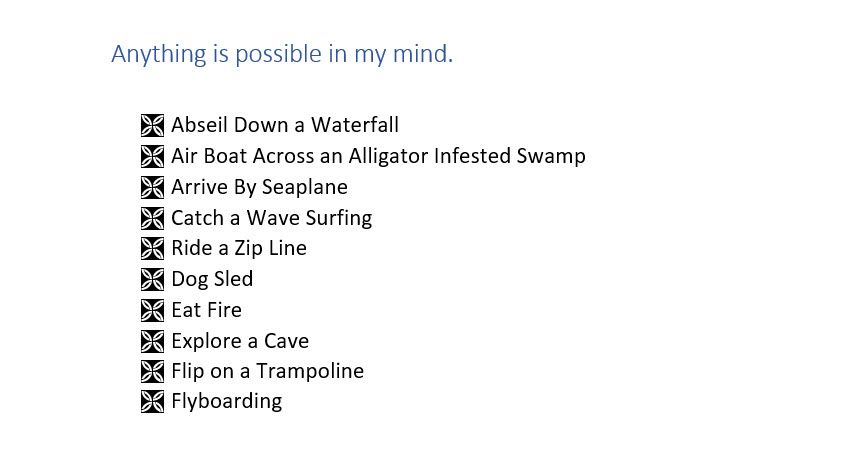
Bulleted and numbered lists can be used in your documents to format, arrange, and emphasize text. In this lesson, you will learn how to modify existing bullets, insert new bulleted and numbered lists, select symbols as bullets, and format multilevel lists.
Using bulleted and numbered lists
When you want to organize lists in Word, you can format them as either bulleted or numbered lists. Word offers a variety of bullet options that allow you to customize your lists to suit your needs.
Optional: You can download this example for extra practice.
To create a list:
- Select the text you want to format as a list.
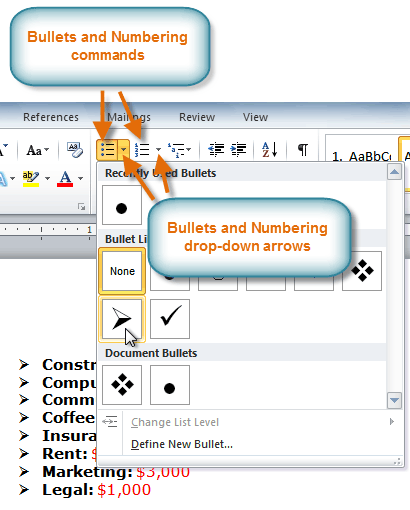
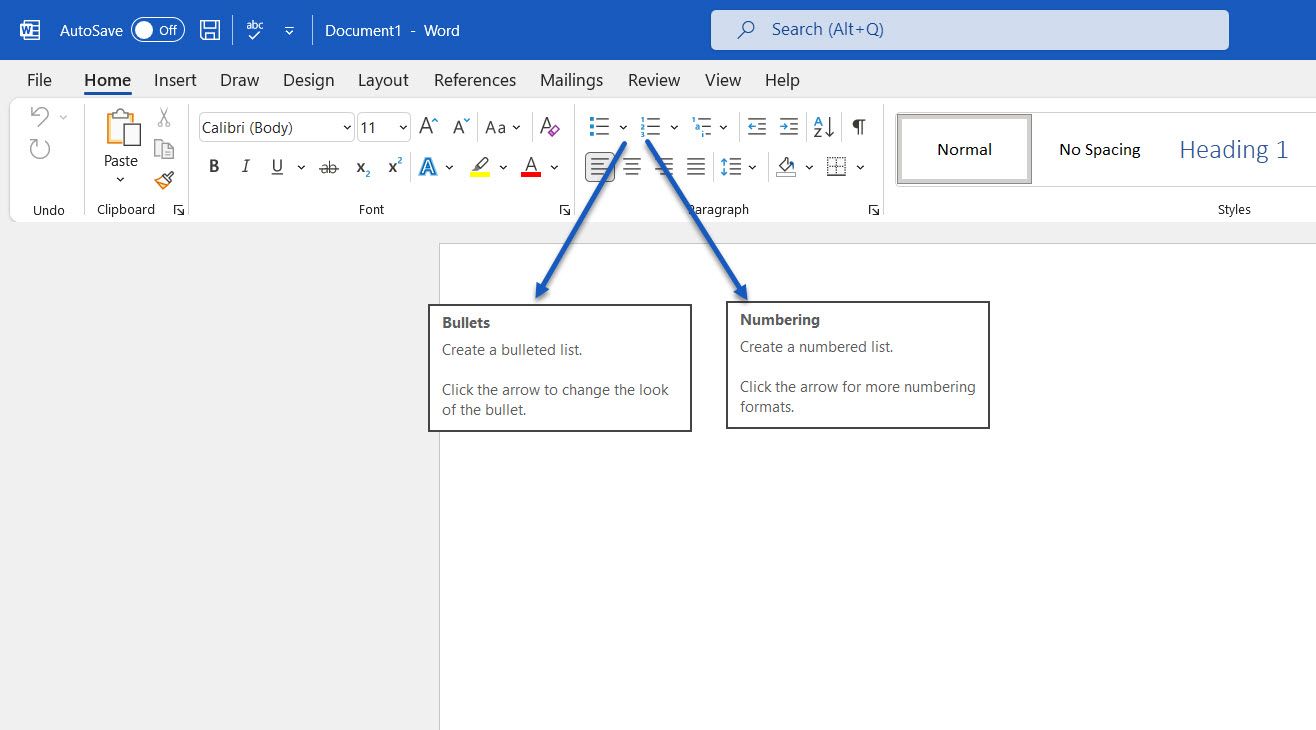
- Click the Bullets or Numbering drop-down arrow on the Home tab.
The Bullets and Numbering commands and drop-down arrows
- Select the bullet or numbering style you want to use, and it will appear in the document.
- To remove numbers or bullets from a list, select the list, then click the Bullets or Numbering commands.
When you’re editing a list, you can press Enter to start a new line, and the new line will automatically have a bullet or number. When you’ve reached the end of your list, press Enter twice to return to normal formatting.
Bullet options
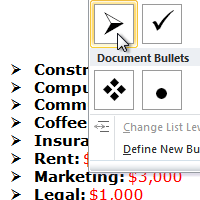
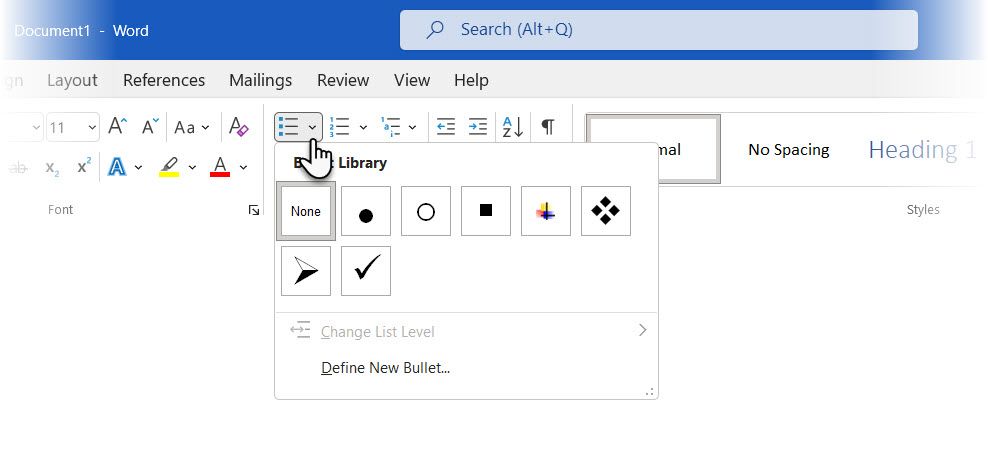
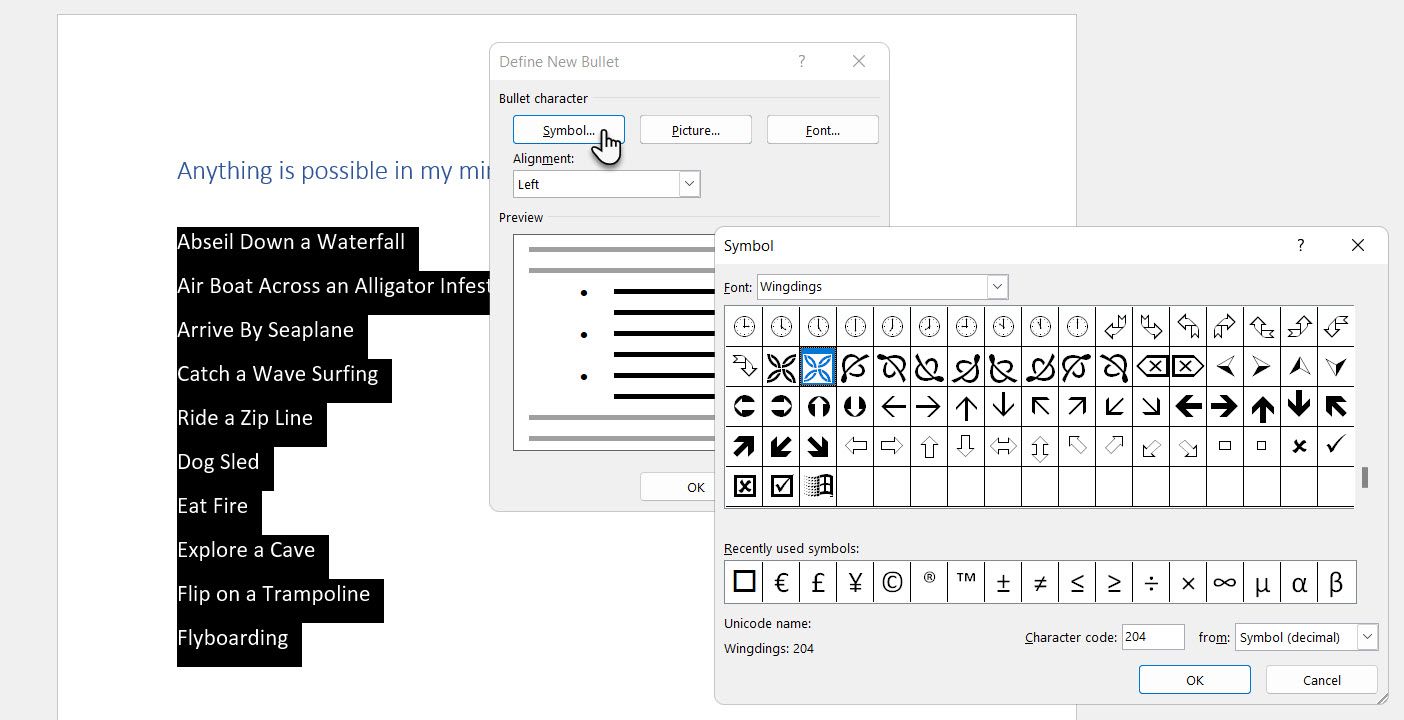
To use a symbol as a bullet:
- Select an existing list.
- Click the Bullets drop-down arrow.
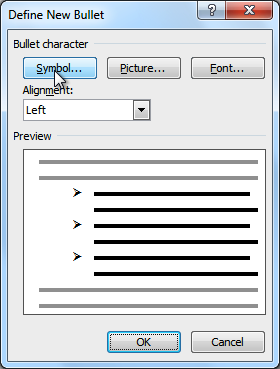
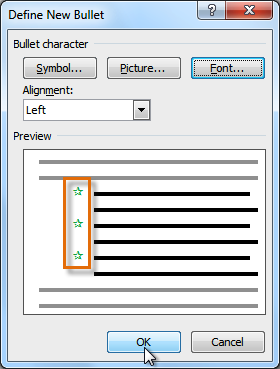
- Select Define New Bullet from the drop-down menu. The Define New Bullet dialog box appears.
The Define New Bullet dialog box
- Click the Symbol button. The Symbol dialog box appears.
- Click the Font drop-down box, and select a font. The Wingdings and Symbol fonts are good choices because they have a large number of useful symbols.
Choosing a symbol
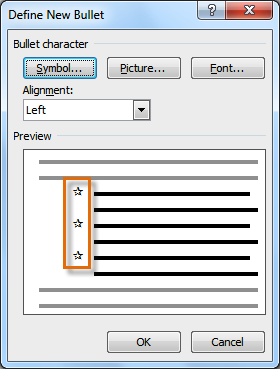
- Select the desired symbol.
- Click OK. The symbol will now appear in the Preview section of the Define New Bullet dialog box.
Preview of the new bullets
- Click OK to apply the symbol to the list in the document.

You can use a picture as a bullet. Click the Picture button in the Define New Bullet dialog box, then locate the image file on your computer.
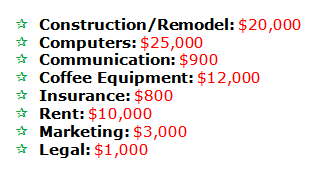
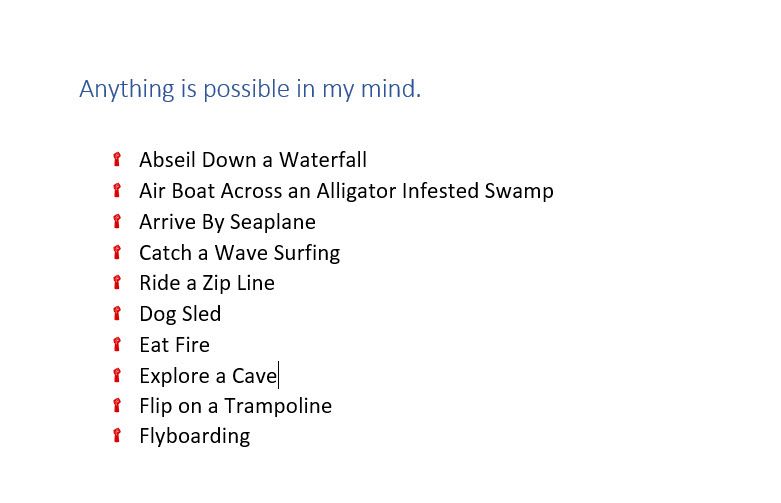
To change the bullet color:
- Select an existing list.
- Click the Bullets drop-down arrow.
- Select Define New Bullet from the list. The Define New Bullet dialog box appears.
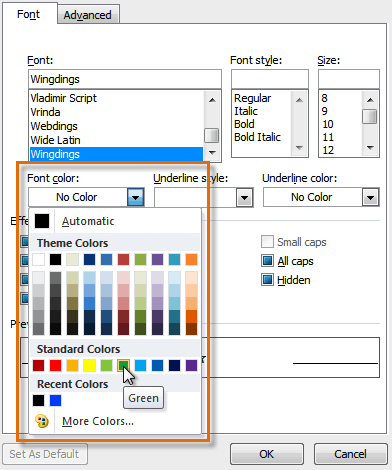
- Click the Font button. The Font dialog box appears.
- Click the Font Color drop-down box.
Choosing a bullet color
- Click the desired color to select it.
- Click OK. The bullet color will now appear in the Preview section of the Define New Bullet dialog box.
Preview of the new bullet color
- Click OK to apply the bullet color to the list in the document.
The finished bullets
Multilevel lists
Multilevel lists allow you to create an outline with multiple levels. In fact, you can turn any bulleted or numbered list into a multilevel list by placing the insertion point at the beginning of a line and pressing the Tab key to change the level for that line. You can then use the Multilevel List command to choose the types of bullets or numbering that are used.
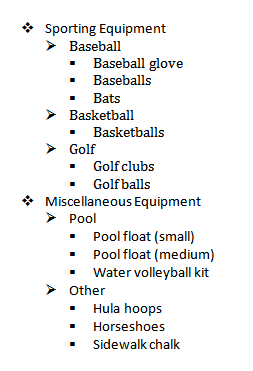 A multilevel list
To create a multilevel list:
- Select the text you want to format as a multilevel list.
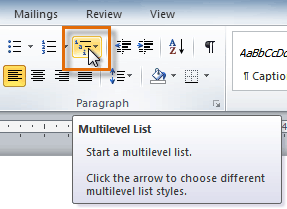
- Click the Multilevel List command on the Home tab.
The Multilevel List command
- Click the bullet or numbering style you want to use. It will appear in the document.
- Position your cursor at the end of a list item, then press the Enter key to add an item to the list.
To remove numbers or bullets from a list, select the list, then click the Bullets or Numbering commands.
To change the level of a line:
- Place the insertion point at the beginning of the line.
Placing the insertion point at the beginning of a line
- Press the Tab key to increase the level.
Pressing the Tab key to increase the level of a line
- Hold Shift and press Tab to decrease the level.
Challenge!
- Open an existing Word document. If you want, you can use this example.
- Format some text as a bulleted or numbered list. If you’re using the example, use the list of New Clients on page 2.
- Insert a new numbered list into the document.
- Modify the color of a bullet.
- Use the Tab key to change the levels of some of the lines.
/en/word2010/adding-breaks/content/
- Remove From My Forums
-
Question
-
Hi and thanks so much for your time!!!
I am trying to find all instances of bulleted lists within a large selection in a word document and assign them a style as per our company branding.
I have gotten pretty close, the following Macro selects the first line in the first bulleted list in the selection and assigns it the style I require.
I just need some help getting it to select all the bullets in the doc.
Sub findbullets22()
findbullets22 Macro
Dim oPara As Word.Paragraph
With Selection
For Each oPara In .Paragraphs
If oPara.Range.ListFormat.ListType = _
WdListType.wdListBullet Then
oPara.Range.Select
End If
Next
End With
Selection.Style = ActiveDocument.Styles("List Paragraph")
End Sub
Any help you could provide would be amazing — I am starting to go nuts LOL
-
Edited by
Thursday, August 16, 2012 5:49 AM
-
Moved by
Youen Zen
Friday, August 17, 2012 2:32 AM
To provide better support (From:Visual Basic General)
-
Edited by

Answers
-
Well if you want to process ALL bulleted paragraphs (not just what you select), then try:
Sub findbullets22()
Dim oPara As Word.ParagraphFor Each oPara In ActiveDocument.Paragraphs
If oPara.Range.ListFormat.ListType = _
WdListType.wdListBullet Then
oPara.Style = «List Paragraph»
End If
Next
End SubYou do not actually need to Select anything.
Word MVP
-
Proposed as answer by
fumei2
Saturday, August 18, 2012 11:28 PM -
Marked as answer by
Quist Zhang
Sunday, August 26, 2012 5:46 PM
-
Proposed as answer by
In the following text, there are 4 effective ways which enable you to quickly select and group multiple objects in your Word document.
It’s not unusual for some of you to create a Word document with plenty of shapes, text boxes, and pictures, etc. And there are also occasions when you have to select them to group so you can move them together instead of operating one by one. Doubtlessly, the question lies at how to select numerous objects. So we will take the example of selecting several flowchart shapes to demonstrate you the 4 methods.
Method 1: Group Objects by Selecting them One by One
Obviously, you can select number of objects one by one.
- Firstly, suppose we have an example as below:


Press either “Ctrl” or “Shift”.
- Then left click shapes to be group one by one.
- Next right click.
- Click “Group” option on the list-menu.
- And again click “Group” on the extend list-menu.


Now you have succeeded in grouping these objects, and you can move them together as a whole.
Method 2: Group Objects by Selecting them on “Selection Pane”
- This time click “Page Layout” tab first.
- Then click “Selection Pane” in “Arrange” group.

- Next on the right side of the document, there will open the “Selection Pane” where you can see all the shapes on a certain page. Press “Ctrl” and hold on.
- And click the shape name on the pane one by one. You can see the shapes on the document page have been selected.

- Then repeat from step 3 to step 5 in method 1.


Method 3: Group Objects by Using “Select Objects” Option in Word 2010
Here is what you need to know that you are unable to use “Select Objects” option in Word 2010 directly but to insert a “New Drawing Canvas” into Word document first before you insert all the shapes.
- To begin with, click “Insert” tab.
- Then choose “Shapes” in “Illustrations” group.
- Next click “New Drawing Canvas”.

- Then insert shapes you need on the drawing canvas.
- Next, click “Home” tab.
- And go to click “Select” option in “Editing” group.
- Choose “Select Objects” on the list-menu.

- Now you can see the indication on the left-down corner of the document page, such as below:


Just follow the lead, and click and drag to draw an area including all objects on the canvas so as to select them.

- Again repeat from step 3 to step 5 in method 1.
Method 4: Group Objects by Using “Select Objects” Option in Other Word Versions
Actually, in all Word versions except Word 2010, you can use “Select Objects” option directly to select and group objects without inserting a canvas first. What you need to do is follow from step 5 to step 9 in method 3.
Also you can save the .docxs file as .doc file so you can select objects on document directly.
And if you try to group pictures, then you have to change the pictures’ “Text Wrapping” style into any one but “In line with text”.
Comparison
| Methods | Advantages | Disadvantages |
| Method 1: Group Objects by Selecting them One by One | 1. It’s an easy and simple way.
2. You can apply this method no matter what Word version you’re using. |
1. You have to select objects one by one.
2. You could miss some small objects since there are too many. |
| Method 2: Group Objects by Selecting them on “Selection Pane” | 1. It’s an easy and simple way.
2. You won’t miss objects since they are listed on the pane. 3. You can apply this method no matter what Word version you’re using. |
You have to select objects one by one. |
| Method 3: Group Objects by Using “Select Objects” Option in Word 2010
& Method 4: Group Objects by Using “Select Objects” Option in Other Word Versions |
1. You can select multiple objects at one time.
2. You’re less likely to miss some objects. 3. If you are not using Word 2010, then you can select multiple objects directly by drawing an area to include them. |
1. For Word 2010 users, you have to insert a drawing canvas before inserting shapes into documents so as to select them multiply.
2. For Word 2010 users, you may need to save the .docx file as .doc file so as to select objects directly. |
Keep Handy a High Efficiency Recover Tool
Basically, in modern business practices, time is money. So there is not so much time for you to think about what to do once you get files corrupted. Therefore, the best way is to keep a well-functioned Word file repair tool in place so you can address the corruption issues efficiently.
Author Introduction:
Vera Chen is a data recovery expert in DataNumen, Inc., which is the world leader in data recovery technologies, including corrupted Excel file repair and pdf repair software products. For more information visit www.datanumen.com
Checklists and lists have become the staple of everything from grocery shopping to NASA launches. But they are boring.
Still, lists and checklists are also the simplest tools to reduce the complexity of information that assaults us every day. They are also the perfect antidote against forgetfulness. So, even as we swear to make perfect lists for productivity, let’s also get down to the basics with Microsoft Word and check off one daily office function—how to make those visually appealing lists and manage them.
1. Create Your First List
Most of the list-making tricks and tips lie within the Ribbon’s Paragraph group on the Home tab.
Select the text to which you want to add the numbered list and click the down arrows next to the Bullet Lists icon or the Numbered List icon to access the libraries for both. Preview each list format by hovering over the selections available.
Microsoft Word also automatically creates a list for you when you start a paragraph with an asterisk or a number 1, period, and space followed by a press on the Enter key. With an asterisk, Word creates a bulleted list. Word senses that you are trying to create a numbered list with a number.
If you don’t want your text turned into a list, you can click the AutoCorrect options button image that appears. To disable or enable this option, go to File > Options > Proofing > AutoCorrect Options > AutoFormat As You Type.

To quickly change the style of a bulleted or numbered list, just click the style you want in the list that appears when you click the arrow next to Bullets or Numbering.
General Tip: You can change the format of just one or some of the bullet or number styles in a list. Place the cursor at the start of the line that you want to change before opening the Bullets and Numbering dialog box. Your changes will apply only to the selected lines.
2. Use Just the Keyboard to Create a List
Use a handy Microsoft Word shortcut to create numbered lists quickly with the keyboard alone.
The keyboard shortcut for a bulleted list: Press Ctrl + Shift + L to apply the default bullets to a list. Press Ctrl + Shift + N to remove the bullets.
To customize a keyboard shortcut for a numbered list, right-click anywhere on the Ribbon and select Customize the Ribbon from the popup menu. You can also open Word Options from File > Options > Customize Ribbon.

Click on the Customize button for Keyboard shortcuts.
Select All Commands in the Categories list. Scroll down the list on the left, and select FormatNumberDefault.
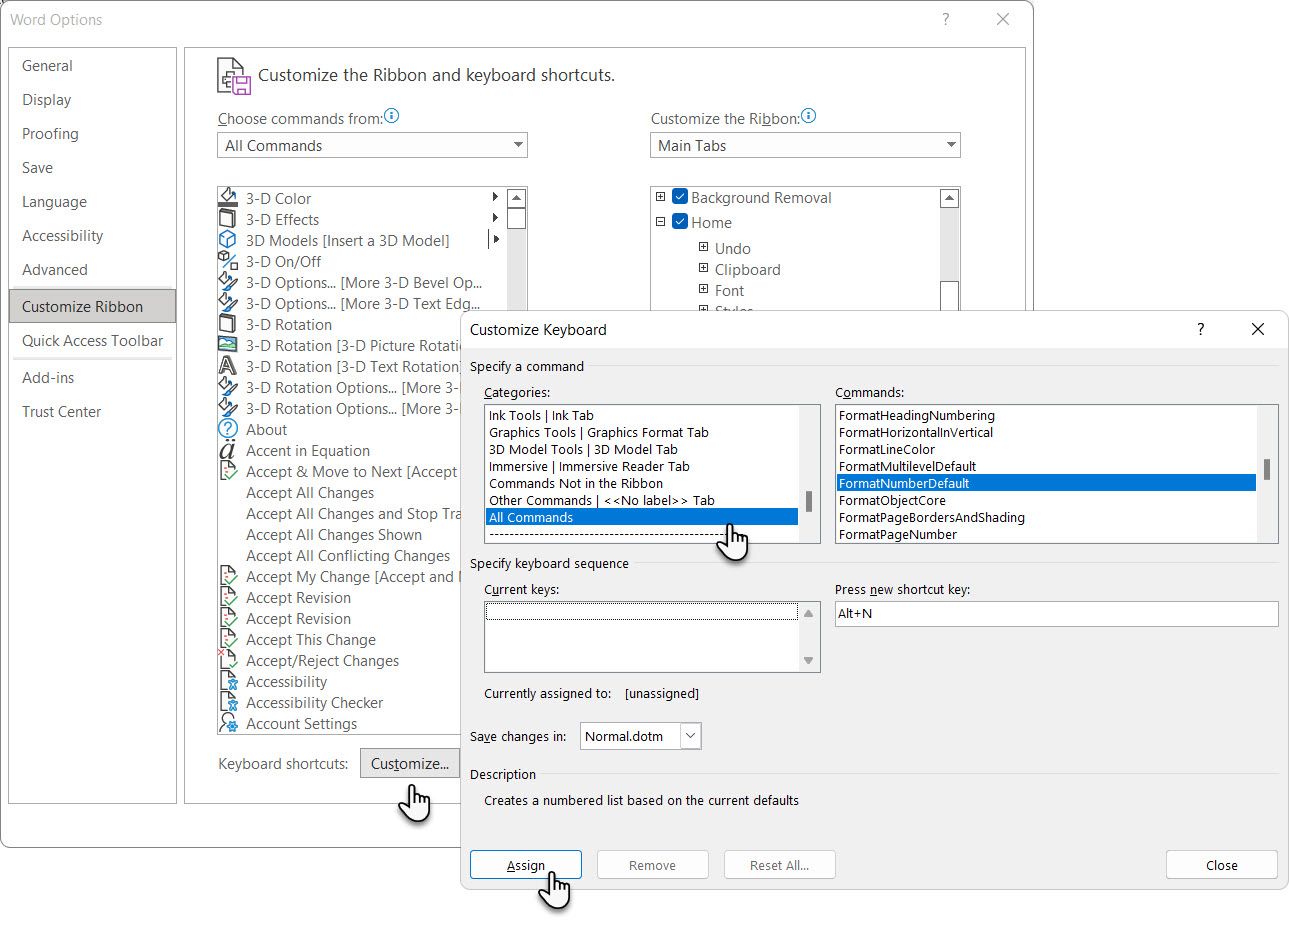
Place the cursor in the Press new shortcut key box and press the shortcut key combination you want to use to create a numbered list. For example, you could use Alt + N because it’s not assigned to anything else in Word. Click Assign.
The new keyboard shortcut is added to the Current keys list.
Click OK to exit the dialog box and test the new shortcut. Pressing «Alt + N» creates a numbered list. Pressing it again reverts it back to paragraph text.
General Tip: Do you want to skip numbering for a list item and convert it into a paragraph in the middle of a list? Select the specific list item and use the Alt + N shortcut to turn off the numbering.
3. Change the Default Numbered List Format
You can change, edit, or create a new numbered list. You have four Numbered List formats to choose from. But what if you want to use your own format other than the letters or Roman numerals, and it’s not available?
Go to Home > Paragraph group > Numbering. Click the down arrow. Choose Define New Number Format.
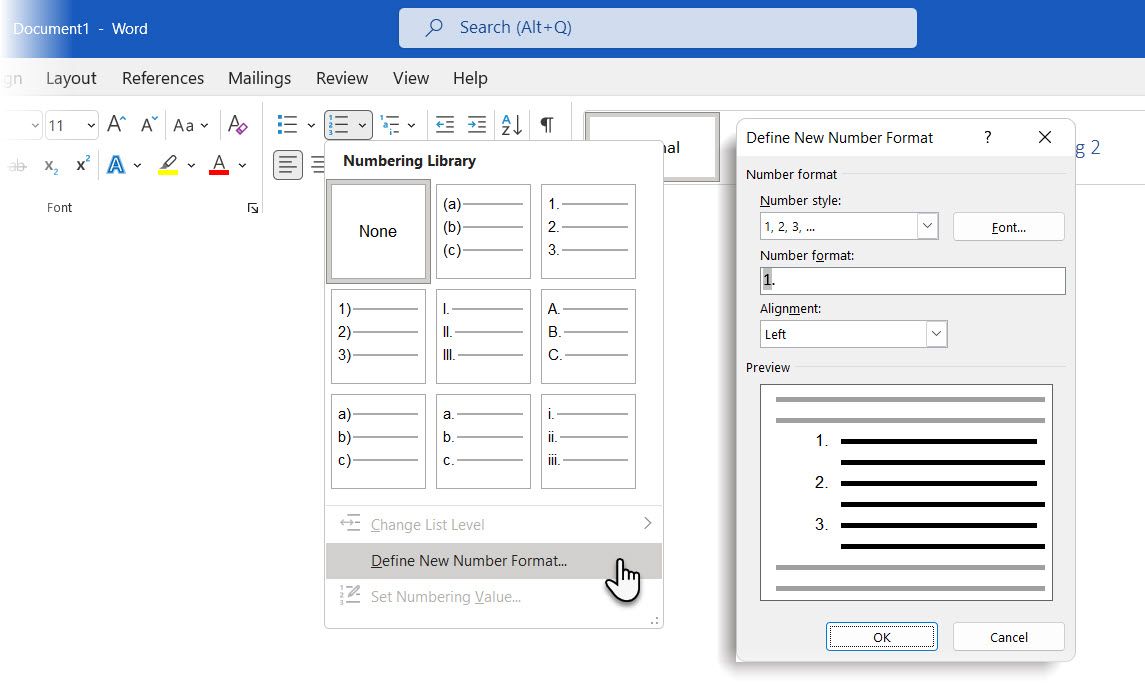
Choose any chronological format. To change the font size, style, and color, click Font and choose a setting on the Font or Advanced tab.
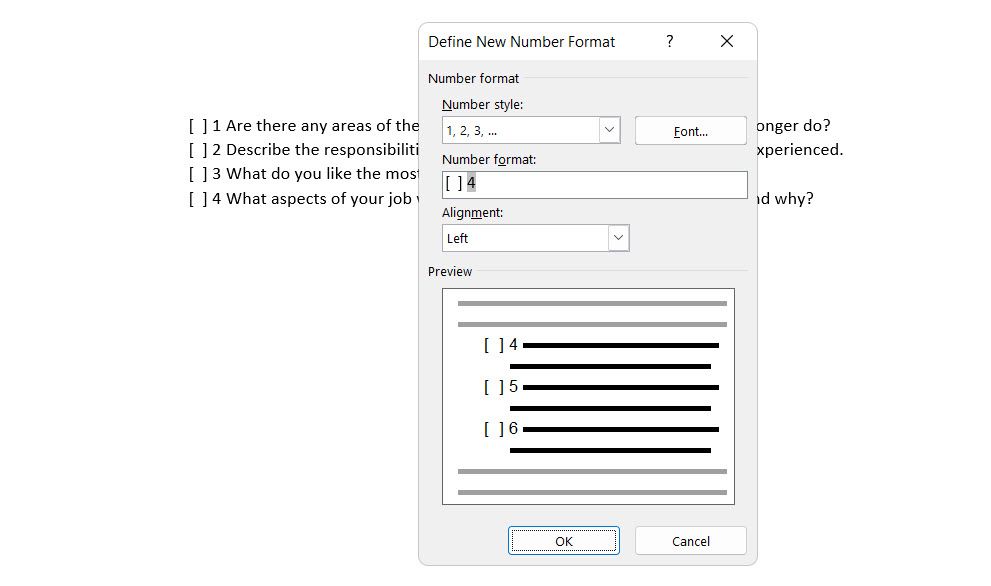
When you want to add a dash, parentheses, or another value like a pound sign to the number, enter it in the Number format field. The little preview displays the changes. You can see the square brackets for a list you can tick off in the screenshot below.
Choose Left, Centered, or Right under Alignment to change the number alignment. The default is Left-Aligned.
Click OK.
The new number format is applied to any selected text on your document.
General Tip: You can even prefix the numbered lists with descriptive text, e.g., Attendee 1, Attendee 2, Attendee 3…and so on.
4. Change the Default Bullet List Format
Just like the numbered list, you can also change the default look of any bulleted list. Again, visually appealing bullets (other than the boring black solid dots) help your documents stand out from the mundane.
Select the text you want the bulleted list for and follow these steps.
Go to Home > Paragraph group. Click the arrow next to Bullets.
When the bullet you want isn’t in the library, click Define New Bullet.
The Define New Bullet dialog box opens. Under Bullet Character, choose Symbol.
Another dialog opens, which lets you choose appropriate symbols from your installed fonts.
The Wingdings fonts have the best variety that makes for stylized bullet lists. Like any other font, you can change the color, size, style, and other characteristics of your chosen bullet font. Click the Font button in the Bullet character section to enter the Font dialog box.
General Tip: Use an open box (Open box) or a three-dimensional box (3D box) from the Wingdings character palette to create a Word document with neat checkboxes.
5. Use a Picture Instead of a Bullet
Sometimes all the mystic symbols in Webdings might not be enough. You can also use your own reusable graphics for bullet points. Though picture and SmartArt bullets look better on a PowerPoint slide, they work just as well in Word.
Select the bulleted list for which you want to change the bullets to pictures. Next, go to the Home tab > Paragraph group, click on the Bullets button, and select Define New Bullet from the dropdown menu. On the Define New Bullet dialog box, click Picture.
The Insert Pictures dialog box is displayed with different choices for your source file. You can insert a picture From a file on your PC or local network, from a Bing Image Search, or your OneDrive account.
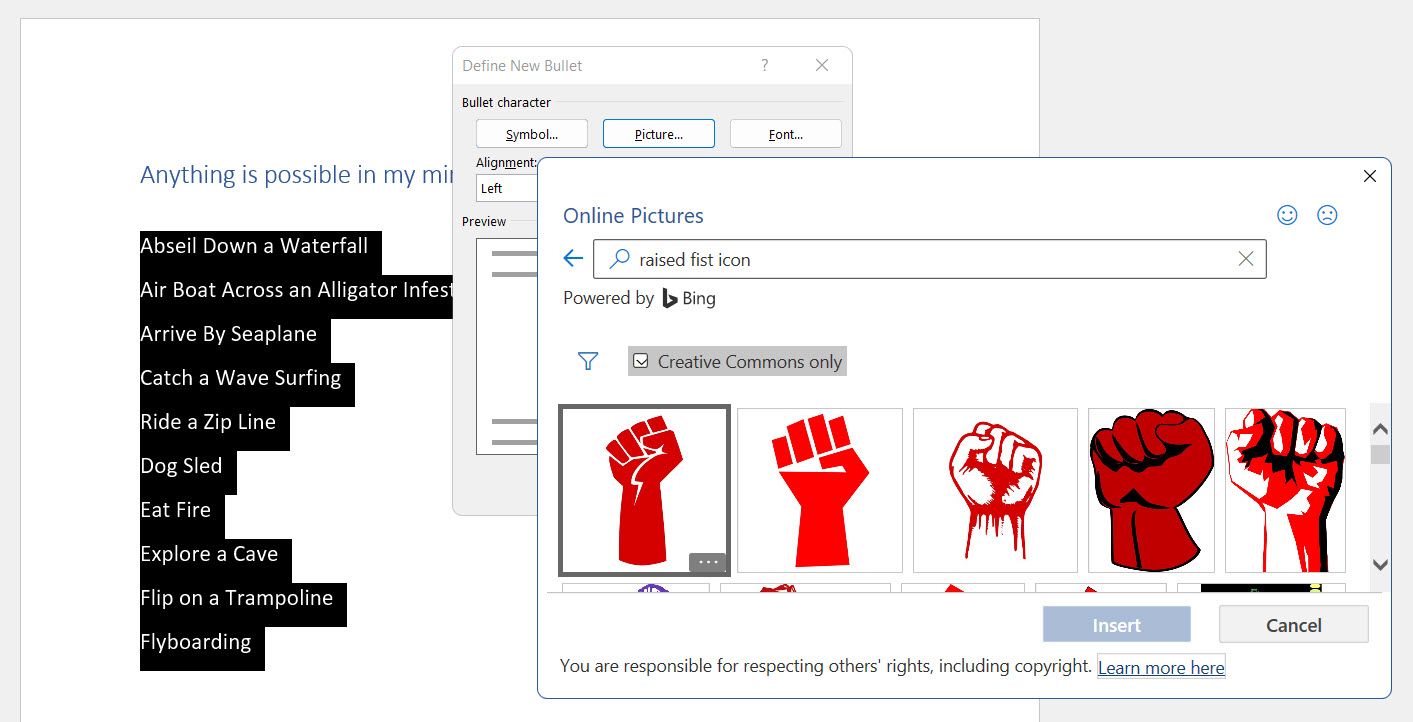
Navigate to the location of your source file and click on Insert. The Preview window shows the selection.
General Tip: You can choose a graphic that matches the «theme» of your list. For instance, display a banana as a picture bullet for a list of fruits. Make sure images are transparent and have a good background. In my experience, simple graphics work best.
6. Line Up the Numbers in a List
Sometimes, the smallest of tweaks can make a big visual difference. For example, note the screenshot below, which shows a numbered list with Word’s default Left alignment. As soon as the list reaches double digits, the default left alignment seems skewed as the decimal points do not line up neatly. Microsoft Word allows you to control this alignment and flush the double-digit numbers to the right.

Create your numbered list. Select the list items. Word can also control the alignment of a few selected items.
Go to Home > Paragraph. Then, click the dropdown arrow on Numbered list button.
Click on Define New Number Format. Choose Right alignment from the dropdown. Click OK.
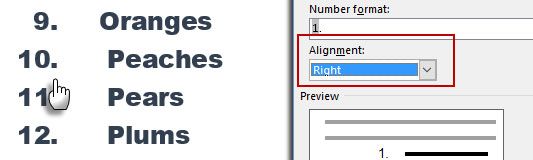
General Tip: Even if there is no decimal, it is preferable to have them aligned on the right edge of the number. Try it with brackets.
7. Adjust Microsoft Word’s Automatic List Indent
Every Word list comes with an automatic indent. Depending on the visual look you want, you may want to adjust the space.
Double-click any number in the list to select all of the numbers in the list.
Right-click the selection and choose Adjust List Indents from the context menu.
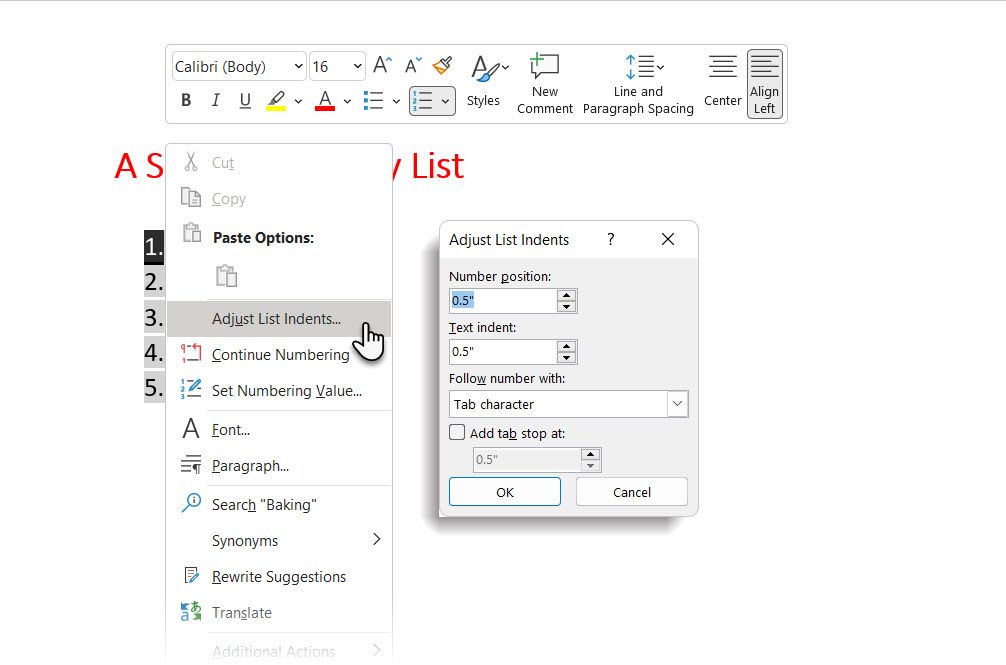
Change the distance of the bullet indent from the margin with the Number position box. Change the distance between the bullet and the text with the Text indent box.
Click OK.
8. Apply Formatting to a Single Number or Bullet on a List
You may want to format (changing the bullet style, color, or the size) a single bullet or number on a list without affecting any text on the list or any other succeeding bullets or numbers. Here’s an easy way.
Show formatting marks by clicking Home > Show/Hide.
Select just the paragraph marker (pilcrow) at the end for the list item whose bullet or number you want to change. Apply any formatting. The formatting affects only the bullet or number; the text in the list item retains its original format.
New bulleted or numbered items on the list coming after this will reflect this too. The text in the new list item will have the same font characteristics as the previous text, and the new bullet/number will have the same font characteristics as the previous bullet/number.
9. Create a Multilevel Numbered List
A multilevel list can be a mix of numbers, alphabets, and bullets arranged on different levels, as shown below. You can use multilevel lists to break down a list into its hierarchies or sub-points. Such an alignment is also used to create outlines. Word 2016 gives us a dedicated button on the Ribbon to create a multilevel list.
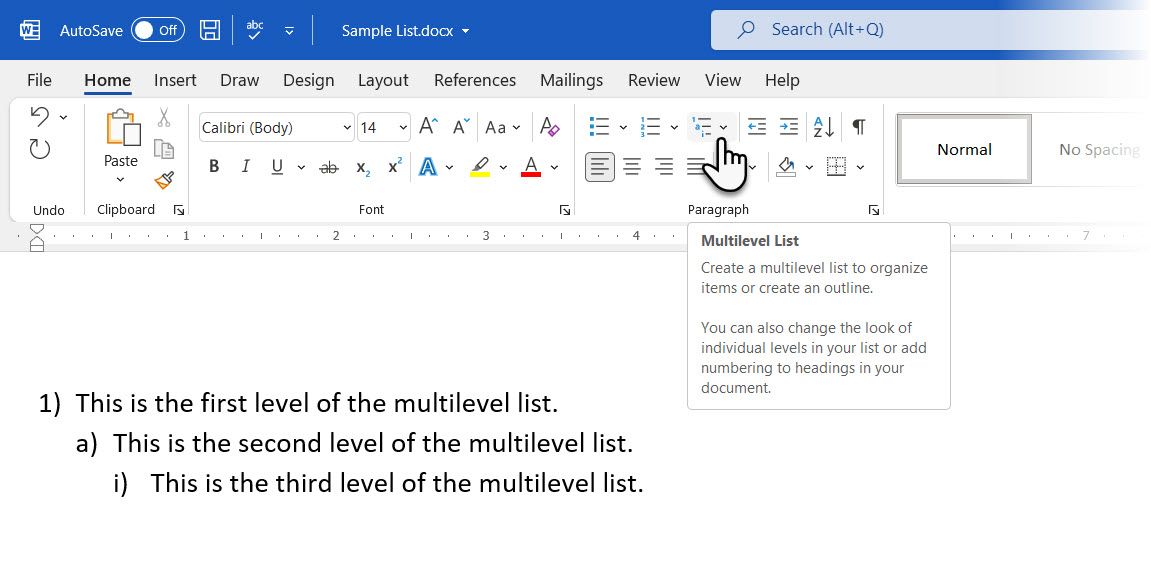
Click the Multilevel List button and type the list.
Press the Tab key to indent and create a sublevel. Press Shift + Tab to unindent and promote an item to a higher level.
General Tip: You can also write the entire list in advance. Select it, and click the Multilevel List button to align it using the Tab and Shift + Tab keys to organize the topics. You can also use the Increase or Decrease Indent commands on the Ribbon.
10. Create Reusable Styles for Multilevel Lists
You can change the bullets, letters, or numbers’ style, color, and alignment like any other list type. Save these changes as a new style and use it again and again.
Go to Ribbon > Home > click the arrow next to Multilevel List > Define New Multilevel List.
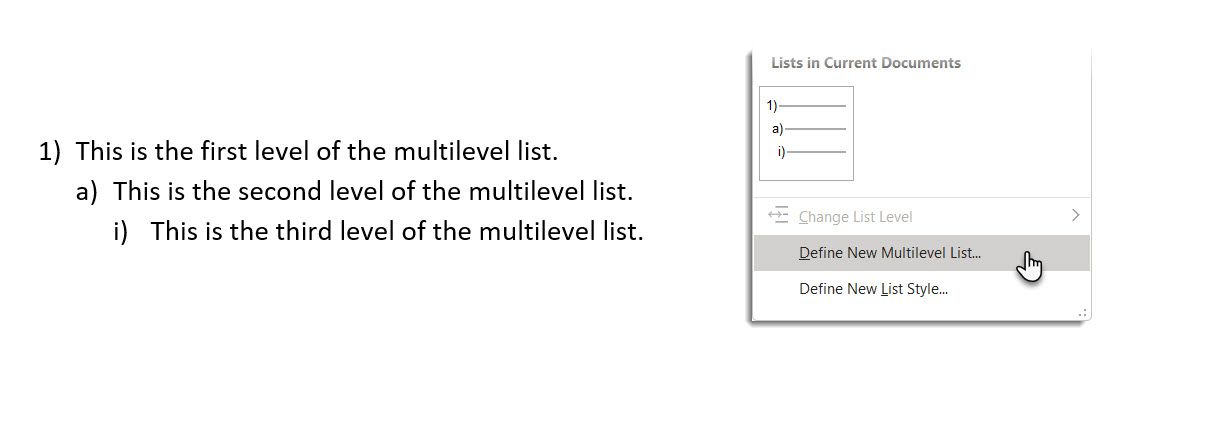
Click on More to expand the options.
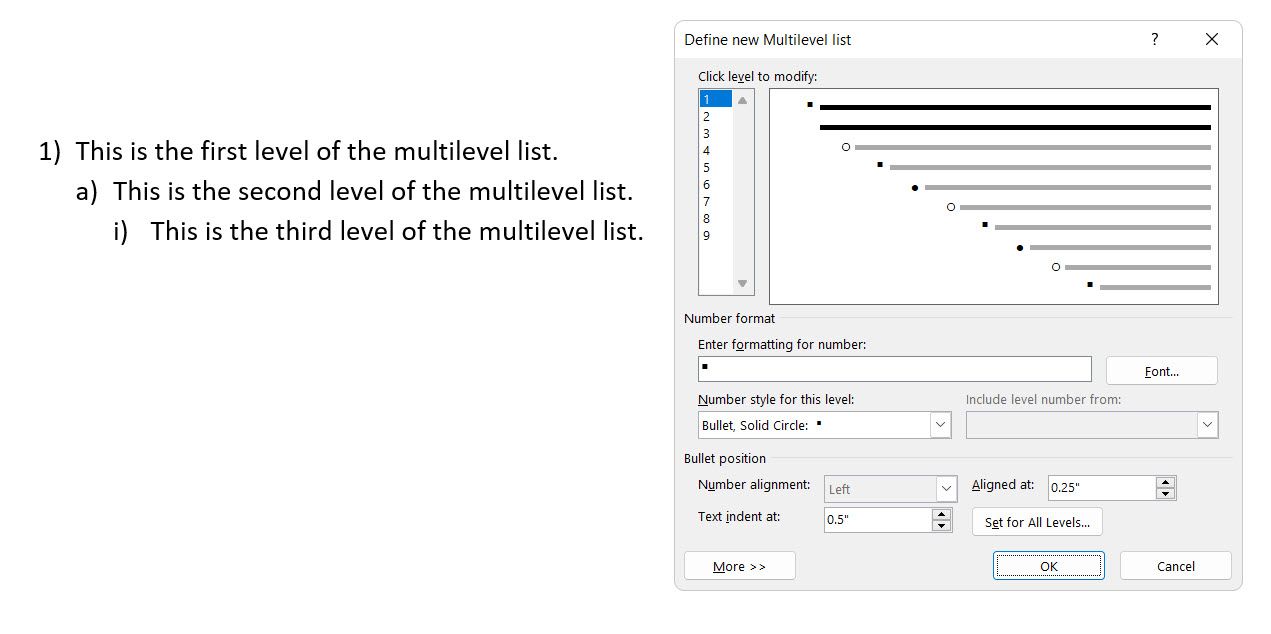
For customizing any of the levels, click the level number you want to modify. 1 is the default.
Use the options provided to change the appearance of the list. For example:
- In Number style for this level, type (1) if you want to style the numbers with parentheses or (A) to style the letters with parentheses.
- In Start at, choose the number, letter, or bullet where you want to start the list.
When you’ve finished the customizations, give the list a name under the ListNum field list name. This name will appear wherever you see the ListNum field.
Choose a style under Link level to style. This lets you use an existing style in Word for each level in the list.
Choose where you would like to apply your changes by clicking on Apply changes to and selecting from Selected text, Whole list, or This point forward.
11. Convert a List to a Table
First, select the list. Next, go to Home > Insert. Click the Table option in the Tables group.
Choose Convert Text to Table from the dropdown list.
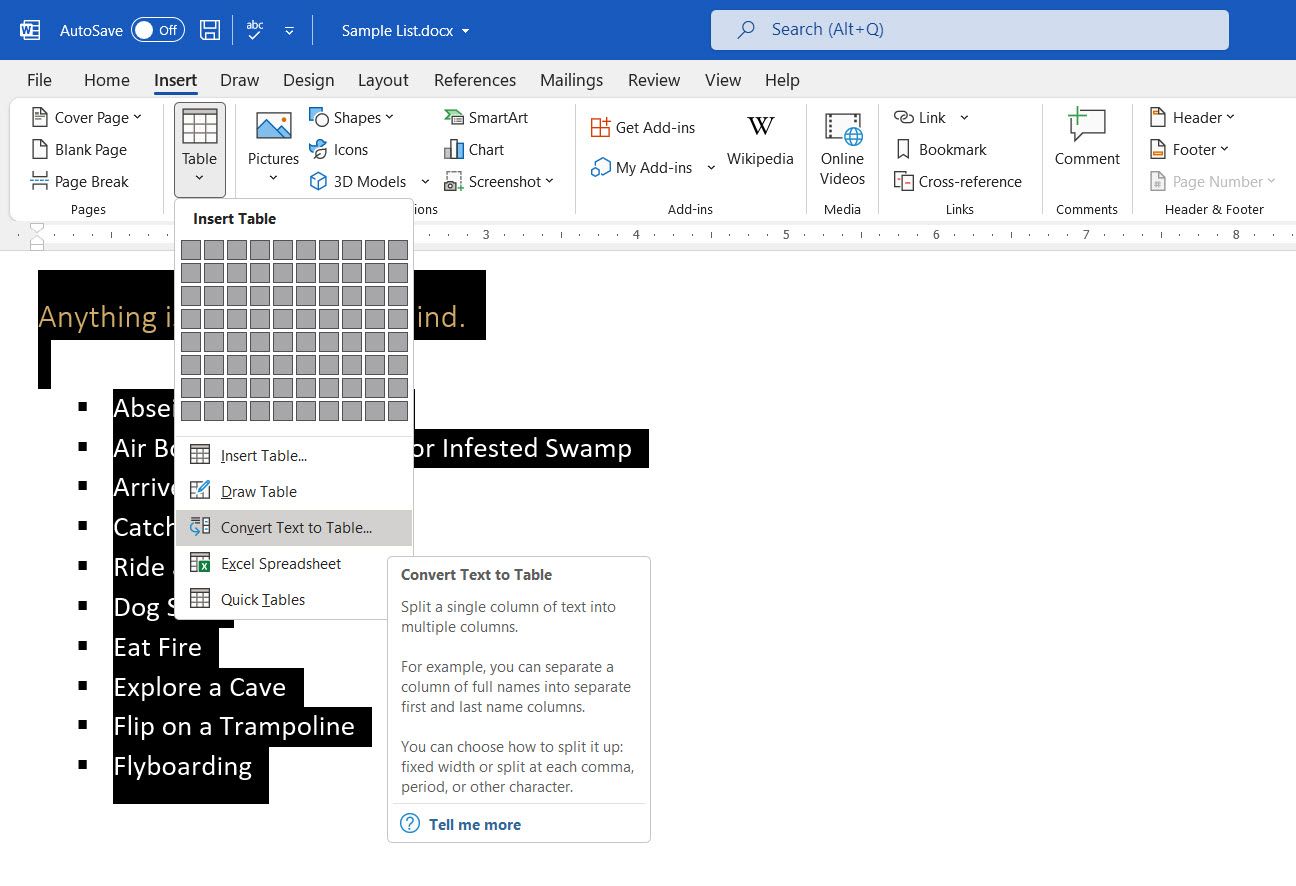
Microsoft Word estimates the table structure based on the list’s contents. Word creates the columns based on the separators between the items on the list.
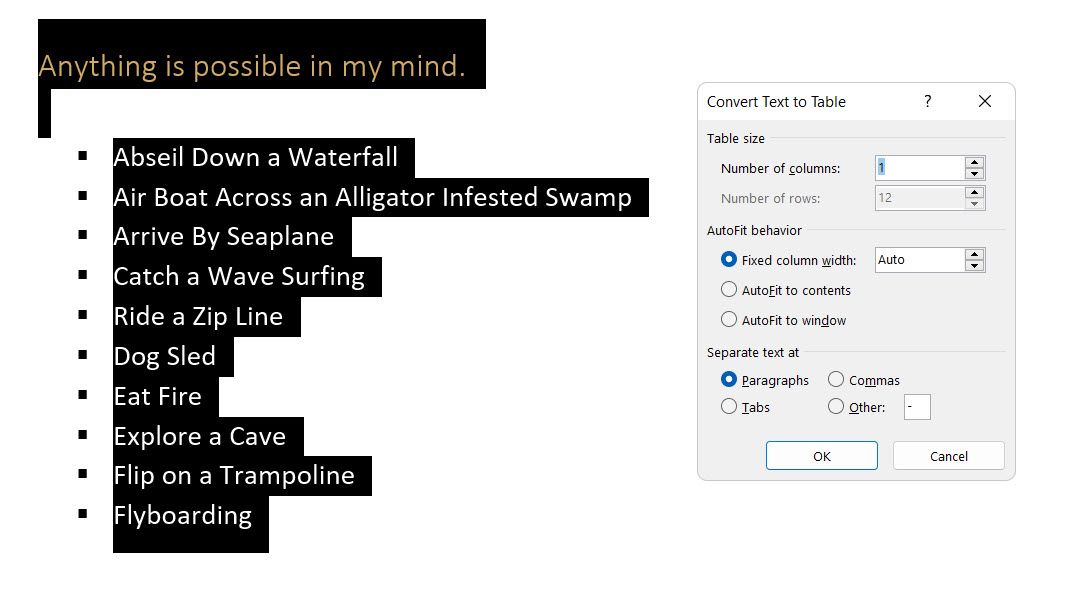
When Word doesn’t get it right, you have to modify the settings and make it easier for Word to convert the list. Once the table has been created, you can use the Table design tools to format the appearance.
General Tip: In most cases, the results aren’t perfect. The best way is to remove the numbering or the bullets and then create the table from the list of items. The serial numbers can easily be added to the table later.
12. Continue Your Numbering When a Paragraph Cuts It Short
Sometimes, a paragraph of text needs to interrupt the sequence of the list. Follow these steps to continue the list after the paragraph with the same number format.
Enter the rest of your numbered list after the paragraph and format it. The list begins with 1 again. Right-click on the list that comes after the paragraph. Choose Continue Numbering from the Context menu. The list is modified instantly.
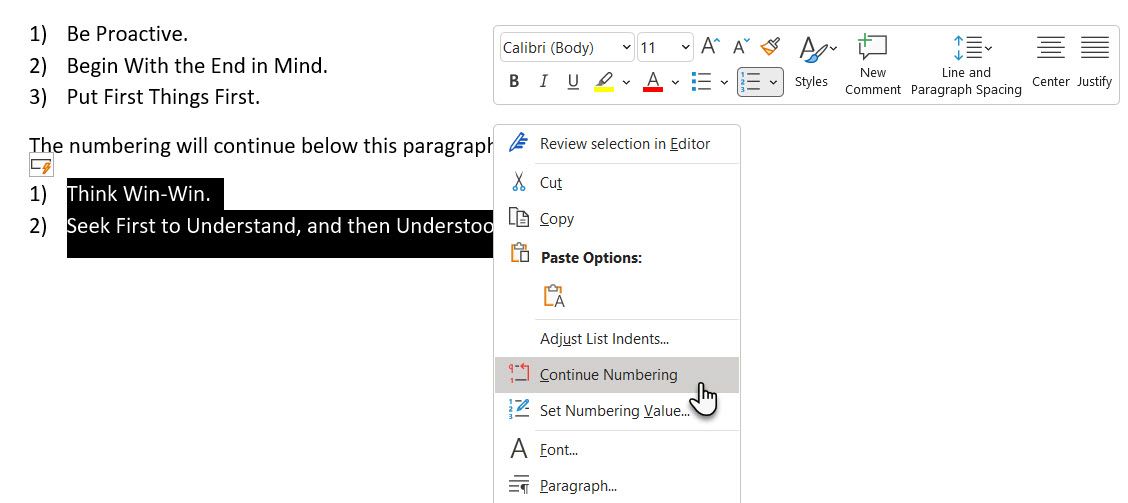
The list numbering continues from where the paragraph broke it off.
The Importance of Lists as Timesavers
Lists are time savers when a document has to be an exercise in economy. They instantly become a little less boring than blocks of text. Use them as the organizational backbone of a document and see your document better organized.
Check Out These 6 Ways to Select All in Microsoft Word Documents
by Avantix Learning Team | Updated March 24, 2022
Applies to: Microsoft® Word® 2010, 2013, 2016, 2019, 2021 or 365 (Windows)
In Microsoft Word documents, you can select all using the Ribbon or keyboard shortcuts. You can select all text in a document, select from the cursor to the end or the beginning of the document, select all text with similar formatting or select all cells in a table.
Recommended article: 10 Microsoft Word Tips, Tricks and Shortcuts for Selecting in Tables
Do you want to learn more about Microsoft Word? Check out our virtual classroom or in-person Word courses >
When you select all using a keyboard shortcut or the Ribbon, the main content of the document is highlighted and headers and footers are selected only if there are section breaks in the document because headers and footers are attached to sections. Headers and footers for the last section are not included as the last section is not followed by a section break. If you are trying to select all to change the font and size for an entire document, a better strategy is to use themes and styles.
1. Select all using a keyboard shortcut
To select all using a keyboard shortcut, click in the document and then press Ctrl + A to select the entire document.
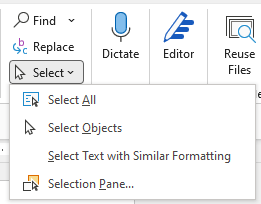
2. Select all using the Ribbon
To select all using the Ribbon:
- Click in the document.
- Click the Home tab in the Ribbon.
- In the Editing group, click Select. A drop-down menu appears.
- Click Select All.
Select All appears in the Select drop-down menu on the Home tab in the Ribbon:

3. Select all from the cursor to the end of the document
To select all from the cursor to the end of the document using a keyboard shortcut, position the cursor where you want to start the selection and then press Ctrl + Shift + End.
4. Select all from the cursor to the beginning of the document
To select all from the cursor to the beginning of the document, position the cursor where you want to start the selection and then press Ctrl + Shift + Home.
5. Select all text with similar formatting
To select all text with similar formatting:
- Select the text with the desired formatting.
- Click the Home tab in the Ribbon.
- In the Editing group, click Select. A drop-down menu appears.
- Click Select Text with Similar Formatting.
All text with the same formatting will be selected and you can clear the formatting or apply other formatting.
Select Text with Similar Formatting appears in the Select drop-down menu on the Home tab in the Ribbon:
6. Select all cells in a table
To select all cells in a table, click in the table, press Alt and then double-click. You can also click the four-arrow pointer on the top left of the table.
Subscribe to get more articles like this one
Did you find this article helpful? If you would like to receive new articles, join our email list.
More resources
How to Find and Replace in Word (and Use Wildcards)
How to Create, Save, Use and Edit Templates in Microsoft Word
How to Keep Text Together in Microsoft Word (Words, Lines or Paragraphs)
How to Insert a Check Mark in Word (5 Ways to Insert a Check or Tick Mark with Shortcuts)
10+ Great Microsoft Word Navigation Shortcuts for Moving Around Quickly in Your Documents
Related courses
Microsoft Word: Intermediate / Advanced
Microsoft Word: Designing Dynamic Word Documents Using Fields
Microsoft Word: Long Documents Master Class
Microsoft Excel: Intermediate / Advanced
Microsoft PowerPoint: Intermediate / Advanced
VIEW MORE COURSES >
Our instructor-led courses are delivered in virtual classroom format or at our downtown Toronto location at 18 King Street East, Suite 1400, Toronto, Ontario, Canada (some in-person classroom courses may also be delivered at an alternate downtown Toronto location). Contact us at info@avantixlearning.ca if you’d like to arrange custom instructor-led virtual classroom or onsite training on a date that’s convenient for you.
Copyright 2023 Avantix® Learning
Microsoft, the Microsoft logo, Microsoft Office and related Microsoft applications and logos are registered trademarks of Microsoft Corporation in Canada, US and other countries. All other trademarks are the property of the registered owners.
Avantix Learning |18 King Street East, Suite 1400, Toronto, Ontario, Canada M5C 1C4 | Contact us at info@avantixlearning.ca

on
August 15, 2011, 3:56 AM PDT
15 ways to select text in a Word document
There are many ways to select Word text — 15 at least! Susan Harkins shares her favorite selection methods.
Besides entering text, selecting text is probably the most common task for most Word users. Almost every task begins by selecting something. Perhaps that’s why there are so many ways to select text. The following list includes the methods I use. There are more – I left off a few because I’ve listed easier methods. If you have a favorite that I haven’t listed, please share it with us.
Click and drag
Probably the most intuitive and common way to select text is to click and drag the mouse in any direction.
[Shift]+arrow
To move one character or one line at a time, hold down the [Shift] key while pressing the right and left arrow keys and the up and down arrow keys, respectively.
[Shift]+[Home] | [End]
Pressing [Shift] + [Home] selects everything from the insertion point to the left margin in the current line. Similarly, [Shift]+[End] selects everything from the insert point to the last character to the right.
Double-click
To select the current word, double-click it. Word will select to the left and right of the cursor, until it encounters a space character.
Triple-click
A triple-click selects the current paragraph.
Margin+click
To select an entire line, move the cursor into the left margin. When you see the insertion pointer turn into an arrow pointer, click. Doing so will select the current line. You can also press [Home]+[Shift]+[End], but doing so is a bit awkward.
Margin+click and drag
This selection method is similar to the previous one. If you drag while holding down the mouse, Word will select multiple lines, even paragraphs. Word will stop selecting when you stop dragging.
[Ctrl]+a
Pressing [Ctrl]+a selects the entire document.
[Ctrl]+click
To select a sentence (not just a line), hold down [Ctrl] and click any place within the sentence.
Click+[Shift]+click
To select a block of text, click at one end of the block. Then, hold down the [Shift] key and click a second time at the opposite end of the block.
[Alt]+drag
This combination selects a vertical block. While holding down [Alt], click and drag up or down. (You must press [Alt] first.)
Selection+[Ctrl]+selection
To select two noncontiguous blocks of text, select the first bit of text. Then, hold down [Ctrl] while you select the next, and the next, and the next – use it to select two or several non-contiguous areas. (I probably use this one more than any other besides click and drag – it’s great for applying the same format to several spots.)
[Ctrl]+[Shift]+[Right arrow] | [Left arrow]
Use this combination to select from the current position to the right or left of the current word, depending on whether you press the right or left arrow, respectively.
[Ctrl]+[Shift]+[Up arrow] | [Down arrow]
This combination selects from the current position to the beginning or ending of the current paragraph, depending on whether you press the up or down arrow, respectively.
[Alt]+[Ctrl]+[Shift]+[Page Up] | [Page Down]
This is another awkward keystroke combination that selects from the current insertion point to the beginning or the ending of the current window (what you see on the screen), respectively. This one’s awkward enough that I’d probably use a quick click and drag instead.