
To do so, hold down the Ctrl key and click each picture. Remember, if you can’t create a multi-picture selection, check the text wrapping options–they should all be With Text Wrapping. With all of the pictures selected, click the contextual Format tab.
How do I copy an image size in Word?
format the size of one image. click on another image. press F4.
How do you auto fit a picture in Word?
So, insert all your images without worrying about their size. Then right click on the first image and select Size and Position. Set the width as desired, then click OK. Then select each of the subsequent images (left click on them) and simply press F4 or Ctrl – Y .
How do I fix the size of a picture in Word?
Do one of the following:
- To resize a picture, under Picture Tools, on the Format tab, in the Size group, click the Size and Position dialog box launcher .
- To resize a shape, text box, or WordArt, under Drawing Tools, on the Format tab, in the Size group, click the Size and Position dialog box launcher .
How do I change the width and height of a picture?
Online Image Resizer
- Upload an image: Select the PNG, JPG or JPEG image from your device that you want to resize.
- Type your new width and height: After uploading the image, type width and height (in pixels) that you want.
- Click submit button: After entering width and height, click the submit button.
How can I change the size of an image?
How to Reduce the Size of an Image Using Photoshop
- With Photoshop open, go to File > Open and select an image.
- Go to Image > Image Size.
- An Image Size dialog box will appear like the one pictured below.
- Enter new pixel dimensions, document size, or resolution.
- Select Resampling Method.
- Click OK to accept the changes.
What is height and width of image?
The width attribute specifies the width of an image, in pixels. Tip: Always specify both the height and width attributes for images. If height and width are set, the space required for the image is reserved when the page is loaded. To avoid this, rescale the image with a program before using it on a page.
How do I change the width and height of an image in Windows 10?
Select a group of images with your mouse, then right-click them. In the menu that pops up, select “Resize pictures.” An Image Resizer window will open. Choose the image size that you want from the list (or enter a custom size), select the options that you want, and then click “Resize.”
How do I resize an image without losing quality python?
How to Resize Images in a Fixed Aspect Ratio with Python’s PIL Library
- First line: Determine a fixed number for creating the ratio.
- Second line: Open the image.
- Third line: Create the height percent according to your fixed value.
- Fourth line: Create the image width by multiplying it with the proportioned height value.
What does cv2 resize do?
resize() function of OpenCV library cv2. Resizing, by default, does only change the width and height of the image. The aspect ratio can be preserved or not, based on the requirement. Aspect Ratio can be preserved by calculating width or height for given target height or width respectively.
How do I resize an image using PIL?
Use PIL Image. resize(size, resample=0) method, where you substitute (width, height) of your image for the size 2-tuple.
How do I resize an image in Opencv?
Resize only the width
- import cv2.
- img = cv2.imread(r’C:UsersDEVANSH SHARMAcat.jpeg’, cv2.IMREAD_UNCHANGED)
- print(‘Original Dimensions : ‘, img.shape)
- width = img.shape[1] # keep original width.
- height = 440.
- dim = (width, height)
- # resize image.
- resized = cv2.resize(img, dim, interpolation=cv2.INTER_AREA)
How do I resize an image in pygame?
You can either use pygame. transform. scale or smoothscale and pass the new width and height of the surface or pygame….smoothscale blurs the Surface.
- Creates a new surface ( newSurface ) with size (width, height) .
- Scale and copy Surface to newSurface .
- Return newSurface .
How do you make all images the same size in Python?
You can resize multiple images in Python with the awesome PIL library and a small help of the os (operating system) library. By using os. listdir() function you can read all the file names in a directory. After that, all you have to do is to create a for loop to open, resize and save each image in the directory.
How do I get the size of an image in Python?
How to get the size of an image with PIL in Python
- image = PIL. Image. open(“sample.png”) image to open.
- width, height = image. size. extract width and height from output tuple.
- print(width, height)
How do I resize an image in Python?
To resize an image, you call the resize() method on it, passing in a two-integer tuple argument representing the width and height of the resized image. The function doesn’t modify the used image; it instead returns another Image with the new dimensions.
How do I resize and save an image in Python?
The Image module from pillow library has an attribute size. This tuple consists of width and height of the image as its elements. To resize an image, you call the resize() method of pillow’s image class by giving width and height.
How do I display an image in Python?
Python – Display Image using PIL To show or display an image in Python Pillow, you can use show() method on an image object. The show() method writes the image to a temporary file and then triggers the default program to display that image.
How do you process an image in Python?
Let’s get started
- Step 1: Import the required library. Skimage package enables us to do image processing using Python.
- Step 2 : Import the image. Once we have all the libraries in place, we need to import our image file to python.
- Step 3 : Find the number of Stars.
- Step 4 : Validated whether we captured all the stars.
Is Python good for image processing?
Python is an excellent choice for these types of image processing tasks due to its growing popularity as a scientific programming language and the free availability of many state-of-the-art image processing tools in its ecosystem.
What is image model?
Image-based modeling refers to the process of using two-dimensional images to create three-dimensional models. These models often consist of a geometric shape and a texture map defined over this shape.
How do you rhetorically analyze an image?
In order to conduct a proper visual rhetoric analysis, follow these steps:
- Write down absolutely everything you see in the ad.
- Determine the importance of the objects and pictures.
- Consider the message.
- Determine who the audience is – the rules of visual rhetoric can be changed based on who the author is speaking to.
Select objects, shapes, pictures or text boxes, to change or move them. Sizing handles indicate that a shape or object has been selected.
Click or tap the object to select it. If that doesn’t select it, go to Home > Select and do one of the following:
-
To select all of the text in the document, choose Select All.
-
To select objects that are hidden, stacked, or behind text, choose Select Objects. To select an object, click or tap when your pointer becomes a selection arrow
 as it moves over an object. To select multiple objects, press and hold Ctrl while you click or tap the objects that you want.
 -
To select text with similar formatting, choose Select All Text with Similar Formatting.
-
To open the task pane where you can select, multi-select, show, hide, or change the order of objects, choose Selection Pane, and then select the options that you want.
 as it moves over an object. To select multiple objects, press and hold Ctrl while you click or tap the objects that you want.

Tips for selecting shapes and objects
|
To do this |
Do the following |
|---|---|
|
Select multiple objects. |
Press and hold Shift or Ctrl while you select the objects. |
|
Select an object that is under other objects and cycle forward through the stack of objects. |
Select the top object, and then press Tab. |
|
Select an object that is under other objects and cycle backward through the stack of objects. |
Select the top object, and then press Shift+Tab. |
|
Select objects that are part of a group. |
Select the group, and then do one of the following:
|
|
Cancel the selection of one object at a time. |
Press and hold Shift or Ctrl while you click or tap each object. |
See Also
Group or ungroup shapes, pictures, or other objects
Select objects, shapes, pictures or text boxes, to change or move them. Sizing handles indicate that a shape or object has been selected.
Using the Selection Pane
If you can’t select an object or there many objects to select, use the Selection pane.
-
Select one of the objects you want to manage.
-
Go to Shape Format or Picture Format> Arrange
> Selection Pane.
-
The Selection Pane opens with all your objects listed, and you can do any of the following:
-
Drag an item up or down in the list to change the order. If you have objects that cover each other, this will bring an object to the front, or put it behind another object.
-
Choose to show or hide objects from the Selection Pane. To hide an object, select the eye icon in the Selection Pane indicating that the object is Showing
. The icon changes to a simple icon indicating that the object is Hidden from view. To show the object once again, select the Hidden icon , and the object reappears. -
Group or ungroup objects listed in the Selection Pane. If you select multiple objects by using Command + Click, you can then group them or ungroup them by selecting Format Shape or Format Picture > Arrange
> Group Objects.
-
 > Selection Pane.
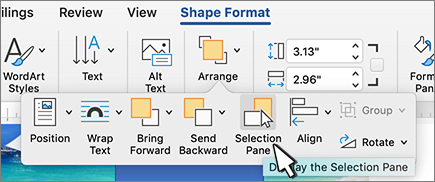
 . The icon changes to a simple icon indicating that the object is Hidden
  from view. To show the object once again, select the Hidden icon
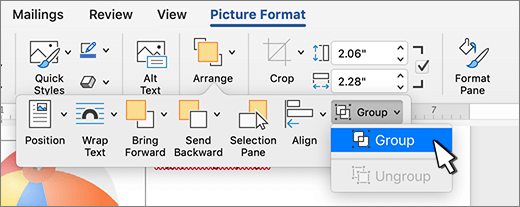
Microsoft Word can do a lot more things for you than you can actually know! Most people use MS-Word for very basic things. But at times you may face situations where you feel that MS-Word will not be able to help you and you will have to do it all manually. For example, what if you need to find and replace all the images in a Word document? Do you think MS-Word can do this? Well, yes! A reader of TechWelkin sent me a query. She said that she is a writer and is working on a large manuscript in MS-Word. She used a tiny image as a separator for various chapters and sections in the document. Now she wants to replace that image with a new one. But there are hundreds of copies of the image. So, will she have to replace each image one by one? Let’s explore the answer!
How to Find and Replace Images in MS Word
MS-Word can help in the above given scenario. There is an automatic way to find all the images in a document and then replace them all with a new image. Please note that this method will find all the images and it will replace all of them with a new one. With this method, we can not be selective about images. Here are the steps:
- Open the MS-Word document in which replacement is to be done.
- Insert the new image at the top of the document.
- Select the newly inserted image and press Ctrl + C to copy it.
- Now delete the newly inserted image.
- Press Ctrl + H to open the Find and Replace box.
- Put ^g in the Find what box and ^c in the Replace with box
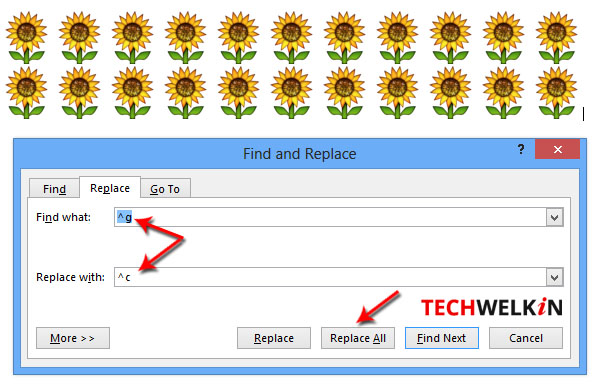
Method of finding all images and replacing them with a new one.
Now press Replace All button to see the magic!
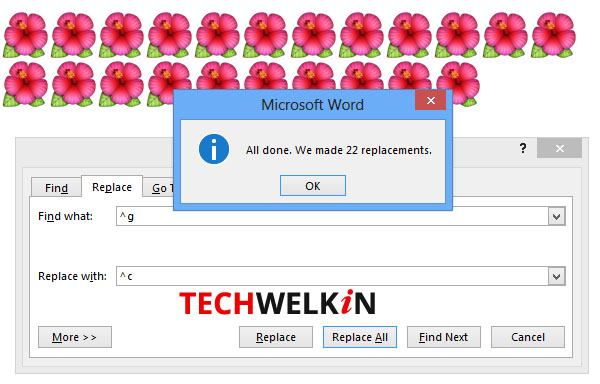
All images have been replaced in MS Word.
You will see that all the images in the document will be replaced with the new image. Of course, the replacement operation will also replace the images that you did not want to replace. In such a case you may need to re-insert the images that were not to be replaced. This method is useful in a scenario where:
- the document contains only those images that are to be replaced
- the document contains a large number of images that need to be replaced and a smaller number of images that should not be replaced
The first scenario is straightforward. In the second scenario, you’ll be doing much less manual work by re-inserting images that were replaced as a side-effect.
The method works by replacing all graphics (denoted by ^g) with the clipboard content (denoted by ^c). Therefore, essentially, you can replace all images with anything that you can copy to clipboard.
To keep your document’s pagination intact, you should use the same size new image.
I hope this MS-Word tip was useful for you. If you have any question on this topic, please feel free to ask me through comments. I will try to assist you. Thank you for using TechWelkin.
- Remove From My Forums
-
Question
-
Word 2010. How to select all picutres inserted in a document? I need to add border to each image but failed to locate all images at once.
Any help will be appreciated.
Answers
-
Well you can’t select them at once, but you can find them.
Using CTRL-F, you can search for ^g, this will give you all pictures as a result.Simple click the result, and you can make the preferred changes to the picture.
Hope this helps.
-
Proposed as answer by
Sunday, December 31, 2017 3:43 PM
-
Marked as answer by
Danielshah
Monday, January 8, 2018 2:43 PM
-
Proposed as answer by
-
Hi Daniel,
Agree with AntoonBouw that it may not supported to select all images in a document at once.
I followed the instructions provided by AntoonBouw and it worked great. Additionally, you may consider adding the Picture Border option to Quick Access Toolbar so that it can more convenient:
Select a image, go to Picture Tools, right click Picture Borders, click Add to Quick Access Toolbar, so that you can quickly add border by clicking the button on the QAT:
HoptHopHHYopHH
Regards,
Yuki Sun
Please remember to
mark the replies as answers if they helped. If you have feedback for TechNet Subscriber Support, contact
tnsf@microsoft.com.
Click
here to learn more. Visit the dedicatedforum to share, explore and
talk to experts about Microsoft Teams.-
Edited by
Yuki SunMicrosoft contingent staff
Monday, January 1, 2018 7:59 AM -
Proposed as answer by
Yuki SunMicrosoft contingent staff
Tuesday, January 2, 2018 10:00 AM -
Marked as answer by
Danielshah
Monday, January 8, 2018 2:43 PM
-
Edited by
-
When using:
Find = ^g
The only pictures that will be found are those that are formatted in-line with text;
pictures with any other kind of wrapping will not be found. Accordingly, the most efficient approach may be to use a macro — which will also allow you to differentiate shape/inlineshape types. For example:Sub FormatPics() Application.ScreenUpdating = False Dim Rng As Range, Shp As Shape, iShp As InlineShape ' Pictures in all story ranges in the document are processed. For Each Rng In ActiveDocument.StoryRanges ' Go through the shapes in the story range. For Each Shp In Rng.ShapeRange With Shp ' Restrict borders to pictures If .Type = msoPicture Then ' Apply the required formatting With .Line .Weight = 1 .ForeColor = wdColorRed End With End If End With Next Shp ' Go through the inlineshapes in the story range. For Each iShp In Rng.InlineShapes With iShp ' Restrict borders to pictures If .Type = wdInlineShapePicture Then ' Apply the required formatting With .Borders .Enable = True .OutsideLineWidth = 1 .OutsideColor = wdColorRed End With End If End With Next iShp Next Rng Application.ScreenUpdating = True End Sub
Cheers
Paul Edstein
[MS MVP — Word]-
Proposed as answer by
Yuki SunMicrosoft contingent staff
Tuesday, January 2, 2018 9:59 AM -
Marked as answer by
Danielshah
Monday, January 8, 2018 2:43 PM
-
Proposed as answer by
You may have a few pictures in your Word document. To change several parameters of the pictures, you can edit them one by one. When you have a larger number of pictures, you may want to select them all at a time. This allows you to change them all at once. By default, Word does not allow you to select more than one picture at a time.
Word has two layout options for inserting pictures:
- In Line with Text
- With Text Wrapping
By default, Word inserts pictures In Line with Text in the document. That means Word will treat the inserted picture as a character. Word also treats other characters in the text in the same way. Therefore, Word will not allow selecting multiple pictures in your document when they are In Line with Text.
Therefore, you must change the layout of the pictures to With Text Wrapping. This will allow you to select multiple pictures at the same time.
- Using keyboard and mouse
- Using the Select Multiple Objects dialog
We will show you in simple steps how to go about selecting multiple pictures in your Word document.
Let us begin.
Method #1: Select using keyboard and mouse
Step #1: Open Word document
Open the Word document that has several pictures.

Step #2: Change to With Text Wrapping
Click on the first picture to select it.
Click on the icon for Layout Options that appears next to the picture.

The Layout Options menu will open.

Click on one of the icons under With Text Wrapping.
Exit the menu by clicking on the X on the top right-hand corner.
Repeat this step for all the pictures in the document.
Step #3: Select multiple pictures using keyboard
Click on the first picture to select it.
Press the CTRL button on your keyboard and hold it.
Click on the rest of the pictures.
Word will allow selecting multiple pictures.

Method #2: Select using Select Multiple Objects Dialog
Step #1: Open Word document
Open the Word document that has several pictures.

Step #2: Change to With Text Wrapping
Click on the first picture to select it.
Click on the icon for Layout Options that appears next to the picture.

The Layout Options menu will open.

Click on one of the icons under With Text Wrapping.
Exit the menu by clicking on the X on the top right-hand corner.
Repeat this step for all the pictures in the document.
Step #3: Get Select Multiple Objects icon in the Quick Access Toolbar
By default, Word does not show Select Multiple Objects icon in the toolbar. We must include it in the Quick Access Toolbar.
Click on the Customize Quick Access Toolbar icon.

This will open the Customize Quick Access Toolbar menu.
Click on More Commands.

This opens the Word Options dialog box.

Under Choose commands from, click on the expand button.
Click on Commands Not in the Ribbon.

Click inside the box under Commands Not in the Ribbon and type S on your keyboard.
This will bring all commands beginning with S into the box.
Scroll down and click on Select Multiple Objects.
Click on the Add button to include the selection in the right-hand side.
Exit the dialog box by clicking on the Ok button.
Word adds the Select Multiple Objects in the Quick Access Ribbon.

Step #4: Save your document in .doc format
Click on the File tab on the top menu bar to open the file menu.

Click on Save as and then click on Browse to open the File Manager.
Select Word 97-2003 Document against Save as type, and save the document.

Word will save and reopen the document in the .doc format.
Step #5: Select multiple pictures using Select Multiple Objects dialog.
Click on Select Multiple Objects icon in the Quick Access Ribbon.
This will open the Select Multiple Objects dialog box.

Word lists all the pictures within the dialog box.
Click on the names of the pictures you want to select.
Exit the dialog box by clicking on Ok.
Word will select the pictures you chose.

Conclusion
Follow our simple instructions above. You will be able to select multiple pictures in your Word document with ease.