
![]()
Download Article
![]()
Download Article
Instead of wading through every Microsoft Word paragraph style just to find the one you need, try viewing only the styles used in the current document. You’ll need a version of Word installed on a Windows or macOS device, as this option is not yet available for Android, iOS, and Office Online.
-

1
Open your document in Word.
-
2
Click the Home tab. This is the first tab in the toolbar at the top of the screen.
Advertisement
-
3
Click the Styles Pane icon on the right side of the toolbar. The Styles pane will appear on the ride side of the screen, displaying a list of every style in Word.[1]
-
4
Place a checkmark next to “Show Styles Guides.” Now the Styles toolbox lists only the styles used in the current document. To view a style’s details (such as font size, color, etc.), hover your mouse over its name.
- Each style name is preceded by a colored box containing a number.
- Colored boxes now also appear along the left side of your document.
-
5
Compare the colored boxes in the Styles toolbox to those in your document.
- For example, if the style “Normal” shows a blue box with a 1, each paragraph using that style will also show a blue box with a 1.
- To assign a different style to a paragraph, highlight that paragraph and then click a style in the Styles toolbox.


Advertisement
-
1
Open your document in Word.
-
2
Click the View menu at the top of the screen.[2]
-
3
Click Print Layout.
-
4
Click Show or hide the toolbox on the toolbar. The button may appear as an icon of a square containing three horizontal lines with a smaller red square at its top. Once clicked, the “Styles” toolbox will appear.[3]
-
5
Click the ¶ at the top left corner of the toolbox. The Styles toolbox will now show a list of all available styles in Word.
-
6
Place a checkmark next to “Show Styles Guides.” Now the Styles toolbox lists only the styles used in the current document. To view a style’s details (such as font size, color, etc.), hover your mouse over its name.
- Each style name is preceded by a colored box containing a number.
- Colored boxes now also appear along the left side of your document.
-
7
Compare the colored boxes in the Styles toolbox to those in your document.
- For example, if the style “Normal” shows a blue box with a 1, each paragraph using that style will also show a blue box with a 1.
- To assign a different style to a paragraph, highlight that paragraph and then click a style in the Styles toolbox.


Advertisement
-
1
Open your document in Word.
-
2
Click the Home tab.
-
3
Press Alt+⇧ Shift+Ctrl+S. The Styles pane will open on the right side of the screen, displaying the list of all styles in Word.[4]
- You can also open the Styles pane by clicking the tiny arrow at the bottom right corner of the “Styles” toolbar at the top of the screen.
-
4
Click the Options link at the bottom of the Styles pane.
-
5
Click the dropdown menu beneath “Select Styles to Show.”
-
6
Select In Current Document from the dropdown menu.
-
7
Place a check next to “Paragraph Level Formatting.” The other check boxes should remain blank.
-
8
Click OK. Now the Styles pane will only show the paragraph styles used in the current document.
-
9
Click anywhere in your document to see which style is used. The style used in the paragraph you clicked will now appear highlighted in the Styles pane.
- Hover your mouse over the name of the style in the Styles pane to see its details, such as font size, face, and color.
- To modify a Style, hover the mouse over its name and click the small arrow.
- To change the style of part of your document, highlight the part you want to change, then click a style in the Styles pane.


Advertisement
Ask a Question
200 characters left
Include your email address to get a message when this question is answered.
Submit
Advertisement
-
To find out which style is being used in a paragraph in Word for Windows, click the document and press Ctrl+⇧ Shift+S. This opens the “Apply Styles” box, which displays the currently-selected style.
Thanks for submitting a tip for review!
Advertisement
References
About This Article
Thanks to all authors for creating a page that has been read 17,144 times.
Is this article up to date?
Word for Microsoft 365 Word 2021 Word 2019 Word 2016 Word 2013 Word 2010 Word 2007 More…Less
In Microsoft Office Word, styles are reusable sets of formatting options that you can apply to text. For example, suppose you want the headings in your document to appear in bold and in a particular color and font size. Although you can manually set each formatting option individually for each header, it is much easier to use a style that applies all of these options at once.
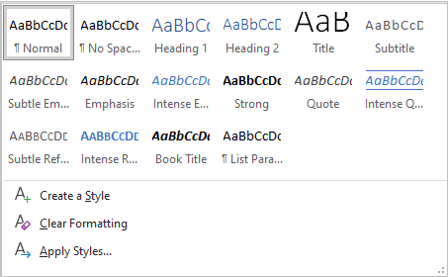
You can apply a specific style quickly and easily from the Styles gallery on the Home tab. You can also manage the contents of the gallery by adding new or other popular styles and deleting those that you don’t need.
Create a new style for the Styles gallery
The styles that you use frequently can be kept in the Styles gallery on the Home tab for ease of use. You can create a new style and add it to the gallery at any time.
-
Select the text that you want to format as a new style.
For example, perhaps you want text that contains certain information about your business to always appear as bold and red in your document.
-
On the mini toolbar that appears above your selection, specify the formatting that you want. For example, you can click Bold and Red .
-
With the formatted text selected, click the More
arrow in the lower-right corner of the Styles gallery, and then click Create a Style.The Create New Style from Formatting dialog box appears.
-
Give the style a name—for example, Business Fact—and then click OK. The style that you created appears in the Styles gallery with the name that you gave it, ready for you to apply whenever you want to text to appear bold and red.
 arrow in the lower-right corner of the Styles gallery, and then click Create a Style.
Move a style to the Styles gallery
You can move any existing style to the Styles gallery for easy access.
-
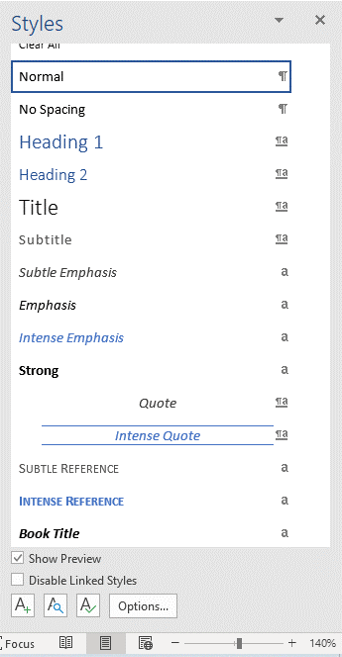
On the Home tab, click the Styles Dialog Box Launcher.
The Styles pane appears.
-
In the lower-right corner of the Styles pane, click Options.
-
Under Select styles to show, click All styles.
All styles are displayed in the Styles pane.
-
Select text in your document in the style that you want to move, and then click the style in the Styles task pane.
The style now appears in the Styles gallery.

Modify a style in the Styles gallery
You can change the definition of styles that are available for your document. For example, suppose you want the Heading 1 style to stand out more. You could use a larger font size or a heavier font, or you could add more space above and below the heading.
-
On the Home tab, in the Styles group, right-click the style in the gallery that you want to change, and then select Modify.
-
In the Modify Style dialog box, change the style any way that you want, and then click OK.
For example, under Formatting, you can click the arrow next to the Color box, and then click a new font color. All instances of the style are updated automatically throughout the document.
Remove a style from the Styles gallery
-
On the Home tab, in the Styles group, right-click the style that you want to remove from the gallery.
-
Click Remove from Style gallery on the shortcut menu.
Note: Removing a style from the gallery does not remove the style from the entries that appear in the Styles task pane. The Styles task pane lists all of the styles in the document.
In addition to using the Quick Styles gallery on your Home tab to easily apply formatting to text, you can also choose an entire set of styles that work together to create document designed for a specific purpose. For example, you could have one set of Quick Styles to be used for reports. It might include styles for a title, an abstract, several heading levels, and body text. All of the style colors and formats in a single style set are designed to be used together to create a compelling and readable document.
Create a new style for the Quick Styles gallery
A Quick Style set contains the basic styles that you need to build a document. However, you may want to add a custom style.
-
Select the text that you want to format as a new style.
For example, perhaps you want text that contains certain information about your business to always appear as bold and red in your document.
-
On the mini toolbar that appears above your selection, specify the formatting that you want. For example, you can click Bold and Red .
-
Right-click the selection, point to Styles, and then click Save Selection as a New Quick Style.
-
Give the style a name—for example, Business Fact—and then click OK. The style that you created appears in the Quick Styles gallery with the name that you gave it, ready for you to apply whenever you want text to appear bold and red.
Move a style to the Quick Styles gallery
You can move any existing style to the Quick Styles gallery for easy access.
-
On the Home tab, click the Styles Dialog Box Launcher, and then click Options.
-
Under Select styles to show, click All styles.
All styles are displayed in the Styles task pane.
-
Select text in your document and then click the style in the Styles task pane.
The style now appears in the Quick Styles gallery.
Modify a style in a Quick Style set
You can change the definition of styles in the Quick Style set. For example, suppose you want the Heading 1 style to stand out more. You could use a larger font size or a heavier font, or you could add more space above and below the heading.
-
On the Home tab, in the Styles group, right-click the style in the Quick Styles gallery that you want to change, and then select Modify.
-
In the Modify Style dialog box, change the style any way that you want, and then click OK.
For example, under Formatting, you can click the arrow next to the Color box, and then click a new font color. All instances of the style are updated automatically throughout the document.
Save styles as a new Quick Style set
After you change a Quick Style set, you can save the new Quick Style set to the list of Style sets that you can choose from.
-
Create new styles or change the styles in a Quick Style set.
Note: You can also change the colors or fonts that are used in a Quick Style set by clicking Change Styles in the Styles group and then clicking Colors or Fonts.
-
On the Home tab, in the Styles group, click Change Styles, and then point to Style Set.
-
Click Save as Quick Style Set.
-
In the Save Quick Style Set dialog box, type a name for your new Quick Style set, and then click Save.
To view the new Quick Style set, click Change Styles in the Styles group, and then point to Style Set. The new Quick Style set appears in the list so that you can apply it to a document at any time.
Remove a style from the Quick Styles gallery
-
On the Home tab, in the Styles group, right-click the style that you want to remove from the gallery.
-
Click Remove from Quick Styles gallery on the shortcut menu.
Note: Removing a style from the Quick Styles gallery does not remove the style from the entries that appear in the Styles task pane. The Styles task pane lists all of the styles in the document.
Need more help?
Use the Styles Task Pane to Display All Styles in a Word Document
by Avantix Learning Team | Updated April 19, 2022
Applies to: Microsoft® Word® 2010, 2013, 2016, 2019, 2021 or 365 (Windows)
You can display all available styles in a Microsoft Word document using the Styles task pane. By default, only some of the available styles (including heading styles) are displayed in the Home tab in the Ribbon. There are 9 levels of heading styles that can be displayed as well as many other styles. In order to view all available styles, you will need to customize the Styles task pane.
Recommended article: How to Hide Comments in Word (or Display Them)
Do you want to learn more about Microsoft Word? Check out our virtual classroom or in-person classroom Word courses >
Note: Screenshots in this article are from Word 365 but are very similar in previous versions of Word.
Displaying styles in the Ribbon
The easiest way to view and apply styles in Word is by using the Styles Gallery in the Home tab in the Ribbon.
To view styles using the Ribbon:
- Click the Home tab in the Ribbon.
- In the Styles group, click the down arrow on the bottom right of the Styles Gallery to view styles.
All available styles do not appear in the Styles Gallery.
The Styles Gallery appears as follows on the Home tab in the Word Ribbon:

If you click the More arrow on the bottom right of the Styles Gallery, an expanded Styles Gallery appears:
Although more styles appear in the expanded Styles Gallery, all available styles are not displayed.
Displaying styles in the Styles task pane
To display styles in the Styles task pane:
- Click the Home tab in the Ribbon.
- Click the dialog box launcher (diagonal arrow) on the bottom right in the Styles group. You can also press Ctrl + Alt + Shift + S. The Styles task pane will appear. If the task pane is floating, double-click the title bar.
The Styles task pane appears with styles in the document (this is the default display setting and all styles are typically not displayed):
Displaying all available styles in a document
To display all available styles in a document (including headings 1-9):
- Ensure the Styles task pane is displayed using the method(s) above.
- At the bottom of the Styles task pane, click Options. A dialog box appears.
- Below Select styles to show, select All Styles from the drop-down menu.
- Below How list is sorted, choose Alphabetical or another option from the drop-down menu.
- To apply this setting to the current document only, select Only in this document.
- Click OK.
Below is the Styles Pane Options dialog box with options to display all styles in the current document:

All available styles will appear in the task pane and you can apply or modify the styles.
Subscribe to get more articles like this one
Did you find this article helpful? If you would like to receive new articles, JOIN our email list.
More resources
How to Create a Table of Contents in Word
How to Double Space in Word (4 Ways + Shortcut)
14+ Word Selection Shortcuts to Quickly Select Text
How to Align or Justify Text in Word (4 Ways with Shortcuts)
How to Convert a PDF to Word in Microsoft Word (for Free – No Third Party Programs Needed)
Related courses
Microsoft Word: Intermediate / Advanced
Microsoft Excel: Intermediate / Advanced
Microsoft PowerPoint: Intermediate / Advanced
Microsoft Word: Long Documents Master Class
Microsoft Word: Styles, Templates and Tables of Contents
Microsoft Word: Designing Dynamic Word Documents Using Fields
VIEW MORE COURSES >
Our instructor-led courses are delivered in virtual classroom format or at our downtown Toronto location at 18 King Street East, Suite 1400, Toronto, Ontario, Canada (some in-person classroom courses may also be delivered at an alternate downtown Toronto location). Contact us at info@avantixlearning.ca if you’d like to arrange custom instructor-led virtual classroom or onsite training on a date that’s convenient for you.
Copyright 2023 Avantix® Learning
Microsoft, the Microsoft logo, Microsoft Office and related Microsoft applications and logos are registered trademarks of Microsoft Corporation in Canada, US and other countries. All other trademarks are the property of the registered owners.
Avantix Learning |18 King Street East, Suite 1400, Toronto, Ontario, Canada M5C 1C4 | Contact us at info@avantixlearning.ca

Styles in Word allow you to easily apply a consistent look throughout your entire document, rather than formatting everything manually. If you want to review your formatting, you can display the styles applied to the paragraphs in the left margin for quick reference.
Normally, to see which styles are applied to which paragraphs, you have to put the cursor in the paragraph and look at the Styles section of the Home tab. However, there’s an option in Word that allows you to see all your styles at a glance as you scroll through the document. We’ll show you how to turn on and adjust that setting.
To display the paragraph styles in the left margin, your document must be in Draft mode. To change to Draft mode, click the “View” tab.

In the Views section, click “Draft”.
Now, we’ll change the setting that will show the styles in the left margin. Click the “File” tab.
On the backstage screen, click “Options” in the list of items on the left.
Click “Advanced” in the list of items on the left side of the Word Options.
In the “Style area pane width in Draft and Outline views” box, enter a number for the width of the pane. To start, enter .5 and we’ll see if that width is big enough.
Click “OK” to accept the change and close the Word Options dialog box.
You’ll see paragraph style names in the left margin. For us, the .5 size for the left pane is not wide enough to show the full paragraph style names.
So, we changed the width to a bigger number and now we can see the full names of the paragraph styles.
If you don’t want to see the styles pane on the left anymore, change the “Style area pane width in Draft and Outline views” to 0 (zero).
READ NEXT
- › How to Add, Edit, and Remove Tab Stops in Microsoft Word
- › What’s the Difference Between Microsoft Office’s Desktop, Web, and Mobile Apps?
- › Android’s Nearby Share Has (Unofficially) Arrived on Mac
- › How to Get a Refund on the PlayStation Store
- › Discord Direct Message Won’t Go Away? Here’s the Fix
- › Windows 11 Has a New Photo Gallery in the File Explorer
- › Save Hundreds on Elegoo’s New PHECDA Laser Engraver Through Kickstarter
- › The New Winamp Is Here, but It’s Not What You’d Expect
How-To Geek is where you turn when you want experts to explain technology. Since we launched in 2006, our articles have been read billions of times. Want to know more?
When using Microsoft Word, you might notice that some of the Styles in the “Styles” section are missing. This is very likely to happen after you changed between designs. No need to worry, though. You can simply unlock the “missing” styles in three simple steps. We made a short but sweet video to explain how it’s done. In under three minutes, you’ll learn how to unlock those styles again.
Not into videos? We’ll give you a hint. Look at the bottom right of the “Styles” pane in your menu. When you find it and click it, a “Styles” pane will open somewhere on your screen.
On the bottom of that pane, you haven an “Options” button. Of course, the name might be different in your language, but the location stays the same: click that button on the bottom right.
A new window will open. If you open the first drop-down menu, you can choose which styles Word should display. The setting will usually be set to “Recommended” but you can select “All” to unlock the missing styles. Then click “Okay” a few times, and the missing styles should now be available.
Well, almost all of them
You will notice that you won’t be seeing all the styles that you saw in the “Style” pane. That’s expected behaviour. Word will only show you certain Styles if you are already using their parent styles in a document. For example, it won’t show you Heading 4, 5 or 6 if you haven’t used Heading 1, 2 or 3 at least once in a document. Can’t argue with their logic that there’s no need to apply a Heading 6 when there’s no other heading in your document!
So, in order to “unlock” these styles, you simply have to use their parent styles in the document as well. Easy peasy!