
Trusted By
Keyword Tool — это лучшая альтернатива Планировщику ключевых слов Google Ads и инструментам для поиска ключевых слов
Вот некоторые из причин почему:
Бесплатная версия Keyword Tool генерирует до 750+ ключевых слов для каждого поискового запроса
Стабильность. Keyword Tool — это очень надежный инструмент, который работает в 99.99% случаев
Вы можете использовать Keyword Tool совершенно бесплатно, даже без создания учетной записи
Вы владелец бизнеса, интернет-маркетолог или блогер? Если да, то вам абсолютно необходимо заинтересовать посетителей вашего сайта, для того, чтобы заставить их читать ваши статьи или кликать на рекламные объявления. Первый шаг на этом пути — это понять, чем на самом деле интересуются и что ищут ваши потенциальные клиенты или покупатели.
Каждый поисковый запрос — это выражение нужд, желаний и интересов конкретного человека. Представьте, какую пользу смог бы получить ваш бизнес, если бы вы могли анализировать поисковые запросы, имеющие отношение к вашему бизнесу и адаптировать ваш продукт или сервис таким образом, чтобы он отвечал реальным потребностям ваших покупателей.
Keyword Tool поможет вам найти тысячи новых ключевых слов, связанных с заданным вами поисковым запросом, используя функцию Автозаполнения Google. Генерируемые ключевые слова будут использовать выбранный вами язык и домен Google.


Как работает Keyword Tool?
Как работает Keyword Tool? Автозаполнения Google для генерации сотен близко связанных ключевых слов.
Автозаполнение Google — это функция, используемая в веб-поиске Google. Ее предназначение — помочь пользователям быстрее найти нужную информацию.
Поисковые запросы, которые появляются в рекомендациях Автозаполнения, подбираются на основе разных факторов, один из них — то как часто пользователи искали определенное слово в прошлом.
Keyword Tool поможет вам использовать функцию автозаполнения Google для поиска ключевых слов. Инструмент извлекает поисковые подсказки Google и представляет их в удобной для вас форме.
Для генерации ключевых слов, Keyword Tool добавляет к заданному вами поисковому запросу разные буквы и цифры, размещая их до и после вашего запроса. Более того, у вас есть возможность выбрать домен Google (поддерживаются 192 домена) и язык (поддерживаются 83 языка) для генерации поисковых запросов.
Бесплатная версия Keyword Tool помогает найти более 750 ключевых слов за считанные секунды. В то же время, Keyword Tool Pro, находит в среднем в 2 раза больше ключевых слов и предоставляет много других полезных функций. Вы можете экспортировать найденные ключевые слова и использовать их для создания контента, поисковой оптимизации, контекстной рекламы или любых других целей.
Почему Keyword Tool — это один из лучших бесплатных инструментов для поиска ключевых слов?
Есть несколько мест, где вы можете найти ключевые слова, которые пользователи используют для того, чтобы найти информацию с помощью Google. Один из наиболее популярных источников этой информации — это Планировщик ключевых слов Google Ads.
К сожалению, информация доступная в Планировщике ключевых слов, предназначена для использования в контекстной рекламе внутри платформы Google Ads. Ключевые слова, которые вы найдете там могут быть слишком общими и не достаточно полезными с точки зрения поисковой оптимизации.
С другой стороны, Автозаполнение Google, функция, используемая Keyword Tool, предназначена для того, чтобы ускорить поисковый процесс.
В интересах компании Google, показывать пользователям наиболее релевантные ключевые слова. Ключевые слова, которые помогли бы Google, найти наиболее актуальные сайты и в тоже время, дали возможность пользователям обнаружить интересующих их контент.
Цитата от Google:
“
Подсказки подбираются автоматически с учетом таких факторов, как популярность поисковых запросов.


Keyword Tool поможет найти ключевые слова, которые спрятаны в планировщике ключевых слов Google Ads
Вы заметили, что вы не можете пользоваться планировщиком ключевых слов без аккаунта в Google Ads?
Этому есть причина. Планировщик ключевых слов — это инструмент, созданный для рекламодателей, который не предназначен для поисковой оптимизации. Да, он содержит полезную информацию, такую как среднее число запросов в месяц, цену за клик и уровень конкуренции.
Но в то же время, он скрывает большое количество ключевых слов, которые имеют тысячи запросов в месяц и могут быть использованы для создания контента для вашего сайта. Некоторые професионалы интернет-маркетинга считают, что это сделано специально, и помогает Google взвинчивать цену за клик для ограниченного количества ключевых слов.
Keyword Tool — это лучшая альтернатива планировщику ключевых слов Google для поисковой оптимизации, так как этот инструмент не скрывает популярные ключевые слова, которые могут быть использованы для создания контента.
Keyword Tool для поисковой оптимизации и создания контента
Если вы хотите, чтобы ваш сайт получал трафик из Google или других поисковиков, содержание вашего сайта должно быть создано на основе правильных ключевых слов. Это значит, что вы должны использовать те ключевые слова, создавая ваш сайт, которые уже использует ваша целевая аудитория при поиске аналогичных товаров и услуг.
Лучший способ найти эти ключевые слова, как это было доказано на примере тысяч успешных интернет-сайтов — это использовать ключевые слова, рекомендуемые Автозаполнением Google.
Создавая качественный контент для вашего сайта на основе этих популярных поисковых запросов, вы сделаете ваш сайт полезным для посетителей. Взамен Google и другие поисковики будут повышать ваш сайт в поисковой выдаче, что приведет к росту количества посетителей сайта.


Keyword Tool для продвижения сайта на иностранных рынках
Если вы ищете ключевые слова на разных языках, функции Keyword Tool будут вам невероятно полезны. У вас есть возможность выбрать один из 194 доменов Google и 1 из 83 языков для генерации ключевых слов. При этом, найденные поисковые запросы, будут релевантны для того рынка, для которого вы создаете контент.
Keyword Tool для контекстной рекламы
Если вы пользуетесь рекламой с оплатой за клик, и используете контекстный таргетинг (то есть именно те ключевые слова, которые пользователи пишут в поиске Google) для показа вашей рекламы, то вам хорошо известно, насколько важно выбрать правильные ключевые слова.
Правильно выбранные ключевые слова приведут нужную аудиторию на ваш веб-сайт. Реклама, показанная именно тем людям которые ищут то, что вы можете предложить, приведет к более высокому Click-Through-Rate (CTR), более низкой цене за клик и более высоким показателям конверсии для вашего сайта. В результате этого, вы потратите меньше денег на рекламу и получите больший возврат на ваши инвестиции.

Frequently Asked Questions
Вы можете использовать Keyword Tool, для получения ключевых слов абсолютно бесплатно. Просто введите любое слово в строку поиска и нажмите ввод — это очень просто!
Вы можете увидеть частотность поисковых запросов, используя Keyword Tool Pro — наш платный продукт. Keyword Tool Pro поможет вам найти больше ключевых слов, предоставит данные о количестве запросов в месяц и многое другое! Вы можете найти больше информации здесь.
Keyword Tool получает ключевые слова, используя функцию автозаполнения Google и других поисковых систем. Чтобы получить поисковые подсказки, мы берем ваш поисковый запрос, добавляем к нему различные буквы и цифры, и извлекаем поисковые подсказки для всех запросов!
Keyword Tool Pro — это платная версия Keyword Tool, которая поможет вам получить больше ключевых слов, проверить частотность для вашего списка поисковых запросов и многое другое. Вы можете подписаться на Keyword Tool Pro здесь.
Start Using Keyword Tool Now
Find Keywords
You need a keyword research tool. You think easy peasy and do the ol’ Google search. Then you see that there are PPC keyword tools and SEO keyword tools. Long-tail keywords and broad. Social media keywords. Questions. Prepositions. Tools with suggestions. Tools with SERP and site and competitive analyses…

And then there’s pricing. Free forever, free (but not really), paid (but a ripoff), paid but more than you need.
So which keyword research tool is right for you? In this post, I share the 18 best keyword research tools for different goals, levels of experience, and budgets. For each one, I’ll provide
- Who and what it’s best suited for.
- Something that makes it different from the others in the list.
- The real, no-nonsense price.
Let’s get into it.
The best free keyword research tools for PPC
There are plenty of keyword research platforms out there designed for both SEO and PPC (which I’ll get to in a bit), but these are the best tools to use for your PPC keyword research.
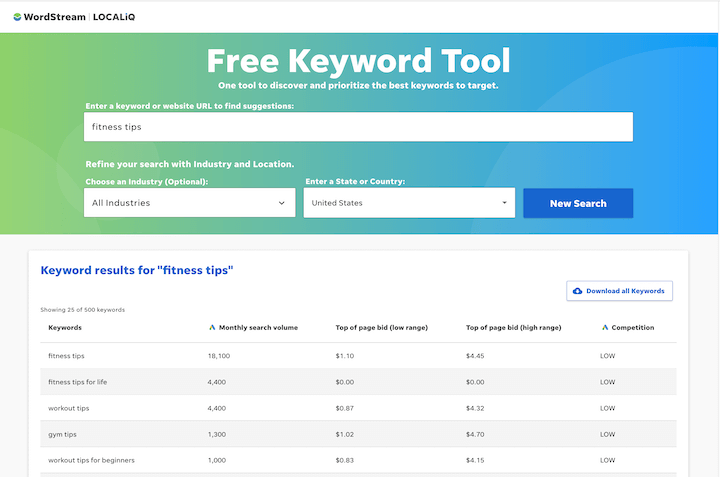
1. WordStream’s Free Keyword Tool
A free tool that comes with strategic advice? Sold!
- Good for: Easy and headache-free PPC keyword research.
- Unique feature: Popular keywords database for 60 verticals, with strategic advice.
- Price: Free for the first 25 results, free for the rest of the results via email.
With WordStream’s Free Keyword Tool, enter a keyword or URL and you’ll get a list of relevant keyword suggestions, including related and long-tail variations, along with search volume, competition, and CPC. You can also filter by location (for over 23 countries), or industry (by 24 different verticals). The tool will provide the top 25 keywords right away. To get the full list, just enter your email address and you’ll get it sent to you for free.
We’ve also used our keyword research to create a database of the most popular keywords for 60 different verticals. Head to our Popular Keywords page, click on your vertical, and you’ll get the top 25 keywords for that vertical. This is great for identifying seed keywords and starting points for your campaigns.

Even better, scroll down on the Popular Keywords page to get tips on using high-volume keywords, and on the specific vertical pages to get tips for marketing in that space.
2. Google Keyword Planner
For information straight outta the horse’s mouth.
- Good for: Intermediate to advanced PPC keyword research and account insights.
- Unique feature: Bidding data and advanced attribute filtering.
- Price: Free with an active Google Ads account.
With Google’s Keyword Planner, enter one or more keywords into the search box and you will see the following data for the keywords you entered as well as related keywords: average monthly searches, 30-day search trends, three month and year over year change, and competition (low, medium, high).

The refine keywords tool, which has been in beta since 2020, helps you to filter by specific attributes related to the keywords. For example, if you had keywords related to dry skin, you could refine by skin type, symptom, condition, branded vs non branded terms, and more.

You’ll also see what advertisers have historically paid for that keyword’s top of page bid. If you’re actively advertising, you’ll also see your ad impression share for that keyword as well as whether that keyword is in your account.
3. Microsoft Advertising Intelligence Keyword Planner Tool
^ Quite a mouthful—and an appropriate preview for what’s next.
- Good for: Advanced keyword research for cross-channel marketing.
- Unique feature: Robust list organization and keyword research templates.
- Price: Free with a Microsoft Ads account.
The Microsoft Keyword Planner Tool offers a free Excel plugin where you can paste in a list of keywords and get a monster list of keyword recommendations—with volume, clicks, searches, CPC, bid estimates, match type, and [lots of] other metrics.

Now there’s a lot going on here, but there are a number of ways to organize and filter through the data. Here are four ways to do so:
- In the traffic view, organize by device (not match type) to get a duplicate-free list.
- Filter by age group and gender to identify keywords that are (and aren’t) right for your audience.
- Paste in a list of URLs to get keyword suggestions and then check the device and keyword match type used for those keywords.
- Find related keywords other advertisers are bidding on and see if it’s feasible for you to compete.
You can also plug the list of new keywords you come up with into the Google Keyword Planner and see what you come up with. You’d be surprised at how low-volume keywords on Bing are higher on Google, and vice versa! PPC expert Joe Martinez covers how to use the Microsoft keyword research tool here.
4. The search terms report (Google & Bing)
You get what you get and you don’t get upset.
- Good for: Search ad campaign optimization and (light) negative keyword research.
- Unique feature: Information tied directly to your account.
- Price: Free for active advertising campaigns.
The search terms reports in Google Ads and Microsoft Advertising show you the actual queries that have triggered your ads to show and get clicked on. It can help you to identify your top-performing keywords, new keywords to add to your list, and negative keywords too. With this information, you can make granular adjustments to improve your CTR, Quality Scores, and ROI.

Unfortunately, starting in September 2020, this report (for both Google and Microsoft) became restricted to show only terms of a certain volume (for privacy reasons), making it slightly less useful for finding negative keywords as it once was. Alas, it’s the only thing we have. And at least Google has added new data to the report to include queries that pulled in an impression—regardless of whether the ad got a click.
The search terms report is a free feature available for active Google Ads and Microsoft Advertising accounts.
The best keyword research tools for content ideation
You should always be maintaining your keyword lists for search advertising, but you’re somewhat limited in how much you can step outside the box or branch out. For your organic content, on the other hand, the sky’s the limit! Here are some of the best keyword research tools to use for blog and social media post ideation.
5. Keyworddit
Bear in mind that Reddit is the Walmart of web forums…
- Good for: Content creators and social media managers looking for topic ideas.
- Unique feature: Reddit keyword mining.
- Price: Free
Keyworddit searches through Reddit posts, titles, and comments to find keywords and provide you with their search volume. If you’re unfamiliar, Reddit is a massive online community where people can join groups (called subreddits) for just about anything. Some subreddits are massive, like r/funny while others can be pretty niche like r/businessowners.
With this tool, you can’t enter in a specific term; instead, you choose a subreddit and the tool will pull keywords from posts and comments in that subreddit.

This can be helpful for getting blog post and social media ideas for your niche market, forming audience personas, or getting keyword ideas to feed into other tools in this list. If you click on the context button, it will show you Google search results for that keyword within that subreddit. You can also export the list.
Keyworddit is free with no catches.
6. Soovle (free)
Be prepared to time travel back to the 90s—but also to get new ideas.
- Good for: Initial brainstorming for new keywords.
- Unique feature: See queries for nine different platforms in one view (+90’s nostalgia).
- Price: Free

With Soovle, enter a term into the box and it will show you the most popular queries for that term across 16 different search engines, including Google, Bing, YouTube, Amazon, eBay, Buy.com, Overstock.com, Walmart, and more.
You can customize the tool to show you only the search engines you want, drag queries into a saved suggestions box, and click on any one query to be brought to the SERP for that platform.
While it doesn’t provide volume, competition, or cost data, it’s great for coming up with content ideas as well as understanding intent in some cases. Like who knew that YouTubers look for lawn mower sounds for sleep?

Head to “secrets” (haha) on the top right to get some more info on how to use the tool.
Soovle is free, through and through.
7. AnswerThePublic
Trippy video background…questions for days…it’s a mind-bender.
- Good for: Finding question keywords, targeting People Also Ask in the SERP.
- Unique feature: Keyword visualization
- Price: Free at three searches a day, paid starts at $99/mo.
With AnswerThePublic, type in a phrase or term and it will show you the questions people are asking related to your entry. You won’t get any volume or click data, but you will get some cool visuals.

You can see this type of visual (or a list view) for:
- Questions: who, what, where, when, why, which, can, and ho
- Comparisons: vs, or, and
- More: which, are, will, can, like.
I personally find it to be hard to digest the information, even in the list view. Luckily, you can export the data to CSV.
AnswerThePublic is free for only three queries per day. The paid version starts at $99 and offers more features like monitoring and alerts, customized viewing, data comparison over time, and folders.
8. QuestionDB
“Why are tennis shoes called tennis shoes and not just shoes or something.”
- Good for: Finding blog topic and social media post ideas.
- Unique feature: Over 32 million questions in its database.
- Price: Free for 50 results per query, paid starts at $10/mo.
With QuestionDB, enter a broad keyword into the box and you’ll get queries from question websites like Quora and Reddit. It will show you related topics mentioned in the questions and also give you the option to strip the queries down to keywords only.

If you click “Show source link”, you can see where it came from and see the question thread in that source.

The free QuestionDB account allows 50 results per query with the option to upgrade to $10/month for unlimited searches, full results, and API access.
The best free keyword research tools for SEO
While the above tools are good for finding topic ideas, they don’t offer the data you need if you’re looking to create targeted SEO content, including blog posts, product pages, your homepage, and more.
9. Google Search Console
For reading your readers’ minds.
- Good for: Optimizing existing SEO content and finding spinoff content ideas.
- Unique feature: The most accurate and real-time reporting on organic.
- Price: Free for anyone with a website.
Keyword research is just one of the many ways to use Google Search Console for SEO. Head to “Search results” in the left-hand pane and you’ll see the top queries that are leading your site to appear in the SERP, with clicks, impressions, click-through rate, and position for each.
You can then filter by URL where you can first see how effective your keyword targeting is. From there, you can plug the other queries into a keyword research tool to see whether you should incorporate them into your post. For example, here are the top queries for our post on how to do keyword research for SEO and PPC:

This report told me to incorporate “easy keyword research” into the post.
You can also find queries for which your page is not performing well and which might be keywords to target with a separate post.

Hence why we wrote the post you’re reading now.
Google Search Console is free for anyone with a website.
10. Google Trends
For when you want to know “is that a thing?”
- Good for: Identifying the evergreen value of a keyword.
- Unique feature: Real-time data and search history all the way back to 2004.
- Price: Free
With Google Trends, you can identify recent and popular keywords that don’t yet show volume in keyword research tools because they haven’t been around long enough.
You can also use it to make sure a keyword that has solid volume in a keyword research tool is worth targeting. For example, “google goggles” has a search volume of 14K. But the Google Trends report shows dwindling interest:

If you were unfamiliar with Google products, this report would lead you to find out that Google Goggles is no longer! Not worth targeting if you want a post with long-term value.
On the flip side, you can identify keywords that have low volume and competition but are growing in popularity. You can then target and rank for those keywords now to accumulate traffic, backlinks, and authority ahead of time.

Google Trends is free for all, through and through.
The best multi-purpose keyword research tools for SEO—low budget
You’ll notice that the above tools are meant for those who have solid SEO skills and additional tools at their disposal. The tools in this section are meant to serve multiple purposes in one tool and are great for business owners or SEO beginners who don’t have an advanced SEO strategy or a large budget.
11. Free version of Semrush
Sort of like lawn seats…
- Good for: Light SEO work for beginner to intermediate experience levels.
- Unique feature: Assistance with writing SEO content.
- Price: Free
I’ll cover the full version of this tool later on, but the free version of Semrush provides your basic keyword data like volume, difficulty, and CPC. It offers 10 queries per day, one project where you can track 10 keywords and audit 100 pages of your site, one SEO Content Template, one on-page SEO Checker Campaign, and one use of the SEO Writing Assistant.
This is probably the most decent free version of a premium keyword research tool out there.
12. KeywordTool.io
“Google autocomplete is a window into the soul of our society.” – Someone on the web.
- Good for: Finding long-tail keywords for SEO and PPC.
- Unique feature: Suggestions for eight different platforms.
- Price: Free with no numerical data, paid starts at $69/month with a 30-day money-back guarantee.
Keyword Tool uses Google autocomplete (which uses search behavior and data) to generate long-tail keyword suggestions for any term. Google autocomplete typically only gives you about five suggestions, but this tool shows you the hundreds of suggestions available. It will prepend and append the term with words and prepositions, and you can find suggestions specific to Google, YouTube, Bing, Amazon, eBay, Play Store, Instagram (Instagram SEO is a thing!), and Twitter.

The free version of Keyword Tool allows you to sort out questions and prepositions and filter to include and exclude specific words within results (a maximum of five exclusions). The paid version (starting at $69/month) provides the full list of suggestions, data like search volume, cost per click, competition, and trends, as well as competitive analysis capabilities.
13. Growthbar
AI is not just for the big companies or experts anymore.
- Good for: Business owners and beginners in content marketing—with tech savvy.
- Unique feature: Uses AI to generate SEO content outlines.
- Price: Starts at $29/month with five-day free trial and seven-day money-back guarantee.
Growthbar provides the standard information you can expect from an SEO platform: keyword suggestions with monthly search volume, cost per click, difficulty scores, rank tracking, and site analyses with domain authority, keywords, backlinks, and even Facebook and Google Ads. Platform subscribers get a free chrome extension that provides this data as you search.
The best part about Growthbar is that it will also create content outlines for you, including keywords to target, title, introduction, headings, word counts, images, links, and more. AI in marketing is a wonderful thing!

There isn’t a free version of Growthbar. Pricing starts at $29/month with a five-day free trial and seven-day money-back guarantee.
14. KWFinder by Mangools
For suggestions on getting suggestions…
- Good for: Intermediate SEO for small teams on a budget.
- Unique feature: Doesn’t just append or prepend to provide keyword suggestions.
- Price: Free at five searches/day, paid starts at $29/month with free 10-day trial.
Aside from great copywriting on their website, KWFinder‘s easy-to-use interface provides all of your keyword/SEO platform basics: suggestions, long-tail variations, volume, cost per click, competition, SERP analysis, and site analysis. You can search by keyword or domain as well as location.

A nice feature of KWFinder is that its keyword suggestions aren’t just the term you typed in with words appended or prepended to it.
The free version of KWFinder allows five lookups per 24 hours, with 25 related and 10 competitor keywords per lookup. The paid version starts at $29/month.
15. Serpstat
- Good for: Intermediate SEO, PPC, and competitive analysis.
- Unique feature: Shows a competitors graph as well as ad examples for a keyword.
- Price: Free for 10 requests per day, paid starts at $55.
Serpstat teeters on the edge of both premium and budget-friendly keyword research tools. The biggest focus of this tool is competitive analysis. You can compare your site to a competitors and get a report on the top competing sites for any keyword. You’ll see how many keywords each site is targeting with organic content and paid ads, how many keywords they have in common with your site, and even examples of ads for that keyword.

The reports are separate for paid vs organic. Another cool feature is a visualization of your competitiors.

Image source
Serpstat is free for 10 requests per day, and the paid version starts at $55/mo.
16. Ubersuggest
For a streamlined SEO with a side of hand-holding.
- Good for: Intermediate SEO and content marketers.
- Unique feature: SEO difficulty score, social shares, content ideas.
- Price: Free version is very limited (one site, three keywords per day), paid starts at $29/month with free seven-day trial available.
Similar to the content ideation tools above, Ubersuggest allows you to filter keyword suggestions by comparison, question, and preposition variations. And similar to the premium tools below, it offers the core keyword, SERP, and site analysis data as well as project creation.
![]()
One thing that differentiates Ubersuggest is it’s helpful annotations, like “The average web page that rans in the top 10 for this keyword has X backlinks and a domain score of X”. Another is it’s Content ideas feature, which shows you pages performing well for that keyword as well as their Facebook and Pinterest shares.
The free version is VERY limited (read: useless), but the paid version starts at $29/month with options for coaching and a seven-day free trial. Also, the free Ubersuggest chrome extension—which provides keyword data as you search on Google, YouTube, and Amazon—is quite useful.
The best all-in-one keyword research tools (premium)
These are hummers of keyword research. The all-in-one platforms, best for teams, experts and consultants in PPC, SEO, or content marketing, and/or large businesses and agencies. But it can’t hurt to explore the free trial versions. Here is the information they all share:
- Keyword analysis: volume, competition, cost, interest trends, often separated by organic vs paid, and more.
- SERP analysis: top-ranking pages for a keyword, including their domain rating, referring domains, backlinks, traffic, keywords, rank tracking, rich snippets, and more.
- Keyword gaps: keywords your competitors are ranking for that you are not.
- Site analyses: for your and competitors’ sites.
- SEO audits: complete technical and content SEO audits for your site.
- Integration with apps, plugins, CRMs, and reporting tools.
RELATED: How to Do Competitor Keyword Analysis in 5 Steps (+Free Template!)
17. Semrush
“Semrush is like a lighthouse as I surf through the Ocean of Websites.” -Someone on the web
- Good for: Advanced SEO and PPC for experts, agencies, and large businesses.
- Unique feature: Content marketing toolkit, social media marketing, shows intent of keywords.
- Price: Free version is pretty useful, paid starts at $119.95/mo with a seven-day free trial.
Semrush is often referred to as the gold standard for premium keyword research platforms (although ahrefs is catching up!). It offers over 40 tools and reports to help you with not only keyword research, but also content marketing, social media management, local seo, listing management, marketing analysis, PR, and more.

Image source
18. Ahrefs
“Ahrefs is like a bloodhound with content research.” -Someone on the web
- Good for: Advanced SEO, link building, and click data.
- Unique feature: Unmatched backlink index, unique click metrics, and Return Rate.
- Price: No free version, seven-dollar seven-day trial, paid starts at $99/mo.
Ahrefs actually started as a backlink analysis tool, so it’s no surprise that with the largest backlink index in the world, it is the best tool out there for link building. For any link, you can find out when it went live, whether it’s do-follow or no-follow, its anchor text, and more. You can also check a site’s ranking history for any keyword, automate internal linking, analyze and monitor outbound links, see which links are bringing in the most traffic to any site, and find link opportunites and backlink prospects
One of it’s distinguishing features is unique click metrics. For any keyword, you can learn how many searches result in clicks, the average number of clicks per search, the click distribution between paid and organic results, and how often people search the same keyword in 30 days (Return Rate (RR)).

Ahrefs does not have a free version, but you can try a $7 one-week free trial, and the paid version starts at $99/month.
19. Moz Keyword Explorer
“Moz is like the mac daddy of SEO.” – Someone on the web
- Good for: Beginner to intermediate SEOs and PPCers who don’t need the bells and whistles..
- Unique feature: Organic CTR and Priority Score.
- Price: Free for 10 searches/mo, paid starts at $99/mo.
Moz (the company) is one of the leading resources for SEO. It is the originator of Domain Authority, Whiteboard Fridays, and has a free Chrome extension that provides Page and Domain Authority for any page.
It’s tool, the Moz Keyword Explorer, offers your basic keyword data along with rank tracking, site audits, and page optimization reports. It provides a Priority Score to help you identify whether a keyword is worth targeting, based on that keyword’s data and your “My Score”— a score you give on how relevant the keyword is to your business.
However, it lacks quite a few of the functionalities offered by Semrush or ahrefs, like SERP position history or the number of keywords a ranking result ranks for. The platform hasn’t been updated much since Rand Fishkin left the company in 2018. Nevertheless, it is a good platform to use if you’re looking for a less overwhelming and more intuitive platform.
Moz Keyword Explorer is free for 10 searches per month, and the paid version starts at $99.
The best keyword research tools [recap]
And that wraps up the 18 best keyword research tools, for any level, any purpose, and any business. I hope you found it helpful! Here’s the full list:
- WordStream’s Free Keyword Tool
- Google Keyword Planner
- Microsoft Advertising Intelligence
- Bing and Google search terms report
- Soovle
- AnswerThePublic
- Keyworddit
- QuestionDB
- Google Search Console
- Google Trends
- Semrush (free version)
- Keywordtool.io
- KWFinder
- Growth Bar
- Serpstat
- Ubersuggest
- Semrush
- Ahrefs
- Moz Keyword Explorer
Can’t get enough keyword research?
We’ve got posts!
- 7 Cross-Platform Keyword Research Tools You Need to Try
- The 8 Best Tools for Finding Competitor Keywords
- The Experts’ Guide to Keyword Research for Social Media
- Beginner’s Guide to Keyword Search Volume for Marketers
- The Easy Guide to Keyword Research for PPC & SEO
This article describes the keyboard shortcuts and function keys in Word for Windows.
Notes:
-
To quickly find a shortcut in this article, you can use Search. Press Ctrl+F, and then type your search words.
-
If an action that you use often does not have a shortcut key, you can record a macro to create one. For instructions, go to Create or run a macro or Use a screen reader to create a macro in Word.
-
If you are using Microsoft Word Starter, be aware that not all the features listed for Word are supported in Word Starter. For more information about the features available in Word Starter, go to Word features that are not fully supported in Word Starter.
-
Get these keyboard shortcuts in a Word document at this link: Word 2016 for Windows keyboard shortcuts.
In this topic
-
Frequently used shortcuts
-
Ribbon keyboard shortcuts
-
Navigate the document
-
Preview and print documents
-
Select text and graphics
-
Edit text and graphics
-
Work with web content
-
Work with tables
-
Review a document
-
Work with references, citations, and indexing
-
Work with mail merge and fields
-
Work with text in other languages
-
Work with document views
-
Use function key shortcuts
Frequently used shortcuts
This table shows the most frequently used shortcuts in Microsoft Word.
|
To do this |
Press |
|---|---|
|
Open a document. |
Ctrl+O |
|
Create a new document. |
Ctrl+N |
|
Save the document. |
Ctrl+S |
|
Close the document. |
Ctrl+W |
|
Cut the selected content to the Clipboard. |
Ctrl+X |
|
Copy the selected content to the Clipboard. |
Ctrl+C |
|
Paste the contents of the Clipboard. |
Ctrl+V |
|
Select all document content. |
Ctrl+A |
|
Apply bold formatting to text. |
Ctrl+B |
|
Apply italic formatting to text. |
Ctrl+I |
|
Apply underline formatting to text. |
Ctrl+U |
|
Decrease the font size by 1 point. |
Ctrl+Left bracket ([) |
|
Increase the font size by 1 point. |
Ctrl+Right bracket (]) |
|
Center the text. |
Ctrl+E |
|
Align the text to the left. |
Ctrl+L |
|
Align the text to the right. |
Ctrl+R |
|
Cancel a command. |
Esc |
|
Undo the previous action. |
Ctrl+Z |
|
Redo the previous action, if possible. |
Ctrl+Y |
|
Adjust the zoom magnification. |
Alt+W, Q, then use the Tab key in the Zoom dialog box to go to the value you want. |
|
Split the document window. |
Ctrl+Alt+S |
|
Remove the document window split. |
Alt+Shift+C or Ctrl+Alt+S |
Top of Page
Close a task pane
To close a task pane using the keyboard:
-
Press F6 until the task pane is selected.
-
Press Ctrl+Spacebar.
-
Use the arrow keys to select Close, and then press Enter.
Ribbon keyboard shortcuts
The ribbon groups related options on tabs. For example, on the Home tab, the Font group includes the Font Color option. Press the Alt key to display the ribbon shortcuts, called Key Tips, as letters in small images next to the tabs and options as shown in the image below.

Note: Add-ins and other programs can add new tabs to the ribbon and might provide access keys for those tabs.
You can combine the Key Tips letters with the Alt key to make shortcuts called Access Keys for the ribbon options. For example, press Alt+H to open the Home tab, and Alt+Q to move to the Tell Me or Search field. Press Alt again to see Key Tips for the options for the selected tab.
Depending on the version of Microsoft 365 you are using, the Search text field at the top of the app window might be called Tell Me instead. Both offer a largely similar experience, but some options and search results can vary.
In Office 2013 and Office 2010, most of the old Alt key menu shortcuts still work, too. However, you need to know the full shortcut. For example, press Alt, and then press one of the old menu keys E (Edit), V (View), I (Insert), and so on. A notification pops up saying you’re using an access key from an earlier version of Microsoft 365. If you know the entire key sequence, go ahead and use it. If you don’t know the sequence, press Esc and use Key Tips instead.
Use the Access Keys for ribbon tabs
To go directly to a tab on the ribbon, press one of the following access keys. Additional tabs might appear depending on your selection in the document.
|
To do this |
Press |
|---|---|
|
Move to the Tell Me or Search field on the Ribbon to search for assistance or Help content. |
Alt+Q, then enter the search term. |
|
Open the File page to use Backstage view. |
Alt+F |
|
Open the Home tab to use common formatting commands, paragraph styles, and the Find tool. |
Alt+H |
|
Open the Insert tab to insert tables, pictures and shapes, headers, or text boxes. |
Alt+N |
|
Open the Design tab to use themes, colors, and effects, such as page borders. |
Alt+G |
|
Open the Layout tab to work with page margins, page orientation, indentation, and spacing. |
Alt+P |
|
Open the References tab to add a table of contents, footnotes, or a table of citations. |
Alt+S |
|
Open the Mailings tab to manage Mail Merge tasks and to work with envelopes and labels. |
Alt+M |
|
Open the Review tab to use Spell Check, set proofing languages, and to track and review changes to your document. |
Alt+R |
|
Open the View tab to choose a document view or mode, such as Read Mode or Outline view. You can also set the zoom magnification and manage multiple document windows. |
Alt+W |
Top of Page
Work in the ribbon with the keyboard
|
To do this |
Press |
|---|---|
|
Select the active tab on the ribbon and activate the access keys. |
Alt or F10. To move to a different tab, use access keys or the arrow keys. |
|
Move the focus to commands on the ribbon. |
Tab key or Shift+Tab |
|
Move between command groupings on the ribbon. |
Ctrl+Left or Right arrow key |
|
Move among the items on the ribbon. |
Arrow keys |
|
Show the tooltip for the ribbon element currently in focus. |
Ctrl+Shift+F10 |
|
Activate the selected button. |
Spacebar or Enter |
|
Open the list for the selected command. |
Down arrow key |
|
Open the menu for the selected button. |
Alt+Down arrow key |
|
When a menu or submenu is open, move to the next command. |
Down arrow key |
|
Expand or collapse the ribbon. |
Ctrl+F1 |
|
Open the context menu. |
Shift+F10 Or, on a Windows keyboard, the Windows Menu key (between the right Alt and right Ctrl keys) |
|
Move to the submenu when a main menu is open or selected. |
Left arrow key |
Top of Page
Navigate the document
|
To do this |
Press |
|---|---|
|
Move the cursor one word to the left. |
Ctrl+Left arrow key |
|
Move the cursor one word to the right. |
Ctrl+Right arrow key |
|
Move the cursor up by one paragraph. |
Ctrl+Up arrow key |
|
Move the cursor down by one paragraph. |
Ctrl+Down arrow key |
|
Move the cursor to the end of the current line. |
End |
|
Move the cursor to the beginning the current line. |
Home |
|
Move the cursor to the top of the screen. |
Ctrl+Alt+Page up |
|
Move the cursor to the bottom of the screen. |
Ctrl+Alt+Page down |
|
Move the cursor by scrolling the document view up by one screen. |
Page up |
|
Move the cursor by scrolling the document view down by one screen. |
Page down |
|
Move the cursor to the top of the next page. |
Ctrl+Page down |
|
Move the cursor to the top of the previous page. |
Ctrl+Page up |
|
Move the cursor to the end of the document. |
Ctrl+End |
|
Move the cursor to the beginning of the document. |
Ctrl+Home |
|
Move the cursor to the location of the previous revision. |
Shift+F5 |
|
Move the cursor to the location of the last revision made before the document was last closed. |
Shift+F5, immediately after opening the document. |
|
Cycle through floating shapes, such as text boxes or images. |
Ctrl+Alt+5, and then the Tab key repeatedly |
|
Exit the floating shape navigation and return to the normal navigation. |
Esc |
|
Display the Navigation task pane, to search within the document content. |
Ctrl+F |
|
Display the Go To dialog box, to navigate to a specific page, bookmark, footnote, table, comment, graphic, or other location. |
Ctrl+G |
|
Cycle through the locations of the four previous changes made to the document. |
Ctrl+Alt+Z |
Top of Page
Navigate the document using the browse options in Word 2007 and 2010
In Word 2007 and 2010, you can browse the document by various types of objects, such as fields, footnotes, headings, and graphics.
|
To do this |
Press |
|---|---|
|
Open the list of browse options to define the type of object to browse by. |
Ctrl+Alt+Home |
|
Move to the previous object of the defined type. |
Ctrl+Page up |
|
Move to the next object of the defined type. |
Ctrl+Page down |
Top of Page
Preview and print documents
|
To do this |
Press |
|---|---|
|
Print the document. |
Ctrl+P |
|
Switch to print preview. |
Ctrl+Alt+I |
|
Move around the preview page when zoomed in. |
Arrow keys |
|
Move by one preview page when zoomed out. |
Page up or Page down |
|
Move to the first preview page when zoomed out. |
Ctrl+Home |
|
Move to the last preview page when zoomed out. |
Ctrl+End |
Top of Page
Select text and graphics
|
To do this |
Press |
|---|---|
|
Select text. |
Shift+Arrow keys |
|
Select the word to the left. |
Ctrl+Shift+Left arrow key |
|
Select the word to the right. |
Ctrl+Shift+Right arrow key |
|
Select from the current position to the beginning of the current line. |
Shift+Home |
|
Select from the current position to the end of the current line. |
Shift+End |
|
Select from the current position to the beginning of the current paragraph. |
Ctrl+Shift+Up arrow key |
|
Select from the current position to the end of the current paragraph. |
Ctrl+Shift+Down arrow key |
|
Select from the current position to the top of the screen. |
Shift+Page up |
|
Select from the current position to the bottom of the screen. |
Shift+Page down |
|
Select from the current position to the beginning of the document. |
Ctrl+Shift+Home |
|
Select from the current position to the end of the document. |
Ctrl+Shift+End |
|
Select from the current position to the bottom of the window. |
Ctrl+Alt+Shift+Page down |
|
Select all document content. |
Ctrl+A |
Top of Page
Extend a selection
|
To do this |
Press |
|---|---|
|
Start extending the selection. |
F8 In the extend selection mode, clicking a location in the document extends the current selection to that location. |
|
Select the nearest character to the left or right. |
F8, Left or Right arrow key |
|
Expand the selection. |
F8 repeatedly to expand the selection to the entire word, sentence, paragraph, section, and document. |
|
Reduce the selection. |
Shift+F8 |
|
Select a vertical block of text. |
Ctrl+Shift+F8, then press the arrow keys |
|
Stop extending the selection. |
Esc |
Top of Page
Edit text and graphics
|
To do this |
Press |
|---|---|
|
Delete one word to the left. |
Ctrl+Backspace |
|
Delete one word to the right. |
Ctrl+Delete |
|
Open the Clipboard task pane and enable the Office Clipboard, which allows you to copy and paste content between Microsoft 365 apps. |
Alt+H, F, O |
|
Cut the selected content to the Clipboard. |
Ctrl+X |
|
Copy the selected content to the Clipboard. |
Ctrl+C |
|
Paste the contents of the Clipboard. |
Ctrl+V |
|
Move the selected content to a specific location. |
F2, move the cursor to the destination, and then press Enter. |
|
Copy the selected content to a specific location. |
Shift+F2, move the cursor to the destination, and then press Enter. |
|
Define an AutoText block with the selected content. |
Alt+F3 |
|
Insert an AutoText block. |
The first few characters of the AutoText block, and then press Enter when the ScreenTip appears. |
|
Cut the selected content to the Spike. |
Ctrl+F3 |
|
Paste the contents of the Spike. |
Ctrl+Shift+F3 |
|
Copy the selected formatting. |
Ctrl+Shift+C |
|
Paste the selected formatting. |
Ctrl+Shift+V |
|
Copy the header or footer used in the previous section of the document. |
Alt+Shift+R |
|
Display the Replace dialog box, to find and replace text, specific formatting, or special items. |
Ctrl+H |
|
Display the Object dialog box, to insert a file object into the document. |
Alt+N, J, J |
|
Insert a SmartArt graphic. |
Alt+N, M |
|
Insert a WordArt graphic. |
Alt+N, W |
Top of Page
Align and format paragraphs
|
To do this |
Press |
|---|---|
|
Center the paragraph. |
Ctrl+E |
|
Justify the paragraph. |
Ctrl+J |
|
Align the paragraph to the left. |
Ctrl+L |
|
Align the paragraph to the right. |
Ctrl+R |
|
Indent the paragraph. |
Ctrl+M |
|
Remove a paragraph indent. |
Ctrl+Shift+M |
|
Create a hanging indent. |
Ctrl+T |
|
Remove a hanging indent. |
Ctrl+Shift+T |
|
Remove paragraph formatting. |
Ctrl+Q |
|
Apply single spacing to the paragraph. |
Ctrl+1 |
|
Apply double spacing to the paragraph. |
Ctrl+2 |
|
Apply 1.5-line spacing to the paragraph. |
Ctrl+5 |
|
Add or remove space before the paragraph. |
Ctrl+0 (zero) |
|
Enable AutoFormat. |
Ctrl+Alt+K |
|
Apply the Normal style. |
Ctrl+Shift+N |
|
Apply the Heading 1 style. |
Ctrl+Alt+1 |
|
Apply the Heading 2 style. |
Ctrl+Alt+2 |
|
Apply the Heading 3 style. |
Ctrl+Alt+3 |
|
Display the Apply Styles task pane. |
Ctrl+Shift+S |
|
Display the Styles task pane. |
Ctrl+Alt+Shift+S |
Top of Page
Format characters
|
To do this |
Press |
|---|---|
|
Display the Font dialog box. |
Ctrl+D or Ctrl+Shift+F |
|
Increase the font size. |
Ctrl+Shift+Right angle bracket (>) |
|
Decrease the font size. |
Ctrl+Shift+Left angle bracket (<) |
|
Increase the font size by 1 point. |
Ctrl+Right bracket (]) |
|
Decrease the font size by 1 point. |
Ctrl+Left bracket ([) |
|
Switch the text between upper case, lower case, and title case. |
Shift+F3 |
|
Change the text to all upper case. |
Ctrl+Shift+A |
|
Hide the selected text. |
Ctrl+Shift+H |
|
Apply bold formatting. |
Ctrl+B |
|
Add a bulleted list. |
Ctrl+Shift+L |
|
Apply underline formatting. |
Ctrl+U |
|
Apply underline formatting to the words, but not the spaces. |
Ctrl+Shift+W |
|
Apply double-underline formatting. |
Ctrl+Shift+D |
|
Apply italic formatting. |
Ctrl+I |
|
Apply small caps formatting. |
Ctrl+Shift+K |
|
Apply subscript formatting. |
Ctrl+Equal sign ( = ) |
|
Apply superscript formatting. |
Ctrl+Shift+Plus sign (+) |
|
Remove manual character formatting. |
Ctrl+Spacebar |
|
Change the selected text to the Symbol font. |
Ctrl+Shift+Q |
Top of Page
Manage text formatting
|
To do this |
Press |
|---|---|
|
Display all nonprinting characters. |
Ctrl+Shift+8 (do not use the numeric keypad) |
|
Display the Reveal Formatting task pane. |
Shift+F1 |
Top of Page
Insert special characters
|
To do this |
Press |
|---|---|
|
Insert a line break. |
Shift+Enter |
|
Insert a page break. |
Ctrl+Enter |
|
Insert a column break. |
Ctrl+Shift+Enter |
|
Insert an em dash (—). |
Ctrl+Alt+Minus sign (on the numeric keypad) |
|
Insert an en dash (–). |
Ctrl+Minus sign (on the numeric keypad) |
|
Insert an optional hyphen. |
Ctrl+Hyphen (-) |
|
Insert a nonbreaking hyphen. |
Ctrl+Shift+Hyphen (-) |
|
Insert a nonbreaking space. |
Ctrl+Shift+Spacebar |
|
Insert a copyright symbol (©). |
Ctrl+Alt+C |
|
Insert a registered trademark symbol (®). |
Ctrl+Alt+R |
|
Insert a trademark symbol (™). |
Ctrl+Alt+T |
|
Insert an ellipsis (…) |
Ctrl+Alt+Period (.) |
|
Insert the Unicode character for the specified Unicode (hexadecimal) character code. For example, to insert the euro currency symbol ( Tip: To find out the Unicode character code for a selected character, press Alt+X. |
The character code, then press Alt+X |
|
Insert the ANSI character for the specified ANSI (decimal) character code. For example, to insert the euro currency symbol, hold down Alt and press 0128 on the numeric keypad. |
Alt+the character code (on the numeric keypad) |
 ), type
 Top of Page
Work with web content
|
To do this |
Press |
|---|---|
|
Insert a hyperlink. |
Ctrl+K |
|
Go back one page. |
Alt+Left arrow key |
|
Go forward one page. |
Alt+Right arrow key |
|
Refresh the page. |
F9 |
Top of Page
Work with tables
Move around in a table
|
To do this |
Press |
|---|---|
|
Move to the next cell in the row and select its content. |
Tab key |
|
Move to the previous cell in the row and select its content. |
Shift+Tab |
|
Move to the first cell in the row. |
Alt+Home |
|
Move to the last cell in the row. |
Alt+End |
|
Move to the first cell in the column. |
Alt+Page up |
|
Move to the last cell in the column. |
Alt+Page down |
|
Move to the previous row. |
Up arrow key |
|
Move to the next row. |
Down arrow key |
|
Move one row up. |
Alt+Shift+Up arrow key |
|
Move one row down. |
Alt+Shift+Down arrow key |
Top of Page
Select table content
|
To do this |
Press |
|---|---|
|
Select the content in the next cell. |
Tab key |
|
Select the content in the previous cell. |
Shift+Tab |
|
Extend a selection to adjacent cells. |
Shift+Arrow keys |
|
Select a column. |
Select the top or bottom cell of the column, and then press Shift+Up or Down arrow key |
|
Select a row. |
Select the first or last cell in the row, and then press Shift+Alt+End or Home. |
|
Select the whole table. |
Alt+5 on the numeric keypad, with Num Lock switched off |
Top of Page
Insert paragraphs and tab characters in a table
|
To do this |
Press |
|---|---|
|
Insert a new paragraph in a cell. |
Enter |
|
Insert a tab character in a cell. |
Ctrl+Tab |
Top of Page
Review a document
|
To do this |
Press |
|---|---|
|
Insert a comment. |
Ctrl+Alt+M |
|
Turn change tracking on or off. |
Ctrl+Shift+E |
|
Close the Reviewing Pane. |
Alt+Shift+C |
Top of Page
Work with references, citations, and indexing
Use the following shortcuts to add references to your document, such as a table of contents, footnotes, and citations.
|
To do this |
Press |
|---|---|
|
Mark a table of contents entry. |
Alt+Shift+O |
|
Mark a table of authorities entry (citation). |
Alt+Shift+I |
|
Choose citation options. |
Alt+Shift+F12, Spacebar |
|
Mark an index entry. |
Alt+Shift+X |
|
Insert a footnote. |
Ctrl+Alt+F |
|
Insert an endnote. |
Ctrl+Alt+D |
|
Go to the next footnote. |
Alt+Shift+Right angle bracket (>) |
|
Go to the previous footnote. |
Alt+Shift+Left angle bracket (<) |
Top of Page
Work with mail merge and fields
To use the following keyboard shortcuts, the Mailings ribbon tab must be selected. To select the Mailings tab, press Alt+M.
Perform a mail merge
|
To do this |
Press |
|---|---|
|
Preview the mail merge. |
Alt+Shift+K |
|
Merge a document. |
Alt+Shift+N |
|
Print the merged document. |
Alt+Shift+M |
|
Edit a mail-merge data document. |
Alt+Shift+E |
|
Insert a merge field. |
Alt+Shift+F |
Top of Page
Work with fields
|
To do this |
Press |
|---|---|
|
Insert a DATE field. |
Alt+Shift+D |
|
Insert a LISTNUM field. |
Ctrl+Alt+L |
|
Insert a PAGE field. |
Alt+Shift+P |
|
Insert a TIME field. |
Alt+Shift+T |
|
Insert an empty field. |
Ctrl+F9 |
|
Update the linked information in a Word source document. |
Ctrl+Shift+F7 |
|
Update the selected fields. |
F9 |
|
Unlink a field. |
Ctrl+Shift+F9 |
|
Switch between a selected field code and its result. |
Shift+F9 |
|
Switch between all field codes and their results. |
Alt+F9 |
|
Run GOTOBUTTON or MACROBUTTON from a field displaying field results. |
Alt+Shift+F9 |
|
Go to the next field. |
F11 |
|
Go to the previous field. |
Shift+F11 |
|
Lock a field. |
Ctrl+F11 |
|
Unlock a field. |
Ctrl+Shift+F11 |
Top of Page
Work with text in other languages
Set the proofing language
Every document has a default language, typically the same default language as your computer’s operating system. If your document also contains words or phrases in a different language, it’s a good idea to set the proofing language for those words. This not only makes it possible to check spelling and grammar for those phrases, but it also enables assistive technologies like screen readers to handle them appropriately.
|
To do this |
Press |
|---|---|
|
Display the Language dialog box to set the proofing language. |
Alt+R, U, L |
|
Set default languages. |
Alt+R, L |
Top of Page
Insert international characters
To type a lowercase character by using a key combination that includes the Shift key, hold down the Ctrl+Shift+symbol keys simultaneously, and then release them before you type the letter.
Note: If you type extensively in another language, you might prefer to switch to a different keyboard instead.
|
To insert this |
Press |
|---|---|
|
à, è, ì, ò, ù, |
Ctrl+Grave accent (`), the letter |
|
á, é, í, ó, ú, ý |
Ctrl+Single quotation mark (‘), the letter |
|
â, ê, î, ô, û |
Ctrl+Shift+Caret (^), the letter |
|
ã, ñ, õ |
Ctrl+Shift+Tilde (~), the letter |
|
ä, ë, ï, ö, ü, ÿ, |
Ctrl+Shift+Colon (:), the letter |
|
å, Å |
Ctrl+Shift+At sign (@), a or A |
|
æ, Æ |
Ctrl+Shift+Ampersand (&), a or A |
|
œ, Œ |
Ctrl+Shift+Ampersand (&), o or O |
|
ç, Ç |
Ctrl+Comma (,), c or C |
|
ð, Ð |
Ctrl+Single quotation mark (‘), d or D |
|
ø, Ø |
Ctrl+Forward slash (/), o or O |
|
¿ |
Ctrl+Alt+Shift+Question mark (?) |
|
¡ |
Ctrl+Alt+Shift+Exclamation point (!) |
|
ß |
Ctrl+Shift+Ampersand (&), s |
Top of Page
Use Input Method Editors for East Asian languages
|
To do this |
Press |
|---|---|
|
Switch to the Japanese Input Method Editor (IME) for a 101-key keyboard, if available. |
Alt+Tilde (~) |
|
Switch to the Korean Input Method Editor (IME) for a 101-key keyboard, if available. |
Right Alt |
|
Switch to the Chinese Input Method Editor (IME) for a 101-key keyboard, if available. |
Ctrl+Spacebar |
Top of Page
Work with document views
Word offers several different views of a document. Each view makes it easier to do certain tasks. For example, Read Mode enables you view the document as a horizontal sequence of pages, which you can quickly browse using the Left and Right arrow keys.
Switch the document view
|
To do this |
Press |
|---|---|
|
Switch to the Read Mode view. In Word 2007 and 2010, this is called Full Screen Reading view. |
Alt+W, F |
|
Switch to the Print Layout view. |
Ctrl+Alt+P |
|
Switch to the Outline view. |
Ctrl+Alt+O |
|
Switch to the Draft view. |
Ctrl+Alt+N |
Top of Page
Outline a document
These shortcuts only apply when the document is in the Outline view.
|
To do this |
Press |
|---|---|
|
Promote a paragraph. |
Alt+Shift+Left arrow key |
|
Demote a paragraph. |
Alt+Shift+Right arrow key |
|
Demote the paragraph to body text. |
Ctrl+Shift+N |
|
Move the selected paragraphs up. |
Alt+Shift+Up arrow key |
|
Move the selected paragraphs down. |
Alt+Shift+Down arrow key |
|
Expand the text under a heading. |
Alt+Shift+Plus sign (+) |
|
Collapse the text under a heading. |
Alt+Shift+Minus sign (-) |
|
Expand or collapse all text or headings. |
Alt+Shift+A |
|
Hide or display the character formatting. |
Forward slash (/) (on the numeric keypad) |
|
Switch between showing the first line of body text and showing all body text. |
Alt+Shift+L |
|
Show all headings with the Heading 1 style. |
Alt+Shift+1 |
|
Show all headings with the specified heading level. |
Alt+Shift+Heading level number |
|
Insert a tab character. |
Ctrl+Tab |
Top of Page
Move through the document in Read Mode
|
To do this |
Press |
|---|---|
|
Move to the beginning of the document. |
Home |
|
Move to the end of the document. |
End |
|
Go to a specific page. |
Type the page number, then press Enter |
|
Exit Read Mode. |
Esc |
Top of Page
Use function key shortcuts
|
Key |
Description |
|---|---|
|
F1 |
|
|
F2 |
|
|
F3 |
|
|
F4 |
|
|
F5 |
|
|
F6 |
|
|
F7 |
|
|
F8 |
|
|
F9 |
|
|
F10 |
|
|
F11 |
|
|
F12 |
|
Top of Page
See also
Word help center
Basic tasks using a screen reader with Word
Use a screen reader to explore and navigate Word
Screen reader support for Word
This article describes the keyboard shortcuts and function keys in Word for Mac.
Notes:
-
The settings in some versions of the Mac operating system (OS) and some utility applications might conflict with keyboard shortcuts and function key operations in Microsoft 365 for Mac. For information about changing the key assignment for a keyboard shortcut, see Mac Help for your version of macOS, your utility application, or refer to Shortcut conflicts.
-
If you don’t find a keyboard shortcut here that meets your needs, you can create a custom keyboard shortcut. For instructions, go to Create a custom keyboard shortcut for Office for Mac.
-
Many of the shortcuts that use the Ctrl key on a Windows keyboard also work with the Control key in Word for Mac. However, not all do.
-
To quickly find a shortcut in this article, you can use Search. Press Command+F, and then type your search words.
For the best experience using your keyboard with the ribbon, enable your keyboard to access all controls.
-
To open the System Preferences, press
 +Spacebar, type system preferences, and press Return.
 -
To go to Keyboard Settings, type keyboard and press Return.
-
In the Shortcuts tab, press Control+F7 to change the Full Keyboard Access setting from Text boxes and lists only to All Controls.
In this topic
-
Frequently used shortcuts
-
Shortcut conflicts
-
Navigate the document
-
Select text and graphics
-
Edit text and graphics
-
Work with tables
-
Drawing
-
Work with fields
-
Outline a document
-
Review a document
-
Use footnotes and endnotes
-
Work with right-to-left languages
-
Use function key shortcuts
Frequently used shortcuts
This table lists frequently used shortcuts in Word for Mac.
|
To do this |
Press |
|---|---|
|
Undo the previous action. |
|
|
Redo the previous action, if possible. |
|
|
Cut the selected content to the Clipboard. |
|
|
Copy the selected content to the Clipboard. |
|
|
Paste the contents of the Clipboard. |
|
|
Display the shortcut menu for the selected item. * |
Shift+F10 |
|
Display the Go To dialog box. |
|
|
Display the Spelling and Grammar dialog box. |
|
|
Enable extended selection mode. |
F8 |
|
Switch to the next window. |
|
|
Switch to the previous window. |
|
|
Display the Save As dialog box. |
|
|
Find text (move focus to the Search in Document box). |
|
|
Display the Find and Replace pane. |
Control+H |
|
Display the Print dialog box. |
|
|
Close the current document. |
|
|
Expand or minimize the ribbon. |
|
|
Find the next spelling or grammatical error. The Check spelling as you type feature must be enabled. |
Option+F7 |
|
Open the Dictionary. |
In Word 2011, Option+Shift+F7 |
Top of Page
Shortcut conflicts
Some Word for Mac keyboard shortcuts conflict with default macOS keyboard shortcuts. This topic flags such shortcuts with an asterisk ( * ). To use these shortcuts, you may have to change your Mac keyboard settings to change the shortcut for the key.
Change system preferences for keyboard shortcuts
-
From the Apple menu, select System Preferences.
-
Select Keyboard.
-
Select the Shortcuts tab.
-
Select Mission Control.
-
Clear the check box for the keyboard shortcut conflicting with the Word for Mac shortcut that you want to use.
Navigate the document
|
To do this |
Press |
|---|---|
|
Move the cursor one word to the left. |
Option+Left arrow key |
|
Move the cursor one word to the right. |
Option+Right arrow key |
|
Move the cursor up by one paragraph. |
|
|
Move the cursor down by one paragraph. |
|
|
Move the cursor to the beginning of the current line. |
Home |
|
Move the cursor to the end of the current line. |
End |
|
Move the cursor to the top of the previous page. |
On a MacBook, press |
|
Move the cursor to the top of the next page. |
On a MacBook, press |
|
Move the cursor to the beginning of the document. |
On a MacBook, press |
|
Move the cursor to the end of the document. |
On a MacBook, press |
|
Move the cursor to the previous insertion point. |
Shift+F5 |
|
Move the cursor by scrolling the document view up by one screen. |
Page up |
|
Move the cursor by scrolling the document view down by one screen. |
Page down |
Top of Page
Select text and graphics
Tip: If you know the key combination to move the cursor, you can generally select the text by using the same key combination while holding down Shift. For example,  +Right arrow moves the cursor to the next word, and +Shift+Right arrow selects the text from the cursor to the beginning of the next word.
|
To do this |
Press |
|---|---|
|
Select multiple items that are not next to each other. |
Select the first item that you want, hold down |
|
Select text. |
Shift+Arrow keys |
|
Select the word to the left. |
Shift+Option+Left arrow key |
|
Select the word to the right. |
Shift+Option+Right arrow key |
|
Select from the current position to the beginning of the current line. |
Shift+Home |
|
Select from the current position to the end of the current line. |
Shift+End |
|
Select from the current position to the beginning of the current paragraph. |
|
|
Select from the current position to the end of the current paragraph. |
|
|
Select from the current position to the top of the screen. |
Shift+Page up |
|
Select from the current position to the bottom of the screen. |
Shift+Page down |
|
Select from the current position to the beginning of the document. |
|
|
Select from the current position to the end of the document. |
|
|
Select from the current position to the bottom of the window. |
|
|
Select all document content. |
|
Top of Page
Extend a selection
|
To do this |
Press |
|---|---|
|
Start extending the selection. * |
F8 In the extend selection mode, clicking a location in the document extends the current selection to that location. |
|
Select the nearest character to the left. |
F8, Left arrow key |
|
Select the nearest character to the right. |
F8, Right arrow key |
|
Expand the selection. |
F8 repeatedly to expand the selection to the entire word, sentence, paragraph, section, and document. |
|
Reduce the selection. * |
Shift+F8 |
|
Select a vertical block of text. |
|
|
Stop extending the selection. |
Esc |
Top of Page
Edit text and graphics
|
To do this |
Press |
|---|---|
|
Cut the selected content to the Clipboard. |
F2 |
|
Copy the selected content to the Clipboard. |
F3 |
|
Paste the contents of the Clipboard. |
F4 |
|
Display the Paste Special dialog box. |
|
|
Cut the selected content to the Spike. |
|
|
Paste the contents of the Spike. |
|
|
Copy the selected formatting. |
|
|
Paste the copied formatting. |
|
|
Create an AutoText entry. |
Option+F3 |
Top of Page
Align and format paragraphs
|
To do this |
Press |
|---|---|
|
Center the paragraph. |
|
|
Justify the paragraph. |
|
|
Align the paragraph to the left. |
|
|
Align the paragraph to the right. |
|
|
Indent the paragraph. |
Control+Shift+M |
|
Remove a paragraph indent. |
|
|
Create a hanging indent. |
|
|
Remove a hanging indent. |
|
|
Apply single-spacing to the paragraph. |
|
|
Apply double-spacing to the paragraph. |
|
|
Apply 1.5-line spacing to the paragraph. |
|
|
Enable AutoFormat. |
|
|
Apply the Normal style. |
|
|
Apply the Heading 1 style. |
|
|
Apply the Heading 2 style. |
|
|
Apply the Heading 3 style. |
|
|
Apply the List style. |
|
|
Insert a nonbreaking space. |
Option+Spacebar |
Top of Page
Format characters
|
To do this |
Press |
|---|---|
|
Increase the font size. |
|
|
Decrease the font size. |
|
|
Increase the font size by 1 point. |
|
|
Decrease the font size by 1 point. |
|
|
Display the Font dialog box. |
|
|
Switch the text between upper case, lower case, and title case. |
Shift+F3 |
|
Change the text to all upper case. |
|
|
Apply bold formatting. |
|
|
Add a bulleted list. |
|
|
Apply underline formatting. |
|
|
Apply underline formatting to the words, but not the spaces. |
|
|
Apply double-underline formatting. |
|
|
Apply italics formatting. |
|
|
Apply small caps formatting. |
|
|
Apply strike-through formatting. |
|
Top of Page
Insert special characters
|
To do this |
Press |
|---|---|
|
Insert an empty field. |
|
|
Insert a line break. |
Shift+Return |
|
Insert a page break. |
|
|
Insert a column break. |
|
|
Insert a nonbreaking hyphen. |
|
|
Insert a registered trademark symbol (®). |
Option+R |
|
Insert a trademark symbol (™). |
Option+2 |
Top of Page
Work with tables
Move around in a table
|
To do this |
Press |
|---|---|
|
Move to the next cell and select its content. |
Tab key |
|
Move to the previous cell and select its content. |
Shift+Tab |
|
Move to the next row. |
Down arrow key |
|
Move to the previous row. |
Up arrow key |
|
Move to the first cell in the row. |
Control+Home |
|
Move to the last cell in the row. |
Control+End |
|
Move to the first cell in the column. |
Control+Page up |
|
Move to the last cell in the column. |
Control+Page down |
|
Add a new row to the bottom of the table. |
Tab key, at the end of the last row |
|
Insert a row. |
|
Top of Page
Select table content
|
To do this |
Press |
|---|---|
|
Select the content in the next cell. |
Tab key |
|
Select the content in the previous cell. |
Shift+Tab |
|
Extend a selection to adjacent cells. |
Shift+Arrow keys |
|
Select a row. |
Select the first or last cell in the row, and then press Shift+Alt+End or Home. |
Top of Page
Resize table columns with the ruler
|
To do this |
Press |
|---|---|
|
Retain the column sizes to the right and change the table width. |
Drag the column boundary in the ruler |
|
Move a single column line and retain the table width. |
Shift+Drag the column boundary in the ruler |
|
Equally resize all columns to the right and retain the table width. |
|
|
Proportionally resize all columns to the right and retain the table width. |
|
Top of Page
Resize table columns directly in a table
Tip: To finely adjust the column width and display the column’s measurements in the ruler when you resize the column, turn off the snap-to functionality by pressing Option with the shortcut keys.
|
To do this |
Press |
|---|---|
|
Move a single column line and retain the table width. |
Drag the column boundary |
|
Retain column sizes to the right and change the table width. |
Shift+Drag the column boundary |
|
Equally resize all columns to the right and retain the table width. |
|
|
Proportionally resize all columns to the right and retain the table width. |
|
Top of Page
Insert paragraphs and tab characters in a table
|
To do this |
Press |
|---|---|
|
Insert a new paragraph in a cell. |
Return |
|
Insert a Tab character in a cell. |
Option+Tab |
Top of Page
Drawing
|
To do this |
Press |
|---|---|
|
Toggle drawing mode. |
|
Top of Page
Work with fields
|
To do this |
Press |
|---|---|
|
Insert a DATE field. |
Control+Shift+D |
|
Insert a LISTNUM field. |
|
|
Insert a PAGE field. |
Control+Shift+P |
|
Insert a TIME field. |
Control+Shift+T |
|
Insert an empty field. |
|
|
Update the selected fields. * |
F9 |
|
Switch between a field code and its result. * |
Shift+F9 |
|
Switch between all field codes and their results. |
Option+F9 |
|
Run GOTOBUTTON or MACROBUTTON from a field displaying field results. |
Option+Shift+F9 |
|
Lock a field. |
|
|
Unlock a field. |
|
Top of Page
Outline a document
These shortcuts only apply when the document is in the Outline view.
|
To do this |
Press |
|---|---|
|
Promote a paragraph. |
Control+Shift+Left arrow key |
|
Demote a paragraph. |
Control+Shift+Right arrow key |
|
Demote the paragraph to body text. |
|
|
Move the selected paragraphs up. * |
Control+Shift+Up arrow key |
|
Move the selected paragraphs down. * |
Control+Shift+Down arrow key |
|
Expand the text under a heading. |
Control+Shift+Plus sign (+) |
|
Collapse text under a heading. * |
Control+Shift+Minus sign (-) |
|
Expand all body text and headings, or collapse all body text. |
Control+Shift+A |
|
Switch between showing the first line of body text and showing all body text. |
Control+Shift+L |
|
Show all headings with the specified heading level. |
Control+Shift+Heading level number |
Top of Page
Review a document
|
To do this |
Press |
|---|---|
|
Insert a comment. |
|
|
Turn change tracking on or off. |
|
|
Move to the beginning of a comment. |
Home |
|
Move to the end of a comment. |
End (The End key is not available on all keyboards.) |
|
Move to the beginning of the list of comments. |
|
|
Move to the end of the list of comments. |
|
Top of Page
Use footnotes and endnotes
|
To do this |
Press |
|---|---|
|
Insert a footnote. |
|
|
Insert an endnote. |
|
Top of Page
Work with right-to-left languages
Word supports right-to-left functionality for languages that work in a right-to-left or a combined right-to-left, left-to-right environment for writing, editing, and displaying text. In this context, right-to-left languages refers to any writing system that is written from right to left and includes languages that require contextual shaping, such as Arabic, and languages that do not.
Before you can use these keyboard shortcuts, you need to ensure keyboard shortcuts are enabled for the language you are using:
-
Go to Apple > System Preferences > Keyboard.
-
On the Input Sources tab, select the language for which you want to enable shortcuts.
-
On the right side of the tab, select the check box for Enable keyboard shortcuts.
|
To do this |
Press |
|---|---|
|
Switch the writing direction to right-to-left. |
Control+ |
|
Switch the writing direction to left-to-right. |
Control+ |
Top of Page
Use function key shortcuts
Word for Mac uses the function keys for common commands, including Copy and Paste. For quick access to these shortcuts, you can change your Apple system preferences so you don’t have to press the Fn key every time you use a function key shortcut.
Note: Changing system function key preferences affects how the function keys work on your Mac, not just in Word. After changing this setting, you can still perform the special features printed on a function key. Just press the Fn key. For example, to use the F12 key to change your volume, press Fn+F12.
If a function key doesn’t work as you expect it to, press the Fn key in addition to the function key. If you don’t want to press the Fn key each time, you can change your Apple system preferences. For instructions, go to Change function key preferences.
The following table provides the function key shortcuts for Word for Mac.
|
Key |
Description |
|---|---|
|
F1 |
|
|
F2 |
|
|
F3 |
|
|
F4 |
|
|
F5 |
|
|
F6 |
|
|
F7 |
|
|
F8 |
|
|
F9 |
|
|
F10 |
|
|
F11 |
|
Top of Page
Change function key preferences
-
In the Apple menu, select System Preferences.
-
Select Keyboard.
-
On the Keyboard tab, select the check box for Use all F1, F2, etc. keys as standard function keys.
See also
Word help center
Basic tasks using a screen reader with Word
Use a screen reader to explore and navigate Word
Screen reader support for Word
This article describes the keyboard shortcuts in Word for the web.
Notes:
-
If you use Narrator with the Windows 10 Fall Creators Update, you have to turn off scan mode in order to edit documents, spreadsheets, or presentations with Microsoft 365 for the web. For more information, refer to Turn off virtual or browse mode in screen readers in Windows 10 Fall Creators Update.
-
To quickly find a shortcut in this article, you can use Search. Press Ctrl+F and then type your search words.
-
When you use Word for the web, we recommend that you use Microsoft Edge as your web browser. Because Word for the web runs in your web browser, the keyboard shortcuts are different from those in the desktop program. For example, you’ll use Ctrl+F6 instead of F6 for jumping in and out of the commands. Also, common shortcuts like F1 (Help) and Ctrl+O (Open) apply to the web browser – not Word for the web.
In this topic
-
Frequently used shortcuts
-
Ribbon keyboard shortcuts
-
Navigate the document
-
Edit and format the document
-
Work with comments
Frequently used shortcuts
This table lists the most frequently used shortcuts in Word for the web.
Tip: To quickly create a new document in Word for the web, open your browser, type Word.new in the address bar, and then press Enter.
|
To do this |
Press |
|---|---|
|
In the Reading view, open a PDF-based view tagged to work with screen readers. |
Press the Tab key until you reach the Accessibility Mode button, and then press Enter |
|
Find text in the Reading view. |
Ctrl+F or F3 |
|
Find text in the Editing view. |
Ctrl+F or Ctrl+G |
|
Find and replace text in the Editing view. |
Ctrl+H |
|
Hide the task pane, if one is open. |
Esc |
|
Switch to the Zoom control. |
Alt+Period, W, then Q or Alt+Windows logo key, W, then Q |
|
Print the document. |
Ctrl+P |
|
Move to the next landmark region. |
Ctrl+F6 |
|
Go to the Tell Me or Search text field. |
Alt+Q |
Top of Page
Ribbon keyboard shortcuts
Word for the web offers shortcuts called access keys to navigate the ribbon. If you’ve used access keys to save time on Word for desktop computers, you’ll find access keys very similar in Word for the web.
On a Windows computer, access keys all start with Alt+Period (.) or Alt+Windows logo key, then add a letter for the ribbon tab. For example, to go to the Review tab, press Alt+Period, R or Alt+Windows logo key, R.
If you’re using Word for the web on a Mac computer, press Control+Period (.) to start.

-
To get to the ribbon, press Alt+Period or Alt+Windows logo key. You can alternatively press Ctrl+F6 until you reach the Home tab.
-
To move between tabs on the ribbon, press the Tab key.
-
To hide the ribbon so you have more room to work, press Ctrl+F3. Repeat to display the ribbon again.
Go to the access keys for the ribbon
To go directly to a tab on the ribbon, press one of the following access keys:
|
To do this |
Press |
|---|---|
|
Open the Tell Me or Search text field on the ribbon to type a search term. |
Alt+Period, Q or Alt+Windows logo key, Q |
|
Open the File tab to use the Backstage view. |
Alt+Period, F or Alt+Windows logo key, F |
|
Open the Home tab to format text and use the Find tool. |
Alt+Period, H or Alt+Windows logo key, H |
|
Open the Insert tab to insert a picture, link, comment, header or footer, or a page number. You can also access the Symbol gallery. |
Alt+Period, N or Alt+Windows logo key, N |
|
Open the Page Layout tab to set page margins, orientation, and size, and paragraph spacing. |
Alt+Period, A or Alt+Windows logo key, A |
|
Open the References tab to insert a table of contents, footnotes, or endnotes. |
Alt+Period, S or Alt+Windows logo key, S |
|
Open the Review tab to check spelling, add comments, or track and review changes to your document. |
Alt+Period, R or Alt+Windows logo key, R |
|
Open the View tab to choose a view, open the Navigation pane, edit the Header & Footer, and to Zoom the document view. |
Alt+Period, W or Alt+Windows logo key, W |
Top of Page
Use Search
To find an option or perform an action quickly, use the Search text field. To learn more about the Search feature, go to Find what you need with Microsoft Search.
Note: Depending on the version of Microsoft 365 you are using, the Search text field at the top of the app window might be called Tell Me instead. Both offer a largely similar experience, but some options and search results can vary.
-
Select the item or place in your document, presentation, or spreadsheet where you want to perform an action.
-
To go to the Search text field, press Alt+Q.
-
Type the search words for the action that you want to perform. For example, if you want to add a bulleted list, type bullets.
-
Press the Down arrow key to browse through the search results.
-
Once you’ve found the result that you want, press Enter to select it and to perform the action.
Work in the ribbon tabs and menus
The following shortcuts can save time when you work with the ribbon tabs and ribbon menus.
|
To do this |
Press |
|---|---|
|
Select the active tab on the ribbon, and activate the access keys. |
Alt+Period or Alt+Windows logo key. To move to a different tab, use an access key or the Tab key. |
|
When a Ribbon tab is selected, move the focus to the tab commands. |
Enter, then Tab key or Shift+Tab |
|
Activate a selected button. |
Spacebar or Enter |
|
Open the list for a selected command. |
Spacebar or Enter |
|
Open the menu for a selected button. |
Alt+Down arrow key |
|
When a menu or submenu is open, move to the next command. |
Down arrow key |
|
Collapse or expand the ribbon. |
Ctrl+F3 |
Top of Page
Navigate the document
|
To do this |
Press |
|---|---|
|
Move the cursor right by one word. |
Ctrl+Right arrow key |
|
Move the cursor left by one word. |
Ctrl+Left arrow key |
|
Move the cursor up by one paragraph. |
Ctrl+Up arrow key |
|
Move the cursor down by one paragraph. |
Ctrl+Down arrow key |
|
Move the cursor to the beginning of the current line. |
Home |
|
Move the cursor to the end of the current line. |
End |
|
Move the cursor to the beginning of the document. |
Ctrl+Home |
|
Move the cursor to the end of the document. |
Ctrl+End |
|
Select text. |
Shift+Arrow keys |
|
Select the word to the right. |
Shift+Ctrl+Right arrow key |
|
Select the word to the left. |
Shift+Ctrl+Left arrow key |
|
Select the paragraph above. |
Shift+Ctrl+Up arrow key |
|
Select the paragraph below. |
Shift+Ctrl+Down arrow key |
|
Select from the current position to the beginning of the line. |
Shift+Home |
|
Select from the current position to the end of the line. |
Shift+End |
|
Select from the current position to the beginning of the document. |
Shift+Ctrl+Home |
|
Select from the current position to the end of the document. |
Shift+Ctrl+End |
|
Select all document content. |
Ctrl+A |
Top of Page
Edit and format the document
|
To do this |
Press |
|---|---|
|
Cut the selected content to the Clipboard. |
Ctrl+X |
|
Copy the selected content to the Clipboard. |
Ctrl+C |
|
Paste the content from the Clipboard. |
Ctrl+V |
|
Undo the previous action. |
Ctrl+Z |
|
Redo the previous action. |
Ctrl+Y |
|
Shrink the font size. |
Ctrl+Left bracket ([) |
|
Grow the font size. |
Ctrl+Right bracket (]) |
|
Apply bold formatting to the selected text. |
Ctrl+B |
|
Apply italic formatting to the selected text. |
Ctrl+I |
|
Underline the selected text. |
Ctrl+U |
|
Align the paragraph to the left. |
Ctrl+L |
|
Align the paragraph to the right. |
Ctrl+R |
|
Center the paragraph. |
Ctrl+E |
|
Justify the paragraph. |
Ctrl+J |
|
Create a bulleted list. |
Ctrl+Period (.) |
|
Create a numbered list. |
Ctrl+Slash (/) |
Top of Page
See also
Word help center
Basic tasks using a screen reader with Word
Use a screen reader to explore and navigate Word
Screen reader support for Word
Find ideas for keywords with the Research Tool
Just put in a keyword and get suggestions
You already have an idea for a landing page or piece of content and know which keyword to optimize on, but you’re still looking for related keywords? Use our free Keyword Research Tool to find relevant keywords for your content.
Here’s how it works: enter your keyword in the first field, select a country and click on «Start research». You don’t have to limit your search to a single word as you can also enter word groups or phrases (e.g. «best keyword research tool»). After a few seconds, you will get a clear list of related keywords that our tool has found for your search term or phrase.
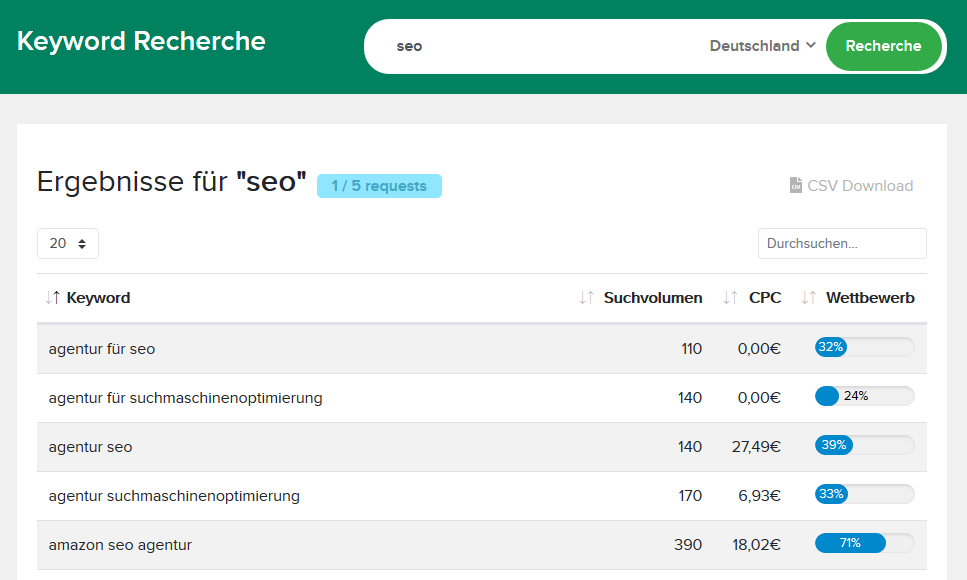
Clear keyword list
To help you with your research, our tool also provides you with the search volume, CPC (Cost per Click on Google Ads) and competition of each keyword. This way, you can decide which keywords are actually important for you and have the greatest potential for your SEO. An example:
-
Select your keyword
Enter the search term you want to rank for, e.g. “keyword research”.
-
Analysis starts
The tool analyzes 100 related keywords that are relevant in this context.
-
Compare search volume
The results are already sorted by search volume so that the most important keywords will be right at the top.
-
Select keywords
You can now select the keywords that are relevant for you and include them in your text.
-
Compare CPCs
If you want to start a Google Ads campaign, the CPC indicates the click prices you can expect.
-
Evaluate keyword competition
The bar at the right shows how strong the competition for each keyword is. The higher the competition, the harder it will be to rank for this keyword on Google.
How to find the right keyword?
Finding the right keyword to achieve good Google rankings and increase your search traffic is not easy and requires an analytical process. Even if your website ranks high for a specific keyword in Google’s search results, it doesn’t mean that this keyword will bring success. Does the keyword have a high search volume? Which topics could also be interesting? The following tips for your keyword research will help you find such related terms.
![]()
Google Suggest
While you are typing in your keyword, Google will suggest further, complementary terms (this is called «Google Suggest»). You can use these keywords for a deeper, more accurate search.
![]()
Related searches
Once you have submitted your search query, scroll down to the bottom of the first search result page. There you will find other search queries that are related to your search term. These terms and word groups can also be an important source for research.
![]()
Compare keywords
You can now compare the terms from Google Suggest with the related search queries. Consider including terms in your text, that appear in both places as these seem to be highly relevant for users.
![]()
Refine your research
Use the terms suggested by Google to refine your keyword research with this tool. This way, you will get even more terms that you can use to create and optimize your content.
What to bear in mind when doing your research
When creating your content, you should not include too many of the terms from your keyword research. Both Google and our free keyword tool only give you suggestions that are important but not mandatory. Always write your text in a way that makes it readable and interesting for users. Through various updates in the past, Google is now able to detect overoptimized SEO texts that don’t provide real value to users. Therefore, you should always ask yourself what your users are actually interested in when you’re creating content for them. Combining this with sound keyword research will help you create content that is both valuable to users and optimized for search engines.
Interesting links on the subject of keyword research
- https://backlinko.com/keyword-research
- https://blog.hubspot.com/marketing/how-to-do-keyword-research-ht
- https://www.searchenginejournal.com/seo-guide/complete-guide-keyword-research/

While editing large documents in Microsoft Word, you want tools that will help you find and replace certain text. Here are a couple of keyboard shortcuts that will allow just that.
When you are editing a large document in Microsoft Word, you want simple and easy ways to help your editing process. One such tip is to use keyboard shortcuts to find and replace text in the document. That’s right; Keyboard Shortcuts aren’t just for Windows 10.
Here is a look at the keyboard shortcuts you need to know to do just that.
While you’re in a large Word document, you can easily find text by hitting Ctrl + F. Then, type the word or phrase you’re looking for in the navigation pane. When the word or phrase you are looking for is found, each instance will be highlighted in the document. Just this step alone makes it much easier to manage the specific text you’re looking for.

If you want to find and replace text in a Word document, use the key combo Ctrl + H. That will bring up the “Find and Replace” dialog box. Then type in the word or words you’re looking for and what to replace them with. Then click the “Replace All” button.

Word will go through and replace the text. When complete, it will display the following message letting you know the task is complete. Click OK.

Use the Ctrl + F keyboard shortcut to find the text that was replaced. Looks good!

![]()