
This article is for people with visual or cognitive impairments who use a screen reader program such as Microsoft’s Narrator, JAWS, or NVDA with the Microsoft 365 products. This article is part of the Microsoft 365 screen reader support content set where you can find more accessibility information on our apps. For general help, visit Microsoft Support home or Fixes or workarounds for recent office issues.
Use Word with your keyboard and a screen reader to explore and navigate the different views and move between them. We’ve tested it with Narrator, JAWS, and NVDA, but it might work with other screen readers as long as they follow common accessibility standards and techniques.
 Need instructions on how to get started with Word, but not using a screen reader? See Word help & learning.
Notes:
-
New Microsoft 365 features are released gradually to Microsoft 365 subscribers, so your app might not have these features yet. To learn how you can get new features faster, join the Office Insider program.
-
To learn more about screen readers, go to How screen readers work with Microsoft 365.
In this topic
-
Navigate the main view
-
Navigate between views
-
Explore a document
-
Use Search
Navigate the main view
When you open a Word document for editing, you land on the main view. To cycle between the elements in the main view, press the F6 (forward) or Shift+F6 (backward). The main elements are, in order:
-
The main content area, which shows the document content. You hear the name of the document, followed by «Editing,» when the focus is on the document content.
-
The status bar at the bottom of the screen where you can find document statistics such as page count, word count, text language, and zoom level. You hear the current page number when the focus is on the status bar, for example, «Page two of three.»
-
To navigate the status bar, use the Right and Left arrow keys.
-
-
The row of ribbon tabs, which includes tabs such as File, Home, Insert, Review, View, and the Share and Comments buttons. The ribbon containing the options specific to the currently selected tab is located below the row of ribbon tabs.
-
When the focus moves to the ribbon tabs, you hear «Ribbon tabs,» followed by the currently selected tab. To navigate the row of ribbon tabs, press the Left or Right arrow key until you hear the name of the tab or control you want, and press Enter to select it.
-
To navigate from the row of ribbon tabs to the ribbon, press the Tab key or the Down arrow key once. You hear the name of the first option on the ribbon. To navigate between options on the ribbon, press the Tab key, Shift+Tab, or the Right or Left arrow key. You can also use keyboard shortcuts to select options directly. For the ribbon keyboard shortcuts, refer to Use the keyboard to work with the ribbon in Word.
-
Navigate between views
In addition to the main view, Word has the following commonly used views and areas:
The File menu
The File menu contains commands such as New, Open, and Save a Copy. You can also access your accounts and the app settings from the File menu. The File menu consists of a tab pane on the left and the contents of a selected tab on the right.
-
To open the File menu, press Alt+F. You hear: «File, home.» The focus is on the Home tab in the tab pane.
-
To navigate between the tabs in the tab pane, press the Up or Down arrow key until you hear the tab you want to open, for example, «New.» Press Enter to open the tab. The content pane of the selected tab opens to the right of the tab pane. To move the focus to the content pane, press the Tab key once.
-
To navigate within a tab content pane, press the Tab key, Shift+Tab, or the arrow keys.
-
To exit the File menu and return to the main view, press Esc.
For the File menu keyboard shortcuts, refer to Keyboard shortcuts for the File menu in Microsoft 365 for Windows.
The Quick Access Toolbar
The Quick Access Toolbar and title bar at the top of the screen contain the document name, buttons for AutoSave, ribbon display options, and your account, and buttons for minimizing, restoring the size, and closing the active window.
-
To navigate to the Quick Access Toolbar and title bar, press Alt once. You hear: «Ribbon tabs.» Then press Shift+Tab once. The focus is now on the Quick Access Toolbar.
-
To browse the available options, press Shift+Tab repeatedly. You can add and remove Quick Access Toolbar buttons and change their order on the toolbar. For instructions, refer to Use a keyboard to customize the Quick Access Toolbar.
The Options window
The Options window contains Word settings, such as personalization, proofreading, and language preferences. The Options window consists of an options category pane on the left and the content pane of the selected category on the right.
-
To open the Options window, press Alt+F, T. You hear: «Word options.»
-
To navigate the options categories, press the Down arrow key until you hear the name of the category you want, then press the Tab key to move the focus to the content pane.
-
To navigate the content pane, press the Tab key, Shift+Tab, or the Up and Down arrow keys.
-
To exit the Options window and return to the main view, press the Tab key until you hear «OK,» and press Enter. To return to the main view without making changes, press Esc.
Explore a document
Use the Narrator scan mode
To navigate the content of your document by elements, you can use the Narrator scan mode. To turn on the scan mode, press the SR key+Spacebar.
With the scan mode enabled, you can use the Up and Down arrow keys and keyboard shortcuts to navigate your document and cycle between paragraphs, other elements, areas, and landmarks. For detailed information on how to use the Narrator scan mode, refer to Chapter 3: Using scan mode.
To find the JAWS cursor that suits your needs, refer to So Many Cursors, So Little Time, Understanding Cursors in JAWS. To learn how to use the NVDA Browse mode which is also optionally available for Word, refer to 6. Browse Mode.
Use the Navigation pane
You can use the Navigation pane to quickly navigate between parts of the document such as headings or graphics.
-
To turn on the Navigation pane, press Alt+W, K. You hear: «Navigation, search document, edit box.»
-
Do one of the following:
-
To navigate the headings in the document, press the Tab key until you hear «Heading tab item,» press the Tab key until you hear the heading you want, and then press Enter. The focus moves to the beginning of the heading row in the document body.
-
To navigate by certain elements in your document, such as graphics, press the Tab key until you hear «Search, split button,» and then press Alt+Down arrow key to expand the menu. Press the Down arrow key until you hear the element you want, for example, «Graphic,» and then press Enter to select. The focus moves to the next result button. Press Enter repeatedly to move through the results.
-
-
To close the Navigation pane, press Alt+W, K.
Use Read Mode
Read Mode is designed to make reading text easier and includes reading tools such as Read Aloud.
-
To enable Read Mode, press Alt+W, F.
-
Do one or more of the following:
-
To access the Read Mode toolbar, press Alt, and then press the Tab key until you hear the name of the menu you want, and then press Enter to select it. Press the Down arrow key to move down on the list of available options, and press Enter to select an option.
-
To use Read Aloud, press Alt+W, R. To access the reading controls, press the Tab key until you reach the option you want, and then press Enter to select it.
Tip: For the best results, it might be helpful to turn off your screen reader when you use Read Aloud.
-
-
To exit Read Mode, press Esc.
Use the Immersive Reader view
With Immersive Reader, you can improve focus, declutter the text you’re reading, read scanned texts more easily, and decode complex texts.
-
To turn on Immersive Reader, press Alt+W, L, 2.
-
To access the Immersive Reader ribbon and options, press Alt. You hear: «Immersive, Immersive Reader, tab.» Press the Tab key to move between the options on the ribbon and press Enter to select an option.
-
To turn off Immersive Reader, press Alt+W, L, 2.
Use the Focus mode
The Focus mode can help you minimize distractions and concentrate on writing, creating, and collaborating in Word. The Focus mode hides the ribbon and status bar, showing just the Word document itself.
-
To turn on the Focus mode, press Alt+W, O.
-
To turn off the Focus mode, press Esc.
Navigate between floating shapes
-
To quickly move the focus to the first floating shape such as a text box or a chart, press Ctrl+Alt+5.
-
To cycle between the floating shapes, press the Tab key or Shift+Tab.
-
To return to the normal navigation, press Esc.
Zoom in or out
Zoom in to get a close-up of your document or zoom out to get an overview of the page at a reduced size.
-
Press Alt+W, Q. You hear “Zoom dialog” or “Zoom window.”
-
Press the Tab key until you reach the Percent spinner, and then type a percentage or use the Up or Down arrow key to change the percentage.
-
Press the Tab key until you reach the OK button and press Enter.
Use Search
To find an option or perform an action quickly, use the Search text field. To learn more about the Search feature, go to Find what you need with Microsoft Search.
Note: Depending on the version of Microsoft 365 you are using, the Search text field at the top of the app window might be called Tell Me instead. Both offer a largely similar experience, but some options and search results can vary.
-
Select the item or place in your document, presentation, or spreadsheet where you want to perform an action.
-
To go to the Search text field, press Alt+Q.
-
Type the search words for the action that you want to perform. For example, if you want to add a bulleted list, type bullets.
-
Press the Down arrow key to browse through the search results.
-
Once you’ve found the result that you want, press Enter to select it and to perform the action.
See also
Use a screen reader to insert and change text in Word
Use a screen reader to insert a picture or image in Word
Keyboard shortcuts in Word
Basic tasks using a screen reader with Word
Set up your device to work with accessibility in Microsoft 365
Make your Word documents accessible to people with disabilities
What’s new in Microsoft 365: Release notes for Current Channel
Use Word for Mac with your keyboard and VoiceOver, the built-in MacOS screen reader, to explore and navigate the different views and move between them.
Need instructions on how to get started with Word, but not using a screen reader? See Word help & learning.
Notes:
-
New Microsoft 365 features are released gradually to Microsoft 365 subscribers, so your app might not have these features yet. To learn how you can get new features faster, join the Office Insider program.
-
This topic assumes that you are using the built-in macOS screen reader, VoiceOver. To learn more about using VoiceOver, go to VoiceOver Getting Started Guide.
In this topic
-
Navigate the main view
-
Navigate between views
-
Explore a document
Navigate the main view
When you open a Word document for editing, you land on the main view. To navigate the main view, press F6 (forward) and Shift+F6 (backward). The focus moves through the following elements in the main view, in order:
-
The main content area, which shows the document content. This is where you edit the document. When the focus is on the content area, you hear the page you’re on, followed by the location of the text insertion point.
-
The status bar at the bottom of the screen, which contains document statistics such as page count, word count, text language, and the zoom level. When the focus moves to the status bar, you hear the current page number, followed by the total number of pages, for example, «Page six of fourteen.» To browse the options on the status bar, press Control+Option+Right or Left arrow key.
-
The quick access toolbar at the top of the screen, which contains, for example, the AutoSave, Print, and Undo buttons and the name of the document. You hear «Autosave» when the focus moves to the quick access toolbar. To move between the options on the toolbar, press Control+Option+Right or Left arrow key.
-
The row of ribbon tabs, which includes tabs such as Home, Insert, Review, View, and the Share and Comments buttons. When the focus moves to the ribbon tabs, you hear the currently selected tab, for example, «Home, selected tab.»
-
To navigate the row of ribbon tabs, press Control+Option+Right or Left arrow key until you hear the name of the tab or control you want, and press Control+Option+Spacebar to select it and display the ribbon.
-
The ribbon containing the options specific to the currently selected tab is located below the row of ribbon tabs. To navigate from the row of ribbon tabs to the ribbon, press the Tab key until you hear the ribbon you’re entering and the first option on the ribbon. For example, with the View tab selected, you hear: «Entering View tab commands scroll area.» To navigate between the options on the ribbon, press Control+Option+Right or Left arrow key.
-
Navigate between views
In addition to the main view, Word has the following commonly used views and areas:
Word start page
When you open the Word app, you land on the start page. On the start page, you can create a new document, browse templates, open an existing document, and access your account info. The start page consists of a tab pane on the left and the contents of a selected tab on the right.
-
To navigate the tab pane, press the Tab key. To display the tab contents, press Control+Option+Spacebar.
-
To navigate from the tab pane to the content pane of the selected tab, press the Tab key until you hear: «Entering scroll area.» To browse the available sections in the content pane, press Control+Option+Right arrow key. To interact with a section, press Control+Option+Shift+Down arrow key. To stop interacting with a section, press Control+Option+Shift+Up arrow key.
-
To navigate to the start page from the main view, press Shift+Command+P.
The app menu bar
The app menu bar contains additional options and controls, for example, for editing text and formatting tables. You can also access the File menu with options to start a new document or open an existing one.
-
To move the focus to the app menu bar, press Control+Option+M.
-
To browse the options on the menu bar, press Control+Option+Right arrow key.
-
To exit the menu bar, press Esc.
The Word Preferences window
In the Word Preferences window, you can access Word settings such as AutoCorrect and ribbon options.
-
To open the Word Preferences window, press Command+Comma (,).
-
To navigate the window, press the Tab key. To select a setting, press Spacebar. The setting dialog box opens. To navigate within a setting dialog box, press the Tab key or the arrow keys.
-
To close the Word Preferences window and return to your document, press Esc.
Explore a document
To navigate around a Word document, you can use the keyboard shortcuts, the VoiceOver features such as rotor, or the Navigation Pane.
Use the keyboard shortcuts
One of the quickest ways to move around in a document is to use the keyboard shortcuts. For a full list of keyboard shortcuts for navigating a document, refer to the «Navigate the document» section in Keyboard shortcuts in Word.
Use the VoiceOver rotor, Quick Nav, or Item Chooser
You can use the VoiceOver features such as rotor, Quick Nav, or Item Chooser to navigate directly to an item, for example, a section heading or link.
-
To open the rotor, press Control+Option+U. For more info, refer to Use the VoiceOver rotor on Mac.
-
To open the Item Chooser, press Control+Option+I. For more info, refer to Use the VoiceOver Item Chooser to navigate on Mac.
-
To activate Quick Nav, press the Left and Right arrow keys at the same time. For more info, refer to Use VoiceOver Quick Nav in apps and webpages on Mac.
Use the Navigation Pane
Use the Navigation Pane to quickly navigate between parts of the document such as headings.
-
To turn on the Navigation Pane, press Command+F6 until you hear the name of the current ribbon tab. Press Control+Option+Right arrow key until you hear «View, tab,» and press Control+Option+Spacebar. Press the Tab key until you hear «Navigation pane, toggle button,» and press Control+Option+Spacebar.
-
To move the focus to the navigation pane, press Command+F6 until you hear: «Thumbnails pane, selected.»
-
Press Control+Option+Right arrow key until you hear «Document map, tab,» and then press Control+Option+Spacebar.
-
Press Control+Option+Right arrow key until you hear «Table,» and then press Control+Option+Shift+Down arrow key to open the headings table.
-
To move between the headings, press the Down or Up arrow key until you find the heading you want, and then press Control+Option+Spacebar to move the focus to the beginning of the heading in the document body.
See also
Use a screen reader to insert and change text in Word
Use a screen reader to insert a picture or image in Word
Keyboard shortcuts in Word
Basic tasks using a screen reader with Word
Set up your device to work with accessibility in Microsoft 365
Make your Word documents accessible to people with disabilities
What’s new in Microsoft 365: Release notes for Current Channel
Use Word for iOS with VoiceOver, the built-in iOS screen reader, to explore and navigate the different views and move between them.
Need instructions on how to get started with Word, but not using a screen reader? See Word help & learning.
Notes:
-
New Microsoft 365 features are released gradually to Microsoft 365 subscribers, so your app might not have these features yet. To learn how you can get new features faster, join the Office Insider program.
-
This topic assumes that you are using the built-in iOS screen reader, VoiceOver. To learn more about using VoiceOver, visit Apple accessibility.
In this topic
-
Navigate the main view
-
Navigate between views
-
Explore a document
-
Use VoiceOver with an external keyboard
Navigate the main view
When you open a Word document for editing, you land on the main view. It contains the following main elements:
-
The top menu bar, which contains options such as Close file, Share, and File.
-
To move the focus to the top menu bar, tap near the top of the screen with four fingers. You hear the name of the document. Then swipe right once. The focus is now on the top menu bar. To browse the available options, swipe right repeatedly.
-
-
The document content area, which appears under the top menu and takes up the majority of the screen.
-
To move the focus to the content area, swipe right or left until you hear the name of the document, followed by the file extension, for example «Docx» and the current page. VoiceOver starts to read the page content.
-
-
The quick toolbar, which appears at the bottom of the screen when you’ve selected an editable element in the content area. It contains document formatting options for the selected element.
-
To go to and navigate the quick toolbar, select an editable element in the document, and swipe right until you reach the toolbar buttons.
-
-
The ribbon menu, which pops up from the bottom of the screen and contains tabs with different sets of tools and options. The ribbon options specific to the selected tab are displayed below the tab name.
-
To go to the ribbon menu, tap near the top of the screen with four fingers, swipe right until you hear «Show ribbon,» and double-tap the screen. You hear the currently selected tab.
-
To switch to another tab, double-tap the screen, swipe left or right until you hear the name of the tab you want, and then double-tab the screen.
-
To navigate the ribbon options, swipe left or right.
-
Navigate between views
In addition to the main view, Word has the following commonly used views:
The Home, New, and Open tabs
When you open the Word app, you land on the Home tab. This tab lists the documents that you’ve recently worked on and documents that others have shared with you. At the top of the Home tab, you can find the Search text field to search for a document.
The New tab is where you can start a new document. Here you can also find the available templates.
On the Open tab, you can access the document storage locations that are available to you, such as OneDrive, SharePoint, and your iPhone. You can browse for a file in each location and open it for editing.
-
To navigate the contents of each tab, swipe left or right. To select a file, folder, or storage location, double-tap the screen.
-
To switch between the Home, New, and Open tabs, tap near the bottom of the screen with four fingers, swipe left or right until you hear the tab you want, and then double-tap the screen.
-
To navigate to a tab when you’re editing a document in the main view, tap near the top of the screen with four fingers, swipe right until you hear «Close file,» and double-tap the screen. The focus moves to the tab from where you opened the document you just closed.
The File menu
The File menu contains options such as Save a Copy, Export, and Print.
-
To open the File menu, tap near the top of the screen with four fingers, swipe right until you hear «File,» and double-tap the screen.
-
To navigate the menu, swipe left or right.
-
To exit the menu, swipe left until you hear «Done,» and double-tap the screen.
The Search view
In the Search view, you search the currently open document and browse search results.
-
To navigate to the Search view when you’re editing a document, swipe left until you hear «Find,» and double-tap the screen. Use the on-screen keyboard to type the search words.
-
To browse the search results, tap near the top of the screen with four fingers, swipe left until you hear «Next search result» or «Previous search result,» and double-tap the screen.
-
To exit the Search view, swipe right until VoiceOver starts to read the document content, and then double-tap the screen.
Explore a document
-
To explore the text of a document, swipe right or left until you hear VoiceOver announce the currently open page, followed by «Content.» Swipe up or down to change the screen reader navigation mode, for example, to headings, paragraphs, lines, or words, and then swipe right or left to navigate.
-
Use the VoiceOver rotor to choose how you want to move through a document when you swipe up or down. For example, if you choose «Words,» the focus moves through the document word by word with each swipe.
-
To use the rotor, rotate two fingers on your phone screen as if you’re turning a dial. You hear the first rotor option. Keep rotating your fingers until you hear the option you want, and lift your fingers to select the option. To navigate by the selected element, swipe up or down.
-
-
To scroll through a document, swipe up or down with three fingers. When you lift your fingers off the screen, VoiceOver announces the page you’re on.
-
Use the Mobile view to simplify the page layout, which could make it easier to read and edit text on your phone’s screen. Swipe left or right until you reach the Mobile view button, and then double-tap the screen. To return to the Print view, swipe left until you hear «Print view,» and double-tap the screen.
Use VoiceOver with an external keyboard
If you use VoiceOver with an external keyboard and you want to use keyboard shortcuts to navigate and edit your document, make sure Quick Nav is turned off. To turn Quick Nav off, on your external keyboard, press the Left and Right arrow keys simultaneously. To turn Quick Nav back on, press the Left and Right arrow keys again.
For the keyboard shortcuts, refer to Keyboard shortcuts in Word.
See also
Use a screen reader to insert and change text in Word
Use a screen reader to insert a picture or image in Word
Basic tasks using a screen reader with Word
Set up your device to work with accessibility in Microsoft 365
Make your Word documents accessible to people with disabilities
What’s new in Microsoft 365: Release notes for Current Channel
Use Word for Android with TalkBack, the built-in Android screen reader, to explore and navigate the different views and move between them.
Need instructions on how to get started with Word, but not using a screen reader? See Word help & learning.
Notes:
-
New Microsoft 365 features are released gradually to Microsoft 365 subscribers, so your app might not have these features yet. To learn how you can get new features faster, join the Office Insider program.
-
This topic assumes that you are using the built-in Android screen reader, TalkBack. To learn more about using TalkBack, go to Android accessibility.
In this topic
-
Navigate the main view
-
Navigate between views
-
Explore a document
-
Use the TalkBack menu
Navigate the main view
When you open a Word document for editing, you land on the main view. It contains the following main elements:
-
The top menu bar, which contains buttons such as More options to open the ribbon, Search, Undo, and Menu to open options for saving and sharing, for example.
-
To go to the top menu bar from the document content, swipe left until you hear «Menu.»
-
To navigate the top menu, swipe left and right.
-
-
The main content area, which appears under the top menu and takes up the majority of the screen. To move the focus to the content area, swipe right until you hear the name of the document and its file extension, for example, «Docx.»
-
The quick toolbar, which appears at the bottom of the screen when you’ve selected an editable element in the content area. It contains document formatting options for the selected element.
-
To go to and navigate the quick toolbar, select an editable element in the document, and swipe right until you reach the toolbar buttons.
-
-
The ribbon, which pops up from the bottom of the screen and contains tabs with different editing tools and options.
-
To go to the ribbon, slide one finger near the top of the screen until you hear «More options, button,» and double-tap the screen. You hear the currently selected ribbon tab. The ribbon options specific to the selected tab are displayed below the tab name.
-
To switch to another tab, double-tap the screen, swipe left or right until you hear the name of the tab you want, and double-tab the screen.
-
To navigate the ribbon options, swipe left or right.
-
Navigate between views
In addition to the main editing view, Word has the following commonly used views and areas:
The Recent, Shared, and Open views
When you open the Word app, you land on the Recent view. It lists the documents that you’ve recently worked on. To browse the list, swipe right or left. To select a document, double-tap the screen. The document opens in the editing view.
In the Shared view, you can find the documents that others have shared with you. To browse the list, swipe right or left. To select a document, double-tap the screen. The document opens in the editing view.
In the Open view, you can browse the available file storage locations or navigate to a document you want to open.
-
To switch between the Recent, Shared, and Open views, slide one finger near the bottom of the screen until you hear the view you want, and double-tap the screen.
-
At the top of each view, you can find buttons for accessing your account info, and creating a new document. Slide one finger at the top of the screen until you hear «New button,» or «Signed in as,» followed by your username. In the Recent and Shared views, you can also find a button to search for a document. Swipe right or left until you hear «Search, button,» and double-tap the screen.
-
To navigate to the Recent view when you’re editing your document in the main view, swipe left or slide one finger near the upper-left corner of the screen until you hear «Back button,» and double-tap the screen.
The Word menu
The Word menu contains options for saving, sharing, and printing your document. From here you can also access the Word for Android settings.
-
To open the Word menu, swipe left until you hear «Menu,» and then double-tap the screen.
-
To navigate the Word menu, swipe left or right until you hear the option you want, and then double-tap the screen.
-
To exit the menu, swipe down-then-left.
The Find bar
Use the Find bar to search the currently open document and browse the search results.
-
To navigate to the Find bar when you’re editing a document, swipe left until you hear «Find,» and then double-tap the screen. Use the on-screen keyboard to type your search words.
-
To browse the search results, swipe left until you hear «Find previous» or «Find next,» and double-tap the screen.
-
To close the Find bar, swipe right you hear «Close Find bar,» and then double-tap the screen.
Explore a document
To explore the text of a document, swipe right or left until you hear the screen reader announce the currently open page, followed by «Content.» You can change the screen reader navigation mode, also known as the reading control, for example, to headings, paragraphs, lines, or words. The gestures to change the mode depend on the Android version of your phone. For more information, refer to Use TalkBack gestures.
See also
Use a screen reader to insert and change text in Word
Use a screen reader to insert a picture or image in Word
Keyboard shortcuts in Word
Basic tasks using a screen reader with Word
Set up your device to work with accessibility in Microsoft 365
Make your Word documents accessible to people with disabilities
What’s new in Microsoft 365: Release notes for Current Channel
Use Word for the web with your keyboard and a screen reader to explore and navigate the different views and move between them. We have tested it with Narrator in Microsoft Edge and JAWS and NVDA in Chrome, but it might work with other screen readers and web browsers as long as they follow common accessibility standards and techniques.
Need instructions on how to get started with Word, but not using a screen reader? See Word help & learning.
Notes:
-
New Microsoft 365 features are released gradually to Microsoft 365 subscribers, so your app might not have these features yet. To learn how you can get new features faster, join the Office Insider program.
-
To learn more about screen readers, go to How screen readers work with Microsoft 365.
-
When you use Word for the web with a screen reader, switch to the full screen mode. Press F11 to toggle the full screen mode on and off.
-
When you use Word for the web, we recommend that you use Microsoft Edge as your web browser. Because Word for the web runs in your web browser, the keyboard shortcuts are different from those in the desktop program. For example, you’ll use Ctrl+F6 instead of F6 for jumping in and out of the commands. Also, common shortcuts like F1 (Help) and Ctrl+O (Open) apply to the web browser – not Word for the web.
In this topic
-
Navigate the main view
-
Navigate between views
-
Explore a document
-
Use Search
Navigate the main view
When you open a Word for the web document, you land on the main view. To cycle between the elements in the Word for the web main view, press the Ctrl+F6 (forward) or Shift+Ctrl+F6 (backward). The main elements are, in order:
-
The main content area, which contains the document content. This is where you edit the document. You hear «Document contents, editing» when the focus is on the main content area.
-
The status bar at the bottom of the screen, which contains document statistics such as page count, word count, text language, and the zoom level. When the focus is on the status bar, you hear the number of the page you’re currently on and the total number of pages in the document, for example, «Page one of three, button.» To navigate within the status bar, press the Tab key or Shift+Tab.
-
The title banner at the top of the screen, which contains the App Launcher button for launching other applications, the name and file path of the currently open file, the Search text field, and buttons for accessing the settings and your account info. You hear «Banner, App launcher» when the focus is on the title banner. To navigate the title banner, press the Tab key or Shift+Tab.
-
The row of ribbon tabs, which includes tabs such as File, Home, Insert, View, and Help. When the focus moves to the row of ribbon tabs, you hear «Ribbon tabs,» followed by the currently selected tab. To navigate the row of ribbon tabs, use the Right and Left arrow keys.
-
The ribbon containing buttons specific to the currently selected tab is located immediately below the row of ribbon tabs. To navigate from a ribbon tab to the ribbon, press the Tab key once. You hear the name of the first button in the ribbon. To navigate between buttons on the ribbon, use the Right and Left arrow keys.
-
The row of ribbon tabs also contains controls for additional actions such as switching between modes, sharing the document, displaying the Comments pane, and more. To access the additional controls, press Ctrl+F6 until you hear «Ribbon tabs, and then press the Tab key until you hear «Additional controls, Mode menu,» followed by the currently selected mode, for example, «Editing, selected.» To browse the additional controls, press the Right arrow key.
-
Navigate between views
In addition to the main view, Word for the web has the following commonly used views and areas:
The File menu
The File menu contains options such as New, Open, and Save a Copy. You can also access your account info and the app settings. The File menu consists of a tab pane on the left and the contents of a selected tab on the right.
-
To open the File menu, press Alt+Windows logo key+F. You hear: «Close.» The Home tab is selected and its contents are displayed in the content pane.
-
To navigate between the tabs in the tab pane, press the Up or Down arrow key until you hear the tab you want to open, for example, «New.» Press Enter to open the tab. The content pane of the selected tab opens to the right of the tab pane. The focus moves to the first item in the content pane.
-
To navigate within a content pane, press the Tab key, Shift+Tab, or the arrow keys.
-
To exit the File menu and return to the main view, press Esc.
Reading View
Reading View is designed to make reading text easier for everyone. In Reading View, Word for the web also offers Accessibility Mode, which can make reading a document easier for people who use screen reader. In Accessibility Mode, Word for the web presents a Portable Document Format (PDF) version of the file with tagging in your browser. Your screen reader reads the text and its formatting from the PDF version in the browser.
-
To turn on Reading View, press Alt+Windows logo key, W, F.
-
To navigate to the Reading View toolbar, press Ctrl+F6 until you hear «Accessibility Mode,» press the Tab key to explore the options on the toolbar.
-
In Reading View, to turn Accessibility Mode on or off, press Ctrl+F6 until you hear «Accessibility Mode,» and press Enter.
-
To exit Reading View, press Ctrl+F6 until you hear «Accessibility Mode,» press the Tab key until you hear «Edit document,» and press Enter. You hear: «Edit document, Make quick changes right here in Word.» Then do one of the following:
-
To continue editing and reading the document in Word for the web, press Enter.
-
To open the document in the full desktop version of Word, press the Down arrow key until you hear «Open in desktop app,» and press Enter.
-
Explore a document
Use the Navigation Pane
You can use the Navigation Pane to quickly navigate between headings in a document.
-
To turn on the Navigation Pane, press Alt+Windows logo key, W, K. You hear: «Navigation, search for.»
-
Press the Tab key or Shift+Tab until you hear «Headings,» and press Enter. Press the Tab key until you hear the currently selected tab, for example, «Find tab item,» and then press the Right arrow key until you hear: «Heading tab item.»
-
Press the Tab key until you hear the heading you want, and press Enter. The focus moves to the beginning of the heading row in the document body.
Use zoom
-
Press Ctrl+F6 until you hear the current page number followed by the total number of pages in the document, for example, «Page one of three.»
-
To zoom in, press the Tab key until you hear «Zoom in,» and press Enter. You hear the new zoom percentage, for example, «90 percent.» To zoom out, press the Tab key or Shift+Tab until you hear «Zoom out,» and press Enter.
Use Search
To find an option or perform an action quickly, use the Search text field. To learn more about the Search feature, go to Find what you need with Microsoft Search.
Note: Depending on the Microsoft 365 version of you are using, the Search text field at the top of the app window might be called Tell Me instead. Both offer a largely similar experience, but some options and search results can vary.
-
Select the item or place in your document, presentation, or spreadsheet where you want to perform an action. For example, in an Excel spreadsheet, select a range of cells.
-
To go to the Search text field, press Alt+Q.
-
Type the search words for the action that you want to perform. For example, if you want to add a bulleted list, type bullets.
-
Press the Down arrow key to browse through the search results.
-
When you’ve found the result that you want, press Enter to select it and to perform the action.
See also
Use a screen reader to insert and change text in Word
Use a screen reader to insert a picture or image in Word
Keyboard shortcuts in Word
Basic tasks using a screen reader with Word
Make your Word documents accessible to people with disabilities
What’s new in Microsoft 365: Release notes for Current Channel
Technical support for customers with disabilities
Microsoft wants to provide the best possible experience for all our customers. If you have a disability or questions related to accessibility, please contact the Microsoft Disability Answer Desk for technical assistance. The Disability Answer Desk support team is trained in using many popular assistive technologies and can offer assistance in English, Spanish, French, and American Sign Language. Please go to the Microsoft Disability Answer Desk site to find out the contact details for your region.
If you are a government, commercial, or enterprise user, please contact the enterprise Disability Answer Desk.
Содержание
- Способ 1: Стандартный поиск
- Вариант 1: Microsoft Word 2013 – 2021
- Вариант 2: Microsoft Word 2007 – 2010
- Вариант 3: Microsoft Word 2003
- Вариант 4: Microsoft Word Online
- Способ 2: Расширенный поиск
- Вопросы и ответы

Способ 1: Стандартный поиск
Зачастую для нахождения нужной информации в документе используется стандартный поиск, который подразумевает ввод запроса с дальнейшим выделением соответствующих результатов. Дополнительные параметры, такие как форматирование текста и специальные знаки, при этом не учитываются.
Важно! У текстового редактора Microsoft Word есть несколько версий, каждая из которых имеет собственные отличительные особенности. Предоставить универсальную инструкцию по осуществлению поиска в документе невозможно, поэтому каждая категория программного обеспечения будет рассмотрена отдельно.
Вариант 1: Microsoft Word 2013 – 2021
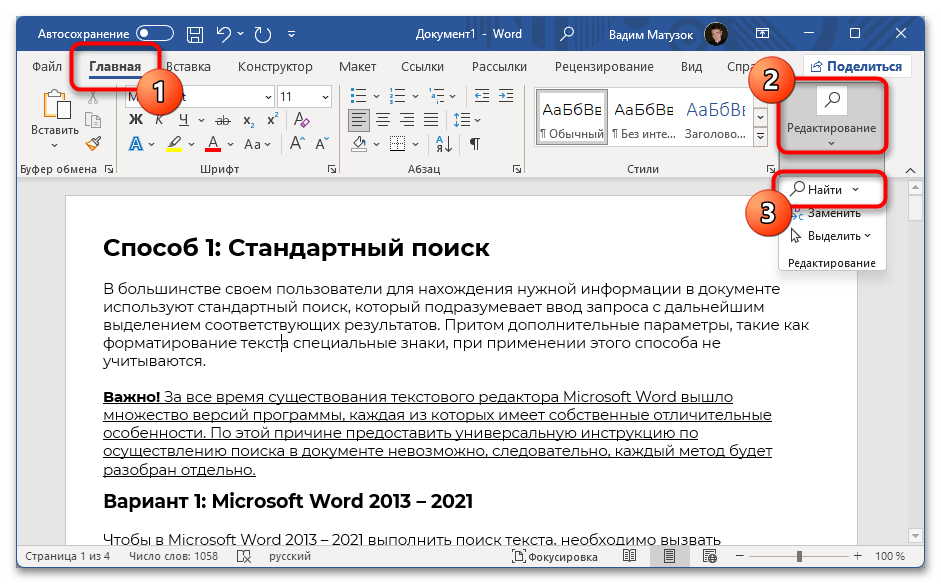
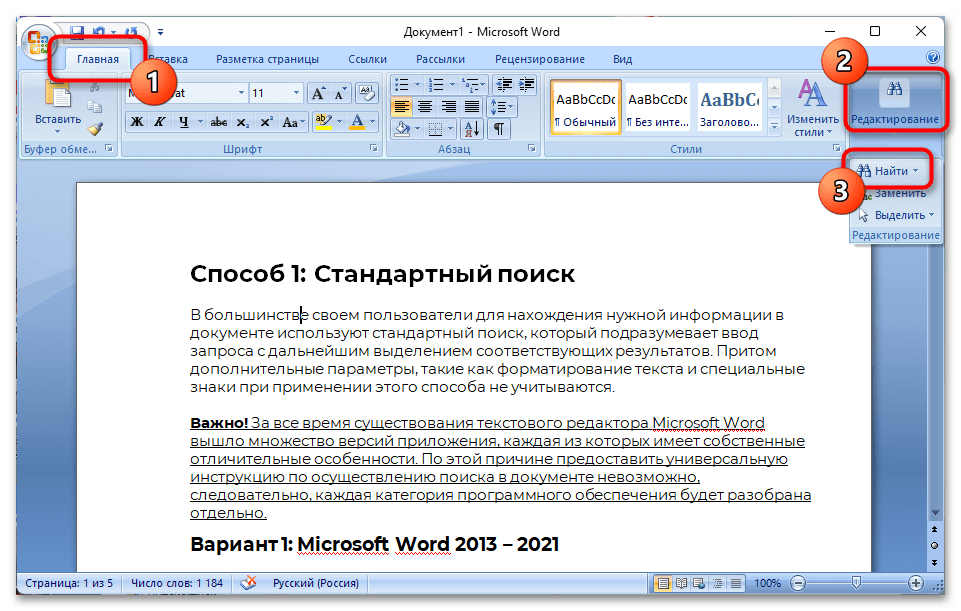
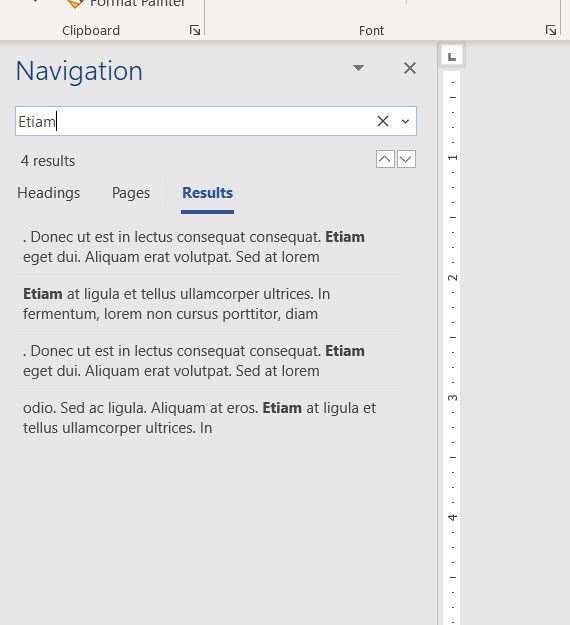
Чтобы в Microsoft Word 2013 – 2021 выполнить поиск текста, необходимо вызвать специальную навигационную панель, которая позволяет исключительно подсветить фрагменты текста, соответствующие пользовательскому запросу. Среди дополнительных функций есть анализ по заголовкам и страницам документа. Панель можно вызвать посредством специальной кнопки на ленте инструментов. Для этого перейдите во вкладку «Главная» и правой части щелкните по пункту «Найти», расположенному в блоке «Редактирование».
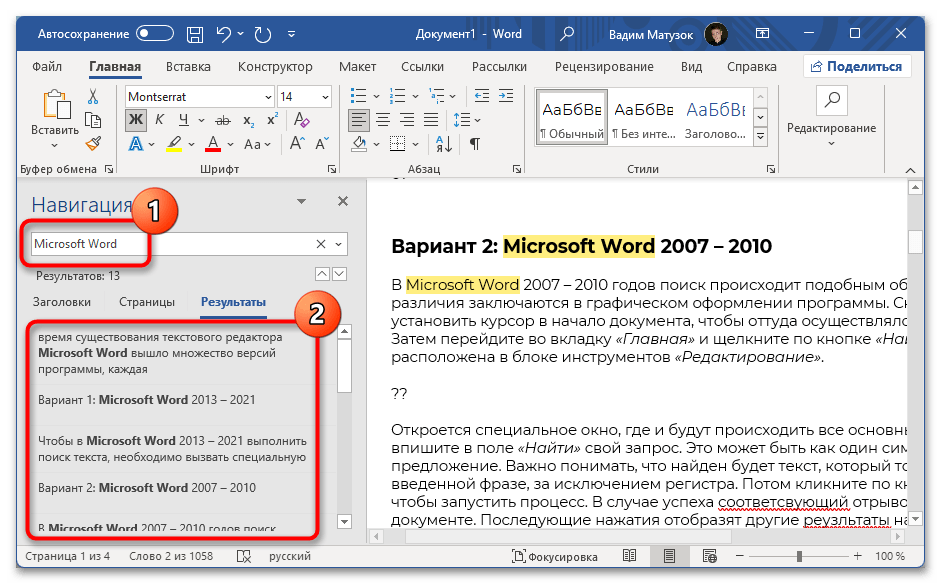
Впишите в поле «Поиск в документе» свой запрос, после чего нажмите по клавише Enter. На вкладке «Результаты», расположенной на боковой панели чуть ниже, будет представлен перечень предложений, в которых есть указанное слово или словосочетание. Нажатие по одному из них, сразу переместит курсор в соответствующее место документа.
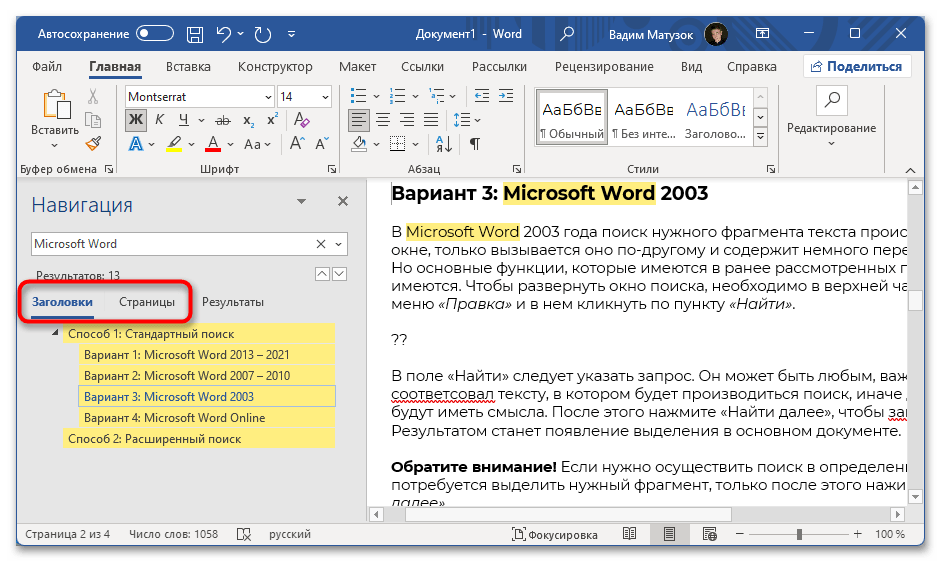
Также можно просмотреть результаты на определенной странице или в заголовке, для этого достаточно перейти на одноименную вкладку. Щелчок по желаемому объекту переместит курсор в соответствующую область документа.
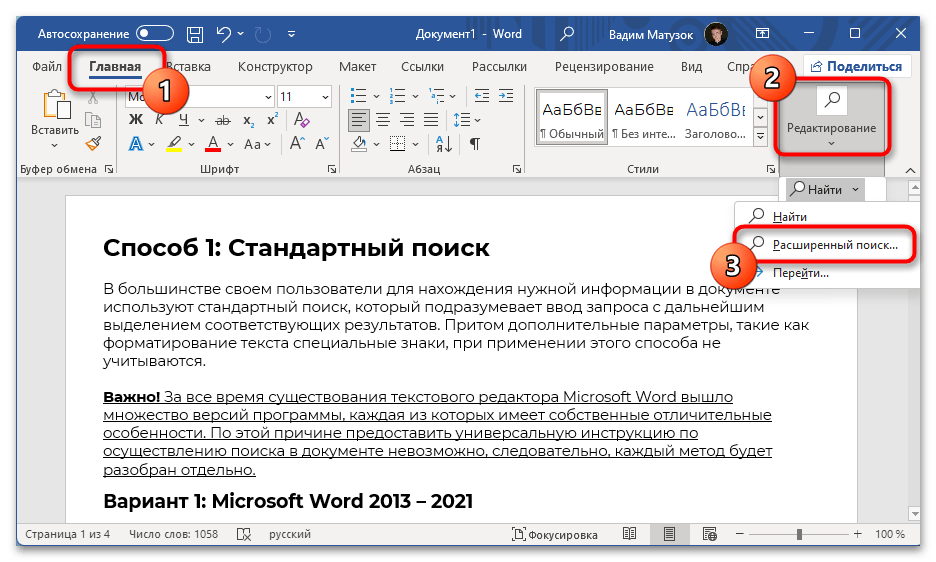
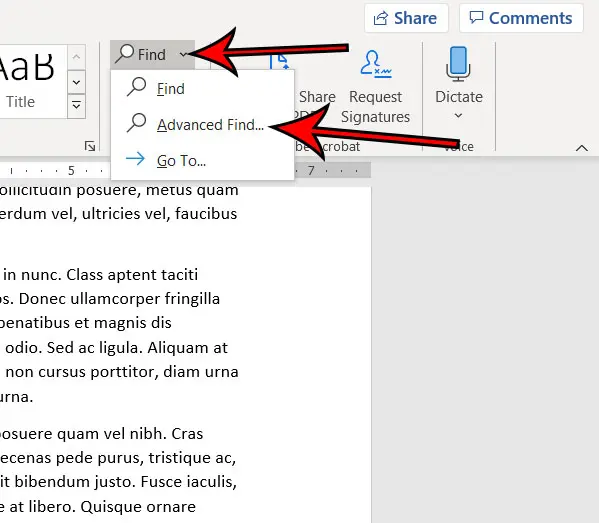
Важно! Это не все способы стандартного поиска информации в Microsoft Word 2013 – 2021. Можно получить больше возможностей, перейдя в расширенный режим. Для этого на вкладке «Главная» нужно раскрыть контекстное меню пункта «Найти» и выбрать «Расширенный поиск». Часть представленных в нем функций будет рассмотрена в соответствующей части статьи.
Читайте также: Использование области навигации в MS Word
Вариант 2: Microsoft Word 2007 – 2010
В Microsoft Word 2007 – 2010 годов поиск происходит подобным образом, основные различия заключаются в графическом оформлении программы. Установите курсор в начало документа, чтобы оттуда осуществлялся анализ всего текста, затем перейдите во вкладку «Главная» и щелкните по кнопке «Найти», которая расположена в блоке инструментов «Редактирование».
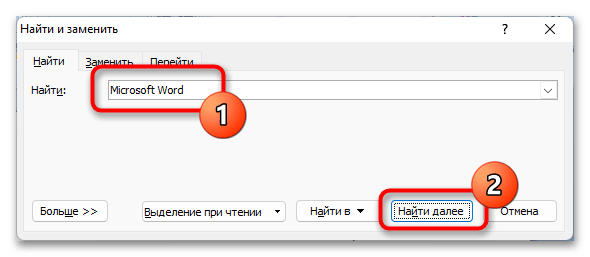
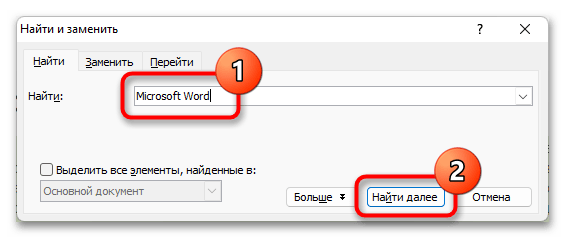
В открывшемся окне впишите в поле «Найти» свой запрос. Это может быть как один символ, так и целое предложение. Важно понимать, что найден будет текст, который точно соответствует введенной фразе, но без учета регистра. Кликните по кнопке «Найти далее», чтобы запустить процесс. В случае успеха соответствующий отрывок будет выделен в документе. Последующие нажатия отобразят другие результаты на странице.

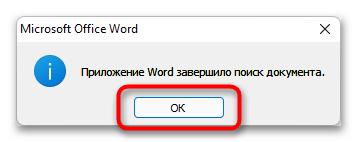
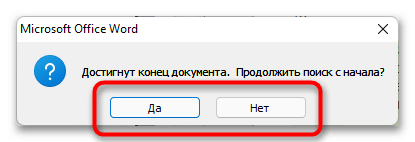
При очередном нажатии по кнопке «Найти далее» может появиться всплывающее окно с надписью «Приложение Word завершило поиск документа». Это означает, что были найдены все отрывки текста в документе, которые соответствуют введенному запросу. В таком случае нужно кликнуть «ОК», чтобы закрыть окно.
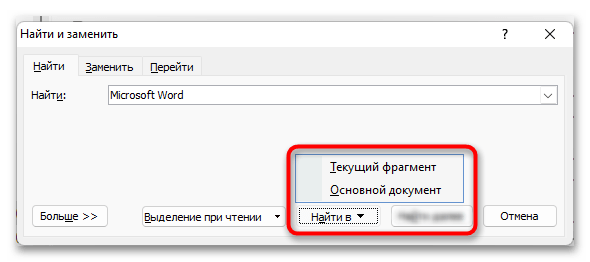
В этом же окне можно осуществлять поиск искомого слова или словосочетания во всем документе сразу или в определенной его части (во втором случае предварительно необходимо будет выделить нужный фрагмент текста). Отвечает за такую функцию кнопка «Найти в», нажатие на которую открывает дополнительное меню, где следует выбрать параметр «Текущий фрагмент» или «Основной документ». После этого в тексте выделятся все соответствующие введенному запросу результаты.
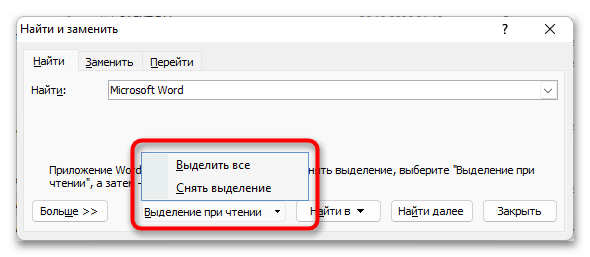
Последняя функция стандартного поиска подразумевает выделение результата, которое не будет исчезать даже при чтении и редактировании документа. Чтобы ею воспользоваться, необходимо в окне кликнуть по кнопке «Выделение при чтении» и в появившемся контекстном меню выбрать пункт «Выделить все». На страницах документа найденные слова сразу же станут обрамлены желтым цветом. В дальнейшем, чтобы убрать этот эффект, потребуется снова кликнуть по той же кнопке, но в этот раз выбрать опцию «Снять выделение».
Вариант 3: Microsoft Word 2003
В Microsoft Word 2003 поиск нужного фрагмента текста происходит тоже в отдельном окне, только вызывается оно по-другому и имеет немного переработанный интерфейс. Однако основные функции, которые имеются в ранее рассмотренных программах, здесь тоже имеются. Чтобы развернуть окно поиска, необходимо в верхней части программы раскрыть меню «Правка» и в нем кликнуть по пункту «Найти».

В поле «Найти» следует указать запрос. Он может быть любым, важно только соответствие тексту, в котором будет производиться поиск, иначе дальнейшие действия не будут иметь смысла. После этого нажмите «Найти далее», чтобы запустить процесс. Результатом станет появление выделения в основном документе.
Обратите внимание! Если необходимо осуществить поиск в определенной части текста, сначала потребуется выделить нужный фрагмент, только после этого нажимать по кнопке «Найти далее».
Когда все совпадения с введенным запросом будут отображены, при следующем нажатии на кнопку появится соответствующее уведомление. Для повторного проведения операции кликните «Да». Чтобы закрыть окно, выберите ответ «Нет».
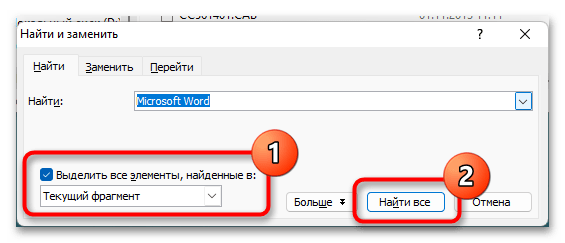
Также есть возможность подсветить искомое слово сразу во всем документе или в определенной его части (во втором случае предварительно выделите интересующий фрагмент). Для этого установите отметку напротив параметра «Выделить все элементы, найденные в» и в выпадающем списке, находящемся ниже, выберите область поиска — «Текущий фрагмент» или «Основной документ». Останется только нажать по кнопке «Найти все», чтобы обнаруженные совпадения тут же отобразились.
Примечание! В отличие от поздних версий текстового редактора, в Microsoft Word 2003 отсутствует возможность выделения текста при чтении, которая рассматривалась ранее в статье.
Вариант 4: Microsoft Word Online
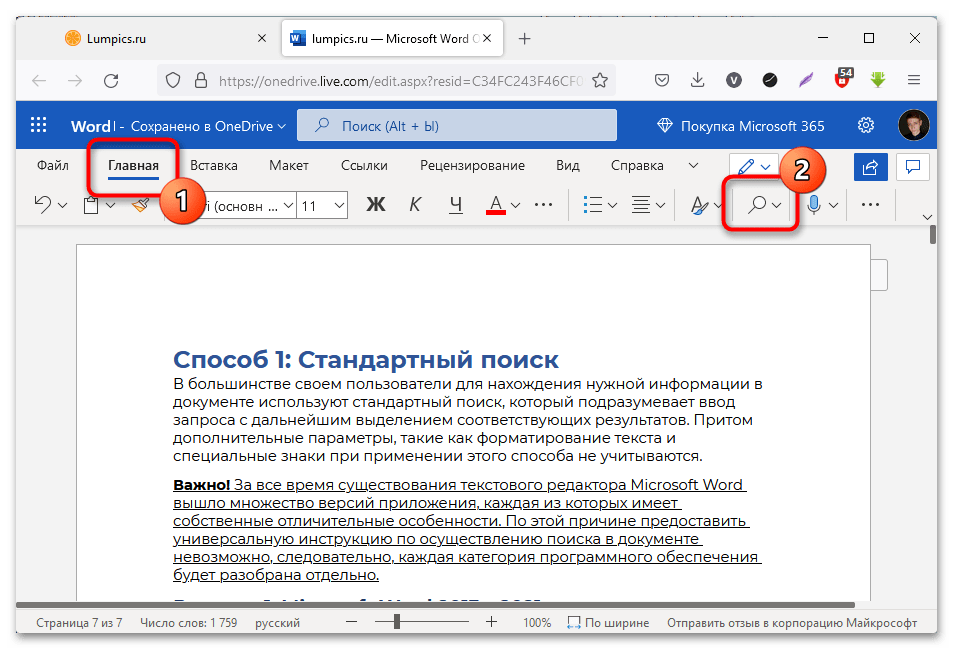
Последняя нерассмотренная реализация текстового процессора — это онлайн-версия, интегрированная в сервис облачного хранения данных OneDrive от Microsoft. Поиск в ней осуществляется через всплывающее боковое меню, как это реализовано в последних релизах десктопных программ. Чтобы его вызвать, находясь во вкладке «Главная», кликните на панели инструментов по кнопке «Найти», выполненной в виде лупы.
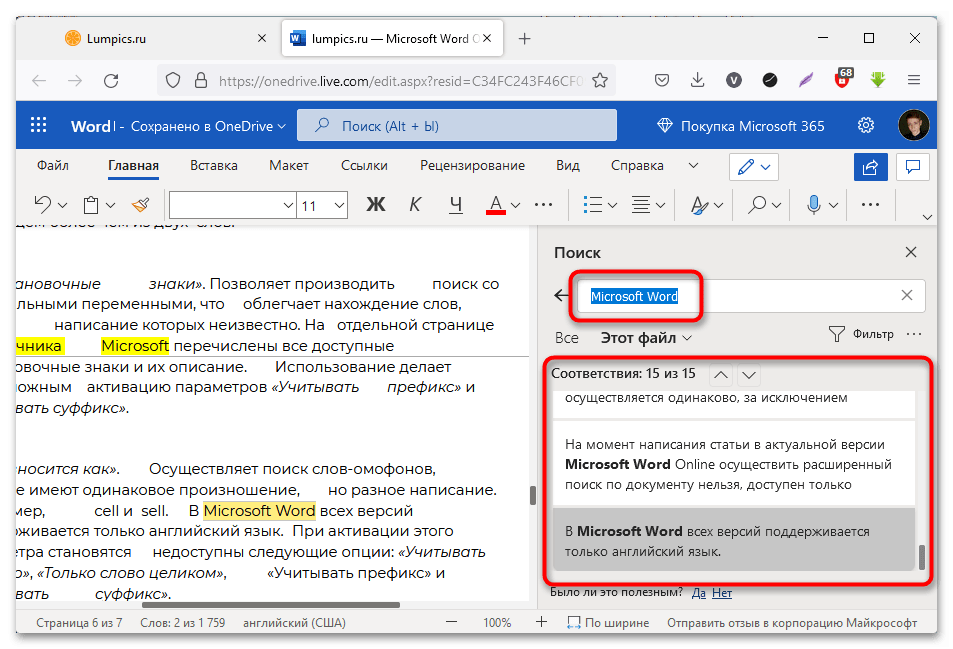
Появится боковая панель, в которой нужно ввести в поле «Поиск» свой запрос. Проследите также за тем, чтобы чуть ниже из выпадающего списка было выбрано значение «Этот файл», если необходимо осуществлять поиск в рабочем документе. После выполнения предварительных настроек нажмите по клавише Enter. В документе подсветятся все найденные результаты, а на боковой панели в основной ее части отобразятся предложения, включающие введенный ранее запрос.
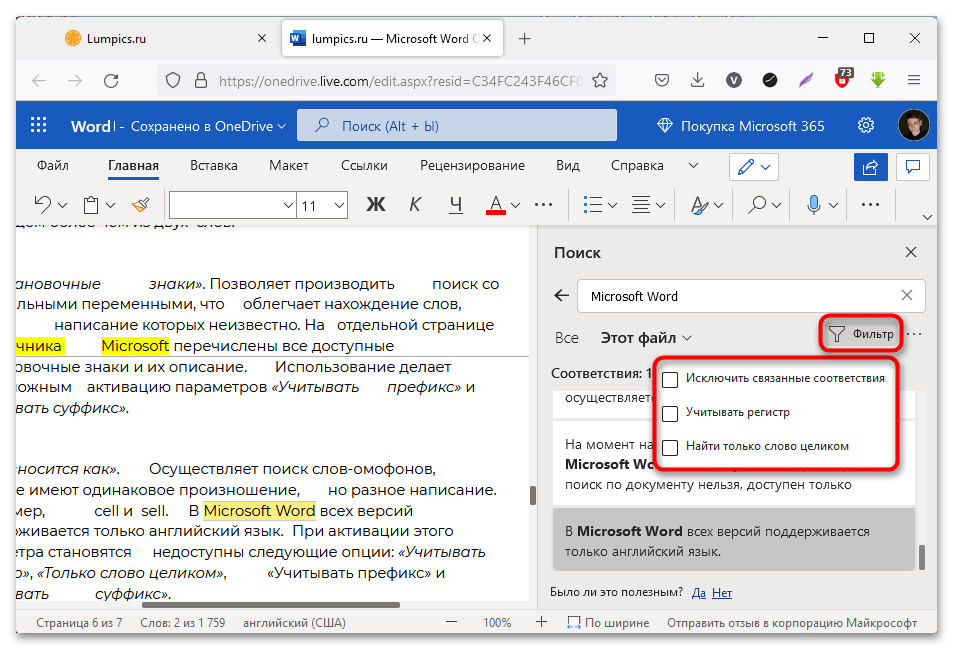
Дополнительно можно установить фильтр, который отсеет ненужные результаты. Для этого кликните по одноименной кнопке, месторасположение которой показано на изображении ниже. В появившемся контекстном меню предлагается три параметра:
- «Исключить связанные соответствия». Не осуществляет поиск слов или словосочетаний, которые являются результатом связи отдельных объектов текста. Например, автоматически созданные заголовки или ссылки.
- «Учитывать регистр». При поиске проверяется точное соответствие регистра, то есть строчные и прописные буквы.
- «Найти только слово целиком». Не выделяет слова в документе, если только их часть соответствует предмету поиска. Например, при запросе «это» слово «этот» не будет выделено.
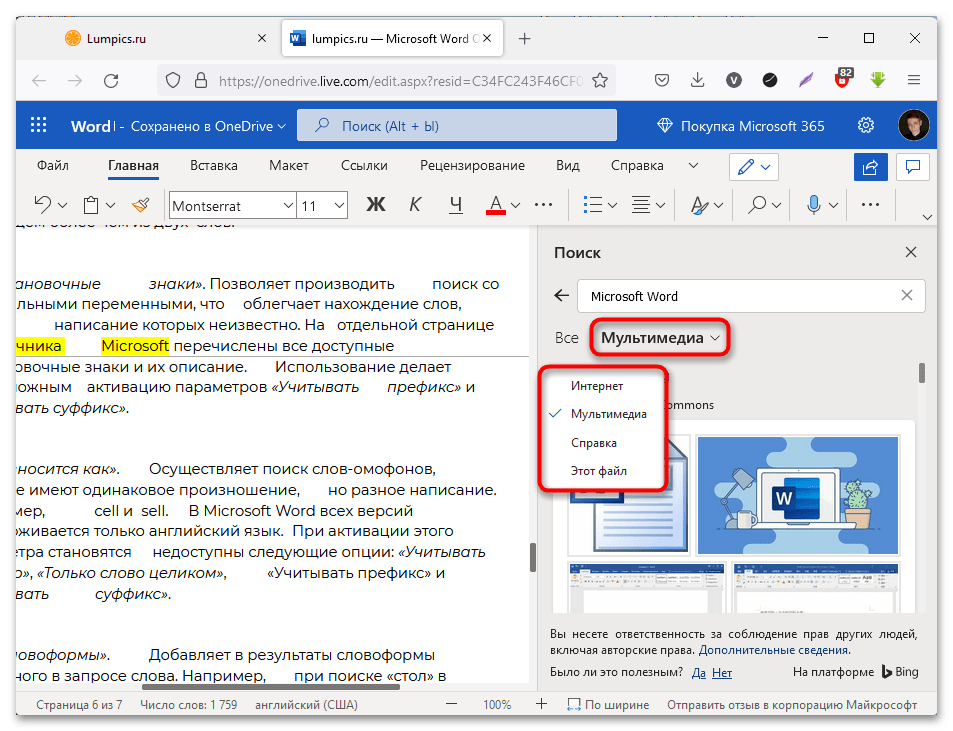
Также онлайн-версия Microsoft Word позволяет осуществлять поиск за пределами документа. Для этого в соответствующем выпадающем списке, который показан на изображении ниже, необходимо предварительно выбрать место:
- «Интернет». Отправляет запрос поисковой системе Bing и предоставляет ссылки на сторонние ресурсы.
- «Мультимедиа». Отображает подборку изображений в сервисе Bing, найденных по введенному запросу.
- «Справка». Обращается к справочным материалам, которые содержат информацию касательно работы Microsoft Word Online.
Читайте также: Поиск и замена слов в Microsoft Word
Способ 2: Расширенный поиск
Расширенный поиск, в отличие от стандартного, позволяет находить интересующую в документе информацию с учетом множества дополнительных параметров, например, учитывая при проверке регистр символов, подстановочные знаки и даже произношение слов. Важным является тот факт, что в каждой версии Microsoft Word расширенный поиск осуществляется одинаково, за исключением отсутствия некоторых настроек в ранних релизах. Поэтому далее будет представлена общая инструкция по выполнению поставленной задачи.
Примечание! На момент написания статьи в актуальной версии Microsoft Word Online осуществить расширенный поиск по документу нельзя, доступен только стандартный режим, который был описан выше.
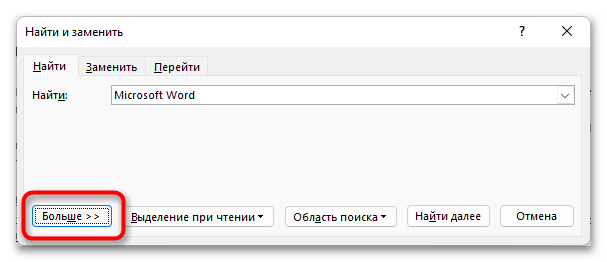
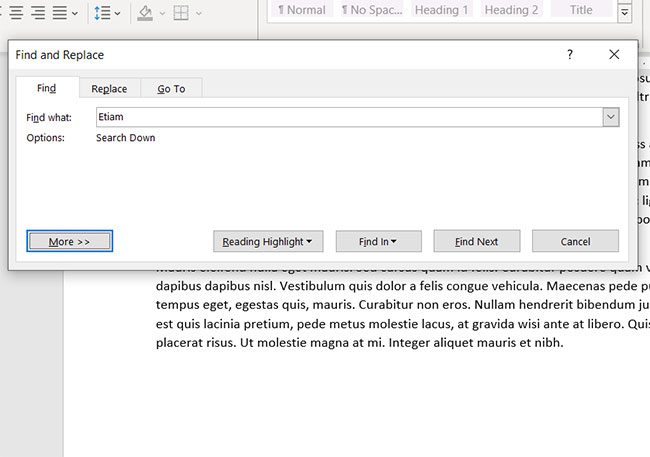
Прежде всего необходимо открыть расширенный поиск. Делается это непосредственно в окне «Найти и заменить». Находясь в нужном меню, щелкните по кнопке «Больше», чтобы развернуть весь список параметров.
Основная логика выполнения поисковых запросов в расширенном режиме остается прежней — необходимо нажимать по кнопке «Найти далее», «Область поиска» или «Выделение при чтении». Но теперь есть возможность добавлять дополнительные параметры, которые помогут более точно сформулировать запрос. Далее каждый из них будет рассмотрен подробно:

- «Направление». Есть три режима — «Вперед», «Назад» и «Везде». Параметр отвечает за направление поиска относительно установленного на странице документа курсора. Режим «Везде» всегда начинает анализ текста с самого начала.
- «Учитывать регистр». Позволяет находить слова и словосочетания с четко заданным размером символа, то есть учитываются прописные и строчные буквы.
- «Только слово целиком». Исключает из результата слова, в которые входит только часть запроса. Так, слово «стол» не будет выделено при запросе «сто». Работает только при вводе одного слова в поисковую строку.
- «Подстановочные знаки». Позволяет производить поиск со специальными переменными, что облегчает нахождение слов, точное написание которых неизвестно. На отдельной странице справочника Microsoft перечислены все доступные постановочные знаки и их описание. Использование делает невозможным активацию параметров «Учитывать префикс» и «Учитывать суффикс».
- «Произносится как». Осуществляет поиск слов-омофонов, которые имеют одинаковое произношение, но разное написание. К примеру, cell и sell. В Microsoft Word всех версий поддерживается только английский язык. При активации этого параметра становятся недоступны следующие опции: «Учитывать регистр», «Только слово целиком», «Учитывать префикс» и «Учитывать суффикс».
- «Все словоформы». Добавляет в результаты словоформы указанного в запросе слова. Например, при поиске «стол» в документе будут выделяться слова «столом», «столами», «столы» и так далее. Плохо работает с русским языком. Делает невозможным использованием параметров «Учитывать регистр», «Только слово целиком», «Учитывать префикс» и «Учитывать суффикс».
- «Учитывать префикс» и «Учитывать суффикс». Объединены в одну группу из-за идентичного метода применения. Требуют в запросе указания приставки или суффикса слова. Выполняют поиск с учетом этого параметра. Не могут использоваться одновременно.
- «Не учитывать знаки препинания». Выполняет поиск словосочетаний, даже ели они разбиты пунктуационными знаками. Удобно при необходимости найти длинные предложения.
- «Не учитывает пробелы». Производит поиск словосочетаний без учета пробелов. Хорошо работает в связке с предыдущей опцией.
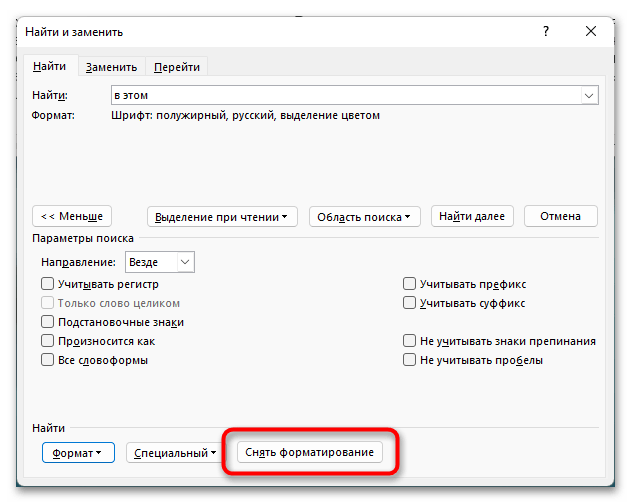
Также можно добавить в поиск дополнительные параметры, которые будут учитывать форматирование текста или невидимые символы. Эти фильтры расположены в блоке «Найти», в нижней части окна.

Нажатие по кнопке «Формат» откроет дополнительное меню, в котором можно выбрать тип форматирования: «Шрифт», «Абзац», «Табуляция», «Язык», «Рамка», «Стиль» и «Выделение цветом». После выбора любого из перечисленных пунктов откроется новое окно, в котором необходимо будет задать параметры. Например, начертание текста (курсив, полужирное), его размер, междустрочный интервал абзаца и т. д. При этом каждый указанный параметр будет отображаться под полем для ввода поискового запроса.

Обратите внимание! Чтобы убрать все выбранные параметры форматирования, достаточно нажать по соответствующей кнопке в нижней части окна.
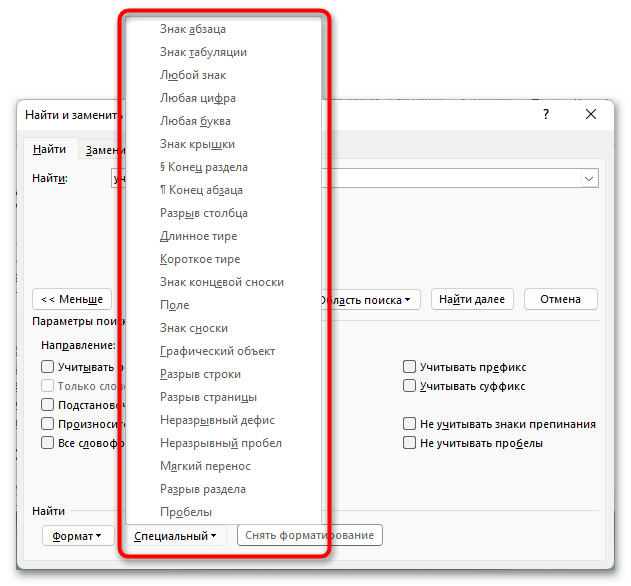
Кнопка «Специальный» открывает меню с условными знаками форматирования текста, такими как абзац, табуляция, неразрывный пробел и им подобные. Удобно использовать для поиска определенных участков объемного текста, например, разделенного длинным тире или разрывом страницы. Так, запрос «учитываются.^pВажно!» (без кавычек) найдет два абзаца текста, первый из которых заканчивается на слово «учитываются», а второй начинается со слова «Важно».
Читайте также: Невидимые знаки форматирования в Microsoft Word
Обратите внимание! Практически все перечисленные параметры расширенного поиска можно комбинировать между собой, что позволяет сформулировать более точный запрос для нахождения определенного участка текста в документе.
- When you learn how to search for a word in Microsoft Word, you will be learning how to use the Find tool. However, there is also an Advanced Find feature that lets you customize your search further, and there is a Find and Replace tool that lets you replace instances of words and phrases.
- Aside from the method below that we use to search for a word in a Word document, you can also use a keyboard shortcut to launch the Find tool. Simply press Ctrl + F on your keyboard to launch it.
- The Find tool lets you search for whole words, phrases, or even letters. You can use it to find what you are looking for in your document, regardless of how much or how little of the information you enter into the search field.
Microsoft Word’s search tools come in a couple of different varieties. The basic search lets you locate specific words or phrases in your document, while the Advanced Find tool lets you do things like match case, use wildcards, and generally find text in most of the ways that you might consider.
You can search for certain words in Microsoft Word by clicking the Home tab, selecting the Find button, then typing your search term into the “Search” field.
This will then highlight each instance of the word that appears in the document, and you can click each of the search results in the Navigation column to jump to the occurrence of that word in your document.
But if you are trying to figure out how to search for a word in Microsoft Word, then you might be struggling to locate the correct tool. Our guide below will show you how to use the search tool in your Word file.
How to Search a Word Document
- Open the Word document.
- Select the Home tab at the top of the window.
- Click the Find button in the Editing group of the ribbon.
- Enter your search term into the search box, then click a result to go to that point in the document.
Our guide continues below with additional information on how to find a word in a document, including pictures of these steps.
How to Search for a Word in a Microsoft Word Document (Guide with Pictures)
The steps in this article were performed in Microsoft Word for Office 365, but will also work in other versions of Word, such as Word 2016 or Word 2019.
As mentioned earlier, you can also open the search tool by pressing Ctrl+F on your keyboard.
Step 1: Open your document in Microsoft Word.
Step 2: Click the Home tab above the ribbon at the top of the window.
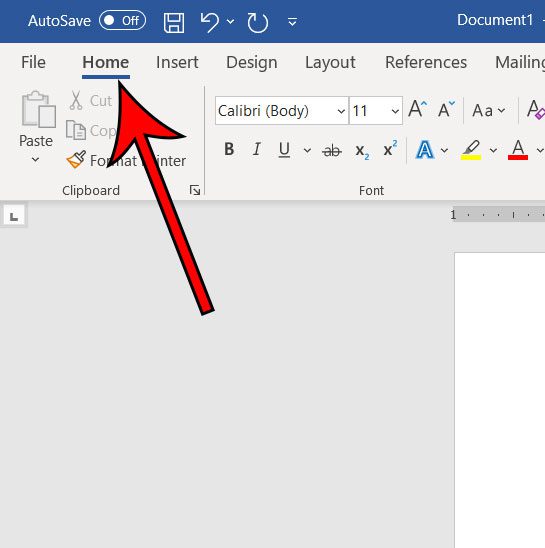
Step 3: Click the Find button in the Editing section of the ribbon.
Note that there are down arrows to the right of the Find button and the Select button in that section that you can use for other options. For example, there’s an Advanced Find option on the Find drop down menu that you can use for additional search options to locate a particular word or words in the document.

Step 4: Type your search term into the search box in the Navigation pane on the left side of the window.
Results containing your search term will appear in the column. You can then click a search result to be taken to its location in the document.
The up and down arrows under the search field will allow you to quickly move between the different results.
Additional Information on How to Search for a Word in a Microsoft Word Document
- Other applications, including Microsoft Excel, can also take advantage of the Ctrl + F keyboard shortcut for finding information.
- If you have used older versions of Microsoft Word, then you might be used to the dialog box that previously appeared when you tried to search for a word. The Navigation pane has replaced the basic search tool, but that dialog box will still appear if you select the Advanced Find option from the dropdown menu.
- The search function in MS Word also displays a magnifying glass at the right end of the search box. If you click that magnifying glass you will see a menu with additional ways to search for words or other items in the document.
- The Find and Replace dialog box also has a “Replace” tab at the top of the window. If you select that tab you will be able to enter the existing word that you want to replace, then enter the word that you want to use to replace it.
- Once the Find and Replace dialog box appears and you start using that to search through Word documents, it’s possible that you will find that to be a better way to search through an entire document and customize what Word replaces. Fortunately this is a similar search function that exists in other Microsoft office applications so you will be able to use it and its advanced options for searching while you look through spreadsheets and slideshows.
Find out how to remove page numbers in Microsoft Word if you have a document that contains page numbers that you either don’t want or don’t need.
Additional Sources

Matthew Burleigh has been writing tech tutorials since 2008. His writing has appeared on dozens of different websites and been read over 50 million times.
After receiving his Bachelor’s and Master’s degrees in Computer Science he spent several years working in IT management for small businesses. However, he now works full time writing content online and creating websites.
His main writing topics include iPhones, Microsoft Office, Google Apps, Android, and Photoshop, but he has also written about many other tech topics as well.
Read his full bio here.
Usually, you can use Ctrl/Command + F
Updated on February 9, 2021
What to Know
- Web page: press Ctrl+F (Windows and Linux) or Command+F (Mac). Enter search term and press Enter.
- Use the Mac Menu Bar to search by selecting Edit > Find in This Page (or Find).
- Type site followed by a colon, a website’s URL, and a search term in a browser address bar.
When you want to find something specific on a web page, you can search for it. This article explains how to search for a word using either the Find Word function found in most major web browsers or a search engine such as Google.
How to Search For a Word Using Command/Ctrl+F
The simplest way to find a word on a page is to use the Find Word function. It is available in the major web browsers, including Chrome, Microsoft Edge, Safari, and Opera.
Here’s the keyboard shortcut method:
-
When you’re on the web page, press Ctrl+F in Windows and Linux. Press Command+F on a Mac.
-
Type the word (or phrase) you want to find.
-
Press Enter.
-
The web page scrolls to the nearest occurrence of the word. If the word occurs more than once on the web page you’re searching, press Enter to go to the next occurrence. Or, select the arrows on the right (or left) side of the Find Word window.
How to Search for a Word With the Mac Menu Bar
Another way to search web pages is to use a relevant menu bar. On a Mac, use the following process, regardless of the browser you use. Use this process when using either Safari or Opera.
How to Search for a Word on Mac
-
Go to the menu bar at the top of the page, then select Edit.
-
Choose Find in This Page. Some browsers may have the option Find.
-
Depending on the browser you use, you may have to take four steps rather than three. For example, with Google Chrome, hover the mouse cursor over Find, then select Find.
How to Search For a Word Using the Browser Controls
If you use a Windows PC or Linux, or if you want to use the web browser rather than the operating system, here’s what you do for each major browser (excluding Safari and Opera).
These instructions should work for the corresponding mobile browsers as well.
For Google Chrome, Mozilla Firefox, and Microsoft Edge:
-
Select the More icon (it’s located in the upper-right corner of the browser window).
-
Choose Find or Find in This Page.
-
Type your search term and press Enter.
How to Search for a Word Using Google
If you don’t know the specific page on which a desired word or phrase could be located, use Google to search for a certain word or phrase, and target the site you want to find it in. Google has special characters and features to narrow and control your search.
-
Go to Google or use the browser’s search function if it’s configured to use Google as its search engine.
-
Type site followed by a colon ( : ) and the name of the website you want to search. It should look like this:
site:lifewire.com
-
After that, leave a space and enter the search terms. Altogether, it should be something like this:
site:lifewire.com Android apps
-
Press Enter to display the search results.
-
The search results come from the website that you entered.
-
To narrow your search results further, enclose the search terms in quotation marks, which makes the search engine look for that exact phrase.
Thanks for letting us know!
Get the Latest Tech News Delivered Every Day
Subscribe

Microsoft Word provides a feature that allows you to search for text within a document. You can also use advanced settings to make your search more specific, such as case matching or ignoring punctuation. Here’s how to use it.
Finding Text in a Word Doc
To search for text in Word, you’ll need to access the “Navigation” pane. You can do so by selecting “Find” in the “Editing” group of the “Home” tab.

An alternative method to accessing this pane is by using the Ctrl + F shortcut key on Windows or Command + F on Mac.
RELATED: How to Search for Text Inside of Any File Using Windows Search
With the “Navigation” pane open, enter the text you want to find. The number of instances that text appears throughout the document will be displayed.
You can navigate through the search results by selecting the up and down arrows located beneath the search box or by clicking directly on the result snippet in the navigation pane.
Setting Advanced Search Features
The caveat with the basic search function is that it doesn’t take into account many things such, as the case of the letters in the text. This is a problem if you’re searching a document that contains a lot of content, such as a book or thesis.
You can fine-tune these details by going to the “Editing” group of the “Home” tab, selecting the arrow next to “Find,” and selecting “Advanced Find” from the drop-down list.
The “Find and Replace” window will appear. Select “More.”
In the “Search Options” group, check the box next to the options you want to enable.
Now, the next time you search for text in Word, the search will work with the selected advanced options.
RELATED: Microsoft Word: Document Formatting Essentials
READ NEXT
- › How to Search in Google Docs
- › How to Highlight Text in Microsoft Word
- › Why Your Phone Charging Cable Needs a USB Condom
- › This 64 GB Flash Drive From Samsung Is Just $8 Right Now
- › How to Install Unsupported Versions of macOS on Your Mac
- › Microsoft Outlook Is Adding a Splash of Personalization
- › The Best Steam Deck Docks of 2023
- › Liquid Metal vs. Thermal Paste: Is Liquid Metal Better?
How-To Geek is where you turn when you want experts to explain technology. Since we launched in 2006, our articles have been read billions of times. Want to know more?