
Word for Microsoft 365 Word for Microsoft 365 for Mac Word 2021 Word 2021 for Mac Word 2019 Word 2019 for Mac Word 2016 Word 2016 for Mac Word 2013 Word 2010 Word for Mac 2011 More…Less
A text box is an object you can add to your document that lets you put and type text anywhere in your file. Text boxes can be useful for drawing attention to specific text and can also be helpful when you need to move text around in your document.
Add a text box
-
Place cursor where you want the text box to appear.
-
Go to Insert and in Illustrations select Drawing.
-
Select Text Box and use your cursor to create the text box.
-
Insert text in box and apply any styling needed.
-
Select Save andClose.
If you aren’t using a mouse
-
Press Alt + Period (.) and then press N.
-
Then press D to select drawings.
-
Press Alt + Period (.) and then press N.
-
Type the text that you want.
-
Press the Esc key 3 times.
-
Press Enter to save textbox.
Notes:
-
To format the text in the text box, select the text, and then use the formatting options in the Font group on the Home tab.
-
To format the text box itself, use the commands on the Shape Format contextual tab that appears when you select a text box.
-
To position the text box, select it, and then when the pointer becomes a
 four-headed arrow, drag the text box to a new location.
 -
You can also change or remove a border from a text box or shape.
-
If you have multiple text boxes, you can link them together so that text will flow from one box to another. Select one of the text boxes and on the Shape Format tab, select Create Link.
-
 four-headed arrow, drag the text box to a new location.
Editing in a text box
-
Double click the textbox.
-
In Drawing (Preview), select the textbox to place your cursor and edit text.
-
When finished select Save and Close to view updated text box.
Copy a text box
-
Select the border of the text box that you want to copy.
-
Press Ctrl+C.
Note: Make sure the pointer is on the border of the text box, not inside it. If the pointer is inside, pressing Ctrl+C will copy the text, not the text box.
-
Select a location and press Ctrl+V to paste the text box.
Delete a text box
-
Select the border of the text box that you want to delete, and then press Delete.
Note: Make sure the pointer is on the border of the text box and not inside it. If the pointer is inside the box, pressing Delete will delete the text inside the text box, not the box.
Add a text box
-
Go to Insert > Text Box, and then select Draw Text Box.
-
Click or tap in the document, and drag to draw the text box the size that you want.
-
To add text to a text box, select inside the text box, and then type or paste text.
Notes:
-
To format the text in the text box, select the text, and then use the formatting options in the Font group on the Home tab.
-
To format the text box itself, use the commands on the Format contextual tab, which appears under Drawing Tools when you select a text box.
-
To position the text box, select it, and then when the pointer becomes a
, drag the text box to a new location. -
You can also change or remove a border from a text box or shape.
-
If you have multiple text boxes, you can link them together so that text will flow from one box to another. Select one of the text boxes and on the Format tab, under Drawing Tools, and then select Create Link.
-
Copy a text box
-
Select the border of the text box that you want to copy.
-
Go to Home > Copy
.Make sure that the pointer is not inside the text box, but rather on the border of the text box. If the pointer is not on the border, pressing Copy will copy the text inside the text box and not the text box.
-
Go to Home and select Paste.
 .
.
Delete a text box
-
Select the border of the text box and then press DELETE.
Make sure that the pointer is not inside the text box, but rather on the border of the text box. If the pointer is not on the border, pressing DELETE will delete the text inside the text box instead.
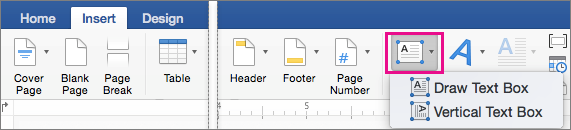
Add a text box
-
Go to Insert > Text Box and then select either Draw Text Box (where the text aligns horizontally on the page) or Vertical Text Box (where the text aligns vertically on the page).
-
Select in the document, and then drag to draw the text box the size that you want.
-
To add text to a text box, click or tap inside the text box, and then type or paste text.
-
To format the text in the text box, select it, and then Control + Click the text and select Font.
-
To add different effects to the text box, select the text box, and use the options on the Shape Format tab (such as changing the text direction or aligning the text at the top, middle or bottom of the text box).
-
To position the text box, select and hold it, and then when the pointer becomes a
, drag the text box to a new location.
-
Note: If you have drawn multiple text boxes, you can link them together so that text will flow from one box to another. You can only link an empty text box to the one that you’ve selected. To do this, select the text box that you want to link to another text box, and then go to Shape Format > Create Link.
Copy a text box
-
Select the text box you want to copy.
Make sure that the pointer is on the border of the text box and not inside the text box. If the pointer is not on the border, the text inside the text box is copied.
-
Press Control + Click, and then select Copy. Or, press
+ C. -
Select the location in your document where you want to paste the text box, press Control + Click, and then select Paste. Or, press
+ V.
 + C.
+ C.Remove a text box
-
Select the border of the text box that you want to delete, and then press DELETE.
Make sure that the pointer is on the border of the text box and not inside the text box. If the pointer is not on the border, pressing DELETE will delete the text inside the text box.
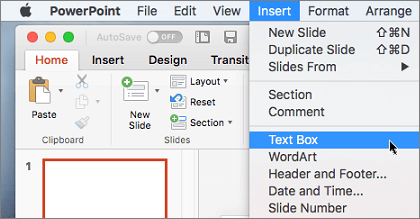
Add a text box
-
Go to Insert > Text Box.
-
Click in your file where you’d like to insert the text box, hold your mouse button down, then drag to draw the text box the size that you want.
-
After you’ve drawn the text box click inside it to add text.
Copy a text box
-
Select the text box you want to copy.
Make sure that the pointer is on the border of the text box and not inside the text box. If the pointer is not on the border, the text inside the text box is copied.
-
Press Control + Click, and then select Copy. Or, press
+ C. -
Select the location in your document where you want to paste the text box, press Control + Click, and then select Paste. Or, press
+ V.
Remove a text box
-
Select the border of the text box that you want to delete, and then press DELETE.
Make sure that the pointer is on the border of the text box and not inside the text box. If the pointer is not on the border, pressing DELETE will delete the text inside the text box.
Need more help?
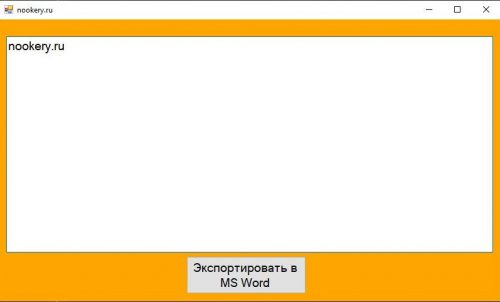
В этом примере мы узнаем, как экспортировать значение texbox в MS Word.
Шаг 1: Дизайн Формы. Добавить текстовое поле и кнопку .
Шаг 2: Измените свойство MultiLine элемента управления textBox.
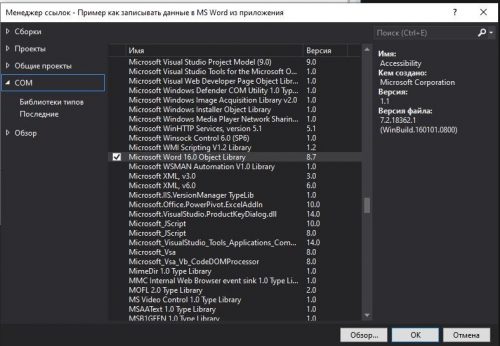
Шаг 3: Нажмите правой кнопкой в обозревателе решений Добавить>ссылка…, Выберите нужную из списка как изображено на скрине ниже.
Шаг 4: Исходный код программы.
|
1 2 3 4 5 6 7 8 9 10 11 12 13 14 15 16 17 18 19 20 21 22 23 24 25 26 27 28 29 30 31 32 33 34 35 36 37 |
using System; using System.Collections.Generic; using System.ComponentModel; using System.Data; using System.Drawing; using System.Linq; using System.Text; using System.Threading.Tasks; using System.Windows.Forms; using exportWord = Microsoft.Office.Interop.Word; namespace Пример_как_записывать_данные_в_MS_Word_из_приложения { public partial class Form1 : Form { public Form1() { InitializeComponent(); } private void Form1_Load(object sender, EventArgs e) { this.BackColor = Color.Orange; } private void button1_Click(object sender, EventArgs e) { exportWord.Application wordapp = new exportWord.Application(); wordapp.Visible = true; exportWord.Document worddoc; object wordobj = System.Reflection.Missing.Value; worddoc = wordapp.Documents.Add(ref wordobj); wordapp.Selection.TypeText(textBox1.Text); wordapp = null; } } } |
|
3 / 3 / 0 Регистрация: 18.05.2014 Сообщений: 140 |
|
|
1 |
|
|
13.05.2015, 14:21. Показов 4657. Ответов 7
Подскажите как сделать так, что бы при нажатии на button всё, что будет написано textBox’ы сохранялось в Word или текстовый документ? Спасибо!
0 |

|
Eugene13 31 / 31 / 28 Регистрация: 19.09.2013 Сообщений: 370 |
||||
|
13.05.2015, 14:44 |
2 |
|||
|
РешениеВ текстовый документ:
1 |
 Сообщение было отмечено Памирыч как решение
|
3 / 3 / 0 Регистрация: 18.05.2014 Сообщений: 140 |
|
|
13.05.2015, 15:42 [ТС] |
3 |
|
А как сохранение в вордовский документ сделать?
0 |
|
374 / 371 / 213 Регистрация: 29.03.2013 Сообщений: 867 |
|
|
13.05.2015, 16:11 |
4 |
|
1 |
|
31 / 31 / 28 Регистрация: 19.09.2013 Сообщений: 370 |
|
|
13.05.2015, 16:12 |
5 |
|
iskilz, с Word всё намного сложнее, всё-таки не просто текст. Тут вроде делали подобное, но я не знаком с этим)
1 |
|
36 / 36 / 15 Регистрация: 08.12.2014 Сообщений: 171 |
|
|
13.05.2015, 16:16 |
6 |
|
iskilz, Насколько критично использовать именно вордовские файлы? Doc или Docx? В первом случае используется вордовский com-компонент,( легко гуглится) но он тяжелый и плохо документированный. Во втором способе можете использовать Open XML,
1 |
|
3 / 3 / 0 Регистрация: 18.05.2014 Сообщений: 140 |
|
|
13.05.2015, 21:51 [ТС] |
7 |
|
чет не допер как с записать из нескольких текстбоксов в текстовый документ….
0 |
|
31 / 31 / 28 Регистрация: 19.09.2013 Сообщений: 370 |
|
|
14.05.2015, 08:17 |
8 |
|
iskilz, а как именно? Добавить содержание второго к первому?
1 |
- Remove From My Forums
-
Question
-
Hi,
I have an application binded to a database. I got Name, Age, Email likewise five textboxes binded and i am using first, next, previous and last buttons to browse the table. Now i woudl like to add a button-
«Export to Msword» which will help me to export thedata in the textboxes only and not the complete dataset to a word application. How can i do it?
Thank you in advance for the help.
by
satenova
Answers
-
I have an application binded to a database. I got Name, Age, Email likewise five textboxes binded and i am using first, next, previous and last buttons to browse the table. Now i woudl like to add a button-
«Export to Msword» which will help me toexport the data in the textboxes only and not the complete dataset to a word application. How can i do it?
Hi satenova,You can add some text into Word document and save it via Word Automation.Code sample: Insert a table with 1 row x 5 columns and fill it with data from five TextBoxes’ text.
Firstly you need to Add Reference COM component:
Microsoft Word x.xx Object Library to your project.
Imports Word = Microsoft.Office.Interop.Word Public Class Form1 Private Sub Button1_Click(ByVal sender As System.Object, ByVal e As System.EventArgs) Handles Button1.Click ‘ Create Word Application Dim oWord As Word.Application = CreateObject(«Word.Application») ‘ Open existing word document Dim oDoc As Word.Document = oWord.Documents.Open(«D:myfile.doc») Dim oTable As Word.Table oWord.Visible = True ‘Insert a table with 1 row x 5 columns and fill it with five TextBox.Text Dim r As Integer, c As Integer oTable = oDoc.Tables.Add(oDoc.Bookmarks.Item(«endofdoc»).Range, 3, 5) oTable.Range.ParagraphFormat.SpaceAfter = 6 oTable.Cell(1, 1).Range.Text = TextBox1.Text oTable.Cell(1, 2).Range.Text = TextBox2.Text oTable.Cell(1, 3).Range.Text = TextBox3.Text oTable.Cell(1, 4).Range.Text = TextBox4.Text oTable.Cell(1, 5).Range.Text = TextBox5.Text ‘ Save this word document oDoc.SaveAs(«D:myfile.doc», True) oDoc.Close() oWord.Application.Quit() End Sub End Class Trackback: How to using Word Automation to open word document and insert some text, finally save it.
http://forums.msdn.microsoft.com/en-US/vbgeneral/thread/eb953664-21d0-46c2-99b9-ea36a0336b8cTutorials: How to automate Word from Visual Basic .NET to create a new document
http://support.microsoft.com/kb/316383/Best regards,
Martin Xie-
Marked as answer by
Monday, November 17, 2008 10:58 AM
-
Marked as answer by
I’ve applied border, background and shadow styles etc. to a text box and would like to save this so I can use it for later use. How can I do this?
![]()
asked Apr 23, 2010 at 20:49
![]()
Create your text box, while the text box is selected, select the «insert» menu.
click on the arrow below insert «text box» button.
select «save to text box gallery».
A box will come up, select your choices (i didn’t change anything) and thats it.
When you want to insert your saved text box into a document,
select the «insert» menu
Click «Text box»
Scroll down, you will find it at the very bottom.
Regards
VJ
answered May 10, 2010 at 18:31
I think, that the way to do it, is that you create a template, and copy that textbox there. Then when creating document based to that template, your textbox with all its styles is available for use.
answered Apr 23, 2010 at 21:29
1
![]()
Written by Allen Wyatt (last updated August 29, 2020)
This tip applies to Word 2007, 2010, 2013, 2016, 2019, and Word in Microsoft 365
Angela has a document that has about 400 text boxes in it, and each text box contains text. She wonders if there is a way of removing the text boxes but leaving the text in the document.
This can be done manually by simply selecting the text in a textbox (being sure not to select the textbox itself), pressing Ctrl+C to copy the text, clicking where you want the text to go, pressing Ctrl+V, and then deleting the text box. This would, however, quickly get tedious when you are dealing with as many text boxes as Angela has.
In this case, it is best to rely on a macro to do the changes. The macro can run through all the text boxes rather quickly, doing the work that is necessary. The following is an example of such a macro:
Sub ConvertTextboxText()
    Dim shp As Shape
    Dim oRngAnchor As Range
    Dim sTemp As String
    Dim J As Long

    For J = ActiveDocument.Shapes.Count To 1 Step -1
        Set shp = ActiveDocument.Shapes(J)
        If shp.Type = msoTextBox Then
            sTemp = shp.TextFrame.TextRange.Text
            If Len(sTemp) > 1 Then
                Set oRngAnchor = shp.Anchor.Paragraphs(1).Range
                sTemp = Left(sTemp, Len(sTemp) - 1)
                oRngAnchor.InsertBefore "[[ " & sTemp & " ]]"
            End If
            shp.Delete
        End If
    Next J
End Sub
This macro works only with text boxes, ignoring any other shapes that may contain text. It starts at the last text box and works its way toward the beginning of the document. When done, all the text that used to be inside of the text boxes is inserted at the beginning of the paragraph to which the deleted text box was previously anchored.
In addition, that text is surrounded by [[ double brackets ]] so you can easily tell where the text is located. Since text boxes can sometimes be anchored a ways away from where they appear in the document, you will definitely want to search for these double-bracketed pieces of text and move them to where you want them finally located.
If you are looking for other ways to accomplish the same task, you might be interested in this web page:
https://www.datanumen.com/blogs/2-quick-methods-extract-texts-text-boxes-word-document/
If you would like to know how to use the macros described on this page (or on any other page on the WordTips sites), I’ve prepared a special page that includes helpful information. Click here to open that special page in a new browser tab.
WordTips is your source for cost-effective Microsoft Word training.
(Microsoft Word is the most popular word processing software in the world.)
This tip (7739) applies to Microsoft Word 2007, 2010, 2013, 2016, 2019, and Word in Microsoft 365.
Author Bio
With more than 50 non-fiction books and numerous magazine articles to his credit, Allen Wyatt is an internationally recognized author. He is president of Sharon Parq Associates, a computer and publishing services company. Learn more about Allen…
MORE FROM ALLEN
Viewing Footnotes
Adding footnotes to a document is essential for some types of writing. How you view those footnotes depends on the …
Discover More
Searching for Periods Not Followed by a Space
Most periods should be followed by at least one space. What if you think there may be some errors in how your post-period …
Discover More
Importing Based on a Partial File Name
A common task for macros is to open and process a file you want imported into your workbook. If you need to identify the …
Discover More
It sounds like you have to download Open Xml SDK.
Than you will be able to create a word documents from your asp page.
some tutorials:
http://msdn.microsoft.com/en-us/library/office/dd440953%28v=office.12%29.aspx
something like this:
    using (WordprocessingDocument package = WordprocessingDocument.Create(docName, WordprocessingDocumentType.Document))
  {
    // Add a new main document part.
    package.AddMainDocumentPart();

    // Create the Document DOM.
    package.MainDocumentPart.Document =
      new Document(
        new Body(
          new Paragraph(
            new Run(
              new Text("Hello World!")))));

    // Save changes to the main document part.
    package.MainDocumentPart.Document.Save();
  }
then you have to write the word document to the response stream.
something like this:
FileInfo file = new FileInfo(PathToExcelFile);
if (file.Exists)
{
   Response.Clear();
   Response.ClearHeaders();
   Response.ClearContent();
   Response.AddHeader("content-disposition", "attachment; filename=" + fileName);
   Response.AddHeader("Content-Type", "application/Excel");
   Response.ContentType = "application/vnd.xls";
   Response.AddHeader("Content-Length", file.Length.ToString());
   Response.WriteFile(file.FullName);
   Response.End();
}
else
{
   Response.Write("This file does not exist.");
}

This tutorial shows how to save tables and figures as images in Microsoft Word for the PC and in Word for Mac. These steps will also work for shapes and SmartArt.
Why Would You Want to Save Tables and Figures as Images?
You may want to repurpose your tables and figures (or shapes and SmartArt) as images on social media or on a website. In addition, you can insert the image files into different file types such as PowerPoint slides, Publisher files, or PDFs.
Quick Links:
- How to Save Tables and Figures as Images in Microsoft Word (PC)
- How to Save Tables and Figures as Images in Word for Mac
This tutorial is also available as a YouTube video showing all the steps in real time.
Watch more than 150 other writing-related software tutorials on my YouTube channel.
The images below are from Word for Microsoft 365 and Word for Microsoft 365 for Mac. These steps will also work in Word 2021, Word 2019, Word 2016, and Word 2013. However, your interface may look slightly different in those older versions of the software. These steps don’t apply to Word for the web.
Important Note: The following steps only save the table, figure, shape, or SmartArt as an image. These steps don’t save the corresponding title or caption added with Word’s title and caption tools. Therefore, be sure to copy that information separately if you will need it for future use.
- Right-click the table or figure and then select Save as Picture from the shortcut menu.

- Select the location where you want to save your image in the Save As Picture dialog box.

- (Optional) Type a new name into the File name text box.

- Select a file format from the Save as type drop-down menu:
-
- Portable Network Graphics (.png)
- JPEG File Interchange Format (.jpg)
- Graphics Interchange Format (.gif)
- Tag Image File Format (.tif)
- Windows Bitmap (.bmp)
- Scalable Vector Graphics (.svg) (Only available in Word for Microsoft 365 and Word 2021)
JPEG and PNG are the two most common file formats. There are compression differences between these formats, but for most users, the most important difference is the fact that PNGs have a transparent background, while JPEGs have a white background.

- Select the Save button.

Your table or figure should now be saved as an image in the location you chose in the Save As Picture dialog box.
How to Save Tables and Figures as Images in Word for Mac
- Control-click the table or figure and then select Save as Picture from the shortcut menu.

- (Optional) Type a new name into the Save As text box in the Save dialog box.

- Select the location where you want to save your image.

- Select a file type from the Save as Type drop-down menu:
-
- PNG
- JPEG
- GIF
- BMP
- SVG (Only available in Word for Microsoft 365 for Mac and Word 2021 for Mac)
Please see step 4 in the section above for a brief discussion about JPEGs and PNGs.

- Select the Save button.

Your table or figure should now be saved as an image in the location you chose in the Save dialog box.
Related Resources
How to Save Charts as Templates in Microsoft Word
How to Save Tables as Templates in Microsoft Word
How to Create and Update a List of Tables or Figures in Microsoft Word
How to Write Figure Captions for Graphs, Charts, Photos, Drawings, and Maps
How to Write Table Titles
Updated September 10, 2022
Achieve more control and flexibility with your documents
Updated on September 11, 2022
What to Know
- Select Insert > Text Box > choose a text box template. Select and drag box to the position you want.
- To resize text, select and drag circles around the edge. To rotate text, select and drag the circular arrow.
- Place the cursor inside the text box and type the information you want to appear.
This article explains how to use text boxes in Microsoft Word. Instructions apply to Word for Microsoft 365, Word 2019, Word 2016, and Word 2013.
How to Insert a Text Box in Word
Start by opening the document you want to add a text box to. Then follow the steps below.
-
On the ribbon, select Insert.
-
In the Text group, select Text Box, then choose a text box template.
-
The new text box appears in the middle of the text, and the Shape Format tab is automatically selected.
-
Select and drag the box to the position you want. To resize the text box, select and drag the circles around the edge. To rotate the text box, select and drag the circular arrow at the top of the box.
-
Place the cursor inside the text box and type the information you want to appear there.
Why Use Text Boxes?
When you type text in Microsoft Word, you have options for making it look a particular way on the page (such as changing the page margins), but those options are limited. Text boxes expand your formatting repertoire by offering additional control and flexibility for how your text appears. You can place a text box anywhere within a document and format it with different colors and fonts. This feature is especially helpful for creating a blockquote or a sidebar.
Customize a Text Box
After you create a text box, you can customize it in a number of ways.
-
To bring up options, place the cursor inside the text box and right-click. Choose an option and follow the screen prompts to add a border, change the style, or adjust the way the text box interacts with the other text on the page.
Alternatively, use the controls on the Shape Format tab.
-
To go directly to the Layout Options menu, select the text box, then select the Layout Options icon (it looks like a horseshoe and is located to the right of the text box).
-
Change the text, make more adjustments, or move the box to another location at any time. To delete a text box, select its border, then press Delete on the keyboard.
Thanks for letting us know!
Get the Latest Tech News Delivered Every Day
Subscribe