
![]()
Download Article
![]()
Download Article
Want to save a Word document as an image that you can easily share with others? It’s actually pretty simple—you’ll just need to save it as a PDF first, which is a format that’s easy to convert to PDF. This wikiHow will show you how to convert any Microsoft Word document into a JPEG image on your Windows PC or Mac.
-

1
Open the Word document. Double-click the document you want to convert into a JPEG. This will open the document in Microsoft Word.
-
2
Click File. It’s in the top-left corner of the Word window. A pop-out menu will appear.
Advertisement
-
3
Click Save As. This is in the pop-out menu on the left side of the page.
-
4
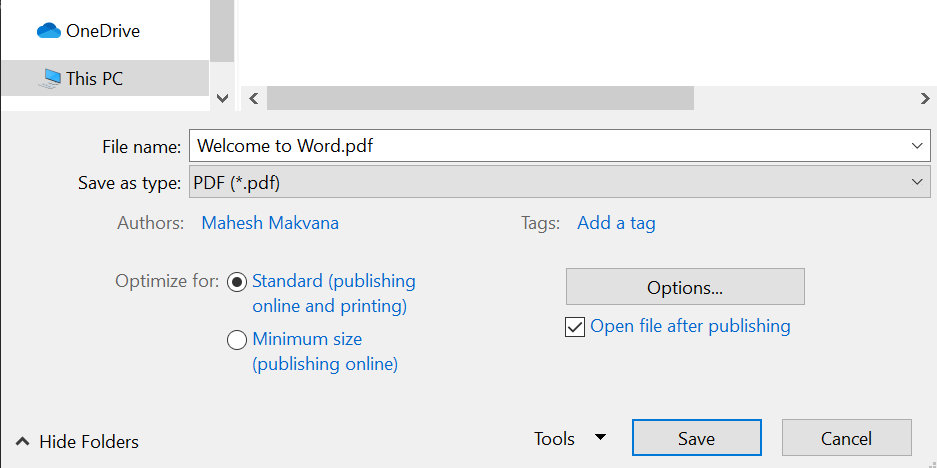
Double-click This PC. It’s in the middle of the page. Doing so opens a File Explorer window.
-
5
Select a save location. Click the folder in which you want to save your converted Word file on the left side of the window.
- For example, to save the file on the desktop, you would click Desktop.
-
6
Click the «Save as type» drop-down box. It’s at the bottom of the window. Doing so prompts a drop-down menu.
-
7
Click PDF. This is in the drop-down menu.
- You can’t convert a Word document directly to a JPEG file, but you can convert a PDF to a JPEG.
-
8
Click Save. It’s in the bottom-right corner of the window. Your Word file will be copied to a PDF file in your selected location.
-
9
Install the free PDF to JPEG converter. This app is free in the Microsoft Store:
- Open
, then type in store and click Microsoft Store at the top of the menu.
- Click Search.
- Type in pdf to jpeg, then press ↵ Enter.
- Click the black-and-white PDF to JPEG icon.
- Click Get in the upper-left side of the window.
- Open
-
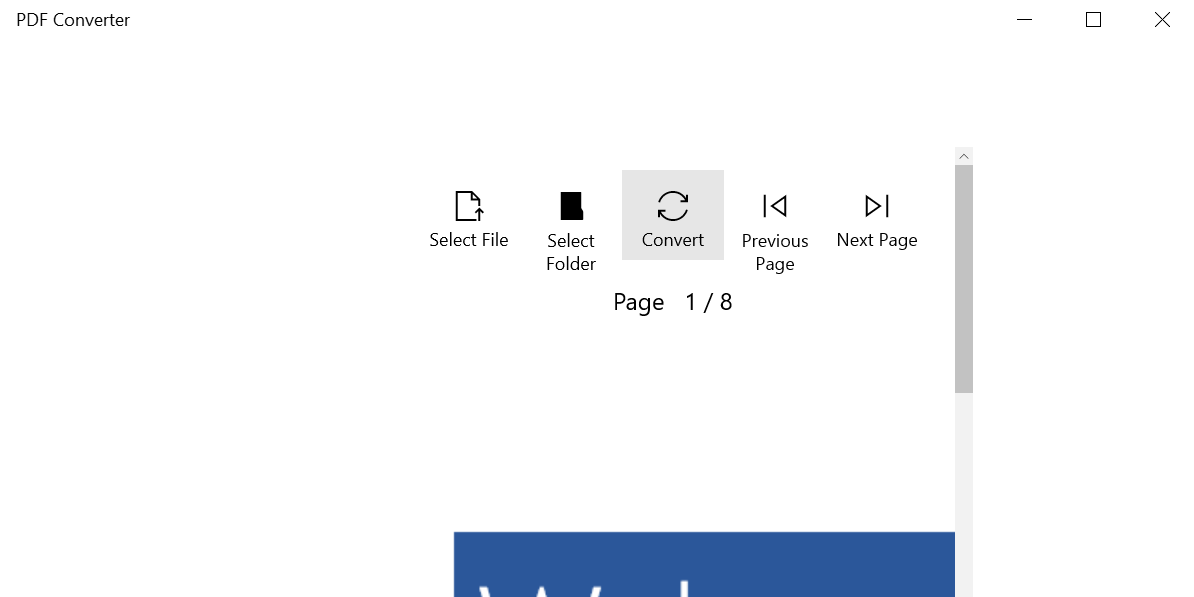
10
Open PDF to JPEG. Click Launch when prompted, or open Start
, type in pdf to jpeg, and click PDF to JPEG in the results.
-
11
Click Select File. It’s at the top of the window. Doing so opens a File Explorer window.
-
12
Open your PDF. Go to the location in which you saved your PDF and click the PDF file, then click Open in the bottom-right corner of the window. This will open the PDF in the PDF to JPEG converter.
-
13
Select a save location. Click Select Folder at the top of the converter window, then click the folder in which you want to save the converted JPEG file and click Select Folder in the bottom-right corner.
-
14
Click Convert. It’s at the top of the window. This will convert your PDF into a JPEG file and store it in your selected location.


Advertisement
-
1
Open the Word document. Double-click the document you want to convert into a JPEG. This will open the document in Microsoft Word.
-
2
Click File. It’s an option in the top-left corner of your Mac’s screen.
-
3
Click Save As. This option is near the top of the drop-down File menu.
-
4
Click the «Format» drop-down box. You’ll see this box toward the middle of the «Save As» window. A drop-down menu will appear.
-
5
Click PDF. It’s near the middle of the drop-down menu.
- While a DOC (Word) file isn’t directly convertible to a JPEG file, a PDF is.
-
6
Click Save. It’s a blue button in the bottom-right corner of the window. Your file has now been saved as a PDF; you’ll likely find it on the desktop.
-
7
Open the PDF file with Preview. To be able to save the PDF as a JPEG, you need to use the Preview application on the Mac because not all third-party PDF applications have this feature. To do this:
- Click once the PDF file.
- Click File at the top of the screen.
- Select Open With in the drop-down menu.
- Click Preview.
-
8
Click File. This option is in the top-left corner of the screen. A drop-down menu will appear.
-
9
Click Export. It’s toward the middle of the drop-down menu.
-
10
Click Format. This box is near the bottom of the «Export» page.
-
11
Click JPEG. Doing so will allow you to save the PDF version of your Word document as a JPEG file.
- You’ll see a slider appear below the Format box; clicking and dragging it right will increase your JPEG’s quality, while dragging it left will decrease the quality. This is helpful if you need to lower the image’s size (wherein you would lower the quality).
-
12
Click Save. It’s in the bottom-right corner of the screen. Your Word document is now preserved in JPEG format.


Advertisement
-
1
Open the Word-to-JPEG converter. Go to http://wordtojpeg.com/ in your computer’s web browser. This is a free website that can convert Word and PDF files into the JPEG format.
-
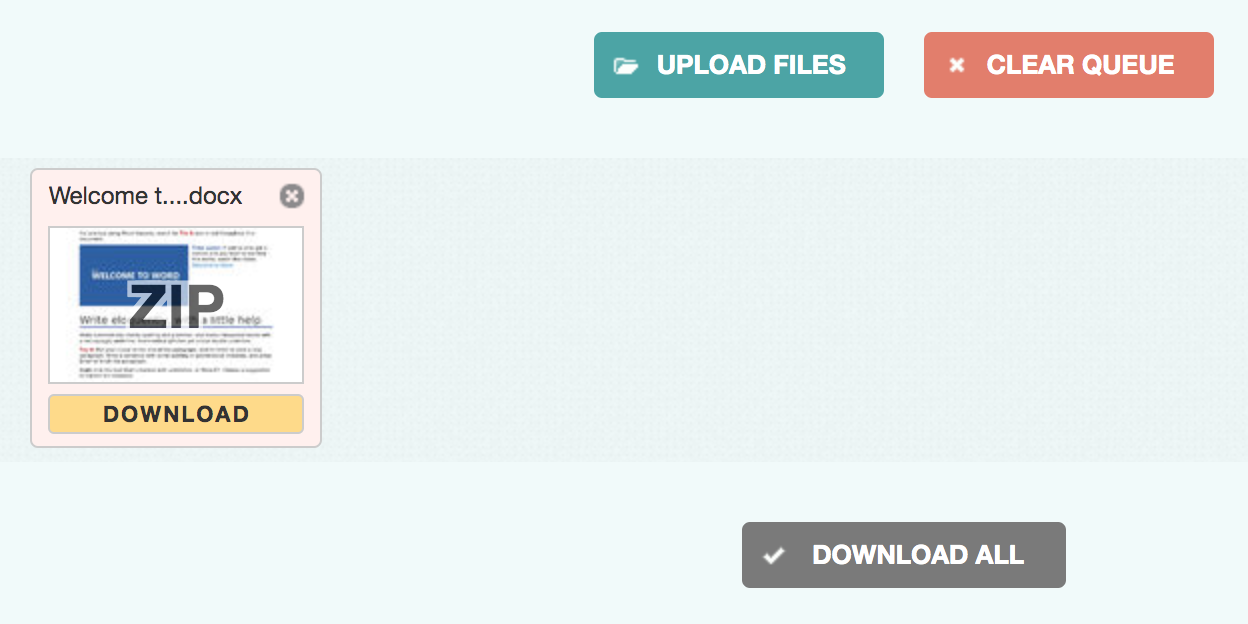
2
Click UPLOAD FILES. It’s the green button near the center of the page.
-
3
Select a Word document and click Open. A thumbnail of the file will appear below the “UPLOAD FILES” button.
- If your Word document contains more than one page, this tool will create a separate JPEG for each page.
-
4
Click DOWNLOAD. It’s at the bottom of the thumbnail. This downloads a ZIP folder containing the image to your computer.
- You may have to select a download location and click Save or OK.
-
5
Extract the ZIP folder you just downloaded. This will vary depending on whether you’re using a Windows computer or a Mac:
- Windows — Double-click the ZIP folder, click Extract at the top of the window, click Extract all, and click Extract all when prompted.
- Mac — Double-click the ZIP folder and wait for it to finish extracting.
-
6
Open your JPEG file. In the extracted folder, you should see one JPEG file for each page of the Word document you converted; double-clicking a JPEG file will open it in your computer’s default photo program.


Advertisement
Add New Question
-
Question
I already used the snipping tool and everything went well, except the lines under the words. How can I get rid of them?

If you mean the lines that indicate spelling or grammar errors, all you have to do is click «Review» in the top menu and select «Spelling and Grammar». Then click through, changing or ignoring the errors as you please. The lines should disappear as you fix everything.
-
Question
Can I change a multi-page Word document to a jpeg?
You can take screenshots of it on a Mac (Command + Shift+ «4») and it will turn into a png or a jpeg based on the settings on your computer.
Ask a Question
200 characters left
Include your email address to get a message when this question is answered.
Submit
Advertisement
-
If you have Word on your iPhone or Android, you can take a screenshot of the document to preserve it as a picture file.
-
Most sites that support JPEG will also support PNG (screenshot) files.
Thanks for submitting a tip for review!
Advertisement
-
If you choose to use an online converter, keep in mind that the service will be able to see the document, therefore you’ll want to avoid online converters if the document is sensitive.
-
Converting your document to a JPEG may cause your file to lose quality. This shouldn’t be an issue unless your Word document is largely visual, and even then you shouldn’t notice too much of a difference.
Advertisement
About This Article
Article SummaryX
1. Open the file in Word.
2. Click the File menu.
3. Click Save As.
4. Select a save location.
5. Select PDF from the «Save as type» menu.
6. Click Save.
7. Install PDF to JPEG from the Microsoft Store.
8. Use PDF to JPEG to covert the file.
Did this summary help you?
Thanks to all authors for creating a page that has been read 4,544,915 times.
Is this article up to date?
![]()
There might come a time when you’d rather share a Word document as an image that anyone can open. Unfortunately, you can’t export a document as a JPEG or JPG, but there are a few other simple solutions. Here are a few.
Convert a Single Page to JPEG
If you have a Word document that’s only a single page or if you want to capture only one specific page of a longer document, then you can use screenshot software such as Snip & Sketch for Windows or Mac’s Screenshot app.
RELATED: What’s the Difference Between JPG, PNG, and GIF?
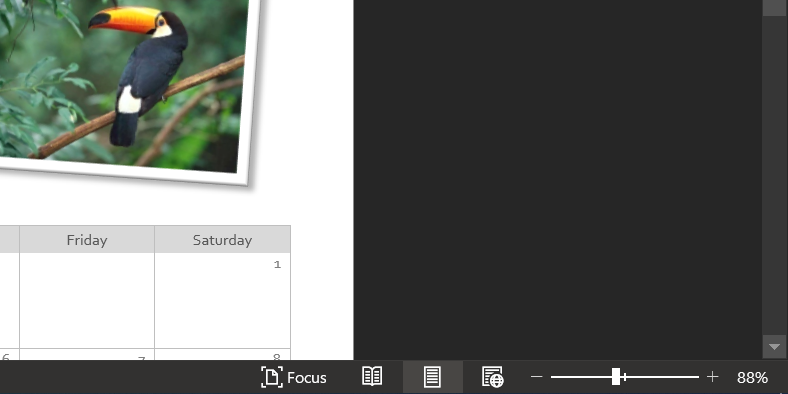
The first thing you’ll want to do is zoom out on your Word document so that the entire page is visible onscreen. You can do so by adjusting the zoom slider on the status bar toward the minus symbol. There’s no exact recommendation on percentage—just make sure the entire document is visible.
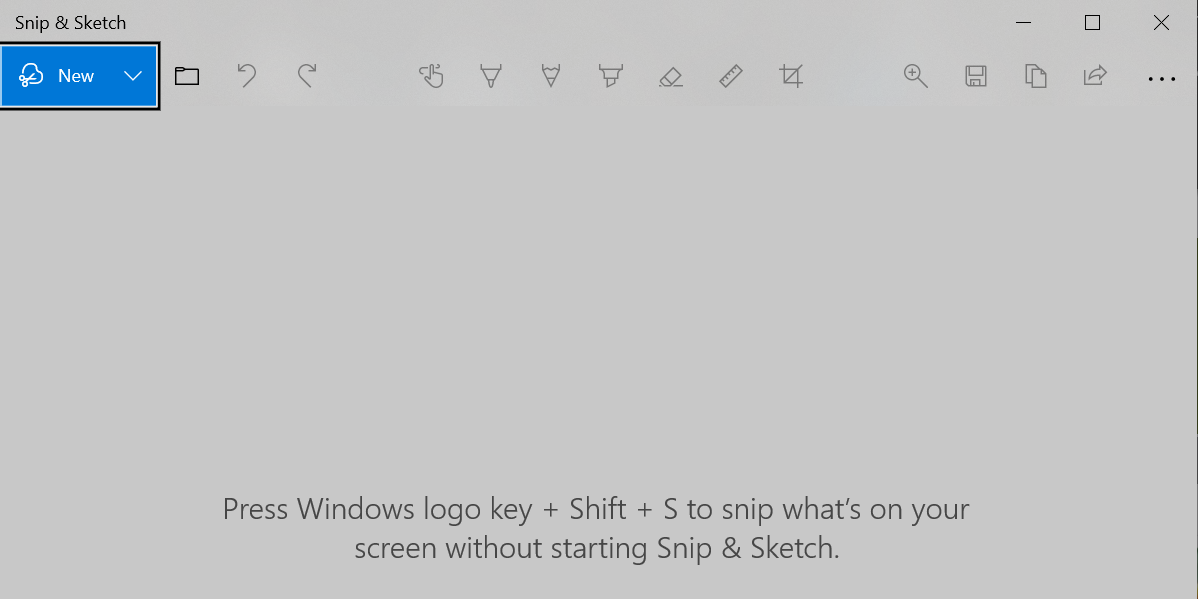
With the page fully visible, type “Snip & Sketch” in the Windows search bar. Open the Snip & Sketch Tool and then select “New” or press Cmd+Shift+4 on Mac to open the Screenshot app.

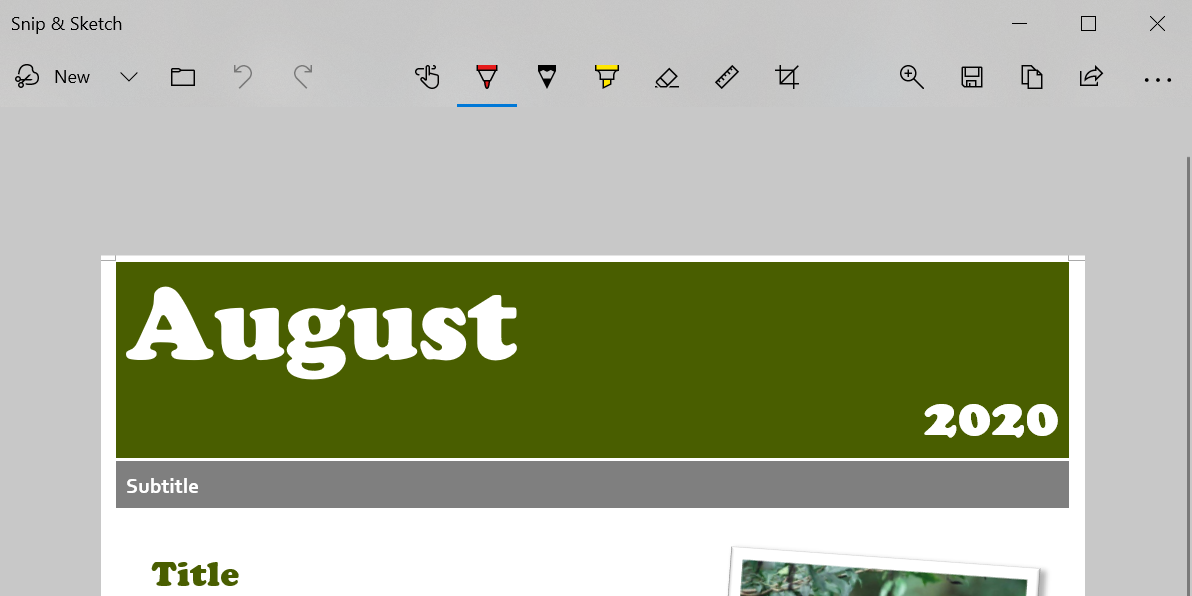
Crosshairs will appear on your screen. Click and drag the crosshairs to capture the entire page of the Word document.
Next, if you’re using Snip & Sketch on Windows, select the floppy disk icon to save the image. Mac users will select File > Export.
Give your image a name and select “JPEG” from the file type list. Finally, click “Save.”
Paste Text as a JPEG in Word on Windows
As we mentioned earlier, you can’t convert a document file directly to JPEG. However, you can highlight text in your Word doc, save it as a PNG photo, and convert it to JPEG.
RELATED: What Is a PDF File (and How Do I Open One)?
First, open the document you want to save as a JPEG in Word. Next, highlight and copy whatever text you’d like to save as an image. You can copy the selected text on Windows by pressing Ctrl+c on your keyboard or by right-clicking the text and clicking “Copy.”
From there, open a new document by going to File > New > Blank Document.
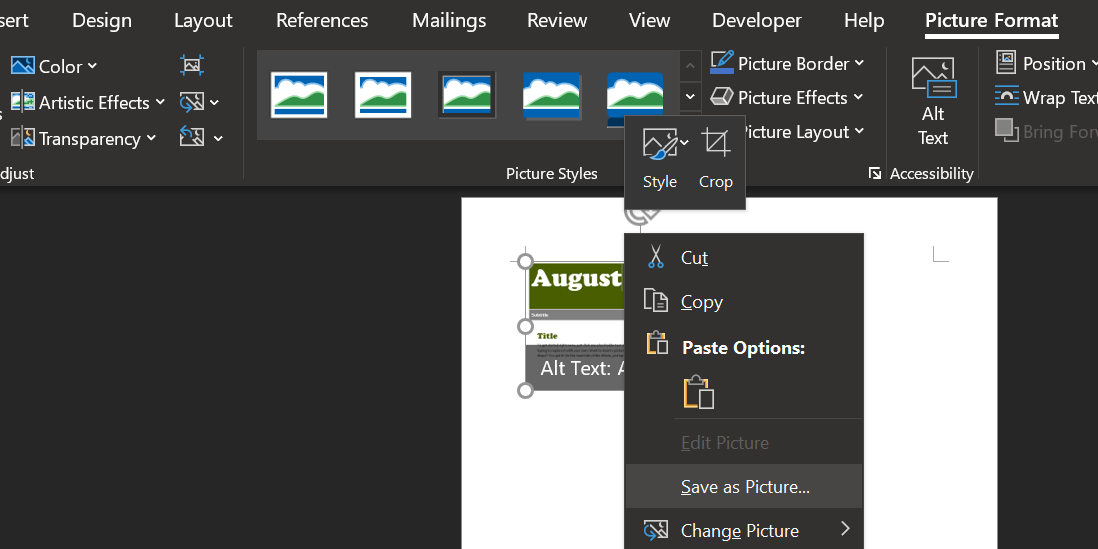
Right-click on the blank document and select the Picture paste option. The button is represented by an icon of a clipboard with an image in front of it.
Although the pasted text will look identical to how you copied it, if you click on the text, a box will surround the image that lets you adjust its size, rotation, and text wrapping.
Next, right-click on the image and select “Save as Picture” from the pop-up menu.
A Save As Picture dialog box will appear. In it, choose where you’d like to save the image, type in a file name, choose “JPEG File Interchange Format” from the Save as Type drop-down menu, and then click the “Save” button.
And with that, you’ve successfully saved a Microsoft Word document as a JPEG.
Paste Text as a JPEG in Word on Mac
The steps for saving your Word Doc to JPEG on Mac are almost exactly the same as the steps mentioned in the previous section. However, Word on Mac names some of the features differently than it does on Windows.
Repeat the steps in the previous section of copying the text you’d like to convert to a JPEG and opening a new blank document. From there, right-click in an empty space and select “Paste Special.”
Choose the “PDF” option from the As section and then click the “OK” button.
The text you copied from the first Word document will now be inserted as an uneditable object. When you click it, a box will appear around the block.
Now, right-click the PDF block and select the “Save as Picture” option.
Finally, from the Save menu that appears, rename the image to whatever you’d like, choose where to save it, change the Save as Type to “JPEG,” and then click the “Save” button.
Don’t feel like going through all of these steps to convert your Word doc to JPEG? There are several Word-to-JPEG converters online that work really well. Browse around and find one you like!
READ NEXT
- › This 64 GB Flash Drive From Samsung Is Just $8 Right Now
- › Liquid Metal vs. Thermal Paste: Is Liquid Metal Better?
- › Microsoft Outlook Is Adding a Splash of Personalization
- › How to Install Unsupported Versions of macOS on Your Mac
- › Why Your Phone Charging Cable Needs a USB Condom
- › The Best Steam Deck Docks of 2023
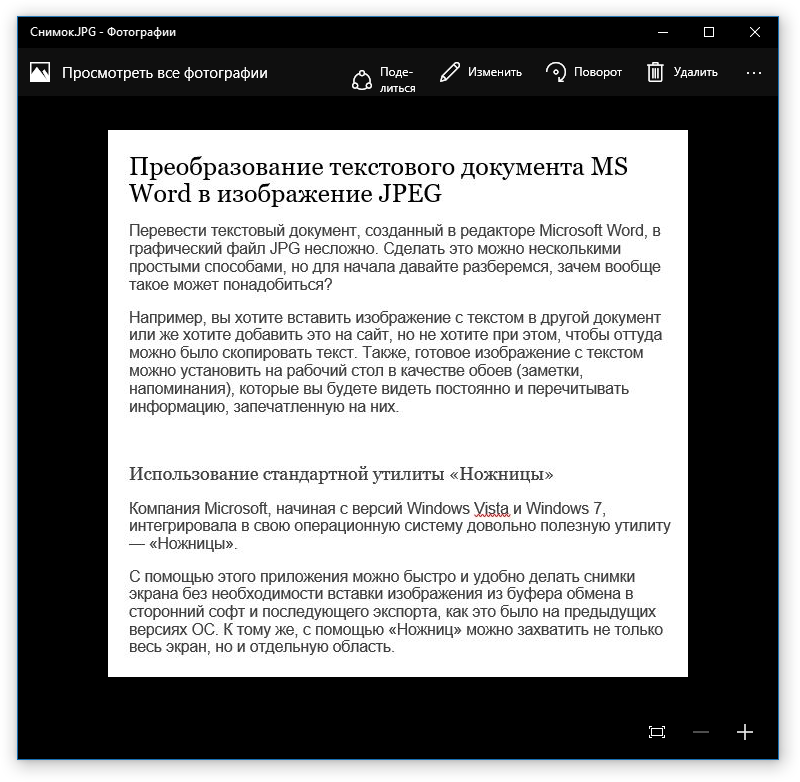
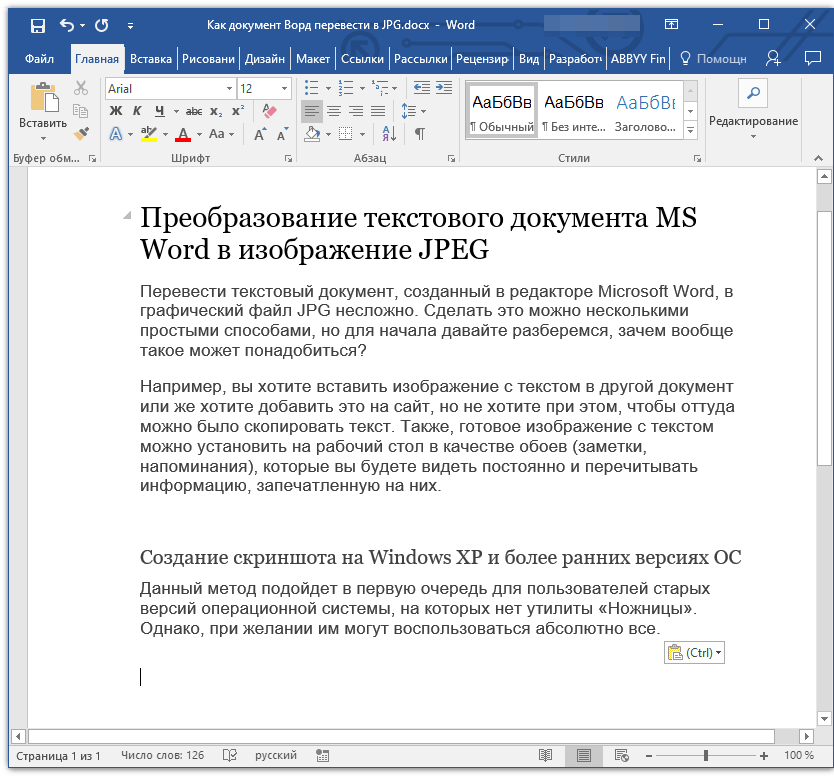
Если вам необходимо преобразовать документ из текстового редактора Microsoft Word в файл форматом JPG, вы можете воспользоваться несколькими способами. Все они доступные и не вызовут у вас сложностей. Прежде чем преступить к переводу текстового документа в графический, нужно понять в каких случаях это может пригодиться.

В ситуациях, когда вам нужно вставить картинку с написанным текстом в иной документ, обязательно понадобится совершить перевод текста в изображение. Также, если вы не хотите чтобы с вашего сайта скопировали авторский текст, то смело можете добавить на него картинку с написанной ранее статьей с помощью Microsoft Word. Вы также сможете установить изображение как обои рабочего стола, для того что бы ваши заметки или напоминания были всегда на виду.
Содержание
- Встроенная программа «Ножницы»
- Как сделать скриншот в Windows XP и предыдущих версиях
- Функции софта Microsoft Office
- Некоторые важные детали напоследок
Встроенная программа «Ножницы»
Начиная с версии Windows Vista и Windows 7, в операционную систему встроена программа, которая очень необходима для пользователей и называется «Ножницы».
Благодаря этой утилите вы сможете сделать скрин экрана без использования сторонних сервисов, специальных приложений, а также, больше нет нужды перемещать объекты в буфер обмена для дальнейшей вставки их и редактирования в иных приложениях. Также, «Ножницы» могут зафиксировать отдельную часть экрана.
- Загрузите необходимый текст в Word.
- Измените масштаб в правом нижнем углу документа, для того чтобы текст был на весь экран, но при этом полностью влазил на него.
- Зайдите в «Пуск» и откройте раздел «Программы». Перейдите в пункт «Стандартные» и найдите программу «Ножницы».
- В открывшемся окне нажмите на кнопку «Создать», и выберите строку «Окно» и наведите курсор на документ Ворд. С помощью параметра «Область» вы можете выбрать только область с текстом.
- Отмеченный вами эпизод откроется в программе. Далее перейдите в раздел «Файл» и нажмите на «Сохранить как». Теперь вы можете отметить формат в котором необходимо сохранить файл.
- Выберите куда необходимо сохранить изображение и дайте ему название.


Таким образом, текстовый документ был сохранен как изображение, но это только один из возможных способов преобразования.
Как сделать скриншот в Windows XP и предыдущих версиях
Подобным вариантом, в первую очередь, пользуются люди, которые предпочитают более ранние версии Виндовс, где не предусмотрена программа «Ножницы». Но данный способ может подойти для любого пользователя.
- Проделайте такие же действия для увеличения масштаба как в предыдущем способе.
- Кликните на кнопку «PrintScreen» на вашей клавиатуре.
- Зайдите в «Пуск» и в стандартных программах найдите «Paint».
- Для того чтобы вставить скопированное фото, нажмите на CTRL+V.
- Тут вы сможете изменить картинку, обрезав лишнее или исправив размер.
- В разделе «Файл» выберите графу «Сохранить как». Тут же выберите нужный формат и название для изображения.


Читайте также:
Как вытащить картинки из PDF-файла
Как перевести PDF в Word для редактирования
Чем открыть файл DOCM?
Теперь вы знаете еще один способ как можно захватить текст и перевести его в картинку.
Функции софта Microsoft Office
Множество различных программ входят в полнофункциональный пакет Office. К ним относятся не только всем известные редакторы, таблицы и приложения для создания компьютерных презентаций, а и заметки OneNote. Конкретно последний инструмент будет полезен при переводе текста в картинку.
- В открытом документе перейдите в раздел «Файл» в панели управления. В более старых версиях эта кнопка называлась «MS Office».
- В графе «Печать» откройте пункт «Принтер» и нажмите на кнопку «Отправить в OneNote». Теперь кликните «Печать».
- Откроется текст в дополнительной отдельной странице инструмента OneNote. Если слева или справа есть какие-то дополнительные вкладки, закройте их.
- В разделе «Файл» перейдите в графу «Экспорт» и выберите «Документ Word». Теперь нажмите клавишу «Экспорт» и выберите, куда сохранять документ.
- Если вы снова откроете данный файл в Ворде, то документ будет отображаться как картинка, которая содержит текст.
- Теперь сохраните картинки как отдельные файлы. Для этого кликните правой клавишей мыши на картинку и во всплывающем окне нажмите «Сохранить как рисунок» и выберите, куда сохранять файл и под каким именем.


Некоторые важные детали напоследок
Не стоит забывать о том, что преобразовывая текст в картинку, качество написанного, с большой вероятностью, будет изменено в худшую сторону. Это происходит, потому что все описанные методы переводят векторный текст в изображение, представляющее собой сетку пикселей. В основном это приводит к тому, что текст на изображении получается размытым и будет не читабельным.
Несколько простых примечаний помогут вам избежать таких проблем и облегчат работу в данном направлении.
- Первый шаг во всех методах это изменение масштаба. Перед этим действием сделайте шрифт больше, насколько это возможно. Этот совет особо уместен в ситуации, когда в вашем тексте есть список.
- Если после сохранения файла через Paint не видно страницу, то просто сделайте масштаб, в котором отображается документ меньше.
Теперь вы знаете о самых легких в использовании методах для изменения текстового документа Word в файл форматом JPG. С описанными вариантами вы сможете совершить конвертирование, не прибегая к дополнительным утилитам.

- Copy and paste the document as an image
- Use the Snip & Sketch tool
- Use an online document converter
Method 1: Save a Word Document by Copying and Pasting it as an Image
In this method, we’ll walk you through the steps on how to easily copy your document and paste it as an image. This, by far, is the fastest and the most direct way to save a Word file as an image without using another application.
Here are the steps to do just that!
Step 1: Open up a Word document.

Step 2: Select the content.
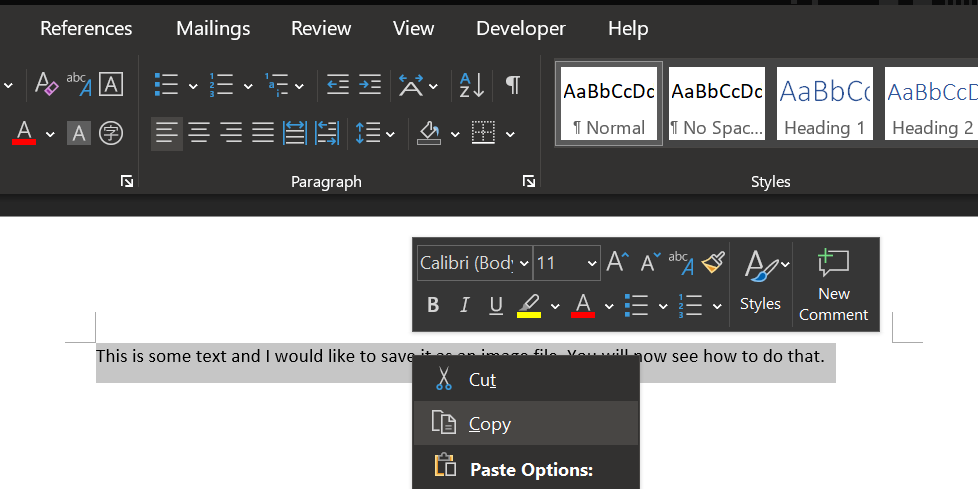
Now that we have our document opened, select the part of your file or the entire document that you need to save as an image. Then, right-click on the selection and click the Copy option.

Alternatively, hit the CTRL + C shortcut keys on your keyboard to copy.
Step 3: Paste the copied content.
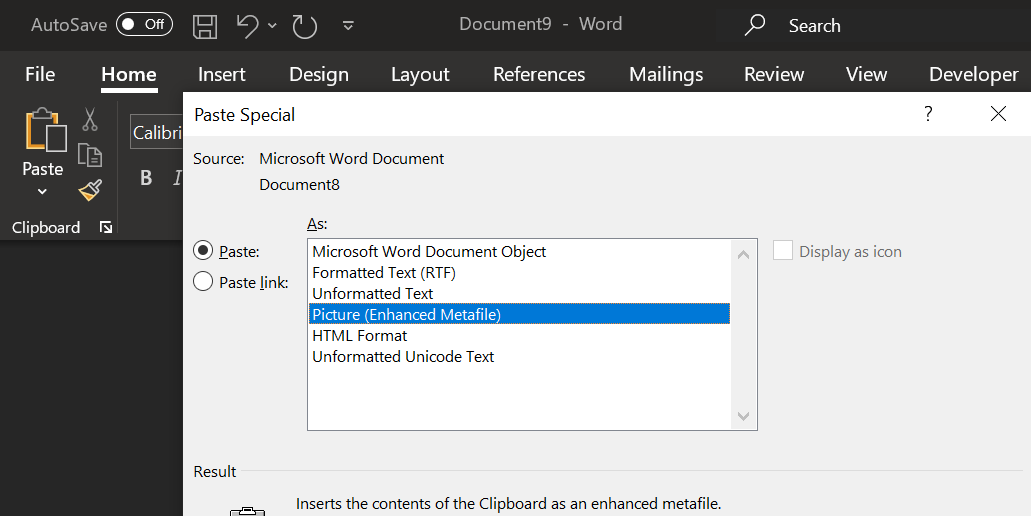
Open a new Word document. You should see the Paste button in the Home tab. Click on the down arrow below the button to access the Paste drop-down menu. Then, select the Paste Special option.

This will launch the Paste Special dialogue box right in the middle of your screen. Now, select the Picture (Enhanced Metafile) option and click the OK button to paste the selected document as a picture. Otherwise, click the Cancel button.

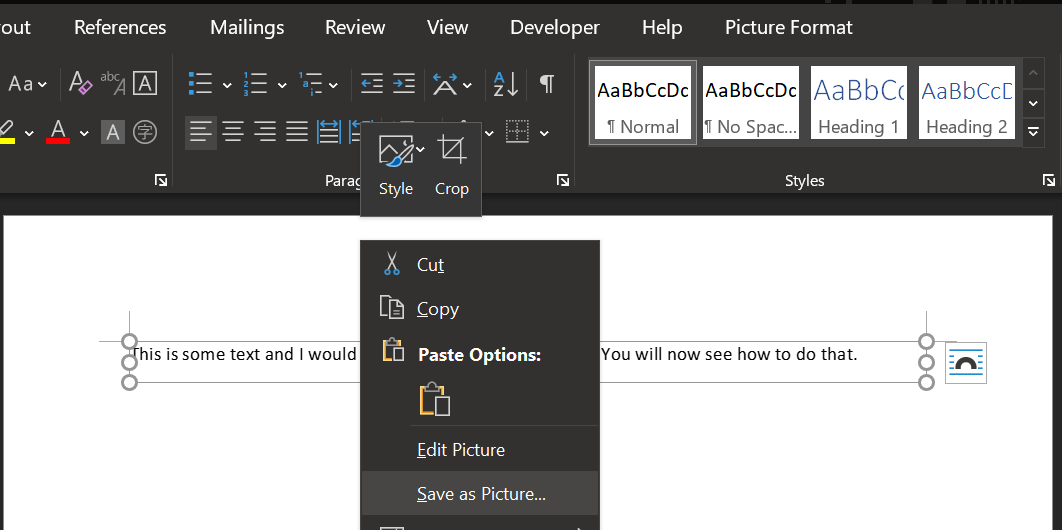
Step 4: Save the picture as an image file.
- Select the picture you pasted and right-click on it. It will open a list of options to choose from. Now, click on Save as Picture.

This launches the File Save dialogue box.
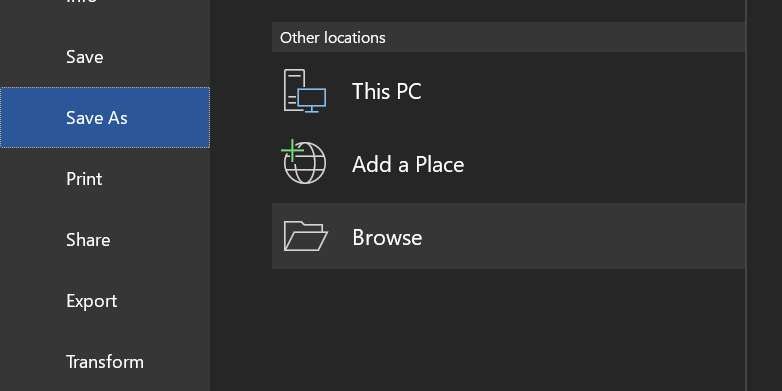
Locate the folder where you want your image file to be saved. Type in the filename in the File Name field, then click on the Save as Type drop-down menu.
After that, select the image file type that suits your needs. If you haven’t decided yet, you can always choose the default Portable Network Graphics file type.

Method 2: Save a Word Document as an Image Using the Snip & Sketch Tool
In this method, we’ll use Windows 10 Snip & Sketch Tool to quickly snip the part of the document you want to be saved as an image. This can come in handy especially if you need to take a snapshot from different parts of your file.
Step 1. Open up a Word document.

Step 2. Launch the Snip & Sketch Tool.
On your keyboard, press the Windows logo + SHIFT + S keys to launch the Snip & Sketch tool.
Now, click and drag your mouse from the top left of the part you wish to capture to its bottom right.
This will highlight a rectangular shape snipping of the part of the document.

Finish the snipping by letting go of the cursor. A notification-like memo will appear at the lower right corner of your window.
Now, click the memo to launch the Snip & Sketch work window.

Step 3. Save the image.
On the Snip & Sketch window, move your cursor to the top-right corner of the window. Click the Save icon to launch the Save As dialogue box.

The steps to save using the Save As dialogue box are the same as the previous method.
Method 3: Save a Word Document as an Image Using an Online Document Converter
While this method requires the use of an online document converter, this is by far the most convenient way to save multiple pages as image files.
Here’s how you can use an online document converter!
Step 1. Open a web browser.
To start off, let’s open up a web browser. In the address bar, type in https://www.zamzar.com/convert/doc-to-jpg/. Of course, you can opt to use similar online document converters other than this. This is just what Google gave us when we searched for “Word to JPG”. Feel free to leave us a comment below if you found something better.

Step 2. Upload the Word file.
Once you’re on the site, click the Add Files button to start uploading your Word file. This will launch the Open dialogue box of your computer. Locate your file and click the Open button.

Step 3. Choose the image file type.
After adding the Word file, click the File Type drop-down button to choose the image file type that you want.
If you haven’t decided yet, simply leave it as jpg.
You should see your file listed in the Files to Convert table. Once verified, click the Convert Now button to start the conversion.

You will be redirected to another page in order for you to download your converted document.
Now, click the Download button to finish the process. If you need to convert more documents, click the Convert more files button.

Note that you will get multiple image files if your Word document contains more than one page.
Conclusion
save as an image.
We hope you’ve found this article helpful!
Download PC Repair Tool to quickly find & fix Windows errors automatically
Sometimes, you may find yourself in a position to want to convert a Word document into a picture. Such circumstances may arise when textual information is required, but you can only send it over in a pictorial format. If this was something that concerned you, today we will be discussing how you can convert your Word document into a picture. This tutorial will show you how to save your Word document in the picture format of your choice (jpg, png, etc.)
There are three ways in which you can convert and save your Word document as an image.
- Using the Screenshot feature in MS Word
- Using the Print Screen option on Windows
- Using the Save as Picture feature.
1] Save document as an image by using the Screenshot feature in MS Word

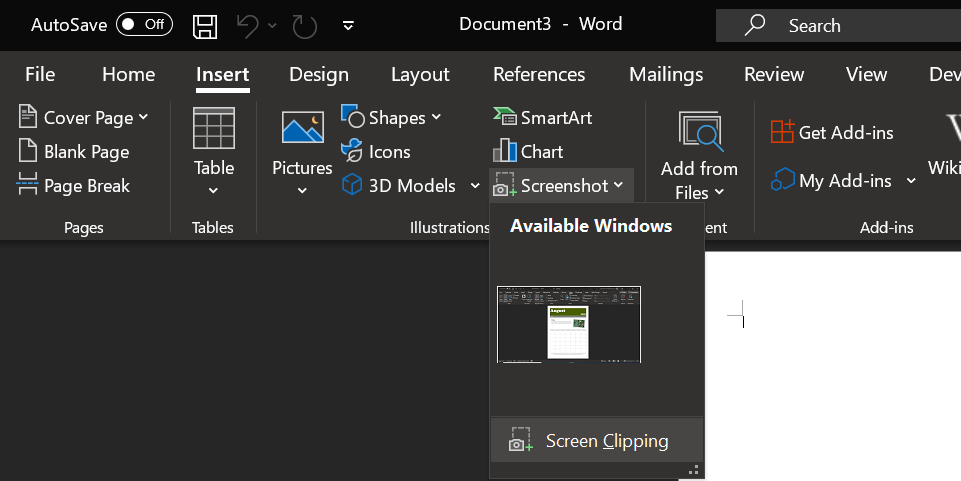
Microsoft Word includes a Screenshot feature which is available in the Insert tab. Its main purpose is to take screen clippings of the active windows opened on your PC. Here’s how you can use it to save either one or multiple pages of a Word document as a picture:
- Firstly, open the document you want to be saved as a picture.
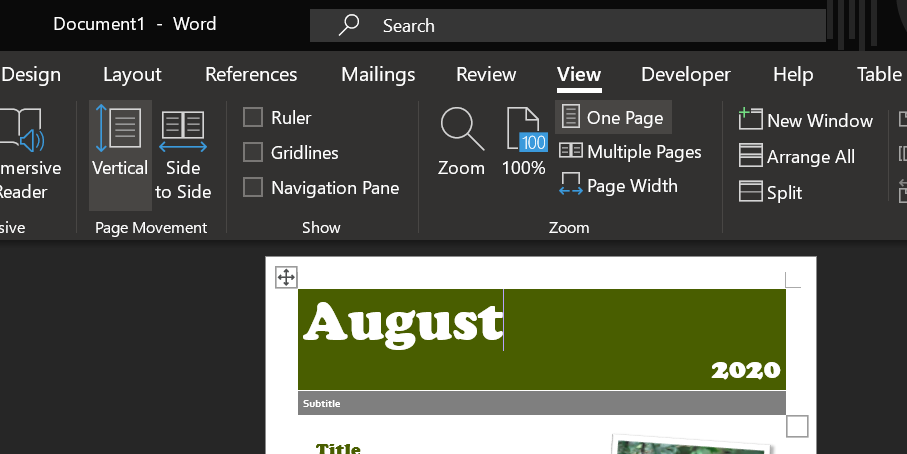
- Visit the View tab on MS Word and look at the Zoom section. If you want to save just one page of a document as an image, click on One Page. Else, select Multiple Pages
- Now, click on File > New to open a new Word document
- Click on the Insert tab and from the Illustrations section, select Screenshot
- In Available Windows, you’ll see the document that you had previously kept opened. Click on Screen Clipping and crop out that section of the document that you want to save
- Right-click the inserted screenshot, and select Save as Picture from the context menu
- Select the file format of your choice and save it,
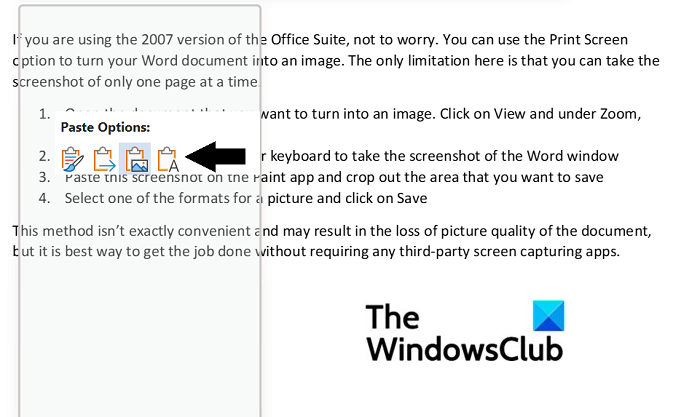
2] Save document as an image by using the Print Screen option
If you are using an earlier version of the Office Suite, don’t worry. You can use the Print Screen option to turn your Word document into an image. The only limitation here is that you can take a screenshot of only one page at a time.
- Open the document that you want to turn into an image.
- Click on View and under Zoom, select One Page
- Now tap the Prt Sc key on your keyboard to take the screenshot of the Word window
- Paste this screenshot on the Paint app and crop out the area that you want to save
- Select one of the formats for a picture and click on Save
This method isn’t exactly convenient and may result in the loss of picture quality of the document, but it is the best way to get the job done without requiring any third-party screen capturing apps.
3] Save document as an image using Save as Picture feature
The third way around this is to use the Save as Picture option from the Word context menu. Here’s how:
- Open the document that you want to save as a picture. Now, highlight and copy the important portion of the document
- Then, go to File > New > New Document
- Here, right-click to open the Context Menu and from Paste Options, select Picture
- At a first glance, it would appear like a normally copied portion of text pasted on a new document, but you’ll notice a box surrounding the text. That box allows you to adjust the dimensions, as per the image you want
- Once you’ve finalized that, right-click on the image and select Save as Picture
This will open a Save as Picture dialog box. Change the file’s format to JPEG File Interchanging Format and click on Save to process this change. You’ll then find that your select portion of the document has been saved as a JPEG image.
We hope this tutorial works out well for you.
How do I copy an image from a Word document?
If you want to extract and save images from a Word document, there is a very easy procedure in place for that. Simply open the section where the picture is, right-click to open the context menu and click on Save as picture. You can further read this article where we discuss how you can extract images from a Word Document without using any software.
How to reduce the size of a Word document?
If you are someone who is concerned about the high size of their Microsoft Word files, there are several things you can do to mitigate this issue like compressing the images in the document and avoiding using any third-party embedded fonts. In this article, we discussed some more measures and how to compress and reduce the size of a Word document.

An undergraduate student of Business Economics at Delhi University, Divyansh loves Cricket, Formula 1, Television and dabbles his interest in Tech on the side. Writing about the Windows ecosystem is what excites him.
Here’s how to save Word docs as images for easy sharing or archiving purposes.
If you need to send a Word document to someone who doesn’t have the app installed or want to keep a copy of it for your records, saving it as an image is a viable option. This lets you share it with anyone while preventing them from editing it.
Let’s look at some of the methods to turn your Word document into an image.
1. Take a Screenshot of the Document
If you’re only looking to save a single page as an image from your Word document, using Word’s screenshot feature is convenient.
You can use this feature for multi-page documents as well, but that requires you to take a screenshot for each of your pages. Using one of the other methods mentioned below will be more convenient in that case.
Here’s how you turn one of the pages in your Word document into an image with a screenshot:
- Open your document with Microsoft Word.
- Click the View tab at the top and select One Page from the Zoom section.

- Scroll to the page that you want to save as an image. Make sure the page takes up the full document view in Word.
- Press Ctrl + N to create a new Word document.
- In your newly created document, click the Insert tab and select Screenshot, followed by Screen Clipping.

- You can now select the portion of your screen that you want to save as an image. Select the part of your screen that has your Word document.
- Word will capture a screenshot and add it to your new document. Right-click on this screenshot and select Save as Picture.

- The standard save box will open, letting you save your Word document as an image. Enter a name for the image, select a file type from the dropdown menu, and click Save.
2. Use Snip & Sketch to Save Word Documents to Images
Snip & Sketch is a built-in app for taking screenshots on Windows 10. Since you can use it for screenshot tasks, it follows that the app works to save Word documents as an image file too.
This tool offers custom area selection, allowing you to precisely select the area where your Word document appears and take a screenshot of it. Here’s how you do this:
- Launch your document with Microsoft Word.
- Go to the page that you want to save as an image.
- At the bottom-right corner of your screen, you’ll find a slider that lets you change the zoom level of your document. Use the slider to make your page fully visible, as you can only save an image of what you can see.

- Press the Win key, search for Snip & Sketch, and open the app. You can also press Win + Shift + S as a shortcut.
- Click the New option in the utility to take a new screenshot.

- Drag your cursor to select the entire area on your page that you want to save as an image.
- The image version of your page will open in Snip & Sketch. Use the Crop tool to trim anything if needed, then click the Save icon in the toolbar to save the image file to your PC.

3. Use Paste Special to Save Word Documents as an Image
Paste special is an option in Microsoft Word that lets you choose how to paste your copied content. There’s an option in this feature that helps you paste your copied content as an image in your current Word document.
To use this, simply copy the content from your Word document, create a new document, and paste the copied content as an image. We’ll show you how you do it step-by-step:
- Open your Word document and select the content that you’d like to save as an image. If you want to save the entire document, press Ctrl + A to select everything.
- Right-click on your selected content and choose Copy (or use Ctrl + C) to copy the content.

- Create a new Word document by pressing the Ctrl + N keyboard shortcut.
- In the new document, go to the Home tab and click Paste, followed by Paste Special.
- A box will open on your screen letting you specify how you want to paste your content. Select the Paste radio button and then choose Picture (Enhanced Metafile).
- Click OK to paste your content as an image.

- You’ll see your copied content as an image in your document. If everything looks good, right-click on your image and choose Save as Picture.

- Enter a name for your image, select a file type, and click Save to save your document as a photo.
4. Save Word Documents as PDF and Convert to Images
Word offers you the option to save your files in many formats, aside from the standard Word document. One of these formats is PDF, which actually allows you to convert your document into an image since PDFs are easy to convert to an image file.
There are two stages to this procedure: first convert the document to PDF, then save the PDF as an image file. Here’s how it works.
1. Save Your Word Document as PDF
You can use the built-in option to save a document as PDF in Word as follows:
- While your document is open in Word, click the File menu at the top and select Save As, followed by Browse.

- The familiar save box will open on your screen. Select PDF from the Save as type dropdown menu, enter a name in the File name field, and click Save at the bottom.

Make sure you can find the newly created PDF on your computer.
2. Convert Your PDF to an Image Format
It’s time to turn your PDF into an image, which you can do using a free app. We detail how to do this with a Windows 10 Store app below, but you can also use a web service like PDF to Image if you don’t want to install anything.
- Launch the Microsoft Store, search for PDF to JPEG, and click the app when it appears in the search results.
- Click on the Get button to download the app to your computer.
- Click on Launch once the app is downloaded and installed.
- On the main app interface, click on Select File and select the PDF you converted earlier.
- You’ll see previews of the pages in your PDF file. Click Select Folder at the top and choose a folder to save your image files.
- Finally, click Convert to start converting your PDF to an image file.

- When the conversion is finished, you’ll find one image for each page in your PDF document.
If you don’t find it convenient to share multiple images with your recipient, you can combine your images together and send them as a single file.
5. Save a Word Document as an Image Online
There are a few online services that let you convert your Word documents to image files. You can use these services without downloading or installing anything on your computer.
Let’s look at two of these services that you can use to save a Word document as an image file.
1. Zamzar
Zamzar is a popular online file conversion service, which you can use to turn your single or multi-page Word documents into image files. It supports several image formats, including popular ones like JPG and PNG.
You can use it as follows:
- Head to the Zamzar site and click Add Files to add your Word document.
- Select an image format from the dropdown menu and click Convert Now.

- Once the document is converted to an image format, click Download to download the images to your computer.

2. Word to JPEG
Word to JPEG is another online service that helps you convert your Word documents to images in JPEG format. Here’s how you use it:
- Open the Word to JPEG site and click Upload Files to upload your Word document.
- It will automatically start converting your document once it’s uploaded.
- Click the Download All button to download your converted files.

You Don’t Need Word to View Word Documents
If your recipient only needs to read your document and not modify it, you can save your Word document as an image file and send it over to them. They’ll be able to view it no matter what device they use.
Not sure of the best way to send it off? You have lots of choices when it comes to sharing photos with your friends and family.
Содержание
- Использование стандартной утилиты «Ножницы»
- Создание скриншота на Windows XP и более ранних версиях ОС
- Использование возможностей пакета Microsoft Office
- Несколько советов и примечаний напоследок
- Вопросы и ответы
Перевести текстовый документ, созданный в редакторе Microsoft Word, в графический файл JPG несложно. Сделать это можно несколькими простыми способами, но для начала давайте разберемся, зачем вообще такое может понадобиться?
Например, вы хотите вставить изображение с текстом в другой документ или же хотите добавить это на сайт, но не хотите при этом, чтобы оттуда можно было скопировать текст. Также, готовое изображение с текстом можно установить на рабочий стол в качестве обоев (заметки, напоминания), которые вы будете видеть постоянно и перечитывать информацию, запечатленную на них.
Использование стандартной утилиты «Ножницы»
Компания Microsoft, начиная с версий Windows Vista и Windows 7, интегрировала в свою операционную систему довольно полезную утилиту — «Ножницы».
С помощью этого приложения можно быстро и удобно делать снимки экрана без необходимости вставки изображения из буфера обмена в сторонний софт и последующего экспорта, как это было на предыдущих версиях ОС. К тому же, с помощью «Ножниц» можно захватить не только весь экран, но и отдельную область.
1. Откройте документ Ворд, из которого вы хотите сделать JPG-файл.

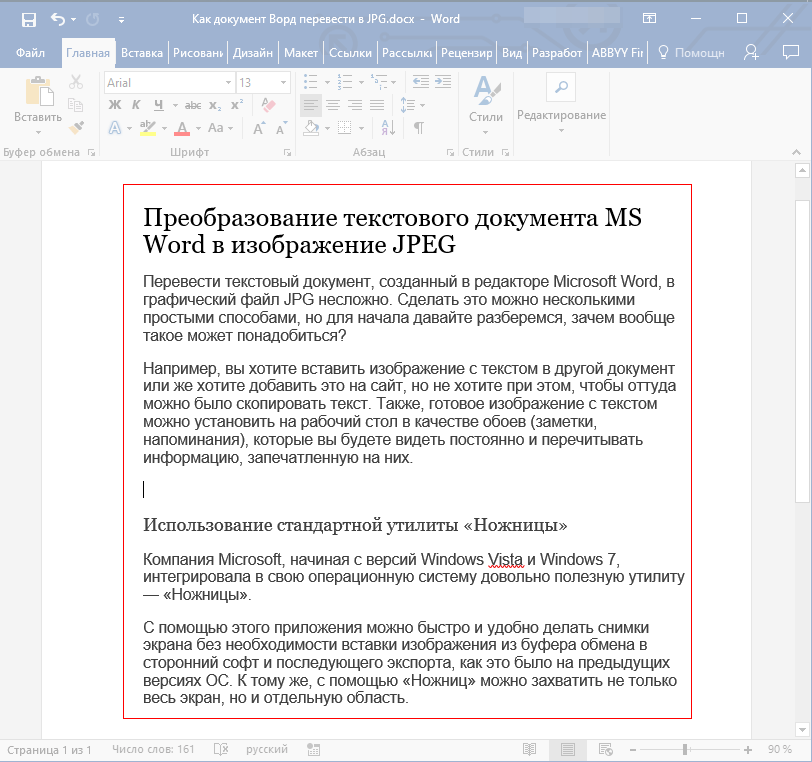
2. Масштабируйте его таким образом, чтобы текст на странице занимал максимум пространства на экране, но помещался при этом целиком.
3. В меню «Пуск» — «Программы» — «Стандартные» найдите «Ножницы».
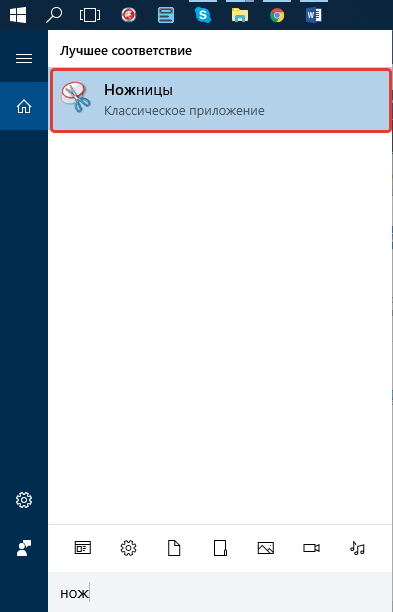
Примечание: Если вы используете Windows 10, найти утилиту можно и через поиск, значок которого расположен на панели навигации. Для этого просто начните вводить в поисковую строку название приложения на клавиатуре.
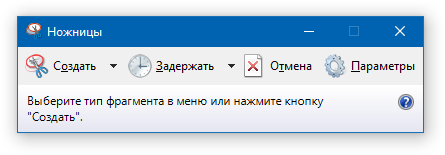
4. Запустив «Ножницы», в меню кнопки «Создать» выберите пункт «Окно» и укажите курсором на документ Microsoft Word. Чтобы выделить только область с текстом, а не все окно программы, выберите параметр «Область» и укажите область, которая должна будет находиться на изображении.
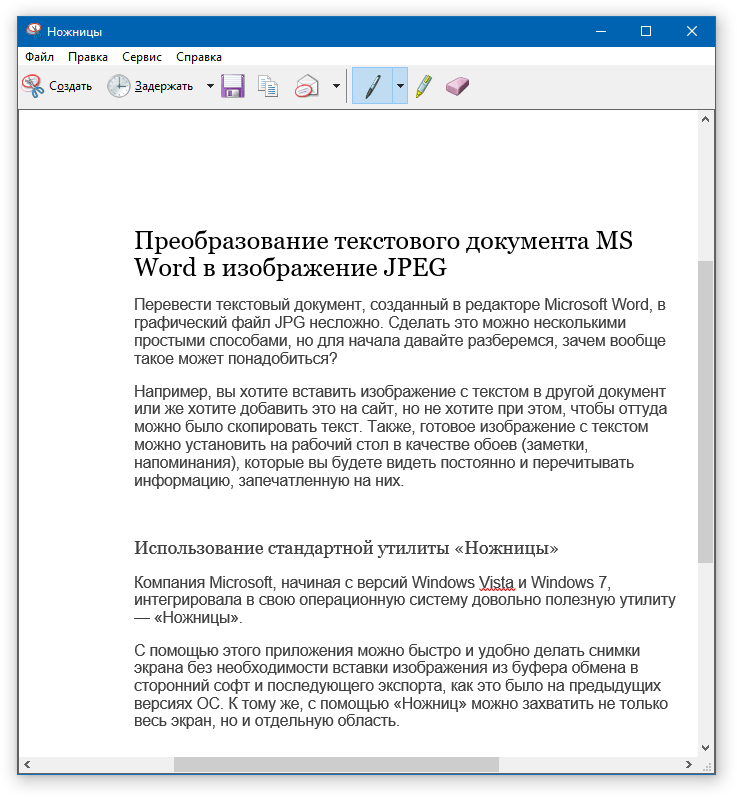
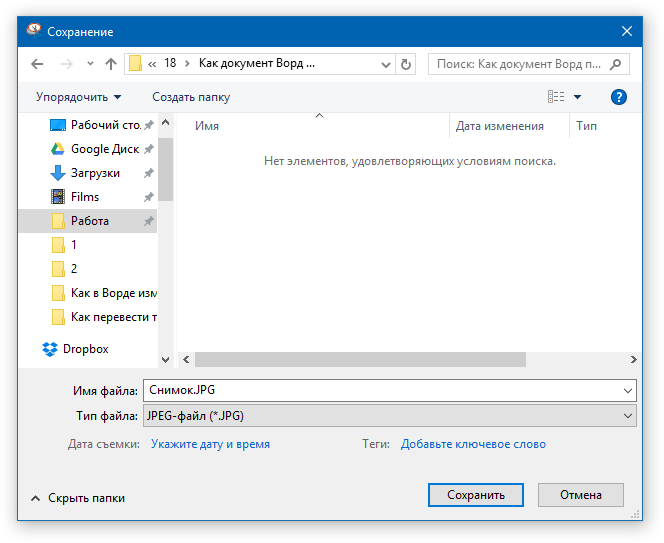
5. Выделенная вами область будет открыта в программе «Ножницы». Нажмите кнопку «Файл», выберите пункт «Сохранить как», а затем выберите подходящий формат. В нашем случае это JPG.

6. Укажите место для сохранения файла, задайте ему имя.
Готово, мы с вами сохранили текстовый документ Ворд в качестве картинки, но пока что лишь одним из возможных методов.
Создание скриншота на Windows XP и более ранних версиях ОС
Данный метод подойдет в первую очередь для пользователей старых версий операционной системы, на которых нет утилиты «Ножницы». Однако, при желании им могут воспользоваться абсолютно все.
1. Откройте и масштабируйте документ Word так, чтобы текст занимал большую часть экрана, но не вылазил при этом за его пределы.
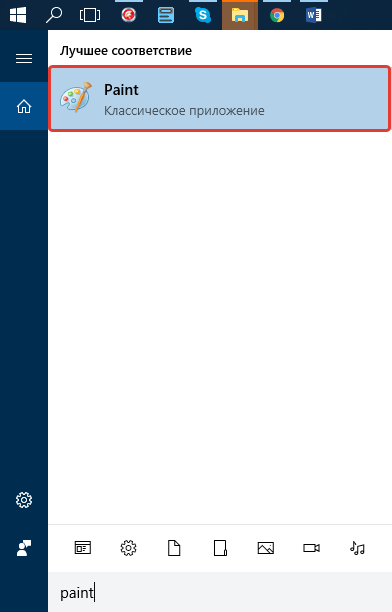
2. Нажмите клавишу «PrintScreen» на клавиатуре.
3. Откройте «Paint» («Пуск» — «Программы» — «Стандартные», или же «Поиск» и ввод названия программы в Windows 10).
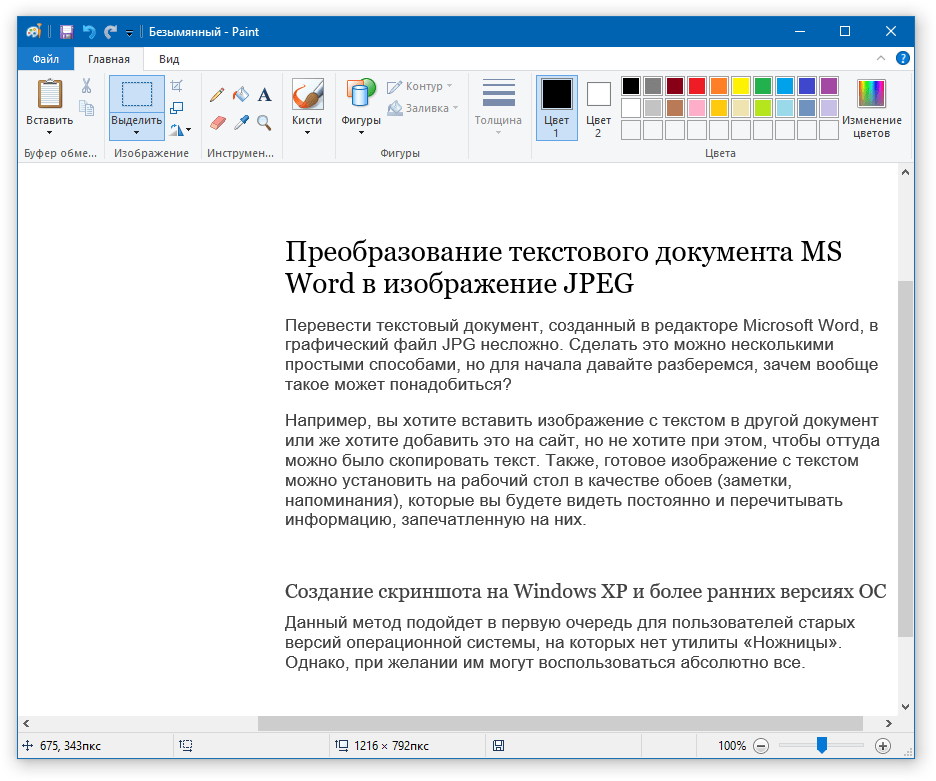
4. Захваченное изображение с текстового редактора сейчас находится в буфере обмена, откуда нам его нужно вставить в Paint. Для этого просто нажмите «CTRL+V».
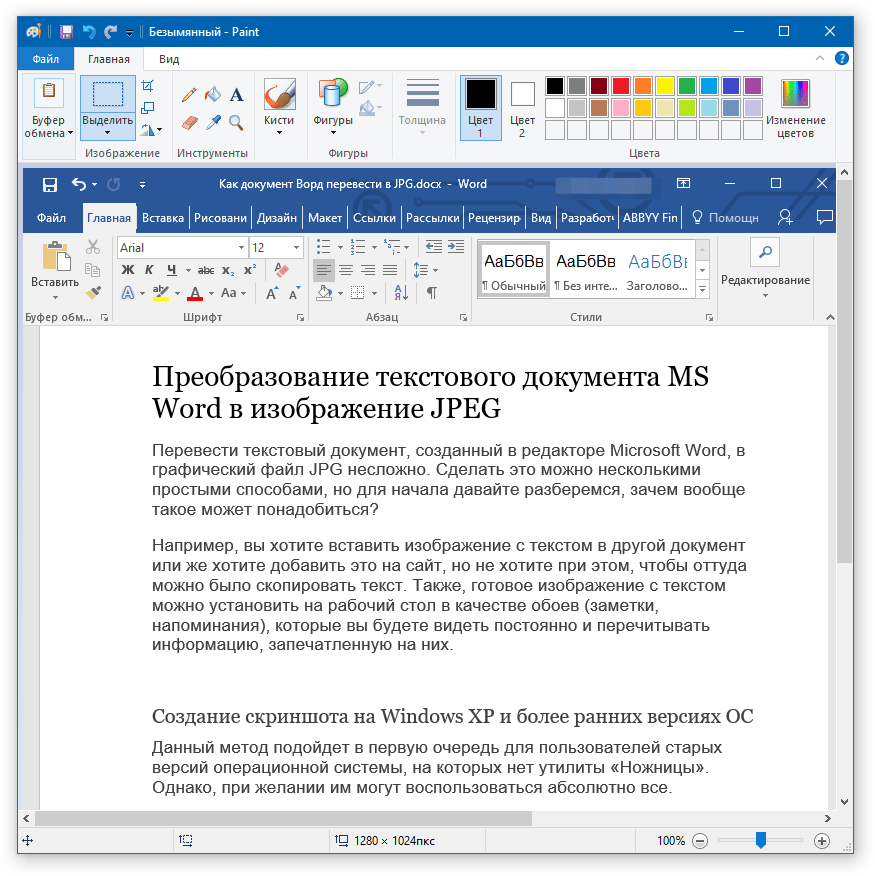
5. Если это необходимо, отредактируйте изображение, изменив его размер, отрезав ненужную область.
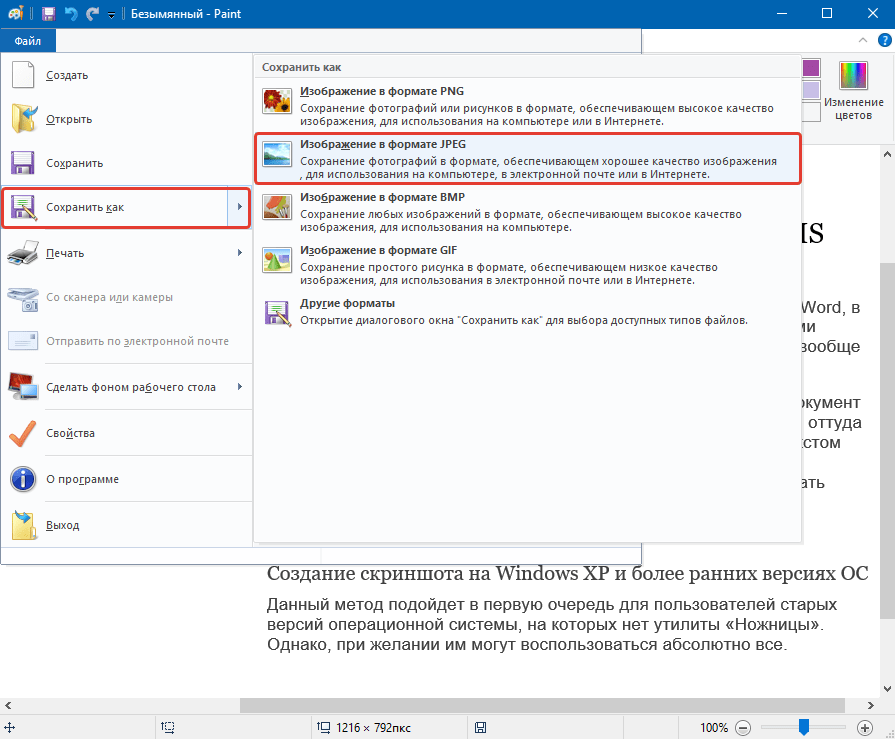
6. Нажмите кнопку «Файл» и выберите команду «Сохранить как». Выберите формат «JPG», укажите путь для сохранения и задайте имя файла.
Это еще один способ, благодаря которому можно быстро и удобно перевести текст Ворд в картинку.
Использование возможностей пакета Microsoft Office
Майкрософт Офис — это полнофункциональный пакет, состоящий из ряда программ. В числе таковых не только текстовый редактор Word, табличный процессор Excel, продукт для создания презентаций PowerPoint, но и инструмент для создания заметок — OneNote. Именно он нам и понадобится для того, чтобы преобразовать текстовый файл в графический.
Примечание: Данный метод не подойдет для пользователей устаревших версий ОС Windows и Microsoft Office. Чтобы иметь доступ ко всем возможностям и функциям софта от Майкрософт, рекомендуем своевременно его обновлять.
Урок: Как обновить Ворд
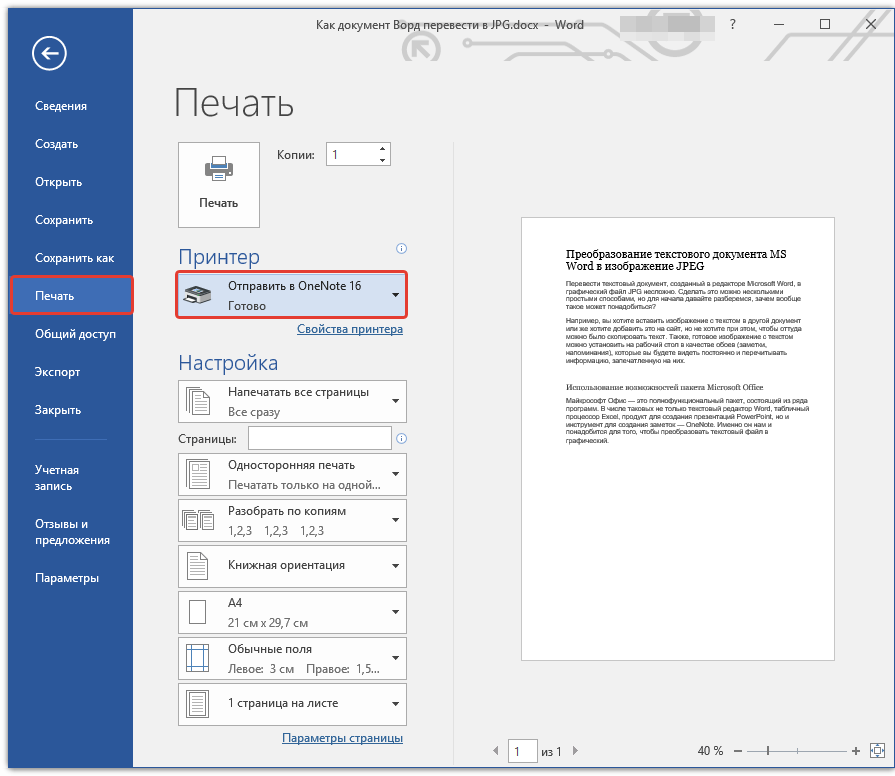
1. Откройте документ с текстом, который нужно перевести в изображение, и нажмите кнопку «Файл» на панели быстрого доступа.
Примечание: Ранее это кнопка называлась «MS Office».
2. Выберите пункт «Печать», а в разделе «Принтер» выберите параметр «Отправить в OneNote». Нажмите кнопку «Печать».
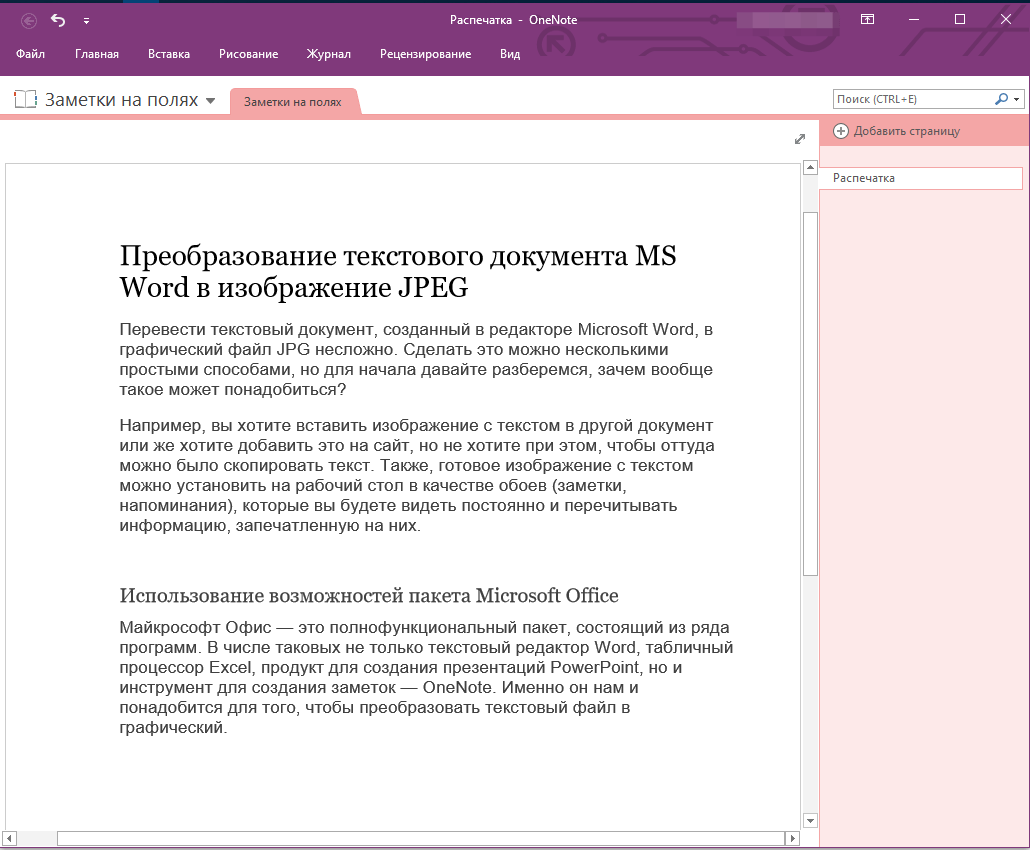
3. Текстовый документ будет открыт в виде отдельной страницы заметочника OneNote. Убедитесь в том, что в программе открыта только одна вкладка, что слева и справа от нее нет ничего (если есть — удалите, закройте).
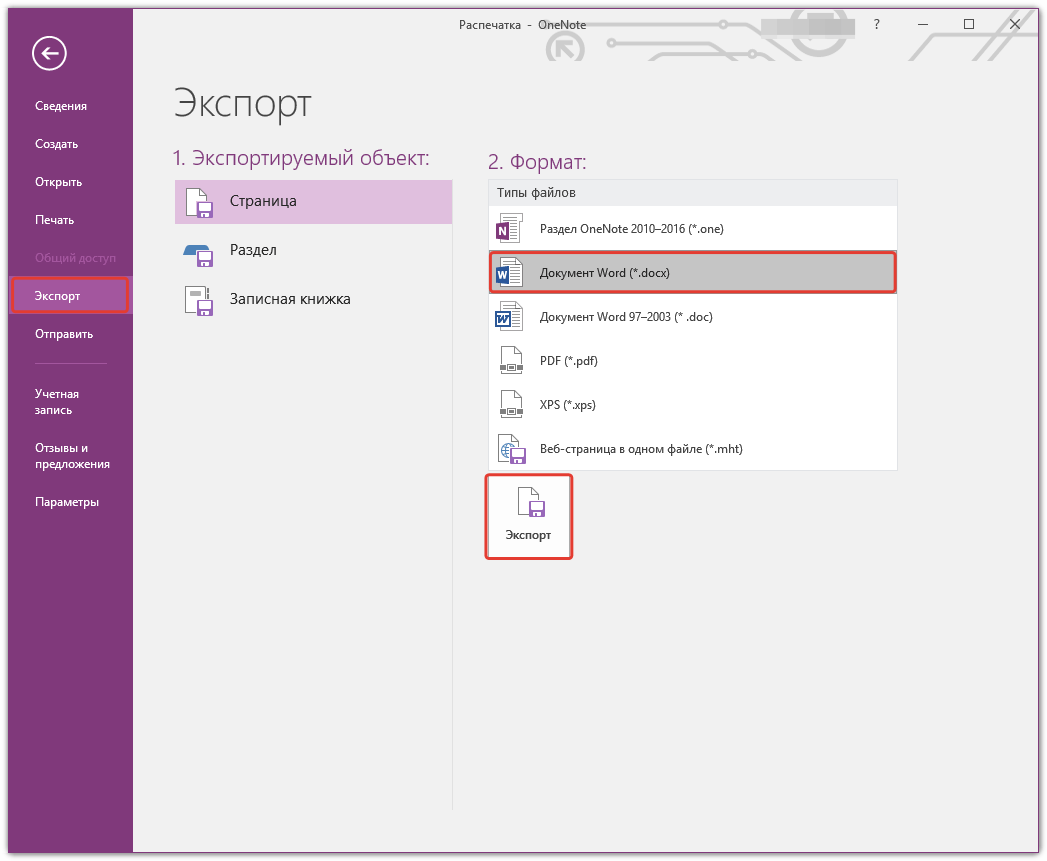
4. Нажмите кнопку «Файл», выберите пункт «Экспорт», а затем выберите «Документ Word». Нажмите кнопку «Экспорт», а затем укажите путь сохранения файла.
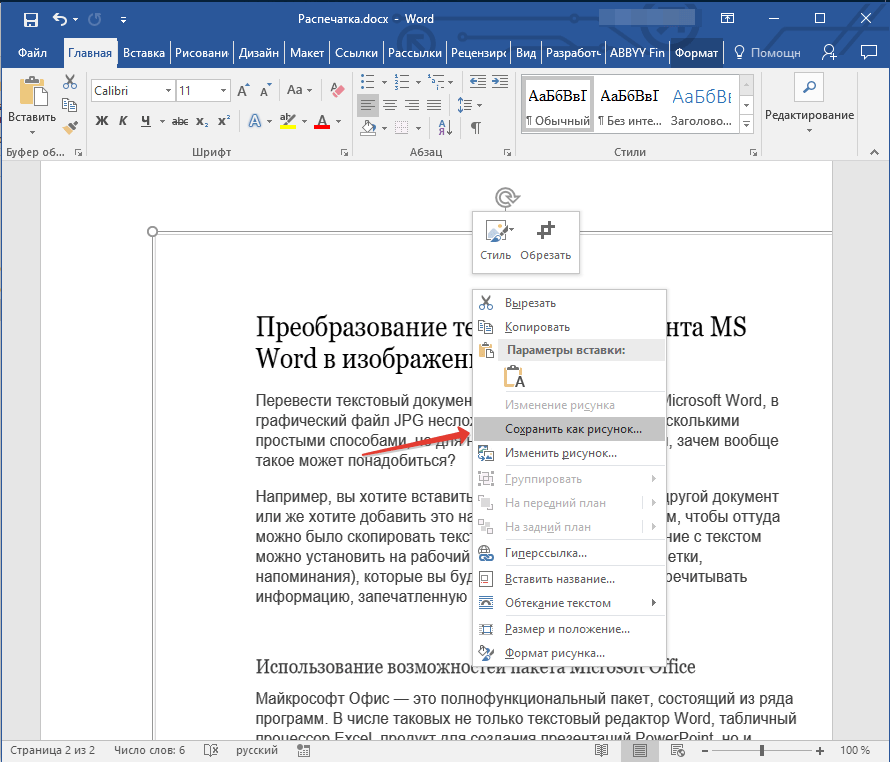
5. Теперь снова откройте этот файл в Ворде — документ будет отображен в качестве страниц, на которых вместо обычного текста будут содержаться изображения с текстом.

6. Все, что вам остается — сохранить изображения с текстом в качестве отдельных файлов. Просто поочередно кликайте по картинкам правой кнопкой мышки и выбирайте пункт «Сохранить как рисунок», укажите путь, выберите формат JPG и задайте имя файла.
О том, как еще можно извлечь изображение из документа Word, вы можете прочесть в нашей статье.
Урок: Как в Ворде сохранить изображение
Несколько советов и примечаний напоследок
Делая из текстового документа картинку, следует учитывать тот факт, что качество текста в конечном итоге может оказаться отнюдь не таким высоким, как в Word. Все дело в том, что каждый из вышеописанных методов, конвертирует векторный текст в растровую графику. Во многих случаях (зависит от многих параметров) это может привести к тому, что текст, преобразованный в картинку, окажется размытым и плохо читаемым.
Наши простые рекомендации помогут вам добиться максимально возможного, положительного результата и обеспечить удобство работы.
1. Масштабируя страницу в документе перед ее преобразованием в изображение, увеличьте по возможности размер шрифта, которым этот текст напечатан. Это особенно хорошо для случаев, когда в Ворде у вас содержится какой-то список или небольшое напоминание.
2. Сохраняя графический файл через программу Paint, вы можете не видеть всю страницу целиком. В данном случае необходимо уменьшить масштаб, в котором файл отображается.
На этом все, из этой статьи вы узнали о самых простых и доступных методах, с помощью которых можно конвертировать документ Word в файл JPG. На случай, если вам понадобится выполнить диаметрально противоположную задачу — преобразовать изображение в текст — рекомендуем ознакомиться с нашим материалом на эту тему.
Урок: Как перевести текст с фото в документ Ворд