
Text boxes within a document in MS Word can help to point out important points. With a text box, you can draw the attention of your readers. Place the important information inside the text box. This gives you the freedom to orient it any way you want. You can also change several aspects of the box and the text inside the box.
By default, when you insert a text box, MS Word adds a rectangular box with sharp corners. If you do not like this, use a box with rounded corners. You may already have a rectangular text box in your document. Word has the tools to change it to one with rounded corners.
- Start with a predefined rounded corner text box
- Change a rectangular text box to one with rounded corners
Our simple, step-wise instructions will cover both.
Let us begin.
Method #1: Start with a predefined rounded corner text box
Step #1: Open a Word document
Open the Word document where you want to insert a text box.
Step #2: Insert a rounded corner text box
Click on the Insert tab on the top menu bar to change the ribbon

In the section Text, click on Text Box.

This opens the Text Box dialog box with a large selection of text box types.
Scroll down and select the Simple Quote text box.

Word will insert a text box with rounded corners.

Method #2: Change a rectangular text box to one with rounded corners
Step #1: Open a Word document
Open a Word document with at least one regular text box.

Step #2: Change the text box shape
Click on the border of the text box to select it.

This will open a new tab Drawing Tools on the top menu bar.
Under Drawing Tools, click on the Format tab to change the ribbon.

In the section Insert Shapes, click on Edit Shape.

A drop-down menu appears, click on Change Shape.

This opens another drop-down menu.
Click on the second icon under Rectangles

Click anywhere in the document to deselect the text box.
Word has changed the existing text box to one with rounded edges.

Conclusion
We have shown you two simple methods to create or change the text box to one with rounded corners. Follow our stepwise instructions to make the text box suit your liking.
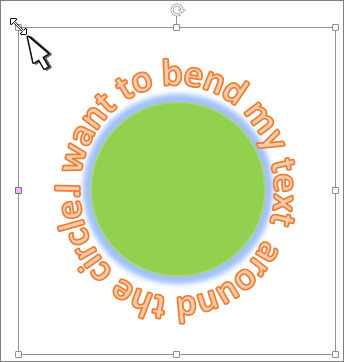
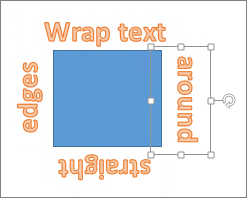
You can use WordArt with a Transform text effect to curve or bend text around a shape. If you want the text to circle the shape, you can also do this, but it’s a little bit more work. You can also insert WordArt multiple times to wrap text around shapes with straight edges.

-
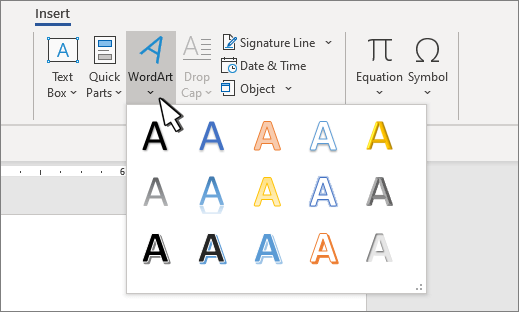
Go to Insert > WordArt, and pick the WordArt style you want.

Note: The WordArt icon is located in the Text group, and it may appear different depending on the version you’re using and the size of your screen. The icon may also look like this
or . -
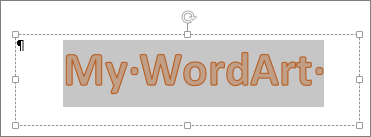
Replace the WordArt placeholder text with your own text.
-
Select your WordArt text.
-
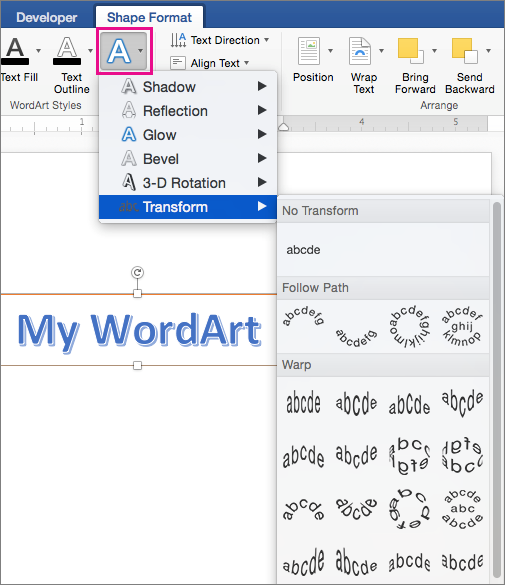
Go to Shape Format or Drawing Tools Format, select Text Effects >Transform and pick the look you want.
 or
or  .
.
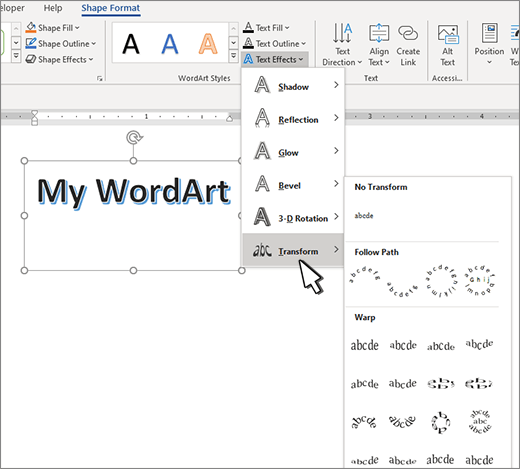
Note: Depending on your screen size, you might only see the icons for WordArt Styles.

Advanced techniques
Wrap around a circle To create text that completely circles your shape, choose Circle under Follow Path, and then drag any of the sizing handles until your WordArt is the size and shape you want.
Wrap around straight edges To wrap text around a shape that has straight edges, such as a rectangle, insert WordArt objects for each edge. In this example, WordArt is inserted four times, one for each side of the shape.
Group moves and copy To move or copy multiple WordArt objects as a single shape, see Group or ungroup shapes, pictures, or other objects .
Precise angle control You can control the angle of your WordArt text in relation to your shape with precision by using the Rotate tool.
If you need very precise control or are creating a complex combination of shapes and text, you’ll want to use a third-party drawing or graphics program to create the text around your shape and then copy and paste it into your Office document.
See Also
Add shapes
Insert WordArt
Create curved or circular WordArt
-
Go to Insert > WordArt.
-
Pick the WordArt style you want.
-
Type your text.
-
Select the WordArt.
-
Go to Shape Format > Text Effects > Transform and pick the effect you want.


Advanced techniques
Wrap around a circle To create text that completely circles your shape, choose Circle under Follow Path, and then drag any of the sizing handles until your WordArt is the size and shape you want.
Wrap around straight edges To wrap text around a shape that has straight edges, such as a rectangle, insert WordArt objects for each edge. In this example, WordArt is inserted four times, one for each side of the shape.
Group moves and copy To move or copy multiple WordArt objects as a single shape, see Group or ungroup shapes, pictures, or other objects .
Precise angle control You can control the angle of your WordArt text in relation to your shape with precision by using the Rotate tool.
If you need very precise control or are creating a complex combination of shapes and text, you’ll want to use a third-party drawing or graphics program to create the text around your shape and then copy and paste it into your Office document.
In Word for the web you can see WordArt that’s already in your document, but to add more WordArt you need to open or edit the doc in the desktop version of Word.
You can use the Font features on the Home tab to change the font color and size, and apply bolding, italics, or underlines to your text.
![]()
Written by Allen Wyatt (last updated February 2, 2019)
This tip applies to Word 2007, 2010, 2013, 2016, 2019, and Word in Microsoft 365
When Manuel uses the Text Box tool on the Insert tab of the ribbon, Word allows him to draw a text box anywhere in his document. This text box is always rectangular, but Manuel wonders if there is a way to create a text box that has rounded corners.
Word actually gives you quite a bit of control when it comes to text boxes. That is because in past versions of Word there was a great deal of difference between text boxes and shapes, but in later versions there has been very little actual difference between them. Thus, one way is to not use the Text Box tool to draw text boxes. Instead, use the Shapes tool (Insert tab of the ribbon, Illustrations group) to create a shape. You can then format the shape to appear just like a text box and even add text within the shape. (To add text, right-click the border of the shape and choose Add Text from the Context menu.)
If you prefer to stay with text boxes or you simply want to change the nature of text boxes already in your document, then follow these steps:
- Select your text box.
- Display the Format tab of the ribbon. (This tab is visible only when the text box is selected.)
- Click the Edit Shape tool, in the Insert Shapes group. Word displays some options.
- Choose Change Shape. Word displays a wide assortment of shapes.
- Click a shape—the rounded-corner rectangle is a good choice.
Word obediently changes your text box to a shape but remembers all the formatting you’d previously applied to the text box.
WordTips is your source for cost-effective Microsoft Word training.
(Microsoft Word is the most popular word processing software in the world.)
This tip (5960) applies to Microsoft Word 2007, 2010, 2013, 2016, 2019, and Word in Microsoft 365.
Author Bio
With more than 50 non-fiction books and numerous magazine articles to his credit, Allen Wyatt is an internationally recognized author. He is president of Sharon Parq Associates, a computer and publishing services company. Learn more about Allen…
MORE FROM ALLEN
IEEE Citation Format
Different style guides describe different ways of formatting information that appears in a document. One such style guide …
Discover More
Returning to Where You Were Before Finding Something
When you use the Find and Replace dialog box to do editing, you could easily lose track of where you were before …
Discover More
Returning to Your Document after Adding an Endnote
Endnotes are a required element in some types of writing. When you add an endnote, Word moves you to the end of your …
Discover More
More WordTips (ribbon)
Columns within Text Boxes
When creating a layout for your document, you might use text boxes to position text in specific places. If you want those …
Discover More
Adding a Drop Shadow to a Text Box
Drop shadows add a nice touch to text boxes, making it seem like they are hovering above the page. Here are the simple …
Discover More
No-border Text Boxes by Default
Text boxes can be a great design element when laying out your documents. If you want those text boxes to have no borders …
Discover More
Microsoft 365, Microsoft Office for Mac, Microsoft Word, Office 2010, Office 2013, Office 2016, Office 2019, Office 2021 / Office LTSC, Office 365 /
7 January 2023
A Microsoft Word text box can have rounded corners instead of the default square corners. It’s remarkably easy once you know the simple trick.
Word Text Boxes always start with square corners, no matter which default you choose from the gallery.
But once it’s inserted, a Word text box can be transformed many different shapes including Rounded Corners.

It’s the same text box with all the power that text boxes offer, just with a different shaped border.
Change Shape
Insert the text box and resize as usual. Select the box then go to Shape Format | Insert Shapes | Edit Shapes | Change Shape.

Select Rectangle: Rounded Corners
That’s it! That’s all there is to it.
Put Word text on its side, an angle or a curve
Gradient Effects and Text in Word – in depth
Text Box in Excel, PowerPoint and Word
Set your own Text Box default settings in Office
Changing Text Box backgrounds
Microsoft Office Word lets you create text boxes in documents and modify them using the text box tools feature. The feature offers a variety of tools that let you change the shape, colour and look of a text box. By using one of the built-in shapes, you can quickly change a regular text box into one with rounded corners to give your document a crisp, professional look. You can also use this feature to change the shape of an existing text box.
- Microsoft Office Word lets you create text boxes in documents and modify them using the text box tools feature.
- You can also use this feature to change the shape of an existing text box.
Open a document in Microsoft Word 2007.
Select the «Insert» tab on the main menu ribbon and choose «Text Box.» A list of built-in text boxes will open.
Click on the «Draw Text Box» option located at the bottom of the list.
Click in the area of the document where the text box will be placed and drag the mouse to create the general height and width of the text box. Click on the text box’s border anchors to adjust the size of the box.
Click on the text box and select the «Text Box Tools» option which will appear above the text box format option on the menu ribbon.
Click the «Change Shape» option in the Text Box Styles section. Select «Rounded Rectangle» in the Basic Shapes section. The text box will change into a box with rounded corners.
- Open a document in Microsoft Word 2003.
- Click the «Change Shape» option in the Text Box Styles section.
- Open a document in Microsoft Word 2003.
- Click the «Change Shape» option in the Text Box Styles section.
Open a document in Microsoft Word 2003.
Click «Insert» on the main menu bar and choose «Text Box» from the drop-down menu.
Click «Draw Text Box» and click in the area of the document where the text box will be placed. Drag the mouse to create the general height and width of the text box. Click on the text box’s border anchors to adjust the size of the box.
Double-click on the text box and the Drawing Tools menu will open.
Click the «Change Shape» option in the Text Box Styles section. Select «Rounded Rectangle» in the Basic Shapes section. The text box will change into a box with rounded corners.
- Open a document in Microsoft Word 2003.
- Click the «Change Shape» option in the Text Box Styles section.
- Open a document in Microsoft Word 2003.
- Click the «Change Shape» option in the Text Box Styles section.
How to Create a Text Box With Rounded Corners in Microsoft Word
- Click the border of the rectangular text box until you see the Resizing and Rotation handles.
- Click the “Format” tab, select “Edit Shape,” and then click “Change Shape.”
- Click the rounded rectangle shape on the row under Rectangles to round the corners of your text box.
How do I circle a number in Word?
Go to Insert tab, click Symbol and choose More Symbols… in the drop-down list. 3. Choose Windings, Windings 2 or Wingdings 3 as the font in Symbols tab, then scroll down to find the circled numbers. Click Insert to add the specified number to your document.
Can you draw a signature in Word?
Here are the guidelines to draw electronic signature in word on Android: Edit it and add fields, including a signature field. Set a signing order. Self sign it after you created a unique e-signature.
How do you make a 6 inch circle in Word?
Press and hold the Shift key to constrain the shape to a circle. Click on the circle and hold while you drag the shape to the desired size. The tab automatically changes to the Format tab. You can fill the circle with a color, change the color and width of the line, and add effects from the Format tab.
Can you change the shape of a text box in Word?
Word. Click the shape that you want to change. Under Text Box Tools, on the Format tab, in the Text Box Styles group, click Change Shape, and then click the shape that you want.
How do I add a signature in Word for Mac?
On the Insert menu, click AutoText > New. The Create New AutoText box opens. Next to Name, type a name for your signature block and click OK. When you want to use this signature, place the insertion point where you want to insert the signature block.
How do I draw in Word 2020?
How to draw in Word
- In the ‘Insert tab,’ click the ‘Shapes’ button, and in the drop-down menu select ‘Scribble’
- Click and hold down your mouse to draw the shape you want.
- Release the mouse when you’ve finished drawing.
- Go to the ‘Shape Format’ tab to edit your shape.
How can I make my style unique?
7 Ways to Create a Wardrobe That’s Uniquely Yours
- Develop your personal brand. If someone were to look at an outfit you’d wear on a typical day, would they immediately recognize it as yours?
- Have things tailored.
- Raid your mother’s or grandmother’s closet.
- Add character with your accessories.
- Find your signature colors.
- Channel your inspirations.
- Be true to yourself!
How do I put a text box in a shape?
Right-click anywhere in your shape and click the “Add Text” command. This places an insertion point in the shape where you can type your text. Once you’ve added whatever you want to write, the “Format” tab has tools you can use to give your text a little pop with things like text styles and shading.
How do I enable the pen in Word?
You define the pens you want to have, and they are then available in Word, Excel, and PowerPoint.
- On the Draw tab of the Ribbon, tap a pen to select it.
- Tap again to open the menu of Thickness and Color options for the pen.
- A Pencil texture is also available:
- On the touch screen, begin writing or drawing.
How do you curate your own style?
When you figure out why specifically you like how someone dresses, it becomes much easier to form your own personal style by taking inspiration from others.
- Curate your wardrobe according to how you want to look.
- Mix basics with a few key statement pieces for a put together but unique look.
- Get out of your comfort zone.
How do I draw in Word 2010?
Add a drawing to a document
- Click in your document where you want to create the drawing.
- On the Insert tab, in the Illustrations group, click Shapes.
- When you find the shape you want to insert, double-click to insert it automatically, or click and drag to draw it in your document.
What is a unique style?
Women with a unique style are tuned into what makes them look their best. There are certain colors that light us up and other colors that just don’t jive well with our skin tones and hair or eye color. Women with extraordinary style know what styles look fabulous on them and they stick with it.
How can I get good style?
How to Develop Your Own Sense of Style
- Gather Inspiration. The primary challenge of personal style isn’t having enough clothes to wear.
- Shop a Bit. At this point, you’re not quite ready to go out and stock up your wardrobe with things that reflect your style.
- Copy Everything.
- Keep Old Clothes.
- Follow the Trends.
What is your personal style?
In the fashion world, “style” is usually shorthand for “personal style,” or the way an individual expresses themselves through aesthetic choices such as their clothing, accessories, hairstyle, and the way they put an outfit together. Style is timeless.
How do I create a digital handwritten signature?
Here are the 2 simple ways to create a handwritten digital signature:
- Use the “Protect” board to sign your name and save the output file as an image.
- Sign your name on a piece of blank paper. Use a scanner to scan it, or just take a snapshot of it. Save it as an image in PNG or JPG format.
Can you type your name for a signature?
No. There are a number of e-signature laws across the world, such as ESIGN and UETA, which define what constitute a legally binding esignature. Simply typing your name into a document cannot tie the signature to the document. You need to have specialist software like ApproveMe to ‘hash’ the document content.
Why can’t I insert shapes in Word?
As the issue occurs with specific document, you may recreate the document then save it in a different name. Then reopen the new document and check if the ‘Insert > Shapes’ option is enabled. To create an instance of document, click on the ‘View’ tab > click on ‘New Window’ under ‘Window’ group.
Asked
6 years, 5 months ago
Viewed
2k times
How can I create a textbox with one edge having a rounded corner in Word 2013? I wish to have the rounded corner the lower-right.
![]()
CharlieRB
22.5k5 gold badges55 silver badges104 bronze badges
asked Nov 14, 2016 at 13:29
![]()
1
Go to insert — shapes — rectangles — «round single corner rectangle»
After inserting it you can format it as you need, and after right click you can select «add text», so it’ll behave as a text box.

answered Nov 14, 2016 at 13:34
![]()
Máté JuhászMáté Juhász
21.2k6 gold badges53 silver badges72 bronze badges
1

Microsoft Word makes it easy to add geometric shapes (and a whole lot more) to your document. You can also add text into these shapes, which is handy when you’re creating flowcharts, network diagrams, mind maps, and so on. This being Word, there are plenty of options for doing this, so let’s take a look.
First, you’ll need to insert a shape by going to Insert > Shapes. We’re going to use a nice rounded rectangle, which by default will be filled in with blue.

Right-click anywhere in your shape and click the “Add Text” command.
This places an insertion point in the shape where you can type your text. Once you’ve added whatever you want to write, the “Format” tab has tools you can use to give your text a little pop with things like text styles and shading.
You can also select the text and use the standard Font, Paragraph and Styles tools on the Home tab to format your text, just as if it were a normal part of the document. When you right click your text, you’ll find the usual quick options as well.
RELATED: How to Position Images and Other Objects in Microsoft Word
If you’d like a little more control over the placement and boundaries of your text, you can add a text box inside your shape instead. When you insert a new image or select an existing image, Word automatically switches you to the “Format” tab. You’ll see two ways here to insert a text box, both of which add a text box in the same way.
Select one of the options and move the cursor over your image. A yellow “+” mark will replace your pointer. Hold down the left mouse button and drag the “+” mark to create a text box. When the box looks about right, release the left click (don’t worry if the text box isn’t exactly the right size or location, you can change it afterward), and your text box will be created.
You can use the handles (the little squares) around the text box to resize it or select the whole text box to move it around within your shape. Add your text and format it in whatever way you want.
There are also text boxes with preset formatting that you can add by selecting your shape and then clicking Insert > Text Box. We’ve only scratched the surface of what you can do with text boxes here, so if you want to know more check out our guide to text boxes and all the things you can do with them.
RELATED: How to Create and Format a Text Box in Microsoft Word
READ NEXT
- › How to Link Text Boxes in Microsoft Word
- › How to Circle Text in Microsoft Word
- › How to Remove Borders in Microsoft Word
- › How to Get a Refund on the PlayStation Store
- › Windows 11 Has a New Photo Gallery in the File Explorer
- › The New Winamp Is Here, but It’s Not What You’d Expect
- › Android’s Nearby Share Has (Unofficially) Arrived on Mac
- › Save Hundreds on Elegoo’s New PHECDA Laser Engraver Through Kickstarter
How-To Geek is where you turn when you want experts to explain technology. Since we launched in 2006, our articles have been read billions of times. Want to know more?