
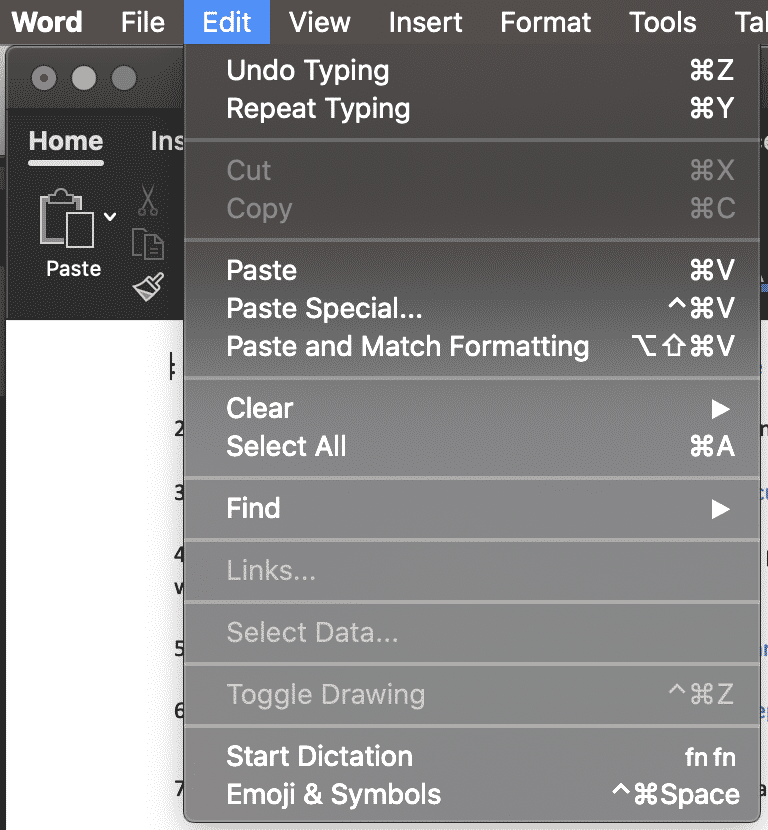
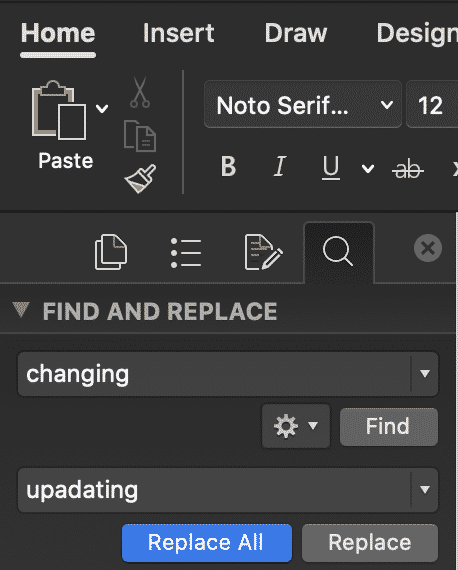
Find and replace text

-
Go to Home > Replace.
-
Enter the word or phrase you want to replace in Find what.
-
Enter your new text in Replace with.
-
Choose Replace All to change all occurrences of the word or phrase. Or, select Find Next until you find the one you want to update, and then choose Replace.
-
To specify only upper or lowercase in your search, select More > Match case. There are several other ways to search in this menu.
For other options, see Find and replace text
Find and replace basic text
In the upper-right corner of the document, in the search box  , type the word or phrase that you want to find, and Word will highlight all instances of the word or phrase throughout the document.
To replace found text:
-
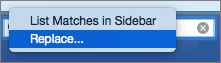
Select the magnifying glass, and then select Replace.

-
In the Replace With box, type the replacement text.
-
Select Replace All or Replace.
Tips:
-
You can also open the basic Find and Replace pane with the keyboard shortcut CONTROL + H.
-
When you replace text, it’s a good idea to select Replace instead of Replace All. That way you can review each item before replacing it.
-
You can find text with special formatting, such as bold or highlight, by using the Format menu.
-
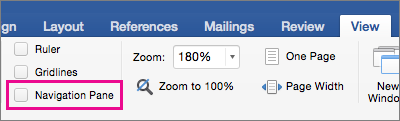
Select View > Navigation Pane.
-
In the Navigation Pane, select the magnifying glass.
-
Select Settings
, and then select Advanced Find & Replace.
Notes:
-
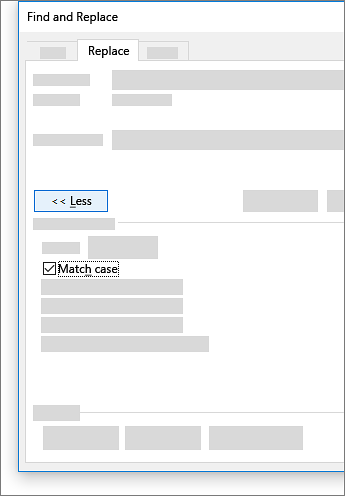
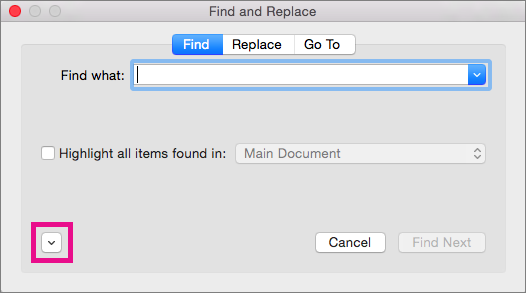
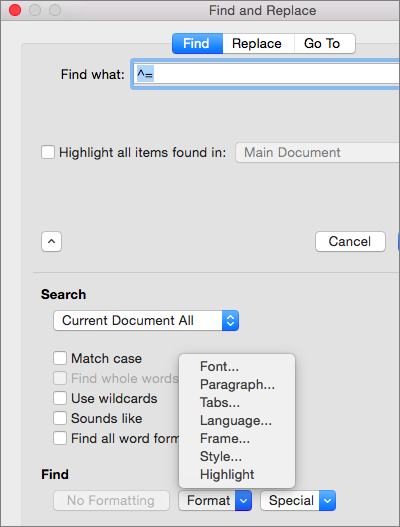
Select the arrow at the bottom of the Find and Replace dialog box to show all options.
-
-
-
On the Format menu, select the option that you want.
If a second dialog box opens, select the options that you want, and then select OK.
-
In the Find and Replace dialog box, select Find Next or Find All.
 , and then select Advanced Find & Replace.
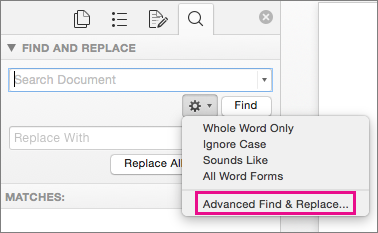
You can find and replace text with special formatting, such as bold or highlight, by using the Format menu.
-
Select View > Navigation Pane.
-
In the Navigation Pane, select the magnifying glass.
-
Select Settings
, and then select Advanced Find & Replace.
-
At the top of the dialog box, select Replace.
Notes:
-
Select the arrow at the bottom of the Find and Replace dialog box to show all options.
-
-
-
On the Find what box, type the text that you want to find.
-
On the Format menu, select the formatting that you want to find.
If a second dialog box opens, select the options that you want, and then select OK.
-
Select in the box next to Replace with.
-
On the Format menu, select the replacement formatting. If a second dialog box appears, select the formats that you want, and then select OK.
-
Select Replace, Replace All, or Find Next.
-
Select View > Navigation Pane.
-
In the Navigation Pane, select the magnifying glass.
-
Select Settings
, and then select Advanced Find & Replace.
Notes:
-
Select the arrow at the bottom of the Find and Replace dialog box to show all options.
-
-
-
On the Special menu, select the special character that you want to find.
-
Select Find Next.

-
Select View > Navigation Pane.
-
In the Navigation Pane, select the magnifying glass.
-
Select Settings
, and then select Advanced Find & Replace.
Notes:
-
Select the arrow at the bottom of the Find and Replace dialog box to show all options.
-
-
-
At the top of the Find and Replace dialog box, select Replace and then select in the Find What box, but don’t type anything there. Later, when you select a special character, Word will automatically put the character code in the box for you.
Note: Select the arrow at the bottom of the Find and Replace dialog box to show all options.
-
On the Special menu, select the special character that you want to find.
-
Select in the Replace with box.
-
On the Special menu, select the special character that you want to use as a replacement.
-
Select Replace or Find Next.
-
Select View > Navigation Pane.
-
In the Navigation Pane, select the magnifying glass.
-
Select Settings
, and then select Advanced Find & Replace.
-
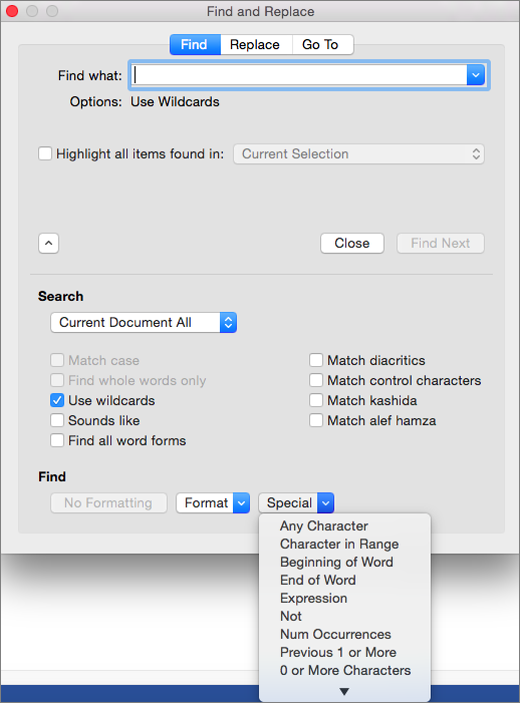
Select the Use wildcards check box.
If you don’t see the Use wildcards check box, select
. -
Select the Special menu, select a wildcard character, and then type any additional text in the Find what box.
-
Select Find Next.
Tips:
-
To cancel a search in progress, press
+ PERIOD. -
You can also enter a wildcard character directly in the Find what box instead of selecting an item from the Special pop-up menu.
-
To search for a character that’s defined as a wildcard character, type a backslash () before the character. For example, type ? to find a question mark.
-
You can use parentheses to group the wildcard characters and text and to indicate the order of evaluation. For example, search for <(pre)*(ed)> to find «presorted» and «prevented.»
-
You can search for an expression and use the n wildcard character to replace the search string with the rearranged expression. For example, type (Newman) (Belinda) in the Find what box and 2 1 in the Replace with box. Word will find «Newman Belinda» and replace it with «Belinda Newman.»
-
-
To replace found text:
-
Select the Replace tab, and then select the Replace with box.
-
Select Special, select a wildcard character, and then type any additional text in the Replace with box.
-
Select Replace All, Replace, or Find Next.
Tip: When you replace text, it’s a good idea to select Replace instead of Replace All. That way you can confirm each replacement to make sure that it’s correct.
-
 .
.
 + PERIOD.
You can refine a search by using any of the following wildcard characters.
|
To find |
Use this |
For example |
|---|---|---|
|
Any single character |
? |
s?t finds «sat» and «set.» |
|
Any string of characters |
* |
s*d finds «sad» and «started.» |
|
One of the specified characters |
[ ] |
w[io]n finds «win» and «won.» |
|
Any single character in this range |
[-] |
[r-t]ight finds «right» and «sight» and «tight.» Ranges must be in ascending order. |
|
Any single character except the characters inside the brackets |
[!] |
m[!a]st finds «mist» and «most» but not «mast.» |
|
Any single character except characters in the range inside the brackets |
[!x-z] |
t[!a-m]ck finds «tock» and «tuck» but not «tack» or «tick.» Ranges must be in ascending order. |
|
Exactly n occurrences of a character or expression |
{ n} |
fe{2}d finds «feed» but not «fed.» |
|
At least n occurrences of a character or expression |
{ n,} |
fe{1,}d finds «fed» and «feed.» |
|
A range of occurrences of a character or expression |
{ n, n} |
10{1,3} finds «10,» «100,» and «1000.» |
|
One or more occurrences of a character or expression |
@ |
lo@t finds «lot» and «loot.» |
|
The beginning of a word |
< |
<(inter) finds «interesting» and «intercept» but not «splintered.» |
|
The end of a word |
> |
(in)> finds «in» and «within,» but not «interesting.» |
Word for the web lets you find and replace basic text. You can match case or fine whole words only. For more varied options, open your document in Word for the desktop.
Need more help?
Let’s assume you’re a paralegal and you just finished typing a lengthy legal document or a contract for your client, only to discover that you misspelled your client’s name or a wrong company’s name multiple times throughout your document. And don’t have time to manually locate and replace every instance of the text. What would you do? Don’t panic – you can easily fix that with MS Word’s Find and Replace feature.
Find and Replace is one of the most useful features in Microsoft Word that can be used to find a character, a word, or phrase in a document and replace them. You can also find and replace text in a specific section of text or a whole document.
Not only can you find a particular word and replace it with another word, but you can also find text based on its formatting, using wildcards, and with matching prefix or suffix. It also allows you to find and replace text with specific formatting, non-printing characters, or special characters. In this post, you will learn how to find and replace text in MS Word.
Find Text in Microsoft Word
To start with, let’s see how to Find text in Excel using the navigational pane or the Find and Replace tool. Then we’ll explore how to use the Find and Replace tool to replace text based on different options.
Find Text
You can use the Navigation pane to search for a character, a word, or a group of words. And you can access this navigation pane from the Ribbon or by pressing a hotkey Ctrl + F.
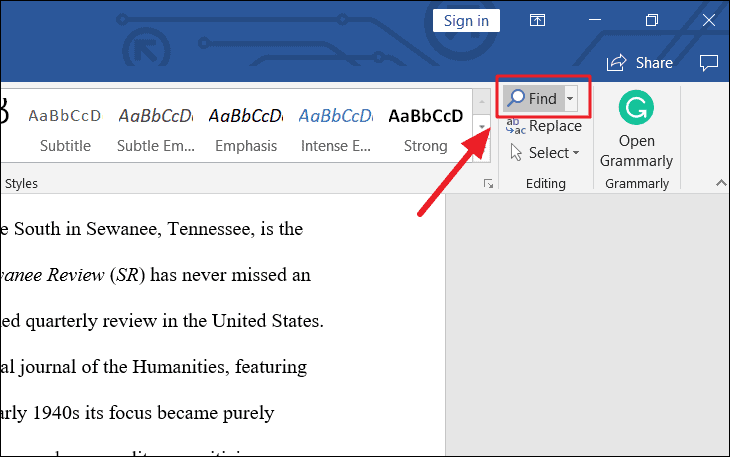
To access, the Navigation panel (Find Command), first, open the Word in which you want to search for text. Then, go to the ‘Home’ tab, and click the ‘Find’ button from the Editing group in the Ribbon. Or you can press the shortcut keys Ctrl + F in the keyboard.
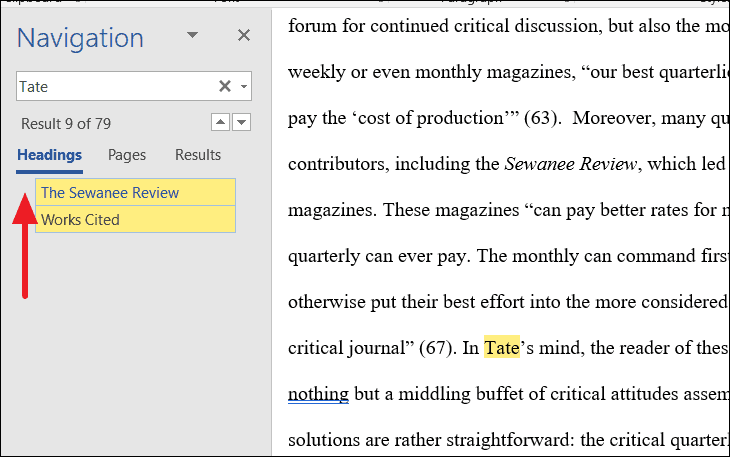
This will open up the Navigation pane on the left of the Window. Type the text or phrase you want to find in the ‘Search document’ text box in the Navigation pane and press ‘Enter’. As you type, the tool will show you all the related matches. In our example, we’ll type ‘Tate’.
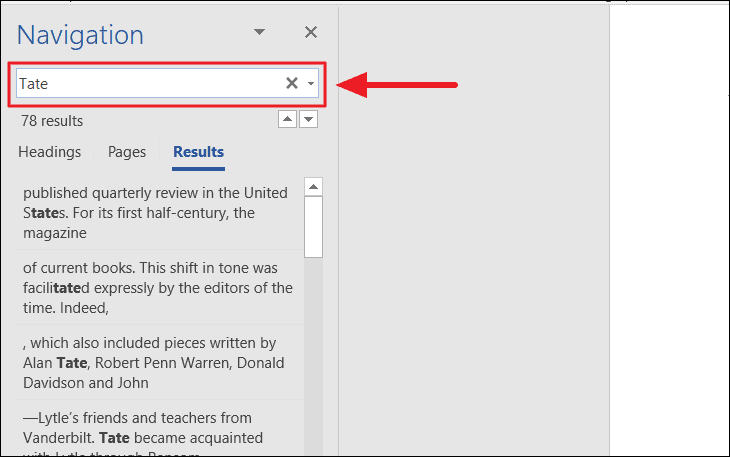
The Find command searches for all the matching text in the document and highlights them in yellow. The navigation pane shows all instances of the search word (Tate) as a preview of the results
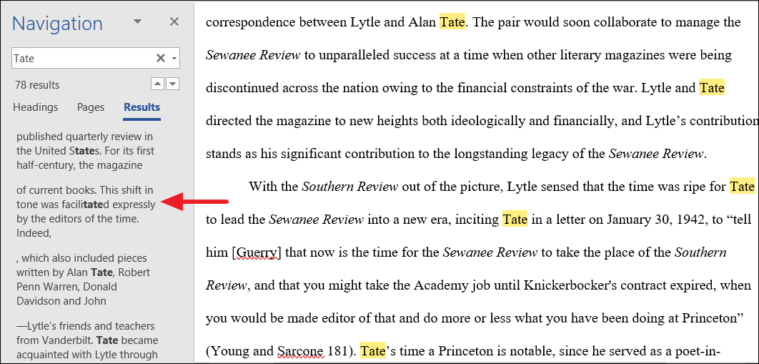
The tool not only highlights the exact words, it even highlights the partially matched words.
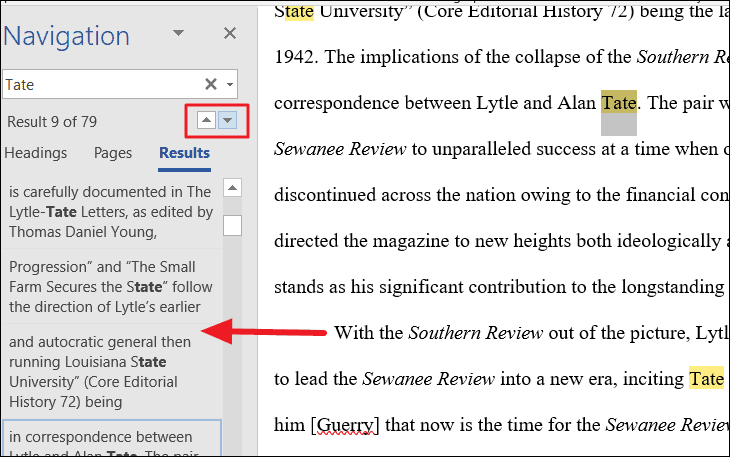
You can use the upward and downward arrows beside the text box to jump to the Previous or Next search result. Or you can click on one of the results below the search field to jump to it directly.
Instead of searching through an entire document for a text or phrase, you can also search a large document by headings. To do that, click the ‘Headings’ tab and select a heading in the Navigation pane to browse by headings in the document.
To search through pages in Word, click the ‘Pages’ tab in the Navigation pane and select one of the thumbnail images of all your pages that you want to see. Then, you can search for a specific text on that page.

Once you’re done editing the document, close the Navigation pane and the highlights will disappear.
Advanced Find
If you are looking for more specific words or phrases, for instance, words with a certain font or style, special characters, or only full words, you can use the Advanced Find feature to track them down. This tool lets you customize your search with various options. Here’s how:
Go to the ‘Home’ tab, click the downward arrow next to the ‘Find’ icon in the Editing group, and select ‘Advanced Find’. Or press Ctrl + H shortcut keys to open the Find and Replace tool.
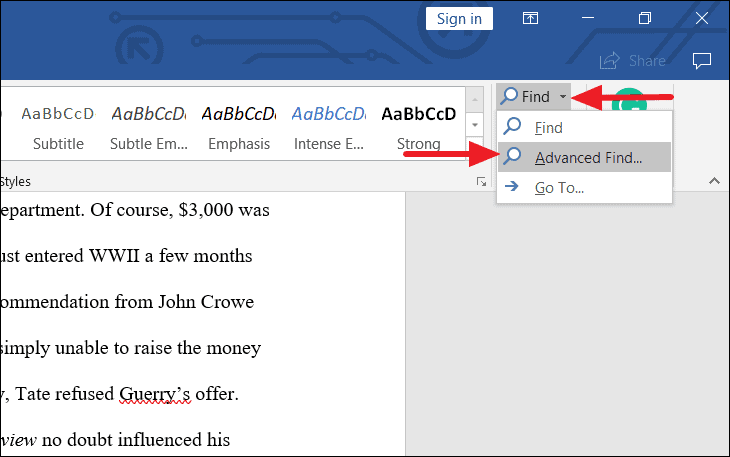
Or you can even launch the Find and Replace tool from the Navigation pane by clicking the magnifying glass icon in the Search Document text box and selecting the ‘Advanced Find’ option.

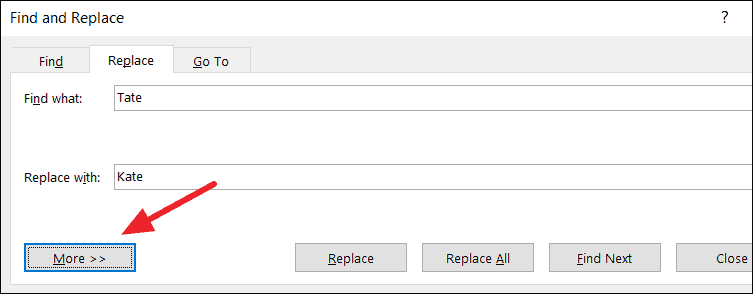
The Find and Replace dialog box will appear. Here, you can do a basic search, but if you want to customize your search with more options, Click the More >> button.

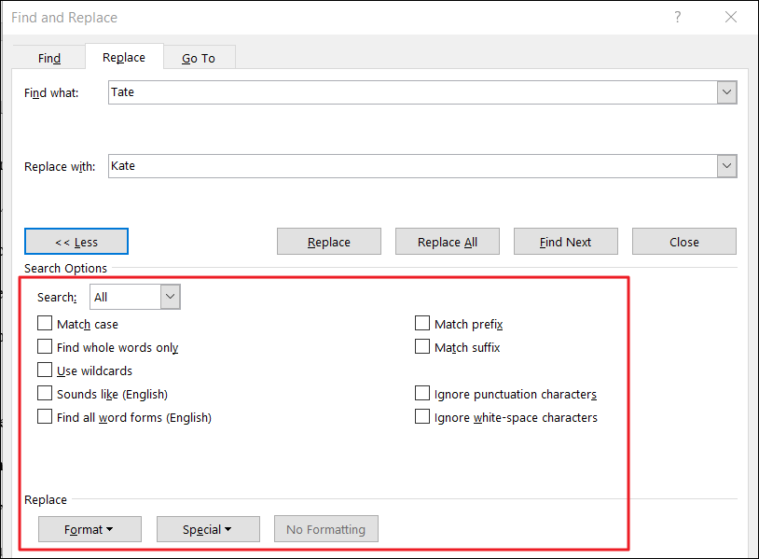
When you expand the More button, you would find more options with which you can do more advanced searches.
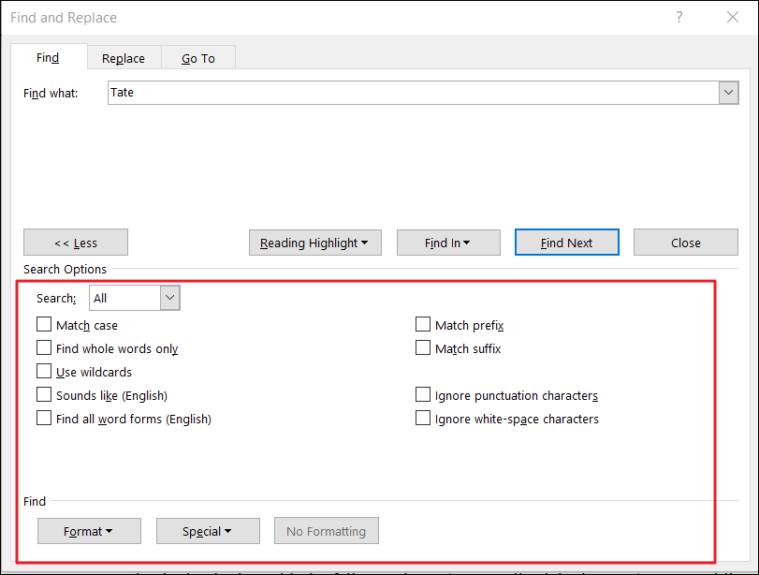
Select one or more options in the Search Options section and click ‘Find Next’ to view the result.
- Match Case: If the Match case box is checked, it searches for the text that exactly matches the uppercase and lowercase letters you type in the ‘Find what’ field.
- Find Whole Words Only: This option finds text that is not partial or part of another word, it only finds the whole words that are exactly matched.
- Use Wildcards: This option is the opposite of the ‘Find Whole Words only’ option. The wildcards you can use are single character (?) and multiple characters (*) wildcards. For example, when you are searching for “Wall*”, you’ll get Walls, Wallmart, or Wallpaper, etc.
- Sounds Like: This option finds words or phrases that sound phonetically similar such as ‘eyes’ when searching for ‘ice’ or ‘ant’ for ‘aunt’.
- Find All Word Forms: This option finds all variants of words (all verb forms). For example, when you search swim, you’ll get swim, swam, and swimming.
- Match Prefix: This searches for words with the same prefixes. For example, search for hype, and you may get hyperactive, hypersensitive, hypercritical.
- Match Suffix: This searches for words with the same suffixes. For example, search for less, and you may get endless, ageless, lawless, effortless.
- Ignore Punctuation Characters: This option lets you ignore punctuation characters in a text when searching. For instance, finding the word ‘Mrs. Jones’ when you searched for ‘Mrs Jones’.
- Ignore white-space characters: This option lets you ignore white spaces in between. For instance, finding the word ‘Days are good’ when you searched for ‘Daysaregood’.
We’ll apply few of these options and see how it works with an example.
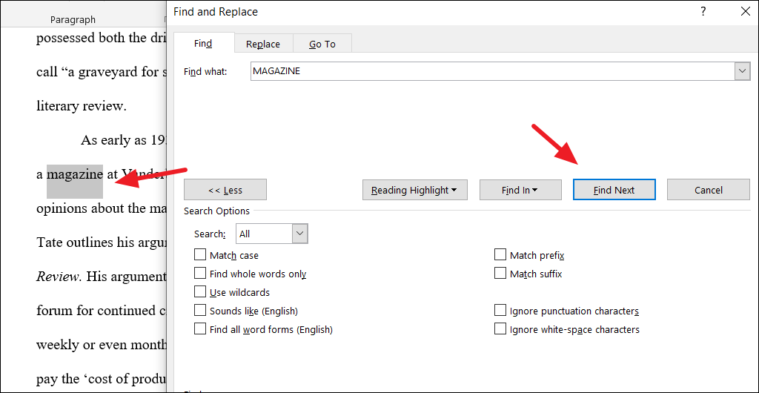
Match Case
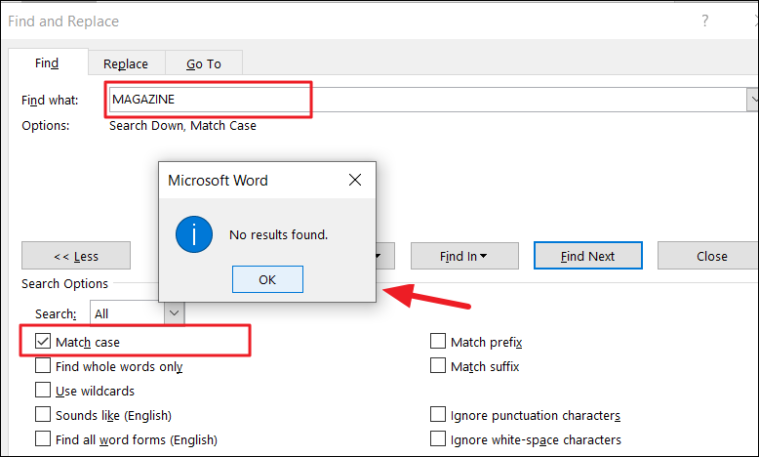
For example, let’s say we search the word ‘MAGAZINE’ in all caps without the match case option enabled. Type the word in the ‘Find what’ field and click the ‘Find Next’ button.

In the ‘Search’ drop-down under Search Options, you choose ‘Down’ to start looking from the top to bottom of the document, choose ‘down’ to start looking from the bottom to top of the document, or ‘All’ to search all over the document.
When you click ‘Find Next’, it will highlight the first instance of the word in grey. When you click ‘Find Next’ again, it will select the next instance of the word. As you click Find Next each time, it will highlight the matching word one at a time.
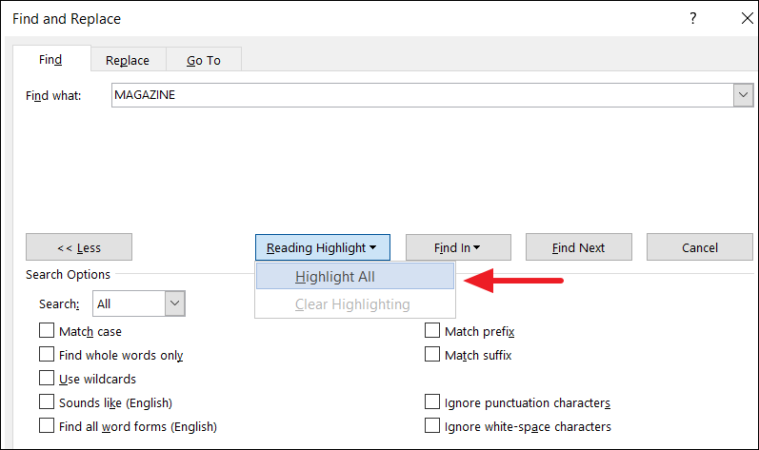
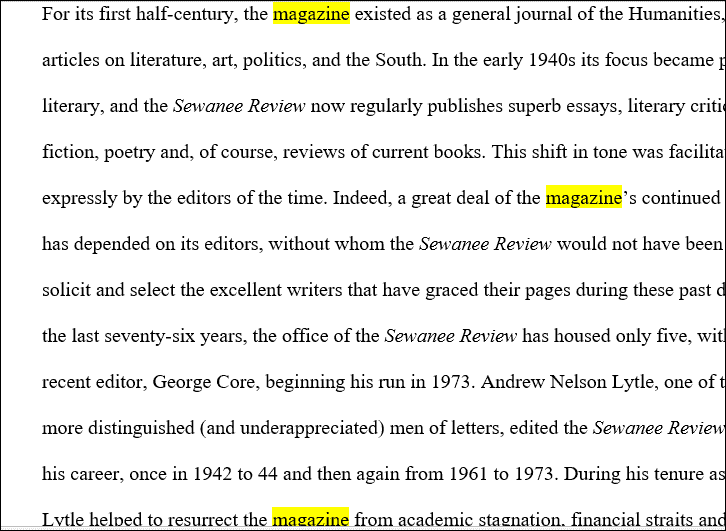
If you want to highlight all the instances of the word at once, click the ‘Reading Highlight’ button and select ‘Highlight All’.
You would get several matches with the word all highlighted in yellow.
But if we searched the same word (capitalized) with match case enabled, we would get no results. Because the tool only looks for the word that exactly matches the uppercase letters we typed earlier.
Find All Word Forms
In another example, if we searched the word ‘write’ with the ‘Find all word forms (English)’ setting enabled, we would get all variants of the word.
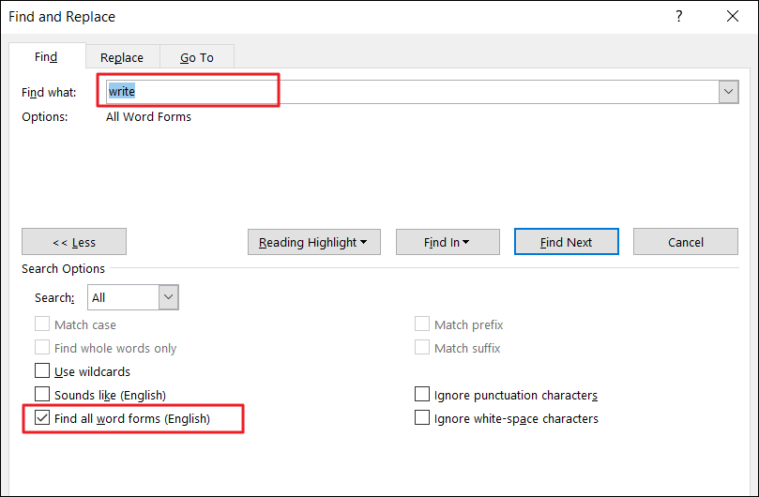
Word will find all verb forms of the word as shown below.
Advanced Find with Formatting
You can also search for certain word or phrase with specific formatting applied.
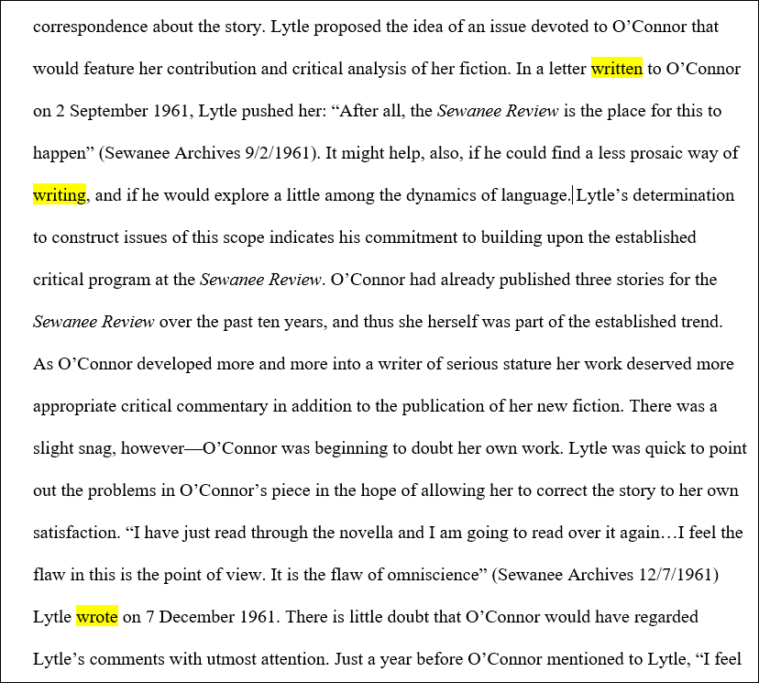
To find words with formatting, first, type the word in the ‘Find what’ box and click the ‘Format’ drop-down button at the bottom of the Find and Replace dialog box. Then choose the format in which you want to look for the word.
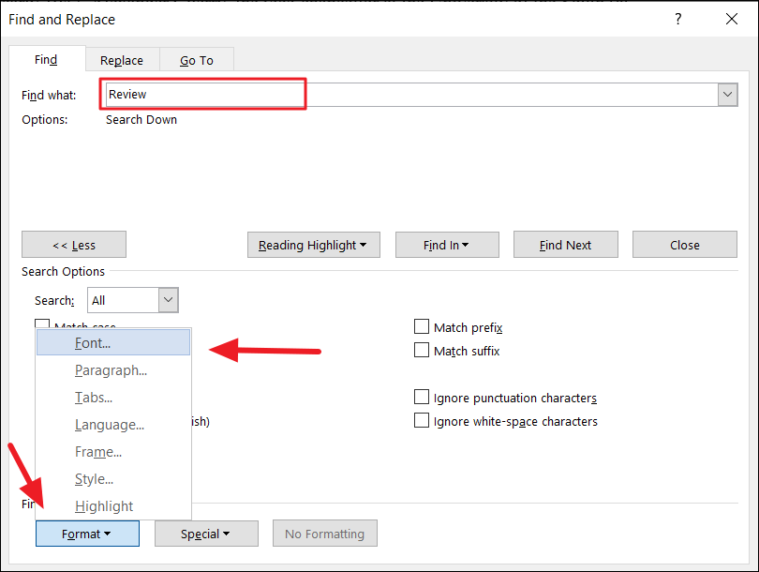
You can even find words with specific font format, paragraphs with specific alignment and format, tabs, words in a certain language, text frame, style, and highlight.
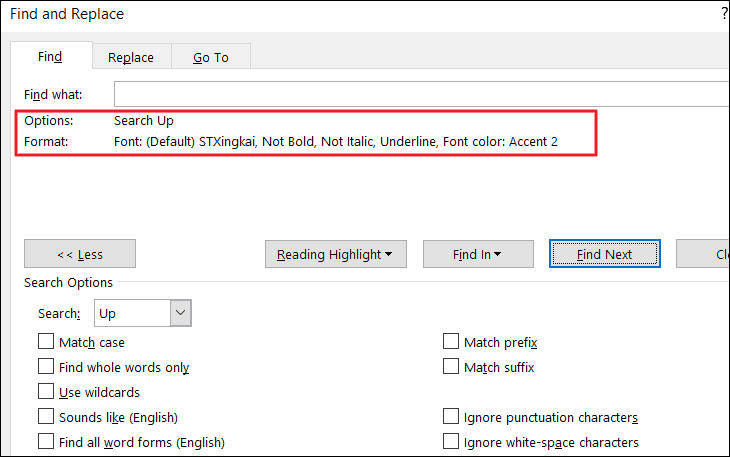
We are going to search for the word with a certain font format, so we are choosing ‘Font’. In the Find Font window, specify the format as shown below and click ‘OK’.
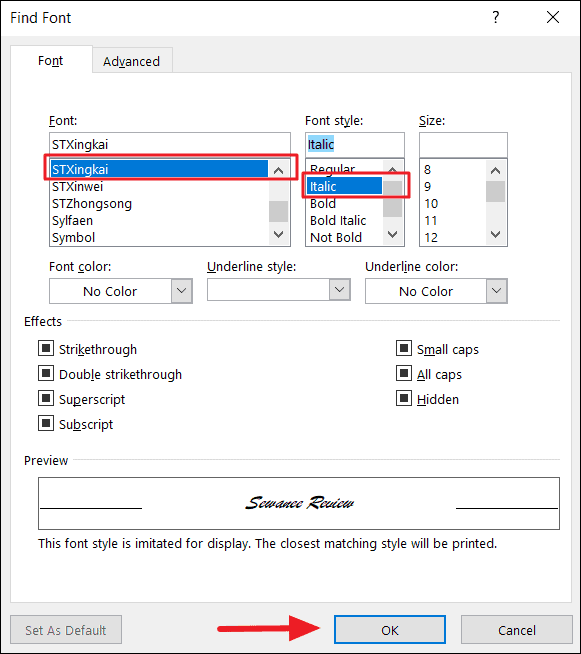
The chosen Format ‘Font: (Default) STXingkai, Italic’ will appear under the ‘Find What’ text box in the Find and Replace dialog box. Now click ‘Highlight All’ to find the matching words with that format.
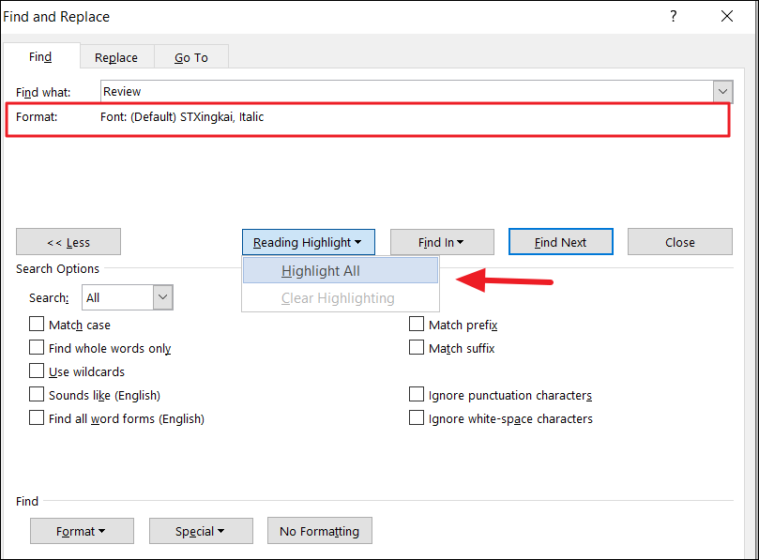
As you can see, the tool only highlights the words with that specific font format, while it doesn’t highlight the same matching word in a different font format.
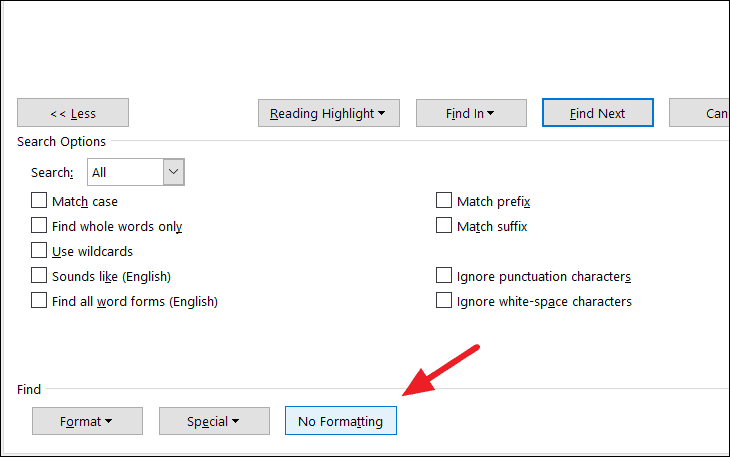
To clear the formatting for the search, click the ‘No Formatting’ button at the bottom of the Find and Replace dialog box.
Find Text with Only Formatting
You can even find texts with formatting alone. You don’t even have to type a word or phrase, you can just specify the only format of the text.
And the tool will find you all the words or phrases with the matching format.
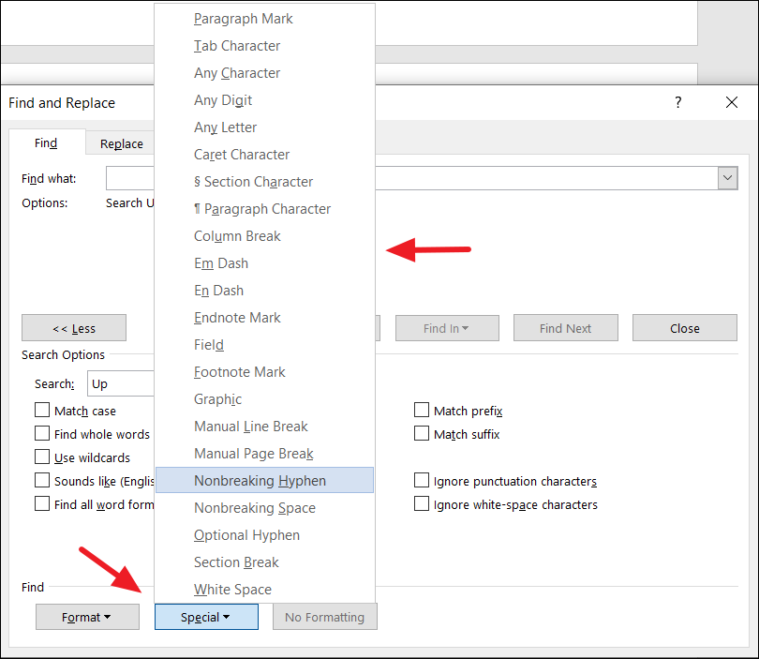
The Find and Replace tool also lets you find non-breaking characters/special characters or words with special characters by choosing the character(s) from the ‘Special’ drop-down button at the bottom of the Find and Replace dialog box.
Find and Replace Text in MS Word
So far, you have learned how to find text and how to find text with advanced options, now let us see how to replace the found text.
The Replace function allows you to find a word or a group of words and replace it with something else or find a word based on text formatting and replace it with other text, or find a specific word and replace its formatting, or find and replace characters with other special characters or words.
Find and Replace Text
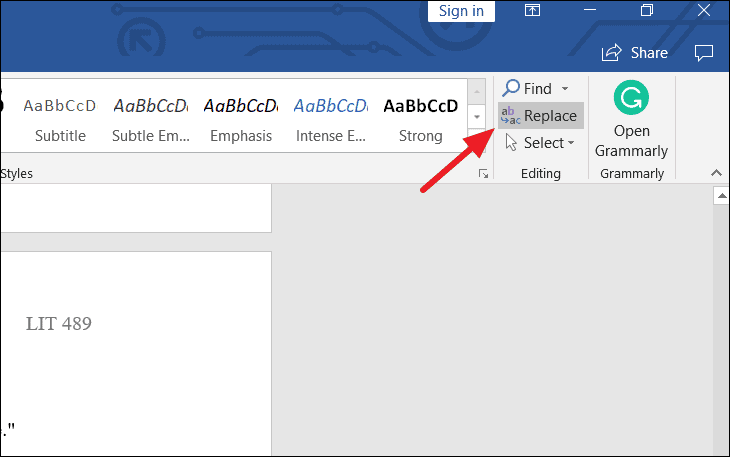
To find and replace a particular word or phrase for another, navigate to the Editing group in the ‘Home’ tab and click the ‘Replace’ command. Alternatively, you can also press the keyboard shortcut Ctrl + H.
This will open the Find and Replace dialog box. In the Find and Replace dialog box, fill out the two fields:
- Type the text you want to search for in the ‘Find what:’ field.
- Type the text you want to replace it with in the ‘Replace with:’ field.
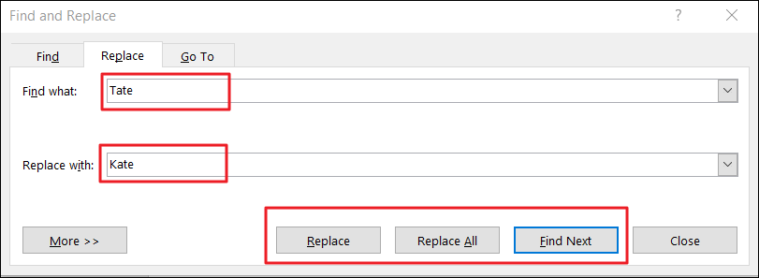
Once you enter the necessary texts, you can either click the ‘Replace’ button to replace the text one by one or ‘Replace All’ to replace all the instances of the word at once.
Replacing all the text together may cause errors in your document if you are not cautious. For example, if you are replacing all the ‘He’ words with ‘She’, it may also replace the words Head with Shead, help with Shelp, heat with Sheat, and so on. So sometimes, it’s better to replace them one at a time.
Click the ‘Find Next’ to find the first instance of the text highlighted in gray and click ‘Find Next’ again to jump to the next instance. Review each instance and click ‘Replace’ to exchange the currently highlighted text.
You can click the title bar of the Find and Replace dialog box and drag it out the way to see the results behind it.
Once you’re done, click the ‘Close’ button to close the dialog box.
Note: If you leave the ‘Replace With’ field blank, the search text in the ‘Find What’ field will be deleted from the document.
Advanced Find and Replace Text
If you are looking to replace more specific words such as words with punctuation, capitalization, certain font or style, or even special characters, you can use the advanced search options of the Find and Replace tool.
To access the advanced options of Find and Replace, click the ‘More >>’ button at the bottom of the dialog.
Here, you have various search and replace options that you can use to narrow down your search.
As we discussed earlier in the Advanced Find section, you already know what each option under the Search Options is used for.
Select one or more options under the Search Options and click ‘Find Next’ to find the matching words or click ‘Replace’ to replace one instance at a time or click ‘Replace All’ to exchange every instance at once.
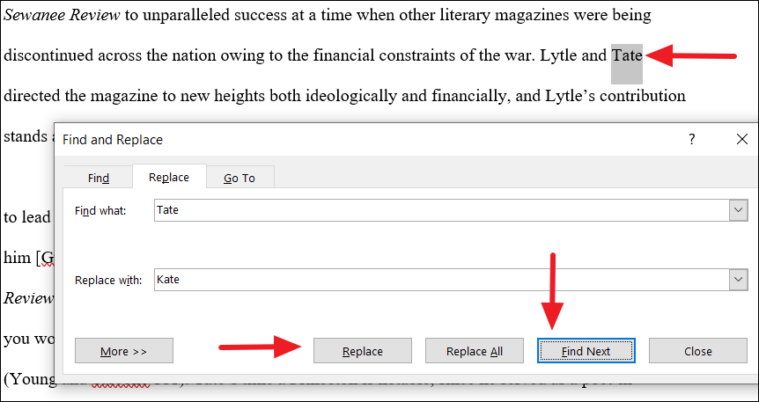
Example:
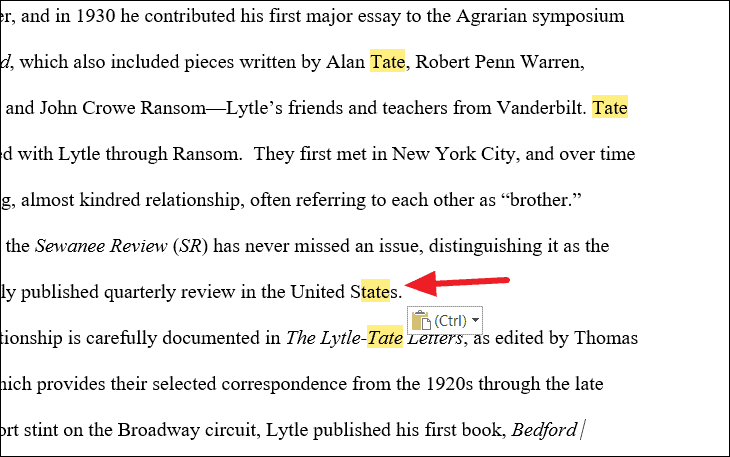
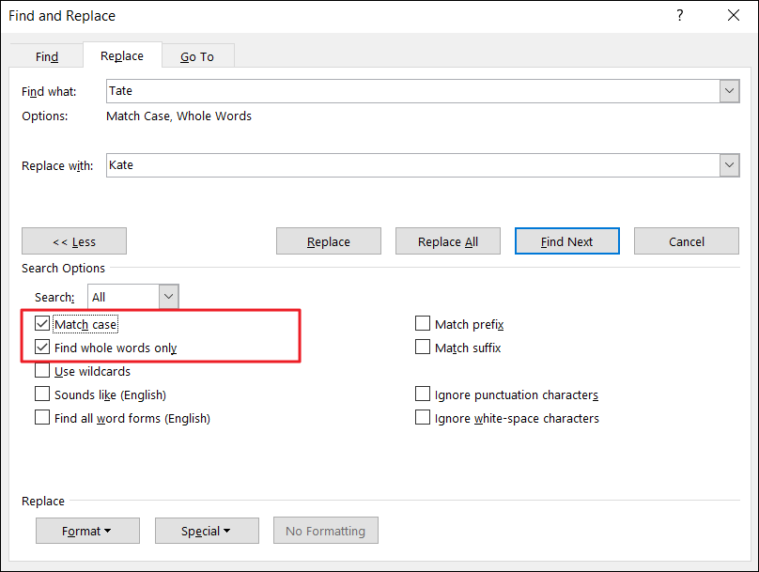
As we mentioned before, this tool finds the combinations of characters of the given word, even as part of other words.
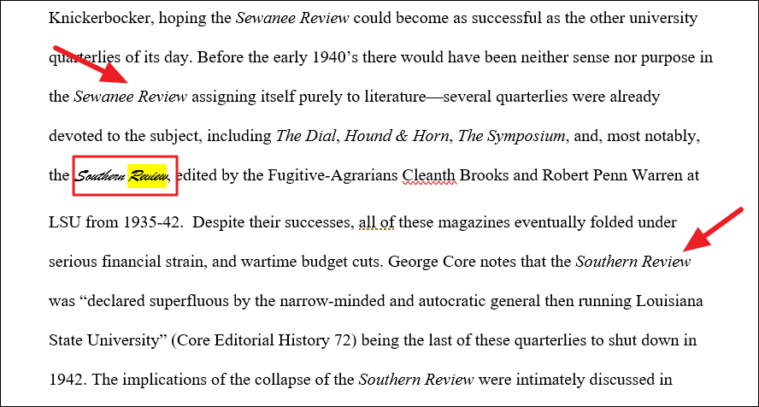
For example, when we search for the word ‘Tate’ in the document, it finds that combination of characters even as part of other words like ‘United States’.
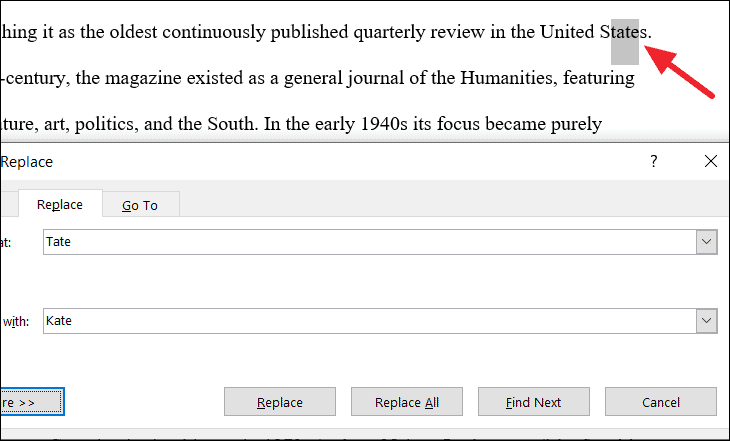
And this is not ideal when we replace these words. Also if you hundreds of matches, it would take forever to replace words one by one.
To fix this, check the ‘Find whole words only’ option, to find the words that are not partial or part of other words, it only finds whole words that are exactly matched. Here, we also checked the ‘Match case’ option to make sure it matches the exact uppercase and lowercase letters too. Then, click ‘Replace’ or ‘Replace All’ to replace the words.
You can use the rest of the above options in a similar fashion to customize your search to find specific words.
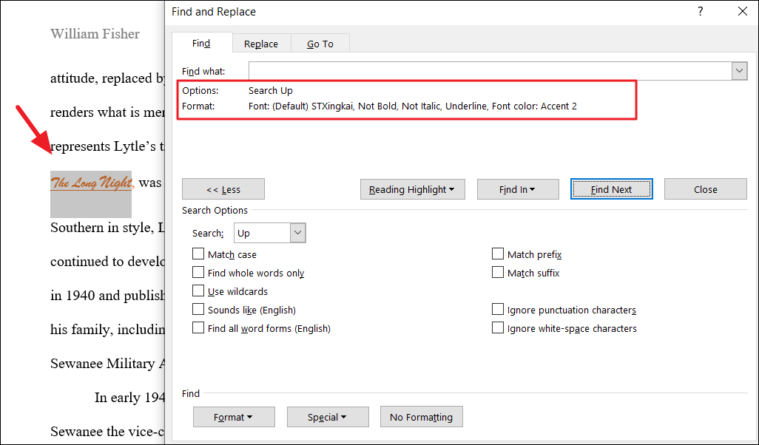
Find Text and Replace Formatting
You can also find a particular word and replace it with the same word but with specific formatting or replace it with another word with formatting.
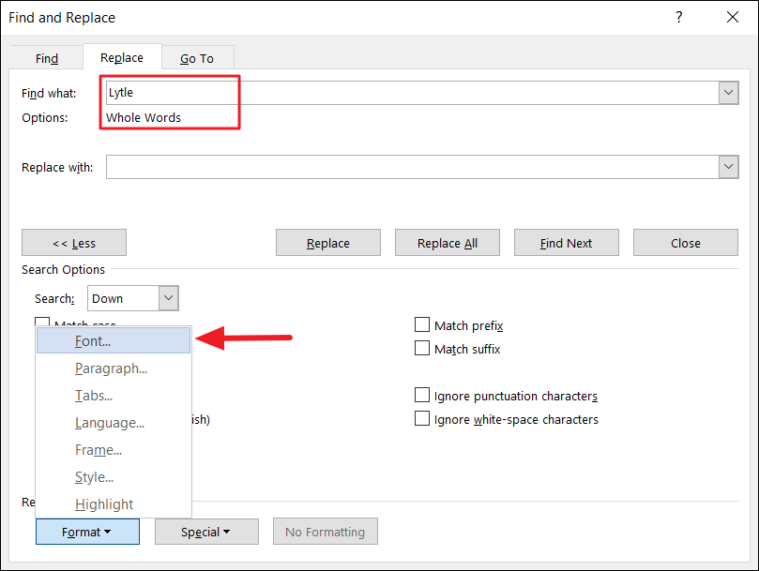
For example, we want to find and replace the whole word ‘Lytle’ with a specific font format. To replace formatting, type the word you want to find in the ‘Find what’ field and select the ‘Find whole words only’ option to search for only that whole word. Then, click the ‘Format’ button at the bottom of the dialog box and choose ‘Font’.
You can replace words with other formatting options such as Style, Paragraph, Frame, and so on.
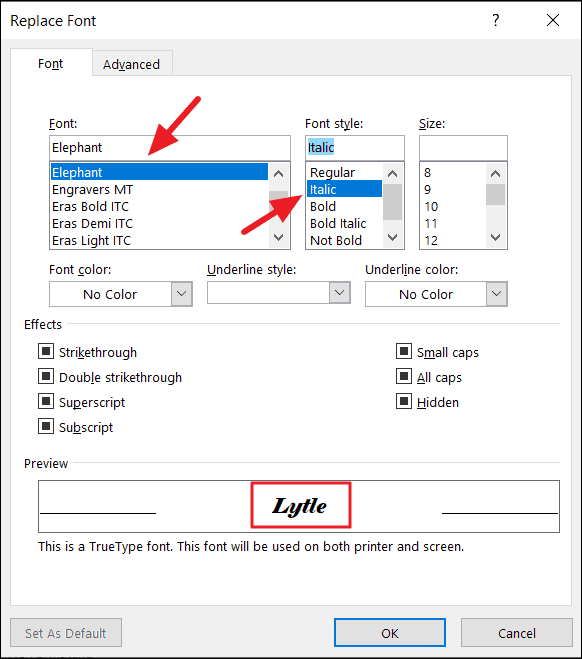
In the Replace Font dialog, choose your desired format style such as font, font style, font color, etc. In our case, we are choosing ‘Elephant’ font and ‘Italic’ style. Then, click ‘OK’ to apply.
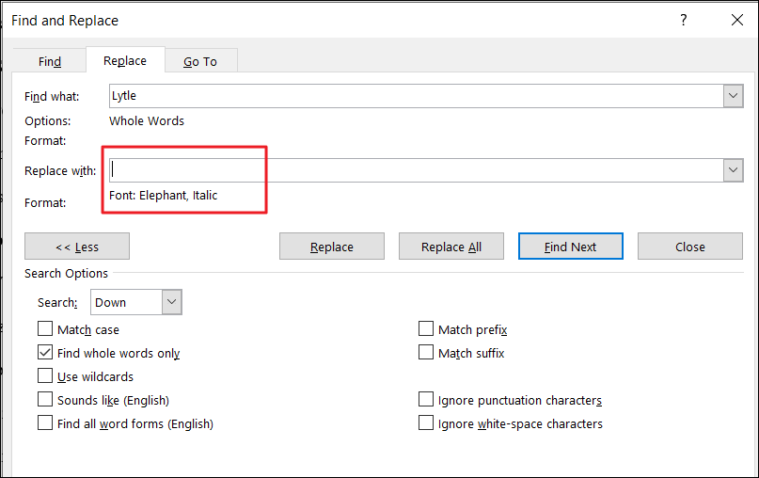
Back in the ‘Find and Replace’ dialog box, you can see the chosen formatting is set for the ‘Replace with:’. Since we are only replacing the formatting of the word, leave the ‘Replace with:’ field blank. Then, click either the ‘Replace’ or ‘Replace All’ button to replace the formatting.
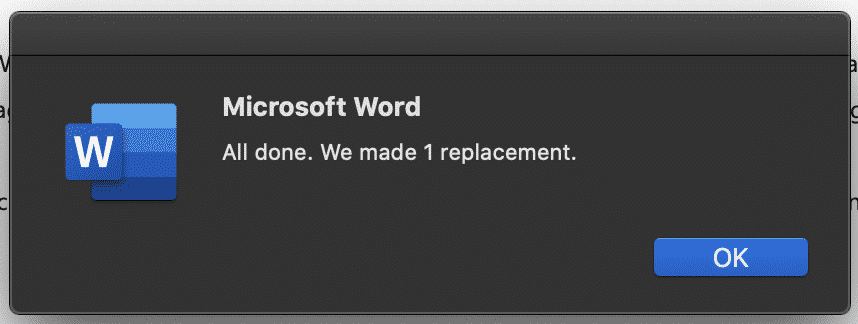
Once you click the ‘Replace All’ button a message box will appear informing you how many replacements were made (In our case, 222).
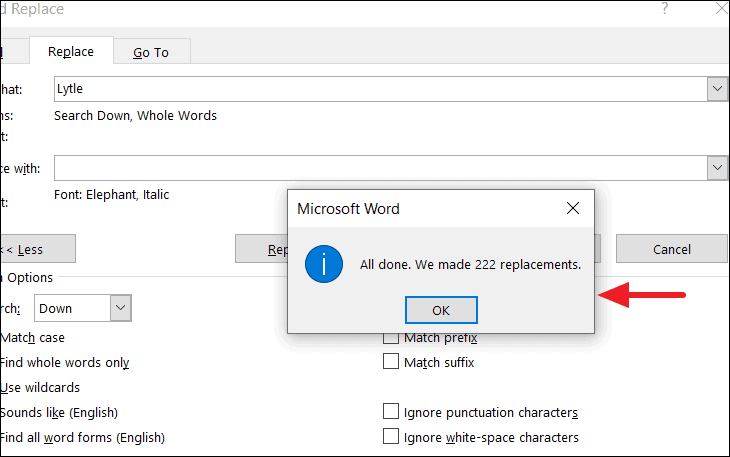
As you can see, all the instances of the word ‘Lytle’ is replaced with specified formatting.
Find Text with a Specific Formatting and Replace
If you want to find a text that has a certain formatting style and replace it with another text, without changing the formatting or with different formatting, you can do it by applying that formatting to the Find word. Here’ how you do this:
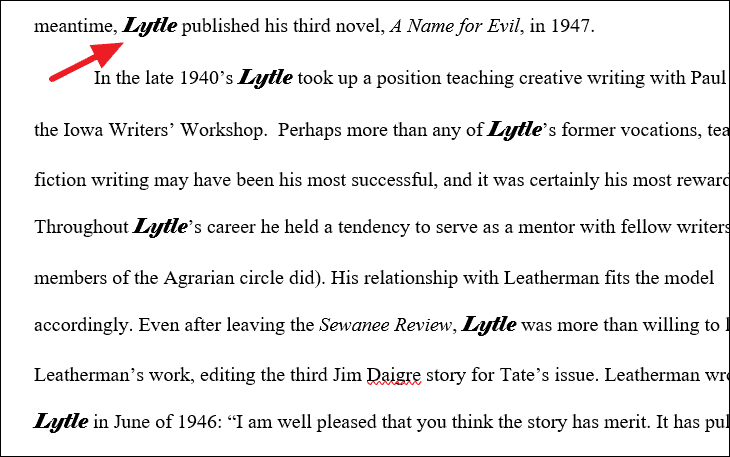
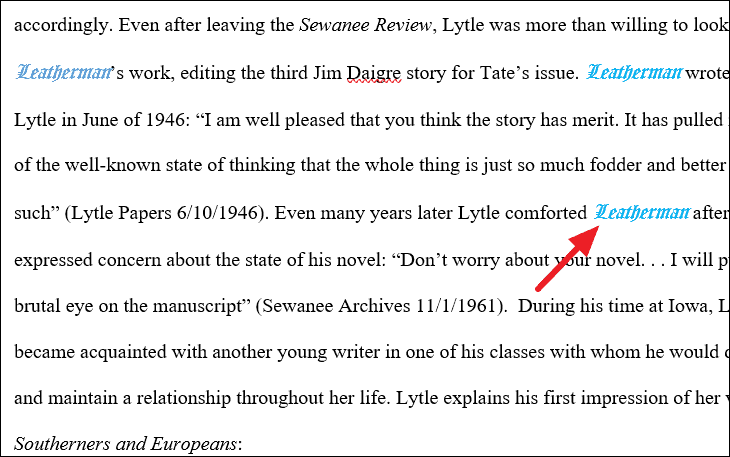
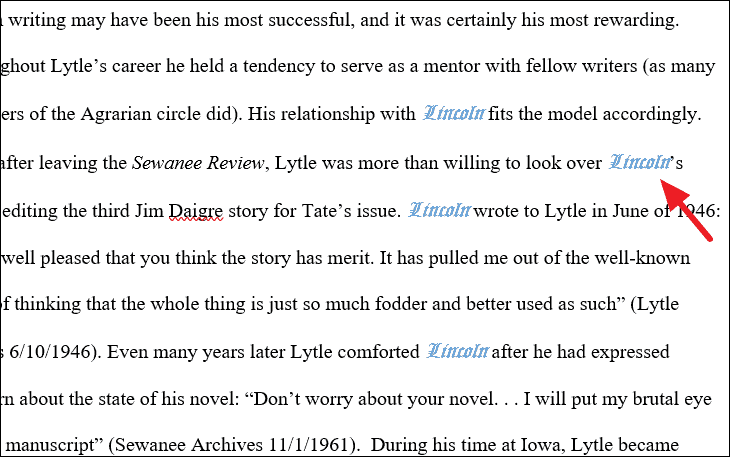
For example, we want to find and replace the text ‘Leatherman’, that has particular formatting (Font: Old English Text MT, Style: Italic, Color: Blue, Accent 5), with the text ‘Lincoln’ (without changing the formatting).
First, type the text you want to search for (in our case, Leatherman) in the ‘Find What’ field. Then, click on the ‘Format’ button and choose the options as required (Font).
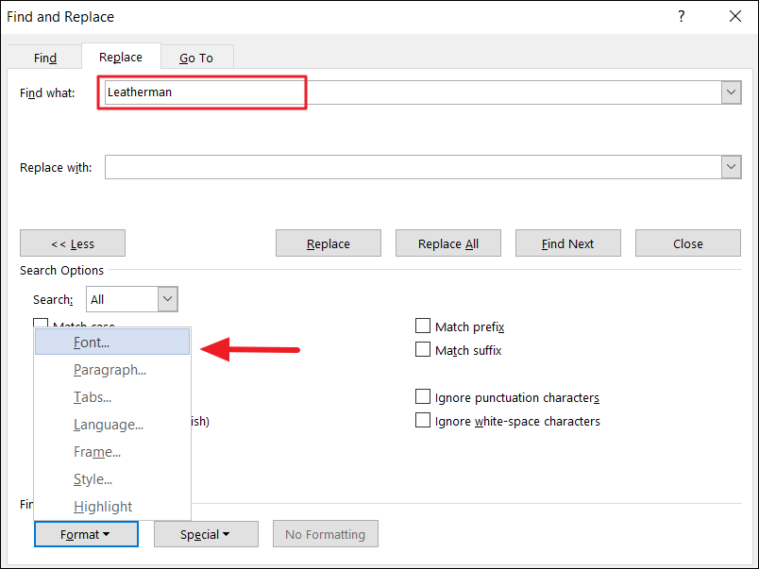
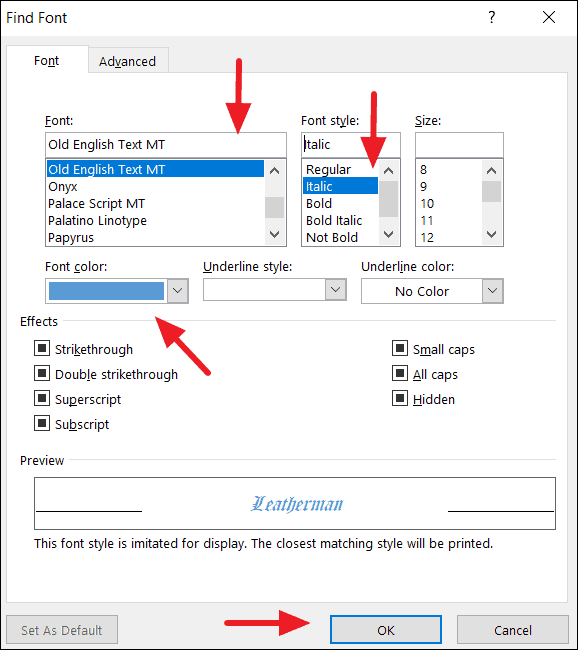
In the Find Font, dialog box, select the required formatting with which we’re going to find text. In our example, the text ‘Leatherman’ is in ‘Font: Old English Text MT, Style: Italic, and Color: Blue, Accent 5’ formatting. Once the options are selected, click ‘OK’.
Now the selected formatting options should appear under the ‘Find What’ text field in the Find and Replace.
Next, type the text you want it to be replaced with (Lincon) in the ‘Replace with field:’ and click ‘Replace All’. You can also add formatting to the replacement text if you want.

Once you click ‘Replace All’, all of the instances will be replaced and a prompt will show you how many replacements were made.

As you can see all the instances of the ‘Leatherman’ with formatting is replaced by the ‘Lincoln’ without changing the formatting.
Find and Replace Special Characters/Non-Printing Characters
The find and replace feature can also help you find special character characters and replace them with other special characters such as ®, é, ä, or any other character listed in the Symbol dialog. You can also find and replace non-printing characters such as manual line breaks, tab characters, paragraph marks, etc. You can even replace special characters with text and vice versa.
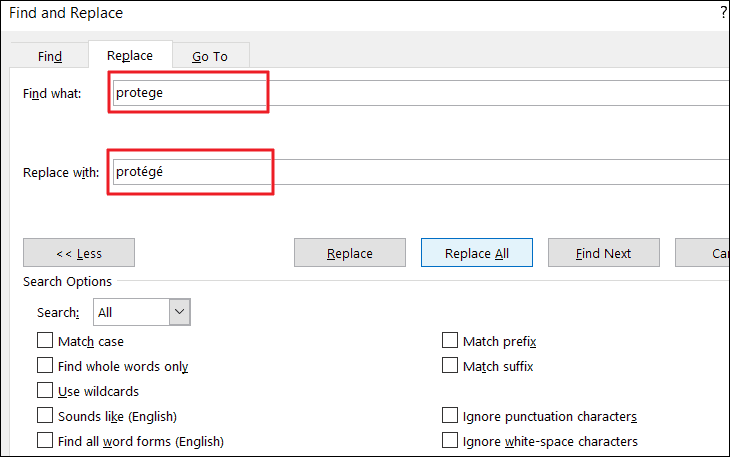
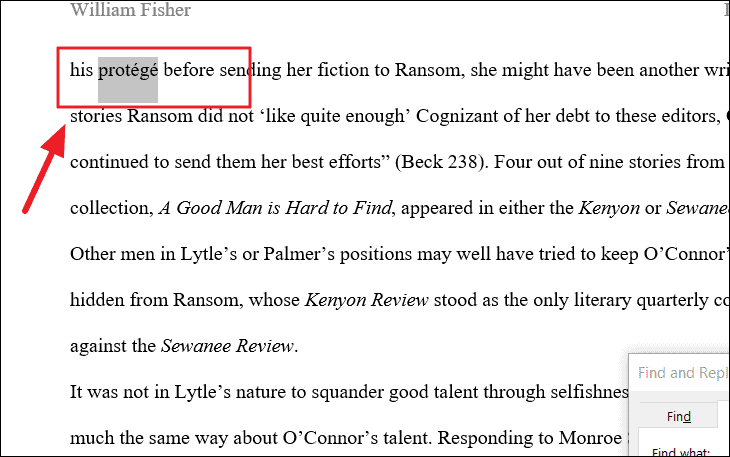
For example, if you want to find and replace the word ‘protege’ with ‘protégé’, type ‘protege’ in the Find what box and type ‘protégé’ in the ‘Replace with’ box. Then, click ‘Replace’ or ‘Replace All’ to replace them.
As you can see the found texts are replaced with replacement text with special characters.
Sometimes you want to replace manual line breaks (non-printing characters) with paragraph marks, in such cases, you need to insert respective character code in the ‘find what’ and ‘replace with’ boxes.
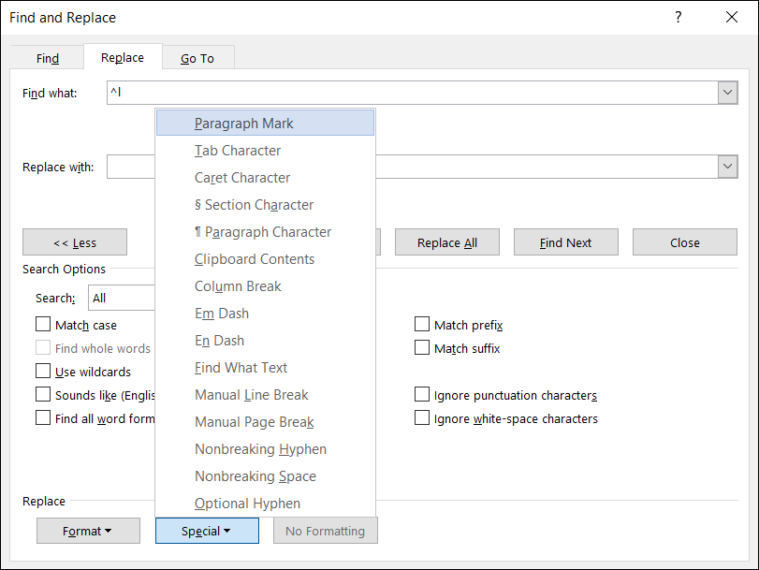
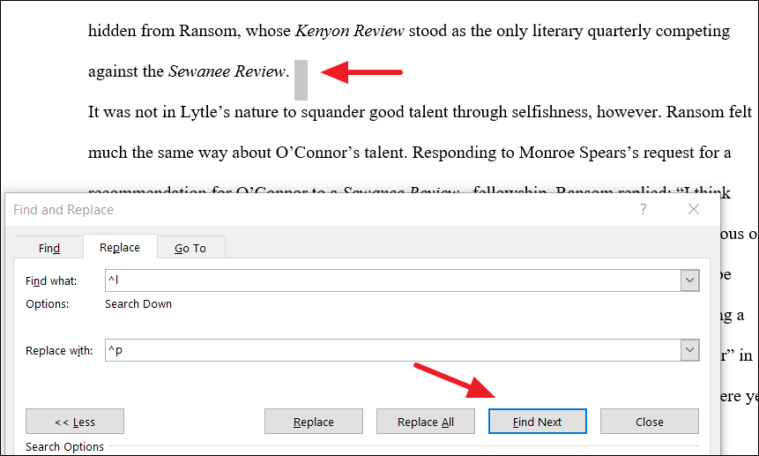
For example, we want to replace all manual line breaks in the documents with paragraph marks. The character code for a manual line break and paragraph mark is ‘^l’ and ‘^p’ respectively. You can either type the code or if you don’t know the code, use the ‘Special’ button to insert the code.
To insert non-breaking characters, first, select the text box where you want to insert. Then, click the ‘Special’ button at the bottom of the Find and Replace dialog box and select an item from the list. And the tool will automatically insert the respective character code in the text box.
In the example, we are choosing ‘Manual Line Break’ for the ‘Find what’ field.
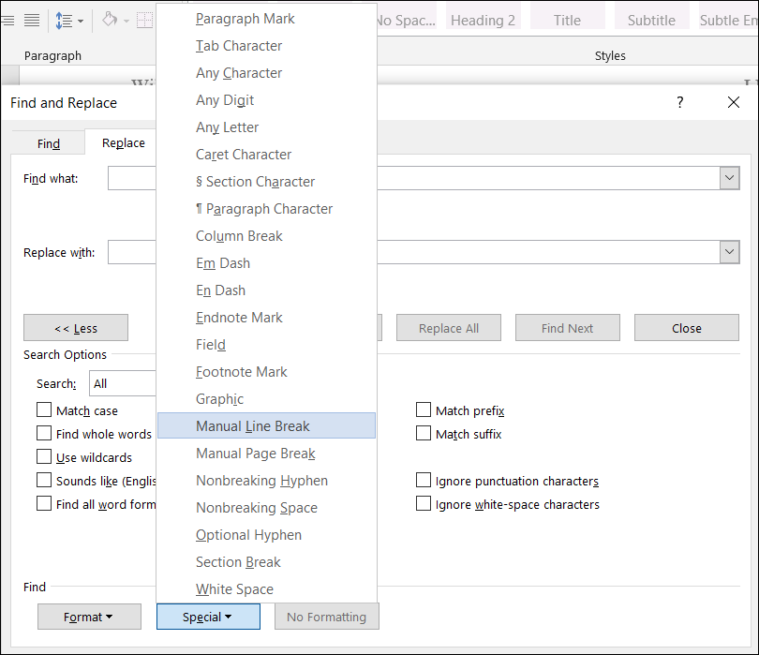
And ‘Paragraph Mark’ for the ‘Replace with’.
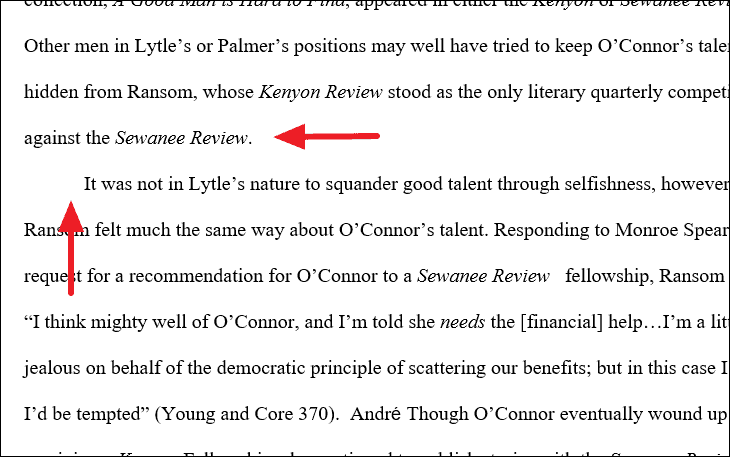
Then, click ‘Find Next’ to see where the line breaks are located. Now, click ‘Replace All’ to replace all the manual line breaks in the documents.
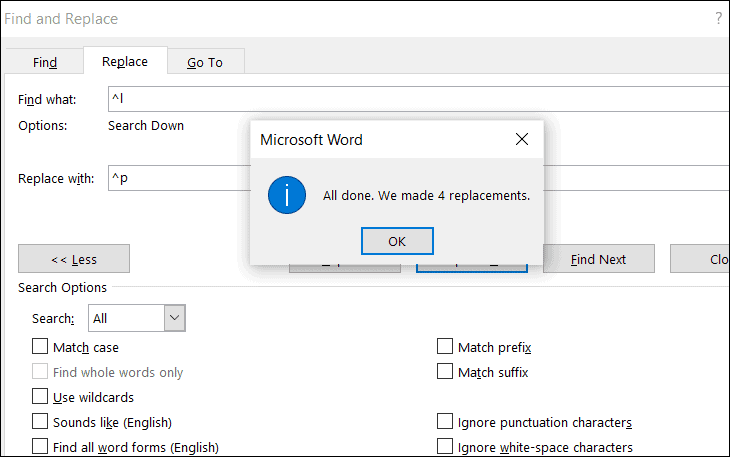
As you can see below, the manual line breaks are replaced with paragraph marks.
In the similar way, you can also replace non-breaking characters/special characters with text and vice versa.
That’s everything you need to know about finding and replacing text in Microsoft Word.
Вы когда-нибудь писали многостраничный документ только для того, чтобы понять, что вам нужно заменить все экземпляры слова другим? Мысль о необходимости прокручивать и сканировать каждое слово вручную мучительна.
К счастью, в Microsoft Word есть функция поиска и замены, которая может сделать всю работу за вас. Вот как вы можете использовать его, чтобы сэкономить время.
Что такое функция «Найти и заменить»?
Функция «Найти и заменить» позволяет заменить основной текст другим текстом. Например, вы можете использовать эту функцию, чтобы изменить одно слово или фразу на другое. Вы также можете использовать его для поиска и замены грамматических ошибок или ошибок форматирования, орфографических ошибок и специальных символов.
Поиск и замена доступны в MS Word и Excel.
Как использовать «Найти и заменить» в Microsoft Word
Вы можете найти и заменить текст в Word для Windows, macOS и веб-версии. Однако веб-версия имеет самый ограниченный функционал, поэтому, если вам нужны более разнообразные возможности, вам придется открывать документ в Word для рабочего стола.
Чтобы использовать поиск и замену в Windows:
- Убедитесь, что документ Word открыт, затем выберите вкладку «Главная».

- Перейдите на вкладку «Заменить».

- В поле «Найти» диалогового окна введите слово или фразу, которую хотите заменить. Рядом с «Заменить на» введите слово, на которое вы хотите его заменить.

- Выберите «Заменить», чтобы заменить слова по одному, или «Заменить все », чтобы заменить их все сразу. Кроме того, вы можете выбрать «Найти далее», чтобы просмотреть следующий экземпляр слова, не изменяя его.

Чтобы использовать функцию поиска и замены на Mac:
- Откройте документ и выберите увеличительное стекло, затем выберите «Заменить».
- В поле «Заменить на» введите слово или фразу, которую хотите заменить. Рядом с «Заменить на» введите слово, которое вы хотите заменить.
- Нажмите «Заменить» или «Заменить все».
Чтобы использовать поиск и замену в Интернете:
- Откройте документ Microsoft Word в веб-версии Word.
- Выберите стрелку вниз рядом с Найти и нажмите Заменить.

- В текстовом поле «Искать» введите конкретное слово или фразу, которую вы хотите заменить. Рядом с «Заменить на» введите слово, которое вы хотите заменить.

- Нажмите «Заменить» или «Заменить все».
Примечание. Вы также можете получить доступ к окну «Найти и заменить» с помощью сочетания клавиш. Нажмите Ctrl + H в Windows и Control + H в macOS.
Расширенные возможности поиска и замены
Помимо замены простого текста, существуют также расширенные функции поиска и замены. Эти расширенные параметры позволяют настроить поиск так, как вам нужно.
Чтобы получить доступ к дополнительным параметрам:
- Перейдите в раздел «Главная» > «Заменить».

- Нажмите «Еще».

Здесь вы увидите следующий список опций с флажками рядом с ними:

- Учитывать регистр : это позволяет вам искать слова с определенными заглавными буквами. Например, вы можете искать имена собственные, написанные строчными буквами (отсутствует заглавная буква).
- Найти только целые слова: это ограничивает возможность замены целыми словами. Например, если вы хотите заменить «конец», он не будет включать такие слова, как «расходовать» или «конец», содержащие это слово.
- Использовать подстановочные знаки : этот параметр позволяет добавлять «подстановочные знаки» для поиска практически всего в документе, включая различные типы форматирования. Чтобы использовать этот параметр, выберите «Использовать подстановочные знаки », затем нажмите «Специальный», чтобы увидеть, какие параметры можно искать во всплывающем меню.

- Звучит как (английский): Это поможет вам найти слова, похожие на введенное вами слово. Эта функция особенно полезна, если автор часто делает ошибки в написании похожих слов, таких как «там» и «их».
- Найти все словоформы (английский): эта функция находит все связанные слова на основе этимологии слова. Например, при поиске «съесть» также будут отображаться «съеденные» и «съеденные».
- Совпадать с префиксом: этот параметр поиска ограничивает результаты только словами, начинающимися с введенного вами слова.
- Совпадение суффикса: этот параметр поиска ограничивает результаты только словами, которые заканчиваются введенным вами словом.
- Игнорировать знаки препинания: этот параметр игнорирует слова, которые могут содержать знаки препинания, например дефис или апостроф. Например, при поиске «Джейнс» будут возвращены все экземпляры «Джейнс» и «Джейн».
- Игнорировать символы пробела: будут найдены все слова, которые могут содержать ошибочные пробелы (или двойные пробелы). Например, поиск «по всему» вернет «по всему» и «по всему».
Вы также можете заменить форматирование слова или фразы в документе. Для этого выберите Формат. Выпадающее меню предлагает несколько вариантов замены шрифта, форматирования, стиля и других характеристик. Например, если вы хотите выделить все экземпляры слова, вы можете выбрать «Выделить».

Больше никакого ручного сканирования
Наряду с другими замечательными функциями, такими как Диктовка, функция поиска и замены Microsoft Office значительно экономит время, особенно если вы имеете дело с большим документом, таким как диссертация или рукопись. Используйте его для поиска и исправления орфографических и грамматических ошибок, а также определенных проблем с форматированием в вашем документе, чтобы ускорить процесс редактирования.
Working with documents or spreadsheets on your computer or laptop, you can instantly find and edit text and data without manually combing through printed or handwritten pages. Word provides a very convenient «find and replace» feature that allows you to use wildcards and even find similar words.
Find and replace
To help you in finding some text in the document, Word offers two different options:
1. Using the Navigation pane:
Like in the most popular applications, to find a text in the document, you can use the Ctrl+F shortcut. That combination opens the Navigation pane in Microsoft Word:

If you have any text in the Clipboard or selected text in the document, it will automatically be shown in the search text box. You can type or insert any text you want to find and click Enter to show the results.
To see the next result, click Shift+F4, or use the Navigation pane and Next and Previous buttons for easy navigating between the next or previous results.
For example:

2. Using the Find and Replace dialog box:
To open the Find and Replace dialog box, do one of the following:
- On the Home tab, in the Editing group, click the Find list and then choose Advanced Find…:

- Click Ctrl+H,
- On the Home tab, in the Editing group, click the Replace button:


For example:

Word will show the next found result.
Advanced find and replace
To show the advanced find and replace options, do the following:
- On the Navigation pane, click the arrow down on the right side of the search text box and choose Options… in the list:

Word opens the Find Options dialog box:

- In the Find and Replace dialog box, click the More >> button (it doesn’t matter, which tab do you open: Find or Replace):

Word added several options that you can use to refine the search criteria:


The advanced find and replace options:
- Match case — Find and replace words that only match specific capitalization. For example, you can find one «Wolf» and 11 words «wolf» in the document.
- Find Whole words only — Avoid partial matches. For example, if you want to find «puff», Word doesn’t show the words «puffed».
- Use wildcards — Get partial matches. See Using wildcards for more details.
- Sounds like (English) — Find and replace words that sound like others. For example, «there», «their», and «three».
- Find all word forms (English) — Find and replace all verb tenses. For example, type «find», and Word will return «finds», «finding», and «found».
- Match prefix — Works with other settings to find and replace words with common prefixes or beginnings. For example, «be» returns «best» and «because».
- Match suffix — Works with other settings to find and replace words with common suffixes or endings. For example, «id» returns «said» and «did».
- Ignore punctuation characters — Ignore differences in hyphenation.
- Ignore white-space characters — Ignore spacing between characters.
The Format button — Find and replace page formatting options like Font types or colors, Paragraph formatting (left, right, center), or highlighted words.
The Special button — Find and replace page and character elements such as Em dashes, tabs, or Section Breaks. See Replacing special characters for more details.
The No Formatting button — Turn off formatting selections.
Highlight search results
On the Navigation pane, enter what you want to find in the search box to highlight all occurrences of the searching in the document and display them on the Results page of the Navigation pane:

If you use the Find and Replace dialog box, Word highlights only the next found result. To highlight all results, click the Reading Highlight button and choose Highlight All:

For example:

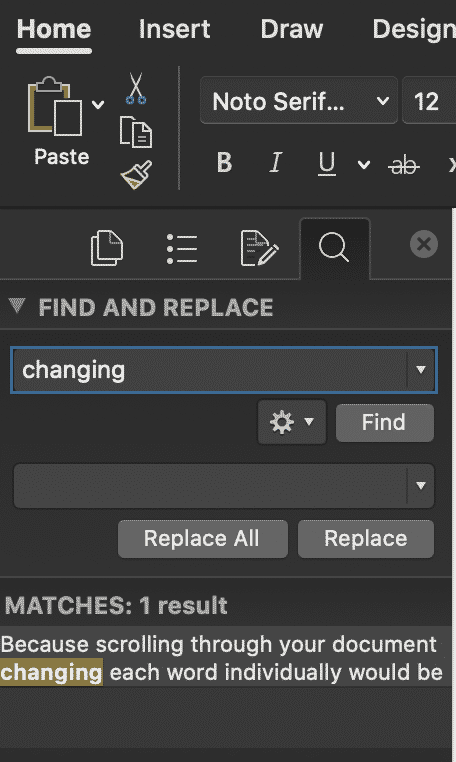
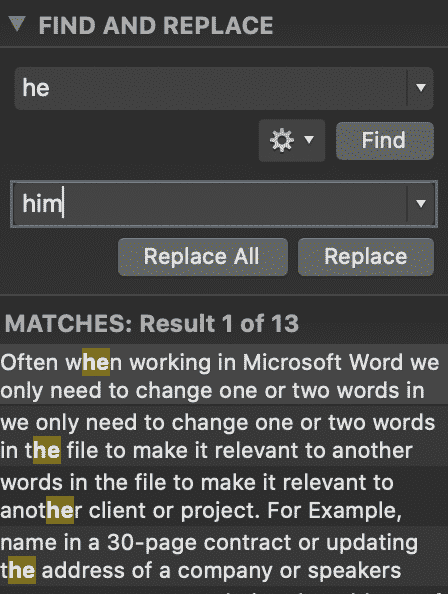
Often when working in Microsoft Word we only need to change one or two words in the file to make it relevant to another client or project. For Example, updating a client’s name in a 30-page contract or updating the address of a company or speakers name in a briefing document.
Because scrolling through your document changing each word individually would be a tedious and time-consuming task Microsoft has built-in a hand tool called ‘Find and Replace’.
Find and Replace allows you to replace one word with another, across the entirety of your Microsoft Word Document at the click of a button.
There is no limit to how many times you can use this tool, but it does need to be done word by word, we can’t yet find and replace multiple words at once. But still, it’s a huge time saver and will guarantee you don’t miss a word that needs replacing.
In this post we will show you how to use the Find and Replace tool in Microsoft Word and leave you updating your document in seconds.
Using Microsoft Word’s Find and Replace
- Open Word
- Find and click Edit in the Home bar
- Under Edit click Find

- In the Find tab press Replace….
- This will open a navigation box on the left-hand side of your Word Document
- Type the word you wish to replace in the Find box
- Type the word you wish to replace this word with, in the second text box
- Choose Replace. To replace all instances at the same time, select Replace All.
- Press OK.
You have no successfully used Words Find and Replace feature to update your Microsoft Word Document.
Advanced Word Replacement
If your word search shows multiple options, as shown below.
You can scroll through the highlighted words until you find the word you would like to replace. This will narrow down the word search and ensure you only replace the exact word you are looking for.

Looking for an easier solution to your collaboration frustrations?
When collaborating in Microsoft Word, your email inbox can quickly become filled with updated versions of a document being sent back and forward between colleagues.
John made an edit, sent an email ‘see updated attached’.
Then Lucy made an edit, sent an email 30minutes later ‘updated version attached’, and it goes on for days.
Sending updated versions via email is one way to know a new version is available and required your attention. But it can also clutter your inbox with internal emails, with a single line or sometimes nobody of text in the email.

The alternative is to send them via a group chat channel such as Slack or Microsoft Teams, but you should make a new channel for the document updates so that you don’t miss one, or lose it in an open channel as other conversations start happening around the document being sent.
With overflowing inboxes and your slack channel constantly telling you there are un-read messages there needs to be a solution for collaborating alone. Somewhere your updated versions can live in peace, with no other noise around them to allow you to easily review and check them at any time.
The solution is here and it comes in the form of a great new purpose-built tool called Simul Docs.
Simul was built just for Microsoft Word and for you, to help you collaborate with ease.
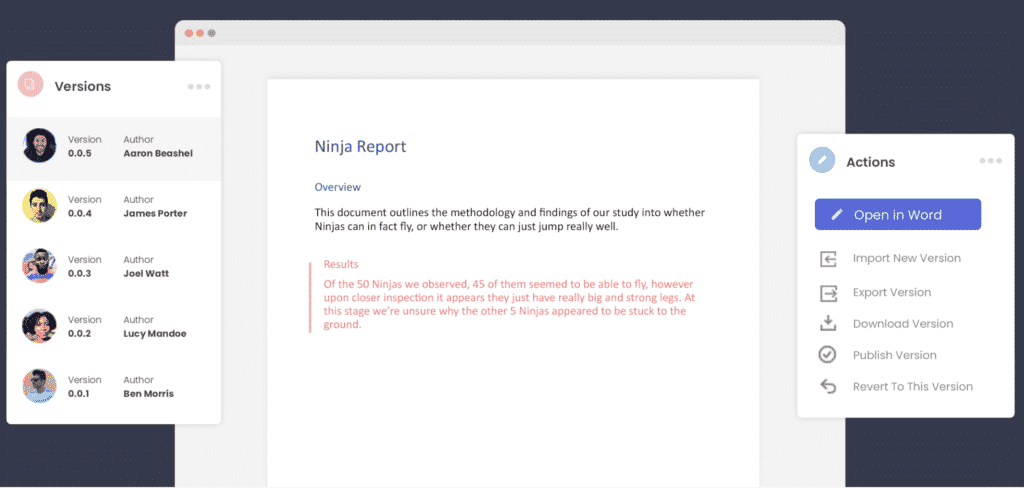
First and foremost, Simul will store and manage every version of your document in an easy to navigate toolbar that you can access from anywhere you have an internet connection (or offline if you do a quick download before losing your connection).
As a new version of your document is created, Simul will automatically save the file under a numerical version number that makes sense. The first version is named 0.0.1, the second 0.0.2, the third 0.0.3 and so on. Making it easy for you to keep track of how many versions have been made and which one is the most recent.
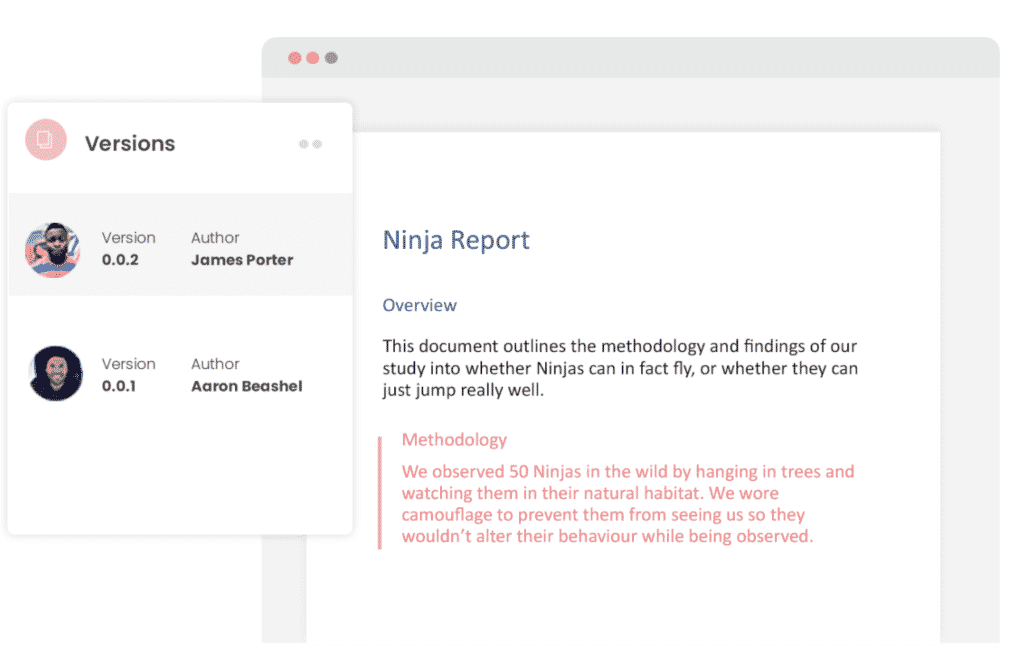
But what about any extra notes or comments the author wanted to make, ones they would usually put in the email such as ‘Tim, this is my final round of edits before we send onto client’? No worries, Simul allows you to add comments and notes to any version as well, so your team can see what is going on at all times.

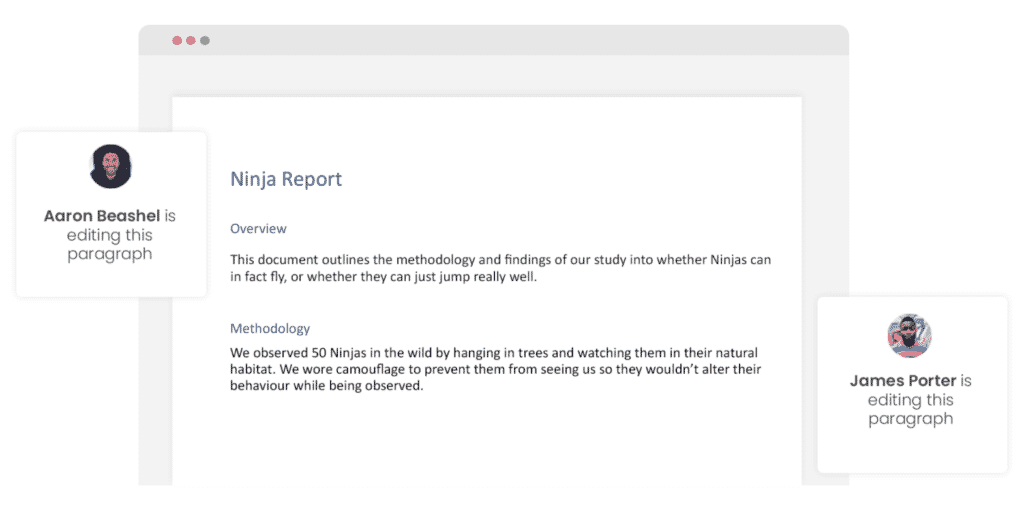
Speaking of comments and notes, Simul will also track every comment, change or edit made to a version for you, without you having to remember to turn tracked changes on. That’s pretty cool, right?
So a tool that manages your version control, saves your files and stores them and tracks all of your edits and changes without you thinking about any of it, it sounds too good to be true or as though it would be difficult to use or implement. Well, don’t worry it’s not, it’s here and it is called Simul Docs and it’s so easy to use, after walking through the in-app tutorial we had it down within 3 minutes.
It’s a bit like an apple product, it just makes sense. It’s clean and simple, nothing too complicated, but with everything you need all in the one spot.
If you’re not convinced already, head over to Simul now and give their free trial a go.
Collaboration just got a whole lot easier with Simul Docs.