
Find and replace text

-
Go to Home > Replace.
-
Enter the word or phrase you want to replace in Find what.
-
Enter your new text in Replace with.
-
Choose Replace All to change all occurrences of the word or phrase. Or, select Find Next until you find the one you want to update, and then choose Replace.
-
To specify only upper or lowercase in your search, select More > Match case. There are several other ways to search in this menu.
For other options, see Find and replace text
Find and replace basic text
In the upper-right corner of the document, in the search box  , type the word or phrase that you want to find, and Word will highlight all instances of the word or phrase throughout the document.
To replace found text:
-
Select the magnifying glass, and then select Replace.

-
In the Replace With box, type the replacement text.
-
Select Replace All or Replace.
Tips:
-
You can also open the basic Find and Replace pane with the keyboard shortcut CONTROL + H.
-
When you replace text, it’s a good idea to select Replace instead of Replace All. That way you can review each item before replacing it.
-

You can find text with special formatting, such as bold or highlight, by using the Format menu.
-
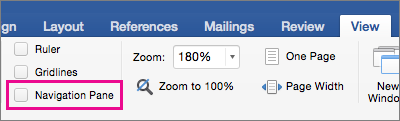
Select View > Navigation Pane.
-
In the Navigation Pane, select the magnifying glass.
-
Select Settings
, and then select Advanced Find & Replace.
Notes:
-
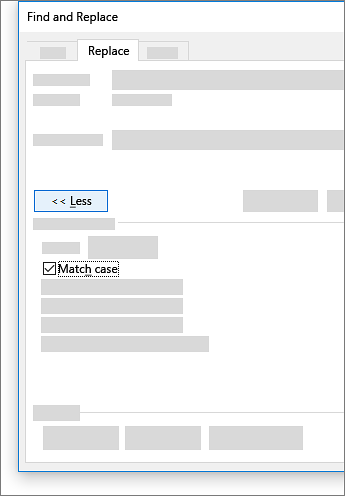
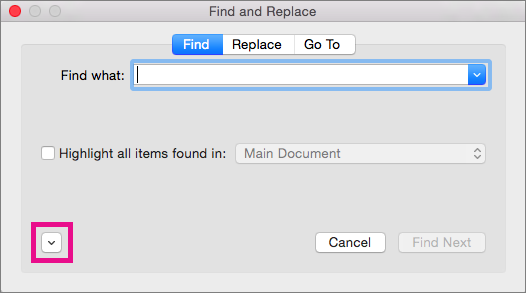
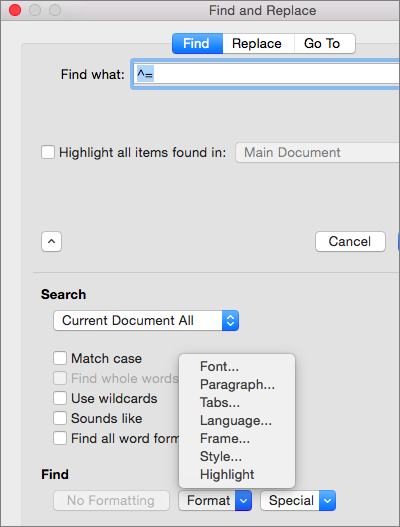
Select the arrow at the bottom of the Find and Replace dialog box to show all options.
-
-
-
On the Format menu, select the option that you want.
If a second dialog box opens, select the options that you want, and then select OK.
-
In the Find and Replace dialog box, select Find Next or Find All.
 , and then select Advanced Find & Replace.
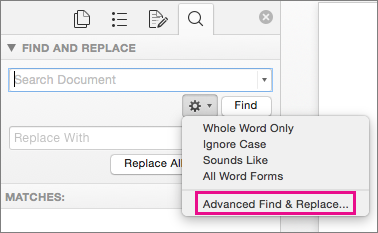
You can find and replace text with special formatting, such as bold or highlight, by using the Format menu.
-
Select View > Navigation Pane.
-
In the Navigation Pane, select the magnifying glass.
-
Select Settings
, and then select Advanced Find & Replace.
-
At the top of the dialog box, select Replace.
Notes:
-
Select the arrow at the bottom of the Find and Replace dialog box to show all options.
-
-
-
On the Find what box, type the text that you want to find.
-
On the Format menu, select the formatting that you want to find.
If a second dialog box opens, select the options that you want, and then select OK.
-
Select in the box next to Replace with.
-
On the Format menu, select the replacement formatting. If a second dialog box appears, select the formats that you want, and then select OK.
-
Select Replace, Replace All, or Find Next.
-
Select View > Navigation Pane.
-
In the Navigation Pane, select the magnifying glass.
-
Select Settings
, and then select Advanced Find & Replace.
Notes:
-
Select the arrow at the bottom of the Find and Replace dialog box to show all options.
-
-
-
On the Special menu, select the special character that you want to find.
-
Select Find Next.

-
Select View > Navigation Pane.
-
In the Navigation Pane, select the magnifying glass.
-
Select Settings
, and then select Advanced Find & Replace.
Notes:
-
Select the arrow at the bottom of the Find and Replace dialog box to show all options.
-
-
-
At the top of the Find and Replace dialog box, select Replace and then select in the Find What box, but don’t type anything there. Later, when you select a special character, Word will automatically put the character code in the box for you.
Note: Select the arrow at the bottom of the Find and Replace dialog box to show all options.
-
On the Special menu, select the special character that you want to find.
-
Select in the Replace with box.
-
On the Special menu, select the special character that you want to use as a replacement.
-
Select Replace or Find Next.
-
Select View > Navigation Pane.
-
In the Navigation Pane, select the magnifying glass.
-
Select Settings
, and then select Advanced Find & Replace.
-
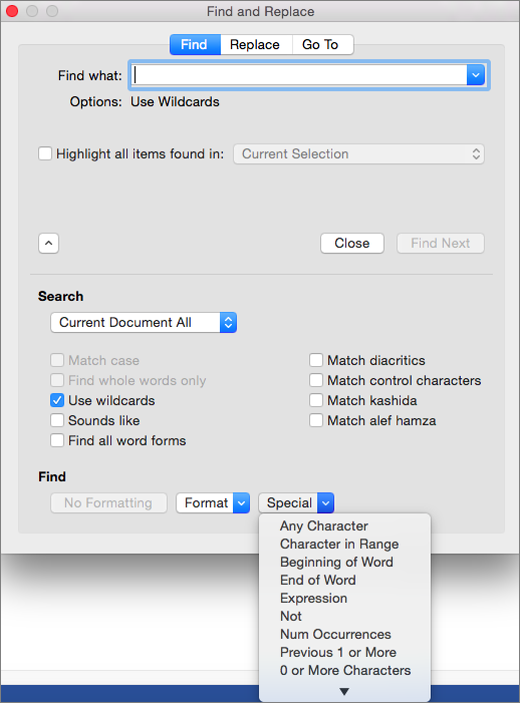
Select the Use wildcards check box.
If you don’t see the Use wildcards check box, select
. -
Select the Special menu, select a wildcard character, and then type any additional text in the Find what box.
-
Select Find Next.
Tips:
-
To cancel a search in progress, press
+ PERIOD. -
You can also enter a wildcard character directly in the Find what box instead of selecting an item from the Special pop-up menu.
-
To search for a character that’s defined as a wildcard character, type a backslash () before the character. For example, type ? to find a question mark.
-
You can use parentheses to group the wildcard characters and text and to indicate the order of evaluation. For example, search for <(pre)*(ed)> to find «presorted» and «prevented.»
-
You can search for an expression and use the n wildcard character to replace the search string with the rearranged expression. For example, type (Newman) (Belinda) in the Find what box and 2 1 in the Replace with box. Word will find «Newman Belinda» and replace it with «Belinda Newman.»
-
-
To replace found text:
-
Select the Replace tab, and then select the Replace with box.
-
Select Special, select a wildcard character, and then type any additional text in the Replace with box.
-
Select Replace All, Replace, or Find Next.
Tip: When you replace text, it’s a good idea to select Replace instead of Replace All. That way you can confirm each replacement to make sure that it’s correct.
-
 .
.
 + PERIOD.
You can refine a search by using any of the following wildcard characters.
|
To find |
Use this |
For example |
|---|---|---|
|
Any single character |
? |
s?t finds «sat» and «set.» |
|
Any string of characters |
* |
s*d finds «sad» and «started.» |
|
One of the specified characters |
[ ] |
w[io]n finds «win» and «won.» |
|
Any single character in this range |
[-] |
[r-t]ight finds «right» and «sight» and «tight.» Ranges must be in ascending order. |
|
Any single character except the characters inside the brackets |
[!] |
m[!a]st finds «mist» and «most» but not «mast.» |
|
Any single character except characters in the range inside the brackets |
[!x-z] |
t[!a-m]ck finds «tock» and «tuck» but not «tack» or «tick.» Ranges must be in ascending order. |
|
Exactly n occurrences of a character or expression |
{ n} |
fe{2}d finds «feed» but not «fed.» |
|
At least n occurrences of a character or expression |
{ n,} |
fe{1,}d finds «fed» and «feed.» |
|
A range of occurrences of a character or expression |
{ n, n} |
10{1,3} finds «10,» «100,» and «1000.» |
|
One or more occurrences of a character or expression |
@ |
lo@t finds «lot» and «loot.» |
|
The beginning of a word |
< |
<(inter) finds «interesting» and «intercept» but not «splintered.» |
|
The end of a word |
> |
(in)> finds «in» and «within,» but not «interesting.» |
Word for the web lets you find and replace basic text. You can match case or fine whole words only. For more varied options, open your document in Word for the desktop.
Need more help?
![]()
Written by Allen Wyatt (last updated October 29, 2020)
This tip applies to Word 2007, 2010, 2013, and 2016
Tim wonders if Find and Replace can be used to search for and locate text boxes. He would like to search for text boxes and replace each of them with a graphic, as he finds this almost impossible to do manually when some text boxes are essentially invisible in his document.
If your text boxes are inline with your text, then you can use Find and Replace to locate and replace them. All you need to do is to display the Replace tab of the Find and Replace dialog box and, in the Find What box, enter ^g. This is the code for find graphics, but Word treats text boxes as of they are graphics when they are inline.
The problem is, of course, that most text boxes are not inline—text wraps around them and they reside on their own layer. For these types of text boxes you must use a macro to do the searching and replacing. The following is an example of one you could use:
Sub ReplaceTextBox()
    Dim shp As Shape

    For Each shp In ActiveDocument.Shapes
        If shp.Type = msoTextBox Then
            shp.Select
            shp.Delete
            Selection.PasteAndFormat (wdPasteDefault)
        End If
    Next
End Sub
To use the macro, select the graphic you want to use in your replacement and then press Ctrl+C. This places the graphic in the Clipboard. When you run the macro, it is this graphic—the one in the Clipboard—that is pasted into the document in place of each text box.
You should be aware that the macro replaces all of the text boxes in a document with the graphics. If you wanted to selectively replace text boxes, the coding would be a good deal more complex.
If you would like to know how to use the macros described on this page (or on any other page on the WordTips sites), I’ve prepared a special page that includes helpful information. Click here to open that special page in a new browser tab.
WordTips is your source for cost-effective Microsoft Word training.
(Microsoft Word is the most popular word processing software in the world.)
This tip (2894) applies to Microsoft Word 2007, 2010, 2013, and 2016.
Author Bio
With more than 50 non-fiction books and numerous magazine articles to his credit, Allen Wyatt is an internationally recognized author. He is president of Sharon Parq Associates, a computer and publishing services company. Learn more about Allen…
MORE FROM ALLEN
Running Macros on Hidden Worksheets
Excel allows you to hide worksheets so that they aren’t visible to those using your workbook. Hiding worksheets has a …
Discover More
Jumping to Text in Worksheet from an Index
In putting together a workbook, you may develop a worksheet that acts as an index, to contain links that lead to other …
Discover More
Calculating Dates with Fields
Can you calculate dates using fields? Yes, but you probably don’t want to except as a learning experience. An easier way …
Discover More
More WordTips (ribbon)
Making Quoted Text Bold and Underlined
If your document contains quoted text, you might want a way to remove the quotes and format the text in some way. This …
Discover More
Using Search Text in the Replacement
When you use the Find and Replace tool in Word, you may want to include what you searched for in the replacement text. …
Discover More
Finding Quoted Text in VBA
Macros are created for all sorts of purposes in creating, editing, and processing documents. You might want to use a …
Discover More
In this article bellow, we want to show you 3 ways to batch change text format in all text boxes in your Word document.
Text boxes are often seen in out documents. While format document texts, we cannot forget those in text boxes. However, text boxes scattering in a document can make you hard to select all texts inside once and for all. Therefore, out of formatting purposes, it’s urgent to learn some trick to do the batch processing.
Method 1: Utilize “Advanced Find” Feature
- First of all, click “Home” tab and go to click the arrow button behind “Find” command in “Editing” group.
- Next on the drop-down list, choose “Advanced Find” to open the “Find and Replace” dialog box.

- Put cursor at “Find what” text box and enter “^?” there.
- Then click “Find In” button and choose “Text Boxes in Main Document”.

- Now you can see all texts in text boxes are in selection. In case you may forget the string to be put in “Find what” box, you can click “More” button to open more options in the box and then click “Special”. Next choose “Any Character”.

- With all texts in selection, just format them as required.


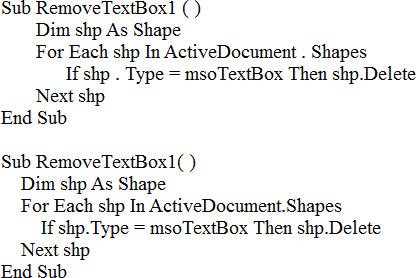
Method 2: Batch Change Text Format in All Text Boxes in One Document
- To start off, press “Alt+ F11” in Word to trigger VBA editor.
- Next click “Normal”.
- Then click “Insert” tab and choose “Module”.

- And double click the new module and paste the bellowing macro there:

Sub FormatTextsInTextBoxes()
  Dim objShape As Shape
  Dim objDoc As Document

  Set objDoc = ActiveDocument

  With objDoc
    For Each objShape In .Shapes
      If objShape.Type = msoTextBox Then
        objShape.TextFrame.TextRange.Font.Name = "Arial"
        objShape.TextFrame.TextRange.Font.Size = "16"
      End If
    Next
  End With
End Sub
- Finally, click “Run”.


This macro sets all text box texts in “Arial” font at 16 pt. You may alter these setting as need.
Method 3: Batch Change Text Format in All Text Boxes in Multiple Documents
Now that we are talking about batch processing, we cannot eliminate the need to do it among multiple files.
- Firstly, arrange all target documents under the same directory.
- Next install and run macro as you do in method 2. This time replace those codes with the following ones:
Sub FormatTextsInTextBoxesInMultiDoc()
  Dim strFile As String
  Dim strFolder As String
  Dim objDoc As Document

  '  Initialization
  strFolder = InputBox("Enter folder path here: ")
  strFile = Dir(strFolder & "*.docx", vbNormal)

  '  Process each file in the folder.
  While strFile <> ""
    Set objDoc = Documents.Open(FileName:=strFolder & strFile)
    Set objDoc = ActiveDocument

    With objDoc
      For Each objShape In .Shapes
        If objShape.Type = msoTextBox Then
          objShape.TextFrame.TextRange.Font.Name = "Arial"
          objShape.TextFrame.TextRange.Font.Size = "16"
        End If
      Next
    End With
    objDoc.Save
    objDoc.Close
    strFile = Dir()
  Wend
End Sub
- While running the macro, there will be an input box prompting up, such as bellow:

- Enter the folder address at the text box and click “OK”. Don’t forget to add a “” at the end of your path string. Then just wait Word to do its job.

Make Full Preparation while You Can
We understand it’s hard to even think about your file getting corrupt. However, we can never overlook this possibility which, to be honest, is relative high. Anyway, it’s less troublesome to take preventive measures than hopping around for a doc fix tool.
Author Introduction:
Vera Chen is a data recovery expert in DataNumen, Inc., which is the world leader in data recovery technologies, including fix Excel and pdf repair software products. For more information visit www.datanumen.com
Sometimes you inherit a document from someone else and it is necessary to remove text boxes that have been placed in it. If there is just one, that is a snap to remove. But suppose your document is very large, like a work manual and there are a hundred text boxes in it? Wow! That can be a little tedious to remove each one individually and look at the time and keystrokes involved! Holy cow!
Below is one method of removing your text boxes en masse:
- In your document, click Ctrl + A to select your entire document.
- Click Ctrl + C to copy your entire document to the Clipboard.
- Click Ctrl + N to open a new document.
- Be certain you have the Home tab of your Ribbon displayed.
- Under the Paste tool, click the down-arrow and select Paste Special to display the Paste Special dialog box.
- In the list of formats displayed, select Unformatted Text.
- Click OK.
You will note, that only text and no text boxes appear in your document now.
Obviously, the biggest drawback is that you will now have to reformat your whole article and if it is a really large document that can be a big pain!
If you want to remove just the text boxes, then you should use a macro. Luckily, even though I am not a macro guru, Allen Wyatt is!! Below is his macro to accomplish this task:
The caveat here is that this macro will not only remove the text boxes from your document, but it will also remove any text that was residing in those text boxes.
If, alternatively, you would like to move the text from the text boxes to your document before you get rid of the text boxes, you will need a modification to the above macro:
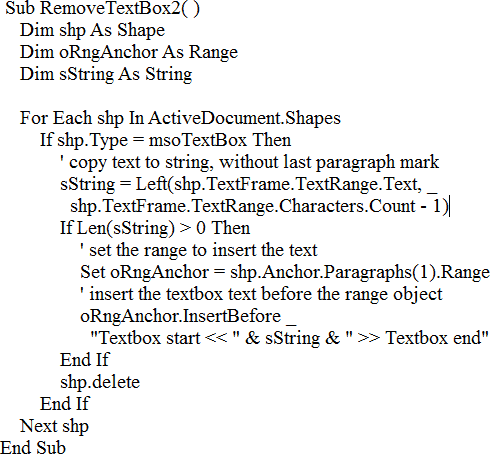
Once you have run this macro you can then search for Textbox start and you will be at the beginning of text that used to be reside inside the text boxes that you have now removed from your document. You will now be able to edit that text in any manner you like.
Thanks Harry Spier, even though I had to modify your code a little — finally it works great!
Sub FindReplaceAnywhere()

Dim pOldFontName As String
Dim pNewFontName As String
Dim rngStory As Word.Range
Dim lngJunk As Long
Dim oShp As Shape

pOldFontName = "FontDoe"  'replace with the font you want to replace
pNewFontName = "Font Dolores"  'replace with the font you really need to have in your doc

'Fix the skipped blank Header/Footer problem
lngJunk = ActiveDocument.Sections(1).Headers(1).Range.StoryType
'Iterate through all story types in the current document
For Each rngStory In ActiveDocument.StoryRanges
'Iterate through all linked stories
  Do
  SearchAndReplaceInStory rngStory, pOldFontName, pNewFontName, pFindTxt, pReplaceTxt
  On Error Resume Next
  Select Case rngStory.StoryType
  Case 6, 7, 8, 9, 10, 11
    If rngStory.ShapeRange.Count > 0 Then
      For Each oShp In rngStory.ShapeRange
        If oShp.TextFrame.HasText Then
          SearchAndReplaceInStory oShp.TextFrame.TextRange, pOldFontName, pNewFontName, pFindTxt, pReplaceTxt
        End If
      Next
    End If
  Case Else
    'Do Nothing
  End Select
  On Error GoTo 0
  'Get next linked story (if any)
  Set rngStory = rngStory.NextStoryRange
Loop Until rngStory Is Nothing
Next
End Sub
Sub SearchAndReplaceInStory( _
    ByVal rngStory As Word.Range, _
    ByVal FindFontName As String, _
    ByVal ReplaceFontName As String, _
    ByVal strSearch As String, _
    ByVal strReplace As String)
With rngStory.Find
  .ClearFormatting
  .Replacement.ClearFormatting
  .Forward = True
  .Wrap = wdFindContinue
  .Font.Name = FindFontName
  .Replacement.Font.Name = ReplaceFontName
  .Text = strSearch
  .Replacement.Text = strReplace
  .Execute Replace:=wdReplaceAll
 End With
End Sub