
Replace a picture
-
Select the picture you want to replace.
-
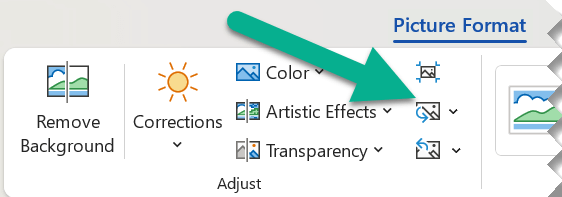
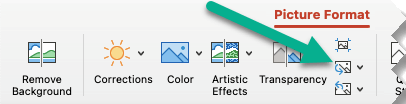
Select the Picture Format (or Format) tab, and then select Change Picture:

-
From the menu that appears, select where you want to get the replacement picture from.
-
Navigate to the image you want, and then select Insert.
Delete a picture
Click the picture you want to delete, and then press the Delete key.
To delete multiple pictures, press and hold Ctrl while you click the pictures that you want to delete, and then press Delete.
Can’t select the picture?
if you can’t select the picture, it’s probably a background picture.
To select a background picture in Word: Go to the Insert tab and select Header > Edit Header. (Once you are in Header and Footer view, you should be able to select the picture.)
To select a background picture in PowerPoint: Go to the Design tab and select Format Background. Then change the picture fill in the Format Background pane. For more details, go to Add a background picture to slides and see the section named «Remove a background picture.»
Replace a picture
-
Click the picture you want to replace.
-
Under Picture Tools, on the Format tab, in the Adjust group, click Change Picture.
-
Locate a new picture, and then double-click it.

Delete a picture
Click the picture you want to delete, and then press the Delete key.
To delete multiple pictures, press and hold Ctrl while you click the pictures that you want to delete, and then press Delete.
Tip: You can also use this procedure to delete clip art in an Office 2007 document.
Can’t select the picture?
if you can’t select the picture, it’s probably a background picture.
To select a background picture in Word: Go to the Insert tab and select Header > Edit Header. (Once you are in Header and Footer view, you should be able to select the picture.)
To select a background picture in PowerPoint: Go to the Design tab and select Background Styles > Format Background. Then change the picture fill in the Format Background dialog box. For more details, go to Add a background picture to slides and see the section named «Remove a background picture.»
Replace a picture
-
Click the picture you want to replace.
-
Click the Picture Format tab, and then click Change Picture:
-
From the menu that appears, select where you want to get the replacement picture from.
-
Navigate to the picture you want, select it, and then select Insert.
Delete a picture
Click the picture you want to delete, and then press Backspace.
Can’t select the picture?
if you can’t select the picture, it’s probably a background picture.
To select a background picture in Word: Go to the Insert tab and select Header > Edit Header. (Once you are in Header and Footer view, you should be able to select the picture.)
To select a background picture in PowerPoint: Go to the Design tab and select Format Background. Then change the picture fill in the Format Background dialog box. For more details, go to Add a background picture to slides and see the section named «Remove a background picture.»
Download PC Repair Tool to quickly find & fix Windows errors automatically
Microsoft Word helps us in many ways during the documentation or submitting the abstract for your project. It also allows us to find the text normally or using a regular expression which makes it easy to find and replace any text. But, what if you have some images in a Word document and want to replace all of them with another image? Suppose, say you have used the image as a separator for chapters of you have used your company logo in the Word document at various places and want to replace all of them at once with another image. Finding and replacing each image individually can be a tedious task. n this article, I will let you know how to Find and Replace all Images in Word at once.
Just remember that using this method will replace all images in Word with a new image and it cannot be done for images selectively. MS Word provides us the feature to find all images automatically. Let us jump into the steps to do so.
Open the Word document which you want to replace. Just have a look at the images which you want to replace.

Next, insert the new image at the top of the document which you use to replace other images
Right-click on the newly inserted image and select “Copy”. This will copy the image to your clipboard. Now you can delete the newly inserted image as it is of no use to us anymore.

Now is the time to find and replace all images in your Word document with a new one.
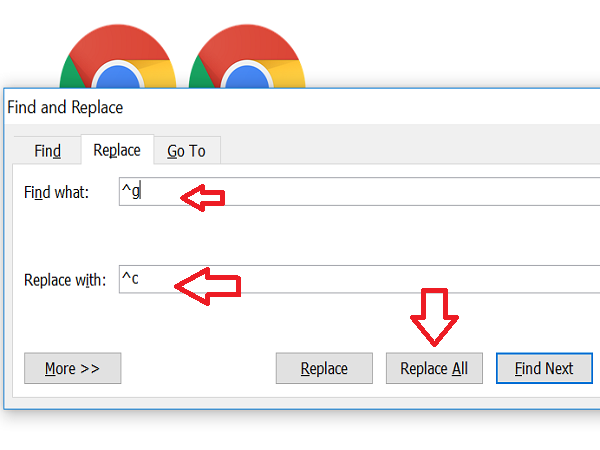
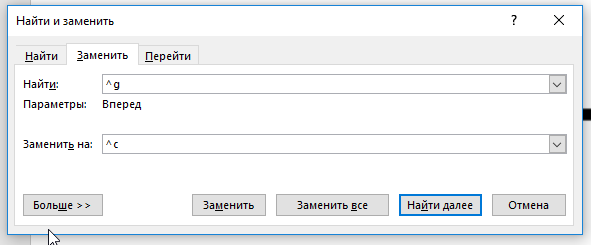
To do so, press CTRL+H which allows you to Find and Replace it in a Word document.
Type ^g in the ‘Find what’ text box and type ^c in the ‘Replace with’ field. Now, click “Replace All” to replace all images in MS Word with the newly copied image.
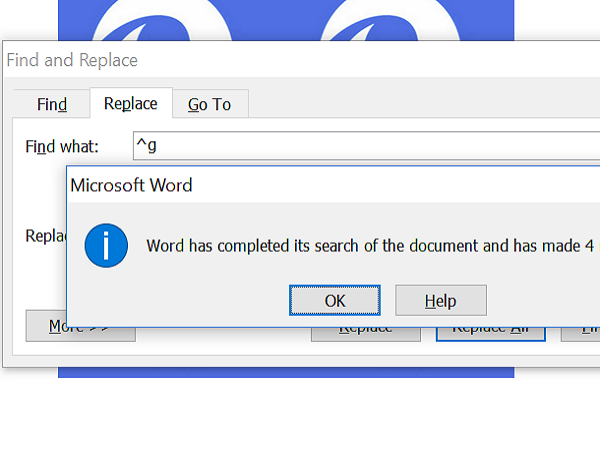
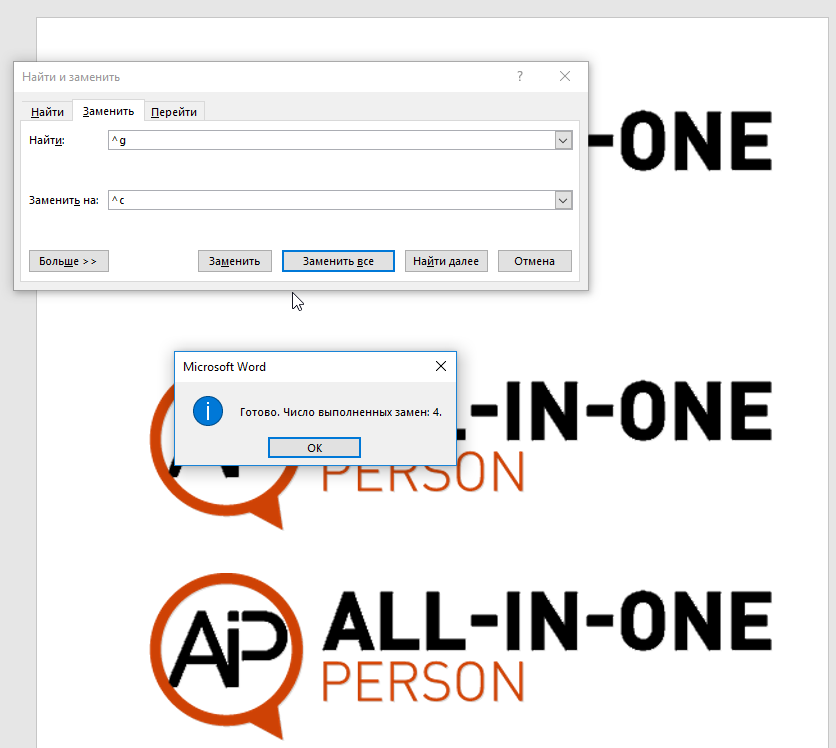
It will raise the prompt mentioning the number of replacements. Click “OK” and close the ‘Find and Replace’ dialog box.
You will now see that all the images have got replaced with the new ones. If you do not want any of the images getting replaced, then you can make changes manually.

How Does It Work?
Actually, we used the well-known find and replace method. Every image in a Word document is treated as graphics and we find it using ^g and replacing it with the copied image using ^c.
Hope this Word trick helps you to get your task done easily.
Bored of using default bullets in MS Word? Then, have a look at how to use Pictures as Bullets in Word.
How to Replace Text with Image in MS Word
You need to follow the same step as above, but instead of using ^g, you will need to write the exact text you want to replace. This comes in handy when you want to replace an emoji text with an emoji image or add an icon instead of using a word.

Sridhar is a Software Engineer who loves to stay updated with developments in the world of technology. He is fond of writing everything related to Internet, Computers and Mobile and Desktop Operating Systems.
Microsoft Word во многом помогает нам во время документации или отправки тезисов для вашего проекта. Это также позволяет нам найти текст обычным способом или с помощью регулярного выражения, что позволяет легко найти и заменить любой текст. Но что, если у вас есть несколько изображений в документе Word и вы хотите заменить их на другое изображение? Предположим, например, что вы использовали изображение в качестве разделителя для глав, в которых вы использовали логотип своей компании в документе Word в разных местах и хотите заменить их все сразу другим изображением. Поиск и замена каждого изображения по отдельности может быть утомительной задачей. В этой статье я расскажу вам, как найти и заменить все изображения сразу в Word.
Найти и заменить все изображения в Word
Просто помните, что использование этого метода заменит все изображения в Word новым изображением, и это нельзя сделать для изображений выборочно. MS Word предоставляет нам возможность автоматически находить все изображения. Давайте прыгнем в шаги, чтобы сделать это.
Откройте документ Word, который вы хотите заменить. Просто посмотрите на изображения, которые вы хотите заменить.

Затем вставьте новое изображение вверху документа, который вы используете для замены других изображений.
Щелкните правой кнопкой мыши на вновь вставленном изображении и выберите « Копировать ». Это скопирует изображение в буфер обмена. Новым вы можете удалить только что вставленное изображение, так как оно нам больше не нужно.

Теперь пришло время найти и заменить все изображения в вашем документе Word на новое.
Для этого нажмите CTRL + H , что позволит вам Найти и заменить в документе Word.
Введите ^ g в текстовом поле Найти что и введите ^ c в поле Заменить на . Теперь нажмите « Заменить все », чтобы заменить все изображения в MS Word новым скопированным изображением.

Это поднимет подсказку с указанием количества замен. Нажмите « ОК » и закройте диалоговое окно «Найти и заменить».

Теперь вы увидите, что все изображения были заменены на новые. Если вы не хотите заменять какие-либо изображения, вы можете внести изменения вручную.

Как это работает?
На самом деле мы использовали известный метод find and replace . Каждое изображение в документе Word рассматривается как графика, и мы находим его с помощью ^ g и заменяем его скопированным изображением с помощью ^ c.
Надеюсь, что этот трюк Word поможет вам выполнить вашу задачу легко.
Надоело использовать маркеры по умолчанию в MS Word? Затем посмотрите, как использовать картинки в качестве маркеров в Word.

Сегодня я хочу поделиться небольшим, но полезным советом с теми, кто пользуется Microsoft Word. Я расскажу, как быстро заменить все картинки в документе на одну новую. Важно понимать, что при таком способе будут заменены абсолютно все картинки.
Начнём с того, что у нас есть документ вот с такой замечательной картинкой, и мы хотим заменить её на другую ещё более замечательную.

Для этого вставляем новую картинку в начало документа и просто копируем её.

После этого набираем комбинацию из клавиш CTRL+H. Откроется окошко «Найти и заменить», где в поле «Найти» вводим ^g, а в поле «Заменить» вводим ^c и жмём «Заменить все».
После чего все картинки заменяются на новую.
Теги:
Microsoft Office
Быстрый совет
Microsoft Word can do a lot more things for you than you can actually know! Most people use MS-Word for very basic things. But at times you may face situations where you feel that MS-Word will not be able to help you and you will have to do it all manually. For example, what if you need to find and replace all the images in a Word document? Do you think MS-Word can do this? Well, yes! A reader of TechWelkin sent me a query. She said that she is a writer and is working on a large manuscript in MS-Word. She used a tiny image as a separator for various chapters and sections in the document. Now she wants to replace that image with a new one. But there are hundreds of copies of the image. So, will she have to replace each image one by one? Let’s explore the answer!
How to Find and Replace Images in MS Word
MS-Word can help in the above given scenario. There is an automatic way to find all the images in a document and then replace them all with a new image. Please note that this method will find all the images and it will replace all of them with a new one. With this method, we can not be selective about images. Here are the steps:
- Open the MS-Word document in which replacement is to be done.
- Insert the new image at the top of the document.
- Select the newly inserted image and press Ctrl + C to copy it.
- Now delete the newly inserted image.
- Press Ctrl + H to open the Find and Replace box.
- Put ^g in the Find what box and ^c in the Replace with box
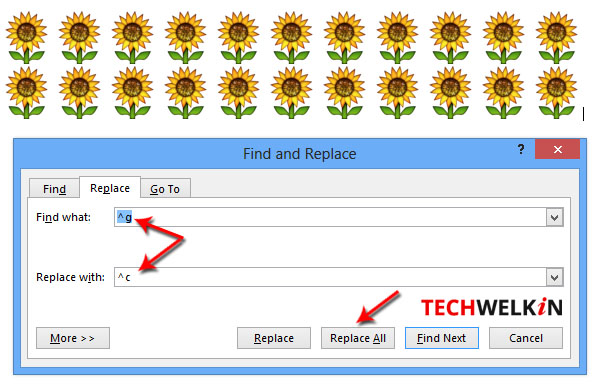
Method of finding all images and replacing them with a new one.
Now press Replace All button to see the magic!
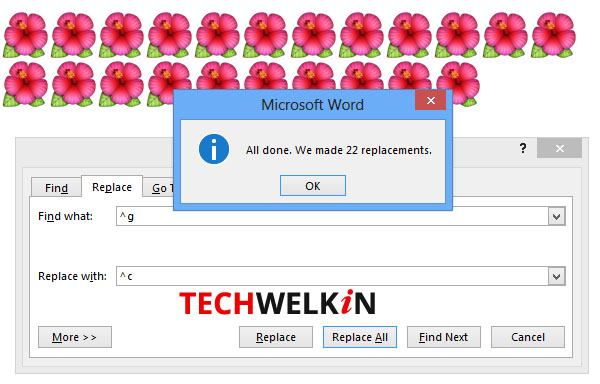
All images have been replaced in MS Word.
You will see that all the images in the document will be replaced with the new image. Of course, the replacement operation will also replace the images that you did not want to replace. In such a case you may need to re-insert the images that were not to be replaced. This method is useful in a scenario where:
- the document contains only those images that are to be replaced
- the document contains a large number of images that need to be replaced and a smaller number of images that should not be replaced
The first scenario is straightforward. In the second scenario, you’ll be doing much less manual work by re-inserting images that were replaced as a side-effect.
The method works by replacing all graphics (denoted by ^g) with the clipboard content (denoted by ^c). Therefore, essentially, you can replace all images with anything that you can copy to clipboard.
To keep your document’s pagination intact, you should use the same size new image.
I hope this MS-Word tip was useful for you. If you have any question on this topic, please feel free to ask me through comments. I will try to assist you. Thank you for using TechWelkin.