
Word for Microsoft 365 Word for Microsoft 365 for Mac Word for the web Word 2021 Word 2021 for Mac Word 2019 Word 2019 for Mac Word 2016 Word 2016 for Mac Word 2013 Word 2010 Word 2007 Word for Mac 2011 More…Less
Remove page numbers
-
Go to Insert > Page Number, and then choose Remove Page Numbers.
-
If the Remove Page Numbers button isn’t available or if some page numbers are still there, double-click in the header or footer, select the page number, and press Delete. This may happen with documents with multiple sections or Different odd and even pages.
To close the header or footer, select Close Header and Footer, or double-click anywhere outside the header and footer area.
Remove page numbers
Caution: If you have headers or footers set up, using this option might remove them entirely. Instead, open the header or footer, select the page number, and then press Delete. You might need to temporarily move or resize any objects that are on top of the page number so you can select it.
-
On the Insert tab, select the Page Number icon, and then click Remove Page Numbers.
If the Remove Page Numbers button isn’t available, double-click in the header or footer, select the page number, and press Delete.
To close the header or footer, select Close Header and Footer, or double-click anywhere outside the header and footer area.
-
If you’re not in Editing View, go to Edit Document > Edit in Word for the web.
-
Go to Insert > Page Numbers.
-
Choose Remove Page Numbers.
For more info on page numbers, see Page numbering in Word.
Need more help?
Want more options?
Explore subscription benefits, browse training courses, learn how to secure your device, and more.
Communities help you ask and answer questions, give feedback, and hear from experts with rich knowledge.
Remove the page number from the first page
-
Go to Insert > Header or Footer > Edit Header or Edit Footer.
-
Select Different First Page.
Note:
Different first page can be applied to the first page of any section in your document, not just the very first page. -
In the header or footer area, you should see a label on the first page that says First Page Header. Select the page number and press Delete.
-
Select Close Header and Footer or press Esc to exit.
Tip: If you want your second page to start at 1 rather than 2, go to Insert > Page Number > Format Page Numbers, and set Start at under Page Numbering to 0, rather than 1.
Start page numbering on Page 3 — double-sided printing
If the first page of your document is a cover page, the second page is a table of contents, and you want the third page to show “Page 1”, see Start page numbering on Page 3 — double-sided printing.
Choose the scenario that most closely matches what you want to do:
You don’t want a page number to appear on your title page, but you want the second page to show «Page 2.»
-
Go to Insert > Header or Footer > Edit Header or Edit Footer.
-
Select Different First Page.

Note:
Different first page can be applied to the first page of any section in your document, not just the very first page. -
In the header or footer area, you should see a label on the first page that says First Page Header. Select the page number to highlight it and press Delete.
-
Select Close Header and Footer or press Esc to exit.

Start page numbering on Page 3 — double-sided printing
If the first page of your document is a cover page, the second page is a table of contents, and you want the third page to show “Page 1”, see Start page numbering on Page 3 — double-sided printing.
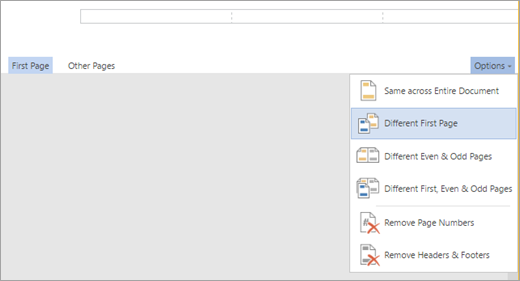
Remove the page number from the first page
-
Go to Insert > Header & Footer.
-
SelectOptions on the right side, and then select Different First Page.
-
Select Options again, and then select Remove Page Numbers.
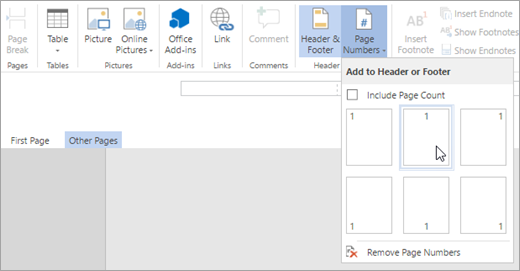
-
To see your page numbers and confirm deletion of the number from the first page, go to View > Reading View.
-
If all page numbers are deleted, go to Insert > Header & Footer and select Other Pages on the left side,. Go to Insert > Page Number and choose a number placement.
Today you’re going to learn how to remove page numbers in Word.
After inserting the page numbers, due to one or two reasons, you realized that you don’t need the numbered pages anymore.
Or maybe you want to remove page numbers for certain pages only, like the first page or the first three pages.
You’ve come to the right place.
Below are some of the easiest ways you can remove page numbers in your Microsoft Word document:
If you are looking for how you can remove page numbers for specific pages, scroll down to option 4 because it explains just that.
However, if what you want is to remove all the page numbers
in your document, the options are outlined below for you to explore.
Option 1: Delete page number from footer or header
This is the easiest option to help you remove page numbers as
it can be done in under five seconds. This method can be used in both Windows and
Mac versions of Word.
NOTE: Use this method if you want to remove all the page numbers from your document. But if you want to remove the page numbers of the first page, or say the first 3 pages, then scroll down to the next section (Option 4).
Without further ado, let’s get started with the steps:
- Double-click the header or footer that has the page number. Double-clicking that area will activate the header and footer sections making them editable.

- Alternatively, you can right-click and click on Edit Footer to turn the footer into edit mode.
- Now highlight the page number and press the Delete key to delete the number. It doesn’t have to be page 1; it could be any page in the document.

- Now press Esc key to exist the Header and Footer section.
After deleting just one of the page numbers, all the page
numbers in the document will be deleted.

NOTE: If there are still page numbers for some of the pages, it means that there’s a page break that divides your document into sections. In this case, delete one of the page numbers in that section in order to remove all the page numbers.
Option 2: Remove page numbers in MS Word by removing the Footer
In Microsoft Word, page numbers are inserted into either
Headers or Footers.
Deleting the pages’ Headers or Footers means deleting
everything it contains including the page numbers.
NOTE: Use this approach if you don’t have other content
(such as a Letter Head) in your Headers or Footers. The footer or Header should
only have the page numbers.
The steps are outlined below:
- Identify the section that contains the page
numbers. Is it in the footer or the header section? Page numbers in the footer
are found at the bottom of the pages whilst page numbers in the headers are
found at the top of the pages. - If the page numbers are found in the Footers,
remove the footers by navigating to the Insert tab, in the Header
& Footer section, click on Footer then Remove Footer. - If the page numbers are found in the Headers,
remove the Headers by navigating to the Insert tab, in the Header
& Footer section, click on Header then Remove Header.

After removing the Footers or Headers in your document, Word
will delete the page numbers as well. At any point in time, you can again
insert the page numbers back into your pages.
Option 3: Using the Remove Page Numbers Command
The previous options are just shortcuts to removing page
numbers.
There’s this built-in command that allows you to remove page numbers in Microsoft Word with just some few clicks.
Here’s how to use this command:
Under the Insert tab in the Header & Footer
section, click on Page Number. A shortcut menu appears, click Remove Page
Numbers.
With these few clicks, all your page numbers should
disappear from your document.
NOTE: If this method fails, it means that the page numbers were inserted directly as a field rather than through the Insert Page Numbers Menu. In that case, use one of the previous methods instead.
Option 4: How to remove page number from first page
The above three methods only showed you how you can remove
all the page numbers from your Word document.
However, most documents and formal reports do not display
the page numbers on the first page.
If that’s the case in your case, you’re in good company.
There are two ways to remove page numbers from the first page in Microsoft Word. One involved using a command called Different First Page. And the other involved breaking the first page into its own sections so that you can delete the page number on the first page without affecting the rest of the pages.
Using Different First Page command
If you don’t want to have a multi-section document, then you
should use the following steps to omit the first page numbering:
- Open your Microsoft Word document that has the first page numbered.
- Double click in the Footer section to make it editable. This exposes all the Header and Footer commands in a suddenly-introduced Tab labeled Header and Footer.

- Click to check the Different First Page
command.
After checking this option, the first page number will hide.
You can also achieve the same result with the following
steps:
- Click to activate the Layout or Page Layout
tab. - Then click the Page Setup launcher at the bottom-right
corner of the Page Setup category.

The Page Setup dialog box should appear.
- Click to activate the Layout tab.
- Under the Headers and Footers section, click to check the checkbox labeled Different first page.
- Now click OK to apply the changes
See screenshot:

As soon as you hit the OK button, the page number on the first page disappear from your Word document.
This is how you remove page number from the first page.
NOTE: After successfully removing the page number from the first page, the second page will start numbering from 2. This means that the first page is still counted though, it is just hidden. If that’s a problem with you, you can set it to start the numbering from zero (0) so that the first page will be zero (0) which is hidden anyway, and the second page will show page number 1.
Option 5: Remove first page number by using Page Break
You can also use the break section command to separate the first
page from the rest of the pages.
This way, when you delete the first page number, it will not
affect the rest of the pages.
But without separating the first page, all the pages will get deleted even if you delete only the page number on the first page.
NOTE: Not only for the first page, but this approach can also be used to remove page numbers from certain sections in word
Without further ado, the steps are outlined below:
- Click to place the insertion pointer at the end of the first page.
- Under the Page Layout or Layout tab, click on Breaks, then Next Page.

This will insert a section break on the first page and start
the new section on the second page.
The first page is now a separate section from the rest of
the pages. However, it is not yet disconnected.
Keep reading to finally disconnect the initial page from the
rest of the pages.
- Scroll to the second page and double-click on the footer section to make it editable. This will also introduce the Header and Footer tab.
- From the Header and Footer tab, unlink the second page from the first page by clicking on the Link to Previous command.

- Now go to the first page and delete the page
number there.
To delete the page number from the first page, double-click in the header or footer area, select the page number and press the Delete key.
You’ll notice that the number on the first page gets removed
without deleting the remaining page numbers.
Conclusion
If you are able to follow the steps on this page very carefully, I’m confident that you can solve any issue concerning how to remove page numbers in Microsoft Word.
However, if you still have issues, you can mention it in the
comments section below for more clarifications.
Thank you very much for landing on this page.
You are here: Home / Office / Remove page number from selected pages in Word
This is in response to the query posted by a reader that
How to remove a page number without removing all page numbers.
Word 2016, 2013 and 2010 have a feature that allows users to remove page number for selected pages alone. The option is know as “Section Break” and it is available as part of the Page Setup menu. For example if you have 5 pages in a document and want to remove the page number for the 4th Page then you can follow the below mentioned steps.
Step 1:- In the Word document, scroll down to the page with number as 4.
Step 2:- Navigate to Page Layout menu then click the Break menu option under Page Setup section.

Step 3 :- Select Next Page from the Breaks menu drop down list.

Step 4 :- Then double click the Footer of the new page section.

Step 5 :- Select Same as Previous option in the document and un select the Link to Previous available under the Header & Footer Tools.
Step 6 :- Now you can edit or remove the page number from only the selected page.
Reader Interactions

Нумерация страниц в программе Word — штука весьма полезная, которая может понадобиться во многих ситуациях. Например, если документ представляет собой книгу, без этого точно не обойтись. Точно так же и с рефератами, дипломными и курсовыми, научными работами и многими другими документами, в которых много страниц и есть или по крайней мере должно быть содержание, необходимое для более удобной и простой навигации.
Урок: Как в Ворде сделать содержание автоматически
В статье, представленной по ссылке ниже, мы уже рассказали, как добавлять нумерацию страниц в документе, ниже речь пойдет об обратном действие — о том, как в Microsoft Word удалить нумерацию страниц. Это то, о чем тоже необходимо знать при работе с документами и их редактировании.
Урок: Как в Ворде пронумеровать страницы
Прежде, чем мы приступим к рассмотрению данной темы, традиционно отметим, что данная инструкция, хоть и будет показана на примере Microsoft Office 2016, точно также применима и ко всем более ранним версиям продукта. С ее помощью можно убрать номера страниц в Ворде 2010, а также последующих и предшествующих версиях этого многофункцуионального офисного компонента.
Как убрать нумерацию страниц в Word?
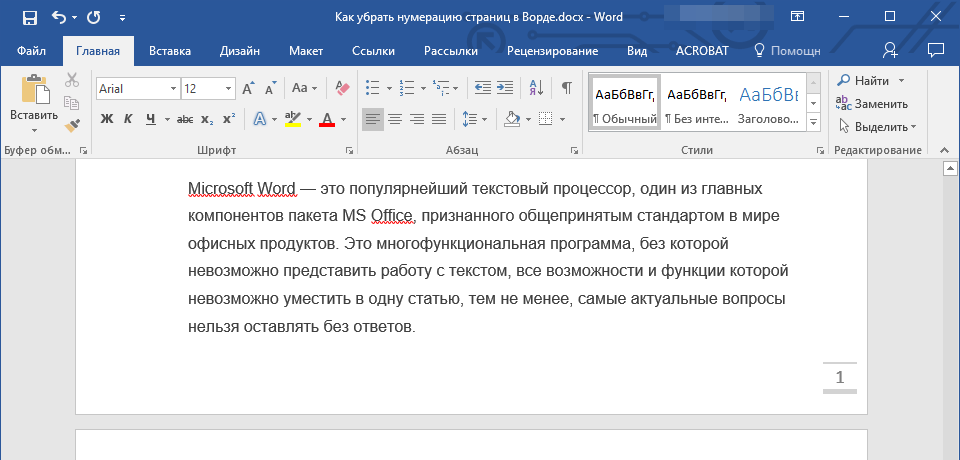
1. Для удаления номера страницы в документе Word, из вкладки «Главная» на панели управления программы нужно перейти во вкладку «Вставка».
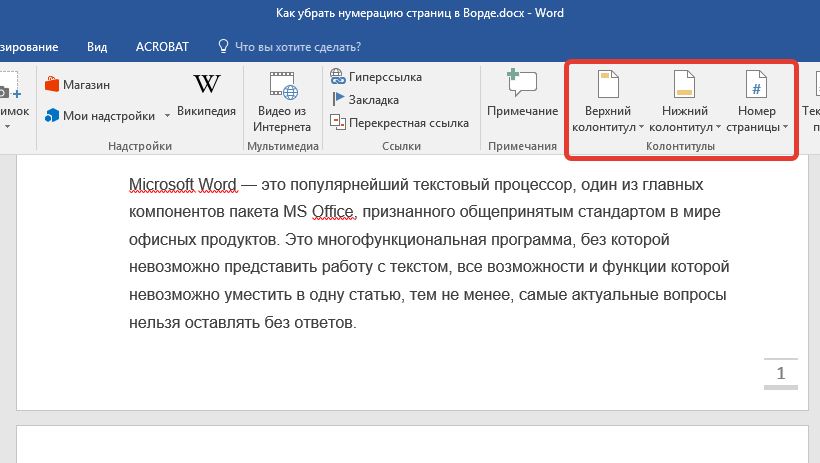
2. Найдите группу «Колонтитулы», в ней находится необходимая нам кнопка «Номера страниц».
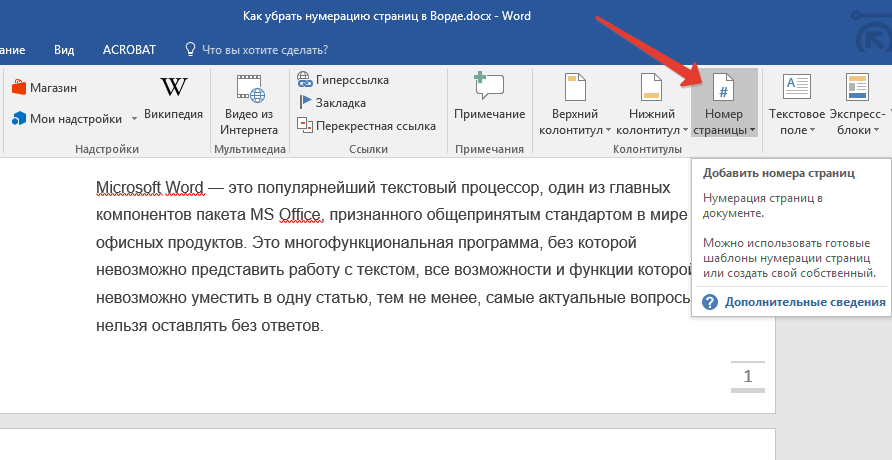
3. Нажмите на эту кнопку и в развернувшемся окне найдите и выберите «Удалить номера страниц».
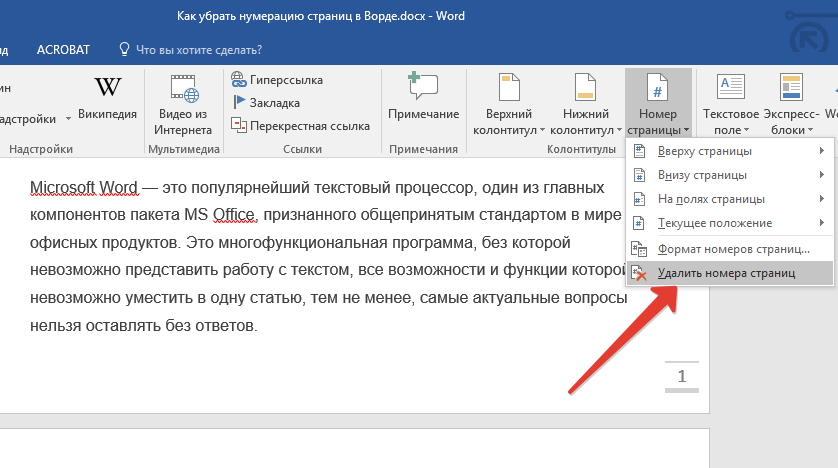
4. Нумерация страниц в документе исчезнет.
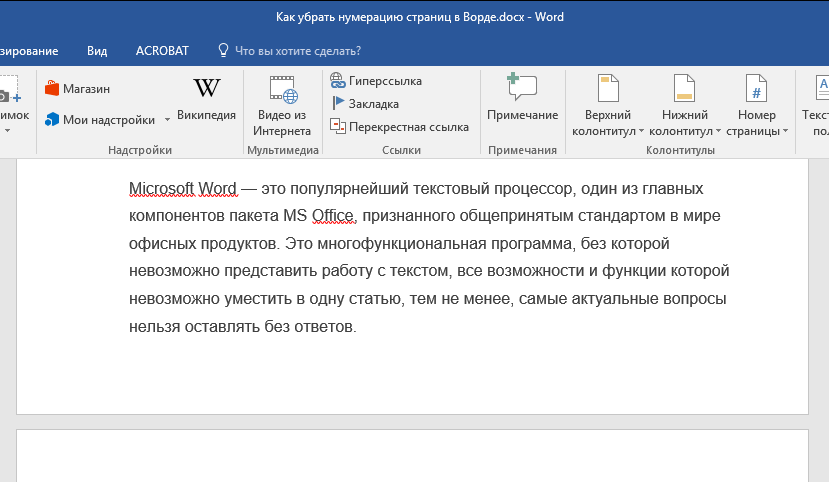

На этом все, как видите, убрать нумерацию страниц в Ворде 2003, 2007, 2012, 2016 как и в любой другой версии программы, совсем несложно и сделать это можно всего в пару кликов. Теперь вы знаете немного больше, а значит, сможете работать результативнее да и просто быстрее.
Еще статьи по данной теме: