
Word for Microsoft 365 Word 2021 Word 2019 Word 2016 Word 2013 Word 2010 Word 2007 More…Less
A cross-reference allows you to link to other parts of the same document. For example, you might use a cross-reference to link to a chart or graphic that appears elsewhere in the document. The cross-reference appears as a link that takes the reader to the referenced item.
If you want to link to a separate document you can create a hyperlink.
Create the item you’re cross-referencing first
You can’t cross-reference something that doesn’t exist, so be sure to create the chart, heading, page number, etc., before you try to link to it. When you insert the cross-reference, you’ll see a dialog box that lists everything that’s available to link to. Here’s an example.
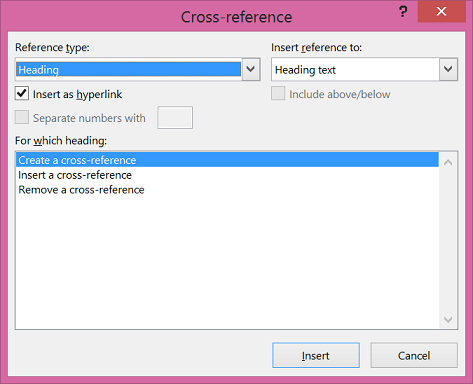
Insert the cross-reference
-
In the document, type the text that begins the cross-reference. For example, «See Figure 2 for an explanation of the upward trend.»
-
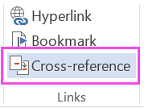
On the Insert tab, click Cross-reference.

-
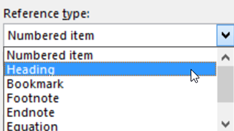
In the Reference type box, click the drop-down list to pick what you want to link to. The list of what’s available depends on the type of item (heading, page number, etc.) you’re linking to.
-
In the Insert reference to box, click the information you want inserted in the document. Choices depend on what you chose in step 3.
-
In the For which box, click the specific item you want to refer to, such as «Insert the cross-reference.»
-
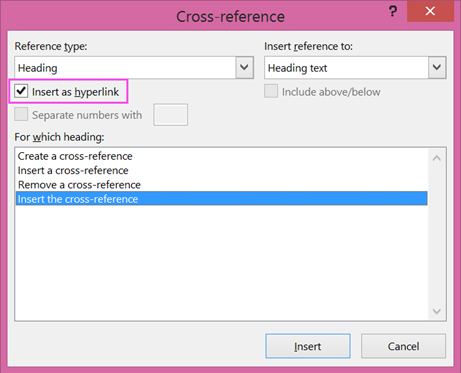
To allow users to jump to the referenced item, select the Insert as hyperlink check box.
-
If the Include above/below check box is available, check it to include specify the relative position of the referenced item.
-
Click Insert.

Cross-references are inserted as fields
Cross-references are inserted into your document as fields. A field is a set of information that instructs Word to insert text, graphics, page numbers, and other material into a document automatically. For example, the DATE field inserts the current date. The advantage of using fields is that the content being inserted—date, page number, graphics, etc.—gets updated for you whenever there’s a change. For example, if you’re writing a document over a period of days, the date will change each day when you open and save the document. Similarly, if you update a graphic that’s stored elsewhere but referenced in the field, the update will get picked up automatically without you having to re-insert the graphic.
If you’ve inserted a cross-reference and it looks similar to {REF _Ref249586 * MERGEFORMAT}, then Word is displaying field codes instead of field results. When you print the document or hide field codes, the field results replace the field codes. To see the field results instead of field codes, press ALT+F9, or right-click the field code, and then click Toggle Field Codes on the shortcut menu.
Use a master document
If you want to cross-reference items that reside in a separate document but don’t want to use hyperlinks, you’ll have to first combine the documents into one master document and then insert the cross-references. A master document is a container for a set of separate files (or subdocuments). You can use a master document to set up and manage a multi-part document, such as a book with several chapters.
Need more help?
Want more options?
Explore subscription benefits, browse training courses, learn how to secure your device, and more.
Communities help you ask and answer questions, give feedback, and hear from experts with rich knowledge.

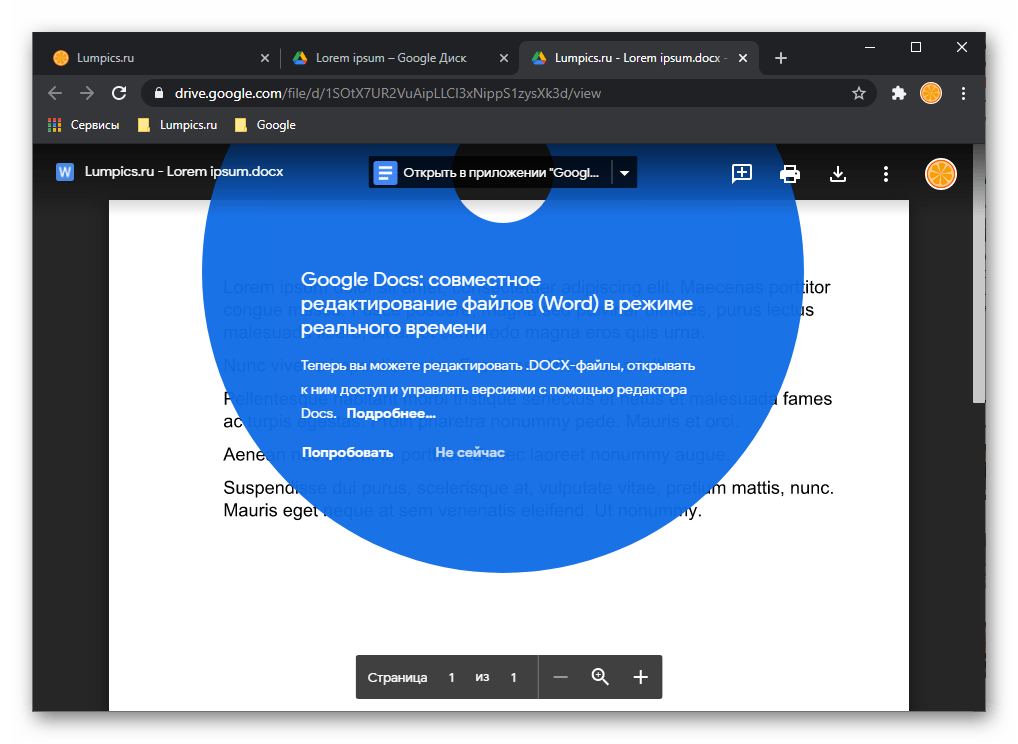
Вариант 1: Документы на диске ПК
Добавление ссылки на документ в Ворде осуществляется по следующему алгоритму:
Примечание: Ссылка может вести на любой документ из пакета приложений Microsoft Office (Word, Excel, PowerPoint и т. д.), обычные текстовые файлы (Блокнот) и файлы многих других форматов. При этом важно учитывать, что рассмотренным ниже способом можно создать заведомо рабочую ссылку только на локальные файлы, которые хранятся на вашем компьютере, просмотр тоже будет доступен только на нем.
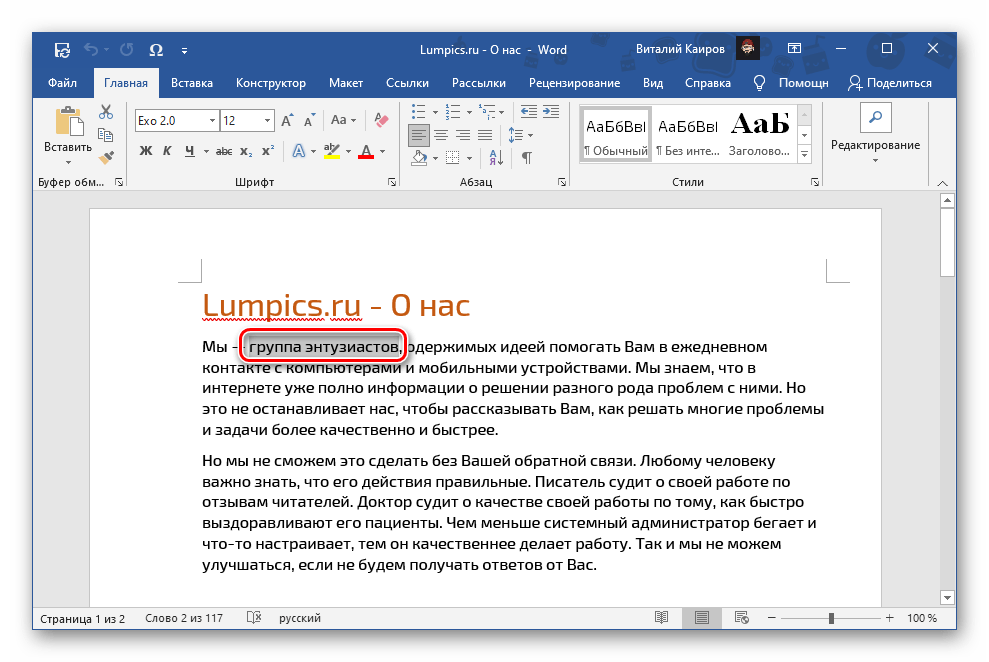
- Выделите то слово или фразу, которое в дальнейшем станет ссылкой на документ.

Обратите внимание! Ссылкой в файле Word может быть не только текст, но и любое изображение, фигура, текстовое поле, SmartArt, WordArt и другие объекты. Алгоритм действий, которые требуется выполнить в подобных случаях, ничем не отличается от рассмотренного ниже.
- Далее можно пойти по одному из трех путей:
Читайте также: Сочетания клавиш для удобной работы в Ворде
- Каким бы из предложенных выше методов вы не воспользовались, будет открыто окно «Вставка гиперссылки».
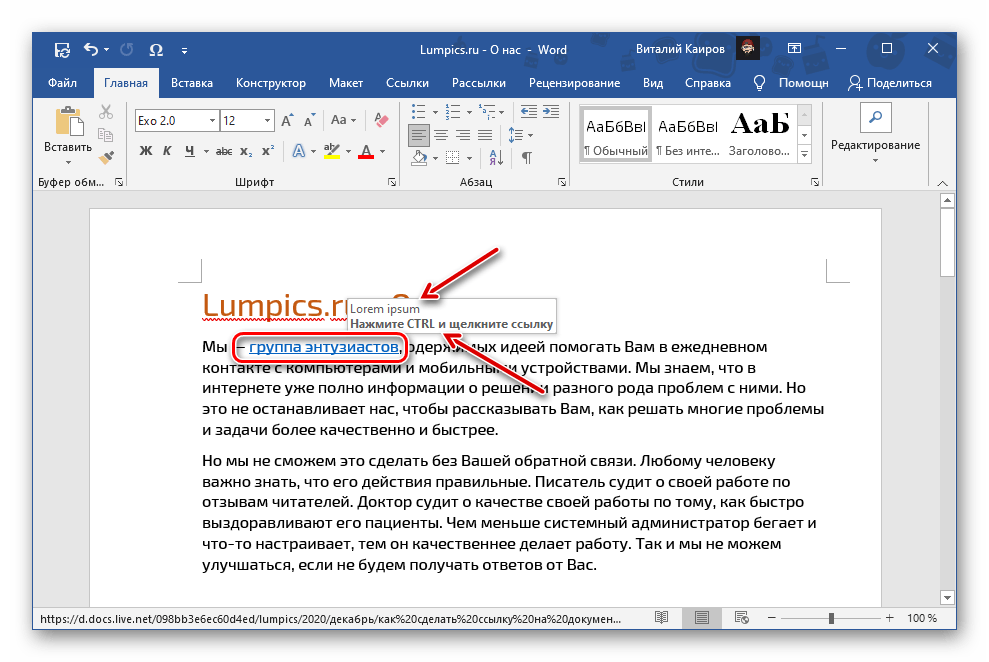
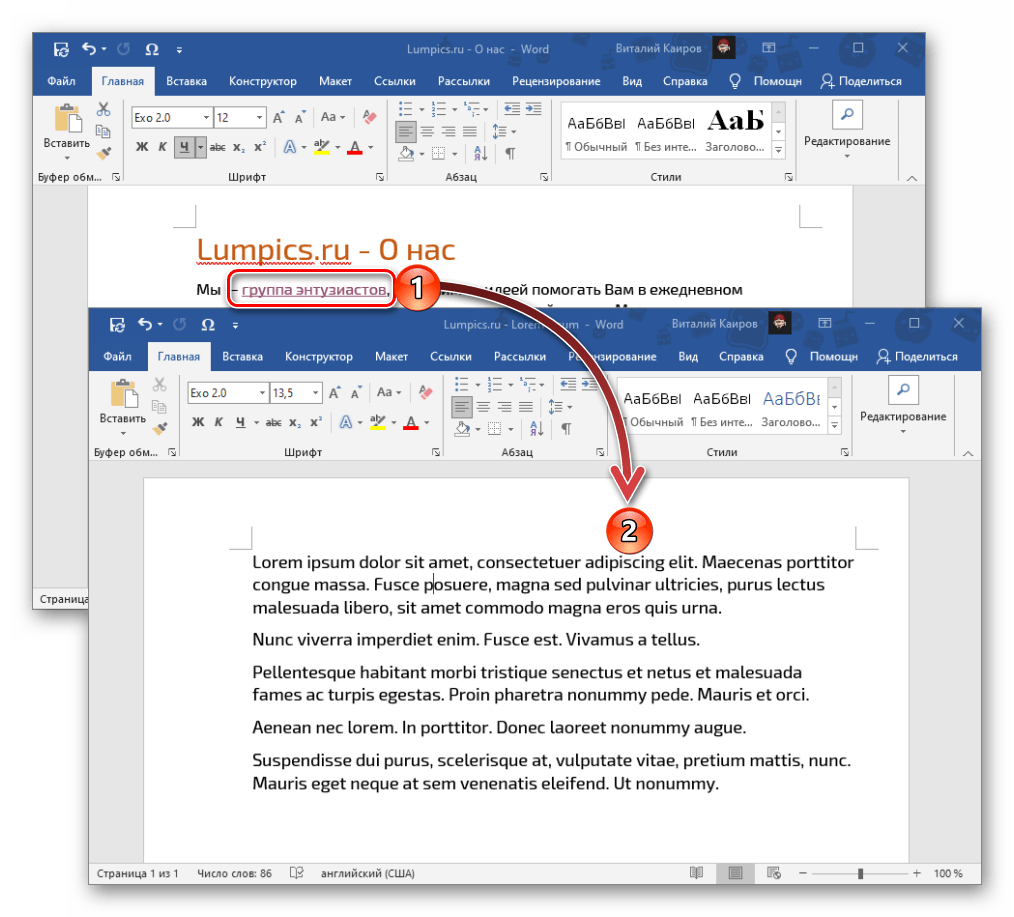
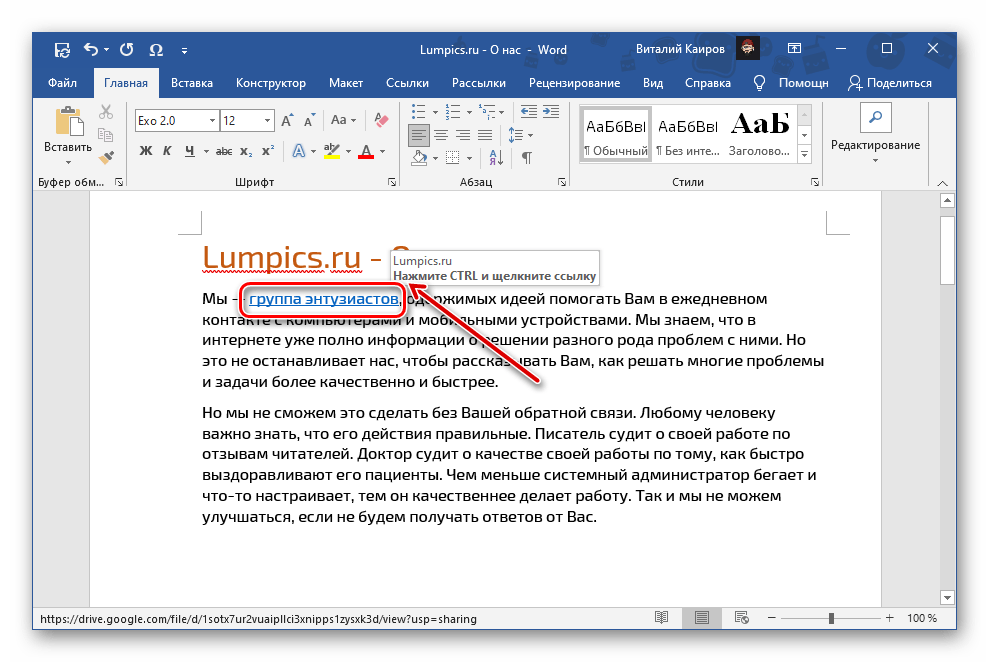
Ссылка на выбранный вами файл будет добавлена в документ Word. Для «перехода» по ней наведите указатель курсора на подсвеченный адрес (во всплывающем окошке будет отображаться подсказка, если ранее она добавлялась), зажмите клавишу «Ctrl» и щелкните левой кнопкой мышки (ЛКМ).
Это действие откроет соответствующий файл.
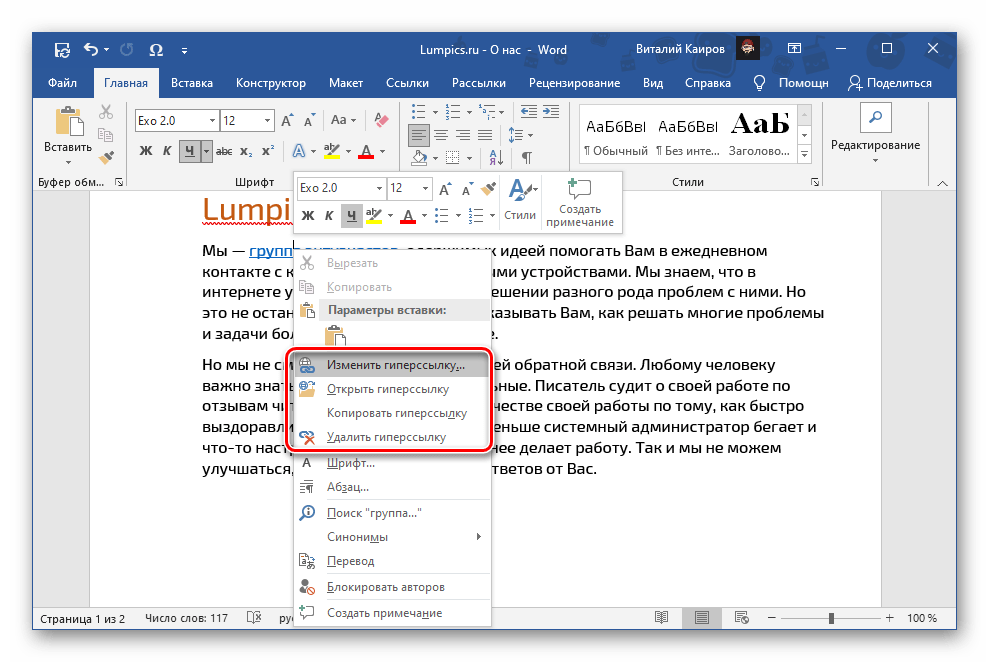
Если ссылку потребуется изменить или удалить, кликните по ней ПКМ и выберите необходимый пункт в контекстном меню. В нем же доступна возможность перехода и копирования адреса.

Читайте также: Как убрать ссылки в документе Ворд
Вариант 2: Документы в облаке
Для того чтобы добавить ссылку на документ, сохраненный в облачном хранилище, потребуется выполнить практически те же действия, что и в рассмотренном выше случае, но с несколькими отличиями.
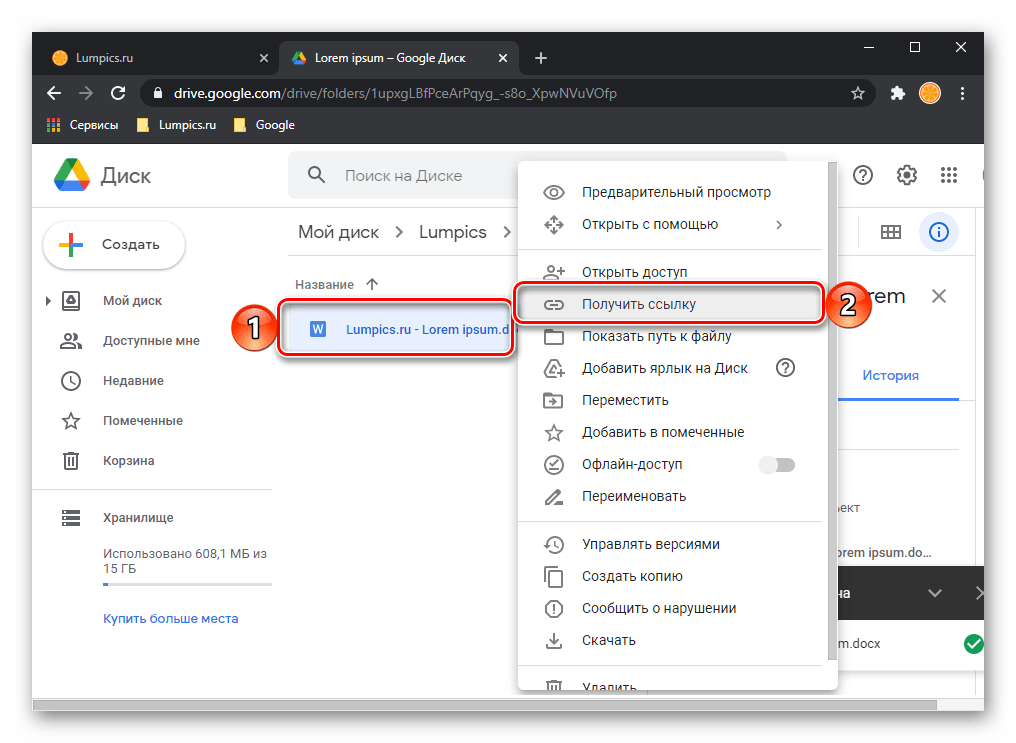
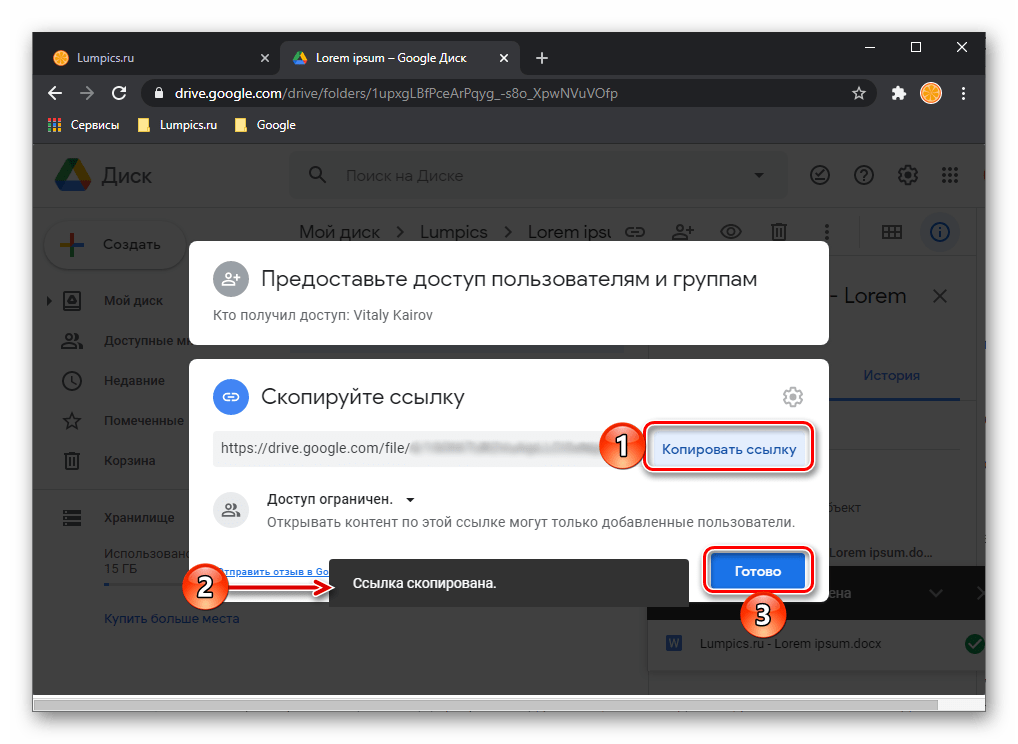
- Создайте общую ссылку на файл. В большинстве сервисов это можно сделать с помощью контекстного меню и функции «Поделиться» или, как в нашем примере «Получить ссылку».
- Скопируйте сгенерированный адрес в буфер обмена, воспользовавшись клавишами «Ctrl+C» или одноименной кнопкой.
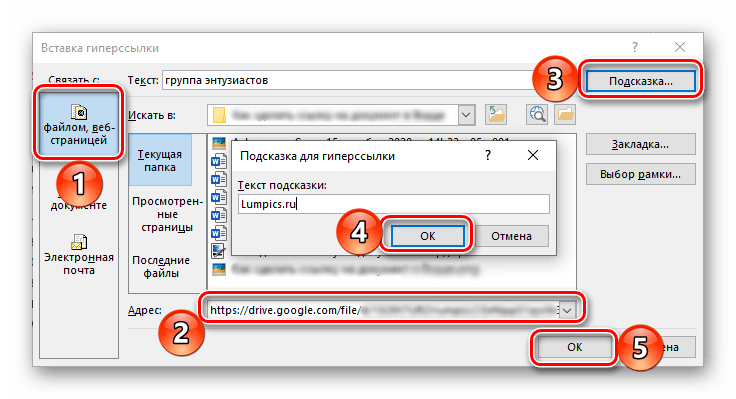
- Выполните все действия из предложенной выше инструкции, пропустив при этом выбор локального документа (средства навигации в строке «Искать в»), но указав полученную ссылку в строке «Адрес».
Когда вы передадите этот документ Word другому пользователю,
он сможет открыть добавленный в ссылку файл путем нажатия по ней ЛКМ с зажатой клавишей «Ctrl».
Читайте также: Как сделать ссылку на сайт в Ворде
Еще статьи по данной теме:
Помогла ли Вам статья?
Software
-
Register Now
or LOG IN to post
- Recent Activity
- FAQs
- Guidelines
Question
-
Creator
Topic
-

Referencing another Word document in a Word document
Locked
by
harry.audus
·
about 14 years, 8 months agoHow can I insert a reference in an open Word document to a heading, table, figure etc in another Word document; and include chapters in another Word document in the TOC of the open Word document? This would enable me to break up very large documents into smaller files while preserving cross-referencing.
-
Creator
Topic

All Answers
-
Author
Replies
-
-
August 13, 2008 at 4:09 am
#2927406
Clarifications
by
harry.audus
·
about 14 years, 8 months agoIn reply to Referencing another Word document in a Word document
Clarifications
-
August 13, 2008 at 4:21 am
#2927404
Create a cross-reference
by
Anonymous
·
about 14 years, 8 months agoIn reply to Referencing another Word document in a Word document
You can create a cross-reference only to an item that is in the same document as the cross-reference. To cross-reference an item in another document, you need to first combine the documents into a master document (master document: A “container” for a set of separate files (or subdocuments). You can use a master document to set up and manage a multipart document, such as a book with several chapters.). The item you cross-reference, such as a heading or bookmark, must already exist. For example, you must insert a bookmark before you cross-reference it.
1. In the document, type the introductory text that begins the cross-reference.
For example, type For more information, see
2. On the Insert menu, point to Reference, and then click Cross-reference.
3. In the Reference type box, click the type of item you want to refer to ? for example, a heading.
4. In the Insert reference to box, click the information you want inserted in the document ? for example, the heading text.
5. In the For which box, click the specific item you want to refer to ? for example, the heading for Chapter 6.
6. To allow users to jump to the referenced item, select the Insert as hyperlink check box.
7. If the Include above/below check box is available, you can select this check box to include information about the relative position of the referenced item.
8. Click Insert.Note Cross-references are inserted as fields (field: A set of codes that instructs Microsoft Word to insert text, graphics, page numbers, and other material into a document automatically. For example, the DATE field inserts the current date.). If your cross-reference looks similar to {REF _Ref249586 * MERGEFORMAT}, Microsoft Word is displaying field codes (field code: Placeholder text that shows where specified information from your data source will appear; the elements in a field that generate a field’s result. The field code includes the field characters, field type, and instructions.) instead of field results (field results: Text or graphics inserted in a document when Microsoft Word carries out a field’s instructions. When you print the document or hide field codes, the field results replace the field codes.). To see the field results, press ALT+F9, or right-click the field code, and then click Toggle Field Codes on the shortcut menu (shortcut menu: A menu that shows a list of commands relevant to a particular item. To display a shortcut menu, right-click an item or press SHIFT+F10.).
Please post back if you have any more problems or questions.
-
August 14, 2008 at 5:03 pm
#2918301
Cross-referencing between documents
by
harry.audus
·
about 14 years, 8 months agoIn reply to Create a cross-reference
Thanks Peconet. I’ll give this a try, but it seems I’ll be able to cross-reference only in one direction – from the master document down. I’d really like to be able to reference (with automatic updating) from anywhere to anywhere, as is common in technical reports (e.g. See section 5.3.2 or See Figure 3.1). This is straightforward in a single document, of course, but how can I do it when I have several linked documents (or chapters)?
Also, I’m not sure that the method you describe will enable me to create automatically a TOC in the master document, but it seems feasible.
-
August 15, 2008 at 6:33 am
#2929207
That’s how it works….
by
thumbsup2
·
about 14 years, 8 months agoIn reply to Cross-referencing between documents
You said “Also, I’m not sure that the method you describe will enable me to create automatically a TOC in the master document, but it seems feasible.”
That’s how the master document/sub-document structure works. Links are dynamically updated. If the master changes, the sub’s all change. If the subs change, the master changes. It’s all done by magic! 😉
-
-
-
March 9, 2011 at 1:49 pm
#2811351
Multi Document Management
by
kcthomas44
·
about 12 years, 1 month agoIn reply to Referencing another Word document in a Word document
I think this is what you want ultimately…
Multi-document TOC using field codes->http://pubs.logicalexpressions.com/Pub0009/LPMArticle.asp?ID=148
Cross reference between documentes ->http://www.wordbanter.com/showthread.php?t=107046
-
-
Author
Replies


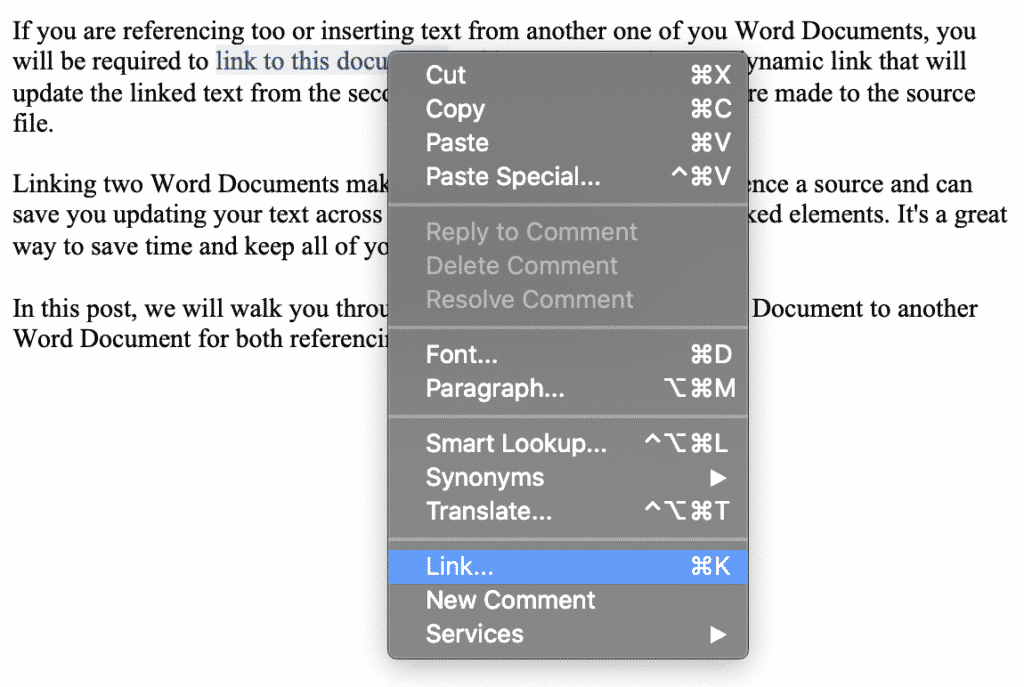
If you are referencing to another Word document from another one of your Word Documents, you will be required to link to this document.
Placing a link in your Word Documents makes it easy for the reader to acquire additional information on a certain point, that you have already written a piece on that topic. Or makes it easy for the reader to see the reference file you are speaking of or quoting from.
In this post, we will walk you through how to link a Microsoft Word Document to another Word Document as well as linking to another file or webpage.
Linking to another Word Document
- Open your Word Document
- Highlight and position the mouse pointer over the word or text you want to link

- Right click on the highlighted word
- Click Link
- Select Web Page or File tab
- Press Select

- Select the document you with to link
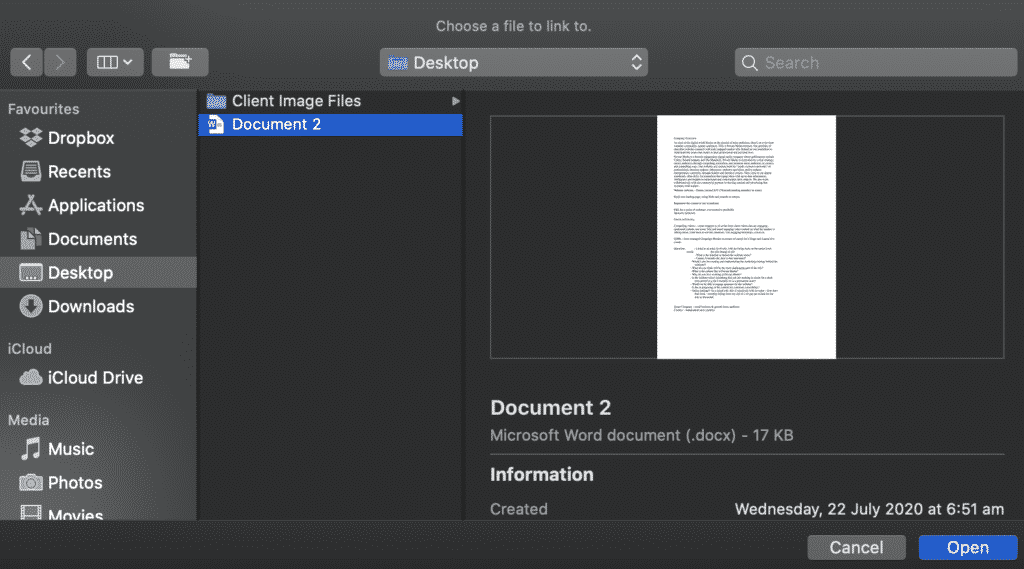
- Press Open
- When you press Open, the file source will automatically drop into the address window
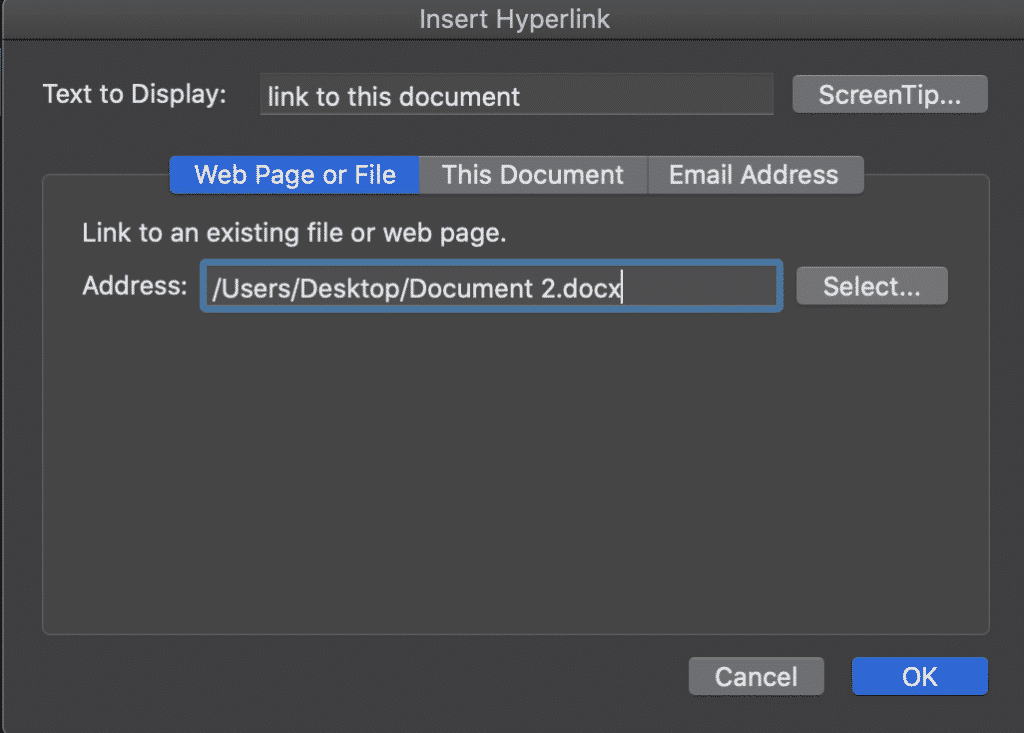
- Press OK

You have now successfully linked your Microsoft Word Document.
On the hunt for an easier way to manage version control?
If you’re collaborating on Microsoft Word Documents and need to keep track of each new version along the way, it is likely that you (like so many of us) have a messy shared drive full of cluttered, badly named versions and no real way of knowing which one if the most recent and who made changes to what.
The endless scrolling through what feeling like 500 versions to figure out if Report_v9_edited_final_FINALFINAL_2 is actually the most recent version.
Is it the final one? Let’s say it is, now you have added your edits and are ready to save a new version, do you just add a _updated onto the end of the already long file name, or the current date – hoping no body else edits and saves on the same day?
Its a mind-field out there!
Then just to add another hidden bomb to the field, there is always one person in the team that saves a version in a different spot and it’s near impossible to figure out where it went.

Collaborating in Word can be challenging, with Version control the number one frustration for most small to large corporations who collaborate regularly and do not have an automatic version control tool on hand.
A tool that manages version control for you, such as Simul Docs will take all of the file naming and searching out of your job description leaving you to spend more time to edit.
Simul Docs manages version control for you. When you open a new file, Simul will save it as file 0.0.1, then John from Marketing opens your file, makes some changes and presses save – this becomes file 0.0.2 and so on.
It’s version control that makes sense.

Then you want to go back and see what changes John has made over the course of the documents life. Well that’s easy, because Simul not only tracks the versions for you with the edits saved in each it places the authors name next to the document so you know who owns which version at a glance.
So now it’s your turn to edit the Word Document, which one is the most recent one?
Simul lists all of the versions in an easy to view ‘versions list’ at the side of your dashboard. The most recent version will be listed at the top, with the highest version number, e.g 0.0.5.
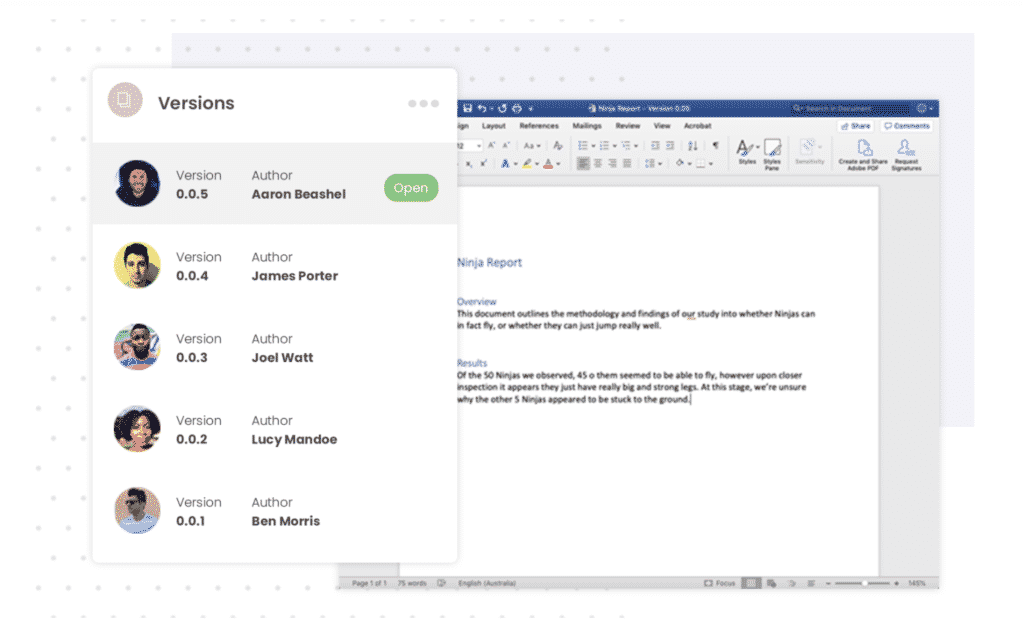
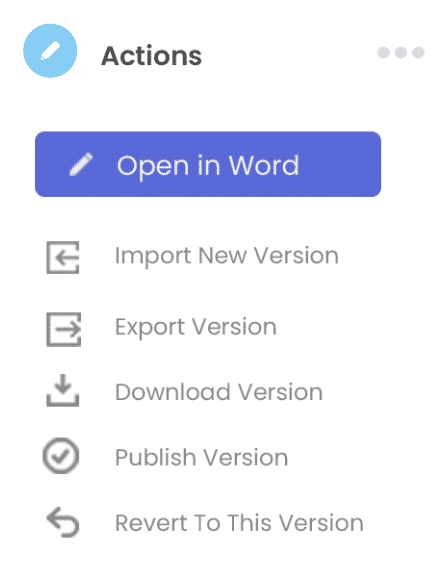
You can open version 0.0.5 at the click of a button, edit it directly in Simul or open it in Microsoft Word, depending on which interface you personally prefer working within.
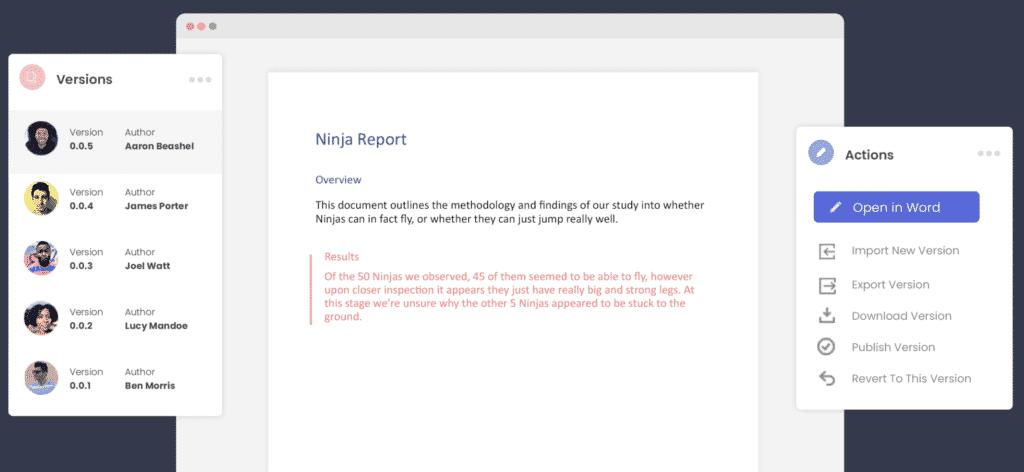
Now that you are editing away, Simul also knows that you are going to want your changes tracked, so tracked changes are automatic, every, single, time you open the document. Because collaborating can be stressful enough without having to remember to turn on tracked changes or save the document as a new version before you start editing to avoid saving over the last file.
So now you’ve made your edits, with all of your changes tracked (thanks Simul!) and are ready to press save and share your file and let your team know you have finished. Simul has you covered again – when you press save Simul automatically sends an email to the document owner letting them know a new version is available for their review.
If you did want to share your document directly, Simul allows you to share via a directly link, email or to any of the popular cloud storage systems such as Dropbox, GoogleDrive, OneDrive and more.
Save, export and download the document out of Simul docs at the click of a button. Simul gives you the option to do so in the original Word Document format or as a PDF.
With collaboration in mind, purpose built tools such as Simul Docs were built to make collaboration easy. From version control, to tracking changes, saving, editing, merging and more – Simul has you covered!
If you find yourself wasting time searching through a messy shared drive, we suggest you give Simul Docs a go.
With free trials available, you’ve got nothing to loose.
Предоставление ссылки для ваших читателей или добавление ссылки для себя — это удобный способ связать связанные документы вместе. К счастью, вы можете вставить документ Microsoft Word в другой документ Word несколькими способами.
В зависимости от того, как вы хотите отобразить ссылочный документ, вы можете связать его с помощью объекта или значка или просто внедрить содержимое из другого документа Word. Мы покажем вам, как сделать каждый из них, чтобы вы могли использовать то, что лучше всего подходит для вас.
Примечание. Имейте в виду, что если вы поделитесь документом с другими, им также потребуется доступ к указанному документу.
Вставьте документ Word как связанный объект
Одним из способов вставки документа является использование связанного объекта. Это добавляет содержимое из другого документа в текущий как объект, текстовое поле.
- Поместите курсор в документ туда, где вы хотите разместить объект, и перейдите на вкладку «Вставка».
- Выберите раскрывающееся меню «Объект» в разделе «Текст» на ленте и выберите «Объект».

- Во всплывающем окне «Объект» перейдите на вкладку «Создать из файла».
- Введите путь к документу в поле Имя файла или используйте кнопку Обзор, чтобы найти, выбрать и открыть документ.

- Установите флажок Ссылка на файл.
- Выберите «ОК», и вы увидите содержимое, встроенное в ваш документ.

На Mac выполните те же действия, чтобы открыть поле «Объект» и выбрать «Из файла». Найдите и выберите файл, выберите «Вставить» и нажмите «ОК».

Если вы выберите встроенный текст, вы заметите рамку вокруг него. Это потому, что это текстовое поле, которое позволяет вам перемещать или изменять его размер по мере необходимости.

Используя этот метод, вы можете дважды щелкнуть объект, чтобы открыть исходный документ. Внесите свои изменения там, сохраните документ, и вы увидите эти изменения в текущем документе.
Если вы хотите удалить объект позже, выберите его и используйте клавишу Delete.
Вставьте документ Word в виде связанного значка
Если вы хотите связать документ Word с помощью значка, это еще один вариант. Затем вы просто выбираете значок, чтобы открыть документ.
- Поместите курсор в документ, где вы хотите значок, и перейдите на вкладку «Вставка».
- Выберите стрелку вниз в меню «Объект» и выберите «Объект».

- В поле «Объект» перейдите на вкладку «Создать из файла».
- Введите путь к документу в поле Имя файла или используйте кнопку Обзор, чтобы выбрать документ.

- Установите флажок Отображать как значок.

- При желании вы можете использовать кнопку значка «Изменить», чтобы выбрать другой. Выберите тот, который вы хотите использовать, в поле «Изменить значок» и нажмите «ОК».

- Выберите «ОК», и вы должны увидеть значок в вашем документе. Щелкните значок, чтобы открыть подключенный документ Word.

На Mac выполните те же действия, чтобы открыть поле «Объект» и при необходимости выбрать тип файла. Выберите «Из файла», найдите и выберите файл и нажмите «Вставить». Установите флажок «Отображать как значок» и нажмите «ОК».

Если вы хотите удалить значок позже, выберите его и используйте клавишу Delete.
Вставить текст из документа Word
Еще один способ вставить документ Word — вставить сам текст. Это не связывает документы вместе, но дает вам весь контент без копирования и вставки из одного в другой. Шаги одинаковы как для Windows, так и для Mac.
- Поместите курсор в документ, где вы хотите текст, и перейдите на вкладку «Вставка».
- Выберите раскрывающееся меню «Объект» и выберите «Текст из файла».

- Когда откроется диалоговое окно «Вставить файл», найдите и выберите файл Word. Затем выберите Вставить.

Затем вы увидите содержимое документа, вставленного в текущий.
В отличие от первого метода, описанного выше, если вы внесете изменения в исходный файл, вы не увидите их отражения в текущем документе. Если вы используете эту опцию, вы можете просто редактировать, форматировать и удалять текст, как если бы вы ввели его непосредственно в документ.

Вставка одного документа Word в другой — удобный способ ссылаться на связанное содержимое.
You can link from one Word document (doc A) to a particular place in another Word document (doc B) using Bookmarks.
NOTE: I would expect that if you moved the documents from their saved and linked locations, the links will break.
The steps and screens for Word 2003 and 2007 are almost exactly the same; the screen shots in these steps are from Word 2003.
Create a bookmark at the specific location in document B
- Open document B (the document you want to link to) and go to the place where you want the link in document A to point to.
- Insert a bookmark at that place in document B, giving it a meaningful name (make sure there are no spaces or punctuation in the name):
- Word 2003: Insert > Bookmark
- Word 2007: Insert tab > Links group > Bookmark button

Create the link in document A
- Open document A and select the text where you want to insert the link to document B.
- Insert a hyperlink:
- Word 2003: Insert > Hyperlink
- Word 2007: Insert tab > Links group > Hyperlink button
- On the Insert Hyperlink window, make sure Existing File or Web Page is selected on the left (1 in the screen shot).
- Check the Text to display to make sure it has the word you want as the link text (2).
- Using the Look in field and its drop-down arrow (3), navigate to the folder where document B is located.
- Select document B (4).
- Click Bookmark (5).

- Select the named bookmark from the list, then click OK.
- The bookmark is added to the file address.
- Click OK again to close the Insert Hyperlink window. Your selected text is now a link to the other document.


Related posts:
- Deleting a bookmark: https://cybertext.wordpress.com/2009/10/20/word-deleting-a-bookmark/
- Removing a link: https://cybertext.wordpress.com/2010/07/08/word-remove-a-link/
[Links last checked July 2010]
A cross-reference in Word can refer to related information elsewhere in the same document (to refer to other documents, sources, etc., see how to use hyperlinks in Word). Cross-referencing helps the reader navigate a lengthy document and aids the author or reviewers to update the document structure by automating tracking changes in headings, picture or table numbers.
For example, you can write “see page 7,” or “in Chapter 3,” or “on Figure 3.” and the reader can click on the cross-reference link to view the information referred to by the author (works as hyperlinks). On the other hand (unlike hyperlinks), when editing a document, if its structure changes (for example, if the pagination changes or Chapter 3 becomes Chapter 4), cross-reference text is automatically updated.
Using a cross-reference, Word offers very helpful features to create and automatically update:
- a table of contents created from paragraphs formatted as headings or specified text fragments,
- an index created from defined index tags,
- a bibliography created from citations,
- footnotes and endnotes that are very useful to provide supporting information without interrupting the flow of the primary content,
- fields with the information from the document property.
Cross-references can be created for the following objects:
- Numbered item (if exist) – paragraphs and headings numbered using Word’s numbering,
- Heading formatted using one of Word’s built-in heading styles,
- Bookmark created using the Bookmark dialog box and marked a block of text,
- Footnote,
- Endnote,
- Equation created using the Microsoft Equation tool with a caption, created using Word’s Caption functionality,
- Figure (see how to insert figures in a Word document) with a caption, created using Word’s Caption functionality,
- Table (see how to create tables in a Word document) with a caption, created using Word’s Caption functionality.
- Other custom caption labels (for example, My Caption). See more about caption labels.
Traditionally, references for equations, tables, and figures are mentioned in a sentence before they appear in the document as near as possible. The first mention with a reference helps readers understand the relationship between equations, figures, and tables with the rest of the text.
If necessary, a new cross-reference can be added again to the already mentioned equation, figure, or table later in the text.
Insert a cross-reference
To insert a cross-reference, do the following:
1. Place the cursor where you want to insert the cross-reference.
2. Do one of the following:
- On the References tab, in the Captions group, click the Cross-reference button:

- On the Insert tab, in the Links group, click the Cross-reference button:


3. In the Cross-reference dialog box:
- In the Reference type list, select the type of reference that you want to link to:

- In the Insert reference to list, select the content type to display in the cross-reference.
The options in the Insert Reference to drop-down list change according to the Reference type list selection.
For example, for the Heading reference type:
See more about reference options for different reference types below.
- If the Insert as hyperlink box check box (selected by default) is:
- Selected, Word creates the hyperlink for the referenced item. So, the reader will be able to Ctrl+ click on it (or click on it – see how to change it) and go to the referenced item.
Note: Word doesn’t format this cross-reference as a hyperlink (blue and underlined).
- Not selected, Word creates a field without the possibility to jump to the source information.
- Selected, Word creates the hyperlink for the referenced item. So, the reader will be able to Ctrl+ click on it (or click on it – see how to change it) and go to the referenced item.
- If the Include above/below check box (not selected by default) is selected, Word will insert the word “above” or “below” in the cross-reference, depending on where the cross-reference is inserted, before or after the referenced item. This word will be changed along with the cross-reference itself if the referenced item is moved.
Note: This feature works for Numbered item and Heading. The above/below item is included in the Insert reference to list for other reference types.
For example, if the paragraph with Chapter 3 is moved after a paragraph with the cross-reference “see Chapter 3 above,” after updating fields in the document will be changed to “see Chapter 3 below.”
- In the For Which item list, select the needed item to reference.
For example, for Bookmark:
Note: In the For Which item list, Word shows all possible choices. If you can’t find the needed element in that list, check the formats and styles in the document content.
- Click the Insert button to insert the cross-reference in the document, then click the Close button to close the dialog box.


Note: You can move your cursor and insert additional cross-references while the Cross-reference dialog box is open.
Update references
Cross-references do not update automatically as other fields in Word. To update fields in the document, select the entire document by clicking Ctrl+A, or its part, and do one of the following:
- Press F9,
- Right-click on any of the fields and select Update Field in the popup menu:


So, your references will be automatically updated, and you can be sure that these references are correct. We strongly recommend checking a document at least visually after changes!
Delete references
To delete a reference, select it and press the Delete key.
Do not forget to update fields in the document!
Reference options
Cross-reference to Headings
Using the cross-referencing to the headings, you transfer to Word such routine as the automatic update of the headings whenever they are changed or moved.
To insert a cross-reference to the heading, in the Cross-reference dialog box:
- In the Reference type list, select the Heading.
- In the Insert reference to list, choose one of the proposed options:
- Heading text inserts the entire text of the Heading.
For example:

- Page number inserts the page number on which the Heading appears.
For example:

- Heading number inserts the Heading number that appears in a document if the heading is numbered, otherwise inserts 0.
For example:
- A heading contains numbering (see how to create the numbering for headings):

- Without numbering:

- A heading contains numbering (see how to create the numbering for headings):
- Heading number (no context) – the same as the previous one.
- Heading number (full context)
For example:
- Above/below inserts the word “above” or “below” in the cross-reference, depending on where the cross-reference is inserted, before or after the referred text. This word will be changed along with the cross-reference itself if the referred text is moved.
For example:
- Heading text inserts the entire text of the Heading.


It can be helpful to use several cross-references to the same heading:

Cross-referencing to Bookmarks
To insert a cross-reference to a bookmark, in the Cross-reference dialog box:
- In the Reference type list, select the Bookmark.
- In the Insert reference to list, choose any of the proposed options:
- Bookmark text inserts the entire text of the Bookmark.
For example:
- Page number inserts the page number on which the Bookmark appears.
For example:
- Paragraph number inserts the Paragraph number that appears in a document if the paragraph is numbered, otherwise inserts 0.
For example:
- Paragraph number (no context)
- Paragaraph number (full context)
- Above/below inserts the word “above” or “below” in the cross-reference, depending on where the cross-reference is inserted, before or after the referenced item. This word will be changed along with the cross-reference itself if the referenced item is moved.
- Bookmark text inserts the entire text of the Bookmark.


See how to work with bookmarks, automatically duplicate information in a Word document.
Cross-reference to Footnotes and Endnotes
Whenever you create footnotes (endnotes) in the document, you can use a single footnote (endnote) multiple times. To do this, for the second and subsequent use of the footnote (endnote) to the information already mentioned, link to the first footnote (endnote).
To insert a cross-reference to a footnote or endnote, in the Cross-reference dialog box:
- In the Reference type list, select the Footnote or Endnote.
- In the Insert reference to list, choose one of the proposed options:
- Footnote number or Endnote number inserts the footnote (endnote) number using the current formatting.
For example:
- Page number inserts the page number on which the footnote (endnote) appears.
For example:
- Above/below inserts the word “above” or “below” in the cross-reference, depending on where the cross-reference is inserted, before or after the referenced text.
This option is meaningless for footnotes and endnotes since all cross-references to an already created note must always be placed after it. This option can only help check the formatting, but do not forget to remove it for the document’s final version.
- Footnote number (formatted) or Endnote number (formatted) inserts the formatted footnote (endnote) number.
For example:
- Footnote number or Endnote number inserts the footnote (endnote) number using the current formatting.


Cross-reference to an Equation
When working with formulas, you can use two types of captions:
I. A caption was created using the Caption functionality (same as captions for tables and figures) with a number and description.
See Cross-reference to Figures and Tables to insert a cross-reference for such equations.
II. Just a number on the same line as equation right-justified:
![]()
See how to create a cross-reference for equations for more details.
Cross-reference to Equations, Figures, and Tables
Figures (pictures, images, icons, photos, etc.) and Tables in the document normally have the label Figure or Table and a number followed by a caption. A caption is a short block of text that provides quick information about the figure or explains table contents without referring to the document content.
To insert a cross-reference to the caption, created using the Caption functionality, in the Cross-reference dialog box:
- In the Reference type list, select the label such as Figure, Table.
- In the Insert reference to list, choose one of the proposed options:
- Entire caption inserts the caption with the label and number.
For example:

- Only label and number inserts the label (if exists) and the number.
For example:

- Only caption text inserts the figure caption or table title without the label and number.
For example:

- Page number inserts the page number on which the figure or table appears.
For example:
- Above/below inserts the word “above” or “below” in the cross-reference, depending on where the cross-reference is inserted, before or after the referenced item. This word will be changed along with the cross-reference itself if the referenced item is moved.
- Entire caption inserts the caption with the label and number.

In the following article, we will focus on introducing you 5 smart ways of how to link one Word document to another.
There are many times when we need to link two or more related documents, so an update in source file can also refresh the text pasted on another one. Speaking of this, Word provides several distinct solutions. Let’s take a look to find out more details.

Method 1: Use “Paste Link” Option
- Firstly, copy a range of text or the entire source document.
- Then put insertion pointer properly and click “Paste” under “Home” tab.
- Next choose “Paste Special” to open the same name dialog box.

- In the “Paste Special” box, select “Paste link”.
- And click to select a link type, such as “Formatted Text” or “Unformatted Text”.
- Lastly, click “OK”.


Any change made in source text should reflect in the new document if you update the link by right click and choosing “Update Link”.
Method 2: Insert an Object
- To begin with, click “Insert” tab then click “Object” in “Text” group.

- Next in “Object” box open, click “Create from File” tab first.
- Then click “Browse” to select a file.
- And check “Link to file” box.
- Finally, click “OK”.


Notice that you will insert the whole document into the new location. You can use the same way in method 1 to update the link.
Method 3: Create a Master Document Linking to Its Subdocument
It’s also a good choice to create a master document that link to subdocument to connect the two files. We have a previous article that explains every detailed step. You can refer to this link: How to Create a Master Document that Links to Multiple Subdocuments in Your Word
Method 4: Hyperlink a Bookmark from Source Document
- First and foremost, create a bookmark for a block of texts in the source document.
- Then in a new document, put insertion pointer at a proper location. Click “Insert” tab and choose “Hyperlink”.

- Put cursor at the “Address” text box and click “Browse for File” tab to select the file which contains the texts you need.
- Next click “Bookmark” tab to open the “Select Place in Document” box.
- Select the bookmark just created and click “OK” in both 2 boxes open.


You will get a hyperlink as bellow:
You can visit the source document through “Ctrl+ Click”.
Method 5: Utilize the “IncludeText” Field
- Click “Insert” tab first and the “Quick Parts” next.
- Then choose “Field” on the drop-down menu.

- In “Field” dialog box, choose “Links and References” for the “Categories”.
- Next select “IncludeText” field.
- Enter the file name of the source document.
- Lastly, click “OK”.


All texts of the source file shall be visible by now in the new document. To update the field, you can click on it and press “F9”.
Deal with Corrupt Word Documents
Once we end up with a damaged document, we certainly won’t discard it immediately. Instead we should try all out to bring a dead file back to life. One of the most important means to address doc corruption is to acquire an advanced recovering tool as soon as possible.
Author Introduction:
Vera Chen is a data recovery expert in DataNumen, Inc., which is the world leader in data recovery technologies, including Excel recovery and pdf repair software products. For more information visit www.datanumen.com
What to Know
- Highlight text or image > right-click text and select Link or Hyperlink > choose destination and enter info > OK.
- Next, select Existing File or Web Page and enter URL to link outside of document.
- Select Place in This Document > select location to link inside of document.
This article explains how to insert or remove a hyperlink in a Word document using Microsoft 365, Word 2019, Word 2016, Word 2013, Word 2010, and Word Starter 2010.
Insert and Remove a Hyperlink in Word
To add and delete hyperlinks in a Word document:
-
Highlight the text or image that you want to link.
-
Right-click the text and choose Link or Hyperlink (depending on the version of Microsoft Word).
-
Select the type of destination you want to link to, then fill in the appropriate information.
- Choose Existing File or Web Page, go to the Address text box, then enter a URL.
- Choose Place in This Document, then select a location within the document.
- Choose Create New Document, go to the Name of new document text box, then enter the name of a new document. If needed, in the Full path section, select Change to change the document folder. In the When to edit section, choose whether you want to edit the document now or later.
- Choose E-mail Address, go to the E-mail Address text box, then enter the email address you want readers to send email to. In the Subject text box, type the subject.
-
Select OK.
-
The text now shows up as a hyperlink in the document.
-
To remove a hyperlink, right-click the link text, then choose Remove Hyperlink.
Use the Right Kind of Hyperlink
There are different kinds of hyperlinks. Choose the one that points your readers to the most helpful information to supplement your document.
Existing File or Web Page Hyperlinks
When you choose this option, the hyperlink opens a website or file. For example, if you’re writing an article about your camping trip to Rocky Mountain National Park, provide a hyperlink to the appropriate section of the National Park Service so readers can quickly find the information they need to plan a similar trip.
Another use might be if you wrote an article about the National Park Service and the document is available to your readers, link to the Word file you created. When the reader selects the hyperlink, that file opens.
Place in This Document Hyperlinks
Another type of hyperlink jumps to a different place in the same document upon selection. Often called an anchor link, this type of link doesn’t take the reader away from the document.
When a document is long and includes sections or chapters that are formatted as headings, create a table of contents at the beginning of the document. Include hyperlinks in the table of contents so that readers can jump to a particular heading.
You could also use this type of hyperlink at the end of each section to return to the top of the document.
Create a New Document Hyperlink
A hyperlink can create a new document when selected. When adding this type of hyperlink, choose whether to make the document at the time you create the link or later. If you choose to make the new document when you create the hyperlink, a new document opens, which you can edit and save. After that, the hyperlink points to that document, exactly like the Existing File or Web Page option.
If you choose to make the document later, you’re prompted to create the new document when you select the hyperlink after the hyperlink has been created. This type of hyperlink is useful if you want to link new content to the current document but don’t want to create the new content yet. Instead, provide the hyperlink to it so you’ll remember to work on the document later. When you do create the document, it will be linked in the main document.
Email Address Hyperlinks
The last type of hyperlink you can make in Microsoft Word is one that points to an email address so that, when selected, the default email client opens and begins composing the message using the information from the hyperlink.
Choose a subject for the email and more than one email address that the message should be sent to. This information is pre-filled for readers when they select the hyperlink but they can change this information before they send the message.
This type of hyperlink is useful for situations when you want readers to contact you to set up a meeting or request additional information.
About Linking in a Word Document
A hyperlink in a Microsoft Word document enables readers to jump from the link to a different place in the document, to a different file or website, or to a new email message. In Word documents, hyperlink text is a different color than other text and is underlined. When you hover over a hyperlink, a preview shows where the link goes. When you select the link, you’re directed to the other content.
Thanks for letting us know!
Get the Latest Tech News Delivered Every Day
Subscribe

You probably have some text that you type often in your Word documents, such as addresses. Instead of retyping this text every time you need it, you can put this common text into one Word document and reference it in other documents–it’ll even automatically update in all your documents if you change it.
Say you want to put your address in the footer of your documents, but the address changes from time to time. You can store the address in a separate, common Word document and use a field in your report to pull the text from the common document, and update whenever it changes. We’ll show you how to do this.
To begin, create a new Word document that will serve as your repository for the address you want to insert into other Word documents. Save it in a location that will be accessible by other documents. For example, don’t save it on a network drive to which you don’t always have access.
We’re going to use bookmarks to refer to the address in our common document. Type the string of text you want to insert into other documents (in our case, the address). Create a bookmark by highlighting the name and going to Insert > Bookmark and giving it a name, like “Address”. See our guide to bookmarks in Word for information on creating them.
Note that bookmark names cannot have any spaces. We recommend putting the name of the bookmark above each item in your common information file so you easily know which name to use for which item. This is especially useful if you plan to have a lot of reusable items in this common document. In our example, we added our address to the common information document and put the bookmark name, “Address”, above the item.

Once you’ve added the item to your common document, you can save and close. Open the document in which you want to insert the address and position the cursor where you want that text to go. For our example, we’re going to add a footer and insert the address there.
We’re going to use the INCLUDETEXT field code to refer to the bookmark we created in the common document. To do this, press “Ctrl + F9” to insert the brackets for the field code.
NOTE: You cannot just type normal brackets around field codes. You must use “Ctrl + F9” to insert the correct type of brackets.
The cursor is automatically placed in between the brackets. Type the following text between the brackets, replacing the “<path to file>” with the absolute full path to your common Word containing the name you want to insert. Replace “<bookmark name>” with the bookmark name you assigned to the item in the common document.
INCLUDETEXT "<path to file>" <bookmark name>
NOTE: Do not enter the brackets in the field code.
For example, we typed the following in between the field code brackets:
INCLUDETEXT "C:\Users\Lori\Documents\Common Information\CommonInformation.docx" Address
NOTE: You must use double backslashes in the path, like we did. Also, make sure you use straight quotes, not smart quotes, when typing the above code into the field.
To grab the address from the common document and insert it into the field code you just entered, right-click on the field code and select “Update Field” from the popup menu.
The address displays in the document. Brackets still display around the address if you have the “Show bookmarks” option on. Again, see our article about bookmarks to learn how to turn off this option. Also, the field code might be shaded. However, you can also turn this off.
If you want to change the field code, you can display the code again rather than the result. To do this, right-click on the resulting item and select “Toggle Field Codes” from the popup menu. The text you typed into the field code displays again and you can edit it. Simply, update the field to display the new result.
Once you’ve created your common document, you can use it to store other items you often type into your Word documents. Simply use a separate INCLUDETEXT field in your Word documents for each piece of information you want to automatically insert from your common document.
READ NEXT
- › How to Cross-Reference in Microsoft Word
- › How to Insert the Contents of One Word Document into Another
- › How to Quickly Insert Blocks of Text in Microsoft Word with AutoText
- › How to Get a Refund on the PlayStation Store
- › Windows 11 Has a New Photo Gallery in the File Explorer
- › Save Hundreds on Elegoo’s New PHECDA Laser Engraver Through Kickstarter
- › The New Winamp Is Here, but It’s Not What You’d Expect
- › Android’s Nearby Share Has (Unofficially) Arrived on Mac