
- Go to Preferences page and choose from different actions for taps or mouse clicks.
Русско-английский словарь
Русско-английский “WordReference” словарь специально адаптирован для использования в Сети.
WordReference с удовольствием предлагает вашему вниманию электронную версию Оксфордского карманного словаря русского языка. Это авторитетный профессиональный словарь, который содержит около 210 000 слов и словосочетаний.
Среди его преимуществ:
- Несложный и удобный для чтения формат представления информации.
- Интегрированный форум, где вы сможете задать дополнительные вопросы.
- Постоянное развитие.
Авторское право © WordReference.com LLC 2023
Копирование больших выдержек из словаря строго запрещено законом.
Sitemap
From Wikipedia, the free encyclopedia
|
Type of site |
Online language dictionary |
|---|---|
| Available in | English, French, Spanish, Italian, German, Russian, Portuguese, Dutch, Polish, Swedish, Japanese, Chinese, Arabic, Korean, Romanian, Turkish, Czech, Greek and Catalan |
| Owner | Michael Kellogg |
| Created by | Michael Kellogg |
| Revenue | from AdSense |
| URL | WordReference.com |
| Registration | No |
| Launched | 1999; 24 years ago |
| Current status | Active |
WordReference is an online translation dictionary for, among others, the language pairs English–French, English–Italian, English–Spanish, French–Spanish, Spanish–Portuguese and English–Portuguese.
WordReference formerly had Oxford Unabridged and Concise dictionaries available for a subscription. These dictionaries contained more translations than the free ones. In 2008, the price was €30 (US$44) per year.[1]
As of June 2008, more language pairs had been created: English–German, English–Russian, English–Polish, English–Romanian, English–Czech, English–Greek, English–Turkish, English–Chinese, English–Japanese, English–Korean, English–Arabic. Dutch, Icelandic and Swedish have since been added.
The website features publicly accessible forums allowing registered users to ask questions about vocabulary and grammar. It also has monolingual dictionaries with definitions in English, Spanish, Italian and Catalan.
|
Type of site |
Internet forum |
|---|---|
| Owner | Michael Kellogg |
| Created by | Michael Kellogg |
| URL | forum.wordreference.com |
| Registration | Yes |
| Launched | 2004; 19 years ago |
References[edit]
- ^ «WordReference Subscription Dictionaries». 2009. Archived from the original on 3 July 2008. Retrieved 16 February 2009.
External links[edit]
- http://www.wordreference.com
APA referencing guidelines
APA Style is widely used by students, researchers, and professionals in the social and behavioral sciences. The Scribbr APA Reference Generator automatically generates accurate references and in-text citations for free.
This referencing guide outlines the most important referencing guidelines from the 7th edition APA Publication Manual (2020). Scribbr also offers free guides for the older APA 6th edition, Vancouver Style, and Harvard Style.
APA in-text citations
The basics
In-text citations are brief references in the running text that direct readers to the full reference entry at the end of the paper. You include them every time you quote or paraphrase someone else’s ideas or words.
An APA in-text citation consists of the author’s last name and the year of publication (also known as the author-date system). If you’re citing a specific part of a source, you should also include a locator such as a page number or timestamp. For example: (Smith, 2020, p. 170).
Parenthetical vs. narrative citation
The in-text citation can take two forms: parenthetical and narrative. Both types are generated automatically when citing a source with Scribbr’s APA Citation Generator.
- Parenthetical citation: According to new research … (Smith, 2020).
- Narrative citation: Smith (2020) notes that …
The in-text citation changes slightly when a source has multiple authors or an organization as an author. Pay attention to punctuation and the use of the ampersand (&) symbol.
| Author type | Parenthetical citation | Narrative citation |
|---|---|---|
| One author | (Smith, 2020) | Smith (2020) |
| Two authors | (Smith & Jones, 2020) | Smith and Jones (2020) |
| Three or more authors | (Smith et al., 2020) | Smith et al. (2020) |
| Organization | (Scribbr, 2020) | Scribbr (2020) |
Missing information
When the author, publication date or locator is unknown, take the steps outlined below.
| Missing element | What to do | Parenthetical citation |
|---|---|---|
| Author | Use the source title.* | (Source Title, 2020) |
| Date | Write “n.d.” for “no date”. | (Smith, n.d.) |
| Page number | Either use an alternative locator or omit the page number. |
(Smith, 2020, Chapter 3) or (Smith, 2020) |
*Format the title in the same way as in the corresponding reference entry (either italicized or, if the title in the reference entry is not italicized, placed in quotation marks). Use title case capitalization.
APA Referencing Generator
Generate accurate APA style references in seconds
Get started
APA references
The basics
APA references generally include information about the author, publication date, title, and source. Depending on the type of source, you may have to include extra information that helps your reader locate the source.
Reference examples
Citing a source starts with choosing the correct reference format. Use Scribbr’s Citation Example Generator to learn more about the format for the most common source types. Pay close attention to punctuation, capitalization, and italicization.
Generate APA references for free
Missing information
It is not uncommon for certain information to be unknown or missing, especially with sources found online. In these cases, the reference is slightly adjusted.
| Missing element | What to do | Reference format |
|---|---|---|
| Author | Start the reference entry with the source title. | Title. (Date). Source. |
| Date | Write “n.d.” for “no date”. | Author. (n.d.). Title. Source. |
| Title | Describe the work in square brackets. | Author. (Date). [Description]. Source. |
Formatting the APA reference page
The basics
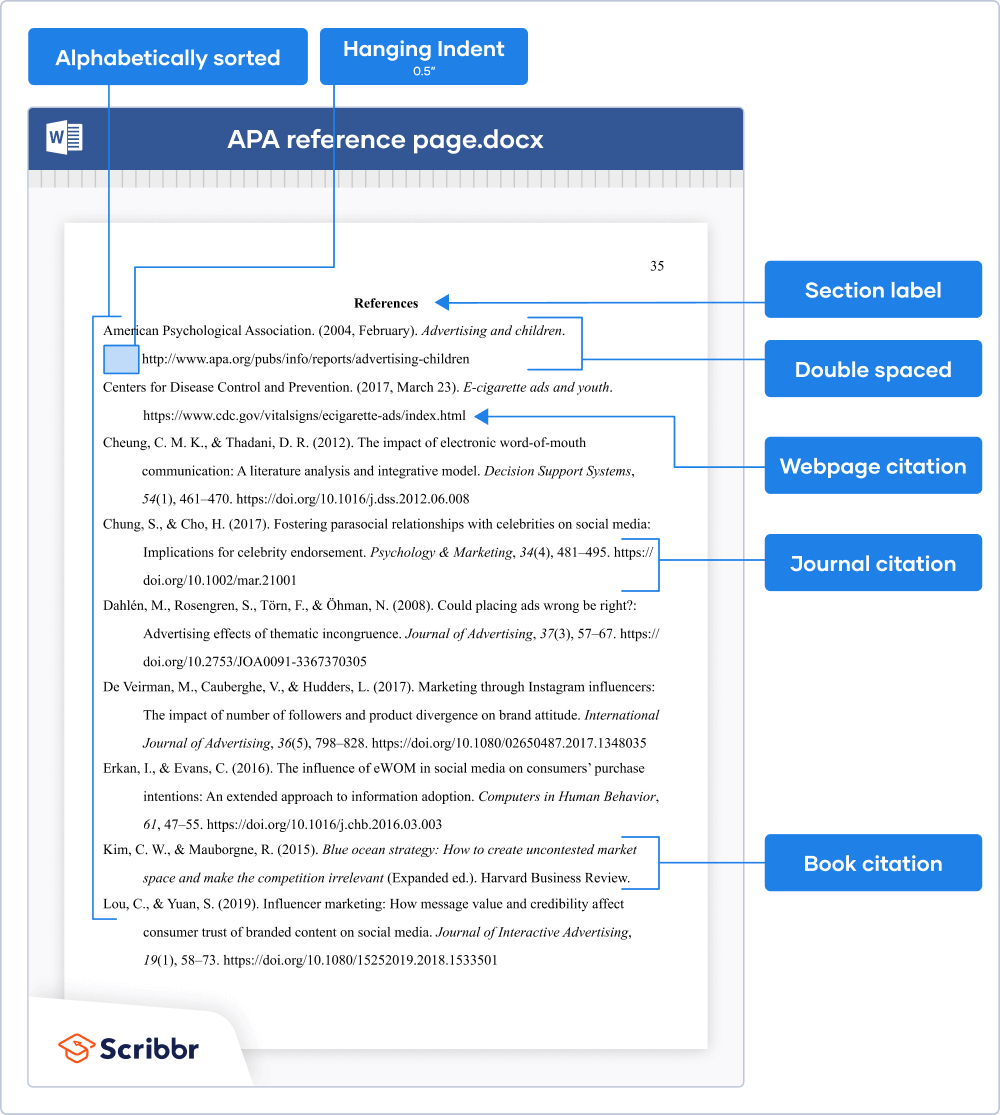 On the reference page, you list all the sources that you’ve cited throughout your paper. Place the page, right after the main body and before any appendices.
On the first line of the page, write the word “References” (in bold and centered). On the second line, start listing your references in alphabetical order.
Apply these formatting guidelines to the APA reference page:
- Double spacing (within and between references)
- Hanging indent of ½ inch
- Legible font (e.g. Times New Roman 12 or Arial 11)
- Page number in the top right header
Which sources to include
On the reference page, you only include sources that you have cited in the text (with an in-text citation). You should not include references to personal communications that your reader can’t access (e.g. emails, phone conversations or private online material).
APA Referencing Generator
Generate accurate APA style references in seconds
Get started
In addition to the APA Reference Generator, Scribbr provides many more tools and resources that help millions of students and academics every month.
- Citation Checker: Upload your paper and have artificial intelligence check your citations for errors and inconsistencies.
- Free plagiarism checker: Detect, understand, and resolve plagiarism by comparing your paper with billions of sources.
- Proofreading services: Have a professional editor (or team of editors) improve your writing so you can submit your paper with pride and confidence.
- Guides and videos: Explore hundreds of articles, bite-sized videos, time-saving templates, and handy checklists that guide you through the process of research, writing, and citation.
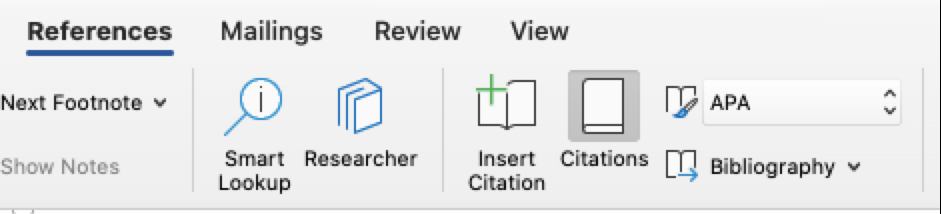
Word for Microsoft 365 Word 2021 Word 2019 Word 2016 More…Less
In Word, you can easily add citations when writing a document where you need to cite your sources, such as a research paper. Citations can be added in various formats, including APA, Chicago-style, GOST, IEEE, ISO 690, and MLA. Afterwards, you can create a bibliography of the sources you used to write your paper.
To add a citation to your document, you first add the source that you used.
Add a new citation and source to a document
-
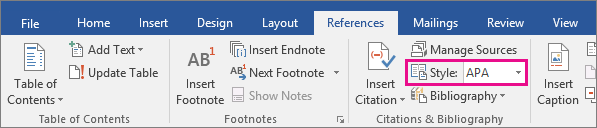
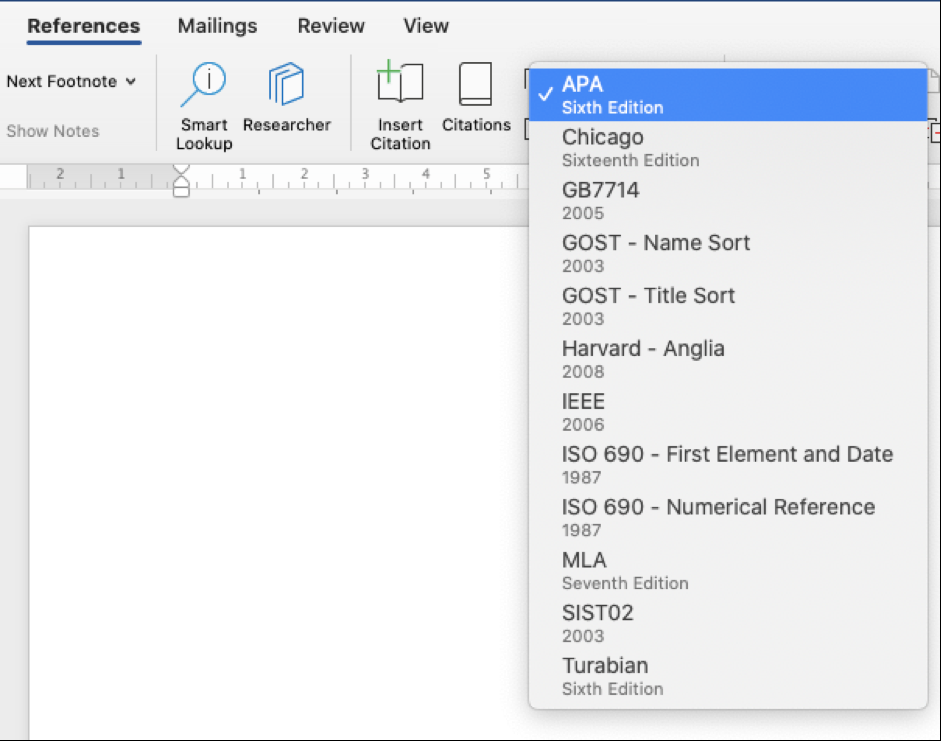
On the References tab, in the Citations & Bibliography group, click the arrow next to Style and click the style that you want to use for the citation and source. For example, social sciences documents usually use the MLA or APA styles for citations and sources.

-
Click at the end of the sentence or phrase that you want to cite.
-
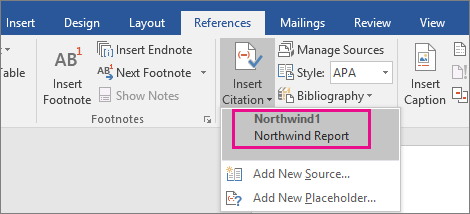
On the Reference tab, click Insert Citation and then do one of the following:
-
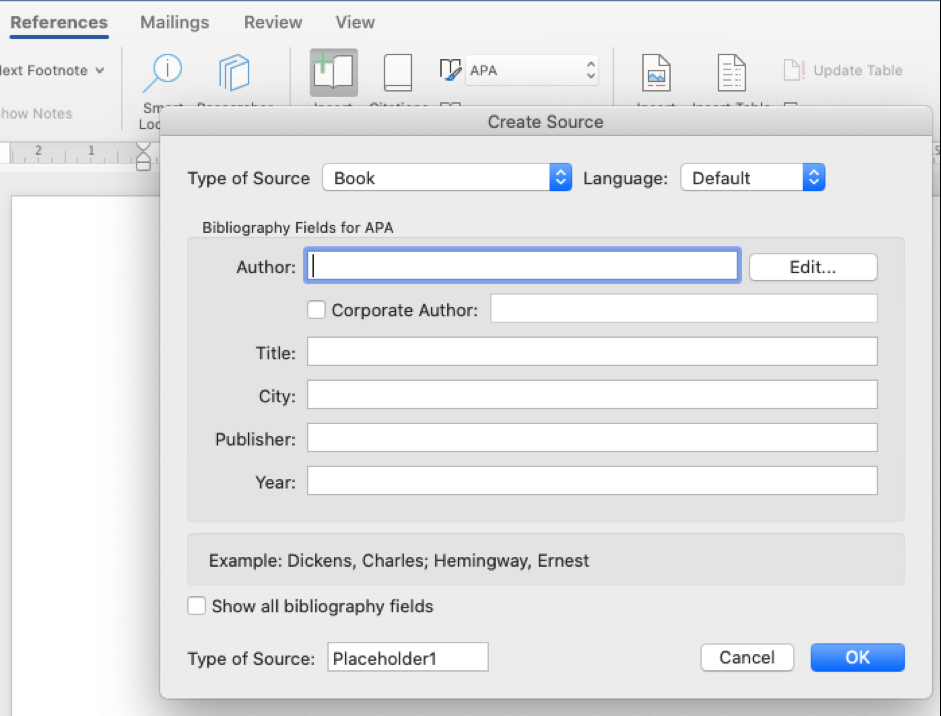
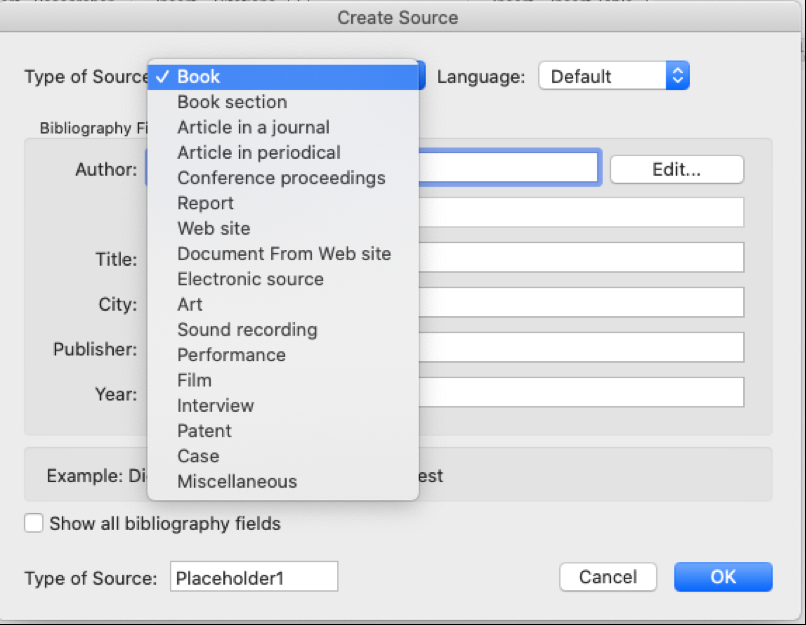
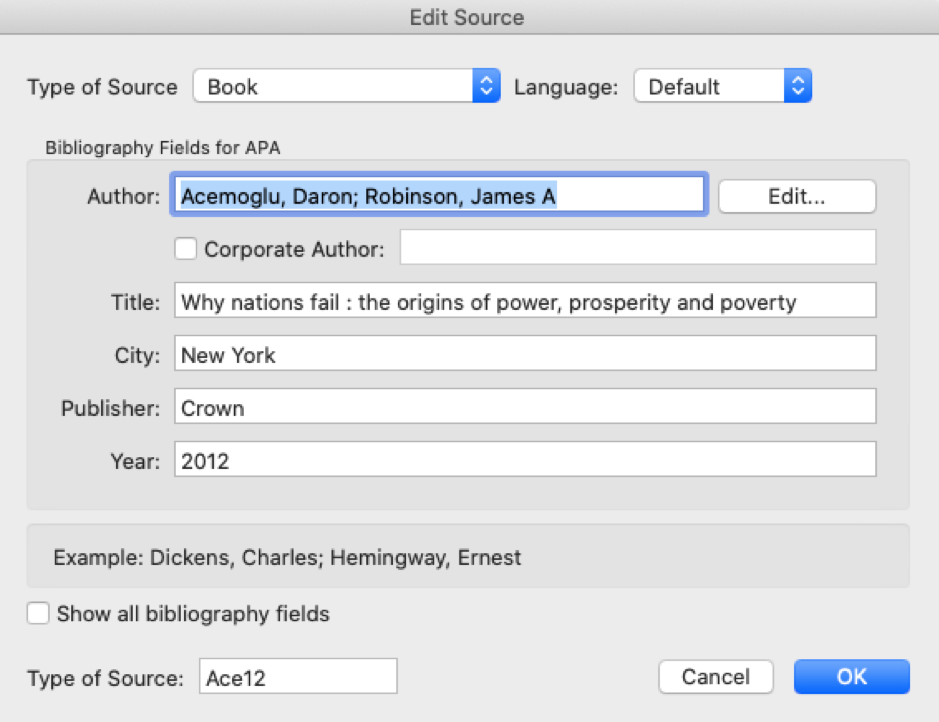
To add the source information, click Add New Source, and then, in the Create Source dialog box, click the arrow next to Type of Source, and select the type of source you want to use (for example, a book section or a website).
-
To add a placeholder, so that you can create a citation and fill in the source information later, click Add New Placeholder. A question mark appears next to placeholder sources in Source Manager.
-
-
If you chose to add a source, enter the details for the source. To add more information about a source, click the Show All Bibliography Fields check box.
-
Click OK when finished. The source is added as a citation at the place you selected in your document.
When you’ve completed these steps, the citation is added to the list of available citations. The next time you quote this reference, you don’t have to type it all out again. You just add the citation to your document. After you’ve added a source, you may find you need to make changes to it at a later time. To do this, see Edit a source.
Notes:
-
If you’ve added a placeholder and want to replace it with citation information, see Edit a source.
-
If you choose a GOST or ISO 690 style for your sources and a citation is not unique, append an alphabetic character to the year. For example, a citation would appear as [Pasteur, 1848a].
-
If you choose ISO 690-Numerical Reference and your citations still don’t appear consecutively, you must click the ISO 690 style again, and then press ENTER to correctly order the citations.
Add citations to your document
-
Click at the end of the sentence or phrase that you want to cite, and then on the References tab, in the Citations & Bibliography group, click Insert Citations.
-
From the list of citations under Insert Citation, select the citation you want to use.
Find a source
The list of sources that you use can become quite long. At times, you might need to search for a source that you cited in another document.
-
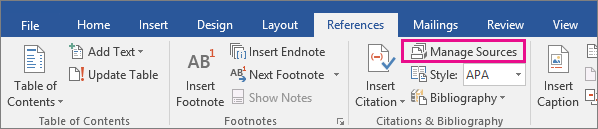
On the References tab, in the Citations & Bibliography group, click Manage Sources.
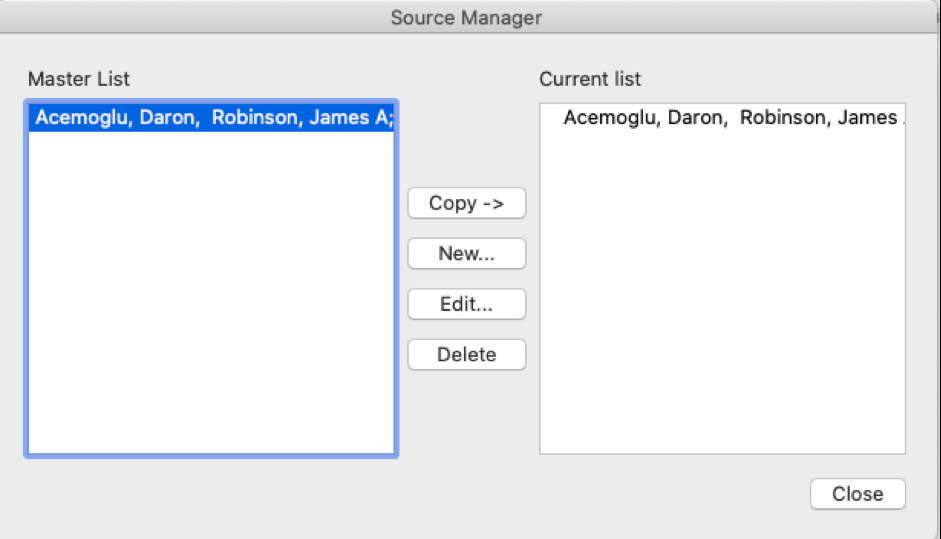
If you open a new document that does not yet contain citations, all of the sources that you used in previous documents appear under Master List.
If you open a document that includes citations, the sources for those citations appear under Current List. All the sources that you have cited, either in previous documents or in the current document, appear under Master List.
-
To find a specific source, do one of the following:
-
In the sorting box, sort by author, title, citation tag name, or year, and then look for the source that you want in the resulting list.
-
In the Search box, type the title or author for the source that you want to find. The list dynamically narrows to match your search term.
-
Note: You can click the Browse button in Source Manager to select another master list from which you can import new sources into your document. For example, you might connect to a file on a shared server, on a research colleague’s computer or server, or on a Web site that is hosted by a university or research institution.
Edit a source
-
On the References tab, in the Citations & Bibliography group, click Manage Sources.
-
In the Source Manager dialog box, under Master List or Current List, select the source you want to edit, and then click Edit.
Note: To edit a placeholder to add citation information, select the placeholder from Current List and click Edit.
-
In the Edit Source dialog box, make the changes you want and click OK.

Need more help?
How to Automatically Add Citations and Bibliographies to Your Document
Properly formatting citations and references have always driven researchers crazy. With Microsoft Office Word, though, the process is streamlined to the point of almost being automatic. Microsoft Word automatically generates a bibliography from the sources you used to write your manuscript. Each time you add a new citation to your document, Word adds that source so that it appears in the bibliography in the proper format, such as APA, Chicago/Turabian, and MLA style. This handout is going to show you how to add citations and bibliographies to your Word documents and how to format references automatically using the Microsoft Word References tool.
The techniques this guide is going to discuss here should work for all Microsoft Word newer versions. The screenshots are all taken in the latest version of Microsoft Word 2020 for Mac, so your Word version might look slightly different, but it works the same way.
Before you can add a citation, a works cited list, or a bibliography; you should add a source to your word document. A works cited list is a list of references, usually placed at the end of the main text, that you referred to in your document. A works cited list is different from a bibliography, which is a list of sources that you consulted when you created the document.
When you add a new source, the source information is saved on your computer automatically
When you complete adding your sources, you can automatically generate a works cited list or a bibliography based on your source information that you completed already. When you add a new source, the source information is saved on your computer automatically. If you want to find and reuse any source that you have previously created, even sources in your other documents, you can use the Citations tool.
A citation is a parenthetical reference that is placed in line with the text. A citation is different from a footnote or an endnote, which is placed at the bottom of the page or end of the document. You can use the source information stored in your citation tool to create citations, a reference list, or a bibliography. However, there is no way to create footnotes or endnotes by using the information in Citations tool or the Source Manager.
For more information about citation styles for various manuals, such as APA, MLA, or Chicago Style, read the following articles: Citation Styles | Which Citation Style Should I Use?, APA Formatting Guide for Academic Manuscripts.
Steps to Automatically Add Citations and References
Step 1:
-
Open a new or existing Microsoft Word document.
Step 2:
-
Place your cursor where you would like your in-text reference to be.
-
When you are working on any Word document, place your cursor where you want the citation to be placed.
Step 3:
-
Choose a documentation style (APA, Chicago, MLA, or IEEE) from the dropdown menu.
Step 4:
-
Click at the end of the sentence or phrase that you want to cite.
-
Choose the References tab at the top and click the Insert Citation button.
-
In the Create Source dialog box, next to Type of Source, select the type of source you want to us.
-
In this dialog box, you can enter all of the relevant information for your source. The default setting for the Type of Source dropdown is Book.
-
If you want to enter other types of sources such as a book section, an article in a journal or periodical, or a website, open the dropdown menu to choose the type of source you want.
-
Then click OK to complete the source.
-
Enter the details for your source (for example, author name, title of the source, and year of the publication), and click OK. The source is added as a citation at the place you selected in your document. If you want to add more details for your source, check the Show all bibliography fields box.
When you have completed the steps mentioned above, the citation is added to the available citations. The next time you quote this reference, you do not have to type it all out again. Just select your source from the list of available citations.
Here is an example:
You can repeat those steps to add any other sources you need, and to place citations where you want.
How to Edit an Existing Source Using Microsoft Word
Step 1:
-
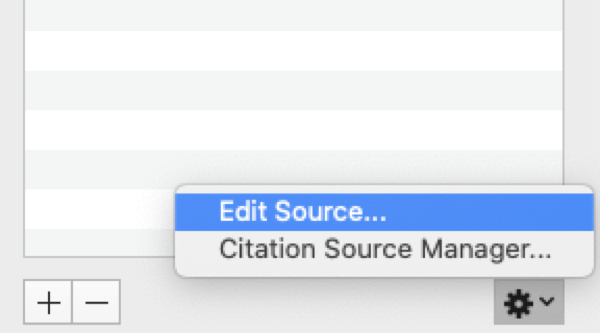
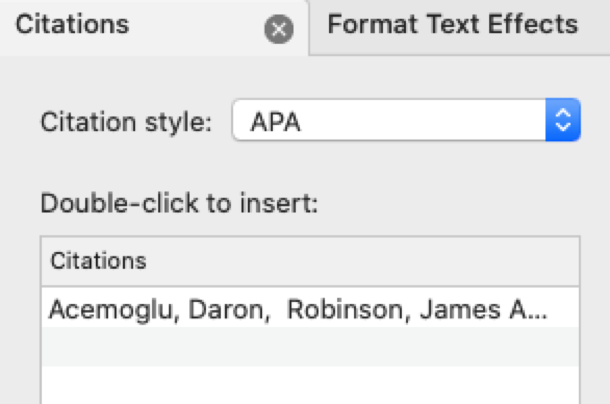
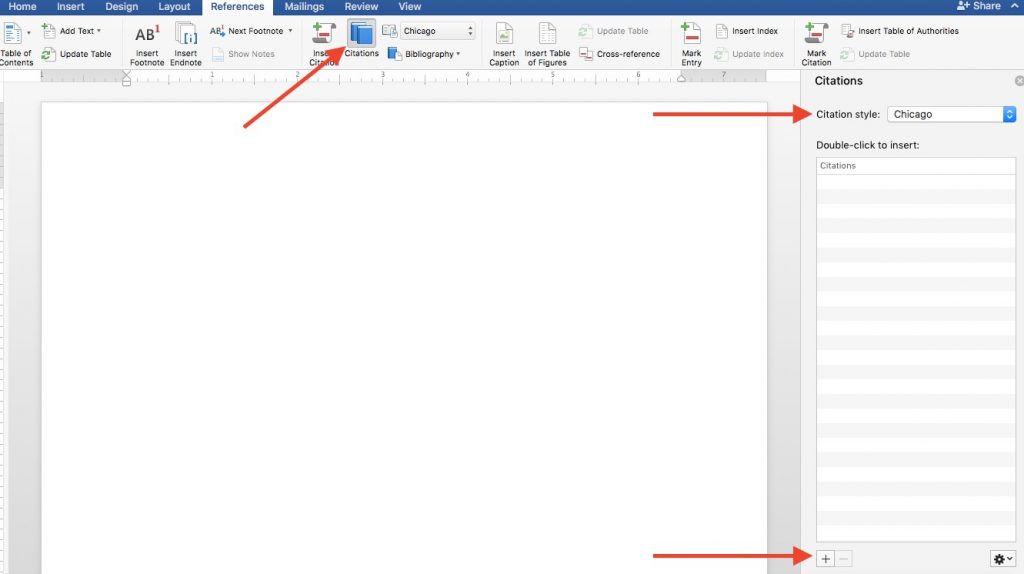
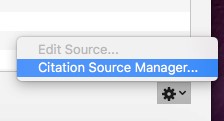
If you want to edit a source, go to the References tab, click Citations, and then click the settings button in the bottom right corner of the Citations pane.
Step 2
-
Click Edit Source, make the necessary changes to the source and then click OK.
Step 3
-
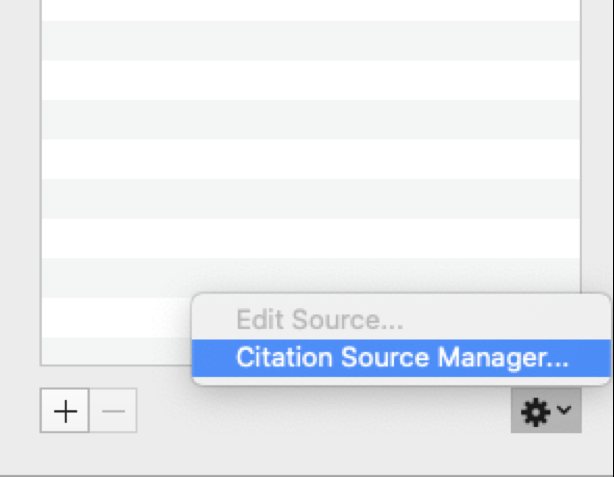
If you want to manage your list of sources, click Citation Source Manager and then add, edit, or delete sources in your list. You can also copy the available sources or add a new one.
How to Add Citations to Your Word Document
Follow the steps below to add a citation to your document.
Step 1
-
Place your cursor where you would like your in-text reference to be and then on the References tab, click Citations
-
Go to the Citations pane on the right and double-click the citation you want to add to your document.
How to Create A Bibliography or A Reference List
A reference list or bibliography is a list of all works you cited or referred to in your document. When your document is completed, you will want to add a bibliography or works cited list that lists all your sources.
Step 1:
-
Click where you want the Works Cited or Bibliography to appear (mostly at the very end of the main text).
Step 2:
-
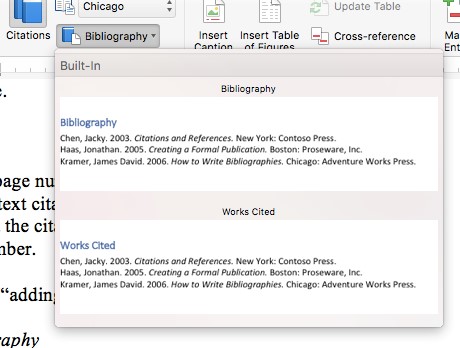
On the References tab, click the arrow next to Bibliography, and then click Bibliography or Works Cited.
-
A works cited list is typically used when you cite sources using the Modern Language Association (MLA) style, and it differs from a bibliography, which is a list of all works that you consulted when your researched and wrote your document.

When you click Bibliography, you will have the following list (for APA style):

When you click Works Cited, you will have the following one (for MLA style:

How to Change A Bibliography or Works Cited List Style
You can change the style of all the citations contained in your document’s works cited list or bibliography without manually editing the style of each citation. You can change the citations from the APA style to the MLA style based on your manual.
-
Go to the View menu, click Draft or Print Layout.

-
On the References tab, click Citations.
-
In the Citations pane, on the Citation style list, select a style.

All references in your document’s bibliography or works cited list change to the new style.
If you need help, then contact us!
Best Edit & Proof expert editors aim to provide your manuscripts with proper scholarly and academic tone and style. They will significantly improve the chances of having your research manuscript accepted for publishing. They provide subject-area proofreading and editing services in several fields categorized under various disciplines. With our extensive knowledge and expertise, we will help you find the right tone and style for your manuscript.
If you need our subject-area editors to format your manuscripts, giving you the fundamental rules for formatting your manuscripts as described in your guidelines, such as APA, MLA, or Chicago/Turabian styles, then contact us. At Best Edit & Proof, our proofreaders and editors edit every type of academic paper. We have a user-friendly website, and a simplified ordering process.
If you would like our subject-area editors and language experts to work on your project for the improvement of its academic tone and style, then please visit the order page. It is easy! It takes only a few minutes to submit your paper and complete the process. Click here to see how it works.
We have flat-rate pricing based on our type of service (editing or proofreading), word count, and turnaround time. Enter your word count or copy and paste your document into our pricing calculator to get an instant quote.
24/7 customer support | Live support
If you need support for editing and proofreading services, contact us. You can also e-mail us or use the 24/7 live chat module to get direct support. We have a 24/7 active live chat mode to offer you direct support along with qualified editors to refine and furbish your manuscript. Alternatively, you can text us through our WhatsApp business line.
Stay tuned for updated information about editing and proofreading services!
Follow us on Twitter, LinkedIn, Facebook, Instagram, and Medium.
For more posts, click here.
For more information about the citation styles and APA style, read the following articles:
-
The 9 Most Important Changes in the 7th Edition of the APA Manual
-
APA Manual 7th Edition: In-Text Citation
-
How to Present Tables and Figures in APA Style (7th edition)
-
How to Use et al. in APA Style (7th Edition)?
-
APA Style: In-Text Citation | Reference List Entry
-
How to Cite Sources in APA Referencing Style? | With APA 7th Edition Update
-
How and When to Use ”et al.” in APA In-Text Citations?
-
Citation Styles | Which Citation Style Should I Use?
-
APA Formatting Guide for Academic Manuscripts
This handout discusses how to add citations and bibliography automatically to your manuscript. To give you an opportunity to practice your proofreading, we have left a few spelling, punctuation, and grammatical errors in the text. See if you can spot them! If you spot the errors correctly, you will be entitled to a 10% discount.
A cross-reference in Word can refer to related information elsewhere in the same document (to refer to other documents, sources, etc., see how to use hyperlinks in Word). Cross-referencing helps the reader navigate a lengthy document and aids the author or reviewers to update the document structure by automating tracking changes in headings, picture or table numbers.
For example, you can write “see page 7,” or “in Chapter 3,” or “on Figure 3.” and the reader can click on the cross-reference link to view the information referred to by the author (works as hyperlinks). On the other hand (unlike hyperlinks), when editing a document, if its structure changes (for example, if the pagination changes or Chapter 3 becomes Chapter 4), cross-reference text is automatically updated.
Using a cross-reference, Word offers very helpful features to create and automatically update:
- a table of contents created from paragraphs formatted as headings or specified text fragments,
- an index created from defined index tags,
- a bibliography created from citations,
- footnotes and endnotes that are very useful to provide supporting information without interrupting the flow of the primary content,
- fields with the information from the document property.
Cross-references can be created for the following objects:
- Numbered item (if exist) – paragraphs and headings numbered using Word’s numbering,
- Heading formatted using one of Word’s built-in heading styles,
- Bookmark created using the Bookmark dialog box and marked a block of text,
- Footnote,
- Endnote,
- Equation created using the Microsoft Equation tool with a caption, created using Word’s Caption functionality,
- Figure (see how to insert figures in a Word document) with a caption, created using Word’s Caption functionality,
- Table (see how to create tables in a Word document) with a caption, created using Word’s Caption functionality.
- Other custom caption labels (for example, My Caption). See more about caption labels.
Traditionally, references for equations, tables, and figures are mentioned in a sentence before they appear in the document as near as possible. The first mention with a reference helps readers understand the relationship between equations, figures, and tables with the rest of the text.
If necessary, a new cross-reference can be added again to the already mentioned equation, figure, or table later in the text.
Insert a cross-reference
To insert a cross-reference, do the following:
1. Place the cursor where you want to insert the cross-reference.
2. Do one of the following:
- On the References tab, in the Captions group, click the Cross-reference button:

- On the Insert tab, in the Links group, click the Cross-reference button:


3. In the Cross-reference dialog box:
- In the Reference type list, select the type of reference that you want to link to:

- In the Insert reference to list, select the content type to display in the cross-reference.
The options in the Insert Reference to drop-down list change according to the Reference type list selection.
For example, for the Heading reference type:
See more about reference options for different reference types below.
- If the Insert as hyperlink box check box (selected by default) is:
- Selected, Word creates the hyperlink for the referenced item. So, the reader will be able to Ctrl+ click on it (or click on it – see how to change it) and go to the referenced item.
Note: Word doesn’t format this cross-reference as a hyperlink (blue and underlined).
- Not selected, Word creates a field without the possibility to jump to the source information.
- Selected, Word creates the hyperlink for the referenced item. So, the reader will be able to Ctrl+ click on it (or click on it – see how to change it) and go to the referenced item.
- If the Include above/below check box (not selected by default) is selected, Word will insert the word “above” or “below” in the cross-reference, depending on where the cross-reference is inserted, before or after the referenced item. This word will be changed along with the cross-reference itself if the referenced item is moved.
Note: This feature works for Numbered item and Heading. The above/below item is included in the Insert reference to list for other reference types.
For example, if the paragraph with Chapter 3 is moved after a paragraph with the cross-reference “see Chapter 3 above,” after updating fields in the document will be changed to “see Chapter 3 below.”
- In the For Which item list, select the needed item to reference.
For example, for Bookmark:
Note: In the For Which item list, Word shows all possible choices. If you can’t find the needed element in that list, check the formats and styles in the document content.
- Click the Insert button to insert the cross-reference in the document, then click the Close button to close the dialog box.


Note: You can move your cursor and insert additional cross-references while the Cross-reference dialog box is open.
Update references
Cross-references do not update automatically as other fields in Word. To update fields in the document, select the entire document by clicking Ctrl+A, or its part, and do one of the following:
- Press F9,
- Right-click on any of the fields and select Update Field in the popup menu:


So, your references will be automatically updated, and you can be sure that these references are correct. We strongly recommend checking a document at least visually after changes!
Delete references
To delete a reference, select it and press the Delete key.
Do not forget to update fields in the document!
Reference options
Cross-reference to Headings
Using the cross-referencing to the headings, you transfer to Word such routine as the automatic update of the headings whenever they are changed or moved.
To insert a cross-reference to the heading, in the Cross-reference dialog box:
- In the Reference type list, select the Heading.
- In the Insert reference to list, choose one of the proposed options:
- Heading text inserts the entire text of the Heading.
For example:

- Page number inserts the page number on which the Heading appears.
For example:

- Heading number inserts the Heading number that appears in a document if the heading is numbered, otherwise inserts 0.
For example:
- A heading contains numbering (see how to create the numbering for headings):

- Without numbering:

- A heading contains numbering (see how to create the numbering for headings):
- Heading number (no context) – the same as the previous one.
- Heading number (full context)
For example:
- Above/below inserts the word “above” or “below” in the cross-reference, depending on where the cross-reference is inserted, before or after the referred text. This word will be changed along with the cross-reference itself if the referred text is moved.
For example:
- Heading text inserts the entire text of the Heading.


It can be helpful to use several cross-references to the same heading:

Cross-referencing to Bookmarks
To insert a cross-reference to a bookmark, in the Cross-reference dialog box:
- In the Reference type list, select the Bookmark.
- In the Insert reference to list, choose any of the proposed options:
- Bookmark text inserts the entire text of the Bookmark.
For example:
- Page number inserts the page number on which the Bookmark appears.
For example:
- Paragraph number inserts the Paragraph number that appears in a document if the paragraph is numbered, otherwise inserts 0.
For example:
- Paragraph number (no context)
- Paragaraph number (full context)
- Above/below inserts the word “above” or “below” in the cross-reference, depending on where the cross-reference is inserted, before or after the referenced item. This word will be changed along with the cross-reference itself if the referenced item is moved.
- Bookmark text inserts the entire text of the Bookmark.


See how to work with bookmarks, automatically duplicate information in a Word document.
Cross-reference to Footnotes and Endnotes
Whenever you create footnotes (endnotes) in the document, you can use a single footnote (endnote) multiple times. To do this, for the second and subsequent use of the footnote (endnote) to the information already mentioned, link to the first footnote (endnote).
To insert a cross-reference to a footnote or endnote, in the Cross-reference dialog box:
- In the Reference type list, select the Footnote or Endnote.
- In the Insert reference to list, choose one of the proposed options:
- Footnote number or Endnote number inserts the footnote (endnote) number using the current formatting.
For example:
- Page number inserts the page number on which the footnote (endnote) appears.
For example:
- Above/below inserts the word “above” or “below” in the cross-reference, depending on where the cross-reference is inserted, before or after the referenced text.
This option is meaningless for footnotes and endnotes since all cross-references to an already created note must always be placed after it. This option can only help check the formatting, but do not forget to remove it for the document’s final version.
- Footnote number (formatted) or Endnote number (formatted) inserts the formatted footnote (endnote) number.
For example:
- Footnote number or Endnote number inserts the footnote (endnote) number using the current formatting.


Cross-reference to an Equation
When working with formulas, you can use two types of captions:
I. A caption was created using the Caption functionality (same as captions for tables and figures) with a number and description.
See Cross-reference to Figures and Tables to insert a cross-reference for such equations.
II. Just a number on the same line as equation right-justified:
![]()
See how to create a cross-reference for equations for more details.
Cross-reference to Equations, Figures, and Tables
Figures (pictures, images, icons, photos, etc.) and Tables in the document normally have the label Figure or Table and a number followed by a caption. A caption is a short block of text that provides quick information about the figure or explains table contents without referring to the document content.
To insert a cross-reference to the caption, created using the Caption functionality, in the Cross-reference dialog box:
- In the Reference type list, select the label such as Figure, Table.
- In the Insert reference to list, choose one of the proposed options:
- Entire caption inserts the caption with the label and number.
For example:

- Only label and number inserts the label (if exists) and the number.
For example:

- Only caption text inserts the figure caption or table title without the label and number.
For example:

- Page number inserts the page number on which the figure or table appears.
For example:
- Above/below inserts the word “above” or “below” in the cross-reference, depending on where the cross-reference is inserted, before or after the referenced item. This word will be changed along with the cross-reference itself if the referenced item is moved.
- Entire caption inserts the caption with the label and number.


In my previous post, I wrote about how to use Word to create a table of contents, a handy feature for longer works. In this post, I’ll give specific instructions on how to use Word to add reference citations to a document. One word of caution about this function: you need to know your style guide extremely well to use this function effectively. More on this later.
Step 1: Adding Citations
To begin, click on the Reference tab, then click on the Citations button to open the Citations pane at the right. Choose your citation style (e.g., APA, Chicago, MLA) at the top of the pane.
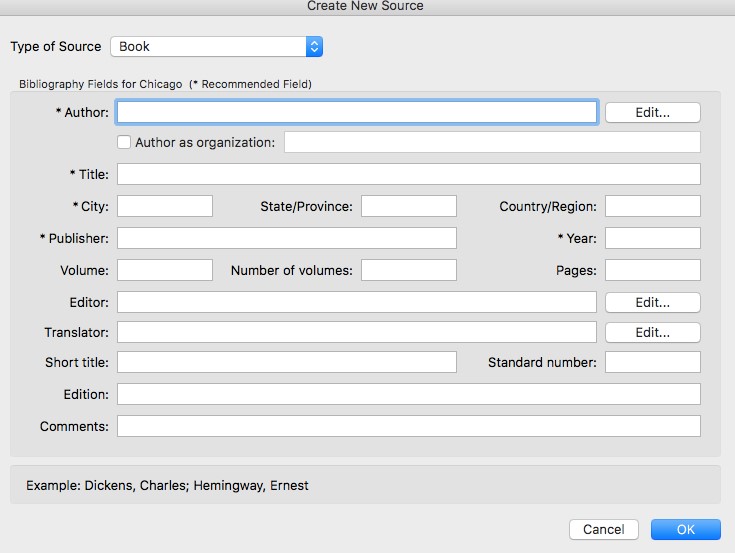
To create a citation, click on the small plus sign at the bottom of the Citations pane. A Create New Source box will appear in which you enter all needed information for the type source you are using.
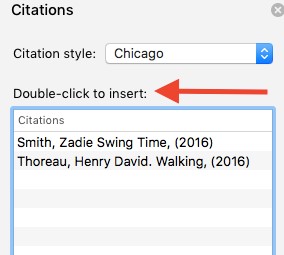
After you’ve entered the needed information and clicked OK, an in-text citation will appear at the cursor in your document. As you continue writing, when you’d like to add another citation, click Insert Citation on the References tab, or click the little plus sign at the bottom of the Citations pane. If you want to add a citation for a source you’ve already added, double-click the source in the list in the Citations pane.
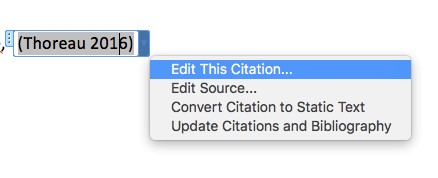
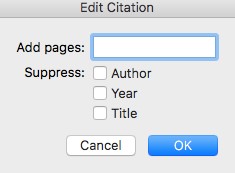
For each citation you add, if it has a page number associated with it, you’ll have to add that information manually. To do this, click on the in-text citation after you add it, then click on the arrow that appears at the right of the box around the citation. Choose Edit This Citation, and a box will appear where you can add a page number.
Step 2: Add a Reference List or Bibliography
Once all your sources and citations are added, it’s time to add your reference list or bibliography. To do this, click on Bibliography on the References tab and choose the option that you prefer. Note that in some versions of Word you can’t choose “References,” so just pick one of the options and remember to edit the title of this page later.
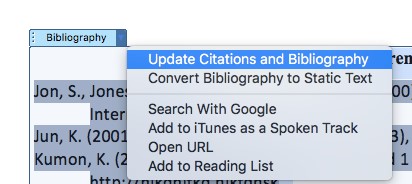
If you do some more editing and add or delete any sources or citations, make sure to update your reference list afterward. To do this, click on the arrow that appears at the right of the box around the title of your reference page. Choose “Update Citations and Bibliography” from the menu that drops down, and the update will reflect the changes you’ve made.
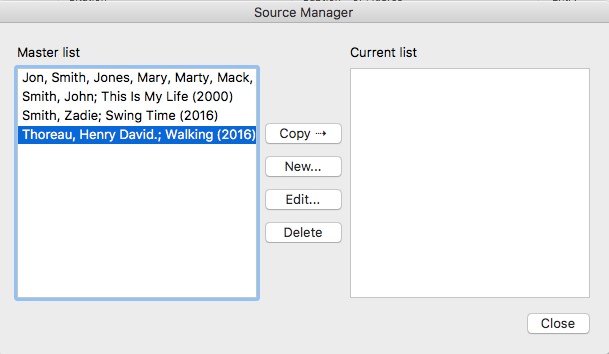
Pros
Word’s Citations function does have one pretty neat feature. When you add citations to a document, it creates a master list that you can use in other documents. To access this master list, click on the button with a little gear on it at the bottom right of the Citations pane.
From there you can choose to add sources from your master list to the list you are using for your current document.
Cons
As far as the downsides are concerned, earlier I mentioned that you will need to know your style guide very well to use this feature of Word. As I was fiddling around with it, I found the feature introduced certain style- related errors in the citations. For example, my version of Word doesn’t correctly apply APA’s rule on using et al. in subsequent citations of sources with three to five authors. Also, it uses hyphens in page ranges rather than en dashes, as APA calls for.
Word’s Citations function also won’t correct errors you make entering information on your sources. For example, if you use the wrong capitalization style in titles in your reference list (headline- vs. sentence-style), it won’t change it for you. Bottom line: this is no quick fix. You will still need to edit your citations with an eagle eye (which is where ProofreadingPal can help).
I also encountered a problem with Chicago notes and bibliography style. In my version of Word, Chicago citations automatically come up author-date. If you want to use notes and bibliography, you can still use Word to create a bibliography, but to add citations in footnotes or endnotes you will have to add the notes yourself separately and delete the author-date citations that appear as you enter citations for your bibliography.
Bottom Line
Word’s Citations function is fairly complicated, and it might be more trouble than it’s worth for novice or occasional users. If you enjoy tasks like figuring out all the details of the Citations function’s use, or if you are doing research for multiple documents and like the idea of creating a master source list, it is worth considering.
Sarah P.