
1. Remove the red underline in Word 2019 for all documents created
2. Delete the red underline in Word 2019 for the current document
3. Delete the red underline in Word 2019 for the current document using the Review menu
Since we have memory regarding the use of operating systems we have used various text processors in order to carry out the creation, edition and presentation of professional type documents . Not only with the text itself but many of us work on creative tasks and we like to add images, audios, effects to give a more personal and original touch to these. In this line Microsoft offers us Word as an integral solution for this type of task or projects.
As human beings we are prone to make some mistake while writing text in Microsoft Word. Many times this happens because time demands us to be agile and it is normal that we make writing mistakes that if they were sent, our image may not be very well valued. Microsoft Word integrates a self-corrector that analyzes what we are writing and based on the type of context it will highlight the words in the following way:
Underlined red
This will be applied at the moment when the affected word is with spelling errors.
Underlined green
This underline will be visible at the moment when a word has grammatical errors.
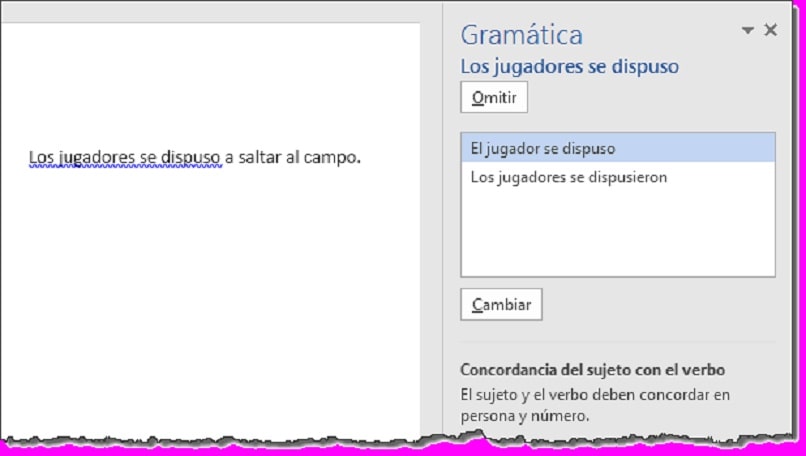
For example, we have written two normal words with spelling errors so that you understand what Microsoft Word analyzes in this case version 2019:
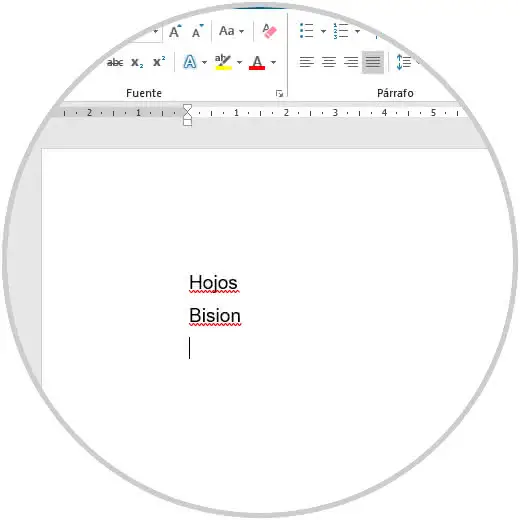
As you can see, Word detects these errors and underlines them with the red line , when we finish the writing process, just press the F7 key or go to the menu «Review», group «Review» and there click on the option «Spelling and grammar «to proceed with the revision of the document and deliver something aesthetic and professional.
It is ideal that Microsoft Word help us with this revision but if you consider that your writing is perfect and you do not want to lose the writing sequence observing red lines, TechnoWikis will explain how to eliminate these red lines of Word and thus prevent it from being automatically carried out This process.
To stay up to date, remember to subscribe to our YouTube channel! SUBSCRIBE
1. Remove the red underline in Word 2019 for all documents created
Step 1
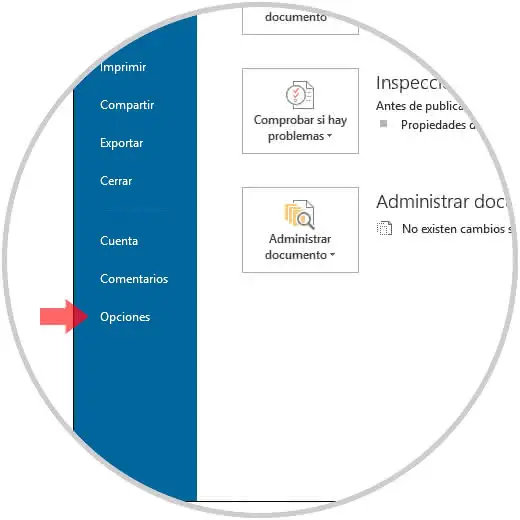
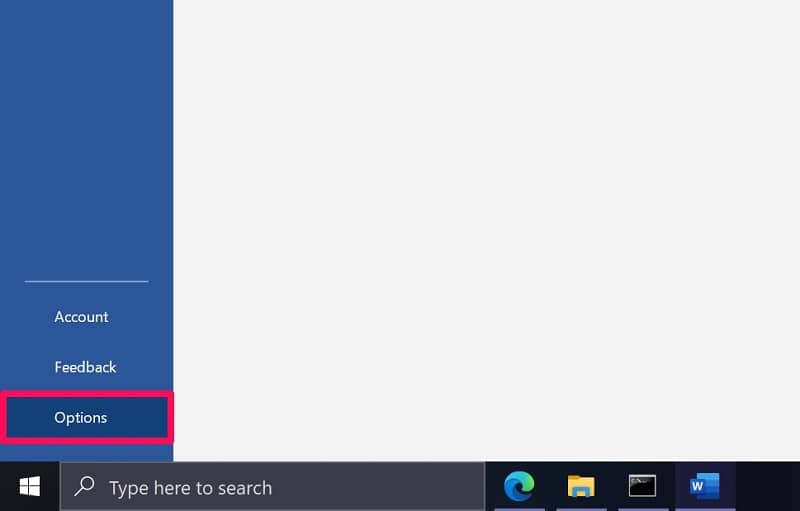
This is a process that will affect all the documents that are created taking as starting point the existing document, to achieve this, we will go to the «File» menu and in the lower part we select the «Options» line:
Step 2
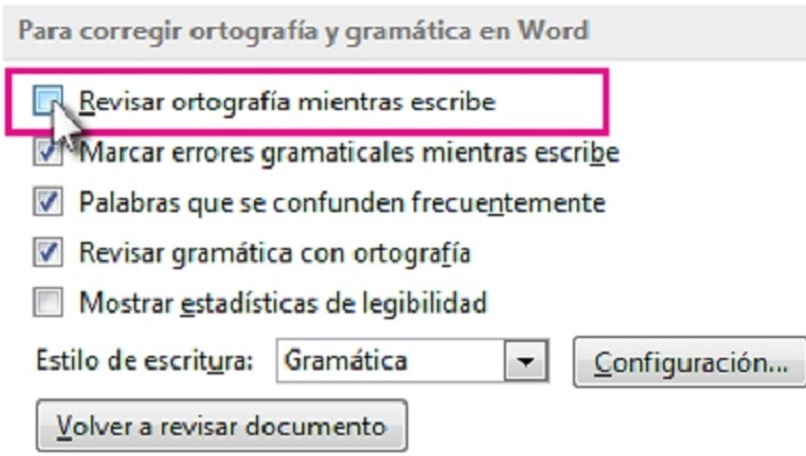
A pop-up window will be displayed in which we will go to the category «Revision» and in the right part we will locate the section «To correct spelling and grammar in Word:» where we will see the following: 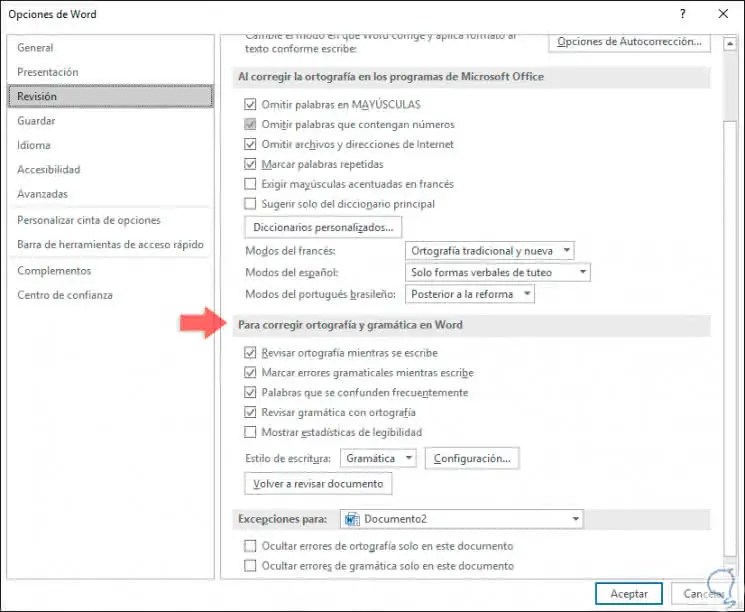
Step 3
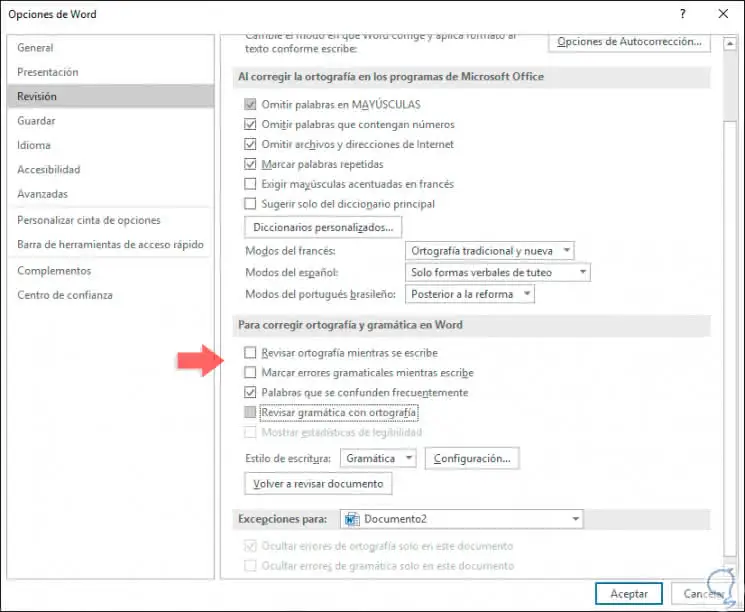
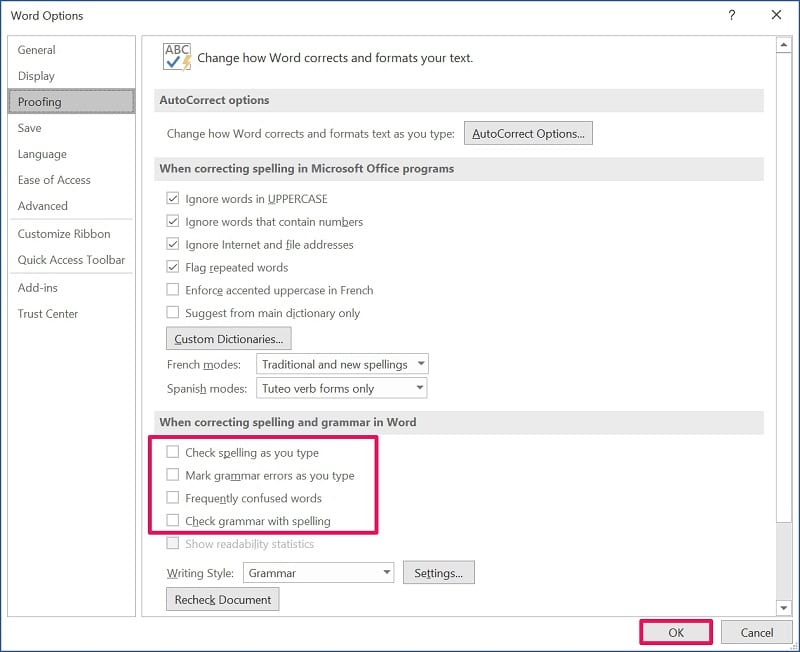
There we will unmark the following boxes. Click on the OK button to apply the changes and in this way all the documents that we create in Microsoft Word 2019 from now on will not be reviewed as far as spelling is concerned.
- Check spelling while writing.
- Mark grammatical errors while writing.
- Check grammar with spelling.
2. Delete the red underline in Word 2019 for the current document
Now, it is normal that we want that only in the document in which we are working does not apply the automatic revision of Word 2019
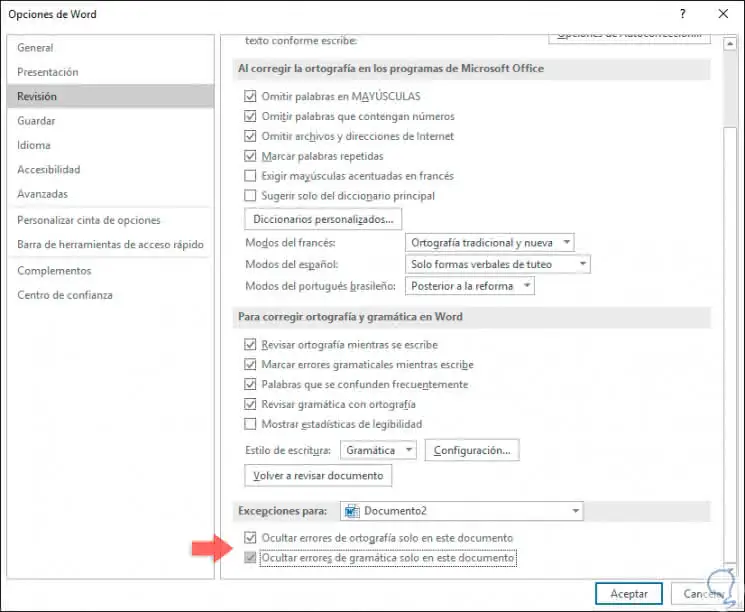
If this is the goal we will go back to the File / Options menu and in the category «Review» and on the right side we find the section «Exceptions for:» with the name of the current document and there it will be necessary to activate the following boxes. Press OK again to apply the changes.
- Hide spelling errors only in this document.
- Hide grammar errors only in this document.
3. Delete the red underline in Word 2019 for the current document using the Review menu
Microsoft Word 2019 integrates a review function which has been developed to help us correct all kinds of errors based on the language and the desired regional configuration.
Step 1
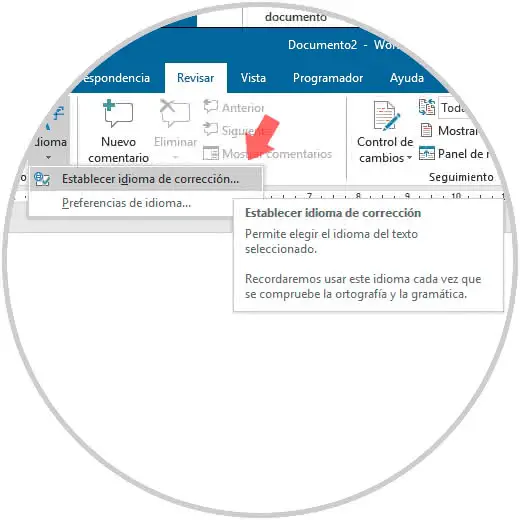
To use this method we will go to the «Review» menu and in the «Language» group and there we will click on «Language» and select the option «Set correction language»:
Step 2
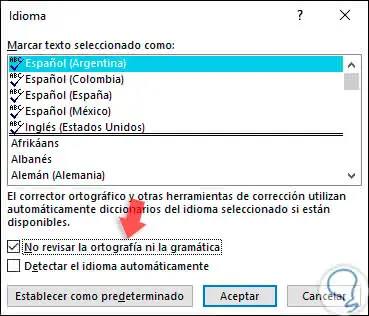
The following window will be displayed where we must activate the «Do not check the spelling or grammar» box. Click OK to apply the changes.
Note
It must be clarified that this process will only apply to the current Microsoft Word 2019 document, but not to everyone in general.
Step 3
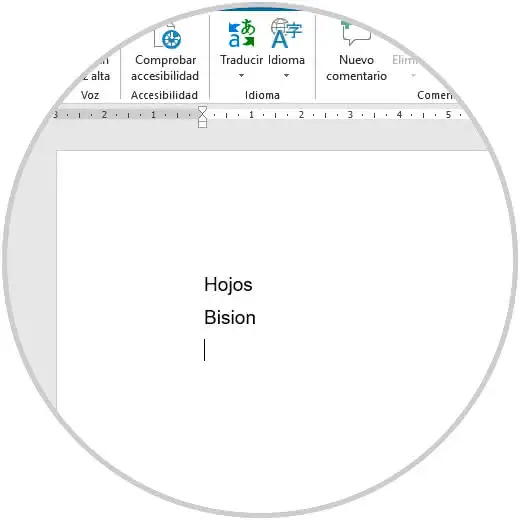
By using any of these methods we can see that although the words are written incorrectly, Word 2019 will not underline them to indicate us about the error:
TechnoWikis recommends disabling this line only if we are sure that the writing will be 100% perfect, but remember that Word 2019 integrates this functionality to allow the general context of the document is adequate.
Using Microsoft Word, you’ve created a professional high quality report at work, or a resume if you are looking for a job. It’s ready to be published to the target reader. The only problem is, it’s full of red (potential spelling mistakes) and green (potential grammar mistakes) squiggly underlines.
Adding all the words that are underlined in red to your dictionary will only affect your own computer. When the document is opened on someone else’s computer, those lines will be back and you won’t even know it.
Is it possible to get rid of not only the red but also the green squiggly underlines for good? Absolutely. Just follow the simple instructions below.
Maximize the quality of your writing by always turning spell checking and grammar checking back on when you go to make changes to the document.
Did You Know? Canadian English is not the same as U.S. English and is different from U.K. English. Always select the correct language to ensure Word is using the correct spelling and grammar rules in your document.
The first step should always be to spell check and grammar check your document. Make sure Word isn’t actually right. Poor spelling (red squiggly underlines) and grammar (green squiggly underlines) can often remove all the credibility you built up in an otherwise very professional looking and sounding documents.
The next steps to follow will depend on the version of Microsoft Word that you are using.
Word 2010 | Word 2007 | Word 2003
Word 2010
 Start by pressing CTRL-A to select your whole document.
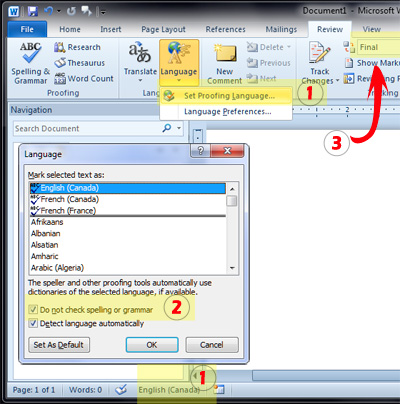
1. Click on the Review tab at the top of the window and then on the Language button. Click on Set Proofing Language…
OR
Click on the name of the language in the status bar at the bottom of the screen.
2. Add a check mark in the Do not check spelling or grammar option and click OK.
All the red and green squiggly underlines should be gone.
3. While you are there, to ensure that the recipient sees things exactly as you do, make sure that you set the document display to Final.
Word 2007
 Start by pressing CTRL-A to select your whole document.
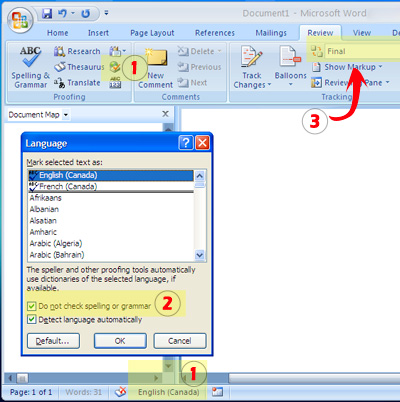
1. Click on the Review tab at the top of the window and then on the Language button. It’s the one with a globe and a checkmark in the proofing section.
OR
Click on the name of the language in the status bar at the bottom of the screen.
2. Add a check mark in the Do not check spelling or grammar option and click OK.
That’s it. The red and green squiggly underlines should have vanished.
3. While you are there, to ensure that the recipient sees things exactly as you do, make sure that you set the document display to Final.
Word 2003
 Start by pressing CTRL-A to select your whole document.
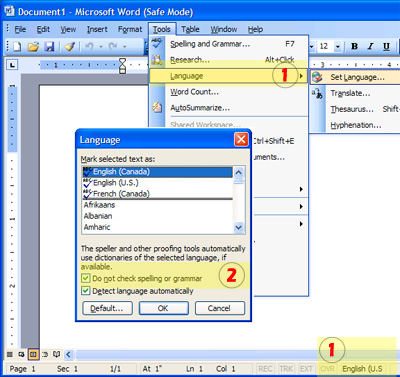
1. Click on the Tools menu at the top of the window, then on Language and then on Set Language…. If you don’t see Language in the menu, double-click on the Tools menu to expand the list.
OR
Click on the name of the language in the status bar at the bottom of the screen.
2. Add a check mark in the Do not check spelling or grammar option and click OK.
There shouln’t be any red or green squiggly underlines left.
Microsoft Word offers certain features to improve your writing experience and ensure you make the least number of mistakes while typing. Spell check is one such major feature that it has to offer. You may have noticed some red wavy lines beneath certain words in your Word document. This is the spell check feature in action. Many new Word users may not know what these lines mean, but that’s exactly what we’ll be talking about here. Not just that, we’ll be helping you remove red lines in Microsoft Word documents permanently if they bother you too much.
Word files working incorrectly might be the result of the document being damaged or corrupted. Word Repair tool is able to fix most existing issues and ensure correct function of the document.
Part 1. What Do the Red Lines in Word Mean?
Usually, when you see a red line under a word, it means that there’s a spelling mistake that you need to correct. However, this isn’t entirely accurate all the time. Any word that’s not in Word’s spell-check dictionary will be marked with a red wavy underline.
Although these red lines can be helpful in correcting your mistakes, they can also be quite annoying at times. Several technical terms and slang words aren’t present in this dictionary, and if you use them while you’re working on your Word document, it will end up having red lines even if you’re spelling it correctly. Hence, people who’re confident with their spelling may want to remove these unnecessary red lines in Word.
Part 2. How to Remove Red Underlines in Word
Typically, users would have to right-click on an underlined word and choose the ‘Ignore All’ option to remove it, but this is not ideal if there are too many red lines in your document. Rather than taking this time-consuming route, you can get rid of red lines altogether in Microsoft Word.
Depending on whether you want to remove the red lines for just the current document or for all the documents you’ll be working on, the steps you need to follow will vary. Here, we’ll be covering two different methods to remove red lines in Microsoft Word documents.
2.1. Remove Red Lines in All Word Documents
If you no longer wish to bother with these red lines whenever you’re working on Word documents, you can remove them permanently. This can be done by changing Microsoft Word’s Proofing settings. Here’s what you need to do:
Step 1. Assuming you have Microsoft Word open on your computer, click on ‘File’ from the menu bar.

Step 2. This will take you to the File menu, where you’ll see all the Word documents you’ve worked on. Here, click on ‘Options’ located at the bottom-left corner of the Word window.
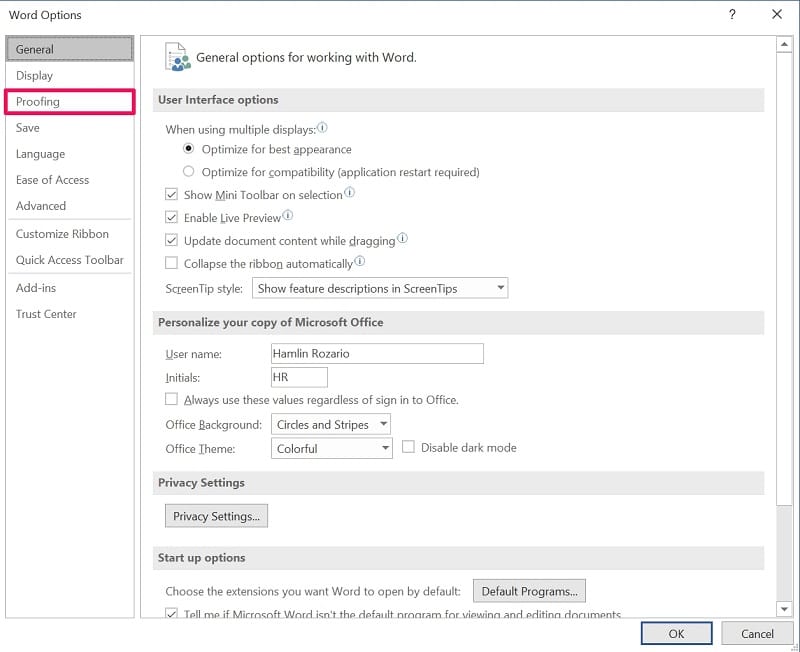
Step 3. A new ‘Word Options’ window will launch within Microsoft Word. You may be in the General section of Word Options. Click on ‘Proofing’ from the left pane to make changes for spell check.
Step 4. Here, you’ll find a bunch of check boxes under the ‘When correcting spelling and grammar in Word’ section. Uncheck the boxes next to ‘Check spelling as you type’ and ‘Frequently confused words.’ Make sure to click ‘OK’ to save your changes.
There you go. Unchecking the boxes for grammar will remove green underlines from your Word document too. Either way, you will no longer find any red underlines in any of your Word documents.
2.2. Remove Red Lines in the Current Word Document Only
This method might be useful for those working on Word documents containing a lot of technical terms that aren’t available in the spell check dictionary. Follow the steps below to remove all the red lines from your current Word document:
Step 1. Just like the above method, head over to the ‘File’ section from the menu bar once you’ve opened up Microsoft Word.
Step 2. Next, click on ‘Options’ from the bottom-left corner of the window to access the Word Options menu.
Step 3. Now, click on ‘Proofing’ from the left pane and scroll down to the bottom to make spell check exceptions for your current document.
Step 4. Here, check the box next to ‘Hide spelling errors in this document only’ as shown in the screenshot below, and click on ‘OK’ to save your changes.
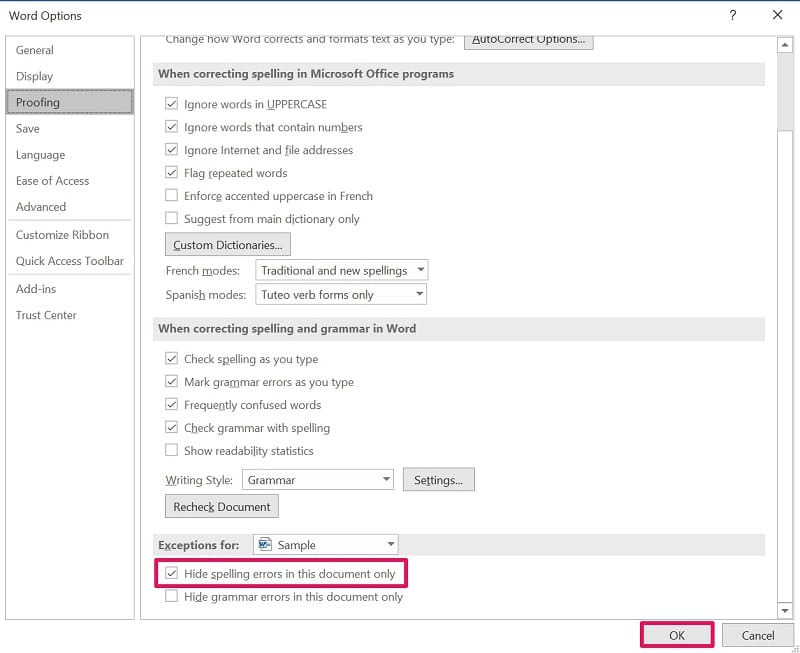
You can make exceptions for other documents here too. Here, the current document is selected by default, but you can click on it and select a different Word file instead. Also, if you want to get rid of green lines, you can check the box for hiding grammar errors.
Conclusion
As you can probably see, it’s not hard to turn off all the red lines in Word whenever it bothers you. For a handful of people who’re on point with their spelling in general, the feature does more harm than help. However, if you change your mind, you can always head back to the Proofing settings and toggle the feature on or off.
We hope you could finally learn multiple ways to get rid of red lines in Microsoft Word. Did you remove red lines from just your current document, or did you turn them off permanently? Do you know any additional ways to deal with red underlines in Word? Feel free to share your ideas, and don’t forget to leave your opinions in the comments section down below.
gfe
-
#1
I opened a document in Word 2000 yesterday and started typing a sentence.
When I looked up, halfway through the sentence my words were now being typed
in BOLD, RED and UNDERLINED. Could I have accidentally hit some key to make
it do all three things (like a redline document)? If so, what because all I
did was start typing and it was black and three or four words later it was
like I described above. Thanks.
Advertisements
RKM
-
#2
The document probably had the «track changes» feature turned on, which shows
all the changes different people have made to the text. I don’t have Word
2000 handy, but in Word 2003, you can toggle track changes with Tools > Track
Changes
Advertisements
Jay Freedman
-
#3
I’m not completely sure it’s Track Changes, since bold/red/underlined
isn’t the default format for inserted text. It could be that the
format was changed, or this could be some character style being
applied.
To tell whether Track Changes is on, look at the status bar at the
bottom of the window. If the letters TRK are black instead of gray,
then it’s on. You can turn it off with the Tools > Track Changes menu
item or just double-click the TRK letters. Besides doing that, you’ll
also need to «accept» the existing changes to get rid of the
formatting. Click the down arrow next to the Accept Change button on
the Reviewing toolbar, and select Accept All Changes in Document.
If Track Changes is not on, press Shift+F1 and click somewhere in the
bold/red/underlined text. In the Reveal Formatting task pane that
appears, look for the bold, red, and underlined items to see where
they come from. Then in the Styles and Formatting task pane, under
«Formatting of selected text», click the Select All button, click the
down arrow next to the style name, and select «Clear formatting».
When you are working on writing a text that includes foreign or slightly colloquial words to highlight a point in your writing, it is likely that the red or blue line will be automatically marked under those words or in a phrase or sentence. This is due to the spell checking activated on your computer.
Many dislike those red and blue lines, they even it is annoying and distracting, that’s why they deactivate it. If you want to know how to remove the red underline from spell checking and the blue underline from contextual errors in Word, read on, because in this article we will tell you how you can do it.
How to make single document red underline not appear in Word?
Spelling is very important when writing a text, because it allows it to be legible and understandable, it also says a lot about whoever writes it. Therefore, when you work with the Microsoft Word program you can easily see those errors and correct them, because it indicates to you by means of the red underline. But many do not like this because it distracts them in the writing process so they decide to disable it. If this is your case, see how it is done.
From Windows
From the Windows operating system you can remove the red underline in a current Word document. You follow the following route: File, Options and Review. In that option you must check the box to Hide spelling errors only in this document and hide grammar errors only in this document and click OK. This will apply the action implemented to that single Word document.
On Mac
On the other hand, if you have a Mac computer, then the procedure to remove the red underline in a Word document differs a bit. But there is no need to be alarmed, we show you how to do it. You go into the Word document and you click on the Tools option, located at the top. You will see a drop-down menu where you must select Spelling and grammar.
Immediately a side menu will be displayed with several options, choose Hide spelling errors. That way your Word document won’t show the red underline. As you can see, it is very easy to do it, you can enable or disable Word’s auto spell checker on Mac.

In Word online
In the case of Word online or for the web, if you want to eliminate the red underline in that document, what you should do is go to the option on the top bar of Review, click there and then on Editor. Next, you must click on set revision language. You will see a language box where you should select the option do not check spelling or grammar and click on OK for the changes to be made.
What boxes are unchecked to disable spell checking for all documents?
There are many functions that you can implement when you use the Word tool, such as when writing a text, you can find all the repeated words in a Word document. But also, you can use the spell checker, which is an excellent tool that allows you to write texts with a grammar and spelling error free.
But there are situations in which you may want to deactivate this option, especially when you do some work in Word in another language or with somewhat difficult words. In that case, it is better disable spell checking so you can work without having to see that red line under each word, signaling your poor spelling and writing.
This action can not only apply to a document, also you can disable spell check to all Word documents. That is why we show you which boxes you must uncheck to deactivate this spell check function. Take a look at the following:
Check spelling as you type
By unchecking the Check spelling while writing box, you are disabling this function, so you will not see the red line in the document you are writing at the moment as well as in all Word documents because simply the system will not spell check the document. After you have entered Files and then Options and Review. And in the To correct spelling and grammar in Word section, uncheck the Check spelling as you type box, and click OK.
Check grammar
On the other hand, when you uncheck the Check grammar box, the spell checker will not recognize misspelled words and that do not have concordance. Because the option that performs this function is disabled. So you will not know if your document meets the rules of grammar. But this is not a problem either because you can easily activate this action again and thus your documents have a better presentation.
How do you prevent the blue underlining of contextual errors from being marked?
The Word tool allows you to edit coherent and understandable texts because it has functions that are predetermined for automatically correct the writing and spelling of the writing. And it does so by means of the blue underline that appears below the words, pointing out the contextual error. For this reason, when writing, some words in a sentence of the text may be highlighted with blue lines to indicate that an inconsistency has been verified in the checker, that is, a grammatical error, which you must correct.
Although this consistency marker may be activated by default on your computer, you can also deactivate it whenever you like. Take a good look at what you must do so that the blue underline of contextual errors is not marked.
You go to File, click on Options, Review and there uncheck the Mark grammar errors box while you write and click OK. As you can see, there are many functions that you can enable or disable in Word and all from the toolbar. That is why it is convenient for you to know the Word toolbar, its parts and what it is for.
In the default configuration (default) of the packages Microsoft Office, installation language and Automatic correction a grammatical errorsThis English language. For this reason, when we edited or copied text in another language than English, in Document Word Office most words will be automatically highlighted in red. This line does not appear when you print the document, but it is annoying when you have readable document. Words that are underlined in red, are words misspelled grammatical standpoint, in English language.
This is how Text in Romanian, Posted in Microsoft Word Office 2003 and in Microsoft Word Office 2010 (Default configuration in English):
Word Office 2003 :

Word Office 2010 :

How do we stop having underlined words in red in Word.
Red underlined words related settings precisely identify si correct typos (spelling) si Grammatical. To disable this function in Microsoft Word Office 2003We have to follow a few simple steps.
1. Open a document Word, and under the menu «Tools«We click on»Options«.

2. In the box that opens, click on the tab «Spelling & Grammar”And here we uncheck the boxes next to the following options:
— Spelling: Check spelling as you type.
— Spelling: Always suggest corrections (optional)
— Grammar: Check grammar as you type
— Grammar: Check grammar with spelling.

3. After clicking on the «OK» button to save the settings, in the open document we will no longer have words underlined in red. Settings will be maintained in other documents.
users Microsoft Word Office 2010 can disable Spelling & Grammar from the menu «File”>“Options«.
1. Click «File”From the top left of the document.

2. Click on «Options”From the menu on the left.

3. Click on «Proofing«, And here we uncheck all the boxes below»When correcting spelling and grammar in Word«.

Set all documents except for the settings to keep and edit other documents.
Stealth Settings — Spelling & Grammar Options in Microsoft Word Office 2003 & 2010.
how to » Microsoft Office » Microsoft Office Word » How do we stop having words underlined in red in Microsoft Word Office (2003 — 2010)

Founder and editor Stealth Settings, from 2006 to the present. Experience on operating systems Linux (in particular CentOS), Mac OS X, Windows XP> Windows 10 si WordPress (CMS).
Microsoft Word comes with a powerful spelling and grammar checking module. World’s most popular word processing software, MS Word, can check your text for correctness and allows you to make amends. If there is a spelling mistake, the word gets underlined with a red color wavy / squiggly / zig-zag line indicating the error. For grammatical errors a wavy green line appears under the word or phrases.
So, all in all, these red-green wavy underlines indicate spelling and grammar mistakes.
This feature is very helpful and millions of users have become used to with it. Or may be I should say that they have become dependent on this feature for writing correct language!
At times, we find ourselves in a need of getting rid of all those red and green wavy underlines. This can happen, for example, when you are working with a non-English, let’s say Hindi, document and while using English language spelling checker. Such a document will get flooded with error indicating underlines because of mismatch between document language and the spell checker language.
ALSO READ: Time Saving MS Word Tips
Our tips on MS-Word make your life easier and increase your productivity at work.
You can always take a right click on a word (or a phrase) and select “Ignore” or “Ignore All” from popup menu to do away with the underline.
But if such errors are too many and you need to hide those irritating underlines in one go —then you can use the following method:
MS Word 2013 and 2010 and 2007
- Open the document
- Go to File > Options
- A box will appear. Select “Proofing” from the options given
- In the “Exceptions for” section, select the document in which you don’t want to see spell mistakes
- Check either or both of the following check boxes as per your need:
- Hide spelling errors in this document only
- Hide grammar errors in this document only
- Click OK
Earlier Versions of MS Word
- Open the document
- Go to Tools > Options > Spelling & Grammar
- Select “Proofing“
- Check the boxes for “Hide spelling errors in this document” and/or “Hide grammar errors in this document“
This method is useful because it hides spelling / grammar errors only in a particular document. It does not completely switch off the spell checker. Spell checker will duly show errors in all other existing and new documents that you’ll create.
I am hoping that in future versions of MS-Office, Microsoft will provide a single click option to do away with all the spelling and grammar error indications.
I hope this was useful for you. Please do let me know if you have another question.
If you regularly use Microsoft Word document editing software, you will probably find it annoying because of the red underlines or the automatic error correction mode that automatically loads on Word . Quickly remove this red underline in Word with the very simple trick below.
Download Microsoft Office 2016 Download Microsoft Office 2019
This red dot appears in most versions including Word 2010, Word 2013, Word 2016, Word 2019, etc. So even if you are used to the appearance of that red underline, no one will be able to persevere in its presence. However, to turn off the spell checking feature in Word is also very easy, you can turn off the red underline at any time.
Instructions to turn off the spelling check feature on Word
Step 1:
The content interface is underlined in Word

Interface default spell checking mode of Word
At the main interface of Microsoft Word editing software version 2013 onwards, click the File menu -> Option .

Setup window on Word
Step 2:
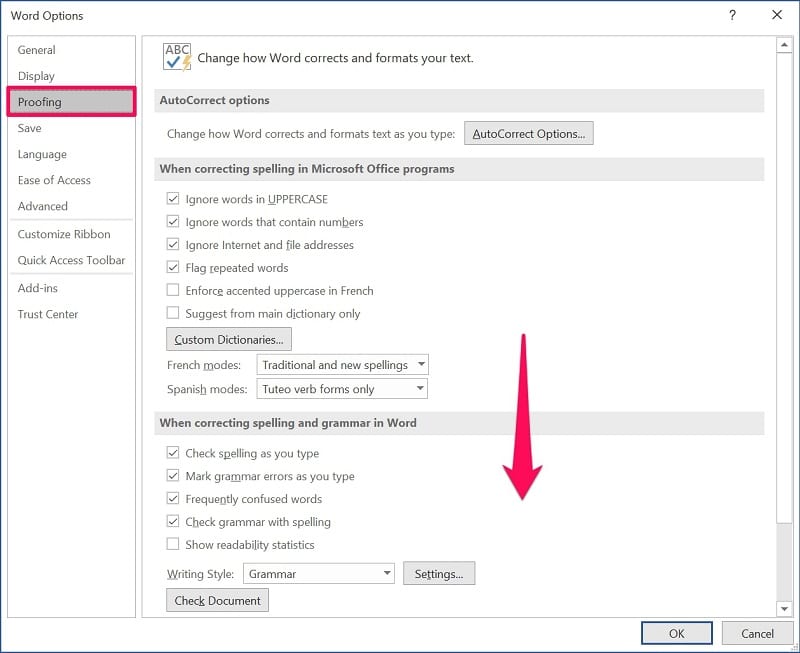
The Option window appears, select the Proofing tab . Here, you need to look to the right window of the screen to find the item When correcting spell and grammar in Word.

Correct spelling and grammar errors in Word
Here you uncheck all selected items by default. After deselecting, click OK to finish.

Turn off the default spell checking mode in Word
Soon you will see that no longer the red underlines below the words in Word.
Video tutorial to remove red underlined check spelling on Word
Above we have instructed you to delete the red underline in Word. Hopefully, you will have more good, simple tips when using the Office suite of Microsoft Office.
You may be interested in:
- Instructions to attach files in Word
- Common keyboard shortcuts in Microsoft Word
- How to mix meeting invitations in Microsoft Word
- 8 tips for perfect table formatting on Microsoft Word
- How to partially freeze a Word document for easy reference