
Pin a file to the recently used files list
-
Click the File tab.
-
Click Open to see a list of the recently used files.
-
Hover your mouse over the file you want to pin and click Pin this item to the list
 (on the right end of the file listing).
When a file is pinned to the list, the pin icon looks like this: In older versions of Office, it looks like this:
 (on the right end of the file listing).
 In older versions of Office, it looks like this:
Tip: Click the pin button again to unpin the file.
Files pinned to the list are displayed in chronological order, with the most recently used file at the top.
Remove an individual file from the recently used file list
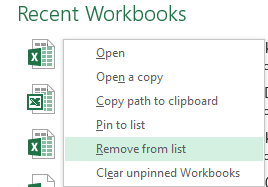
If there are files on your recently used list that you’d like to remove, simply right-click them and choose Remove from list.
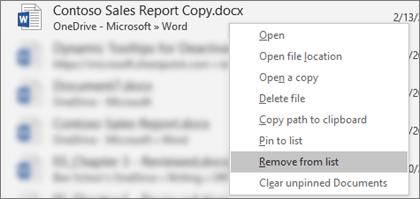
Caution: Make sure you click Remove from List and not Delete file unless you want to actually remove the file from your entire system.
Change the number of files that appear in the list of recently used files
-
Click the File tab.
-
Click Options.
-
Click Advanced.
-
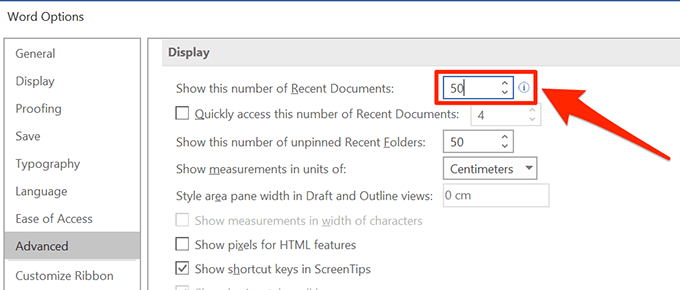
Under Display, in the Show this number of Recent Documents list, click the number of files that you want to display.
Tip: To not see any files in the recently used files list, set the Show this number of Recent Documents list to zero.
Clear unpinned files from the list of recently used files
-
Click the File tab.
-
Click Open.
-
Right click a file in the list, and then click Clear unpinned Documents.
-
Click Yes to clear the list.
What if old, or unexpected, files suddenly appear on my recently used list?
Starting with Office 2013, your recently used files list synchronizes with your Microsoft Account. That’s handy because it means that if you sign in on multiple devices (desktop and laptop, for example) you have the same files listed in both places for easy access.
If you have an older machine that hasn’t been turned on in a while, however, when you bring it online it may synchronize and it’s possible that some of the documents from its old list might end up on your current recently used list.
Another way we sometimes see this happen is if somebody else, like a family member, uses your computer. If they’re signed in as you, any documents they work on would then appear on your recently used list.
The best way to remove these unexpected files is to follow the procedure above, under «Remove an individual file from the recently used file list». Right-click the unexpected files and choose Remove from list.
Pin a file to the recently used files list
-
Click the File tab.
-
Click Recent to see a list of the recently used files.
-
Right click the file you want to keep, and then select Pin to list, or click the pin icon:
.When a file is pinned to the list, the pin icon looks like a push pin viewed from the top:
. -
Click the pin button again to unpin the file.
 .
.-
Click the File tab.
-
Under Help, click Options.
-
Click Advanced.
-
Under Display, in the Show this number of Recent Documents list, click the number of files that you want to display.
Note: These steps do not apply to InfoPath 2010.
-
Click the File tab.
-
Click Recent.
-
Select the check box to Quickly access this number of recent documents: and choose how many files you want to see.
-
Links to those files will appear above Info in the navigation bar, regardless of where you are in the Backstage View.
Note: Clearing the check box removes the list.
-
Click the File tab.
-
Click Recent.
-
Right click a file in the list and select Clear unpinned items.
-
Click Yes to clear the list.
Note: Setting the number of recent files to zero also clears the list. To turn the feature back on, set the number to something other than zero. Update the list by opening the files again and resetting the pins.
Закрепление файла в списке последних использованных документов
-
Откройте вкладку Файл.
-
Выберите пункт Открыть, чтобы просмотреть список последних использованных файлов.
-
Наведите указатель мыши на файл, который вы хотите закрепить, и выберите пункт Закрепить этот элемент в списке
(справа от списка файлов).
Если файл закреплен в списке, значок булавки выглядит так: В более старых версиях Office он выглядит так:
 (справа от списка файлов).
 В более старых версиях Office он выглядит так:
Совет: Чтобы открепить файл, щелкните значок булавки еще раз.
Файлы, закрепленные в списке, выводятся в обратном хронологическом порядке (начиная с новых записей).
Удаление отдельного файла из списка недавно использовавшихся файлов
Если вы хотите удалить какие-либо файлы из списка, просто щелкните их правой кнопкой мыши и выберите команду Удалить из списка.
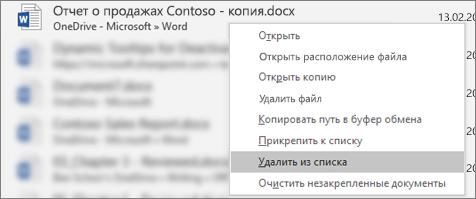
Внимание: Обязательно нажмите кнопку Удалить из списка, а не Удалить файл, если вы не хотите удалить сам файл из системы.
Изменение количества файлов, отображаемых в списке последних использованных файлов
-
Откройте вкладку Файл.
-
Выберите пункт Параметры.
-
Выберите пункт Дополнительно.
-
В группе Отображение в списке Число документов в списке последних файлов: выберите необходимое количество отображаемых файлов.
Совет: Чтобы не отображать файлы в списке последних использованных файлов, выберите в списке Число документов в списке последних файлов значение, равное нулю.
Удаление незакрепленных файлов из списка последних использованных файлов
-
Откройте вкладку Файл.
-
Нажмите кнопку Открыть.
-
Щелкните правой кнопкой мыши файл в списке и выберите команду Очистить незакрепленные документы.
-
Нажмите кнопку ДА, чтобы очистить список.
Почему в списке недавно использовавшихся файлов появились файлы, которые давно (или вообще) не открывались?
Начиная с Office 2013 список последних использовавшихся файлов синхронизируется с учетной записью Майкрософт. Это удобно, так как если вы используете несколько устройств (например, компьютер и ноутбук), в обоих списках будут одни и те же файлы.
Однако если у вас есть старый компьютер, который вы давно не включали, при его подключении к сети он может синхронизироваться, из-за чего некоторые документы их старого списка могут попасть в новый.
Кроме того, иногда это происходит, если кто-то другой — например, член вашей семьи — пользуется вашим компьютером. Если они вошли с вашей учетной записью, все документы, над которыми они работали, появятся в списке.
Лучший способ удалить такие файлы из списка — выполнить процедуру, описанную выше в разделе «Удаление отдельного файла из списка недавно использовавшихся файлов». Щелкните правой кнопкой мыши ненужные файлы и выберите команду Удалить из списка.
Закрепление файла в списке последних использованных документов
-
Откройте вкладку Файл.
-
Выберите пункт Последние, чтобы просмотреть список последних использованных файлов.
-
Щелкните правой кнопкой мыши файл, который вы хотите закрепить, а затем выберите команду Прикрепить к списку или щелкните значок булавки
.Когда файл закреплен в списке, значок булавки выглядит как приколотая булавка при взгляде сверху:
. -
Чтобы открепить файл, щелкните значок булавки еще раз.
 .
.-
Откройте вкладку Файл.
-
В группе Справка выберите команду Параметры.
-
Нажмите кнопку Дополнительно.
-
В группе Отображение в списке Число документов в списке последних файлов: выберите необходимое количество отображаемых файлов.
Примечание: Эти инструкции не относятся к InfoPath 2010.
-
Откройте вкладку Файл.
-
Выберите пункт Последние.
-
Установите флажок Число документов в списке последних файлов и укажите требуемое значение.
-
Ссылки в эти файлы будут отображаться над сведениями на панели навигации независимо от вашего местонахождения в представлении Backstage.
Примечание: Чтобы удалить список, снимите флажок.
-
Откройте вкладку Файл.
-
Выберите пункт Последние.
-
Щелкните правой кнопкой мыши файл в списке и выберите команду Очистить неприкрепленные элементы.
-
Нажмите кнопку Да, чтобы очистить список.
Примечание: Если задать количество последних использованных файлов равным нулю, список также будет очищен. Чтобы снова включить эту функцию, введите число, отличное от нуля. Обновите список, повторно открыв файлы и сбросив закрепленные элементы.
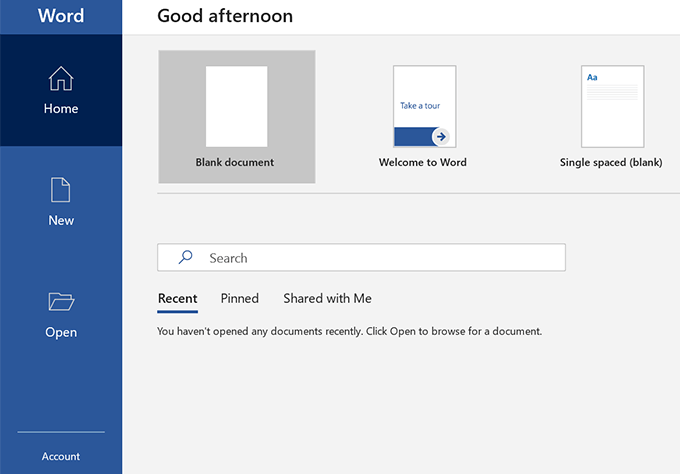
When you launch the Microsoft Word program on your computer, you get quick access to several of its main features right on the home screen. One of these is the recently used files list for Microsoft Word. This option lets you quickly access the documents that you were recently working on, and clicking on any of these opens up the file in the program.
It’s a pretty quick way to get back to your work that you left unfinished the previous time. You actually save yourself from the hassle of manually finding the document wherever it’s saved on your computer. The software finds and displays that for you.
Although it’s a really useful feature, it may not be so for some users. If you’re someone who never uses this recently used files list in Word and you’d rather not have it there, you can actually disable it in the program. You can also remove specific documents from the list if you don’t want to disable it entirely.
Clear a Single Recently Used File In Microsoft Word
If it’s only a single or a few files that you’d like to remove from the recently used files list in MS Word, you can do it by right-clicking on the files and selecting an option. It removes your chosen files from the list and you can do it for as many files as you want.
- Launch the Microsoft Word program on your computer.
- When it opens, you’ll likely land on the home screen. On this screen, you’ll find the Recent section showing all of your recent files created in the program.
To remove a file from the list, right-click on the file and select Remove from list.
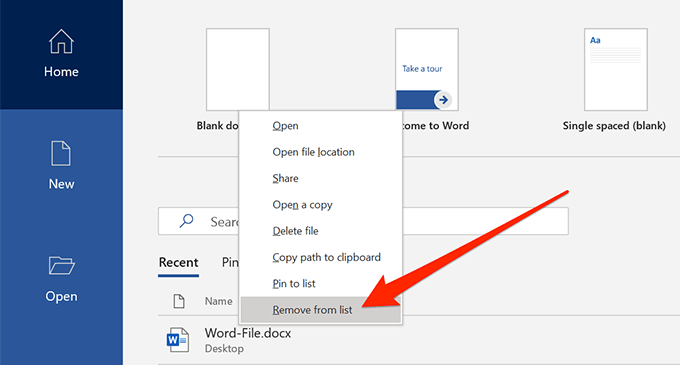
- The file will instantly be removed without any prompts.
The next file in the list will take up the removed file’s place.
Remove All The Recently Used Files In Microsoft Word
If you don’t want for any of your recent files to appear in the list, you can remove all the files from there by selecting a single option in Word. It’ll clear up the entire list and give you an empty section on the home screen.
These steps should work for the latest MS Word 2019/Office 365. If you’re an Office 2016 user, please skip to the next section.
- Open the MS Word software on your computer.
- Although the option to clear the entire recent list is built into Word, you’re not going to see it when you right-click on any file on the homescreen. You’ll first need to click on an option before the option is revealed.
Click on Open in the left sidebar of Word.
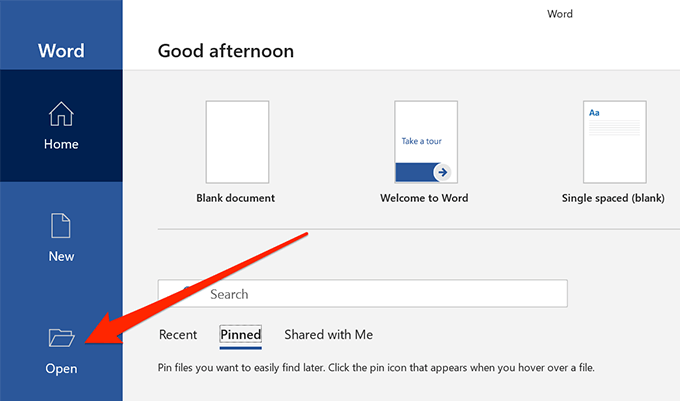
- Your recent files list will appear on the right-hand side pane. To clear all the entries from this list, right-click on any one of the documents in the list and select Clear unpinned items.
- A prompt will appear saying that all the items from the list will be removed. Click on the Yes button to continue.
You should find that your recent documents list is now empty.
Remove The Recently Used Documents In Word 2016
If you’re on Microsoft Word 2016, you can actually clear the entire recently used files list in Word without going to the Open menu.
While you’re on the home screen of the software, right-click on any of your recent documents and select Clear unpinned items. Hit Yes in the prompt that follows and your list will be cleared.
As you can see, there isn’t a huge difference between doing the task in Office 2019 and Office 2016 but it’s good to know exactly where the option is located in various versions of the software.
Disable The Recently Used Files Section In Microsoft Word
Recently used files section in Word may be helpful to many users, even with certain items removed from it. However, if you do not happen to use it at all and you find it taking unnecessary space on the Word’s home screen, you can actually get it removed from there.
The recent files section can be completely disabled and there’s a built-in option in the software to do it. Also, if you ever decide to get it back, you can do so by reversing the change you made to the settings.
- Open Microsoft Word on your computer.
- On the home screen, look for the option that says Options, usually located at the lower-left corner, and click on it to open it.
- A box will open on your screen letting you manage several settings for Word. You need to find the option that says Advanced in the left sidebar and click on it. The option you’re looking for is located there.
- When it opens, scroll down until you find the section that says Display. There’ll be an entry named Show this number of Recent Documents and then a number specified next to it. What you want to do is decrease the number from whatever it is right now to 0 (zero). You can also directly type 0 in the field.
- Click on the OK button at the bottom to save the changes.
- The next time you launch the program, you’ll find that there are no entries at all in the list.
What you actually did above was set the number of recent documents to zero and Word displayed zero (empty) entries on its home screen.
How To Bring Back The Recently Used Files List In Word
If you ever need to bring the recent documents list back, you can do so by opening the same Options panel and then clicking on Advanced.
Then enter the number of recent documents you want to see in the Display section’s first option and hit OK. Your list should be back.
Your Recent Documents list is found under the File menu located in the top menu of Word. Click Open in the left bar that appears. Select Recent, and to the right, you will see a list of your recent documents. Simply click the document you want to open it.
Contents
- 1 Why is Word not showing recent documents?
- 2 How do I find recent documents in Word 2010?
- 3 Where are recent documents stored?
- 4 How do I turn on recent workbook list?
- 5 How do I find recent documents?
- 6 How do I view recent documents in quick access?
- 7 Where is my recent folder?
- 8 How do I find recently opened documents in Windows 7?
- 9 Where are Excel recents stored?
- 10 How do I view recent documents in Excel?
- 11 How do I find recent documents in Windows 10?
- 12 How do I find recent tabs in Windows 10?
- 13 Why does quick access not show recent documents?
- 14 Why does excel not show recent files?
- 15 Where are Windows recent files stored?
- 16 How can I tell when a Word document was last opened?
- 17 How can I see who has opened a Word document?
- 18 How do I open a recent file?
- 19 How do I show recent files in Excel Taskbar Windows 10?
Why is Word not showing recent documents?
Disable and re-enable Recent Documents feature. 1. Open Word 2013/2016, click File -> Options -> Advanced.Under Display, set “Show this number of Recent Documents” to “0” and uncheck the box of “Quickly access this number of Recent Documents”.
If you’re using Word 2010, click the File menu and click Recent in the left pane. In Office 2007, click the Office button to display the recent documents.
Where are recent documents stored?
By default, that location is C:Documents and Settingsuser profileApplication DataMicrosoftOfficeRecent.
How do I turn on recent workbook list?
Click the File tab. Click Recent. Select the check box to Quickly access this number of recent documents: and choose how many files you want to see.
How do I find recent documents?
Press Windows Key + E. Under File Explorer, select Quick access. Now, you will find a section Recent files which will display all the recently viewed files/documents.
How do I view recent documents in quick access?
Step 1: Open the Folder Options dialog. To do that, click the File menu and then click Options/Change folder and search options. Step 2: Under the General tab, navigate to the Privacy section. Here, make sure that Show recently used files in Quick access check box is selected.
Where is my recent folder?
The fastest way to access the all recent files folder is by pressing “Windows + R” to open the Run dialog and typing “recent”. You can then hit enter. The above step will open an Explorer window with all of your recent files. You can edit the options like any other search, as well as delete the recent files you want.
How do I find recently opened documents in Windows 7?
How to get “My Recent Documents” in Windows 7
- Right click the Start/Win button, select Properties.
- Click the Start Menu tab (it should be select as default)
- Click the Customize button.
- Scroll down and check the Recent Items check box.
- Click Ok.
- Click Apply.
- Click Ok.
Where are Excel recents stored?
Let’s take a look. You can find the list of recently opened workbooks on the File tab, under Recent. Here you’ll see a list of workbooks, with the most recently opened workbooks at the top.
How do I view recent documents in Excel?
Show more (or fewer) items in the list. In Excel, head to File > Options > Advanced. In the Display section, you’ll see Show this number of Recent Workbooks, where you can adjust the number depending on how many items you want to see.
How do I find recent documents in Windows 10?
#1 Check your newest files on the Recent Files section
On Windows 10, you can see the recently used files through File Explorer > Quick access > Recent files. This section will store twenty “newest” items ranging from media to document.
How do I find recent tabs in Windows 10?
Or you can press Windows+i. In Settings, click “System,” then select “Multitasking” from the sidebar. In Multitasking settings, locate the “Pressing Alt + Tab shows” drop-down menu and click it. When the menu appears, select “Open windows and all tabs in Edge.”
Why does quick access not show recent documents?
Hide recent files from quick access:
- Press “windows key + E” to open file explorer, and click the folder icon on your taskbar to open file explorer.
- Click on file at the top left and select “options”.
- Click “General Tab”, under privacy section, uncheck “show recently used files in quick access”.
Why does excel not show recent files?
There are a few reasons why the recent files are not showing on your taskbar is that the settings of your PC is not set correctly and there are corrupted system files on your PC. For us to assist you, we recommend that you reset the settings of your PC is correct.
Where are Windows recent files stored?
Quick Access Popup Recent folders and Recent files are taken from the Windows virtual folder Recent items (C:Users[username]AppDataRoamingMicrosoftWindowsRecent or, using the appdata variable, %appdata%MicrosoftWindowsRecent).
How can I tell when a Word document was last opened?
Right click on the files/folders select Properties. Select the Security tab. Click the Advanced button. Select the Audit tab.
How can I see who has opened a Word document?
Viewing Document Statistics
- Click the File tab of the ribbon and then click Info | Properties | Advanced Properties. Word displays the Properties dialog box.
- Click on the Statistics tab.
- Click on OK when you are done reviewing the statistics.
How do I open a recent file?
To open a recently used file on your computer:
- Open the Start menu and right-click any blank area.
- Choose Properties.
- Click the Start Menu tab.
- Make sure that the Store and Display Recently Opened Items in the Start Menu and the Taskbar checkbox is selected and then click OK.
How do I show recent files in Excel Taskbar Windows 10?
Replies (32)
- Go to settings > personalize > and click on start.
- Turn on “show recently open items”
Control how many documents are displayed in your Recent Documents list
Updated on October 16, 2021
Microsoft Word 2016 in the Microsoft 365 suite gives you quick access to files you’ve recently worked on. Did you know you can change the number of documents that appear there? Here’s how to customize this list to make your word processing fast and efficient.
Your Recent Documents list is found under the File menu located in the top menu of Word. Click Open in the left bar that appears. Select Recent, and to the right, you will see a list of your recent documents. Simply click the document you want to open it. If you haven’t worked with any documents yet, this area will be empty.
Changing Recently Displayed Documents Setting
By default, Microsoft Word in the Microsoft 365 suite sets the number of recent documents to 25. You may change this number by following these simple steps:
-
Click on File in the top menu.
-
Select Options in the left bar to open the Word Options window.
-
Select Advanced in the left bar.
-
Scroll down to the Display subsection.
-
Next to «Show this number of Recent Documents» set your preferred number of recent documents to be displayed.
Using the Quick Access List
You’ll notice below this a checkbox item labeled «Quick access this number of Recent Documents.» By default, this box is unchecked and is set to four documents.
Checking this option will display a quick access list of your recent documents in the left bar immediately under the File menu, offering even faster access to past documents.
New Word 2016 Features
If you’re new to Microsoft Word 2016, take a quick five-minute walkthrough of what’s new.
Thanks for letting us know!
Get the Latest Tech News Delivered Every Day
Subscribe

Word offers us a series of very useful tools to work comfortably. One of them is the recent documents list, which allows us to quickly open those files we have been working with lately in one click. Although in some cases it can be a bit annoying, so we will have to deactivate it or eliminate the results it shows us.
When we work with Word and we need several sessions or days to finish the same document, practically without realizing it, we use the recent file history, because in a single click it opens the document we need. When we are extremely organized, we may need to open 5 or 6 folders to get to a Word document, with the list of latest documents we will save time.
However, the opposite can also happen. Instead of working with the same file for days, or weeks, we might open 20 different documents in one morning and the last document history does nothing but annoy, because you try to go to it to open a document and it just messes with us and that we lose time. Therefore, in some circumstances it is interesting to know how to remove files from recent document history or customize that list.
Delete files individually
If you usually work with the list of recently used files you may like to have it sorted and that it only shows us some type of files or only the most useful ones, for this we can delete from the history only the documents we choose.
In Word for Microsoft 365
If we work with the latest version of Word, which is integrated into Microsoft 365, these are the steps we will follow To delete a file from the recently used list:
- We open Word as we normally do.
- We click on File in the top menu.
- We select To open.
- In the list of recently used files we choose the one we want to delete by doing right click mouse over it.
- Click on Remove from the list (We must be very careful not to press Delete file, we would lose it).

In Office 2010
If, on the contrary, we use any of the classic versions of Word As it is the one that is integrated in Microsoft Office 2010, the process to delete files from the list of recently used documents manually is like this:
- We click on File in the top menu bar.
- We will click on Recent.
- We click with the right mouse button and click on Delete undocked items.
- We will press again on Yes to confirm the action.

Disable recent document list
Both the Microsoft operating system and most of the applications developed by themselves have the latest documents tool, but if you are one of those who never use it, it may occupy a space that you want to free up, therefore, to disable recent files list we will have to do what we indicate below.
In Word
For delete recent documents list we will do this:
- We click on File in the top menu bar.
- Then we will click on the button Choices from the bottom of the left side menu bar.
- We will select the section Advanced also in the left sidebar.
- In the central screen we will scroll down to the section Show.
- In the Show this number of recent documents field we will indicate “0”.
- Click on To accept to save the changes.

On Windows 10
The operating system itself also has a history of recently used files and, in the same way as in Word, we can manage this list as follows:
- We open the File Browser.
- In the top menu bar we click on File.
- Click on Folder and search options.
- Inside the tab general and in the section Privacy we can activate or deactivate the history of recent documents or click on the button Clean up to delete them all in one click.

Customize Recent Files List
The history of last documents can be customized to use it to our advantage, we can anchor some files, choose how many documents to show, etc.
Pin a file
For fix a document In the recent history we will do it differently if we use Word for Microsoft 365 or Microsoft Word 2010.

- Microsoft 365
To anchor a file to the history of recently used documents we will go to the list in File / Open and we will click on the gray thumbtack on the right side of each document. These files will be displayed at the top of the list while the non-anchored ones will continue to be placed in chronological order. To undock it, simply press the pin again.
- Microsoft Office 2010
To anchor a file to the recent history we will have to access it by going to File / Recent. In this case we can click on the thumbtack on the right side of each file or right-click and select Pin to list. In the same way, to unpin it, we will only have to click on the pin again.
Delete unpinned files
Once we have anchored the recent files that we most need to have in view, we may be interested delete all other documents. The procedure is the same for Microsoft 365 or Office 2010 users.
To do this we will have to go to File in the main menu and click To open. Then we will click with the right mouse button on any element and click on Remove undocked items. We will click Yes to confirm.

Modify number of files
Recent files history shows a specified number of documents. However, we can modify the number of files we want to see on this list. According to our customs and our way of working, we may be interested in a short list to see a few files or the most extensive list possible. This process is valid for Microsoft 365 and also for Microsoft Office 2010.
For choose how many files we want to see In the history of recent documents we will follow these steps:
- We’ll go to File / Options / Advanced.
- In the section Show we will see the field Show this number of recent documents.
- We indicate the number of files we want to see.

Synchronization with Microsoft account
In the latest versions of Microsoft Office, or in the current Microsoft 365, the history of recently used files is synced with our Microsoft account. In this way, we will see all the documents used recently even if we use Word on our own computers that are connected to our account.
In these cases it may happen that old files appear in our list of recent documents. This happens when a device connects to the Internet after it has been turned off for a long time. It synchronizes with the list and shows us old files in the recent history. The only way to avoid this is to delete them manually as we have indicated above.
The post Manage and Delete Recent Files List in Word appeared first on ADSLZone.
Clear and Delete Recent Documents / Workbooks / Presentations List in Office 2007 / 2010 / 2013 / 2016 (Word, Excel, PowerPoint)
Beginning from Microsoft Office 2007, Word, Excel and PowerPoint uses new Office Fluent Ribbon user interface with a big right pane section of the Office or “File” menu been devoted to “Recent Documents”, “Recent Workbooks” or “Recent Presentations” list. The recent files list records each and every files that user opens recently, and display the list whenever Office button or “File” menu is pressed for quick easy access.
Since Office 2013 and Office 2016, Office apps also display “Recent” list which shows all recently opened files upon launching of Office apps such as Word, Excel and PowerPoint.
The “Recent Documents”, “Recent Workbooks” or “Recent Presentations” list in Word, Excel or PowerPoint shouldn’t be any problem if you’re the only user on the computer. However, if the same computer and same user account is shared by many people, or you’re using a borrowed or public computer, the recent files list will expose documents using trace. To protect your privacy, users need to delete all file opened history in “Recent Documents”, “Recent Workbooks” or “Recent Presentations”.
How to Clear and Delete Entire Recent Documents / Recent Workbooks / Recent Presentations List
- Click or tap on Office button or File menu, and then click on Word Options (in Microsoft Word) or Excel Options (in Microsoft Excel) or PowerPoint Options (in Microsoft PowerPoint) in the bottom of Office Menu.
In Office 2013 or Office 2016 or Office 365, go to Options.
- Go to the Advanced tab.
- Scroll down to the Display section.
- Set the value for Show this number of Recent Documents: (for Microsoft Word) to 0 (zero).

- Click OK button.
- Repeat steps above again, and set back the value for the number of Recent Documents to show to its original default, i.e. 17. If you don’t want this particular Office application to remember any Recent Documents, you can leave the value at 0 and skip this step.

How to Delete and Remove Individual Recent Files Entry
And if you not intend to delete all entries in “Recent Documents”, “Recent Workbooks” or “Recent Presentations” list, it’s also possible to right click on a recent file and select Remove from list to delete the entry from the recent files list.
In Office 2007 and Office 2010, uses the following registry trick instead. The trick can also be used if you don’t want to perform the task to clear the recent files list one by one on many Office products, it’s possible to clear and delete the “Recent Documents”, “Recent Workbooks”, “Recent Presentations”, items, all or some of them, in the registry.
To do so, run Registry Editor (regedit.exe) and navigate to the one of the following registry key branches:
HKEY_CURRENT_USERSoftwareMicrosoftOffice12.0WordFile MRU
HKEY_CURRENT_USERSoftwareMicrosoftOffice12.0ExcelFile MRU
HKEY_CURRENT_USERSoftwareMicrosoftOffice12.0PowerPointFile MRU
Note: Change the version of Office in the registry key above based on version number as follow:
- Office 2007: 12.0
- Office 2010: 14.0
- Office 2013: 15.0
- Office 2016: 16.0
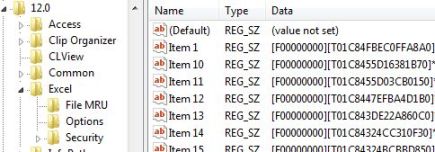
Each registry key represent a corresponding Office product respectively, which should be pretty obviously. Inside the File MRU key, there are plenty of items on the right value pane. Delete any – one, some or all – of the item entries that you want to make disappear and delete from “Recent Documents” list. Restart respective Office 2007 program to see the changes.
About the Author: LK

Page load link
![]()
Download Article
![]()
Download Article
This article will guide you on how to disable or delete your recent document list in Microsoft Word or Excel. This will give you little security and safety from other users who may use your PC. They will not guess or know which files you were working on. The procedure is very easy to follow and implement.
-
1
Open your Microsoft Word or Excel and Click the «Office» icon.
-
2
Click the «Word Options» button.
Advertisement
-
3
From the left menu, click «Advanced».
-
4
Find the «Display» section. Here you can see the «Show the number of recent documents» option.
-
5
Set the counter to 0.
-
6
Click «OK».
-
7
Now you can see the recent document list is empty.


Advertisement
Add New Question
-
Question
How can I delete individual files?

Open all files, then hold the shift key and delete key until all of the files you want to delete have been selected.
Ask a Question
200 characters left
Include your email address to get a message when this question is answered.
Submit
Advertisement
Thanks for submitting a tip for review!
About This Article
Thanks to all authors for creating a page that has been read 205,405 times.
Is this article up to date?
wikiHow Tech Help Pro:
Level up your tech skills and stay ahead of the curve
Let’s go!

When you open Microsoft Word, a list of recently-opened documents appears on the left side of the screen. You can clear documents from this list or, if you’d rather not see recent documents at all, disable the list entirely.
RELATED: How to Clear Recent Items from a Jump List in Windows
The recent documents list also shows up when you select the “Open” option from within Word, and on the jump list for the Word taskbar button. Clearing the list clears those documents out of the two locations within Word, but not on the jump list. You’ll have to clear the jump list separately. Disabling the recent documents view prevents them from showing up in any of these locations. Here’s how to do it.
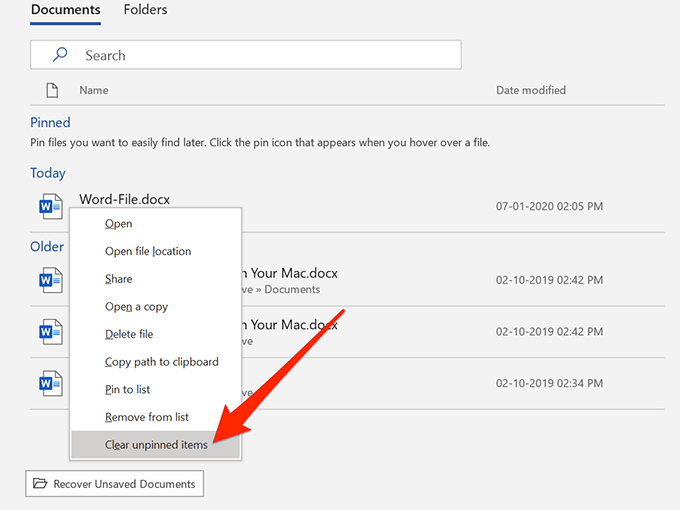
Clearing the recent documents list is simple. Whether you’re on Word’s opening splash screen or on the “Open” page when opening a document, right-click on any document in the recent list, and then choose the “Clear Unpinned Documents” option.
Update: In the latest versions of Word 2019 and Word for Office 365, you’ll need to click the “Open” icon on the left side of the Word home screen before right-clicking recent documents and selecting this option. This will then delete those recent documents from the Home screen. You can’t right-click and clear documents directly from the home screen for some reason.

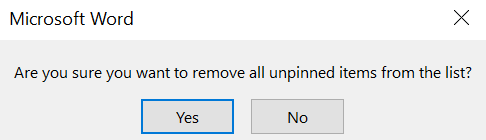
In the warning box that appears, click the “Yes” button.
This clears all documents from the recent list that you have not pinned as favorite documents.
If you prefer, you can also select the “Remove From List” option on that menu to remove only the document you right-clicked.
Disable the Recent Documents List
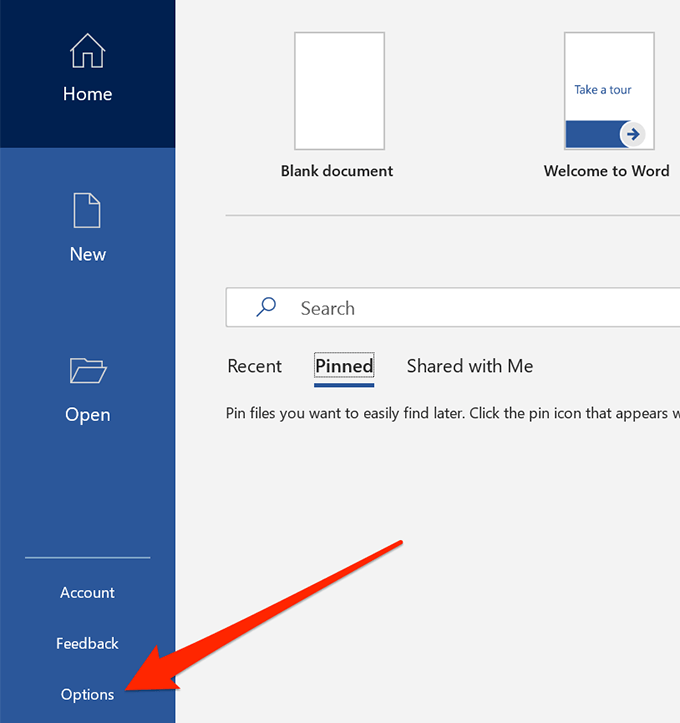
Disabling the recent documents list entirely is also pretty straightforward. If you’re on Word’s opening splash screen, click the “Open Other Documents” link at the bottom left.
Or, if you’ve already got a document open, click the “File” menu.
Next, click the “Options” command toward the bottom left.
In the “Word Options” menu, switch to the “Advanced” tab.
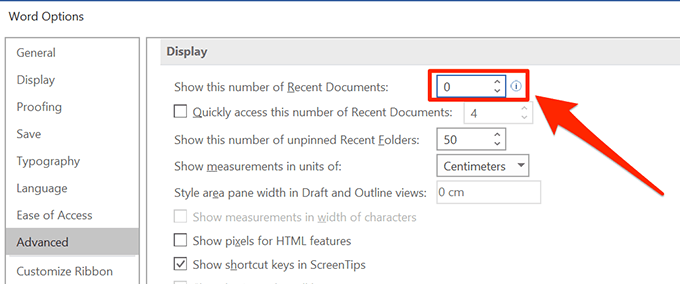
On the right, scroll down to the “Display” section. Disable the display of recent documents by setting the “Show this number of Recent Documents” option to zero, and then click the “OK” button.
Now, when you open Word (or use the “Open” command within the app), the Recent Documents list should be empty. You should also no longer see recent document listed on the jumplist for the taskbar button.
If you want to re-enable the display of recent documents in the future, go back to that same “Word Options” window and set the number of recent documents you want shown. 50 is the default setting, but you can choose any number between 0 and 50. Just note that when you re-enable the recent document display, any previously-displayed documents will be shown again.
READ NEXT
- › Android’s Nearby Share Has (Unofficially) Arrived on Mac
- › The New Winamp Is Here, but It’s Not What You’d Expect
- › Save Hundreds on Elegoo’s New PHECDA Laser Engraver Through Kickstarter
- › Discord Direct Message Won’t Go Away? Here’s the Fix
- › Windows 11 Has a New Photo Gallery in the File Explorer
- › How to Get a Refund on the PlayStation Store
How-To Geek is where you turn when you want experts to explain technology. Since we launched in 2006, our articles have been read billions of times. Want to know more?