
Office 2021 Office 2019 Office 2016 Office 2013 Office 2010 Еще…Меньше
Иногда после открытия файла обнаруживается, что он доступен только для чтения. Доступ только для чтения означает, что вы можете только просматривать или печатать. Доступ к файлам может ограничиваться ради безопасности, например при открытии файлов из Интернета, или настраиваться с помощью параметров. Ниже описаны некоторые ситуации, когда файл может быть открыт только для чтения, и возможные варианты действий.
Антивирусная программа вызывает открытие файлов только для чтения
Некоторые антивирусные программы защищают компьютеры от потенциально опасных файлов, открывая их только для чтения. В этом случае вам может потребоваться обратиться за инструкциями к поставщику антивируса. Например, сведения о том, как добавить приложение в исключения в программе Bitdefender, доступны по следующей ссылке: Добавление приложений или процессов в исключения в Центре управления Bitdefender.
Свойства файла настроены для только чтения
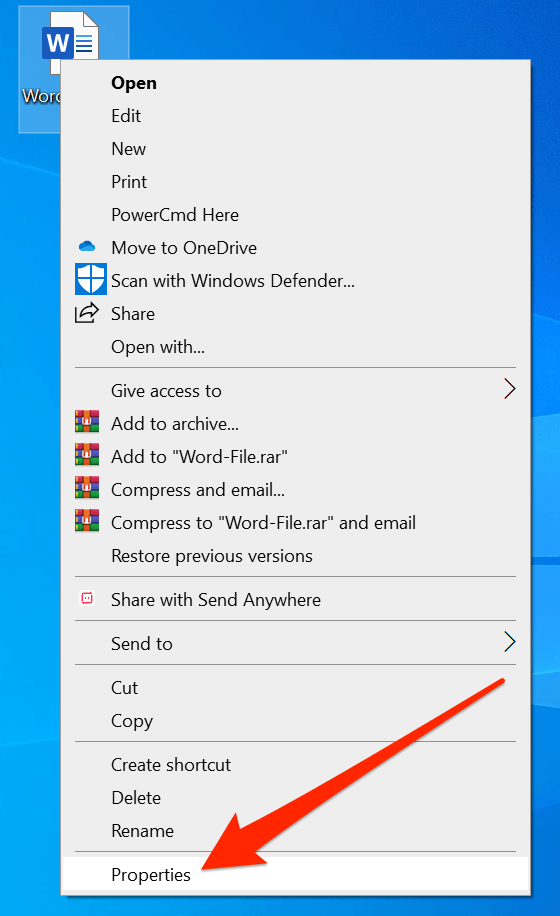
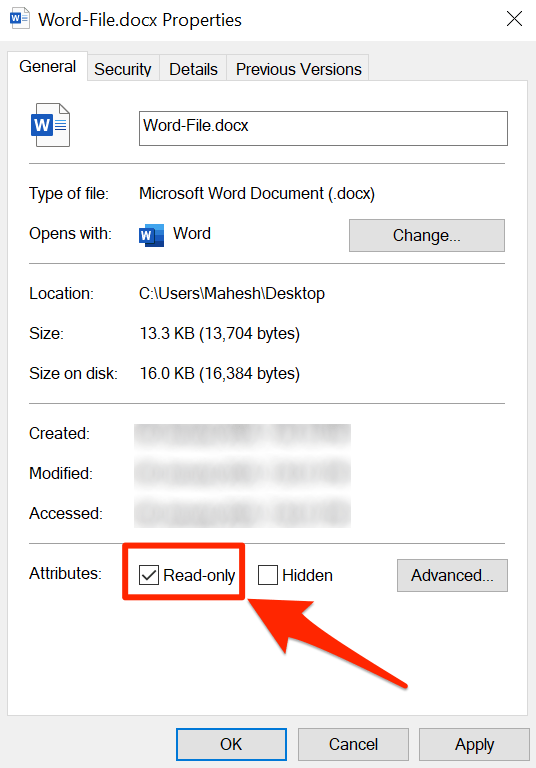
Чтобы проверить свойства файла, щелкните его правой кнопкой мыши и выберите пункт Свойства. Если атрибут «только для чтения» установлен, снимите его и нажмите кнопку ОК.

Содержимое откроется в защищенном представлении
Файлы из Интернета и других потенциально опасных мест могут содержать вирусы, вирусы-червей и другие вредоносные программы, способные причинить вред компьютеру. Заражение также часто происходит при открытии вложений в сообщения электронной почты и скачанных файлов. Для защиты компьютера файлы из таких потенциально опасных мест открываются в защищенном режиме. В этом режиме можно просмотреть содержимое файла с меньшим риском. Дополнительные сведения о защищенном представлении и изменении параметров см. в этой статье: Что такое защищенное представление?
Хранилище OneDrive заполнено
Если файл хранится в OneDrive и оно заполняется до предела, вы не сможете сохранить документ, пока не освободите для него место. Чтобы узнать, сколько свободного места остается в хранилище OneDrive, щелкните значок OneDrive в центре уведомлений и выберите пункт Управление хранилищем или войдите на сайт http://onedrive.live.com и посмотрите нужное значение в левой нижней части экрана.
Активирован ли ваш продукт?
При открытии приложения может появиться сообщение о нелицензированных продуктах или ошибка активации. Это может произойти, если microsoft 365 или Office не активированы или срок действия подписки На Microsoft 365 истек. Справку по этому вопросу см. в статье Ошибки нелицензированного продукта и активации в Office.
Если устранить проблему не удается…
-
Перезагрузите компьютер.
-
Установите обновления Office.
-
Запустите восстановление Office по сети.
-
Проверка подключения к Интернету
Присоединяйтесь к обсуждению
Наши эксперты и участники сообщества обсуждают эту тему на форуме ответов. Щелкните эту ссылку, чтобы перейти туда, почитать обсуждения и поучаствовать в них.
Нам важно ваше мнение
Эта статья была в последний раз рассмотрена Беном 21 июня 2018 года в результате ваших комментариев. Если эта статья оказалась для вас полезной (и особенно если нет), оставьте внизу отзыв, чтобы мы могли ее улучшить.
Нужна дополнительная помощь?
Microsoft Word — популярный среди пользователей Windows текстовый процессор для создания и редактирования документов. Несмотря на годы обновлений и улучшений, Word не полностью застрахован от проблем и ошибок. Одним из таких случаев является то, что Microsoft Word открывает ваши документы в режиме только для чтения.

К счастью, есть несколько способов решить эту досадную проблему. Ниже приведены некоторые советы по устранению неполадок, которые вам нужно попробовать, если Word продолжает открывать документы в режиме только для чтения в Windows 10 и Windows 11.
1. Проверьте, не истек ли срок действия подписки на Office
Прежде чем использовать какие-либо дополнительные советы по устранению неполадок, убедитесь, что срок действия вашей подписки на Office не истек. Это популярная причина, по которой программы Office, такие как Word, могут открывать файлы в режиме только для чтения и не позволяют вам редактировать их.
Направляйтесь к Раздел услуг и подписок на веб-сайте Microsoft и войдите в свою учетную запись Office, чтобы проверить статус подписки. Дата истечения срока действия подписки на Office указана на вкладке «Обзор». Возможно, вам придется продлить подписку с истекшим сроком действия.

2. Отключите ограничения на редактирование файлов, защищенных паролем.
Microsoft Word может открыть документ в режиме только для чтения, если владелец документа наложил ограничения на редактирование. Если у вас есть пароль для файла, вы можете легко снять ограничение только для чтения для этого документа, выполнив следующие действия.
Шаг 1: Откройте защищенный паролем документ в Word.
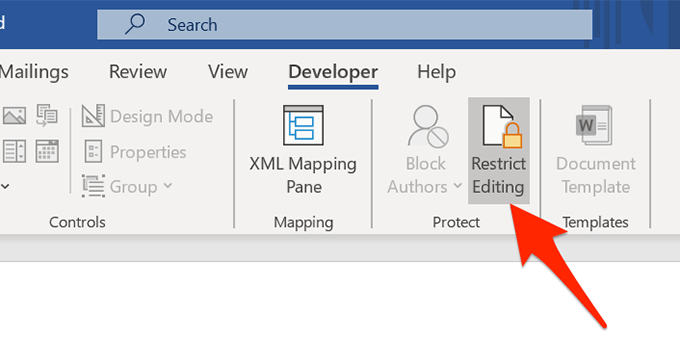
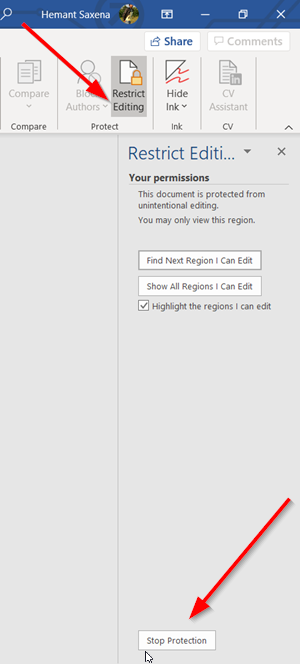
Шаг 2: На вкладке «Обзор» выберите параметр «Ограничить редактирование» в группе «Защитить».

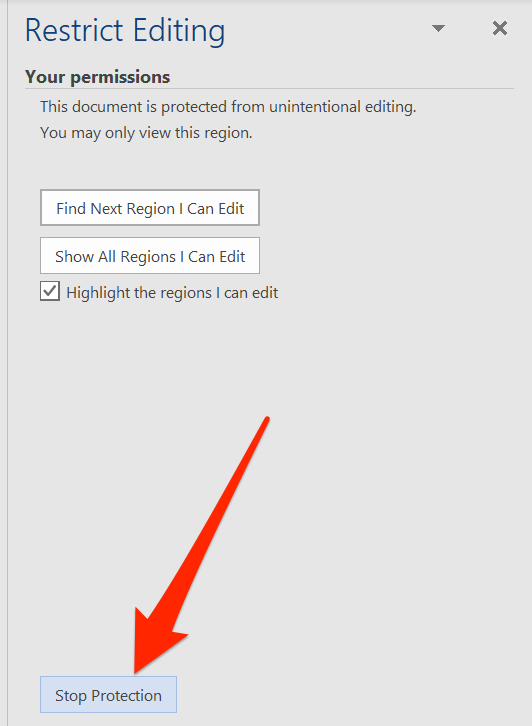
Шаг 3: На панели «Ограничить редактирование», которая появляется справа, нажмите кнопку «Остановить защиту».

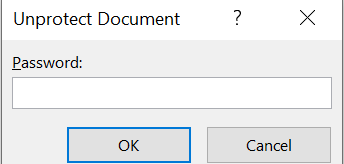
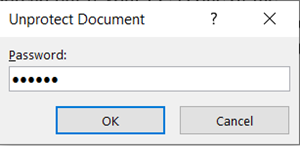
Шаг 4: Введите пароль для файла и нажмите OK.

После проверки пароля Word снимет все ограничения на редактирование, и вы сможете приступить к изменению документа.
3. Отключите открытие вложений электронной почты в режиме чтения
Еще одна причина, по которой Word может открывать ваши документы в режиме только для чтения, заключается в том, что вы ранее настроили его для открытия всех вложений электронной почты в режиме чтения. Вот как вы можете это изменить.
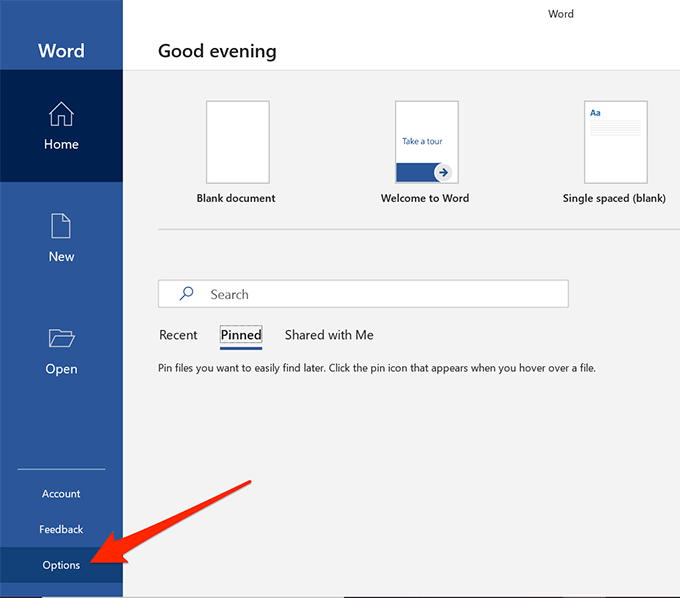
Шаг 1: Откройте Microsoft Word и щелкните меню «Файл» в верхнем левом углу.

Шаг 2: Выберите «Параметры» на левой панели.

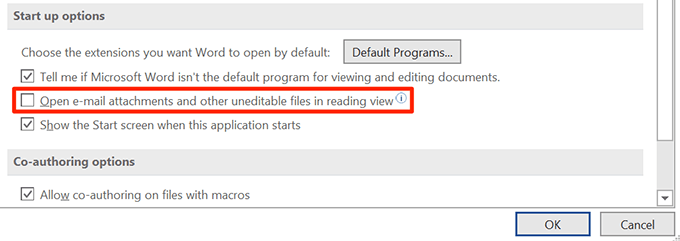
Шаг 3: На вкладке «Общие» прокрутите вниз до раздела «Параметры запуска» на правой панели. Снимите флажок «Открывать вложения электронной почты и другие нередактируемые файлы в режиме чтения» и нажмите «ОК».

После того, как вы выполните вышеуказанные шаги, Word должен открыть все вложения электронной почты в представлении по умолчанию.
Защищенный просмотр — это функция безопасности в Word, которая защищает ваш компьютер от вредоносных файлов. Если этот параметр включен, Word будет открывать любые подозрительные файлы в режиме только для чтения. Однако, если вы уверены в законности своего документа Word, вы можете временно отключить функцию защищенного просмотра.
Шаг 1: В окне Microsoft Word щелкните меню «Файл» в верхнем левом углу.
Шаг 2: Выберите «Параметры» на левой панели.
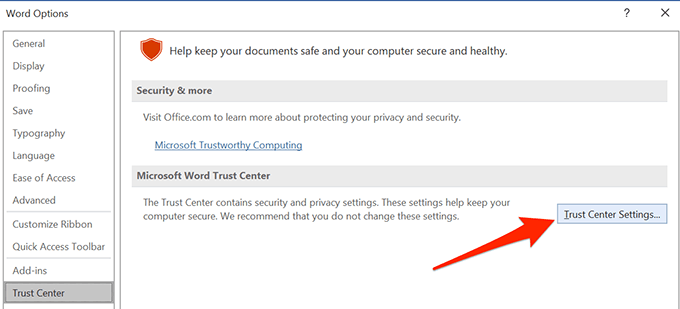
Шаг 3. В окне «Параметры Word» перейдите на вкладку «Центр управления безопасностью» в левом столбце и нажмите кнопку «Настройки центра управления безопасностью» на правой панели.

Шаг 4. По умолчанию отмечены все три параметра на вкладке «Защищенный просмотр». Чтобы отключить защищенный просмотр, снимите все три флажка и нажмите «ОК», чтобы сохранить изменения.

После этого Word не будет открывать ваши документы в режиме только для чтения.
5. Изменить свойства файла
Если рассматриваемая проблема ограничена несколькими выбранными документами Word, атрибут файла только для чтения может быть включен для этих файлов. Вот что вы можете сделать, чтобы это исправить.
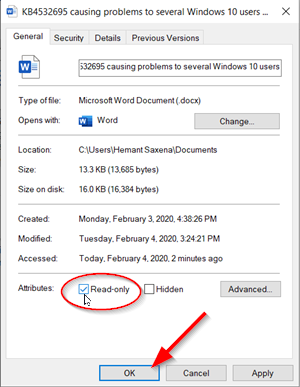
Шаг 1: Щелкните правой кнопкой мыши файл Word и выберите «Свойства».

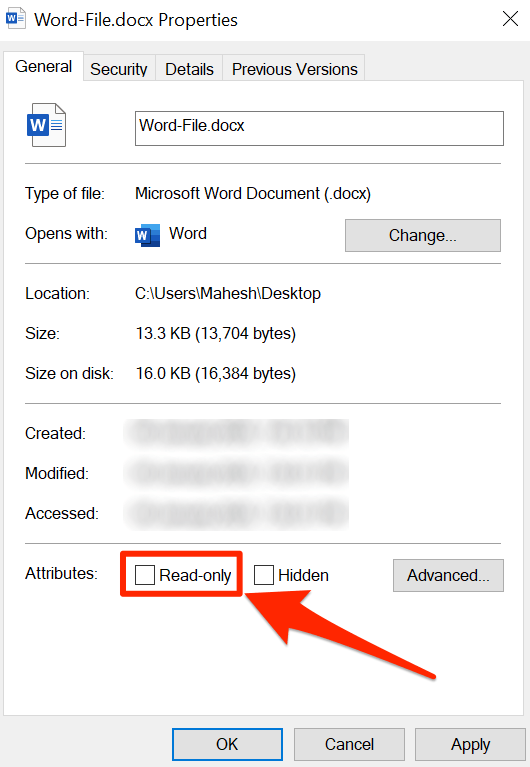
Шаг 2: На вкладке «Общие» снимите флажок «Только для чтения» в разделе «Атрибуты». Затем нажмите «Применить», а затем «ОК».

6. Отключить панель предварительного просмотра в проводнике.
Функция панели предварительного просмотра в проводнике позволяет просматривать файлы, не открывая их. Для этого File Explorer может установить для ваших файлов режим только для чтения. Чтобы избежать этого, вы можете отключить функцию панели предварительного просмотра в проводнике.
Шаг 1: Нажмите клавишу Windows + E, чтобы открыть проводник.
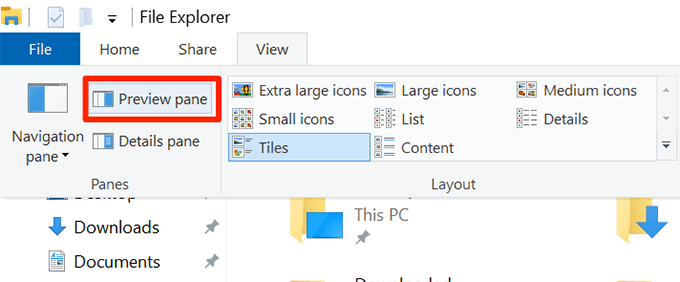
Шаг 2: Нажмите меню «Вид» вверху, перейдите в «Показать» и снимите флажок «Панель предварительного просмотра».

7. Откройте Microsoft Word в безопасном режиме.
Открытие Microsoft Word в безопасном режиме позволяет получить доступ к программе без каких-либо сторонних надстроек. Это должно помочь вам определить, вызвана ли проблема одной из этих надстроек Word.
Удерживая нажатой клавишу Ctrl, щелкните ярлык Word. Когда Word откроется в безопасном режиме, откройте несколько документов, чтобы проверить, отображаются ли они в режиме только для чтения. Если это решит проблему, вам придется отключить все ваши надстройки и снова включить их по одной, чтобы изолировать виновника.
Шаг 1: Перейдите в меню «Файл» и выберите «Параметры».
Шаг 2. На вкладке «Надстройки» выберите «Надстройки COM» в раскрывающемся меню «Управление» и нажмите кнопку «Перейти» рядом с ним.

Шаг 3: Отключите все надстройки и нажмите «ОК».

После этого перезапустите Word и включите надстройки одну за другой. Откройте документ после включения каждой надстройки, чтобы определить ту, которая вызывает проблему.
8. Восстановить Microsoft Office
Microsoft предоставляет удобный инструмент для восстановления пакета Office. Он может автоматически обнаруживать и устранять любые проблемы с вашими программами Office, включая Word. Вы можете запустить этот инструмент в крайнем случае, если Microsoft Word по-прежнему открывает ваши файлы в режиме только для чтения.
Шаг 1: Щелкните правой кнопкой мыши значок «Пуск» и выберите «Установленные приложения» из списка.

Шаг 2. Прокрутите вниз, чтобы найти продукт Microsoft Office в списке. Щелкните значок меню из трех точек рядом с ним и выберите «Изменить».

Шаг 3: Выберите «Быстрое восстановление» и нажмите «Восстановить».

Если проблема остается даже после этого, выполните онлайн-восстановление, используя шаги, описанные выше. Это позволит провести более тщательную операцию восстановления и устранить любые проблемы с приложениями Office. Обратите внимание, что для этого вам потребуется активное подключение к Интернету.
Больше никаких ограничений
Когда Microsoft Word продолжает открывать ваши документы в режиме только для чтения, это нарушает ваш рабочий процесс на компьютере с Windows 10 или Windows 11. Мы надеемся, что одно из решений помогло вам решить проблему, и все вернулось на круги своя.
Post Views: 481
![]()
Download Article
![]()
Download Article
Is your Word document opening in read-only mode? You’ll need to turn off this protected view mode before you can make changes to the file. Fortunately, this is really easy to do! This wikiHow article will walk you through changing a read-only Microsoft Word document into one that’s unlocked and ready to edit.
Things You Should Know
- Word files may be read-only due to Protected View, password protection, or file permissions in Windows or macOS.
- If you’re using Windows, right-click the file, select «Properties,» click the «Properties» tab, then remove the Read-only attribute.
- On a Mac, click the file, go to «File» > «Get Info» > «Sharing & Permissions,» and allow «Read & Write» permission.
-

1
Understand which documents are likely to be protected. Any Microsoft Word document which you download from the Internet (e.g., an email attachment or a file from a website) will have read-only protection assigned to it whenever you open it. You can disable this protection when first opening the document.
-
2
Open the Word document. Double-click the Word document for which you want to remove the read-only protection.
- If the Word document is currently open, close it and re-open it.
Advertisement
-
3
Look for a pale yellow banner. If you see a yellow banner with the phrase «Files from the Internet can contain viruses» written across the top of the Word document, your document qualifies to have its read-only status removed using this method.
- If you don’t see this banner even after closing and re-opening the Word document, try one of the other methods in this article.
-
4
Click Enable Editing. This button should be on the right side of the banner. Doing so will refresh the Word document and remove the read-only protection. You should now be able to edit the document.


Advertisement
-
1
Open the Word document. Double-click the Word document from which you want to remove the protection. It will open in Word.
-
2
Click the Review tab. This tab is in the upper-right corner of the Word window. Doing so opens the Review toolbar at the top of the Word window.
-
3
Click Restrict Editing. You’ll find this option on the far-right side of the Review toolbar. Clicking it prompts a pop-out menu to appear on the right side of the window.
-
4
Click Stop Protection. It’s at the bottom of the pop-out menu. You should see a pop-up window appear at this point.
- If you or another user on your computer’s account created the protection without a password, clicking Stop Protection will automatically remove the protection.
-
5
Enter the password when prompted. Type the document’s password into the «Password» text box, then click OK. This will immediately remove the Word document’s read-only lock if the password is correct.
- If you don’t know the password, you’ll have to copy and paste the file’s contents instead.
-
6
Save your changes. Press Ctrl+S (Windows) or ⌘ Command+S (Mac) to do so. From now on, the file won’t be read-only protected unless you re-enable editing protection.


Advertisement
-
1
Go to the Word document. Find the folder in which the Word document is stored.
- If the file isn’t actually on your computer (e.g., it’s on a flash drive or a CD), move the file onto your computer before proceeding.
-
2
Open the Word file’s properties. This will vary depending on your computer’s operating system:
- Windows — Click once the Word file, right-click the Word file, and click Properties in the drop-down menu.
- Mac — Click the Word file, click the File menu item in the top-left side of your Mac’s screen, and click Get Info.
-
3
Find the «Permissions» section. On a Windows computer, you’ll find the proper options in the «Attributes» section near the bottom of the Properties window.
- On a Mac, you’ll have to click the Sharing & Permissions heading near the bottom of the window.
-
4
Disable the read-only protection. Again, this process will differ depending on whether you’re using Windows or a Mac:
- Windows — Uncheck the «Read-only» box near the bottom of the window, click Apply, and click OK.
-
Mac — Click the Read option to the right of your name, then click Read & Write in the menu which appears.
- You may first have to click the lock in the bottom-left corner of the Get Info window and then enter your Mac’s password before you can do this.
- If this option is greyed out, unchecked, or otherwise not set to «Read-only», you’ll have to try copying and pasting instead.
-
5
Try to edit the file. Open the Word document by double-clicking it, then try to edit it. Keep in mind that you may first have to remove the online read-only lock before doing so.


Advertisement
-
1
Understand how this works. If your primary goal is to edit the Word document, you can copy the Word document’s text and paste it into a new Word document and then save the new document onto your computer. While doing this won’t remove the read-only protection from the original document, it will create an editable copy.
-
2
Open the protected Word document. Double-click the Word document to do so.
-
3
Click anywhere on the document. This will place your mouse cursor on the document’s page.
-
4
Select the whole document. Press either Ctrl+A (Windows) or ⌘ Command+A (Mac) to do so. You should see the entire document become highlighted.
-
5
Copy the selected text. Press either Ctrl+C (Windows) or ⌘ Command+C (Mac). This will copy the document’s text to your computer’s clipboard.
-
6
Open a new Word document. Click File in the upper-left side of the Word window, click New on the left side of the window, and click Blank document to open a blank Word document.
- On a Mac, click the File menu item, then click New Blank Document at the top of the drop-down menu.
-
7
Paste in the copied text. Press either Ctrl+V (Windows) or ⌘ Command+V (Mac) to paste the locked Word document’s text into the blank document.
- This may take a few seconds if the original document was particularly large or contained images.
-
8
Save the document as a new file. Press Ctrl+S (Windows) or ⌘ Command+S (Mac), then enter your document’s name and click Save. You’ll be able to edit the document you just created like usual.


Advertisement
Add New Question
-
Question
My documents are in Microsoft Office as PDF files and they are read only. How do I turn read only off?

Save it as a new document, delete the old one, and rename the new one. This should allow you to edit it.
Ask a Question
200 characters left
Include your email address to get a message when this question is answered.
Submit
Advertisement
Video
-
Another way to remove the read-only protection from a Microsoft Word document is by converting the Word document into a PDF with the SmallPDF online converter, downloading the converted PDF, and then converting the PDF back into a Word document with SmallPDF.
Thanks for submitting a tip for review!
Advertisement
-
It’s much easier to copy the protected document’s text and paste it into a new document than it is to try to crack Microsoft’s security.
Advertisement
About This Article
Article SummaryX
1. Open the document in Word.
2. Click Enable Editing.
Did this summary help you?
Thanks to all authors for creating a page that has been read 978,826 times.
Is this article up to date?
If you’ve opened a document in Word but you can’t edit it, it’s probably locked for editing by someone or by a feature. Learning how to remove read only from Word should help you edit these documents even though they’ve been marked as read-only and aren’t supposed to be edited.
There are various reasons as to why people restrict their documents from being edited. Maybe you yourself made the document read-only but you forgot it, or maybe someone has it locked to ensure no unauthorized users can modify the contents of it.
Regardless, if you’ve come across a document that you must edit but it’s in read-only mode, there are various methods to fix it and to be able to edit the document.
Also, be sure to check out our YouTube channel where we made a short video going over the fixes listed in this article.
Remove Read Only From Word By Disabling Edit Restrictions
We’ll start off by disabling the Word’s built-in feature that lets users restrict their documents from being modified. If you or someone has enabled this option for your current document, it is why you can’t edit it.
Disabling the option should fix it for you.
- Open your read-only document in the MS Word program.
- When it opens, find the tab that says Developer at the top and click on it.
- You’ll find several options to choose from on the following screen. Look towards to the Protect area at the top and click on the option that says Restrict Editing.
- A new pane will appear on the right-hand side. There’s a button at the bottom of this pane saying Stop Protection. Click on the button to remove read only from this Word document.
- If there was a password setup to restrict editing, you’ll need to enter it on the box shown on your screen. Then click on OK to unlock the document.
Your document is no longer in read-only mode and you can actually modify its contents as you wish.
Turn Off The Trust Center Options To Remove Word Opening In Read Only
Trust Center is a feature in Word that blocks certain documents from being fully opened with editing capabilities on your computer. You can disable the feature in the program and that should fix the read only issue you’re facing with your document.
- Launch the MS Word program on your machine.
- At the bottom-left corner of your screen, you’ll find an option that says Options. Click on it to open the standard Word settings menu.

- On the following screen, you’ll find an entry saying Trust Center in the left sidebar. Click on it to open the Trust Center settings.
- You’ll see a button saying Trust Center Settings on the right-hand side pane. Click on it to open the settings menu.
- There’ll be several options in the left sidebar of your screen. Find and select the one that says Protected View.
- On the right-hand side pane, you’ll see three checkboxes that are enabled. Untick each of these boxes to prevent Word from opening your documents in the protected view. Then click on OK at the bottom to save your changes.

- Launch your document in the program and you should be able to edit it.
Fix The Word Opening In Read Only For Email Attachments
MS Word actually has a number of features to protect you from various threats that are spread via Word files. One of these features opens your email attachments in the read-only mode so it can’t affect your computer negatively.
This may be the reason why your documents always open in the read-only mode. Turning this option off should fix the issue for you.
- Open MS Word on your computer.
- Click on the Options option at the lower-left corner and it’ll open the settings menu.
- Click on the General tab in the left sidebar if you aren’t already there. Then on the right-hand side menu, scroll down and find the option that says Open e-mail attachments and other uneditable files in reading view.
Untick the box for the option and click on OK to save the changes.
The Word files you’ve received as email attachments should now open in regular mode letting you edit them however you want.
Disable The Preview Pane In File Explorer
Preview pane in Explorer shows the previews of your files, and for it to do that, it sometimes locks-up your files and prevents you from editing them.
A quick solution to that is to simply turn off the pane.
- Open This PC from your desktop.
- Click on the View tab at the very top of your screen.
- Select the option that says Preview pane in the Panes section. It’ll disable the pane if it was enabled before.
You may now try opening your file in the program to see if it fixed the issue.
Toggle An Option In The Properties To Remove Read Only From Word
One of the possible ways to fix read only mode in Word is to change an attribute for your file.
- Right-click on your Word document and select Properties.
- Tick-mark Read-only and click on OK.
- Open the Properties menu again, untick the Read-only option, and hit OK.
- Open the file in Word and it should let you edit it.
Extract The File Before Opening It In MS Word
If you’re trying to edit a Word file that’s inside an archived format such as RAR or ZIP, you’ll want to first extract the file from it to then edit it. Directly opening the file from an archive sometimes prevents you from editing it.
- Right-click on the archive and select Extract Here.
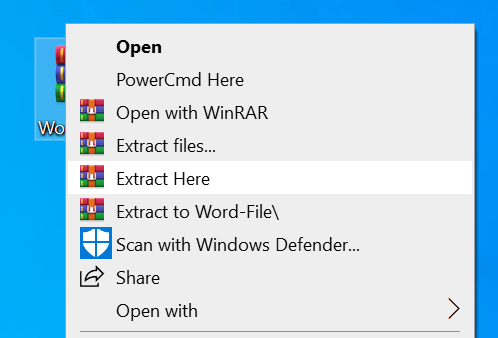
- Open the file in Word and you’ll be able to edit it.
-
MiniTool
-
MiniTool News Center
- Fix: Microsoft Word Opens Files in Read-Only Mode
By Shirley | Follow |
Last Updated February 10, 2023
![]()
Sometimes Microsoft Word opens files in read-only mode, which prevents you from editing the documents. This article from MiniTool mainly introduces several ways to solve the problem “Microsoft Word opens files in read-only mode”.
How to Fix Microsoft Word Opens Files in Read-Only Mode
Opening a word document in read-only mode will restrict the editing and modification of the original Office document, which is very inconvenient. Therefore, to edit and save the original files, you have to fix the issue “Microsoft Word opens files in read-only mode” using the following five methods.
Method 1: Change File Properties
The easiest way to fix “Microsoft Word opens files in read-only mode” is to change the document properties. Here is the detailed guidance.
Step 1: Right-click the file in read-only mode and select Properties.

Step 2: Under the General section, uncheck Read-only and click OK to save the change.

Step 3: Reopen the file, and the file read-only mode should be turned off.
Method 2: Turn off Protected View of Word Documents
Protected View is one of the most important security improvements in Office. Files are opened in read-only mode when Protected View is enabled. Protected View is more restrictive than read-only mode and does not allow you to edit the document. Here are the steps to disable this function:
Step 1: Open a read-only file. Click the File option in the upper left corner and then click Options.
Step 2: Under the Trust Center tab, click Trust Center Settings.

Step 3: Go to the Protected View tab and uncheck the three options of Protected View.

Step 4: Click OK to save the changes and reopen the Microsoft Word document without restriction.
Method 3: Change a Startup Option for Word Documents
When your e-mail attachments are opened in read-only mode, you may need to consider whether it is a file start-up option setting problem. Here are the steps to reset this option:
Step 1: Go to File > Options in a Microsoft Word document.
Step 2: Under the General tab, uncheck Open e-mail attachments and other uneditable files in reading view and click OK.

Method 4: Change Restrict Editing in Microsoft Word
The Restrict Editing feature in Microsoft Word enables you to use a password to protect Word documents from changes. To disable read-only mode in Word, please turn off this function through the guidance below (The premise is that you need to know the password for document protection):
Step 1: Open a read-only Word document.
Step 2: Select Review > Protect. Then click Restrict Editing.

Step 3: Click Stop Protection in the lower right corner.

Step 4: Type the password in the input box and click OK.

Step 5: The read-only mode in your Microsoft Word document should be disabled.
Related article: Easy Ways to Restrict Document Editing in Microsoft Office
Method 5: Turn off Preview Pane in File Explorer
There is a feature in the file explorer called the Preview pane which can preview the files without opening them. Turning on this feature may cause the files to be opened in read-only mode. Therefore, turning off this feature is also one of the effective ways to solve the problem “Files are read-only in Microsoft Word”. Here is the tutorial.
Step 1: Press Windows + E keyboard shortcut to open file explorer.
Step 2: Click View and make sure the Preview pane is turned off (It is turned off by default. If it is turned on, it will be highlighted. Clicking the highlighted button will turn it off).

Related articles:
- How to Fix the “Windows 10 Preview Pane Not Working” issue?
- How To Lock & Protect A Word Document Effectively
Final Words
To sum up, this article lists five ways to solve the problem “Microsoft Word opens files in read-only mode”. If you encounter this problem, please follow the steps in the article to try to solve it. If you have found a better way, welcome to share it in the comment area below.
About The Author

Position: Columnist
Shirley graduated from English major and is currently an editor of MiniTool Team. She likes browsing and writing IT-related articles, and is committed to becoming a professional IT problem solver. The topic of her articles are generally about data recovery, data backup, and computer disk management, as well as other IT issues. In spare time, she likes watching movies, hiking and fishing.
- Remove From My Forums
-
Question
-
-
Moved by
Friday, October 15, 2010 2:12 AM
(From:Office 2010 Setup and Deployment)
-
Moved by
Answers
-
Hi,
I met this issue before. And for me, this issue wouldn’t happen to all my documents, but once it did happen to a particular document, it would keep happening to that document no matter what I did.
The only way I was able to get around the problem was to turn off the automatic backup file feature in Word 2010 while working in that document.
- Click the File tab of the ribbon and then click Options.
- Click Advanced at the left side of the dialog box.
- Scroll down to the Save section and make sure the Always Create Backup Copy check box is NOT selected.
- Optionally, also NOT select the Allow Background Saves check box.
- Click on OK.
In addition, sometimes when you open a word file, a temporary copy is created.
Closing the document should also close the temp file.
Sometimes this does not happen and the temp file remains behind. If so, it also may cause this issue.
Try to reboot or end process by clicking Alt+Ctrl+Delete to open task manager so that clear the temp file.
Hope that helps.
-
Marked as answer by
Jennifer Zhan
Thursday, October 21, 2010 5:22 AM
Download PC Repair Tool to quickly find & fix Windows errors automatically
Office applications like Word periodically, and sometimes, without the consent of a user converts a file to ‘Read-only’ mode while it is being used. The change in default status can be annoying since the mode allows no editing. Nevertheless, you can fix this issue, here’s how!
Apart from you, if someone else has access to your PC then, chances are he/she has locked it accidentally or deliberately to prevent anyone from making changes to the contents of a file. If Microsoft Word documents are opening in Read-only mode on your Windows 11/10 PC, then here are the steps you need to take to fix the issue, then you can remove read-only mode in Word by following these methods:
- Disabling Edit Restrictions
- Unchecking ‘Open e-mail attachments and other uneditable files in reading view’.
- Changing Word File Properties
- Disabling the Preview Pane In File Explorer.
Let’s cover the methods described above in a bit of detail.
1] Disable Edit Restrictions
Open the Read-only Word document.
Go to the ‘Review’ tab and under it look for the option that reads ‘Restrict Editing’.
Click the tab. Then, in the new pane that opens, look for the ‘Stop protection’ button. It should be visible at the bottom of the pane. Hit the button.
When prompted for the password, request the person who configured it to provide it to you.
Enter the password to remove Read-only mode.
2] Uncheck ‘Open e-mail attachments and other uneditable files in reading view’
Sometimes when you receive a word file as an attachment and try to open it to edit it, you cannot do it since it opens in the ‘Read-only’ mode.
Open the Word file on your computer. Click the ‘File’ tab and go to ‘Options’.
In the Word Options window that opens, switch to the ‘General’ tab in the left sidebar.

Then, in the right-pane, scroll down and look for the option that reads as ‘Open e-mail attachments and other uneditable files in reading view’.
Uncheck the box marked against the option and hit the ‘OK’ button to save the changes.
Hereafter, any Word files you receive as email attachments should now open in regular mode letting you edit them however you want.
3] Change Word File Properties
Right-click the Word document that opens only in ‘Read-only’ mode and select ‘Properties’.
Un-check the box marked against ‘Read-only’ option.
4] Disable the Preview Pane In File Explorer
This ahs helped some. See if it helps you; else reverse the changes.
Go to ‘This PC’ section and click on the ‘View’ tab.
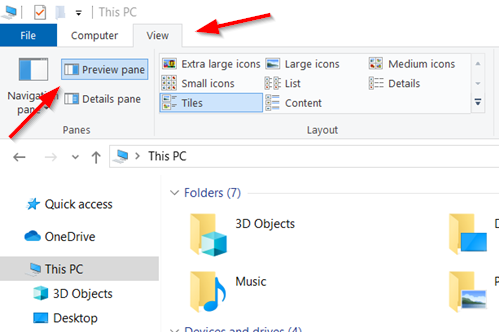
Now, simply select the option that says ‘Preview pane’ in the Panes section. This will disable the pane if it was enabled before.
That’s it!

A post-graduate in Biotechnology, Hemant switched gears to writing about Microsoft technologies and has been a contributor to TheWindowsClub since then. When he is not working, you can usually find him out traveling to different places or indulging himself in binge-watching.
Note (3 July 2020): This is an updated version for Word 365 (for Windows) of the original post for Word 2007 (https://cybertext.wordpress.com/2010/07/14/word-2007-document-goes-to-read-only-for-no-reason/).
I’m not sure how widespread this problem is, but I’ve seen it a few times, and one of my work colleagues gets it regularly:
- You’re happily working in a Word document, saving as you go, when all of a sudden you can’t save as you get a message that the document is set to ‘read-only’
- You save and close a Word document, re-open it, work on it, try to save it again but get the ‘read-only’ message.
The workaround I’ve used to date has been to do a ‘save as’ and save the document with a slightly different file name.
However, after my colleague said that she’s getting the message all the time on a specific document, it was time for me to go off to Google and check if anyone else gets this and how they solved it.
Here are some possible solutions I found:
[Link last checked July 2020]
-
#1
Ok, so here’s the story: everytime I open a document in MSWord 2003, its fine, opens and works and I can type and do whatever. The first time I save the file, it saves properly, however, if I CTRL+S again, it asks me to specify what file I want to save it as, and when I try to save it as the one I have open, it errors me, saying that the file that I have open is a read-only file. That’s weird, because in the properties I can clearly see that its not read-only.
Does anyone have any idea what’s going on? I un and reinstalled on my PC but the problem continues. Any help will be greatly appreciated =]
Thanks in advance.
BTW I am using XP and the in the blue bar of the open document it says «DocumentName (Read-Only)» after I try to save it for the second time.
Sorry if this is the wrong forum to post in, Im new, but I really need help because my comp has been acting weirdly these past few days.
Как в офисе.
У пользователей старых версий Word при открытии документов появляется надпись о режиме ограниченной функциональности. Возникает вопрос, что означает этот режим ограниченной функциональности в Ворде, как убрать его. Ведь это уменьшает возможность редактирования текстов, не даёт доступа к новым расширениям, в целом, создаёт неудобство в работе. Вызывать программиста для такой несложной работы, как изменение формата, в этом случае не потребуется, вы, изучив наши рекомендации, вполне справитесь с задачей, не потратив на это много времени.
Что означает ограничение функциональности

Режим ограниченной функциональности Word 2010, как убрать — читайте ниже. На самом деле отключить режим — процедура несложная, не требующая больших затрат времени и каких-то специальных знаний. Прочитайте нашу инструкцию, и сможете спокойно работать с вашими текстами.
Вы подготовили текст дома на стареньком, но на таком привычном вам Word 2003. Принесли файл на флешке или другом носителе на работу, к друзьям, а там установлен Ворд 2007/2010. Вам перед распечаткой нужно внести изменения либо дополнения, но это недоступно. Итак, перед вами стоит выбор: извиниться и предложить сделать всё позже, когда вернётесь домой, или преобразовать документ, чтобы пользоваться всеми возможностями, предоставляемыми разработчиками.
- Вы решили преобразовать документ 2003 в новый формат, но оставить и исходник. Вам нужно просто пересохранить с другим расширением. Для этого зайдите в «Файл» — «Сохранить как». В строке «Тип файла» выберите «Документ Word», впишите другое название. Откроется дополнительное окошко, где будет предупреждение, что новая версия не станет открываться в Office Нажмите OK, предварительно можно поставить галочку «Больше не задавать этот вопрос», чтобы в следующий раз это сообщение не появлялось. Система сохранить оба варианта с разными расширениями.
- Если вам не нужно сохранять исходный вариант, то поступаем так: во вкладке «Файл» переходим на «Сведения», там кликаем на «Преобразовать». Вы получите файл с расширением docx, все новые функции станут работать без проблем.
В Ворде 2013 проблема решается аналогично, принцип работы не изменился.
Как убрать в ворде режим только для чтения?
Как убрать режим только для чтения в Word 2007?
Чтобы сменить режим открытия документов, снимите флажок с параметра «разрешить запуск в режиме чтения». Для этого зайдите в меню Сервис и выберите команду Параметры. Откроется одноименное диалоговое окно. Перейдите на вкладку Общие и снимите флажок с указанной выше опции.
Почему все документы открываются в ворде только для чтения?
Если Word открывает файлы только для чтения, зайдите в Файл -> Параметры -> Центр управления безопасностью -> Параметры блокировки файлов. … Если и после этого Word открывает файлы только для чтения, попробуйте заново провести активацию вашей копии Office.
Почему файл открывается только для чтения?
Предоставление важным или личным файлам атрибута «только для чтения» помогает защитить их от случайных или неавторизованных изменений. Если файл имеет атрибут «только для чтения», его нельзя изменить. Щелкните правой кнопкой мыши файл, которому нужно предоставить атрибут «только для чтения», и выберите пункт Свойства.
Как убрать режим только для чтения в презентации?
Чтобы отменить защиту презентации в последних версиях Microsoft Office Power Point, зайдите в меню «Файл» — оно скрыто за кнопкой в виде логотипа Windows. Откройте раздел «Сведения» — «Защитить документ» — «Ограничить редактирование». Выберите опцию «Отключить защиту». Подтвердите свой выбор нажатием на «ОК».
Как отключить режим только для чтения?
Удаление доступа только для чтения
- Нажмите кнопку Microsoft Office. и выберите команду Сохранить или Сохранить как, если вы раньше уже сохраняли документ.
- Щелкните Сервис.
- Щелкните Общие параметры.
- Снимите флажок рекомендовать доступ только для чтения.
- Нажмите кнопку «ОК».
- Сохраните документ.
Как убрать режим для чтения?
Отключение автоматического открытия режима чтения в полноэкранном режиме
- Пока документ открыт в полноэкранном режиме чтения, нажмите кнопку Параметры просмотра.
- Нажмите кнопку открыть вложения в полноэкранном режиме, чтобы отключить эту функцию, а затем нажмите кнопку Закрыть , чтобы вернуться в режим разметки.
Как в Экселе убрать режим только для чтения?
Примечание: Снять статус «Только для чтения» может владелец файла или пользователь, имеющий разрешение «Запись».
- Откройте средство поиска и выберите книгу, которую вы больше не хотите использовать для чтения.
- Во всплывающем меню действие нажмите кнопку получить информацию.
- На панели Общие снимите флажок Заблокирован.
Что означает только для чтения?
Ответ: Файлы «только для чтения» («read-only») могут быть открыты, но не могут быть отредактированы. Они обычно используются в качестве шаблонов для создания новых файлов. Так как файлы «только для чтения» не могут быть изменены, они часто выступают в качестве модели или основы для создания нескольких похожих файлов.
Как снять режим только для чтения Excel 2010?
Очистка состояния книги только для чтения
- Откройте Finder и выберите книгу, которая вы хотите защитить.
- В меню «Файл» выберите пункт «Получить сведения».
- На панели Общие снимите флажок Заблокирован.
Как установить атрибут файла только чтение?
Щелкните правой кнопкой мыши по файлу, атрибуты которого вы хотите изменить на Только чтение. В контекстном меню выберите вкладку Свойства. В появившемся окне «Свойства» установите флажок «Только чтение» в разделе «Атрибуты» на вкладке «Общие». Нажмите Применить и затем – ОК.
Как сделать файл только для чтения Эксель?
Сохранение в файле, доступном только для чтения
- Нажмите кнопку Microsoft Office. и выберите команду Сохранить или Сохранить как , если вы раньше уже сохраняли документ.
- Щелкните Сервис .
- Щелкните Общие параметры .
- Установите флажок рекомендовать доступ только для чтения .
- Нажмите кнопку «ОК».
- Сохраните документ.
Как разрешить редактирование в Power Point?
Открываем файл презентации с помощью Microsoft Office PowerPoint. Возможен такой вариант, что изначально программа откроет файл в режиме защищенного просмотра (без возможности редактирования). Тогда в верхней части экрана появится желтая панель с предупреждением и кнопкой «Разрешить редактирование».
Как запретить редактирование в презентации?
В открытой презентации выберите вкладку Файл > Сведения > Защитить презентацию. Пометить как окончательный. Запрет на изменение документа.
Как поставить защиту на презентацию?
Добавление защиты паролем для файла
- На вкладке Файл выберите пункт Сведения.
- Выберите защитить презентацию > зашифровать с помощью пароля.
- В поле Password (пароль ) введите пароль, который вы хотите использовать. …
- PowerPoint предложит вам подтвердить пароль, введя его еще раз.
Как убрать режим только чтение Word 2016?
Как в ворде убрать режим только для чтения?
Чтобы выйти из режима чтения, нажмите Вид > Редактировать документ. В дополнение к часто используемым элементам управления для чтения можно увеличивать и уменьшать масштаб изображений и других объектов, разворачивать и сворачивать разделы, а также смотреть внедренные видео.
Как изменить режим только для чтения?
Если файл имеет атрибут «только для чтения», его нельзя изменить.
- Щелкните правой кнопкой мыши файл, которому нужно предоставить атрибут «только для чтения», и выберите пункт Свойства.
- На вкладке Общие установите флажок Только чтение и нажмите кнопку ОК
Как убрать режим чтения в Ворде 2016?
Отключение автоматического открытия режима чтения в полноэкранном режиме
- Пока документ открыт в полноэкранном режиме чтения, нажмите кнопку Параметры просмотра.
- Нажмите кнопку открыть вложения в полноэкранном режиме, чтобы отключить эту функцию, а затем нажмите кнопку Закрыть , чтобы вернуться в режим разметки.
Как сделать документ Word доступным для редактирования?
На вкладке Рецензирование в группе Защитить нажмите кнопку Защитить документ и выберите пункт Ограничить форматирование и редактирование. В области Ограничения на редактирование установите флажок Разрешить только указанный способ редактирования документа.
Как убрать режим только для чтения в Word 2007?
Удаление доступа только для чтения
- Нажмите кнопку Microsoft Office. и выберите команду Сохранить или Сохранить как, если вы раньше уже сохраняли документ.
- Щелкните Сервис.
- Щелкните Общие параметры.
- Снимите флажок рекомендовать доступ только для чтения.
- Нажмите кнопку «ОК».
- Сохраните документ.
Как отключить режим для чтения?
Чтобы отключить эту функцию, откройте окно «Свойства» браузера Chrome.
…
1] Через настройки
- Обновите Google Chrome до последней версии.
- Откройте диалоговое окно «Свойства Google Chrome».
- Включите режим чтения, добавив команды в поле «Цель».
- Отключите режим чтения, удалив команду из поля «Цель».
Как изменить режим только для чтения на флешке?
Перейдите в «Мой компьютер», кликните правой кнопкой мыши по иконке подключённой флешки и нажмите на «Свойства». В появившемся окне уберите галочку с пункта «Только для чтения». Нажмите «Применить» или ОК и закройте окно.
Как в ворде изменить режим чтения на рабочий режим?
Чтобы включить режим чтения для текущего документа, откройте вкладку Вид (View). В разделе Режимы просмотра (Views) нажмите Режим чтения (Read Mode). Замечание: Кроме этого, Вы можете включить режим чтения, кликнув иконку в виде книги в правой части строки состояния в самом низу окна Word.
Что делать если документ открывается только для чтения?
Если Word открывает файлы только для чтения, зайдите в Файл -> Параметры -> Центр управления безопасностью -> Параметры блокировки файлов. … Если и после этого Word открывает файлы только для чтения, попробуйте заново провести активацию вашей копии Office.
Как убрать режим только для чтения в Excel?
Удаление доступа только для чтения
- Нажмите кнопку Microsoft Office и выберите команду Сохранить или Сохранить как, если вы раньше уже сохраняли документ.
- Щелкните Сервис.
- Щелкните Общие параметры.
- Снимите флажок рекомендовать доступ только для чтения.
- Нажмите кнопку «ОК».
- Сохраните документ.
Как отключить режим чтения на айфоне?
Как исключить сайты из «Автоматического режима чтения» в iOS 11 на iPhone или iPad
- Нажмите и удерживайте значок «Режим чтения» (даже если страница уже загрузилась в этом режиме).
- Выберите опцию «Не использовать на «название сайта»».
Что делать Если Ворд не дает редактировать документ?
Что делать, Microsoft Word не будет редактировать документы
- Разблокировать документ из Свойства
- Используйте Word Online.
- Проверьте, используете ли вы пробную версию
- Используйте Отменить (CTRL + Z)
- Назначить разрешения/Снять защиту
- Проверьте, открыт ли или используется документ у другого пользователя
Почему я не могу редактировать текст в ворде?
Текстовый документ не редактируется по двум причинам: включён режим ограниченного функционала (документ ранее был создан в версии «Ворда» ниже, чем у вас) либо на документе была ранее установлена защита (запрет на редактуру). … Во втором после запуска документа у вас появится панель справа «Ограничить редактирование».
Как создать ворд документ с общим доступом?
Нажмите Файл > Общий доступ > Предоставить доступ другим людям (или Пригласить других пользователей в Word 2013). Введите имена или адреса электронной почты пользователей, которым нужно предоставить доступ к документу. Если нужно, выберите Можно редактировать или Можно просматривать.