
If you don’t want content reviewers to accidentally modify your document, you can make the document read only before sending it for review. Another method is to restrict formatting and editing.
Making your document a read-only file means that the document can be read or copied but not modified. If one of the reviewers tries to make changes to a read-only file, the changes can be saved only by giving the document a new name or saved to a new location.
Note: Making your document read only doesn’t prevent someone from making a new copy of the document and saving it with a different name or in a different place.
Restrict editing
You can restrict the editing of a document, so that the document opens in view-only mode.
-
Select File > Info.
-
Select Protect Document.

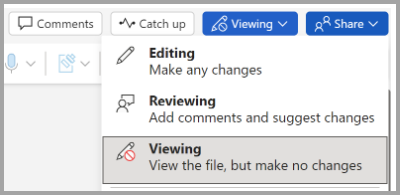
Change the viewing mode
You can switch from View only to other modes granted by the document owner (Editing, Reviewing).
-
Select the Viewing tab to open the options.
-
Select Editing or Reviewing.
Note: The only options that can be selected are the one(s) that the document owner has granted.
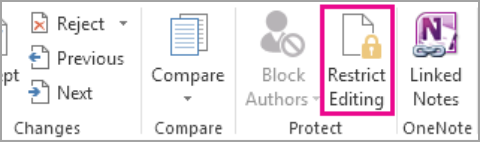
Restrict editing
-
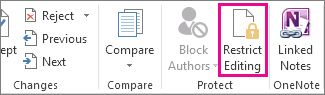
Click Review > Restrict Editing.

-
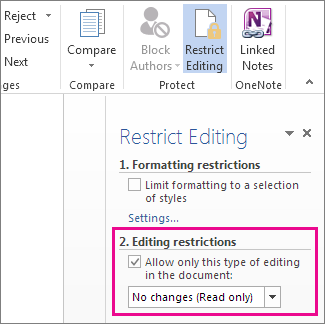
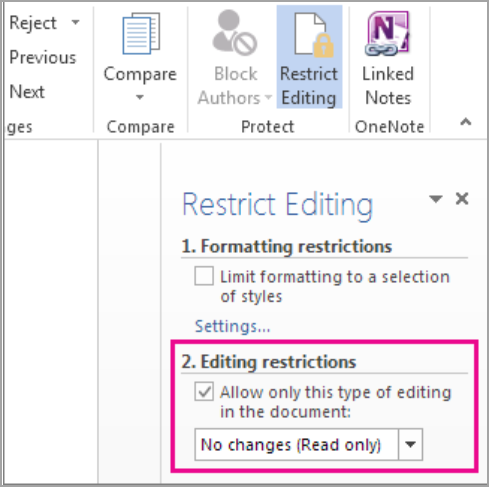
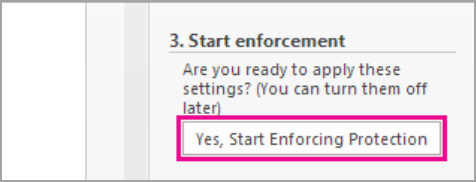
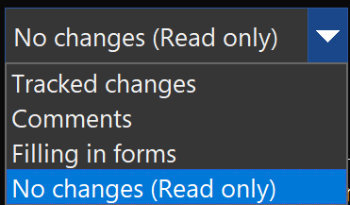
Under Editing restrictions, check Allow only this type of editing in the document, and make sure the list says No changes (Read only).
-
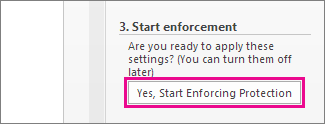
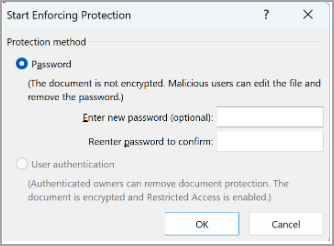
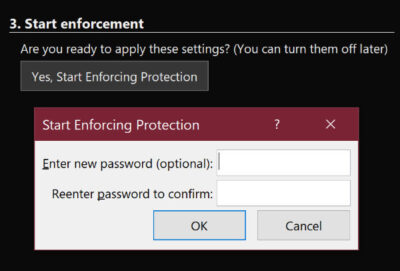
Click Yes, Start Enforcing Protection.
-
In the box that opens, type a password you’ll be able to remember, and then type the password again to confirm it.
The password’s optional. But if you don’t add a password, anyone can click Stop Protection and edit the document.
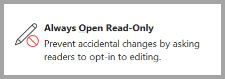
Set to ‘Always open as Read-Only’
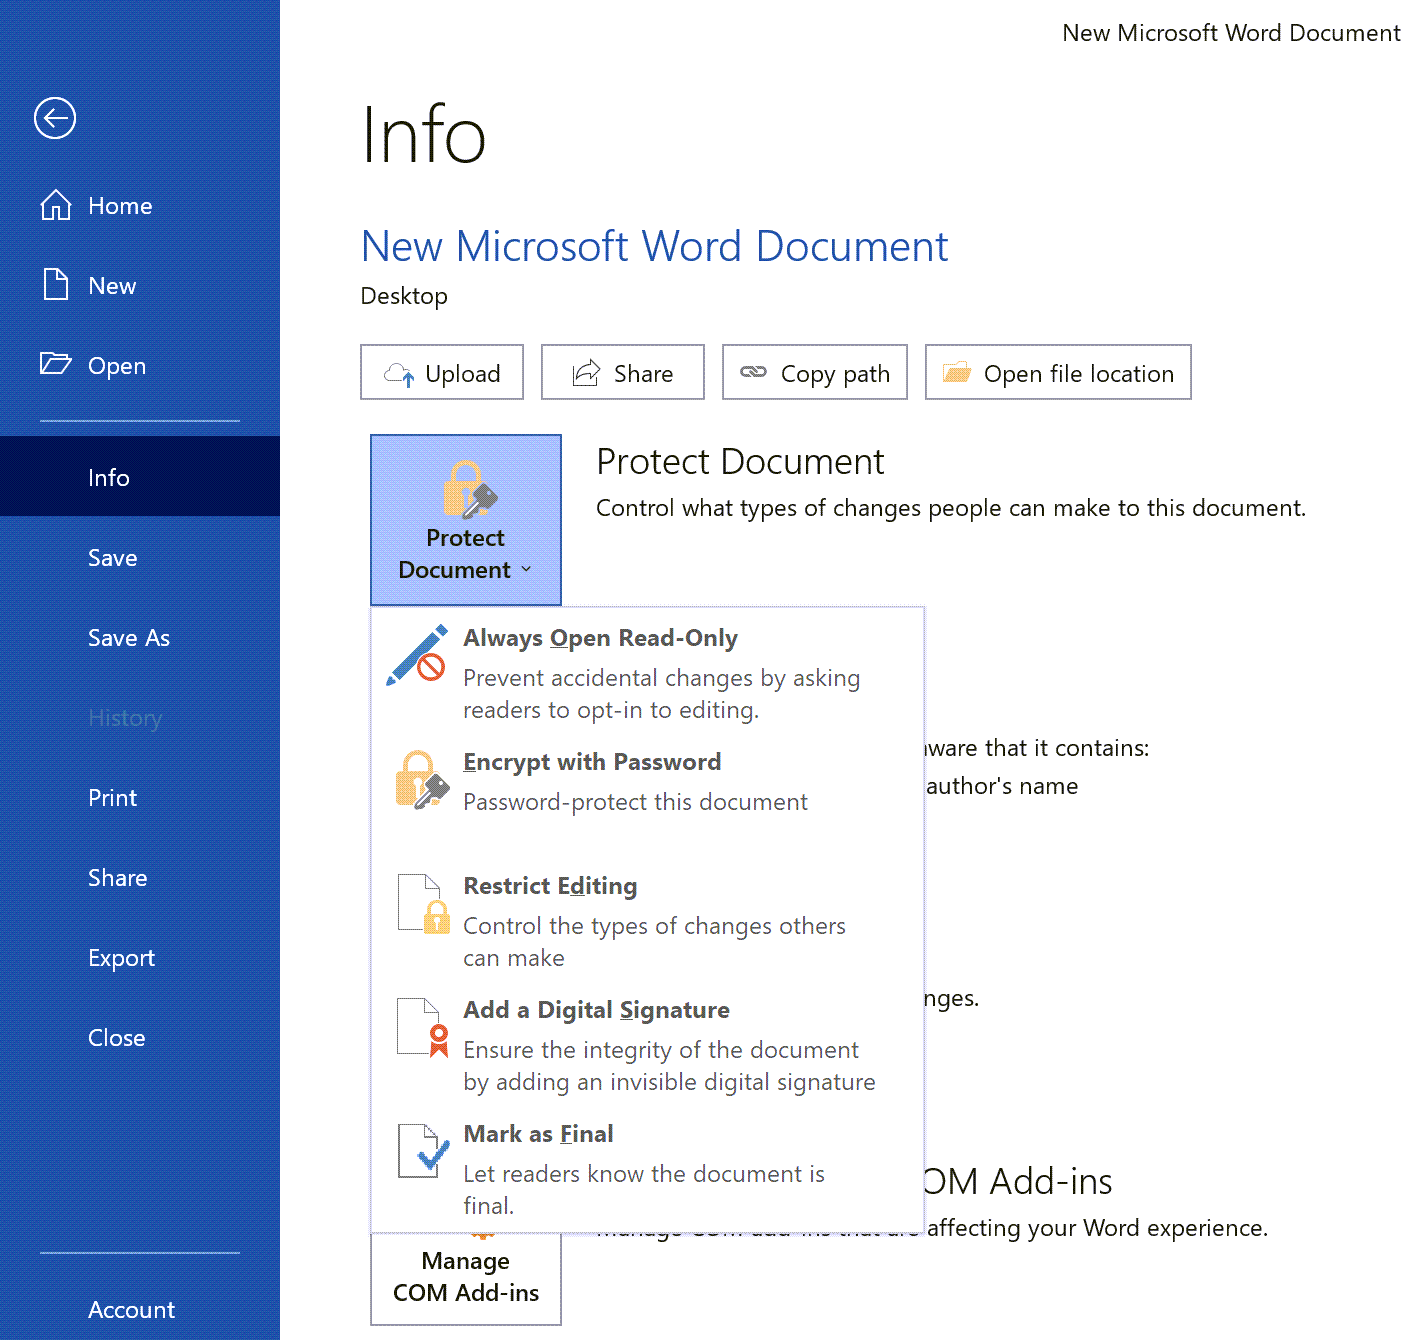
1. Select File > Info > Protect Document.
2. Select Always open Read-Only.
Open a document shared as read only
When you open a document that is shared as Read Only, you have two options.
To open the document as read only
Select Yes
To open the document in editing mode
Select No
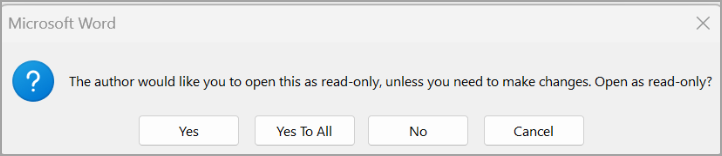
Note: You can close and reopen the document or save a copy of the document to open in edit mode.
Restrict Editing
-
Click Review > Protect > Restrict Editing.
-
Under Editing restrictions, select Allow only this type of editing in the document, and make sure the list says No changes (Read only).
-
Select Yes, Start Enforcing Protection.
-
In the box that opens, type a password you’ll be able to remember, and then type the password again to confirm it. The password is optional. But if you don’t add a password, anyone can select Stop Protection and edit the document.
See also
Add or remove protection in your document, workbook, or presentation
Save as read only
-
Click the Microsoft Office Button
, and then click Save or Save As if you have previously saved the document. -
Click Tools.
-
Click General Options.
-
Click the Read-only recommended check box.
-
Click OK.
-
Save the document. You might need to save it as another file name if you have already named the document.
 , and then click Save or Save As if you have previously saved the document.
Remove read only
-
Click the Microsoft Office Button
, and then click Save or Save As if you have previously saved the document. -
Click Tools.
-
Click General Options.
-
Clear the Read-only recommended check box.
-
Click OK.
-
Save the document. You might need to save it as another file name if you have already named the document.
Top of page
Restrict formatting and editing
You can stop content reviewers from accidentally modifying your document when you restrict formatting and editing.
-
On the Review tab, in the Protect group, click Protect Document.
-
Under Restrict Reviewing Options, click Restrict Formatting and Editing.
-
In the Restrict Formatting and Editing task pane, under Formatting restrictions, Editing restrictions, and Start enforcement, make the selections that meet your formatting and editing needs.
Unrestrict formatting and editing
-
On the Review tab, in the Protect group, click Protect Document.
-
To clear the check mark, click Restrict Formatting and Editing under Restrict Reviewing Options.
Top of page
![]()
Download Article
![]()
Download Article
Is your Word document opening in read-only mode? You’ll need to turn off this protected view mode before you can make changes to the file. Fortunately, this is really easy to do! This wikiHow article will walk you through changing a read-only Microsoft Word document into one that’s unlocked and ready to edit.
Things You Should Know
- Word files may be read-only due to Protected View, password protection, or file permissions in Windows or macOS.
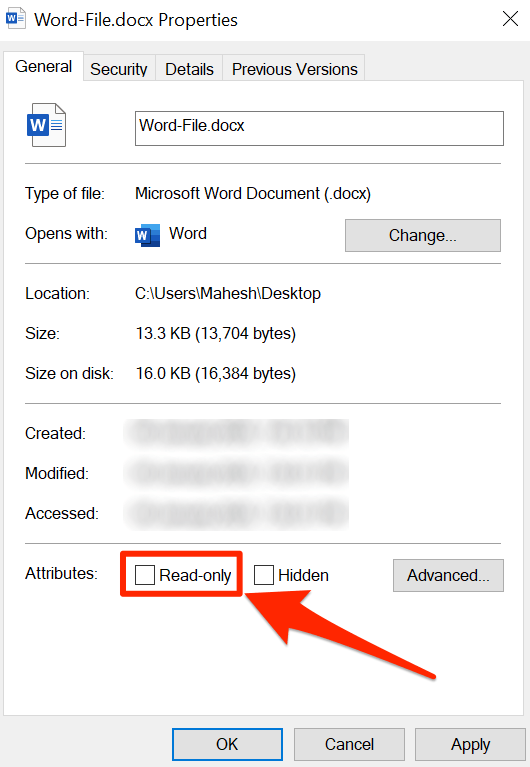
- If you’re using Windows, right-click the file, select «Properties,» click the «Properties» tab, then remove the Read-only attribute.
- On a Mac, click the file, go to «File» > «Get Info» > «Sharing & Permissions,» and allow «Read & Write» permission.
-
1
Understand which documents are likely to be protected. Any Microsoft Word document which you download from the Internet (e.g., an email attachment or a file from a website) will have read-only protection assigned to it whenever you open it. You can disable this protection when first opening the document.
-
2
Open the Word document. Double-click the Word document for which you want to remove the read-only protection.
- If the Word document is currently open, close it and re-open it.
Advertisement
-
3
Look for a pale yellow banner. If you see a yellow banner with the phrase «Files from the Internet can contain viruses» written across the top of the Word document, your document qualifies to have its read-only status removed using this method.
- If you don’t see this banner even after closing and re-opening the Word document, try one of the other methods in this article.
-
4
Click Enable Editing. This button should be on the right side of the banner. Doing so will refresh the Word document and remove the read-only protection. You should now be able to edit the document.


Advertisement
-
1
Open the Word document. Double-click the Word document from which you want to remove the protection. It will open in Word.
-
2
Click the Review tab. This tab is in the upper-right corner of the Word window. Doing so opens the Review toolbar at the top of the Word window.
-
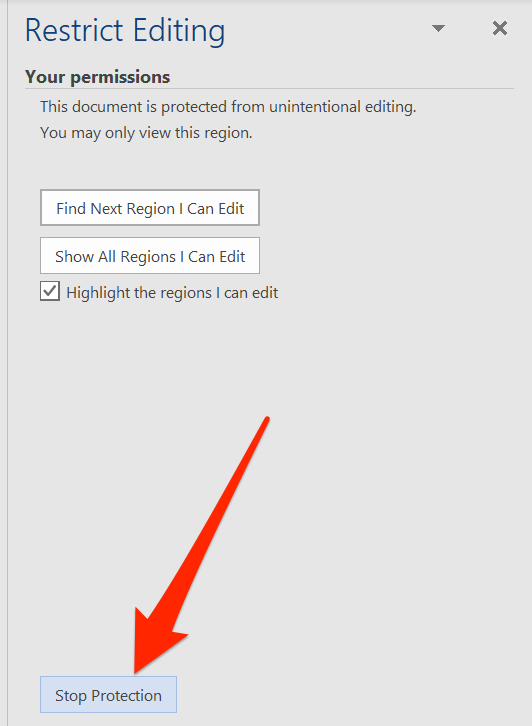
3
Click Restrict Editing. You’ll find this option on the far-right side of the Review toolbar. Clicking it prompts a pop-out menu to appear on the right side of the window.
-
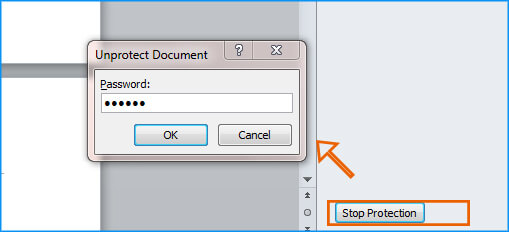
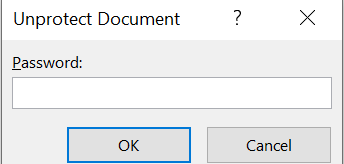
4
Click Stop Protection. It’s at the bottom of the pop-out menu. You should see a pop-up window appear at this point.
- If you or another user on your computer’s account created the protection without a password, clicking Stop Protection will automatically remove the protection.
-
5
Enter the password when prompted. Type the document’s password into the «Password» text box, then click OK. This will immediately remove the Word document’s read-only lock if the password is correct.
- If you don’t know the password, you’ll have to copy and paste the file’s contents instead.
-
6
Save your changes. Press Ctrl+S (Windows) or ⌘ Command+S (Mac) to do so. From now on, the file won’t be read-only protected unless you re-enable editing protection.


Advertisement
-
1
Go to the Word document. Find the folder in which the Word document is stored.
- If the file isn’t actually on your computer (e.g., it’s on a flash drive or a CD), move the file onto your computer before proceeding.
-
2
Open the Word file’s properties. This will vary depending on your computer’s operating system:
- Windows — Click once the Word file, right-click the Word file, and click Properties in the drop-down menu.
- Mac — Click the Word file, click the File menu item in the top-left side of your Mac’s screen, and click Get Info.
-
3
Find the «Permissions» section. On a Windows computer, you’ll find the proper options in the «Attributes» section near the bottom of the Properties window.
- On a Mac, you’ll have to click the Sharing & Permissions heading near the bottom of the window.
-
4
Disable the read-only protection. Again, this process will differ depending on whether you’re using Windows or a Mac:
- Windows — Uncheck the «Read-only» box near the bottom of the window, click Apply, and click OK.
-
Mac — Click the Read option to the right of your name, then click Read & Write in the menu which appears.
- You may first have to click the lock in the bottom-left corner of the Get Info window and then enter your Mac’s password before you can do this.
- If this option is greyed out, unchecked, or otherwise not set to «Read-only», you’ll have to try copying and pasting instead.
-
5
Try to edit the file. Open the Word document by double-clicking it, then try to edit it. Keep in mind that you may first have to remove the online read-only lock before doing so.


Advertisement
-
1
Understand how this works. If your primary goal is to edit the Word document, you can copy the Word document’s text and paste it into a new Word document and then save the new document onto your computer. While doing this won’t remove the read-only protection from the original document, it will create an editable copy.
-
2
Open the protected Word document. Double-click the Word document to do so.
-
3
Click anywhere on the document. This will place your mouse cursor on the document’s page.
-
4
Select the whole document. Press either Ctrl+A (Windows) or ⌘ Command+A (Mac) to do so. You should see the entire document become highlighted.
-
5
Copy the selected text. Press either Ctrl+C (Windows) or ⌘ Command+C (Mac). This will copy the document’s text to your computer’s clipboard.
-
6
Open a new Word document. Click File in the upper-left side of the Word window, click New on the left side of the window, and click Blank document to open a blank Word document.
- On a Mac, click the File menu item, then click New Blank Document at the top of the drop-down menu.
-
7
Paste in the copied text. Press either Ctrl+V (Windows) or ⌘ Command+V (Mac) to paste the locked Word document’s text into the blank document.
- This may take a few seconds if the original document was particularly large or contained images.
-
8
Save the document as a new file. Press Ctrl+S (Windows) or ⌘ Command+S (Mac), then enter your document’s name and click Save. You’ll be able to edit the document you just created like usual.


Advertisement
Add New Question
-
Question
My documents are in Microsoft Office as PDF files and they are read only. How do I turn read only off?

Save it as a new document, delete the old one, and rename the new one. This should allow you to edit it.
Ask a Question
200 characters left
Include your email address to get a message when this question is answered.
Submit
Advertisement
Video
-
Another way to remove the read-only protection from a Microsoft Word document is by converting the Word document into a PDF with the SmallPDF online converter, downloading the converted PDF, and then converting the PDF back into a Word document with SmallPDF.
Thanks for submitting a tip for review!
Advertisement
-
It’s much easier to copy the protected document’s text and paste it into a new document than it is to try to crack Microsoft’s security.
Advertisement
About This Article
Article SummaryX
1. Open the document in Word.
2. Click Enable Editing.
Did this summary help you?
Thanks to all authors for creating a page that has been read 978,826 times.
Is this article up to date?
Have you ever had a document that you can’t edit, or one in which you can modify it but not save the changes to the original files, leaving you with only the option of saving it as a new file? You might be wondering why this happens. As for what causes a Word document to become ‘read-only’?
Situations like this mostly happen due to multiple reasons:
- A Word document is downloaded directly off the internet, such as an email attachment. Their read-only setting is set by default in MS Word to protect your computer, but you have the option of changing it yourself manually if needed.
- Because of some settings by you or someone else. This is a normal situation too. For example, if you are not the only user who can log in on a computer, others might have made some settings for your Word document, or someone gave you a file with editing restrictions. These restrictions can be easily removed.
- The Word document is saved in an unsafe folder (you can change its location).
- Your antivirus software protects you from potentially opening unsafe files, thus making the document read-only (you can add the file or folder to the exclusion list).
- OneDrive is full (you can check the amount of used space).
- MS Office is not activated (check your account and license status).
To edit and save a Word document that’s in a read-only mode, you need to know how to change the file back to normal. In this article, you’ll learn effective solutions to solve Word document read-only problems.
Disable the “Read-Only” Command in Word Document
The “Read-Only” command is for preventing unintended changes in a Word file. Word files with Read-Only attributes can be read/opened, renamed, or edited but cannot be saved in the original file.
To disable this command, simply follow the steps below:
Step 1. Right-click the document that is in the read-only mode.
Step 2. Select the “Properties” option.
Step 3. Click “General”.
Step 4. Unchecked “Read-only” then click “OK”.
The Word file should now be savable.
Turn Off “Always Open Read-Only”
If your file is set to “Always Open Read-Only”, this means that you’ll have to see the message and manually select the option each time you open the file. Here‘s how to turn off this setting.
To turn off “Always Open Read-Only”:
Step 1. Open the Word document.
Step 2. Click on the “File” tab in the top left corner of the screen.
Step 3. Select “Info” from the menu that appears.
Step 4. Click on “Always Open Read-Only” in the “Protect Document” drop-down to turn the setting from yellow-highlighted to normal.
Now, the next time you open this document, you will no longer see the message asking if you want to open read-only.
Disable “Restrict Editing” in Word Document
Microsoft Word’s “Restrict Editing” feature allows you to limit the type of edits and formats that can be made to a document, and by whom. This is useful if you want to prevent someone from accidentally making changes to your document or if you need to collaborate on a document with others but only want certain people to be able to make certain changes.
To disable “Restrict Editing” in a Word document:
Step 1. Open the restricted Word document.
Step 2. Click the “File” option.
Step 3. Click the “Info” option.
Step 4. In the Info option, click the “Protect Document” button.
Step 5. Select the “Restrict Editing” option.
Step 6. Now click the “Stop Protection” button. You may need to enter a password.
If you forgot its password, check out this article: How to Unprotect an MS Word Document for Editing. I use Passper for Word whenever I wanted to remove editing restrictions or recover the opening password in a Word doc.
Free Download
Stop “Marked as Final” in a Word Document
Marked as Final is used to protect sent documents. So, if you get a file from someone that is marked as Final, then you might face problems if you try to edit the document.
Step 1. Double-click the Word document to open.
Step 2. At the top of the word document, click “Edit Anyway”.
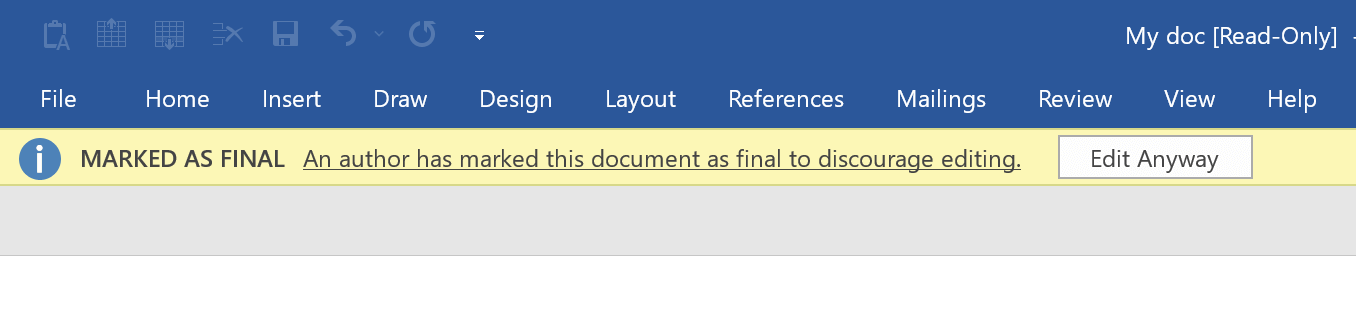
The Word document will refresh and become an editable file.
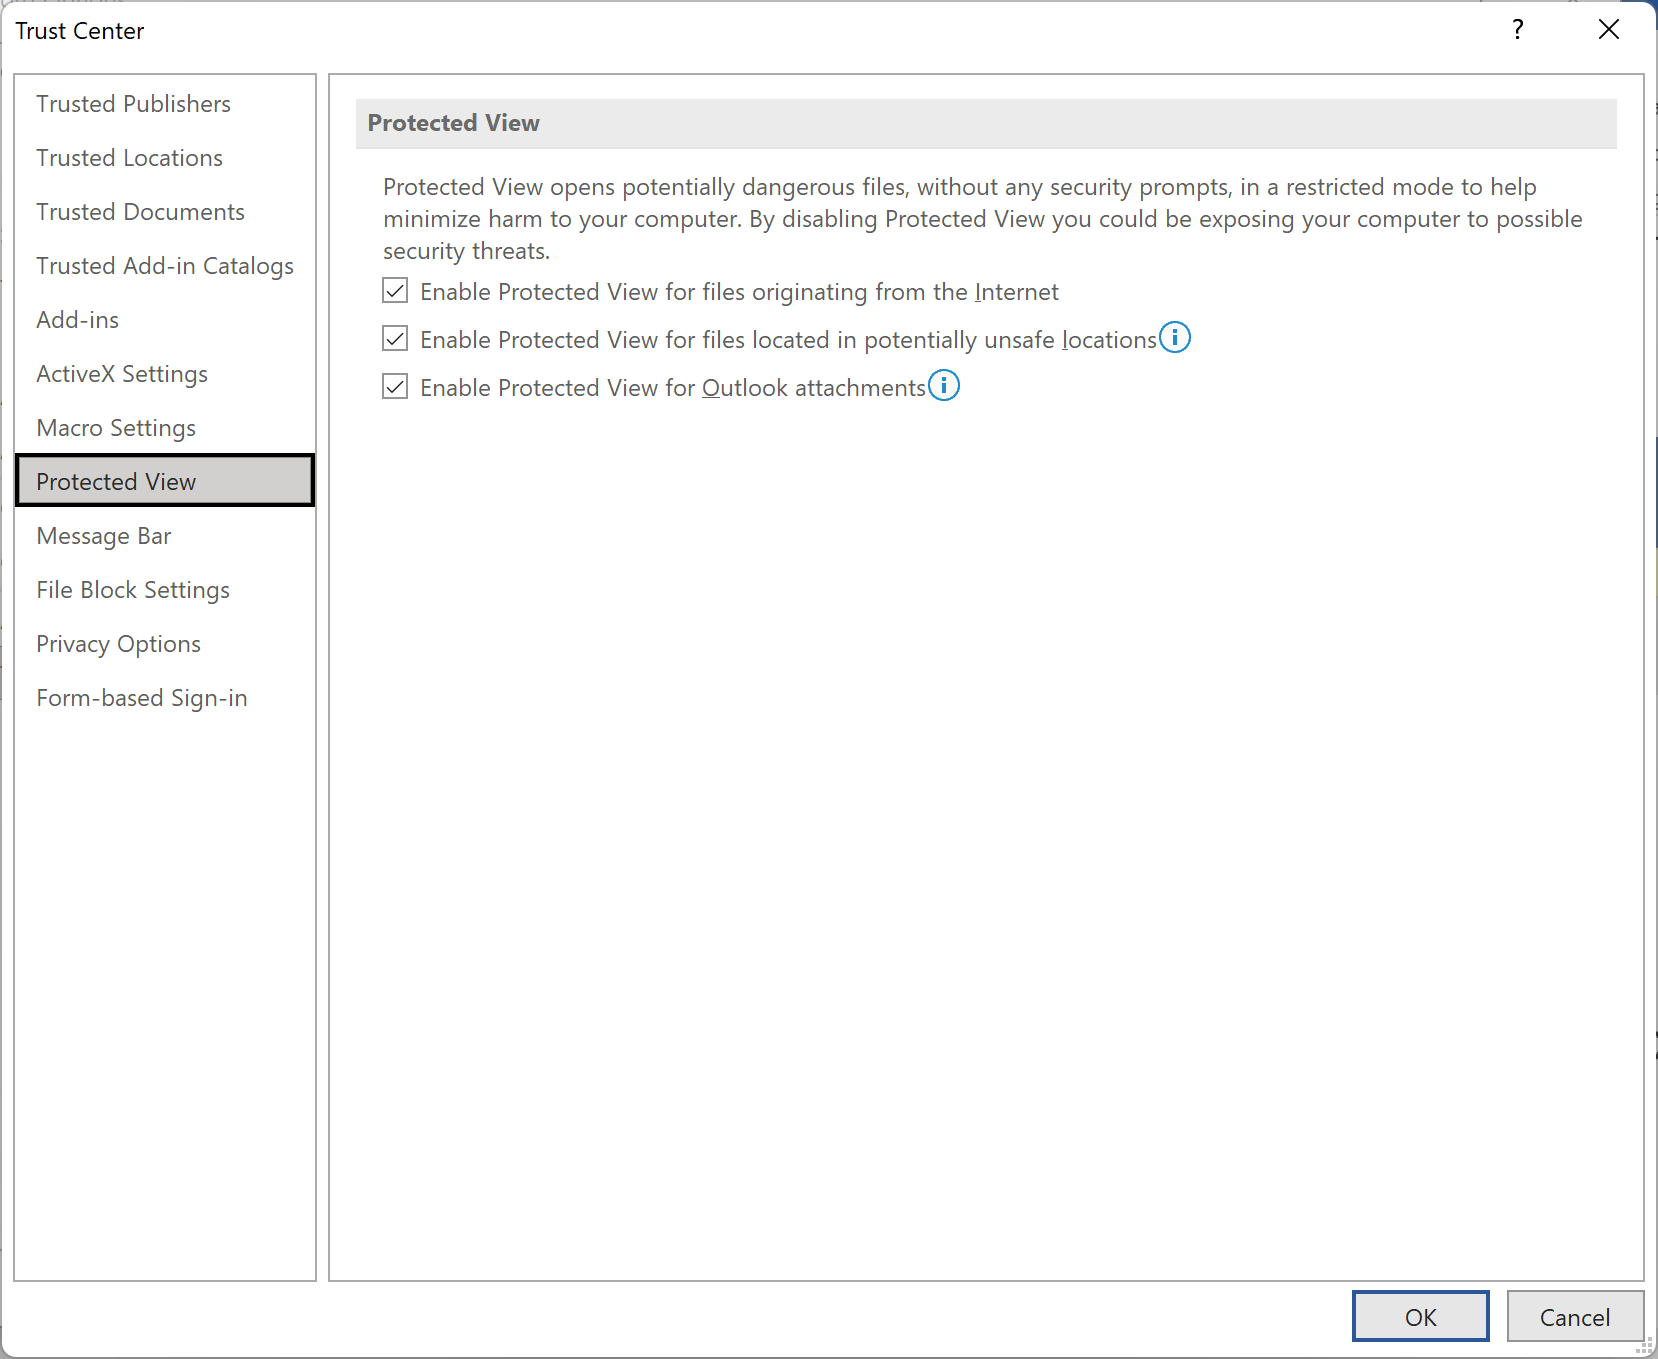
Disable “Protected View” in Word Document
Protected View is a default option for browser-downloaded Word documents and other email attachments. To help avoid putting risk in your computer, these potentially unsafe files are opened in Protected View.
Word files that are in Protected View status have all editing options hidden and disabled. Simply follow the steps below to disable the protected view default.
Step 1. Find the Word document with “Protected View” status and double-click to open.
Step 2. Find and click “Enable Editing”.

The Word document will refresh and will become an editable file together with access to all editing options.
Microsoft Word allows users to turn off Protected View settings in the Trust Center. To do this, open Word and click “File” > “Options” > “Trust Center” > “Trust Center Settings”. In the Protected View tab, uncheck all three options under “Protected View”. This will disable Protected View and allow you to open documents without having to go through the extra step of enabling editing. Keep in mind that disabling Protected View can put your computer at risk for malware and other security threats, so only do this if you trust the source of the documents.
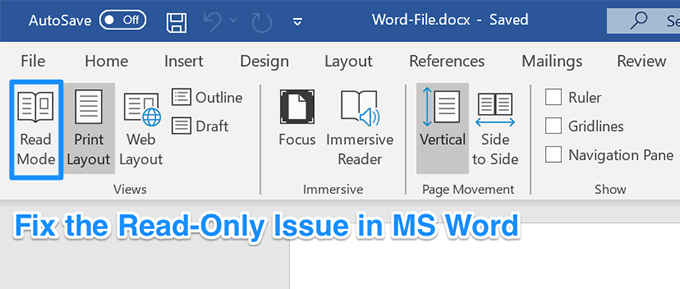
Turn Off “Reading View” in a Word Document
Reading View default is a stripped-down read-only mode and turning it off is simple enough.
Step 1. Click the Word document’s file option.
Step 2. Find and select the “Option” tab.
Step 3. Under the “General” setting, navigate the “Start up options”.
Step 4. Uncheck “Open email attachments and other uneditable files in reading view”.
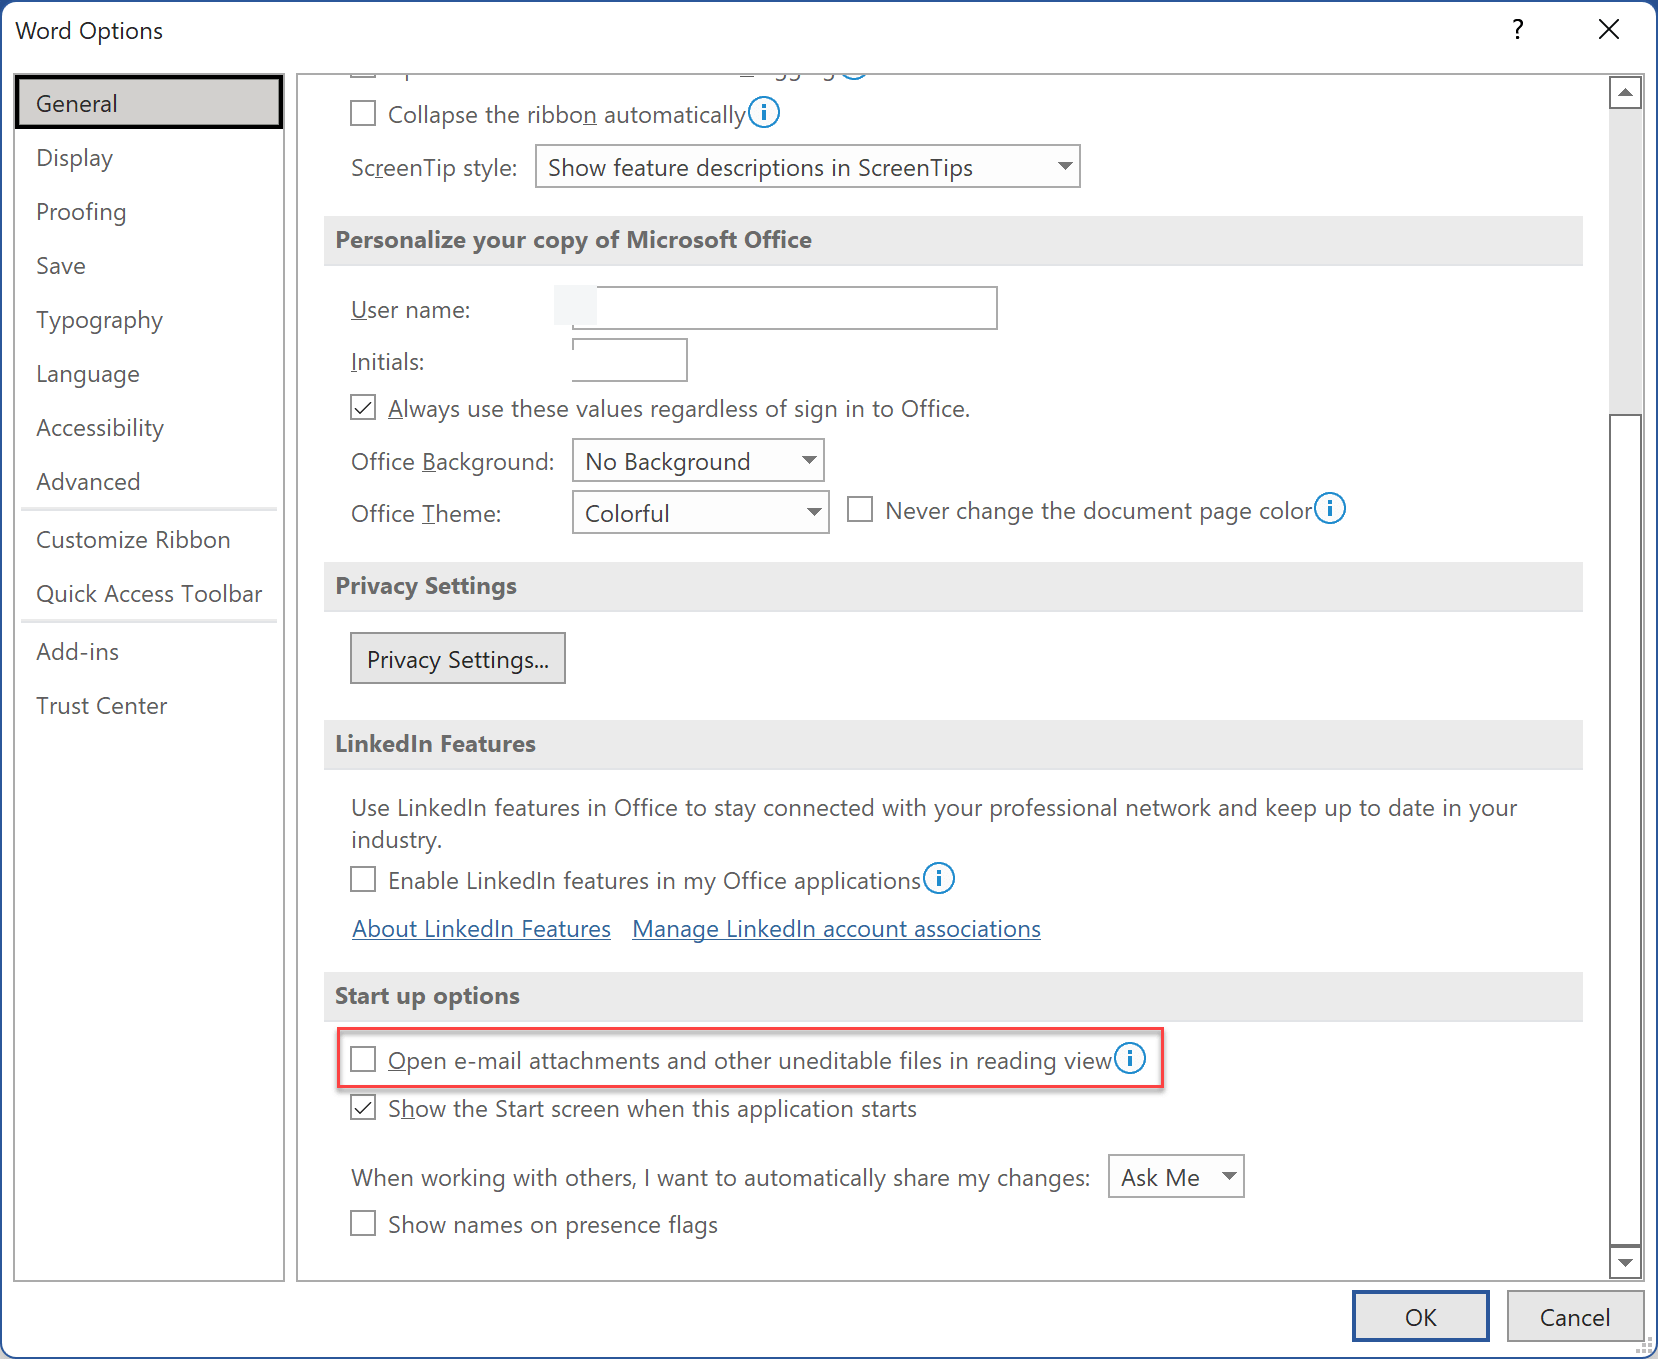
If you’re using Word in reading mode and want to turn it off, there are a couple of ways to do so. You can either change the view to “Print Layout” or “Web Layout”. Or, you can switch the options in the lower right corner of the Word interface.
Copy and Paste a Word Document
Surely, this copy and paste method won’t remove the read-only protection from the original document. However, you can copy the Word document’s text and paste it into a new Word document you can edit.
To create the copy, follow these procedures:
Step 1. Double-click to open the protected Word document.
Step 2. Click the page and Press Ctrl+A to select the entire text.
Step 3. Copy the selected text using the Ctrl+C shortcut.
Step 4. Click File on the upper-left side of the Word.
Step 5. Click New and click Blank document.
Step 6. Paste the copied document into the new Word sheet. Use shortcuts Ctrl+V.
Step 7. Save the copy as a new file. You’ll be able to edit this Word document.
If these solutions fail you and you still can’t save the file, here are other options you can try:
- Check your OneDrive storage space. Full drive storage can hinder you from saving additional documents. Sign in to your OneDrive account and manage your storage.
- Reactivate your MS Office. Expired subscriptions can reduce the functionality mode of the software.
- Save on a different folder. If you’ve been saving your files in a certain folder, try saving them to your Documents folder this time. See if this makes any difference.
- Check if the Word document is in a ZIP file. Make sure that it is not in it.
- Make sure not to open the document in the Preview pane. To check open Windows Explorer and then go to “View” then select “Panes group” and uncheck the “Preview pane”.
- If possible try to set your anti-virus software to not scan Word files.
Conclusion
Each of us has our own preferred type of document for our day-to-day use. But there are also instances where we have to share documents with/from others. So there’s still that chance that you’ll encounter read-only Word files. If that time comes, you can review the solutions in this article to change a word document from being Read-only to a normal one.
If you get a Word document and are unable to edit it, the Word document is in protected mode. Without permission, you can only access as a read only readers. Don’t worry, this article will teach you how to remove read only from Word document and make the Word document editable.
- Method 1: Disable Protected View for the Word Document from the Internet
- Method 2: Change the File’s Properties to Remove Read Only
- Method 3: Remove Editing Restriction Password from Protected Document
- Method 4: Unrestrict Word Document without Password with Third-party Tool
- Method 5: Copy and Paste the Content to New Document for Editing

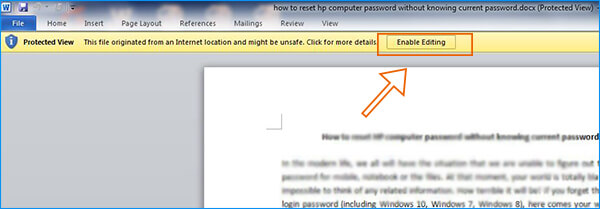
Method 1: Disable Protected View for the Word Document from the Internet
If you get a Word document from the website or email attachment, it is protected with read-only restriction. But you can easily disable the read-only protection when you open the document for the first time.
Step 1: Double click to open the Word document which is downloaded from the internet.
Step 2: On the content interface, you will find there is no way to edit the content or change the layout. On the top of the content interface, you will see a yellow banner that tells the readers the document is in protected view.
Step 3: Click the Enable Editing button on the yellow banner. After that, the read-only protection is removed and you can directly edit the content when you open it next time.
Tips: This method can only apply to the Word document downloaded from the Internet. If your Word file does not have the yellow banner, you can check other ways below.
Method 2: Change the File’s Properties to Remove Read Only
If the Word document is set read-only property, you can easily remove the read-only mode within simple clicks.
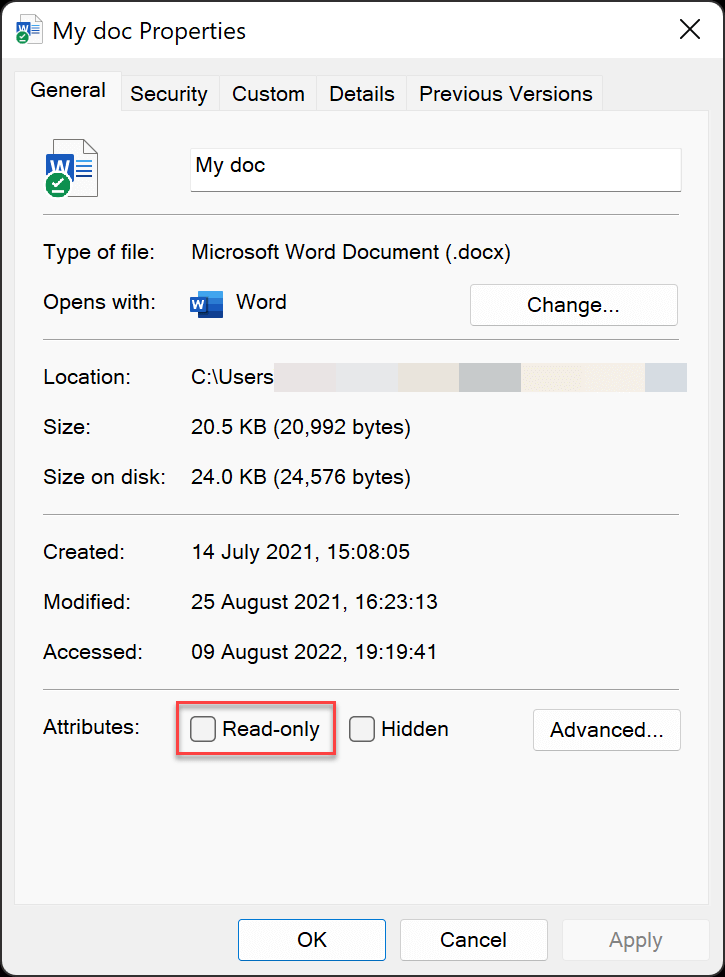
Step 1: Find the Word document in your Windows computer and right-click to choose Properties option from the list.
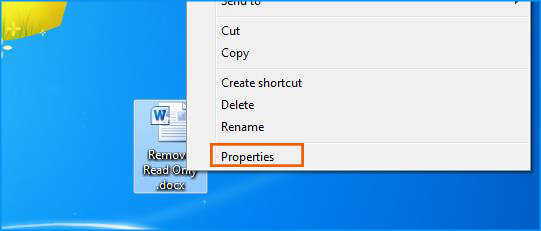
Step 2: In the Properties window, you can find Attributes settings under the General option. Then, uncheck the read only box and click the Apply button and OK button.
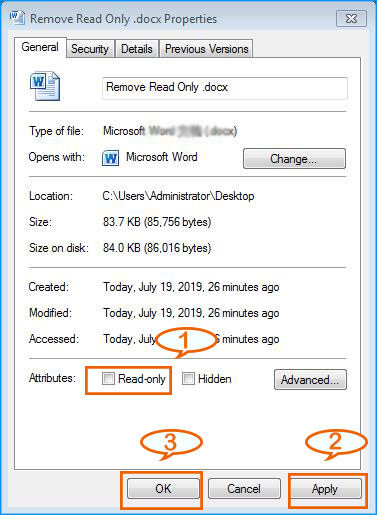
Step 3: Now, the Word file is editable. You can open the Word document and modify the content or layout without restrictions.
Method 3: Remove Editing Restriction Password from Protected Document
In this situation, you need to have the protection password so that you can remove this read-only restriction forever. If you forgot the protection password, you can go to check the last two methods.
Step 1: Double click the Word document with editing restriction which you want to unlock.
Step 2: You have two options here to access Restrict Editing setting. If you fail to find it in Option 1, try another option.
Option 1: Click Review tab and you will find Restrict Editing option.
Option 2: Click File > Info> Protect Document> Restrict Editing.

Step 3: At the bottom of the pop-out menu, you will find the Stop Protection button. Click it and you will see the pop up window which asks you to enter the password. You need to enter the password and click the OK button.
Step 4: The Word Document is editable now. At last, you need to save the changes for this Word document.
Method 4: Unrestrict Word Document without Password with Third-party Tool
If you forgot the Word editing restriction password, you can resort to a third-party tool to unrestrict the Word document. Word Unprotect Genius is used here to help you get out of read only mode in Word. It is convenient to make the read-only Word document unprotected with no data loss. No changes to the original content and 100% safe. This Word read-only remove software supports MS Word 97/2000/2003/2007/2010/2013/2016/2019 (*.doc, *.docx) files.
Step 1: Open Word Unprotect Genius if you have installed it on your computer. If not, you can download here.
Step 2: Add the password-protected Word document by clicking the Add button.
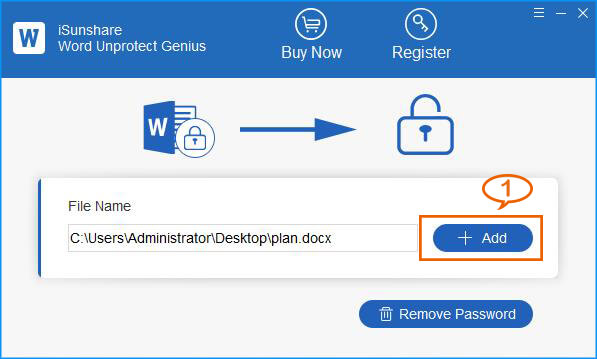
Step 3: Click the Remove Password button and you will get the protected password removed in seconds.
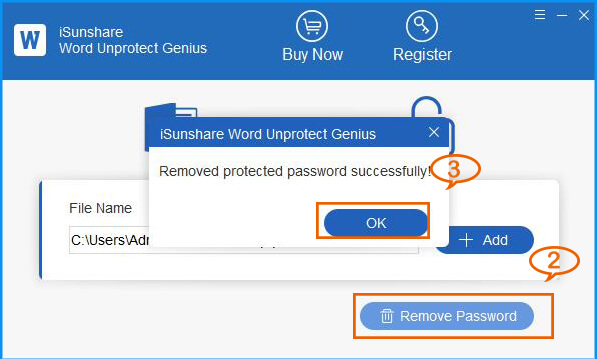
Step 4: After that, you will get the unprotected Word document at the same location of the original read only Word document. And this Word document with “unprotect” suffix is without password restriction. You can directly open and edit as you want.

Method 5: Copy and Paste the Content to New Document for Editing
If you just want to edit the text in read only Word document, you can copy it and paste into a new Word document. But this does not help to remove read only from the original Word document.
Step 1: Double click the protected Word document to open it.
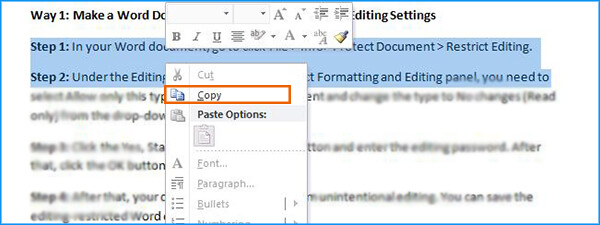
Step 2: Select the texts you want to edit and right-click to choose Copy. Or use the Ctrl +A button on the keyboard to choose all contents.
Step 3: Create a new blank Word document and open it. Then press Ctrl + V button to paste the copied texts into the blank Word document.
Step 4: Next, you can manage the content in your way. Lastly, save the new document with your own name. Then, you can edit this Word document at any time.
Related Articles:
- 8 Methods to Recover Lost Word Document
- How to Unprotect Office 2016 Document
- How to Enable Read-Only Mode in Word Document
- How to Lock Word 2010/2013/2016 Document with Editing Restriction
- 2 Ways to Edit Protected Word Document Without Password
Just want to browse a document, but modify some info without being noticed? Worry about the person who receive the document modifying your efforts? Are you troubled by these things? Actually you can set document as read-only in Word before sending it. Here in this post, I’d like to give a simple guide.
1. Go to File tab and click it in the Ribbon.

2. Click Save As in the left pane, and select This PC in the middle of page,then choose a folder you prefer to save the file.

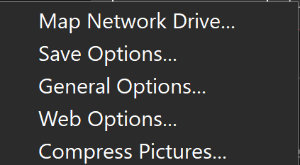
3. The Save As dialog box will display, click the arrow of Tools and choose General Options in the drop-down list.

3. When the window of General Options comes up, just check the box of Read-only recommended and click OK at the bottom to save the settings.


4. The following dialog box will pop up next time when you open the file, click Yes to leave the settings unchanged.
Note: if you want to remove read-only, simply clear the read-only recommended check box of the previous step.

Copyright Statement: Regarding all of the posts by this website, any copy or use shall get the written permission or authorization from Myofficetricks.
If you’ve opened a document in Word but you can’t edit it, it’s probably locked for editing by someone or by a feature. Learning how to remove read only from Word should help you edit these documents even though they’ve been marked as read-only and aren’t supposed to be edited.
There are various reasons as to why people restrict their documents from being edited. Maybe you yourself made the document read-only but you forgot it, or maybe someone has it locked to ensure no unauthorized users can modify the contents of it.
Regardless, if you’ve come across a document that you must edit but it’s in read-only mode, there are various methods to fix it and to be able to edit the document.
Also, be sure to check out our YouTube channel where we made a short video going over the fixes listed in this article.
Remove Read Only From Word By Disabling Edit Restrictions
We’ll start off by disabling the Word’s built-in feature that lets users restrict their documents from being modified. If you or someone has enabled this option for your current document, it is why you can’t edit it.
Disabling the option should fix it for you.
- Open your read-only document in the MS Word program.
- When it opens, find the tab that says Developer at the top and click on it.
- You’ll find several options to choose from on the following screen. Look towards to the Protect area at the top and click on the option that says Restrict Editing.
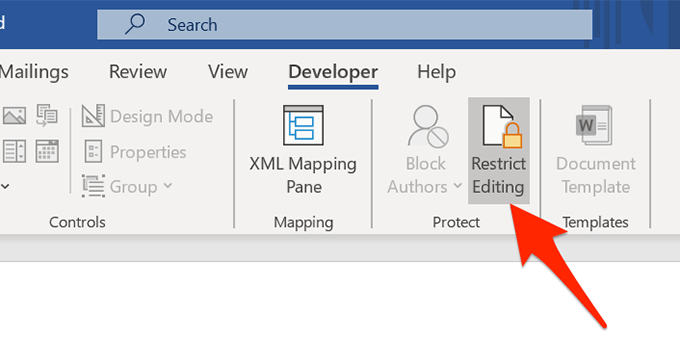
- A new pane will appear on the right-hand side. There’s a button at the bottom of this pane saying Stop Protection. Click on the button to remove read only from this Word document.
- If there was a password setup to restrict editing, you’ll need to enter it on the box shown on your screen. Then click on OK to unlock the document.
Your document is no longer in read-only mode and you can actually modify its contents as you wish.
Turn Off The Trust Center Options To Remove Word Opening In Read Only
Trust Center is a feature in Word that blocks certain documents from being fully opened with editing capabilities on your computer. You can disable the feature in the program and that should fix the read only issue you’re facing with your document.
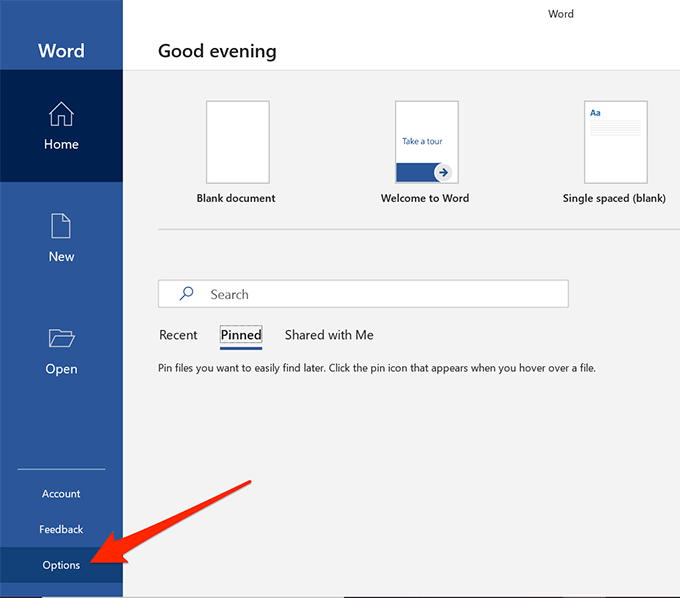
- Launch the MS Word program on your machine.
- At the bottom-left corner of your screen, you’ll find an option that says Options. Click on it to open the standard Word settings menu.

- On the following screen, you’ll find an entry saying Trust Center in the left sidebar. Click on it to open the Trust Center settings.
- You’ll see a button saying Trust Center Settings on the right-hand side pane. Click on it to open the settings menu.
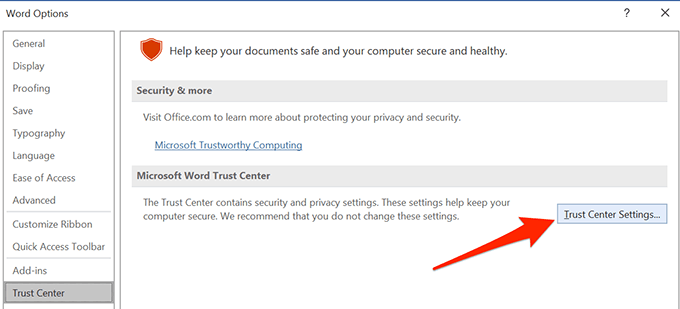
- There’ll be several options in the left sidebar of your screen. Find and select the one that says Protected View.
- On the right-hand side pane, you’ll see three checkboxes that are enabled. Untick each of these boxes to prevent Word from opening your documents in the protected view. Then click on OK at the bottom to save your changes.

- Launch your document in the program and you should be able to edit it.
Fix The Word Opening In Read Only For Email Attachments
MS Word actually has a number of features to protect you from various threats that are spread via Word files. One of these features opens your email attachments in the read-only mode so it can’t affect your computer negatively.
This may be the reason why your documents always open in the read-only mode. Turning this option off should fix the issue for you.
- Open MS Word on your computer.
- Click on the Options option at the lower-left corner and it’ll open the settings menu.
- Click on the General tab in the left sidebar if you aren’t already there. Then on the right-hand side menu, scroll down and find the option that says Open e-mail attachments and other uneditable files in reading view.
Untick the box for the option and click on OK to save the changes.
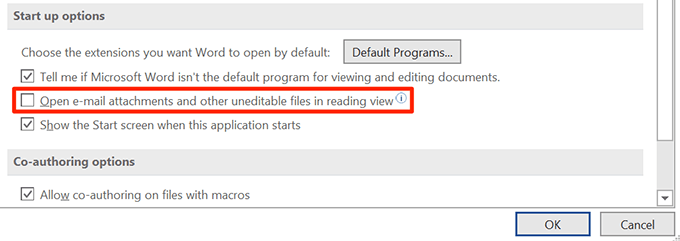
The Word files you’ve received as email attachments should now open in regular mode letting you edit them however you want.
Disable The Preview Pane In File Explorer
Preview pane in Explorer shows the previews of your files, and for it to do that, it sometimes locks-up your files and prevents you from editing them.
A quick solution to that is to simply turn off the pane.
- Open This PC from your desktop.
- Click on the View tab at the very top of your screen.
- Select the option that says Preview pane in the Panes section. It’ll disable the pane if it was enabled before.
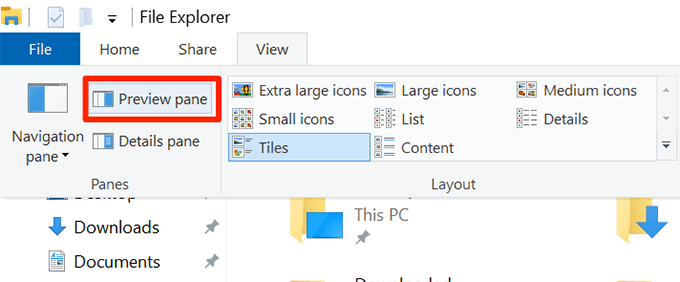
You may now try opening your file in the program to see if it fixed the issue.
Toggle An Option In The Properties To Remove Read Only From Word
One of the possible ways to fix read only mode in Word is to change an attribute for your file.
- Right-click on your Word document and select Properties.
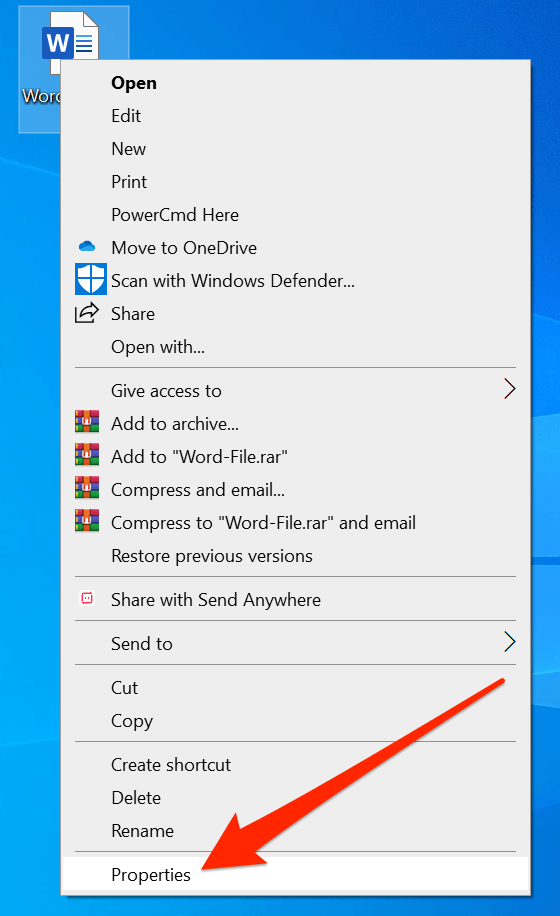
- Tick-mark Read-only and click on OK.
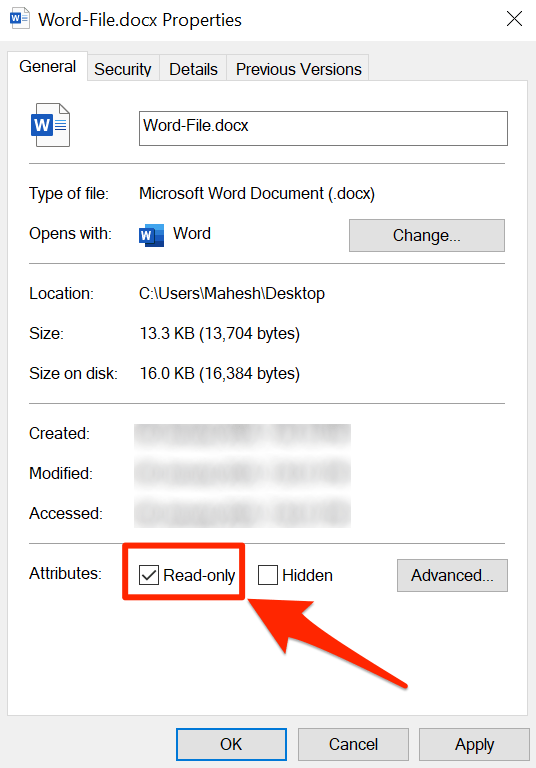
- Open the Properties menu again, untick the Read-only option, and hit OK.
- Open the file in Word and it should let you edit it.
Extract The File Before Opening It In MS Word
If you’re trying to edit a Word file that’s inside an archived format such as RAR or ZIP, you’ll want to first extract the file from it to then edit it. Directly opening the file from an archive sometimes prevents you from editing it.
- Right-click on the archive and select Extract Here.
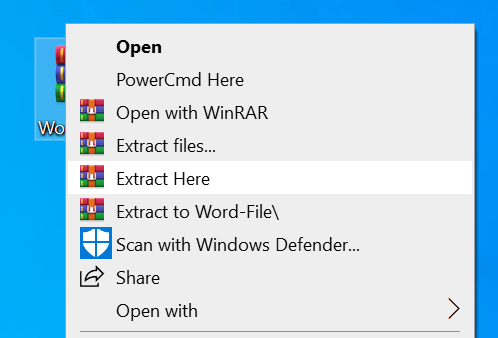
- Open the file in Word and you’ll be able to edit it.
TheTechieSenior.com is reader supported. We may earn a commission if you buy through links on this site. As an Amazon Associate, we earn from qualifying purchases. Learn more here.
Writers often send their works-in-progress to beta readers. Freelance writers may send articles for approval. In either of those cases, it could be appropriate for you to make Word documents Read-only. We’ll show you how. We’ll also show you how to password protect your Word documents.
Table of Contents
What is Read-only in Microsoft Word?
Read-only is a protective measure that you can set for your documents which can deter readers from changing the file without permission.
Document protection in Word for Windows offers similar, but slightly different options than Word for Macs. We’ll look at those differences shortly.
Can Microsoft Word Read-only files be edited?
It is important to understand that setting a document to Read-Only does not prevent that document being edited.
When a Read-only document is first opened on the recipient’s computer, it opens with a bar across the top advising that the document is in Read-only mode.
There is a button in the bar that allows the recipient to open the file with Read-only mode turned off and edit the file.
When you set a document to Read-only, the document that you protect by making it Read-only can’t be edited by anyone but you unless they choose to override the Read-only mode as described above.
Changes can be made if the document is saved under a new file name. Saving under a new name creates a new document. Changes can be made to that copy.
You can password protect the file which will limit those who can edit the file to those who have the password.
You can mark a file as Final, but like Read-only, the recipient can still choose to edit the file.
How to make Word documents read-only
MS Word for Windows and Macs both allow you to apply Read-only protection to your entire document.
You can set a file to be Read-only without requiring a password. Remember, if the document is not password protected, the Read-only setting can be changed by anyone.
Passwords are entirely optional but highly recommended if you want to discourage changes being made to your original file by an unauthorized reader.
In the sections that follow, we’ll look first at Read-only mode in Microsoft Word for Macs, then Ms Word for Windows.
Make Word documents Read-only in Microsoft Word for Macs
The following instructions will help you make a document Read-only in Word for Macs.
With the document open, use either of the following methods.
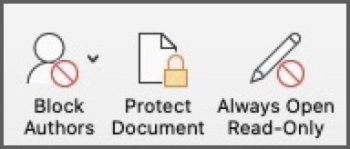
- Open the Review tab.
- In the Protect section (toward the right), click Always Open Read-Only.

- Save the document.
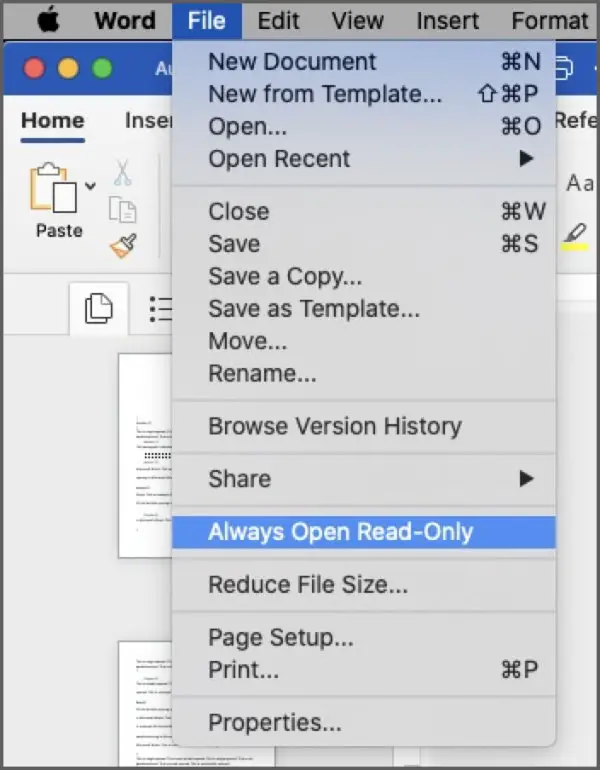
OR
- Open the File Menu.
- Select Always Open Read-Only.
- Save your document.
The next time the document is opened, it should open in Read-only mode.
Password protect a document in Word for Macs
To password protect a document in Microsoft Word for Macs, use either of the following methods to open the Protect Document panel.
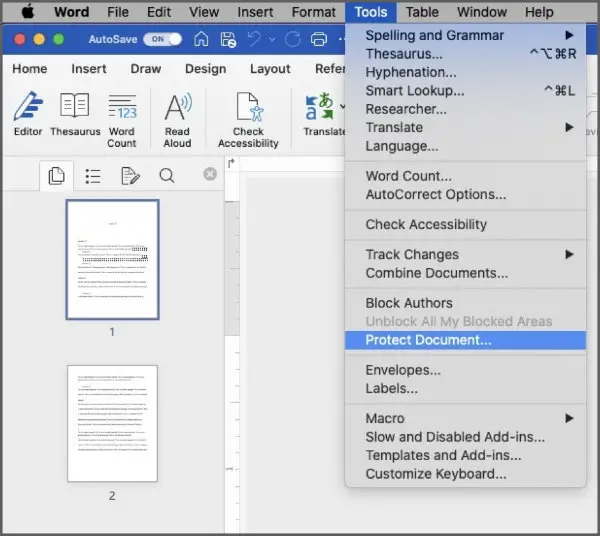
- Open the Review tab.
- Click the Protect Document button.
OR
- Open the Tools menu.
- Select Protect Document….
Either of the above methods will open the same Password Protect settings panel.
- In the first section of the settings panel, type a password in the first box if you want to require a password to open the file.
- Type a password in the second box if you want to require a password to modify the document.
- Click OK.
- Save your document.
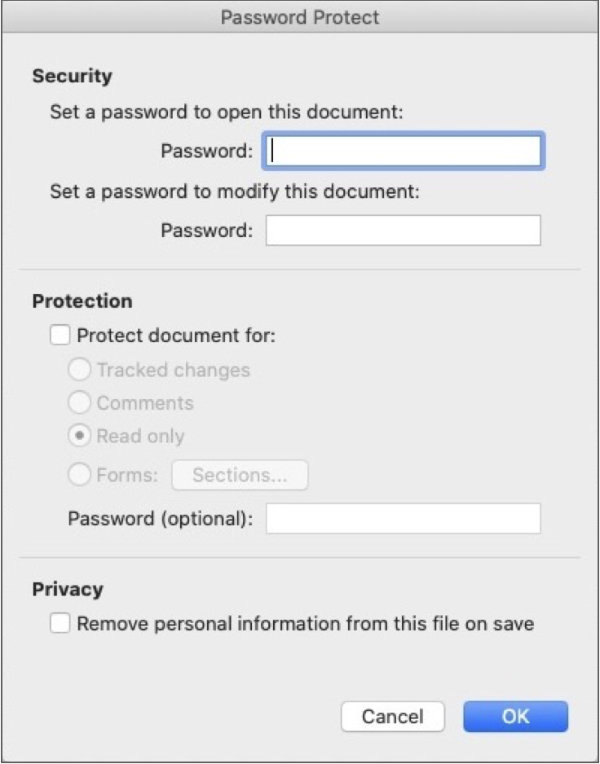
When anyone opens the file, it should require a password to access it. Since you created the password, you will have to provide the recipient of the document with the password.
Make sections of a document Read-only in MS Word for Macs
It is possible to set a document as Read-only, but allow part of the document to be modified.
You might need to leave one part of a document editable if you have a form in a document. Your reader could fill the form in without being able to change the surrounding text.
Another example might be a writer who sends a document out asking for alternate ideas in one paragraph. She could set that one paragraph to be editable and the remainder of the file to be Read-only.
In Word for Macs, that is done through the use of sections.
Divide your document so that the part for which modification is allowed is in a section of its own. If you want non-contiguous paragraphs to be modifiable, place each of those paragraphs in its own section.
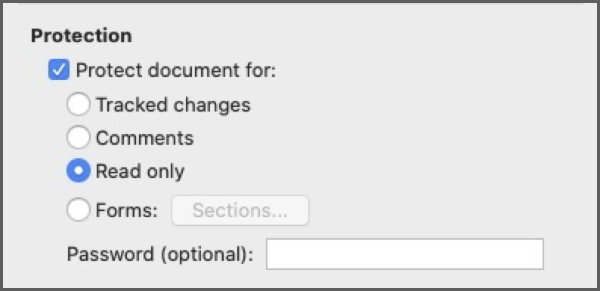
Let’s assume you have set a paragraph in a section of its own. To make that section of a Read-only document editable, first follow the steps above to make the entire document Read-only.
Then, click the Protect Document button in the Review tab.
OR
Select Protect Document… from the Tools menu.
- In the Protection section, check the box labeled Protect document for….
- The last item in that section is Forms with a Sections… button beside it.
- Click the Sections button. Note: If your document has no sections, Forms and the Sections… button will be greyed out and unavailable. If your document includes sections, but no forms, only the Sections button will be active.
- You will see a list of sections in your document. Every section that is checked and highlighted is protected. To make a section editable, uncheck the box next to it. Click the Ok button to save your section selection.
- Fill in the appropriate Password fields if you want your document password protected also.
- Click the next Ok button to save your document protection settings.
- Save your document.
You should now have a document that is Read-only, but with a section that is editable.
If you look closely you will see a thin cursor at the beginning of the unprotected section. If you don’t want to make changes at that point you can move the cursor further into the editable section.
You can click anywhere in the protected document and possibly see your mouse or trackpad cursor flash there and disappear. That is because the only place you can type is inside the unprotected section.
No matter where you think your cursor is outside the editable area, when you start typing, you will notice you are actually typing inside the section you just set as editable.
Make Word documents Read-only in Microsoft Word for Windows
You can use either of the following methods to apply Read-only protection to your document in Word for Windows.
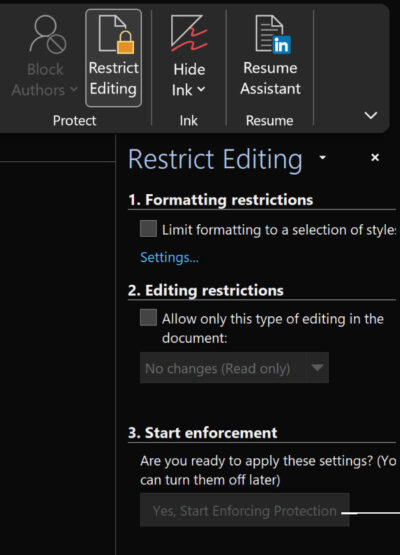
With your document open:
- Open the Review tab.
- Look for Restrict Editing in the Protect section.
- A Restrict Editing settings panel will open. You should see three numbered sections in the panel.

- In the section labeled 2. Editing restrictions, tick the box next to Allow only this type of editing in the document.
- In the drop-down box in section 2, select No changes (Read-only).

- An Exceptions setting will open. We’ll cover that shortly, but you can ignore it for now.
- In section 3, click Yes, Start Enforcing Protection. If you want to insure no one else can edit your file, enter the same password in the next two boxes and click the OK button.

Otherwise, leave the password boxes empty and click the OK button to set your file Read-only but without password protection. - Save your document.
Password protect a document in Microsoft Word for Windows
To password protect a Word document in Windows…
- Open the File menu and toward the bottom, select Info.
- Choose Protect Document, then Encrypt with password.
- Type your password in both boxes and exit the settings panel.
You can also use the Save As… process to require a password to open a document in Word for Windows. When you save your file using Save As…, near the Save button at the bottom of the Save As panel, there is a button or link labeled Other Options. Click that button to open a small list of options. One of them is General Options.
The General Options panel provides a place to fill in a password that will be required whenever the file is opened in the future.
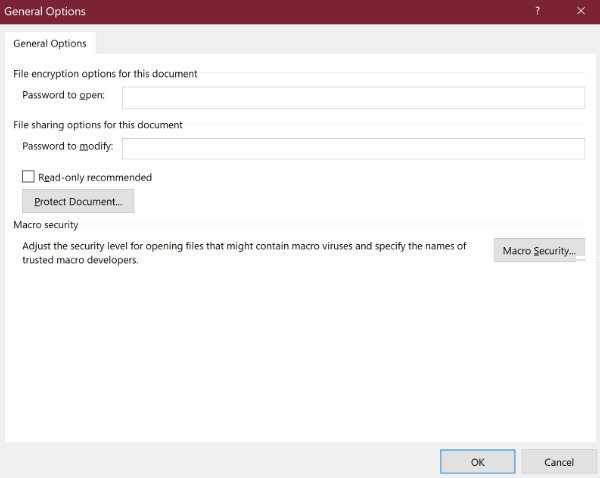
You will see a place to fill in a password for file encryption and a second password for sharing capabilities.
If you want the file to be Read-only, in addition to requiring a password, tick the box for Read-Only recommended.
As with any of the settings listed in this article, save your document after you’ve finished.
Make parts of a document Read-only in MS Word for Windows
Unlike Word for Macs which uses sections to allow portions of a protected document to be editable, Word for Windows allows you to set specific paragraphs as modifiable without the need for specifically creating sections.
- The first step is to make your entire Word document Read-only. Use the instructions above to do that.
- Select the paragraph that you wish to keep editable.
- In the Review tab, click Restrict Editing.
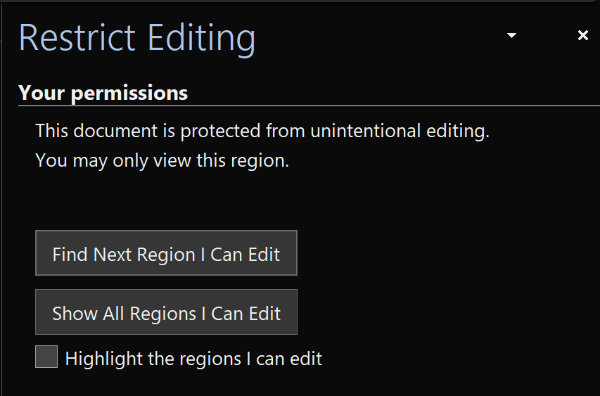
Later, to see which paragraphs are editable, open Restrict Editing again. Individual parts of the document that have been marked as Exceptions are now called Regions. You should see a panel with two buttons. One allows you to move to the next editable region (paragraph, etc.). The other allows you to see all of the regions you are allowed to edit.
Make your Microsoft Word document more difficult to change
As for myself, if I really didn’t want the recipients of my work to be able to edit it, I’d prefer to convert the file to PDF before I send it.
PDFs can be set as Read-only. While an unprotected PDF can be edited with the right software, it is not nearly as straight-forward as editing a Read-only Word file.