
It is fairly straightforward to quickly select all the text in MS Word documents. We will go over 3 ways to do it.

- Select All using a ShortCut Key
- Select All using Mouse
- Select all using the Select tool
Method 1: Select All Using a Shortcut Key
Step 1: Open an MS Word Document.

Step 2: Hit the keyboard shortcut keys.
- Click on any part of the page.
- Then, press the Ctrl + A keys on your keyboard.
- Right after that, you’ll notice that all of the text, including any object in your document, has been selected.

Method 2: Select All by Clicking and Dragging
Step 1: Open an MS Word Document.

Step 2: Highlight your content.
- Once your document is ready, move your mouse pointer to the very beginning of your file.
- Then, click and hold the left mouse button and drag it to the bottom of your window.
- This will allow MS Word to automatically scroll down the pages of your document. Hence, highlighting every line of the content.

Method 3: Select All Using the Select Tool
Step 1: Open an MS Word Document.

Step 2: Click the Select button.
- Go to the Home Tab and click the Select button.
- This will open a drop-down menu.
- Click on Select All.
- This will select all the text in the document.

Conclusion
You’ve finally arrived at the end of this article.
We hope you’ve found this article helpful!
Здравствуйте дорогие читатели блога scriptcoding.ru. Сегодня мы рассмотрим работу с классом Range, который относится к объектном модели Word. Данный класс отвечает за работу с текстом в ворде, а точнее, за его выбор.
В отличии от Selection, Range позволяет не выделить, а выбрать заданный диапазон текста в ворде. Использовать Range более выгодно, чем Selection, так как получить выбор можно только программно, это работает нам на руку, так как пользователь не сможет повлиять на работу макроса или программного кода. Поясню: допустим, мы хотим обработать текст в ворде с помощью объекта Selection, выделив нужный диапазон. Если пользователь во время обработки щелкнет мышью и снимет выделение, то наш макрос потерпит поражение. В случае с Range такой неприятности не произойдет, поэтому и рекомендуется использовать вместо Selection.
Получить доступ к объекту можно несколькими способами:
Одноименный метод объекта Document – данный метод принимает два необязательных параметра, которые задают начальное и конечное значение выбора при работе с текстом в Word. Если вызвать метод без параметров, то будет выбрано содержимое всего документа, например:
' Выбираем весь текст
set oRange = oDoc(1).Range()
'Делаем шрифт жирным
oRange.Bold = true
Или такой вариант:
'Выбираем первые 10 символов
set oRange = oDoc(1).Range(0,10)
Одноименное свойство – данное свойство предусмотрено для большинства классов Word (Bookmark, Selection, Table, Row, Cell, Paragraph и так далее). В данном случае мы получаем Range для заданного класса, автоматически произойдет выбор содержимого данного класса (абзац, выделение, закладка и так далее).
Метод SetRange() – Данный метод предоставляет сам объект Range, и он позволяет переопределить выбор текста в ворде, например:
set oRange1 = oDoc(1).Range()
oRange1.SetRange 1,10
oRange1.Bold = true
Содержание
- Класс Range – выбираем текст в ворде
- Свойства – работа с текстом в ворде
- Методы – работа с текстом в Word
Класс Range – выбираем текст в ворде
Свойства – работа с текстом в ворде

Свойства, которые позволяет задать или получить значение константы:
Case– Регистр текста в ворд, константа WdCharacterCase:
- wdNextCase — -1 – Как в предложении
- wdLowerCase — 0 — Нижний регистр
- wdUpperCase — 1 — Верхний регистр
- wdTitleWord — 2 – Начало слова с заглавной буквы
- wdTitleSentence — 4 — в режиме ввода предложения
- wdToggleCase — 5 – Инвертировать регистр
CharacterWidth — Ширина символов, константа WdCharacterWidth:
- wdWidthFullWidth — 7 – Полная ширина.
- wdWidthHalfWidth — 6 – Половина ширины (нормальный режим).
HorizontalInVertical– Расположение текста в ворде, константа WdHorizontalInVerticalType:
- wdHorizontalInVerticalNone — 0 – Форматирование отсутствует
- wdHorizontalInVerticalFitInLine — 1 – Горизонтальное направление
- wdHorizontalInVerticalResizeLine — 2 – Вертикальное направление
Orientation— Направление ворд текста, константа WdTextOrientation:
- wdTextOrientationHorizontal — 0 – Горизонтально, по умолчанию.
- wdTextOrientationVerticalFarEast — 1 – Вертикально вниз от верхней части, справа налево.
- wdTextOrientationUpward — 2 — Вверх под углом.
- wdTextOrientationDownward — 3 – Вниз под углом.
- wdTextOrientationHorizontalRotatedFarEast — 4 — Горизонтально, но справа налево (только для языков с данным типом письма).
- wdTextOrientationVertical — 5 — Вертикально вниз от верхней части, слева направо.
HighlightColorIndex– Цвет выделения текста в ворде, константа WdColorIndex.
LanguageIDOther– Язык текста в ворд, константа, WdLanguageID.
Style– Стиль, константа WdBuiltinStyle.
Underline– Тип подчеркивания, константа WdUnderline.

Свойства, которые позволяют задать или получить логическое значение:
Bold– Делает шрифт жирным (true).
Italic— Делает шрифт курсивом (true).
GrammarChecked– Проверка грамматики.
LanguageDetected– Определение языка.

Прочие свойства (чтение и запись), только последнее доступно только для чтения.
Startи End– Начальная и конечная позиция для выбора.
FitTextWidth— Ширина текста в текущих единицах измерения.
ID— Имя идентификатора (строковое значение) для указанного диапазона.
Text– Позволяет вставить (в место, где находится курсор), заменить (выбранную область), или получить текст в ворде для заданного диапазона.
Information(type) — Информация об указанном диапазоне (параметр type содержит значение константы WdInformation. Только чтение.
Методы – работа с текстом в Word

CheckGrammar() — Начинает проверку орфографии и грамматики для указанного диапазона.
Set Range2 = Documents("MyDocument.doc").Sections(2).Range
Range2.CheckGrammar
CheckSynonyms() — Отображает диалоговое окно «Тезаурус«.
Collapse(Direction) — Убирает выделение.
Direction – Дополнительный параметр, который задает направление от позиции курсора. Может быть одним из следующих значений константы WdCollapseDirection: wdCollapseEnd — 0 или wdCollapseStart — 1. Значение по умолчанию wdCollapseStart.
ComputeStatistics(Statistic) – Позволяет получить статистику для заданного выбора. Параметр Statistic содержит значения константы WdStatistic.
Copy(), Delete(), Cut() – Копирование, удаление и вырезание выбранного диапазона.
Paste() – Вставка содержимого буфера обмена.
CopyAsPicture() – Копирование текста в ворде как изображения.
Select() – Выделение текущего выбора.
SetRange(Start, End) – Позволяет задать начальную и конечную позицию для выбора, вернет новый объект Range.
Relocate(Direction) — Переставляет местами абзацы в выбранном диапазоне.
Direction – Обязательный параметр, который задает направление, содержит значение константы WdRelocate:
- wdRelocateDown — 1 — Ниже следующего видимого абзаца.
- wdRelocateUp — 0 — Выше предыдущего видимого абзаца.
Методы с префиксом Insert…и Move… и метод ConvertToTable() используются также классом Selection, поэтому я не стал их описывать, просто ознакомьтесь со статьей «Объект Word Selection — выделение фрагмента текста в ворде, методы #1»
Ниже я привел два примера программного кода на языке VBScript и JScript, в них я просто выбираю каждый символ в тексте и задаю для него цвет выделения. Работа с текстами в Word. Причем так, что бы цвета периодически менялись.
Программный код на языке VBSCRIPT:
' ----------------------------------------------------------------------------
' Работа с текстом в ворде
' Выделение разными цветами
' Range1.vbs
' ----------------------------------------------------------------------------
Option Explicit

dim oWord, oDoc, oSel, i, oPars, MyText, oRange, j

Set oWord = CreateObject("Word.Application")
Set oDoc = oWord.Documents
oDoc.Add()
Set oSel = oWord.Selection
Set oPars = oSel.Paragraphs
oWord.Visible = True

MyText = "Работа с текстом в Word "

' Вставляем текст
For i=0 to 4
   oSel.TypeText MyText & MyText & MyText & MyText & MyText & MyText & MyText
   oSel.TypeParagraph
Next

' Создаем ссылку
' Заодно выбираем весь текст в ворде
set oRange = oDoc(1).Range()
i = 1:j = 0

' Обрабатываем каждый символ
Do While i <= oRange.End
   With oRange
      ' выбираем один символ
      .SetRange i, i+1
      ' если выбран последний цвет
      if j = 17 then
         j = 0
         ' Меняем цвет выделения
         .HighlightColorIndex = j
         j = j + 1
      else
         .HighlightColorIndex = j
         j = j + 1
      end if
      i = i + 1
   End With
Loop
Программный код на языке JSCRIPT:
// ----------------------------------------------------------------------------
// Работа с текстом в ворде
// Выделение разными цветами
// Range1.js
// ----------------------------------------------------------------------------

var oWord1, oDoc1, oSel1, oPars1, MyText1 = "Работа с текстом в Word. ", oRange1;

oWord1 = WScript.CreateObject("Word.Application");
oDoc1 = oWord1.Documents;
oDoc1.Add();
oSel1 = oWord1.Selection;
oPars1 = oSel1.Paragraphs;
oWord1.Visible = true;

// Вставляем текст
for (i=0; i<=4; i++){
    oSel1.TypeText(MyText1 + MyText1 + MyText1 + MyText1 + MyText1 + MyText1 + MyText1);
    oSel1.TypeParagraph();
}

// Создаем ссылку
// Заодно выбираем весь текст в ворде
oRange1 = oDoc1(1).Range();

var i = 1, j = 0;
// Обрабатываем каждый символ
while (i <= oRange1.End){
    with(oRange1){
        // выбираем один символ
        SetRange(i, i+1);
        // если выбран последний цвет
        if (j == 17){
            j = 0;
            // Меняем цвет выделения
            HighlightColorIndex = j;
            j++;
        }else{
            HighlightColorIndex = j;
            j ++;
        }
        i++
    }
}
Хорошо, с программированием закончили, теперь можно дать некоторые пояснения. И так, оба примера работают с текстом в Word одинаково. Имена переменных практически идентичны, только для JSCRIPT я к имени переменных добавил 1. В самом начале происходит подключение основных классов для доступа к приложению Microsoft Word, создание нового документа — «Коллекция Documents«, делаем документ видимым. Далее в цикле FOR — «Урок 9 по JScript — оператор цикла for» и «Урок 6 по VBScript: Циклы for…next и for each…next» происходит работа с текстом в ворд, а именно – добавление несколько раз содержимого переменной MyText.

Переменная oRange будет содержать ссылку н6а класс, используя цикл WHILE — «Урок 7 по VBScript: Циклы do…loop и while…wend» и «Урок 10 по JScript: Цикл while и do…while«, мы начинаем обрабатывать каждый символ и менять его цвет, естественно, что количество возможных цветов ограничено. Поэтому нам приходится дополнительно добавить переменные i и j. Ну и все, результат работы можно увидеть на рисунке выше.
Check Out These 6 Ways to Select All in Microsoft Word Documents
by Avantix Learning Team | Updated March 24, 2022
Applies to: Microsoft® Word® 2010, 2013, 2016, 2019, 2021 or 365 (Windows)
In Microsoft Word documents, you can select all using the Ribbon or keyboard shortcuts. You can select all text in a document, select from the cursor to the end or the beginning of the document, select all text with similar formatting or select all cells in a table.
Recommended article: 10 Microsoft Word Tips, Tricks and Shortcuts for Selecting in Tables
Do you want to learn more about Microsoft Word? Check out our virtual classroom or in-person Word courses >
When you select all using a keyboard shortcut or the Ribbon, the main content of the document is highlighted and headers and footers are selected only if there are section breaks in the document because headers and footers are attached to sections. Headers and footers for the last section are not included as the last section is not followed by a section break. If you are trying to select all to change the font and size for an entire document, a better strategy is to use themes and styles.
1. Select all using a keyboard shortcut
To select all using a keyboard shortcut, click in the document and then press Ctrl + A to select the entire document.
2. Select all using the Ribbon
To select all using the Ribbon:
- Click in the document.
- Click the Home tab in the Ribbon.
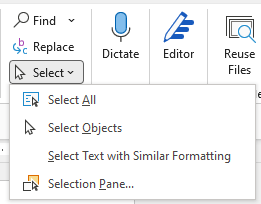
- In the Editing group, click Select. A drop-down menu appears.
- Click Select All.
Select All appears in the Select drop-down menu on the Home tab in the Ribbon:

3. Select all from the cursor to the end of the document
To select all from the cursor to the end of the document using a keyboard shortcut, position the cursor where you want to start the selection and then press Ctrl + Shift + End.
4. Select all from the cursor to the beginning of the document
To select all from the cursor to the beginning of the document, position the cursor where you want to start the selection and then press Ctrl + Shift + Home.
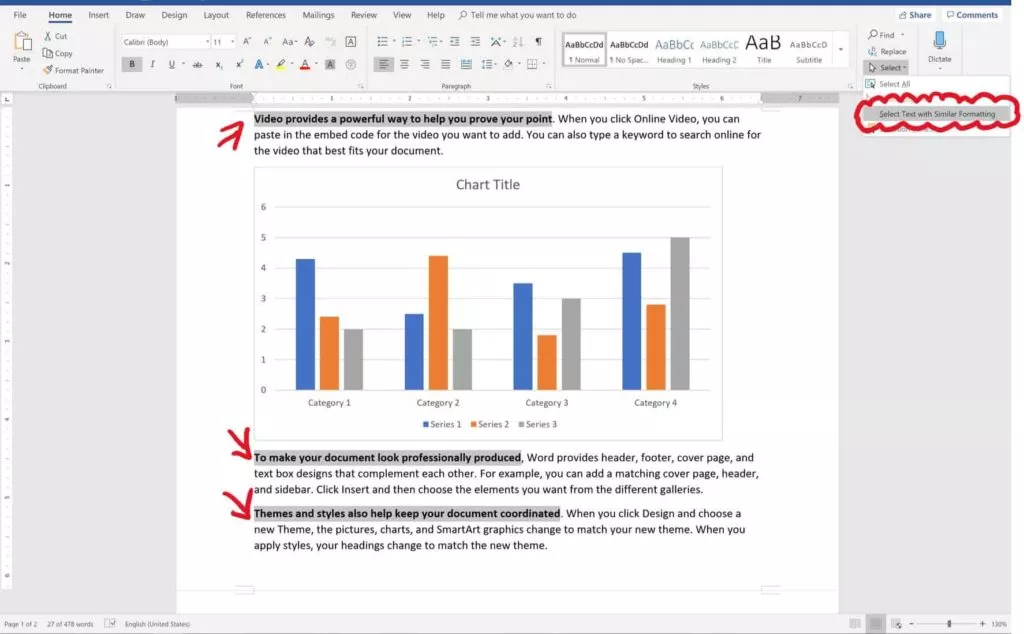
5. Select all text with similar formatting
To select all text with similar formatting:
- Select the text with the desired formatting.
- Click the Home tab in the Ribbon.
- In the Editing group, click Select. A drop-down menu appears.
- Click Select Text with Similar Formatting.
All text with the same formatting will be selected and you can clear the formatting or apply other formatting.
Select Text with Similar Formatting appears in the Select drop-down menu on the Home tab in the Ribbon:
6. Select all cells in a table
To select all cells in a table, click in the table, press Alt and then double-click. You can also click the four-arrow pointer on the top left of the table.
Subscribe to get more articles like this one
Did you find this article helpful? If you would like to receive new articles, join our email list.
More resources
How to Find and Replace in Word (and Use Wildcards)
How to Create, Save, Use and Edit Templates in Microsoft Word
How to Keep Text Together in Microsoft Word (Words, Lines or Paragraphs)
How to Insert a Check Mark in Word (5 Ways to Insert a Check or Tick Mark with Shortcuts)
10+ Great Microsoft Word Navigation Shortcuts for Moving Around Quickly in Your Documents
Related courses
Microsoft Word: Intermediate / Advanced
Microsoft Word: Designing Dynamic Word Documents Using Fields
Microsoft Word: Long Documents Master Class
Microsoft Excel: Intermediate / Advanced
Microsoft PowerPoint: Intermediate / Advanced
VIEW MORE COURSES >
Our instructor-led courses are delivered in virtual classroom format or at our downtown Toronto location at 18 King Street East, Suite 1400, Toronto, Ontario, Canada (some in-person classroom courses may also be delivered at an alternate downtown Toronto location). Contact us at info@avantixlearning.ca if you’d like to arrange custom instructor-led virtual classroom or onsite training on a date that’s convenient for you.
Copyright 2023 Avantix® Learning
Microsoft, the Microsoft logo, Microsoft Office and related Microsoft applications and logos are registered trademarks of Microsoft Corporation in Canada, US and other countries. All other trademarks are the property of the registered owners.
Avantix Learning |18 King Street East, Suite 1400, Toronto, Ontario, Canada M5C 1C4 | Contact us at info@avantixlearning.ca
td
-
#1
In VBA how do you
1. select all text in a document?
2. Copy the selected text to the clipboard?
Thanks
td
Advertisements
Helmut Weber
-
#2
Hi,
In VBA how do you
1. select all text in a document?
2. Copy the selected text to the clipboard?
without going into detail, try:
ActiveDocument.Range.Select
ActiveDocument.Range.Copy
whereby «ActiveDocument.Range.Select» is redundant.
And, that copies _everything_, not only text.
—
Greetings from Bavaria, Germany
Helmut Weber, MVP WordVBA
Win XP, Office 2003
«red.sys» & Chr$(64) & «t-online.de»
td
-
#3
Hello Helmut
When you say «Copies everything» does that include the FILE header & footer?
I am very happy to copy «everything» except these as they contain links to
non-existant files including templates. The object of the exercise is to get
rid of these non-existant links. Manual SelectAll, Copy and Paste into new
document does appear to solve the problem
Many thanks for your input
td
Helmut Weber
-
#4
Hi td,
if you exclude the last paragraph mark,
which is what in former times was the end-of-doc mark,
and which carries a lot more of information
than an ordinary paragraph mark,
then you get nothing but the content of the main story.
Like, this time using selection:
Sub testcopy()
Selection.WholeStory
Selection.End = Selection.End — 1
Selection.Copy
End Sub
—
Greetings from Bavaria, Germany
Helmut Weber, MVP WordVBA
Win XP, Office 2003
«red.sys» & Chr$(64) & «t-online.de»
td
Advertisements
Grateful
-
#6
re
ActiveDocument.Range.Select
ActiveDocument.Range.Copy
I want to thank you so much for this code. I had been looking for this
ability, to include Headers/Footers, etc. and only came up with answers that
it couldn’t be done.
This is terrific. Thank you, Danke
Advertisements
In this article you’ll learn all of the different Select All shortcuts in Word, Excel and PowerPoint, and how to use Select All to quickly grab things like:
- Objects (PowerPoint)
- Text with similar formatting (Word)
- Formulas (Excel)
- Constants (Excel)
- Comments (Excel)
- And more!
This allows you to quickly grab EXACTLY what you need in each of the programs when you need it. This saves you from otherwise having to manually selecting everything yourself, one-by-one.
Select All shortcut (A Must Know)
The universal Select All shortcut for most program (Mac or PC) is:

Select All shortcut (PC Users): Ctrl + A
Select All shortcut (Mac Users) Cmd + A
That said there are a variety of different ways you can use the shortcut in Word, Excel and PowerPoint to finish your tasks faster and get you to Happy Hour (all discussed below).
How to best use the Select All command?
In short, this command is best used to quickly grab all the text, numbers, objects, formulas etc. that you want to quickly format or work with.
This allows you to quickly make changes to everything at once. For example:
- Change the font style of all the text in a Word document
- Grab all the formulas or constants in an Excel spreadsheet to change their font color
- Grab all your PowerPoint objects on a slide to change their shape fill
Which makes sense, right?
Why bother doing things manually (one-by-one) when you can select all your objects at once.
And it’s this kind of know-how why one person leaves the office at a decent hour, while another wastes away at the office all night.
How to Select All in Word

You have 4 different types of selection options in Microsoft Word.
And if you are on a PC, you can additionally shortcut all of these using your Ribbon Guides (details below).

1. Select All (Ctrl + A)
Selects everything within your document so that you can make all the formatting edits that you want at the same time.
Clicking this command with your mouse is the same as hitting Ctrl + A on your keyboard (Cmd + A on a Mac).
2. Select Objects
Changes your mouse cursor into an arrow symbol that allows you to select an element (chart, picture, SmartArt graphic, etc.) as an object.
This is different than when you click things with your mouse. When you click with your mouse, you normally click into the object as if you are going to edit it.
The Select Objects command ensures that you select the object itself. That way you can cut and paste it, or move it around within your document.
3. Select Text with Similar Formatting
Selects all of the text within a Word document that matches the formatting of the text that you have already selected.
This is one of the coolest features in Microsoft Word that hardly anyone knows about. This command grabs all of the same formatted text within a document, so you can change it’s formatting all at once.
Ahem… amazing!
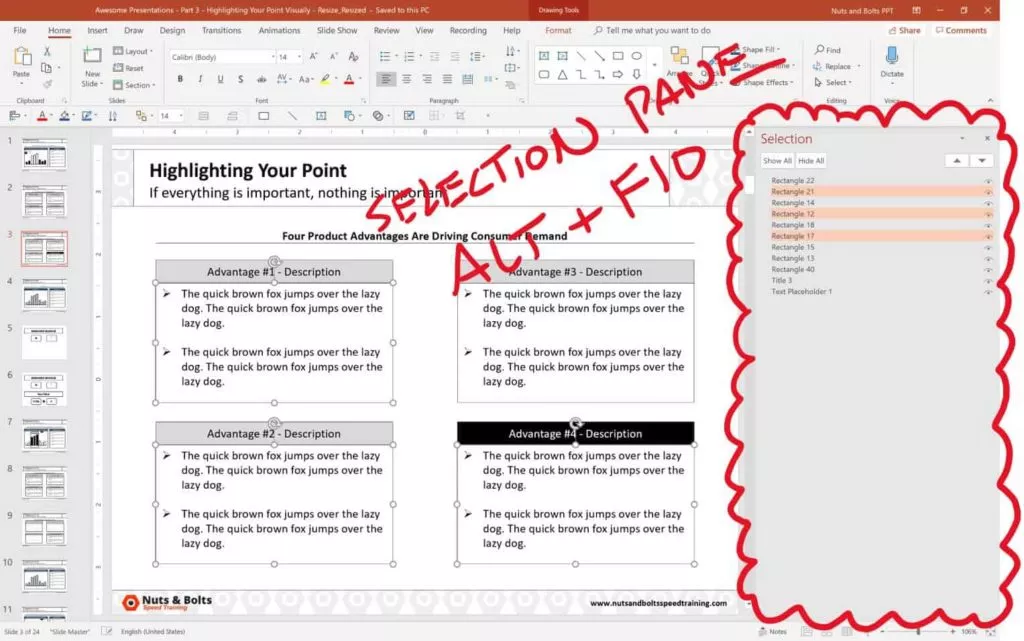
4. The Selection Pane in Word (Alt + F10)
Opens or closes the Selection Pane in Microsoft Word.
Inside the Selection Pane you can see (and quickly manipulate) all the objects in a Word document.
Similar to the Selection Pane in PowerPoint, it only only shows you the objects on the current page you are currently working on.
That means that if you have 100 charts in your Word document but only 1 chart on your current page, you will only see 1 chart in the Selection Pane.
Select All Shortcuts in Word (Ribbon Guides)
Instead of using your mouse to access the selection commands, on a PC you can use your Ribbon Guides.
To use these shortcuts, simply hit the Alt key on your keyboard. Hitting the Alt key, you will see alphabetical sequences to the commands across your Ribbon.

On a PC, your select all Ribbon Guide shortcuts are:
- Select All: Alt, H, SL, A
- Select Objects: Alt, H, SL, O
- Select Text with Similar Formatting: Alt, H, SL, S
- Selection Pane: Alt, H, SL, P
Note: When using your Ribbon Guide shortcuts in Word, you do not need to hold them down. Instead, simply hit and let go of them one at a time (following the letters forward).
To learn more about the Microsoft Office ribbon, see this guide by Microsoft here.
Select All in Excel
Because there are so many more inputs that can go into an Excel spreadsheet, there are 7 different selection commands in Excel (all covered below)
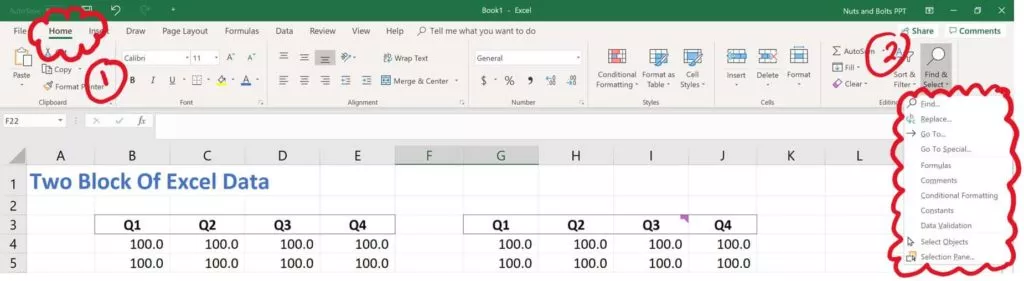
1. Select All (Ctrl + A)
Hitting Ctrl + A triggers the Select All command (which is otherwise not up in your Excel ribbon.
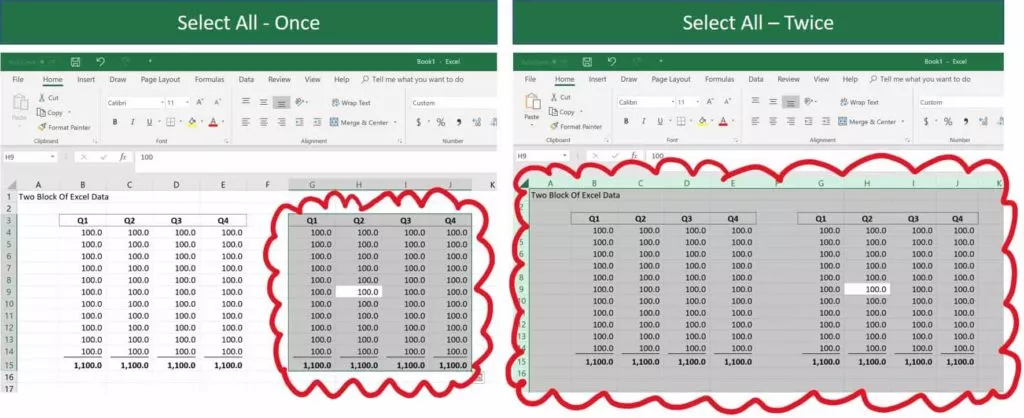
It’s also important to note that the Select All command works a little bit differently in Excel.
Using the command once, first selects the block of cells that you are currently active in.
Using the command a second time, then selects everything within your spreadsheet.
See images above for hitting it once, then twice.
2. Select Formulas
Clicking Formulas will grab all the formulas in your current spreadsheet (pictured below).
This is a fast way and easy way to quickly identify and change the formatting of any formulas in your spreadsheet.

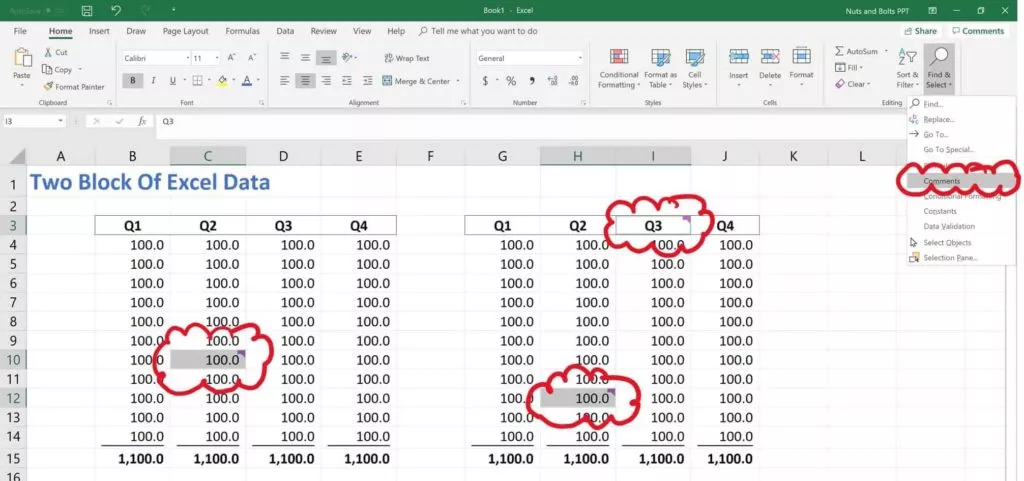
3. Select Comments
Clicking Comments automatically selects all of the comments in your spreadsheet (pictured below).
Comments show up in your spreadsheet as little markers in the upper-right hand corner of your cells. If you don’t want to waste time searching for them, simply use these command.
This allows you to quickly grab all the comments in your spreadsheet and format the cells.
4. Select Conditional Formatting
Clicking Conditional Formatting selects any cells within your spreadsheet that have conditional formatting in them.
This allows you to spot check or change the conditional formatting rules for those specific cells.
To learn more about conditional formatting rules, and how to use them, see this article by Microsoft here.
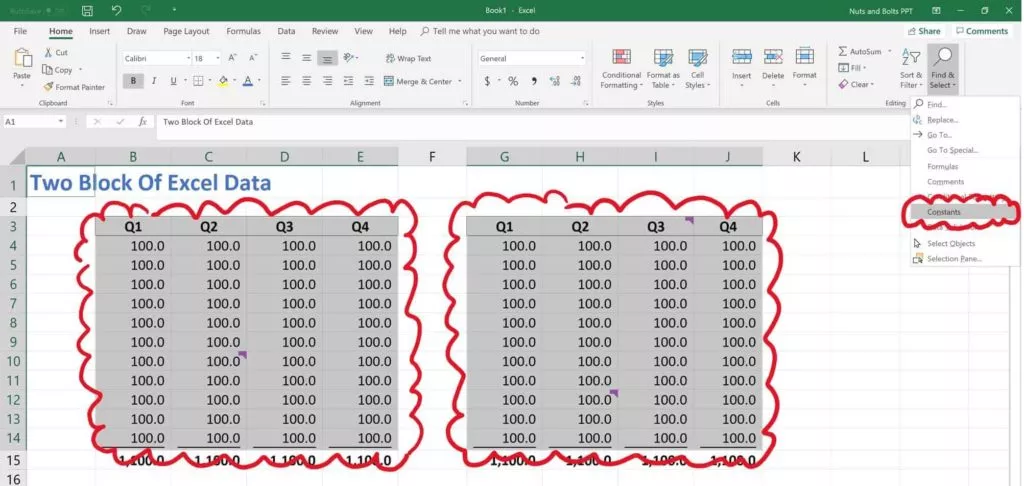
5. Select Constants
Selects all the constant values in your spreadsheet (i.e. values that are not formula-driven).
This is a fast and easy way to find all of the inputs that someone is using in their financial model or spreadsheet so that you can double-check their assumptions (pictured below).
6. Select Objects
Turns your cursor into an arrow that allows you to select objects that are within your spreadsheet (charts, pictures, SmartArt graphics etc.).
This is useful when you have a large spreadsheet or dashboard and you want to just select a single graphic without accidentally selecting the cells around it.
7. The Selection Pane in Excel (Alt + F10)
Opens the Selection Pane in Excel, showing you all of the charts, pictures, SmartArt graphics, etc., that are currently within your active spreadsheet.
Just keep in mind that the Selection Pane will only show you objects that are within the current sheet you are on. It will not show you objects that are on other sheets within your Excel file.
Select All Shortcuts in Excel (Ribbon Guides):
On top of using your mouse to activate the different Select commands in Excel, if you are on a PC, you can also use your Ribbon Guides to shortcut these commands (see key combinations below).
If you use any of these selection commands A LOT when working in Excel and are on a PC, I highly recommend learning these key combinations to save you time.

On a PC, your Ribbon Guide Shortcuts to these different commands are:
- Formulas: Alt, H, FD, U
- Comments: Alt, H, FD, M
- Conditional Formatting: Alt, H, FD, C
- Constants: Alt, H, FD, N
- Data Validation: Alt, H, FD, V
- Select Objects: Alt, H, FD, O
- Selection Pane: Alt, H, FD, P
Note: When using your Ribbon Guide shortcuts, you do not need to hold down the keys to make them work. Instead, simply hit and let go of them one at a time.
Select All in PowerPoint

You have 3 different types of selection options in PowerPoint (all of which you can shortcut on a PC using your Ribbon Guide shortcuts as discussed further below).

1. Select All (Ctrl + A)
Selects all of the objects that are currently on your slide.
This shortcut works in all of the different PowerPoint views including:
- The Normal View
- The Slide Master View
- The Handout Master View
- The Notes Master View, etc.
To learn more about setting up these different views in PowerPoint, see our guide on custom PowerPoint templates here.
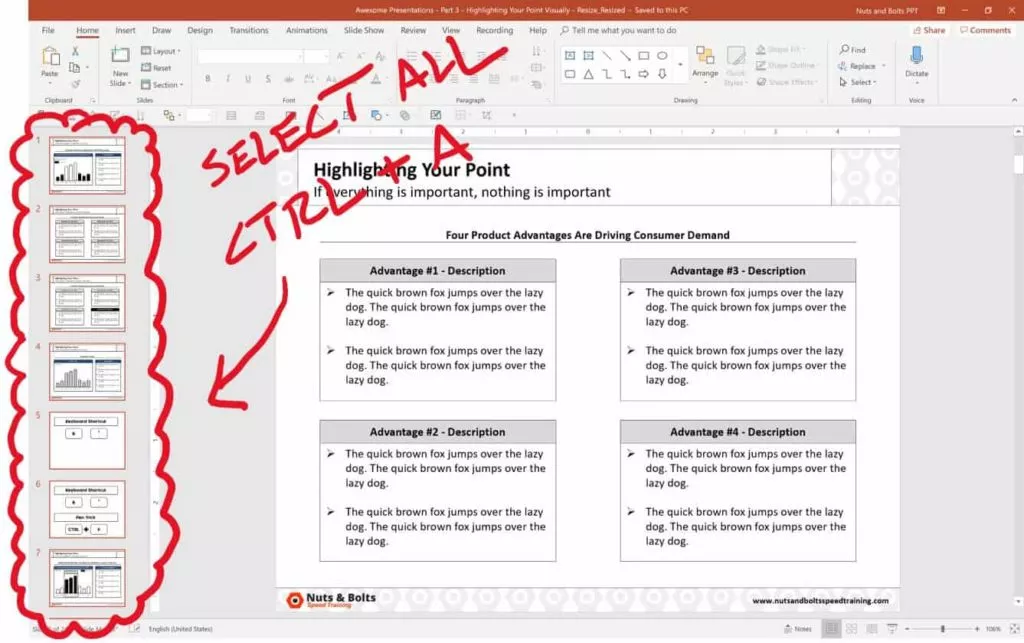
On top of that, if you first click into the thumbnail view (pictured below) you can use the command to grab all of your slides. This allows you to copy and paste those slides, apply a new layout, reset the slides, etc.
2. Select Objects
This is the default selection option in PowerPoint, allowing you to select objects (shapes, text boxes, charts, SmartArt graphics, etc.) which is what all of your slides are made of.
3. Selection Pane in PowerPoint (Alt + F10)
Opens the Selection Pane in PowerPoint, giving you a bird’s eye view of everything that is on your slide (even if it is buried beneath something else).
To learn other useful PowerPoint shortcuts like this to save you time in the program, see our guide here.
Selection Pane Shortcuts in PowerPoint
To learn more about how to use the Selection Pane shortcuts in PowerPoint, watch the short video below.
Inverse selected objects in PowerPoint
Another way to cleverly use the Select All command in PowerPoint is to ‘inverse-select’ your objects.
For example, let’s say you want to select EVERYTHING on your slide except for the title.
To do so, follow these steps:
- Hit Ctrl + A to select everything on your slide
- While holding the Shift key or the Ctrl key, select your Title to un-select it
Doing so leaves you with everything on your slide selected except for your slide title (or whatever else you unselected by holding the Shift or Ctrl key).
Select All shortcuts in PowerPoint (Ribbon Guides)
Besides navigating these selection commands using your mouse, you can also use your Ribbon Guide shortcuts to access them if you are on a PC.
To use your Ribbon Guide shortcuts, simply hit and let go of the Alt key, and then follow the alphabetical or numerical queues to find your command (all shortcut combinations are listed below).

On a PC, your Select All Ribbon Shortcuts are:
- Select All: Alt, H, SL, A
- Select Objects: Alt, H, SL, O
- Selection Pane: Alt, H, SL, P
Note: When using your Ribbon Guide shortcuts, you do not need to hold down the keys to make them work. Instead, simply hit and let go of them one at a time.
Conclusion
So those all the different ways you can Select All in Word, Excel and PowerPoint, and the different Select All shortcuts available to you if you are on a PC version of Microsoft Office.
Knowing how to properly use these, allows you to quickly grab exactly what you’re looking for so you can format it. This saves you time and gets you once step closer to Happy Hour.
If you are interested in taking your PowerPoint skills to the next level, you can learn more about our online courses and training here.