
Word for Microsoft 365 Outlook for Microsoft 365 Word 2021 Outlook 2021 Word 2019 Outlook 2019 Word 2016 Outlook 2016 Word 2013 Outlook 2013 Word 2010 Outlook 2010 Word 2007 Outlook 2007 More…Less
To convert text to a table or a table to text, start by clicking the  Show/Hide paragraph mark on the Home tab. This lets you see how text is separated in your document.

Convert text to a table
-
Insert separator characters—such as commas or tabs—to indicate where to divide the text into table columns.
Note: If you have commas in your text, use tabs for your separator characters.
-
Use paragraph marks to indicate where you want to begin a new table row.
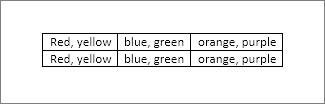
In this example, the tabs and paragraph marks will produce a table with 3 columns and 2 rows:

-
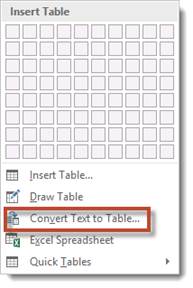
Select the text that you want to convert, and then click Insert > Table > Convert Text to Table.
-
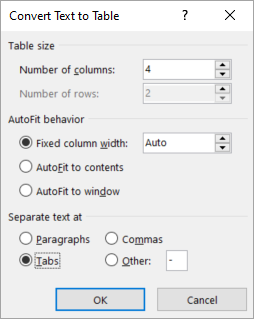
In the Convert Text to Table box, choose the options you want.
Under Table size, make sure the numbers match the numbers of columns and rows you want.
Under AutoFit behavior, choose how you want your table to look. Word automatically chooses a width for the table columns. If you want a different column width, choose one of these options:
To do this
Choose this option
Specify a width for all the columns
In the Fixed column width box, type or select a value.
Resize the columns to fit the width of the text in each column
AutoFit to contents
Resize the table automatically in case the width of the available space changes (for example, web layout or landscape orientation)
AutoFit to window
Under Separate text at, choose the separator character you used in the text.
-
Click OK. The text converted to a table should look something like this:


Convert a table to text
-
Select the rows or table you want to convert to text.
-
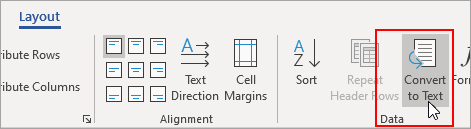
On the Layout tab, in the Data section, click Convert to Text.
-
In the Convert to Text box, under Separate text with, click the separator character you want to use in place of the column boundaries. Rows will be separated by paragraph marks.
-
Click OK.
Need more help?
Want more options?
Explore subscription benefits, browse training courses, learn how to secure your device, and more.
Communities help you ask and answer questions, give feedback, and hear from experts with rich knowledge.

Have you ever started adding text to your document only to discover it would be better suited in a table? After all, a table provides a solid structure and appearance. In Word, you can simply convert text to table.
Whether you have text separated by tabs or commas or a list in a numbered or bulleted format, converting it to table is easy enough. Plus, it takes less time than creating a table and manually moving all that text into the cells.
You can choose the type of delimiter you’re using to properly convert the text. For instance, you may separate words with commas or phrases with tabs. If you aren’t sure, you can display the paragraph marks by going to the Home tab and selecting the Show/Hide paragraph button.

This is good to know if you’re using tabs because you don’t see them in ordinary text, only when you show the paragraph marks.
RELATED: How to Display Non-Printing Characters in Word
Select the text that you want to convert to a table. Then, go to the Insert tab and click the Table drop-down arrow. Choose “Convert Text to Table.”
In the pop-up window, pick the number of columns you want. By default, the text you select separates into columns. If you prefer to use rows, decrease the number of columns so that the number of rows correlates to the number of items you select.
Optionally, select the AutoFit Behavior. You can pick a specific width for the columns or AutoFit the table to the contents or window.
Finally, choose the delimiter you’re using. In our example, we have a list of names separated by tabs.
Select “OK” when you finish. You’ll see your text pop into a table. You can then add rows, resize the table, or center the text.
Convert a List to a Table in Word
Converting a list to a table is a little different than text because the list is already separated by numbers or bullets. This places each item in a separate row instead of a column, but you can change this if you like.
RELATED: How to Automatically Resize a Table in Microsoft Word
Select the list that you want to convert to a table. If you want to include the numbers or bullets in the table, move on to the next step. But if you don’t want those in the table, deselect the list type in the Paragraph section of the Home tab.
This removes the numbers or bullets so that you list items display on separate lines without leaders.
With your list items selected, go to Insert > Table and select “Convert Text to Table.” You’ll see the same pop-up as above. By default, your items display in rows. If you prefer them in columns, enter the same number of columns as your number of list items. Then, optionally choose the AutoFit settings.
By default, the delimiter should be set to Paragraph because the list items are on separate lines. Click “OK” and you’ll see your items in a table. You can then insert columns, resize the table, or move it.
Convert a Table to Text
If you change your mind after converting to a table or have a table that you prefer to remove and leave the text on its own, you can do the reverse of the above. Yes, you can convert a table to text too.
Select the table and go to the Layout tab that displays. Click “Convert to Text” in the Data section of the ribbon.
Choose how you want to separate the text once it’s converted. You can pick paragraph marks, tabs, commas, or a custom option you enter. Click “OK.”
You’ll then see your table data as ordinary text in your document.
Converting your text to a table in Word is a true time-saver compared to creating the table and moving the text into it. For more, take a look at how to nest a table or how to add formulas to tables in Word.
READ NEXT
- › How to Get a Refund on the PlayStation Store
- › Windows 11 Has a New Photo Gallery in the File Explorer
- › Android’s Nearby Share Has (Unofficially) Arrived on Mac
- › The New Winamp Is Here, but It’s Not What You’d Expect
- › Discord Direct Message Won’t Go Away? Here’s the Fix
- › Save Hundreds on Elegoo’s New PHECDA Laser Engraver Through Kickstarter
 Please Note:
This article is written for users of the following Microsoft Word versions: 2007, 2010, 2013, 2016, and 2019. If you are using an earlier version (Word 2003 or earlier), this tip may not work for you. For a version of this tip written specifically for earlier versions of Word, click here: Converting Text Into a Table.
![]()
Written by Allen Wyatt (last updated November 2, 2019)
This tip applies to Word 2007, 2010, 2013, 2016, and 2019
There are two major ways you can create tables in Word. One way is to create a blank table by any of the various methods provided by Word (such as drawing the table or using the Insert Table tool). The other method is to convert existing text into a table. To convert text into a table, follow these steps:
- Make sure the text that is to be converted into the table contains only a single tab character between each column.
- Select the text you want converted into a table.
- Display the Insert tab of the ribbon.
- Click the Table tool and then click Convert Text to Table. Word displays the Convert Text to Table dialog box. (See Figure 1.)
- Make sure all the table settings in the dialog box are correct.
- Click OK.
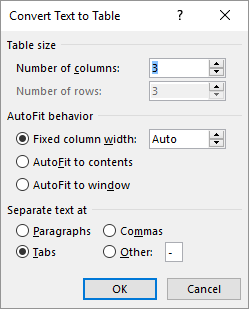
Figure 1. The Convert Text to Table dialog box.
The selected text is immediately converted into a table. In some instances, the width of columns in the resulting table may need to be adjusted. You will know if this is the case because the table will look very strange. Sometimes you can get files from programs such as a spreadsheet that use commas to separate columns. Word will also convert this comma-separated text to a table.
WordTips is your source for cost-effective Microsoft Word training.
(Microsoft Word is the most popular word processing software in the world.)
This tip (7725) applies to Microsoft Word 2007, 2010, 2013, 2016, and 2019. You can find a version of this tip for the older menu interface of Word here: Converting Text Into a Table.
Author Bio
With more than 50 non-fiction books and numerous magazine articles to his credit, Allen Wyatt is an internationally recognized author. He is president of Sharon Parq Associates, a computer and publishing services company. Learn more about Allen…
MORE FROM ALLEN
Inserting Foreign Characters
It is not unusual to need to insert foreign characters (often called diacritical marks) as part of your typing. Word …
Discover More
Protecting Worksheets from Deletion
If you share a workbook with others in your office, you will probably want to make sure that some of the worksheets don’t …
Discover More
Word Count for Headers and Footers
Getting a word count for an entire document is rather easy. If you want a word count for a special part of a document …
Discover More
More WordTips (ribbon)
Cannot Set Heading Rows in a Table
Word allows you to specify which rows in a table should be considered headings. What if setting the headings doesn’t work …
Discover More
Blank Lines Before Tables
Adding a blank line before your table is easy, but Word’s behavior as you attempt to make the insert can depend on where …
Discover More
Borders Disappear on Shaded Table Rows
When creating a table, it is possible that adding row or cell shading can affect how cell borders are displayed. This …
Discover More
Converting Text Into A Table format can help you better organise your data for people reading it.
It also allows you to easier transfer your data between Word and Excel, making it great for any user of both.
If you are learning either software you can view our Excel Course Offerings or Word Course Offerings here.
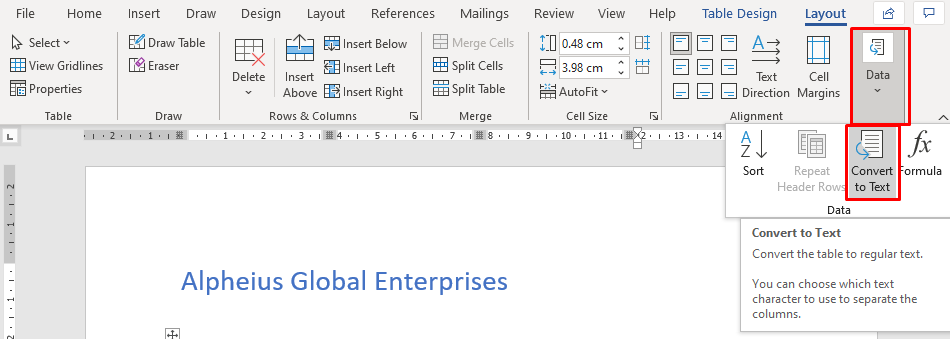
Converting Your Text To A Table – Simple Example
When Converting your text to a table, you need to first have some text in Word. Here you can see my text, under the title “Alpheius Global Enterprises”.
To convert text into a table the text needs to be in columns using some sort of separator – for example a tab, hyphen, comma or other symbol. My text specifically is seperated by tabs and has 4 columns (this will be important later).

- Highlight the piece of text to be converted into a table format.
- In the Insert ribbon there is a table button.
- Click on the table button and convert text to table.

- A dialog box will appear asking how many columns you want, how you want the text to fit and what are the separators used in your document
- Choose the number of columns required, fixed column width and our document has tabs which are separating the text then click OK.
- Your document will now be in a table format.

After selecting your options hit OK. For this example I chose 4 columns as you can see from the inital data, as well as that they are seperated by tabs. For your data you will want to specify differently based on your own data. After hitting OK you should see the results immediately. Below you can see my data changed into a table!

If you want to learn more about Tables and how they can be formatted, read our guide on columns for a newsletter in Word.
Why Convert Between Table And Text?
Going between tables and texts allows you simply to have different types of visual representation.
Ultimately the choice will be up to your discretion but follow these brief guidelines!
If you are doing a presentation based more on raw statistics and important facts maybe a table is more suitable. Tables are more analytical in nature and tend to lend themselves more to situations that are more formal and possibly educational (for example sending your coworker a plan for your business).
If you want to do a more graphically appealing layout maybe the raw text with some formatting is more appropriate (more on Font Formatting In Excel here). Text tends to be better for more informal presentations, and in general for a more casual audience (for example just sending a friend over some information found).
Converting From Table To Text
You can now also convert your table back to text if need be!
- First off just highlight the table using the table highlight option in the top right corner of the table
- Go to the Table Tools and select the layout ribbon
- In the data group at the end of the ribbon you will find the command convert to text
- The convert to text dialog box will appear. Use the tab option as this will keep your text in similar columns to your table
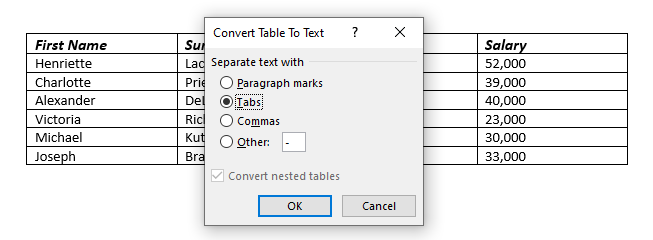
This will take your text back to it’s original form. Whichever you decide, Table or Text, you can save either for later use – read our guide here on How to Create and Use Building Blocks in Word.
Conclusion:
This guide has given you the tools on how to convert text into a Word table and a Word table back into text. Becoming proficient in these simple tools will help greatly when presenting your work, as well as when trying to move your work between Word and Excel. Try and experiment with these different types of representation to see what fits you best – but follow our rough guidelines if you are in need of guidance.
Trouble viewing the screencast at work? Try signing up for new posts on our home page with your personal email address and watch the screencast from home.
You may have had to transfer text in paragraph form into a table. This manual process can be automated with the help of Microsoft Word’s Convert text to table feature.
How the Convert Tool Works
The convert tool will transform each line break of your text into a row of the new table. Each row will further be split into columns based on the concept of a delimiter. A delimiter is a character or section of the document that marks a specific part of the text. In this particular case, the delimiter would mark the start of a new column. Common delimiters are new paragraphs, commas, tabs, or spaces.
When the convert tool is started, it will prompt you to specify your delimiter character. For example, in the following paragraph I have chosen a blank space to be my delimiter. Therefore, the paragraph would be split into two rows and three columns as shown below. It is split into two rows because of the line break after «Jersey». It will be split into four columns because of the single spaces between each of the four words on each line.
navitend Byram New Jersey
GREENER GRASS THIS WAY
| navitend | Byram | New | Jersey |
| GREENER | GRASS | THIS | WAY |
The line in your text that contains the most delimiters will determine how many columns are in your table. Any lines that contain less delimiters will not completely fill their particular row. For example, the following text would result in the table below:
navitend
GREENER GRASS THIS WAY
| navitend | |||
| GREENER | GRASS | THIS | WAY |
How To Use the Convert Tool
Follow along with these steps to learn how to use the feature.
1. Open Microsoft Word and highlight the text you wish to convert into a table.

2. Select the Insert tab and choose Convert Text to Table… from the Table dropdown.

3. The following window will appear. Is is okay to leave the Table size and AutoFit behavior options at their default values. Make sure you choose the appropriate delimiter character from the Separate text at options. In this case, I separated by columns with a blank space, so I’ve chosen Other and typed a blank space into the box.

4. Click OK to complete the process.
If you have an unanswered technical question that you would like to see addressed in an upcoming issue, feel free to email it to social@navitend.com.
Contact us at 973.448.0070
How to Convert Text into Table in MS-Word
Some time you forget to insert table into your document and start writing without table in this case MS-Word have one feature to convert your text into table.
Steps to Convert Text into Table in MS-Word
- Select that you want to convert the text
- Select the Insert tab
- In Tables group click the Table command
- Select the ‘Convert Text to Table’ option;
- It displays a dialog box
- In ‘Separate text at’ section select the desired option
- Click OK, the text will convert to a table
Buy This Ad Space @$20 per Month, Ad Size 600X200 Contact on: hitesh.xc@gmail.com or 9999595223
Magenet is best Adsense Alternative here we earn $2 for single link, Here we get links ads. Magenet
Lesson 21: Working with Tables
/en/word2010/reviewing-documents/content/
Introduction
A table is a grid of cells arranged in rows and columns. Tables can be customized and are useful for various tasks such as presenting text information and numerical data.
In this lesson, you will learn how to convert text to a table, apply table styles, format tables, and create blank tables.
Inserting and modifying tables
In Word, tables are useful for organizing and presenting data. You can create a blank table, convert text to a table, and apply a variety of styles and formats to existing tables.
Optional: You can download this example for extra practice.
To insert a blank table:
- Place your insertion point in the document where you want the table to appear.
- Select the Insert tab.
- Click the Table command.
- Hover your mouse over the diagram squares to select the number of columns and rows in the table.
Inserting a new table
- Click your mouse, and the table appears in the document.
- You can now place the insertion point anywhere in the table to add text.
To convert existing text to a table:
- Select the text you want to convert.
- Select the Insert tab.
- Click the Table command.
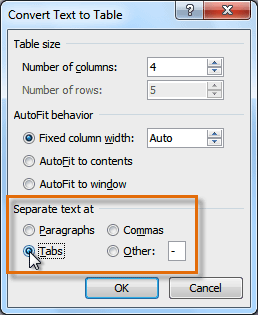
- Select Convert Text to Table from the menu. A dialog box will appear.
Converting text to a table
- Choose one of the options in the Separate text at: section. This is how Word knows what text to put in each column.
Separating text at Tabs
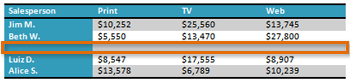
- Click OK. The text appears in a table.
The converted table


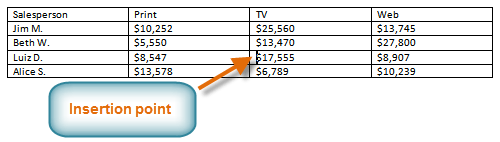
To add a row above an existing row:
- Place the insertion point in a row below the location where you want to add a row.
Placing the insertion point
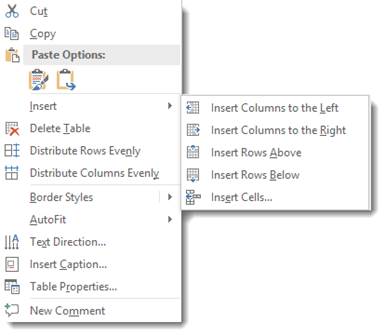
- Right-click the mouse. A menu appears.
- Select InsertInsert Rows Above.
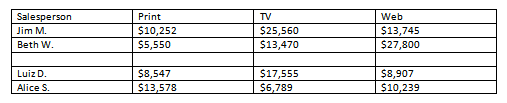
Adding a row
- A new row appears above the insertion point.
The new row
 Insert Rows Above.
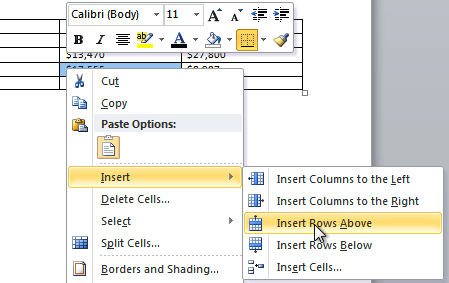
You can also add rows below the insertion point. Follow the same steps, but select Insert Rows Below from the menu.
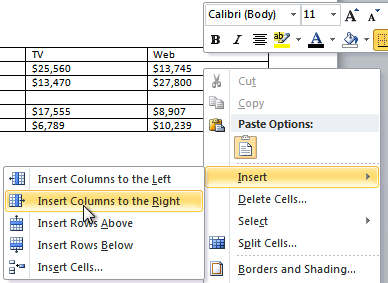
To add a column:
- Place the insertion point in a column adjacent to the location where you want the new column to appear.
- Right-click the mouse. A menu will appear.
Adding a column
- Select InsertInsert Columns to the Left or Insert Columns to the Right. A new column appears.
The new column
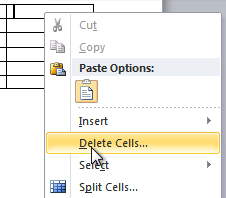
To delete a row or column:
- Select the row or column.
- Right-click your mouse. A menu will appear.
- Select Delete Cells.
Selecting Delete Cells
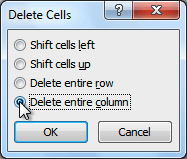
- Select Delete entire row or Delete entire column, then click OK.
Deleting a column
To apply a table style:
- Click anywhere on the table. The Design tab will appear on the Ribbon.
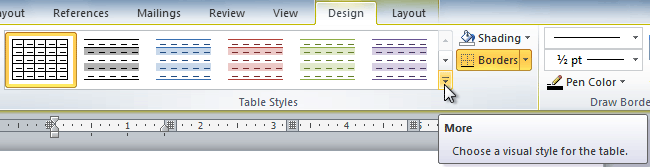
- Select the Design tab and locate the Table Styles.
- Click the More drop-down arrow to see all of the table styles.
Viewing the Table Styles
- Hover the mouse over the various styles to see a live preview.
- Select the desired style. The table style will appear in the document.
After adding a Table Style

To change table style options:
Once you’ve chosen a table style, you can turn various options on or off to change the appearance of the table. There are six options: Header Row, Total Row, Banded Rows, First Column, Last Column, and Banded Columns.
- Click anywhere on the table. The Design tab will appear.
- From the Design tab, check or uncheck the desired options in the Table Style Options group.
Table Style Options

Depending on which table style you’re using, certain table style options may have a somewhat different effect. You may need to experiment to get the exact look you want.
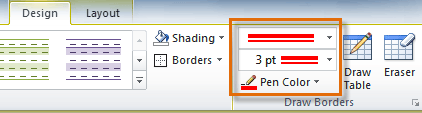
To add borders to a table:
- Select the cells you want to add a border to.
Highlighted cells
- From the Design tab, select the desired Line Style, Line Weight, and Pen Color.
Line Style, Line Weight, and Pen Color commands
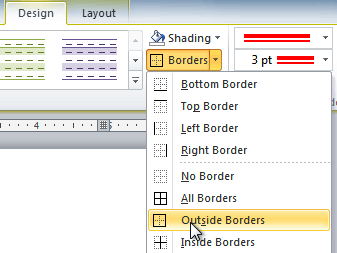
- Click the Borders drop-down arrow.
- From the drop-down menu, select the desired border type.
Selecting a border type
- The border will be added to the selected cells.
The finished border


Modifying a table using the Layout tab
When you select a table in Word 2010, Design and Layout tabs appear under Table Tools on the Ribbon. Using commands on the Layout tab, you can make a variety of modifications to the table.
Click the buttons in the interactive below to learn about the different ways you can modify a table with the Layout tab.
Change Text Direction
Making the text vertical can add style to your table and saves space, allowing you to fit more columns in your table.
Align Cell Text
By changing the alignment of a cell, you can control exactly where the text is located. In the example below, the cell text is aligned to the bottom-right.
Distribute Rows/Columns
To keep your table looking neat and organized, you may want to distribute the rows or columns equally, which makes them all the same size. You can distribute the rows or columns for the entire table or just a portion of it.
Change Cell Size
You can type a desired row height or column width for your cells. If you prefer, you can click AutoFit, and it will automatically adjust column widths based on the text inside them.
Merge and Split Cells
Some tables require a layout that doesn’t conform to the standard grid. In these cases, you may need to merge or split cells.
Add Rows and Columns
You can insert or delete rows and columns in your table. This can be especially useful if you need to add something to the middle of your table.
Challenge!
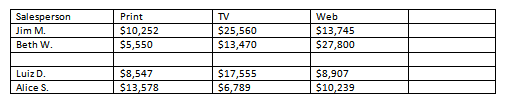
- Open an existing Word document. If you want, you can use this example.
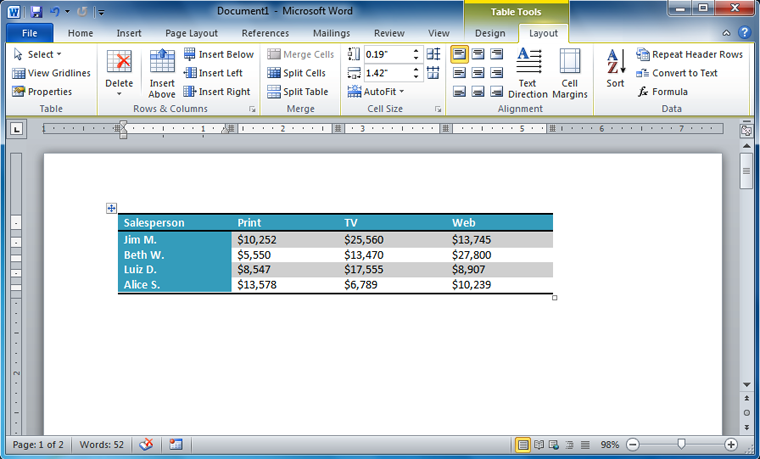
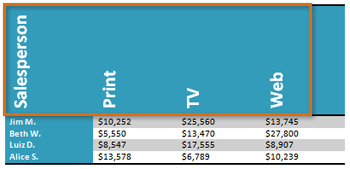
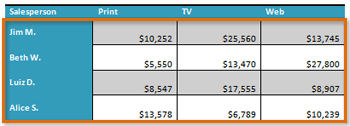
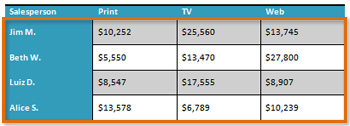
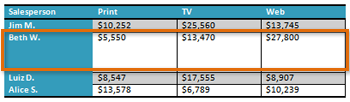
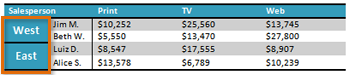
- Convert some text into a table. If you are using the example, convert the text below By Client.
- Apply a table style, and experiment with the table style options. If you are using the example, see if you can make the table match the By Salesperson table above it.
- Delete a row from the table.
- Insert a blank table with five rows and four columns.
- Add borders to the blank table.
/en/word2010/smartart-graphics/content/
Converting text to table is a time-saving and convenient way to deal with large amount of data in Word. In this article, we will mainly look at how to realize the conversion.
Sometimes, we may need to edit a large table in word. Of course, we can input data to table cells one by one, however, it is troublesome and may take up a lot of time. Alternatively, another way is to fist split text with delimiters, and then convert these texts to a table, which is time saving and easy to implement. To realize conversion between table and Word text, you can refer to this article shown as below.
Convert Delimited Texts to a Table
A crucial step to be noted here is to use a delimiter to separate text properly. Generally, the limiters could be paragraphs, commas, tabs or other characters or symbols. Here, we choose commas to break the text.
- Below are some comma-separated texts, we take it as an example to show the conversion of text to table in Word. First, we should select the following text with the cursor.


- Switch to “Insert” page, and then click “table” button. Next, choose “Convert Text to Table”.


- In the subsequent pop up window, make sure we select “Commas” under “Separate text at”. Then, click “OK”.


- Now we can see that the above comma-separated texts have been automatically converted to a table.


Convert the Table Back to Texts
Sometimes, we may also want to extract data from a table in an efficient way. In this section, we will talk about how to achieve that.
- If you only need to convert certain part of a table to texts, just select the targeted table cells. Otherwise, place the cursor on the table and click it.
- Switch to “Layout” page, and click “Convert to Text” button.


- Then, we choose “Tabs” in the following dialogue box and click “OK”. Until now, we can see that the selected table has been transformed to Word text.


Solution to Word File Corruption
Word is extensively used by people, and we need Word to do a lot of work for us in our daily life. However, it is hard to avoid word file corruption for any of us. To repair corrupted Word documents, we can utilize the in-built repair tool in Word. Sometimes, however, the problem may be beyond the healing capacity of the in-built recovery tool. Despite that, we can still resort to external doc repair tools, which have many powerful features and can scan and restore data from the file, ensuring very little loss of data.
Author Introduction
Kelly Zhao is a data recovery expert in DataNumen, Inc., which is the world leader in data recovery technologies, including excel recovery and pdf repair software products. For more information visit www.datanumen.com
If you’ve ever seen a spreadsheet, or used a program such as Excel, then you’re probably pretty familiar with tables. That’s all tables are, after all—simply a grid arranged into columns and rows. You can use them to organize and emphasize certain pieces of information. More than that, you can use tables to do complex page layout operations that almost rival expensive professional publishing programs like Adobe InDesign.
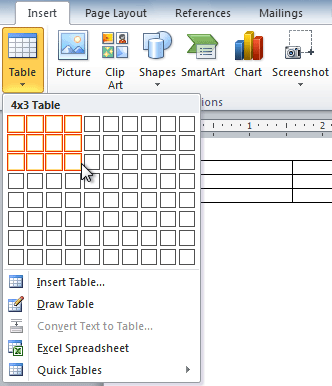
Inserting Tables
Before we identify the different parts of a table, let’s go ahead and insert one into our document. To do this, position the cursor at the point in the document where you want to put the table. Don’t worry if it’s not exactly right—you can always move or manipulate it later.
You’ll find tables under the Insert tab in the Tables group. The Tables button looks like this:

Click the Tables button.
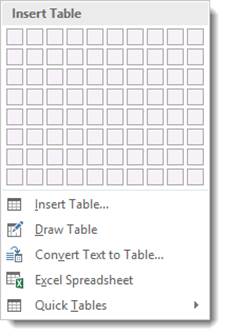
You’ll see a bunch of boxes at the top.
The easiest way to insert a table is to drag your mouse over the rows and columns until you have the amount you want.
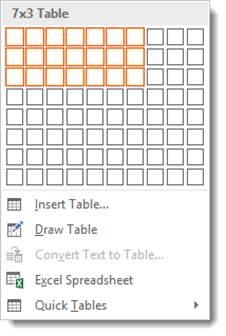
As you can see above, we dragged our mouse to make a table that has seven columns and three rows, or 7×3.
As we drag the table appears on our document:
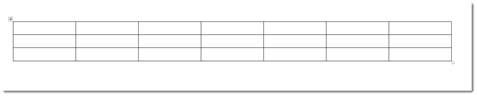
To insert this simple table, click the mouse.
We now have a basic table.
Let’s identify the parts.
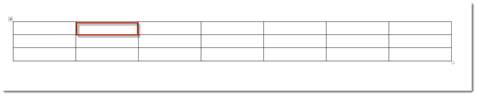
Each box that you see in a table is called a «Cell.» There are 21 cells in the table above. We have highlighted a cell in the snapshot below.
The «Rows» go from top to bottom. There are three rows. Rows go horizontally across the screen.
Columns go from left to right. There are seven columns above. Columns are vertical.
So now that we’ve identified the parts of a table, let’s take a look at the other ways in which we can add them.
Using the Insert Table Dialogue
Once again, we’re going to move the cursor to the point in the document where we want the table to appear. Now go back to the Insert tab, click the Table button, and select «Insert Table» instead of dragging your mouse over the boxes (which really represent cells, as we learned a second ago.)
A dialogue launches in the center of your screen. It looks like this.
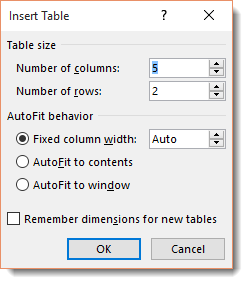
From here you can select the number of rows and columns. In this example, there are going to 5 columns, and 2 rows. Select your preferences in the AutoFit behavior section. You can set a fit column width, make the width of the cells and table fit to the content, or make the table size fit to the window.
Click OK.
Drawing a Table
If you know your table is not going to be uniform (regularly sized columns and rows), you can «draw» a table. This is particularly helpful when using tables to create complex page layouts.
To do this, click the Table button and select Draw Table. Your mouse pointer will transform into a pencil tool and you’ll be able to draw individual cells anywhere in your document. You can even draw cells within cells.
Click and hold the left mouse button, drag the cell into the desired size and shape, and then release. It’s that simple.
Selecting parts of tables
To select part of a table, simply click inside the upper left cell that represents the first cell you want to select. Hold the left mouse button down and drag across the remaining cells you want to select.
Adding Text to a Table
Adding text to a table is as easy as clicking into a cell and then typing. You will be able to change any attributes of that text, too, and even apply a Quick Style.
Position Text within a Cell
Just like in an ordinary document, you can choose whether to center text within a cell, or whether to align it right or left, or toward the top or the bottom. Go to the Alignment group under the Table Layout tab.
To reach the Table Layout tab, click the box above the left top corner of the table. This selects the table.

The Alignment group is pictured below.
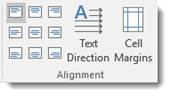
Using the graphics on the left as guides, select how you want text positioned within cell in your table.
NOTE: You can format the text position for just one cell, multiple cells (by selecting the cells), or the entire table (by selecting the table).
Converting Text into a Table
You can convert text into a table. This is especially handy if you’ve already written information that you think would be more effectively conveyed in a table.
To do this, you’ll have to carve up the text into columns and rows using commas and new paragraphs. That’s how you tell Word to separate the text into individual cells. Simply place a comma between the text you want to put into a column and place a paragraph where you want to begin a new row. An example of the text might look like this:
Now select the text, click the Tables button under the Insert tab. From the dropdown menu, choose «Convert Text To Table.»
You can now specify the number of columns, as well as how to separate text. You can separate text into cells by paragraphs, commas, tabs, etc.
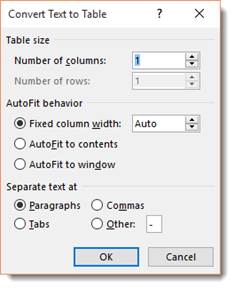
We chose two columns and to separate text at commas.
Look at the example below to see the final result.

Quick Tables
Word 2016 comes with a group of table templates for you to use and quickly customize to fit your needs. You can access them by clicking the Tables tool and choosing Quick Tables. Scroll through the templates and choose the one that best suits your needs. As with other kinds of tables, Word automatically inserts Quick Tables wherever the cursor is positioned in the document.
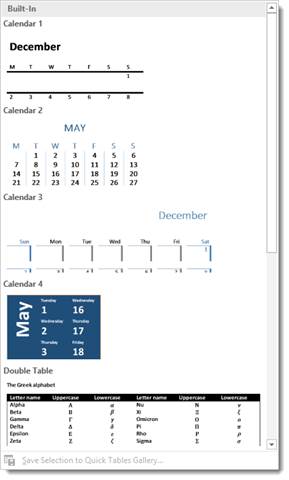
Once the Quick Table has been created, click the template text and start typing to replace it… You can also create your own Quick Tables by selecting a table that you’ve created and clicking the Save to Quick Table Gallery button at the bottom of the Quick Table menu.
Formatting Tables with the Table Tools
Whenever you create or select a table, the Table Tools will open automatically over the Design and Layout tabs in the tool bar. It allows you to easily apply table styles, borders, and shading attributes and more. Below is an example of the Design and Layout tools available for tables.

The Design tab (shown above) lets you customize the look and appearance of your table.
Let’s look at the Table Style Options group. But first, look at our table below:

In the Table Style Options group, we see that Header Row, First Column, and Banded Rows are checked.
Let’s learn what all these options mean so you can decide what you want checked – and what you don’t.
-
A Header Row is the first row in a table that contains headings (labels) for all the columns, as shown our table above.
-
When First Column is checked, it means the first column is also headers or labels. Same goes for the Last Column.
-
You can also choose to have banded rows or columns. Banded Rows formats even and odd rows differently so they are easier to read. If you choose Banded Columns, it formats even and odd columns differently.
-
Total Row means to create a row for mathematical totals.
In the Table Styles group, you can pick a new table style or apply shading to your table by clicking the Shading button.
In the Borders group, you can use Border Styles add borders to rows and columns to customize the look of your table.
Now, let’s click the Layout tab.

The Layout tab, when associated with the Table Tools, allows you to easily insert rows and columns, and format text and objects within cells.
Selecting Cells, Rows, and Columns
Selecting cells, rows, and columns in Word 2016 is easy.
To select a cell, click within the cell so the mouse cursor is blinking.
Go to the table Format tab, then the Table group. Click Select>Select Cell
To select a row, click in the first cell in a row go to Select>Select Row.
To select a column, click the first cell in a column, then go to Select>Select Column.
The Border Painter Tool
The Border Painter tool was a feature added in Word 2013. It makes applying different widths and borders to your table easier than ever before. To find the tool, select your table and go to the Table Tools Design tab.

To use the border painter, first apply formatting to some borders in your table, then click the Border Painter button. Click on any border to apply the formatting. You can also click and drag the mouse to apply it to a whole line.
Border Sampler
The Border Sampler works with the Border Painter tool. The Border Sampler is located at the bottom of the Border Styles Gallery. To access it, click the Border Styles button in the Borders group under the Table Tools Design tab.
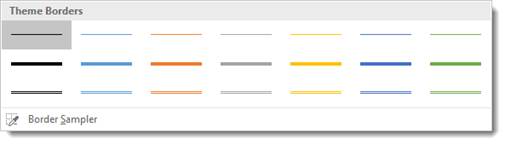
Simply click on Boarder Sampler. An eyedropper will appear. Click on a table border that you want to sample. Word then switches to the Border Sampler. You can apply the same formatting somewhere else in the table.
Adjusting the Width of Individual Columns
There are several ways to adjust the width of individual columns:
1. Position your mouse pointer over the edge of the column and then drag it to the desired width.
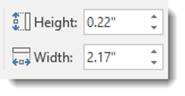
2. Select the column, then go to the Table Tools Layout tab, then the Cell Size group. Enter in a new width (in inches)
Adjusting Width of All Columns
To fix the width of all of the columns at once, select the entire table and use the Width box under the Layout tab to adjust the columns to the desired size.
You can also use the Distribute Columns button to make all of the columns the same size.
Adjust rows in the same way, except use the Height field.
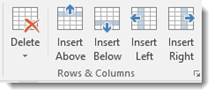
Adding Rows and Columns
There are two ways to add a new row or column to a table.
You can select a cell, row, or column and right click on it, then select Insert from the menu.
You can then choose to:
-
Insert Columns to the Left
-
Insert Columns to the Right
-
Insert Rows Above
-
Insert Rows Below
-
Insert Cells
In addition, you can also select a cell, row, or column, then go to the Table Tools Layout tab. Choose an option from the Rows & Columns group.
You can also add rows or columns simply by mousing over a row or column.
Look at the snapshot below.

When we moused over the row, look at the little plus sign that appeared.

Click the plus sign to add a row.
For columns, move to the top or bottom of the column and the plus sign will appear.
Deleting Cells, Rows or Columns
To delete a Cell, Row or Column, simply select it, navigate to the Layout tab, go to the Delete group, then select if you want to delete cells, rows, or columns, or the entire table from the dropdown menu.
You will then have the option of deleting a cell, a row, a column, or the entire table. You can also delete cells, rows and columns by right-clicking inside a cell. In the menu select Delete Cells. Click the appropriate command and click Ok.
Merging Cells and Splitting Cells
To merge cells, drag your mouse over the cells while holding the left mouse button to select them. In the Layout tab, select the Merge Cells button from the ribbon. It looks like this:

The Merge Cells button is located in the Merge group on the ribbon. Alternatively, select the cells you’d like to merge and click the right mouse button. Select the Merge Cells from the menu.
To split a cell, select it by clicking on it, then click the Split Cell button on the ribbon.

This button is also found in the Merge group. Choose the number of rows and columns you’d like to split the cell into then click OK.
Split a table by clicking the Split Table button. It looks like this:

The Split Table button is located in the Merge group under the Table Tools Layout tab.
Doing Math in a Table
You can do math in tables in much the same way that you do in spreadsheets and Excel. However, Word’s math commands are simpler, so they’re easier to use.
For this example, let’s do a sum.
To figure out a sum of values in a table, create the table and add the values you want to add. You can put values in rows or columns. You should go ahead and do the layout and design for your table at this time. Just make sure the last cell in the row or column (wherever you’re doing your values) is empty.
Now, click in the cell where you want to place the mathematical formula.
Go to the table Layout tab.
Go to the Data group. Click the Formula button.
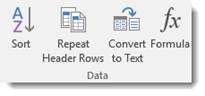
Select Sum from the Paste Function menu, then click OK.
