
Excel for Microsoft 365 Word for Microsoft 365 Access for Microsoft 365 Project Online Desktop Client Publisher for Microsoft 365 Word for the web OneNote for the web PowerPoint for the web Excel 2021 Word 2021 Access 2021 Project Professional 2021 Project Standard 2021 Publisher 2021 OneNote 2021 Excel 2019 Word 2019 Access 2019 Project Professional 2019 Project Standard 2019 Publisher 2019 Excel 2016 Word 2016 Access 2016 OneNote 2016 Project Professional 2016 Project Standard 2016 Publisher 2016 Office 2016 for Mac Excel 2013 Word 2013 Access 2013 OneNote 2013 Project Professional 2013 Project Standard 2013 Publisher 2013 Project Online Excel 2010 Word 2010 Access 2010 OneNote 2010 Project 2010 Project Standard 2010 Publisher 2010 Office 2010 Excel Starter 2010 More…Less
You can use the Office programs to save or convert your files to PDFs so that you can share them or print them using commercial printers. And you won’t need any other software or add-ins.
Use PDF format when you want a file that:
-
Looks the same on most computers.
-
Has a smaller file size.
-
Complies with an industry format.
Examples include resumes, legal documents, newsletters, files that are intended to be read (not edited) and printed, and files that are intended for professional printing.
Important: Many programs, including Microsoft Word, have the ability to open and edit PDF files. Simply sharing something as a PDF is not sufficient to guarantee the recipient can’t edit the file.
To see step-by-step instructions, select an Office program from the drop-down list.
-
Open the table or report you want to publish as a PDF.
-
On the External Data tab, in the Export group, select PDF or XPS.

-
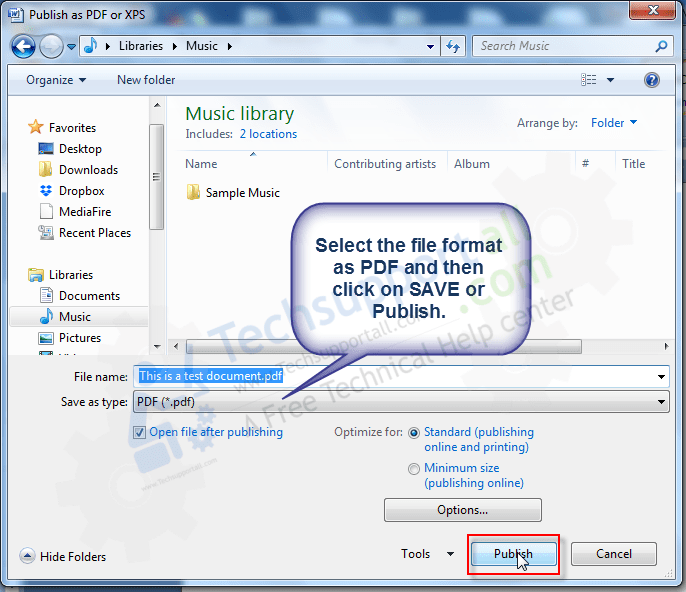
In the File Name field, type or select a name for the document.
-
In the Save as type list, select PDF (*.pdf) .
-
If the document requires high print quality, select Standard (publishing online and printing) .
-
If file size is more important than print quality, select Minimum size (publishing online).
-
-
Select Options to set the page to be printed, to choose whether markup should be printed, and to select output options. Select OK .
-
Select Publish.

Note: You can’t save Power View sheets as PDF files.
-
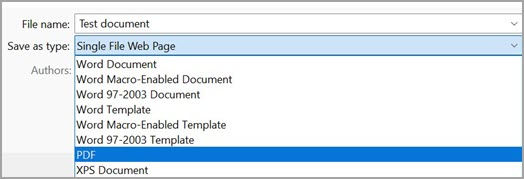
Select the File tab.
-
Select Save As .
To see the Save As dialog box in Excel 2013 or Excel 2016, you have to choose a location and folder. -
In the File Name box, enter a name for the file, if you haven’t already.
-
In the Save as type list, select PDF (*.pdf) .
-
If you want the file to open in the selected format after saving, select the Open file after publishing check box .
-
If the document requires high print quality, select Standard (publishing online and printing) .
-
If file size is more important than print quality, select Minimum size (publishing online) .
-
-
Select Options to set the page to be printed, to choose whether markup should be printed, and to select output options. For more information on the Options dialog box in Excel, see More about PDF options . Select OK when finished.
-
Select Save .
-
Select the File tab.
-
Select Export .
-
Under Export Current , select what part of the notebook you want to save as PDF.
-
Under Select Format , select PDF (*.pdf) , and then select Export .
-
In the Save As dialog box, in the File Name field, enter a name for the notebook.
-
Select Save .
-
Select the File tab.
-
Select Save As .
To see the Save As dialog box in PowerPoint 2013 or PowerPoint 2016 , you have to choose a location and folder. -
In the File Name box, enter a name for the file, if you haven’t already.
-
In the Save as type list, select PDF (*.pdf) .
-
If you want the file to open in the selected format after saving, select the Open file after publishing check box.
-
If the document requires high print quality, select Standard (publishing online and printing) .
-
If the file size is more important than print quality, select Minimum size (publishing online) .
-
-
Select Options to set the page to be printed, to choose whether markup should be printed, and to select output options. Select OK when finished.
-
Select Save .
-
On the File tab, choose Save As .
To see the Save As dialog box in Project 2013 or Project 2016, you have to choose a location and folder. -
In the File Name box, enter a name for the file, if you haven’t already.
-
In the Save as type list, select PDF Files (*.pdf) or XPS Files (*.xps) , and then choose Save .
-
In the Document Export Options dialog box, select a Publish Range , whether to Include Non-printing Information , and ISO 19500-1 compliance (PDF only).
Formatting tips
Project doesn’t support every PDF or XPS formatting feature, but you can still use some print options to change the look of the final doc.
Choose File > Print , and then change any of these options:
-
Dates
-
Orientation
-
Paper Size
-
Page Setup
In the Page Setup dialog box, you can change options on these tabs:
-
Margins
-
Legend
-
View
-
Select the File tab.
-
Select Save As .
To see the Save As dialog box in Publisher 2013 or Publisher 2016, you have to choose a location and folder. -
In the File Name box, enter a name for the file, if you haven’t already.
-
In the Save as type list, select PDF (*.pdf) .
-
If you want to change how the document is optimized, select Change . (Select Options in Publisher 2013 or Publisher 2016.)
-
Make any changes you want to the picture resolution and non-printing information.
-
Select Print Options to make changes to the printing options for the document.
-
Select OK when finished.
-
-
If you want the file to open in the selected format after saving, select the Open file after publishing check box.
-
Select Save .
-
Select the File tab.
-
Select Save As .
To see the Save As dialog box in Visio 2013 or Visio 2016, you have to choose a location and folder. -
In the File Name box, enter a name for the file, if you haven’t already.
-
In the Save as type list, select PDF (*.pdf) .
-
If you want the file to open in the selected format after saving, select the Automatically view file after saving check box.
-
If the document requires high print quality, select Standard (publishing online and printing) .
-
If file size is more important than print quality, select Minimum size (publishing online) .
-
-
Select Options to set the page to be printed, to choose whether markup should be printed, and to select output options. Select OK .
-
Select Save .
-
If the file was previously saved, select File > Save a Copy.
If the file is unsaved, select File > Save As. -
Select Browse to choose the location on your computer where you want to save the file.
-
In the drop-down list, select PDF.
-
Select Save.
Select More Options > Options to customize your PDF.
-
To make a PDF file from only some of the pages in your document, choose an option under Page range.
-
To include tracked changes in the PDF, under Publish what, select Document showing markup. Otherwise, make sure Document is selected.
-
To create a set of bookmarks in the PDF file, select Create bookmarks using. Then, choose Headings or, if you added bookmarks to your document, Word Bookmarks.
-
If you want to include document properties in the PDF, make sure Document properties is selected.
-
To make the document easier for screen-reading software to read, select Document structure tags for accessibility.
-
ISO 19005-1 compliant (PDF/A) This option outputs the PDF document as version 1.7 PDF, which is an archiving standard. PDF/A helps to insure that a document will look the same when it’s opened later on a different computer.
-
Bitmap text when fonts may not be embedded If fonts can’t be embedded into the document, the PDF uses bitmap images of the text so that the PDF looks the same as the original document. If this option isn’t selected and the file uses a font that can’t be embedded, then the PDF reader might substitute another font.
-
Encrypt the document with a password To restrict access so only people with the password can open the PDF, select this option. When you select OK, Word opens the Encrypt PDF Document box, where you can type and re-enter a password.
Open and copy content from a PDF with Word
You can copy any content you want from a PDF by opening it in Word.
Go to File > Open and browse to the PDF file. Word opens the PDF content in a new file. You can copy any content you want from it, including images and diagrams.
To save your file as a PDF in Office for Mac, follow these easy steps:
-
Select File.
-
Choose Save As.
-
Select File Format at the bottom of the window.
-
Choose PDF from the list of available file formats.
-
Give your file a name, if it doesn’t already have one, then select Export.
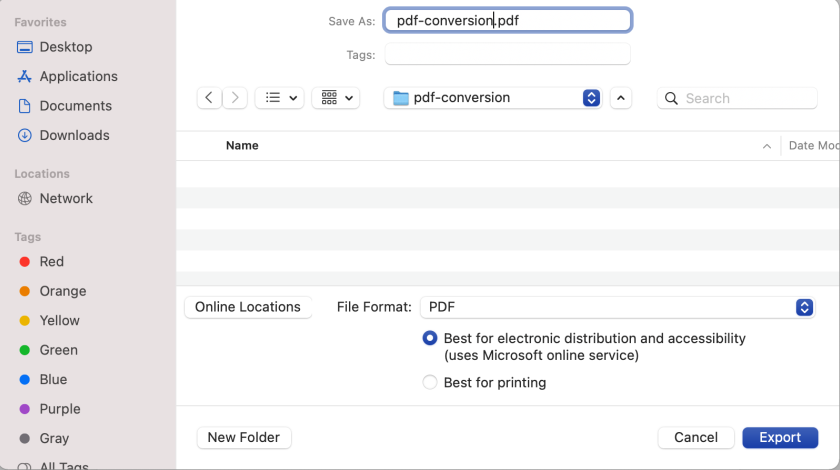
Note: When using Best for printing, the hyperlinks may not convert correctly. This is a known issue in Word for Mac.
Important:
-
When using Online Service , only font that Microsoft has the legal rights to can be used. If the documentation contains custom font, it will be substituted and may cause problems. This can be avoided by embedding the fonts into the document.
-
Learn more about embedding fonts by visiting:
-
Benefits of embedding custom fonts
-
Some of your fonts can’t be saved with the presentation
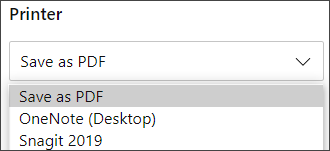
You can use Word, PowerPoint, and OneNote for the Web to convert your doc into a PDF.
-
Select File > Print > Print (in PowerPoint you will select one of three formats).
-
In the dropdown menu under Printer , select Save as PDF and then select Save.
-
Then in the Explorer menu that opens you can name the PDF and choose where to save it and then select Save.
This will generate a basic PDF that preserves the layout and format of your original document.
If you need more control over the options for your PDF, such as adding bookmarks, use the desktop app to convert your doc to a PDF. Select Open in Desktop App in the toolbar of PowerPoint and OneNote to start using the desktop app, and in Word select the Editing dropdown first and then select Open in Desktop App .

If you don’t own the desktop app, you can try or buy Microsoft 365.
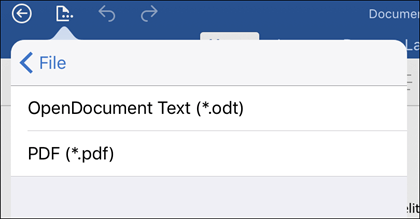
To export your Word document or Excel workbook to PDF format on iOS tap the File button at the top left, choose Export and then PDF.
Portable Document Format (PDF) preserves document formatting and enables file sharing. When the PDF format file is viewed online or printed, it retains the format that you intended. The PDF format is also useful for documents that will be reproduced using commercial printing methods. PDF is accepted as a valid format by many agencies and organizations, and viewers are available on a wider variety of platforms than XPS.
XML Paper Specification (XPS) is an electronic file format that preserves document formatting and enables file sharing. The XPS format ensures that when the file is viewed online or printed, it retains exactly the format that you intended, and that data in the file cannot be easily changed.
Important: Most modern web browsers can open and display a PDF file. If you have an older operating system, however, you may need a PDF reader installed on your device such as the Acrobat Reader, available from Adobe Systems.
See also
-
Edit or make changes to a PDF file
-
Create accessible PDFs
Need more help?
PDF documents are most commonly used file format and mostly used to easily share documents over internet. PDF files can be protected from changes and avoiding problems for fonts and broken layouts. Using Adobe Acrobat Reader, PDF file can be viewed easily.
Microsoft Word also gives an option to save Word files as PDF. follow the given steps below to convert Word Docx document to PDF file.
How to save Word document as PDF file
Step-1
Click on File tab > Share > Create PDF / XPS Document > Create a PDF / XPS

Step-2
Give a PDF file name, You can optimize the PDF file size for publishing online by selecting Minimum size (publish online) option.
Tip: you can also save XPS file here by selecting XPS (*.xps) from Save as type dropdown menu.

Click on Options button for more PDF options like, only publish specific word document page or range of pages, include non-printing info, or PDF iso option and text to bitmap if fonts not embedded.

When you finished with options then click on Publish button to export PDF from Word document
Updated: 04/01/2018 by
Microsoft Word documents are one of the most common types of files to be saved as a PDF. PDF files consist of text and sometimes pictures, which is content created using Microsoft Word.
If you have a Word document that you want to save as a PDF file, there are several ways to do so. Click a link below for instructions on how to create a PDF from a Word document.
Save Word document as a PDF
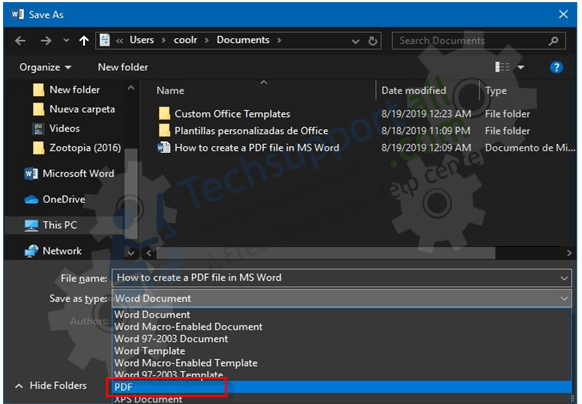
In most versions of Microsoft Word, you can save the Word document straight to a PDF file type by following the steps below.
- Open an existing Word document or create a new Word document.
- Click the File tab or menu option at the top-left of the Word program window.
- Click the Save As option in the menu.
- On the Save As window, click the Browse button or option to select a location on your computer to save the file.
- In the Save as type drop-down list, select the PDF (*.pdf) option.

- Click the Save button to save the Word document as a PDF.
A new feature available in Microsoft Word 2016 is the ability to export a Word document to PDF format, creating a PDF file. Follow the steps below to export your Word 2016 document to PDF.
- Open an existing Word document or create a new Word document.
- Click the File tab or menu option at the top-left of the Word program window.
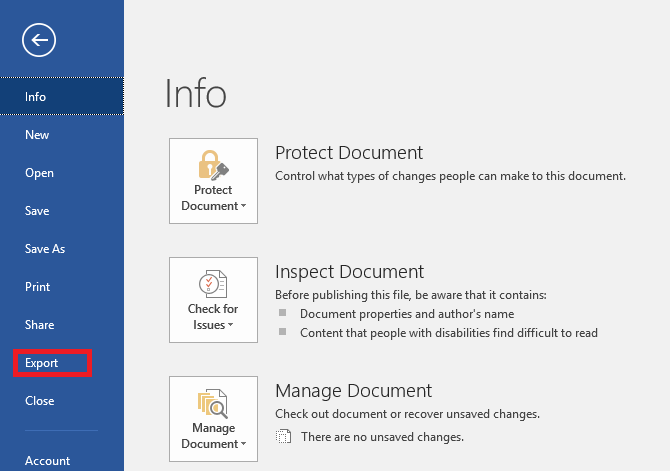
- Click the Export option in the menu.
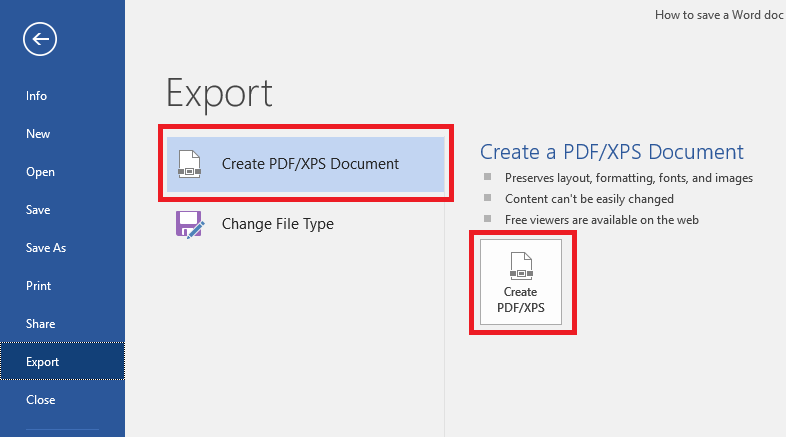
- Select the Create PDF/XPS Document option, then click the Create PDF/XPS button.
- In the Publish as PDF or XPS window, choose the location where you want to save the file. Make sure the Save as type drop-down list is set to PDF (*.pdf), then click the Publish button.
- The published PDF file will be opened in your default PDF viewing application.
Print Word document to a PDF
A Word document can be electronically printed to a PDF format, creating a PDF file. Printing to PDF requires your computer has a PDF creation program installed, so that Word can print to that PDF converter. We recommend one of the two following free PDF conversion applications.
- CutePDF
- PrimoPDF
Download and install one of the two PDF conversion applications, then follow the steps below to print your Word document to a PDF file.
- Open an existing Word document or create a new Word document.
- Click the File tab or menu option at the top-left of the Word program window.
- Click the Print option in the menu.
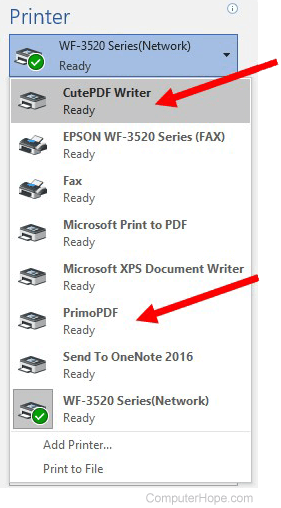
- On the Print page or window, change the selected printer to the CutePDF Writer or PrimoPDF printer option, depending on which you installed.
- Click the Print button.
- If using CutePDF, a Save As window opens. Choose the location where you want to save the PDF file, enter a file name for the PDF file, and click the Save button.
- If using PrimoPDF, a PrimoPDF window opens. By default, the Save As option will be set to Ask when creating PDF. You can leave this as the default, or you can change the option to Specific folder, requiring you to then select where to save the PDF file on your computer. Click the Create PDF button and follow any additional prompts to create and save the PDF file to your computer.
Hi, in this opportunity, we are going to talk about a Microsoft office feature “Save as pdf.” Specifically, regarding how to save as PDF in Microsoft Word Excel 2007, 2010. Some peoples don’t have an idea how to create a PDF file using MS word. In this article, we’ll show you with the step-by-step guide how to save as your “.doc” file into a “.PDF” file. Please follow the following steps.
- Steps for Microsoft Word 2007
- Steps for Microsoft Word 2010 or later
How to save as pdf in Microsoft word 2007
In MS Office 2003, 2007, we have an option to save as a PDF format, but only if you have installed the Save as PDF add-in on your computer. Please follow the following steps to learn how to do.
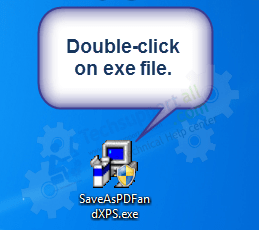
- Download MS Office Save As PDF add-in and run it.

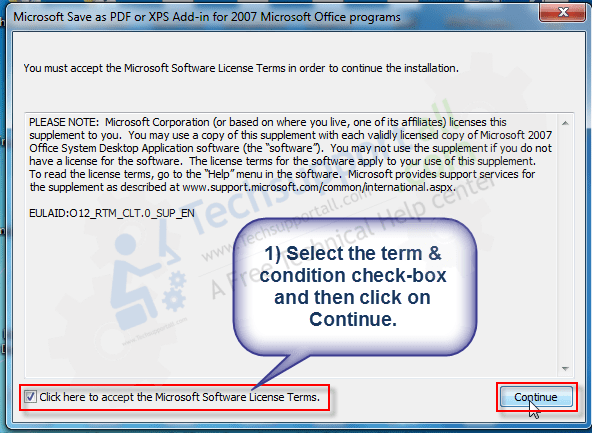
- Select the term & condition check-box and then click on Continue. The add-in will begin installing.

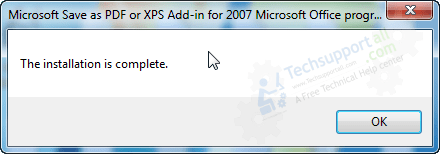
- After installed, you’ll get successfully finished message.

- Open the word document which you want to save into PDF format in MS word.
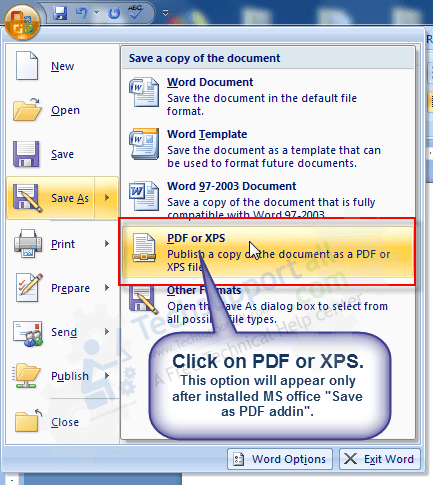
- Click on File menu → Save As → PDF or XPS and then choose the location in the box below.
Note: This PDF or XPS will add automatically when you installed the above give MS add-in.

- Enter the file name and click on save or publish.

How to save as pdf in Microsoft word 2010 or later
Since MS Office 2010, we already have the option to create a PDF document with our favorite MS word. It doesn’t need any external add-on. To do that, please follow the following steps:
- Open the word document which you want to save into PDF format in MS word.

- Click on File menu and then click on Save As, choose the location and in the box below.

- Choose the type of file to save: PDF. As you can see, it is a very simple process.

Editing a PDF document with Microsoft Word
Since Word 2013, we have the opportunity to import and edit a PDF document. From Word 2013, we have the opportunity to import and edit a PDF document.
- To achieve this, just go to File, open and there we will search for the desired PDF document.
- MS Word will start to process it, and in a few seconds, we will have a draft very similar to the original. It is likely that some content, such as frames, tables or labels are not completely the same. But most of the content such as text and images will be accurate.
- Once we have the draft already edited, we can save it either in. DOC or in PDF. Please keep in mind that if you are not satisfied with the results, you can always go back to the original document.
Well, that’s all for now. Finally, I want to leave you this little tip. If you do not have Microsoft Word, note that Windows 10 incorporates a virtual printer that saves any document in PDF.
Additional Info
Microsoft Word is the word processor of the suite. Word has a dominant position in the word processing market. Its proprietary DOC format is considered standard, although in its Word 2007 version it uses a new XML-based format called. DOCX, but it also can save and open documents in the DOC format. Word is also included in some versions of Microsoft Works. It is available for Microsoft Windows and Mac OS platforms. The first version of Word, released in 1983, was for the MS-DOS operating system and had the distinction of introducing the use of the mouse to numerous peoples.
Moreover, the format most used in Microsoft Word is .DOC. However, the PDF format is roughly used at a general level.PDF means Portable Document Format, used to display documents in an electronic way independent of the software, hardware or operating system where it is displayed. Originally developed by Adobe Systems as a universally compatible file format based on the PostScript format, it has become a de facto international standard for the exchange of documents and information. Here’s how to create a PDF document from Microsoft Word.


You use Microsoft Word for your various word-processing needs. It’s simple and easy-to-use, and it simply gets the job done in most cases. But what if someone else requests a file in a different format, such as PDF? What if you need the info in your Word doc to appear in plain text, without any font or paragraph styles?
Microsoft Word 2016 for Windows has a basic feature that lets you save documents in several different, but common, file formats. Here’s how to use it.
See on Microsoft Store (opens in new tab)
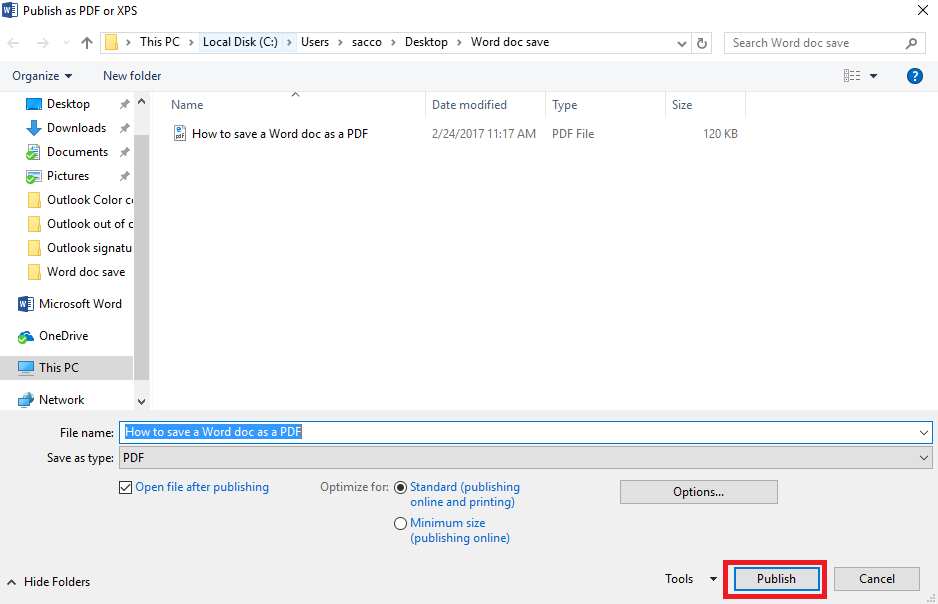
How to save a Microsoft Word doc as a PDF
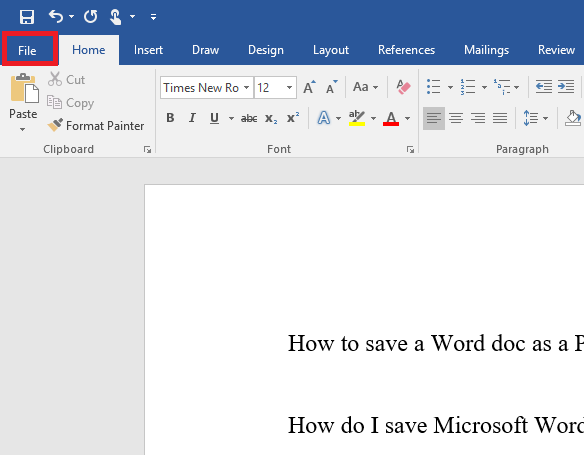
- Click the File tab in the top-left corner of your Word screen.
- Click Export in the blue vertical menu that runs along the left side of your screen.
- With the Create XPS/PDF Document option selected, click the corresponding box on the right side of your screen. (It looks like a document icon wearing a seatbelt.)
- A new box labeled Publish as PDF or XPS appears, and you should use it to navigate to the location on your PC where you want to save the new PDF.
- Click Publish to create and save your PDF.
- You may see a How do you want to open this file? pop-up box. By default, Windows will use the Edge browser but you can choose from other compatible browser apps installed on your PC, as well.
- If you want to continue using the same app to open PDFs in the future, check the Always use this app to open .pdf files option.
If the file format you want isn’t available in Microsoft’s default option, you can also dig a bit deeper for additional file format options.
How to save a Microsoft Word doc in different file formats
- Follow Steps No. 1 and No. 2 above.
- Highlight the Change File Type option on the left side of the screen.
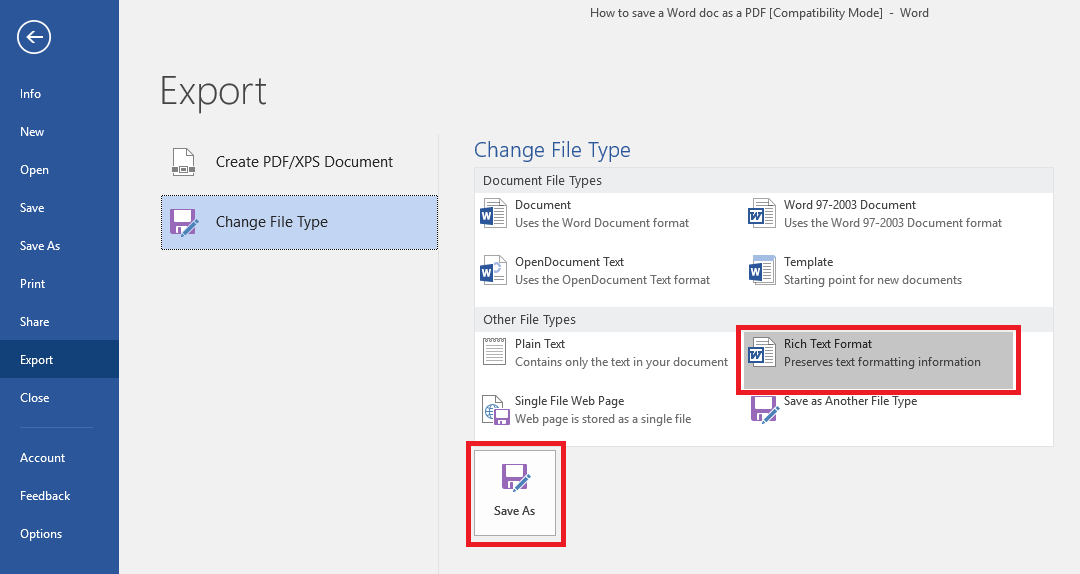
- You’ll see a number of different present options for new file formats, including OpenDocument Text, Word 97-2003 Document, Plain Text and Rich Text Format.
- If you want to use one of the default options, choose and click it accordingly and then hit the Save As box at the bottom of the screen.
- Next, navigate to the location on your PC where you want to save the new file and click Save.

- If you want to save your Word doc in a format that’s not available in Word’s preset defaults, complete Steps No. 1 and No. 2 above, and then choose Save as Another File Type
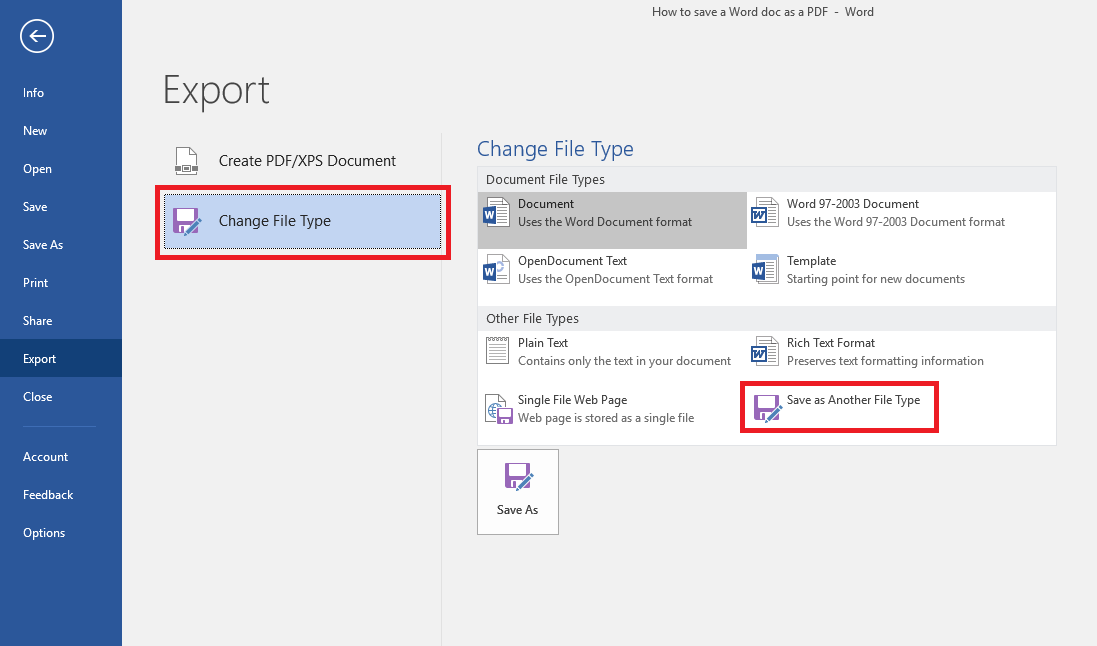
- Click the Save As box at the bottom of the screen.
- In the next box, navigate to the location on your PC where you want to save the new file.
- Open the drop-down menu next to Save as type to see a few additional options, such as Word XML Document, Strict Open XML document, and Web Page, Filtered.
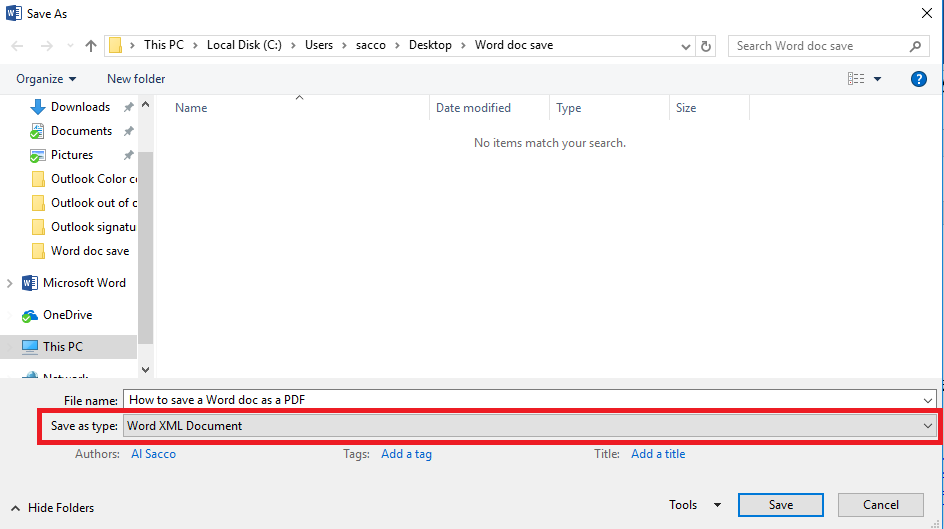
- Choose the format you want and click Save.
Word 2016 for Windows lets you easily convert your documents into more than a dozen different formats, using the process detailed here.
For more Word help and how-to articles, read:
- 13 easy-to-remember Microsoft Word keyboard shortcuts
- How to skip the Start screen in Microsoft Word 2016 for Windows
- How to change font defaults in Microsoft Word 2016 for Windows
- How to master Zoom settings in Word 2016 for Windows
All the latest news, reviews, and guides for Windows and Xbox diehards.
Al Sacco is content director of Future PLC’s Mobile Technology Vertical, which includes AndroidCentral.com, iMore.com and WindowsCentral.com. He is a veteran reporter, writer, reviewer and editor who has professionally covered and evaluated IT and mobile technology, and countless associated gadgets and accessories, for more than a decade. You can keep up with Al on Twitter and Instagram.