
-
Title:
-
Instructions:
-

These word search puzzles were made here! -
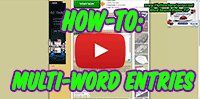
Our MOST ASKED QUESTION:
How do I make multi-word entries?
Colorado Springs
I Have a Dream
United States, etc.
It’s simple! Click the video —>

-
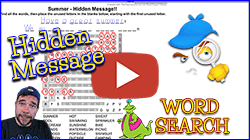
Make «Hidden Message» Word Searches!
Watch our video to learn how you can create a puzzle inside of a puzzle, commonly called a Hidden Message Word Search puzzle!Please SUBSCRIBE to our


- Do you want UPPERCASE or lowercase? We’ve always had that ability! It is in the blue menu after making the puzzle under «Advanced Options…» we have LOTS of options in that menu. We get asked everyday for options that are already there! Don’t cheat yourself out of the perfect puzzle by not looking for it in the blue menu on the left.
-
Rows
(10-50)
-
Columns
(10-50)
- Grid styles
- Language
- Word Placement
-
Show Grid Lines
Yes
No -
Place Word List:
Hide word list
Sort word list alphabetically
- # of columns for word list if ‘Bottom’ list is chosen above.
- TIP: Use the «Fun Options» for neat options like:
1. Hide «WordSearchPuzzle» but show «Word Search Puzzle» in the word list! and
2. Hide «SantaClaus» but show «Who visits on Christmas?»
Watch the video below for more fun tips!
Choose up to 3 fonts + Arial (default)
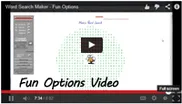
Check out our «Fun Options» video, then click the button below!
I understand that by clicking «Fun Options» below, it will lock out my word list above to further changes, and saving options will be unavailable.
Fun Options
- All effects
- Stylized Effects
- Photo Made of Words

Any photo can now become a piece of word art!
Create your own pictures made of words easily. Use this picture word art generator to turn your photos into text clouds in shades of brown complemented with artistic touch.
- Categories:
Art
Upload a photo:
from computerLoading: 0%by URLLoading…from FacebookLoading…
or select one of these:


Sample photos
What people say about this effect:
- VKontakte
×
Choose from Photos
Browse your albums until you find a picture you want to use
Select an album
Select a new photo
Back to albums
PreviousNext
Page 1 / 1
OKCancel
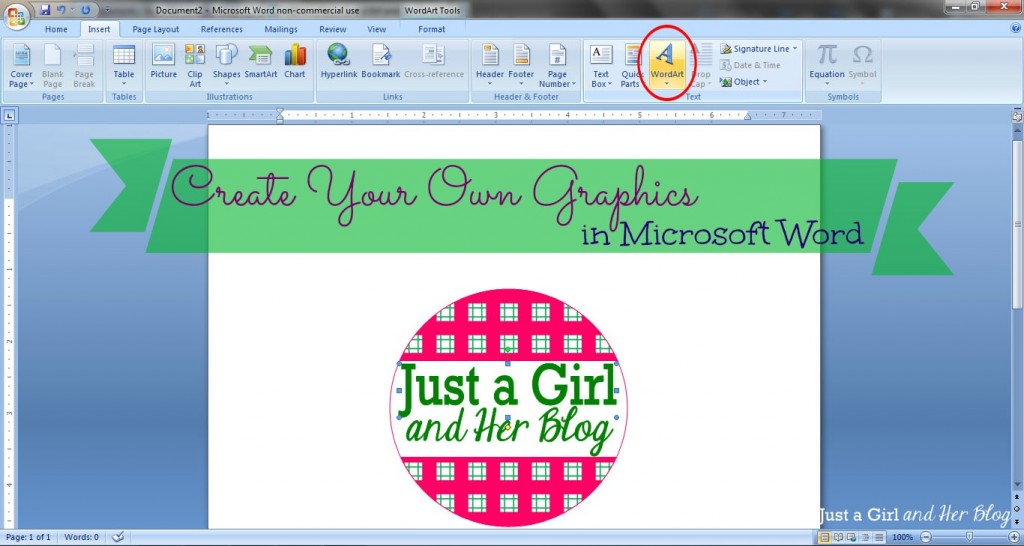
After my posts about creating monograms, labels, and banners in Word, I have received quite a few questions asking if it was possible to make other graphics as well. It is! Today I’m going to show you a couple examples of how to create your own graphics and let you in on my little graphic-making secret. 😉 Let’s get started!
Make Your Own Backgrounds
Have you ever searched and searched for a background graphic to use only to become frustrated that nothing is “just right”? I have definitely been there, so I started creating my own simple backgrounds. I actually make a lot of them in Photoshop Elements, but the same thing can easily be accomplished in Word as well.
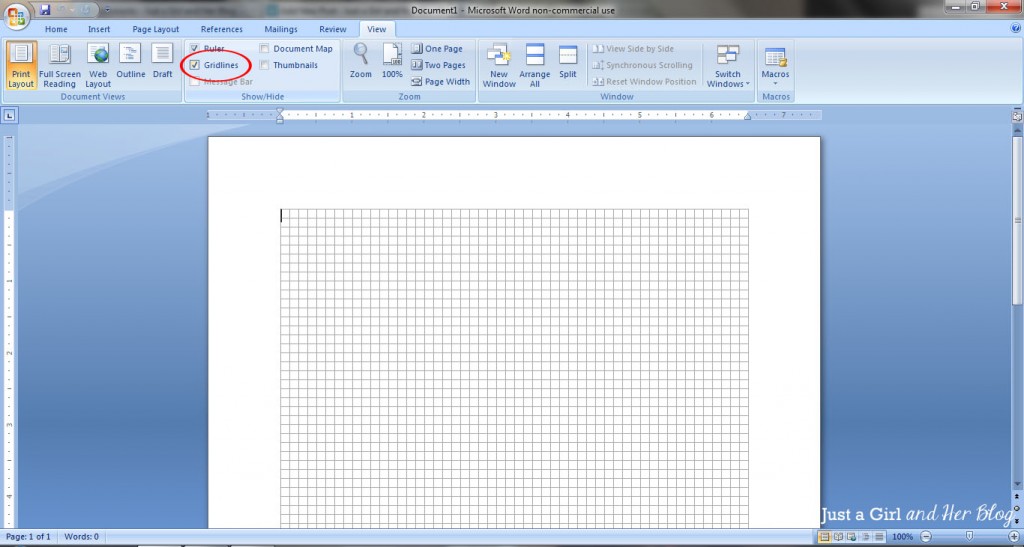
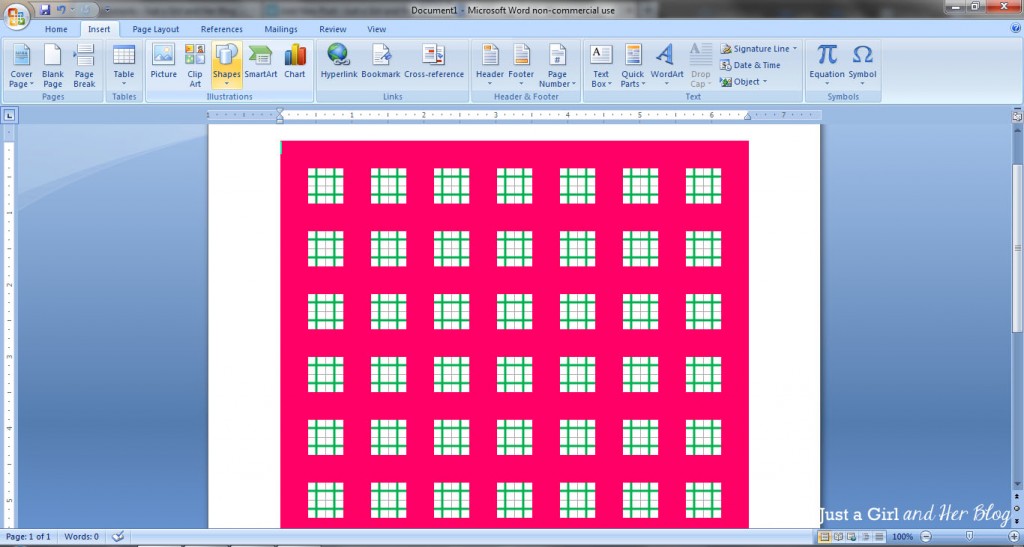
1. Use Gridlines
The first thing I do is, under the “View” tab at the top of the screen, check the “Gridlines” box. This way you’ll have a guide to help you make sure your patterns are straight and evenly spaced.
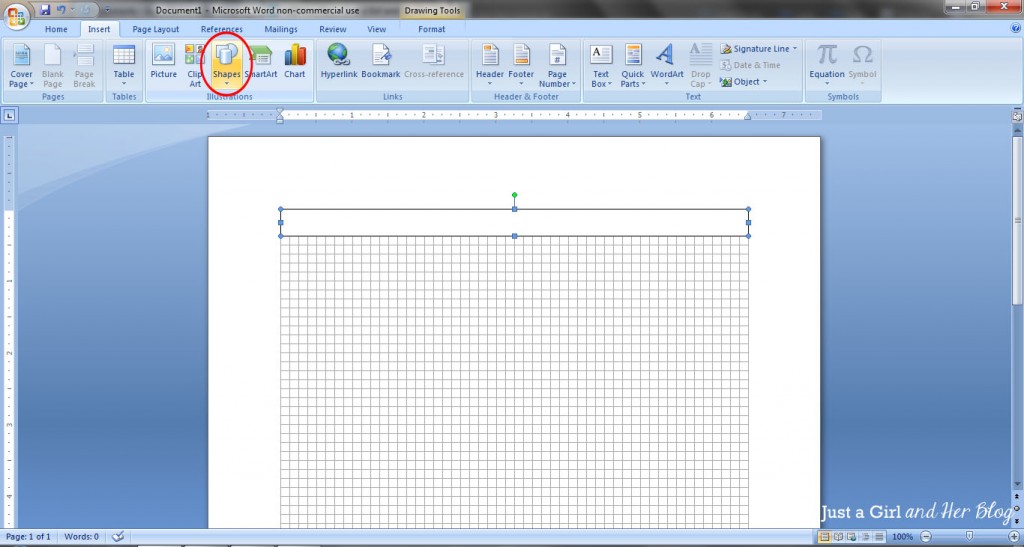
2. Start with a Shape
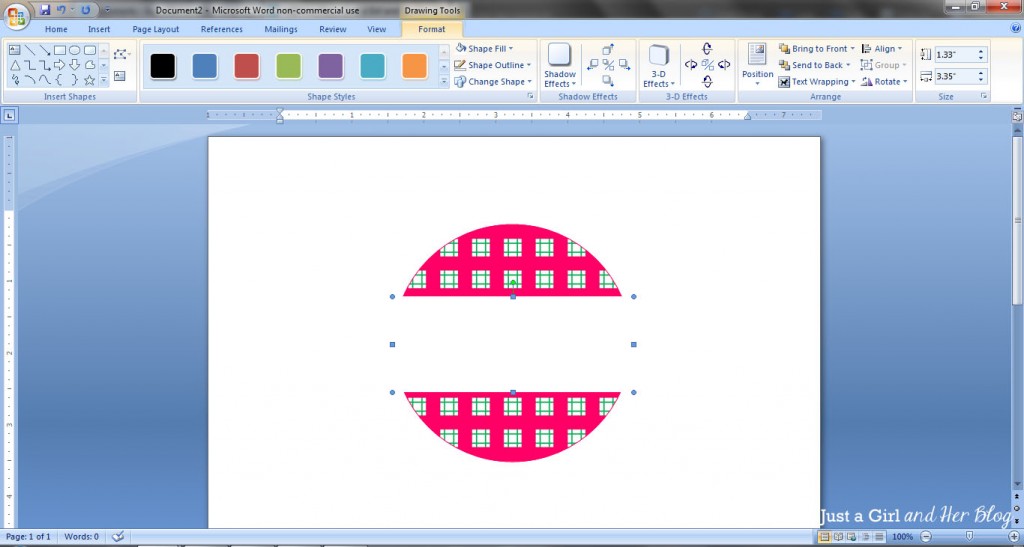
Let’s say I want to make a plaid pattern. I will go to the “Insert” tab, click on “Shape” and choose a rectangle to begin my pattern. I made my rectangle two boxes high and ran it the full width of the gridlines.
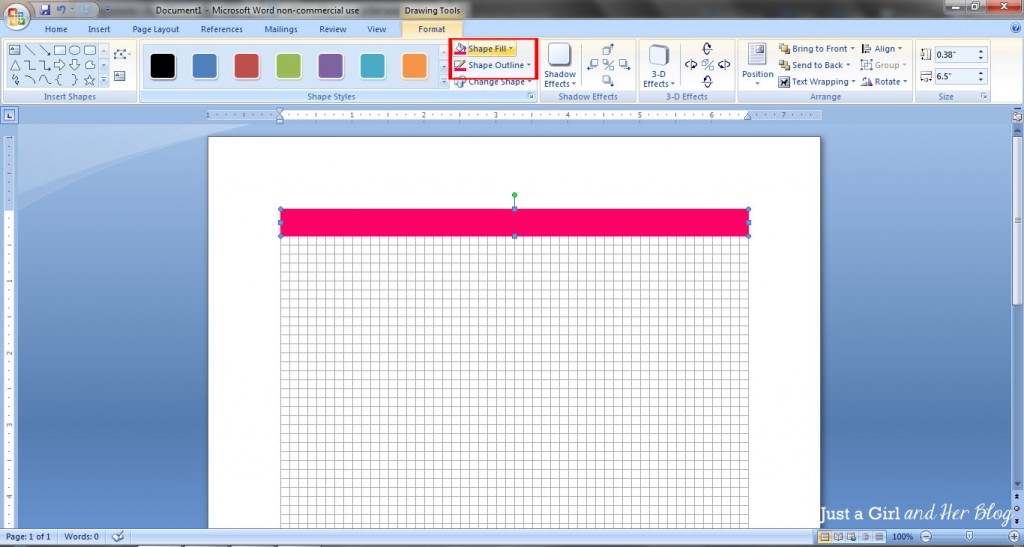
3. Pick your colors.
I can then go to my “Drawing Tools” toolbar to change the outline and fill colors of my shape. I chose pink. {Because who doesn’t love pink in the spring?!}
4. Continue Adding Shapes.
Continue this same process with each shape until you have the pattern you want. {Shortcut: You can copy and paste the shape if you’re using the same one over and over.} I used a combination of vertical and horizontal rectangles and the “Line” shape to make my pattern.
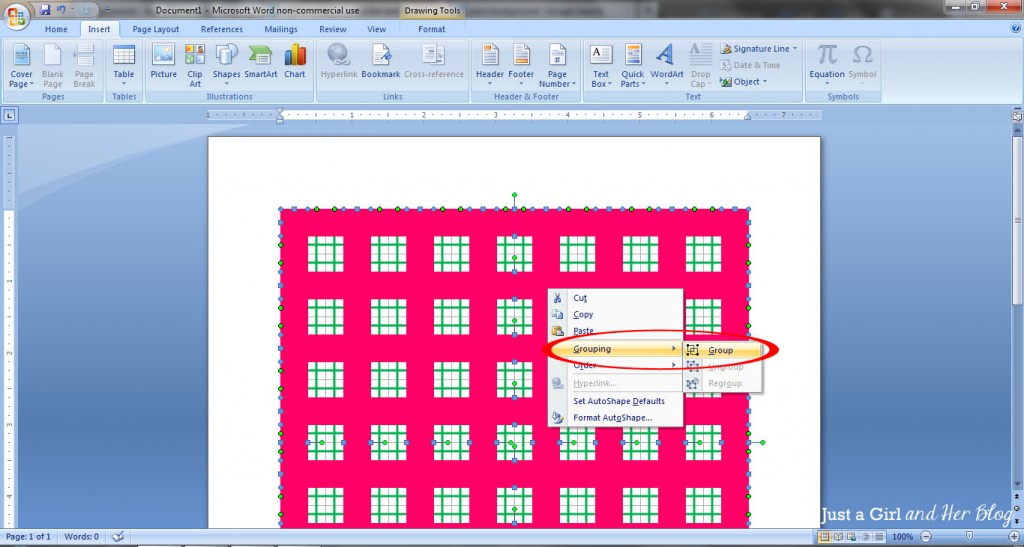
5. Group Your Shapes.
Next, like we did in the labels and bunting banner tutorials, I am going to “group” my pattern. To do this. I select each shape by holding down the “Ctrl” key and clicking each shape individually. I then right click and select “Grouping” and then “Group.”
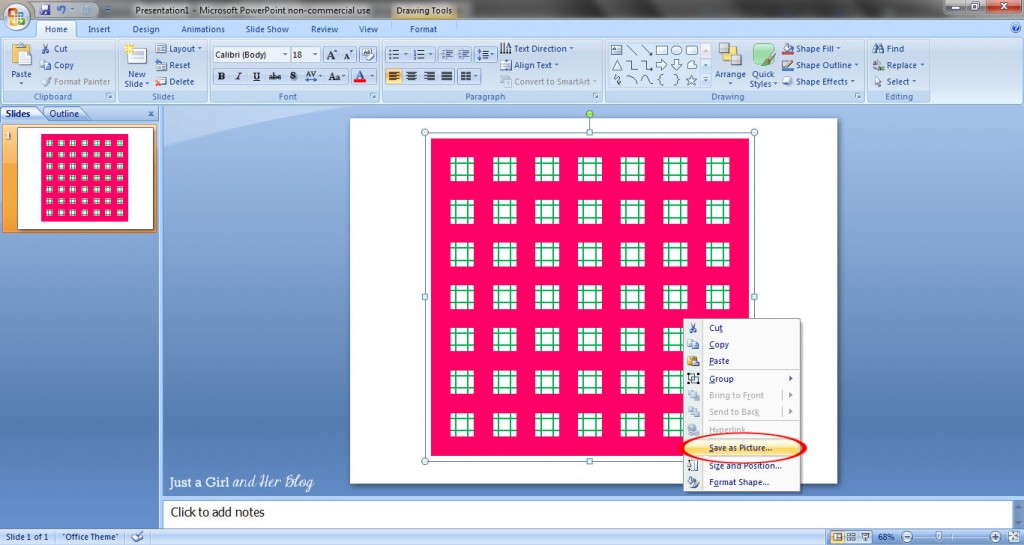
6. Save As Picture in PowerPoint.
Here comes my little secret when it comes to making graphics. In order to use this as a graphic, we need to save it as a .jpg or other picture file. While Microsoft Word doesn’t let you do this, PowerPoint does. So the next thing you’ll do is right click your shape and select “Copy.” Then paste it into a PowerPoint presentation and right click it. Select “Save as Picture…” I usually save it as a .jpg file as opposed to .png or .tif, but you can test them out and see what works best for you.
Use Your Background to Create a Graphic
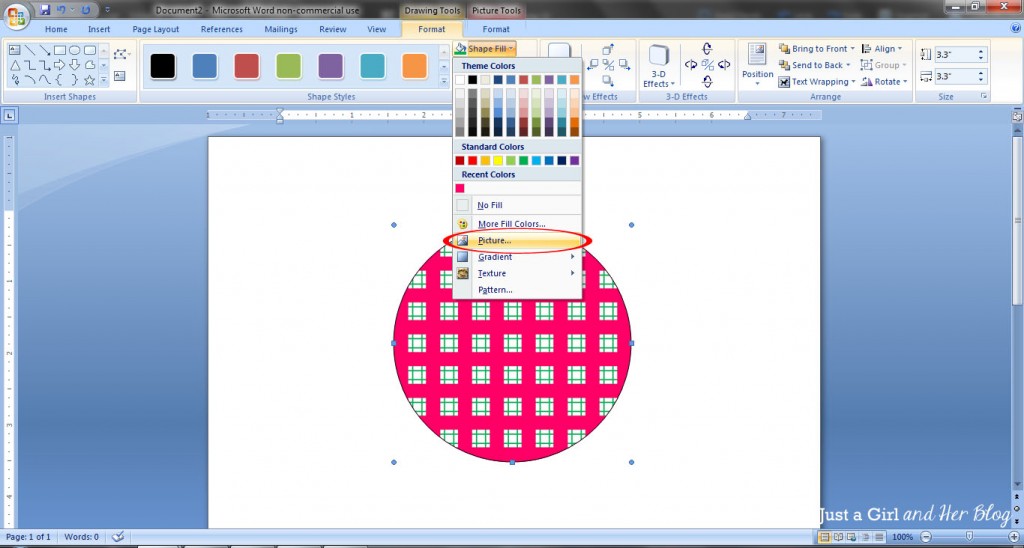
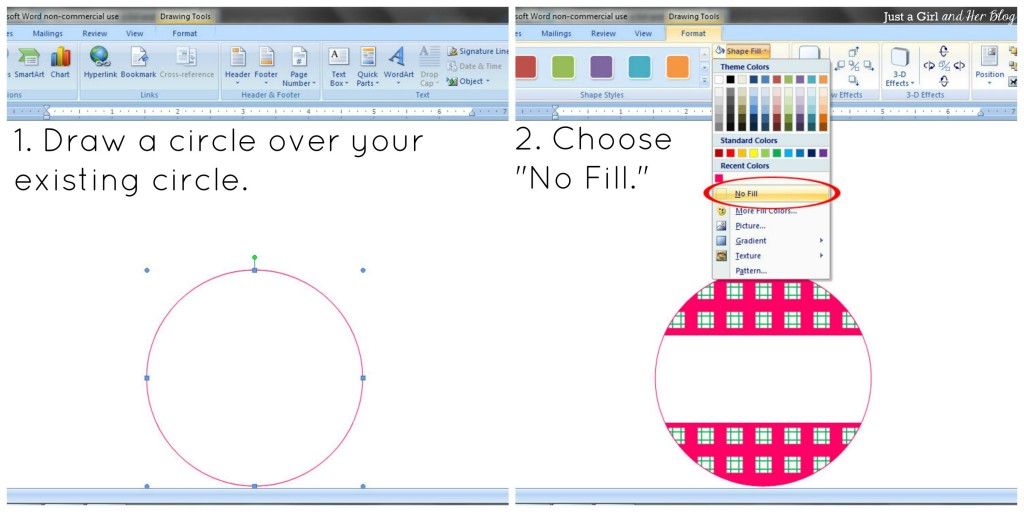
You can now use your graphic as a background in Word or another program or to fill a shape, like we did in the bunting banner tutorial. I used my background to create a graphic for my blog in Word.
I drew a shape, then under the “Drawing Tools” tab, I clicked the “Shape Fill” drop down and selected “Picture.” I picked the pattern .jpg that I just created.
Next, I drew a white rectangle as a background for my blog name.
I wanted to make sure the circle was defined, so I drew another circle of the same size and put it directly over my existing circle. I chose “No Fill” as the fill color so that I could have a well defined outline while still seeing my patterned circle.
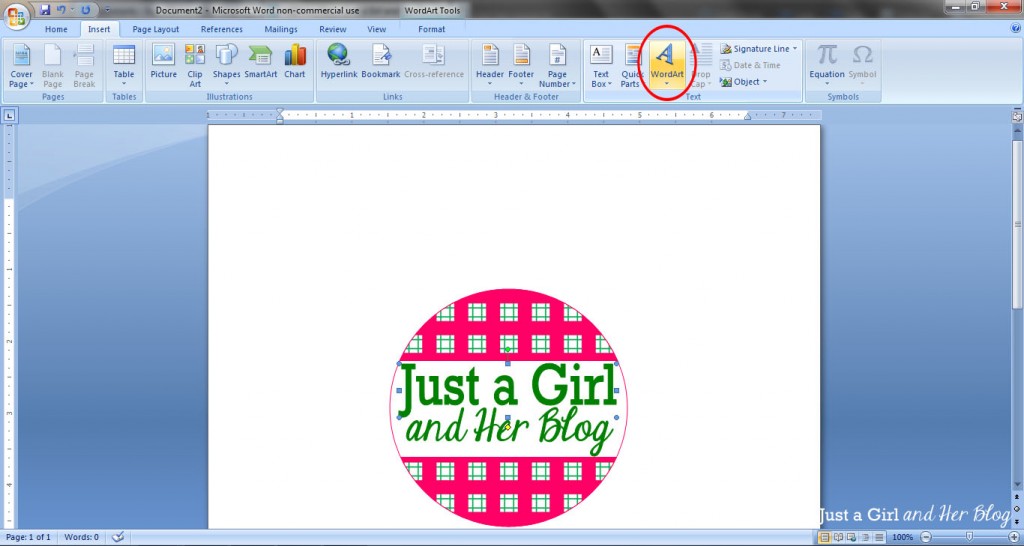
I then went under the “Insert” tab and used the “Word Art” feature to add my blog name. {For more details on how to format your Word Art, see my Bunting Banner Tutorial.}
Finally, you will want to follow steps five and six above to group the graphic and save it as a picture using PowerPoint. Then you can use it like you would use any other .jpg picture file!
If you’re just starting to experiment with graphic design and aren’t ready to invest in designing software, Microsoft Word has a surprising amount of options available and is SO easy to use! The possibilities are endless!
Do you have any design tips in Microsoft Word?

Linked Up Here:
Sharing with Domestic Superhero Thursday, House of Rose- Inspire Me Please
Follow my blog with Bloglovin
Word
Search Maker
Create your own custom word search worksheets! A variety of options
are available including font size, font style, lowercase or uppercase
letters, grid shape, word placement, and more.
Experiment with the settings below to find the best results for
printing. You may also need to adjust your browser’s page setup (change
margins, header/footer, or switch to landscape/portrait mode), then
go to ‘Print Preview’ before printing. These options are under your
browser’s File menu. Landscape mode works best for many puzzles.
Also, set your margins to 0.5″ or less.
Before you create your puzzle, you might also
want to highlight your word list and press Ctrl+C to keep a copy
of it on your computer’s clipboard. That way, if you need to come
back and change settings, you can paste the words into the blank
by pressing Ctrl+V. Otherwise you’ll have to re-type them.
(These
shortcut
commands work on Windows systems.)
PLEASE NOTE: If you are concerned about inappropriate words in the randomized letters, be sure to proofread before handing out to students.
Make your own word search puzzles with the Word Search Maker! This easy-to-use tool allows you to provide your own word list and create custom word searches in minutes. You can then download and print them instantly, or play online the pre-made puzzles right away. So get creative and have some fun!
How do you create custom Word Search Puzzles?
It’s easy! Just provide your word list and the Word Search Maker will create a puzzle for you.
- Enter your words into the text box provided. Make sure to add no more than 30 words.
- Select the theme or topics of your word search.
- Words should only include letters from a-z – uppercase or lowercase. You can use space and dash but these will be omitted while searching for your word search.
- Make sure not to use any personal information if you want your puzzles added to our database.
- When you are ready, click on “Regenerate” and the word search will be generated for you.
- If you want to download and print your word search puzzle, just click on “Download PDF.” The word search will be downloaded as a PDF file which you can then print.
NOTE: These are randomly generated words so be sure to proofread carefully before using. You can also regenerate the puzzle with new array of words.
Do you want to have a 1×1 picture but you don’t have the time and money to have it taken at a photography studio? Thankfully, you can make your own 1×1 photo using available tools like Microsoft Word and you don’t have to be a graphic designer to do it.
Maybe you’re applying for a job where a 1×1 picture is one of the requirements. Most people would go to a photography studio where a professional photographer will take their picture using an expensive camera. It’s recommended to have a studio take your 1×1 picture because it ensures that your photo is of the highest possible quality. Photography studios not only take your picture, they will also enhance it so that the final result is something that you can be proud of.
However, if you can’t visit the photography studio to have your 1″ x 1″ picture taken, whether due to lack of time or just plain old laziness, then you can take the photo yourself using your smartphone and turn it into a 1×1 ID photo. You don’t have to be a Photoshop expert to make a 1×1 picture. You only need basic skills in Microsoft Word and you will have your own 1×1 ID picture in no time.
In this article, we’ll teach you how to make a 1×1 picture using Microsoft Word as well as how to remove the background for a professional-looking result.
Table of Contents
- What is the 1×1 Picture Size?
- How to Remove Background From Photo (Optional)
- How to Make a 1×1 Picture in Microsoft Word
- How to Save Your 1×1 Picture as JPEG or PNG
- Final Thoughts
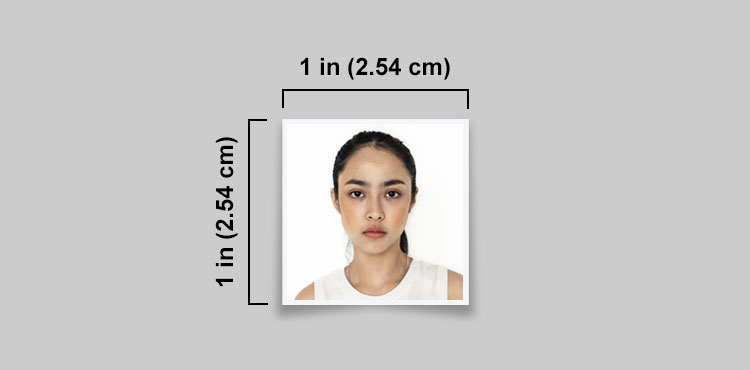
What is the 1×1 Picture Size?
These are the exact dimensions of the 1×1 picture:
- The 1×1 picture size in inches is 1″ x 1″.
- The 1×1 picture size in centimeters (cm) is 2.54 cm x 2.54 cm.
- The 1×1 picture size in millimeters (mm) is 25.4 mm x 25.4 mm.
- The 1×1 picture size in pixels is 300 x 300 pixels at 300 DPI.
How to Remove Background From Photo (Optional)
Before creating your 1×1 picture, you may have to remove the background from your source image. Background removal can be quite tricky and is best left to graphic design experts who know how to use software like Adobe Photoshop to remove the background from a photo.
If you don’t know how to remove a background using Photoshop or if you can’t afford to hire a graphic designer to do it for you, there’s an incredibly quick and easy way to do it. With Remove.bg, you can easily remove backgrounds from photos with just a few clicks. And it’s totally free!
Create a Remove.bg account and then upload your image. Remove.bg will automatically remove the background using AI technology. After that, just click the Download button to download the new image with the background removed.
Check out the sample image below with the background removed using Remove.bg.


You can also click the Edit button to replace the background with your own custom background or color.
Remove.bg is a fantastic tool for removing backgrounds from your photos. However, you can only download a preview image in “good quality” for free. To download a higher resolution photo, you must buy credits. Each credit costs $1.99 but you can save money by purchasing credits in bulk or by subscribing to a monthly plan.
In most cases, the preview image that you can download for free from Remove.bg is good enough for creating your 1×1 picture. After all, a small ID photo doesn’t really require a high resolution.
Another option for removing the background from images is Canva. However, the background remover feature is only available to Canva Pro, Canva for Teams, Canva for Education, and Canva for Nonprofits users.
Now let’s go through the steps of creating a 1×1 picture in Microsoft Word.
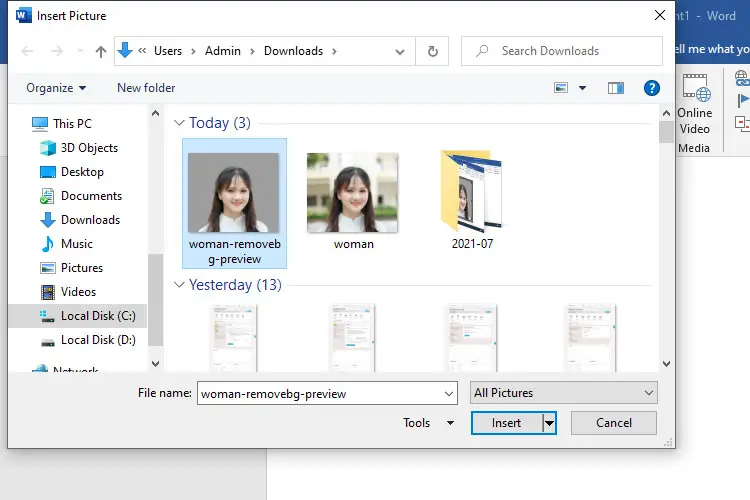
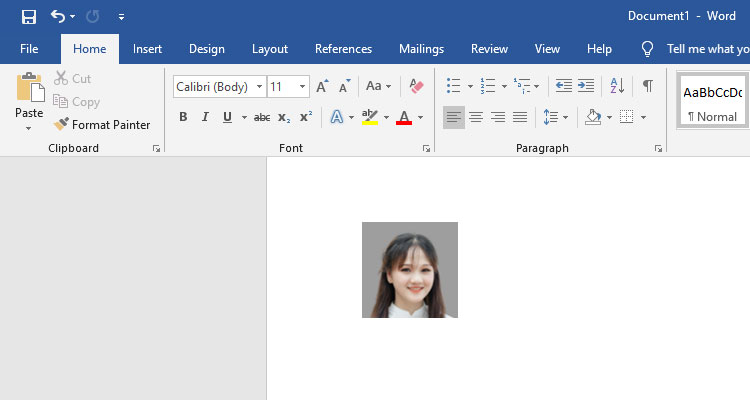
Open Microsoft Word and create a new document. On the main menu, click the Insert tab and then select Pictures.
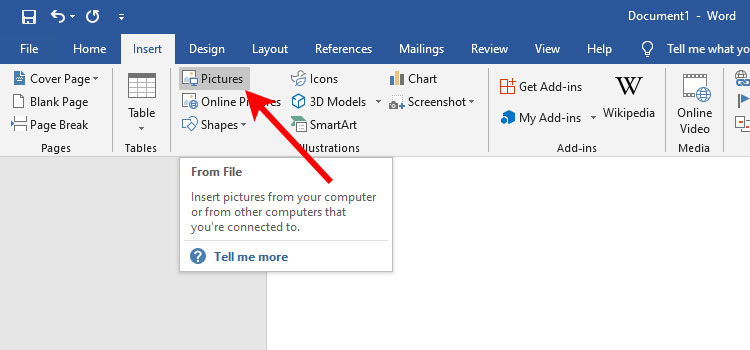
Choose the source image that you want to turn into a 1×1 picture. After selecting the photo, click Insert.
You can also insert the image into your document by copying (Ctrl + C) and pasting (Ctrl + V) it.
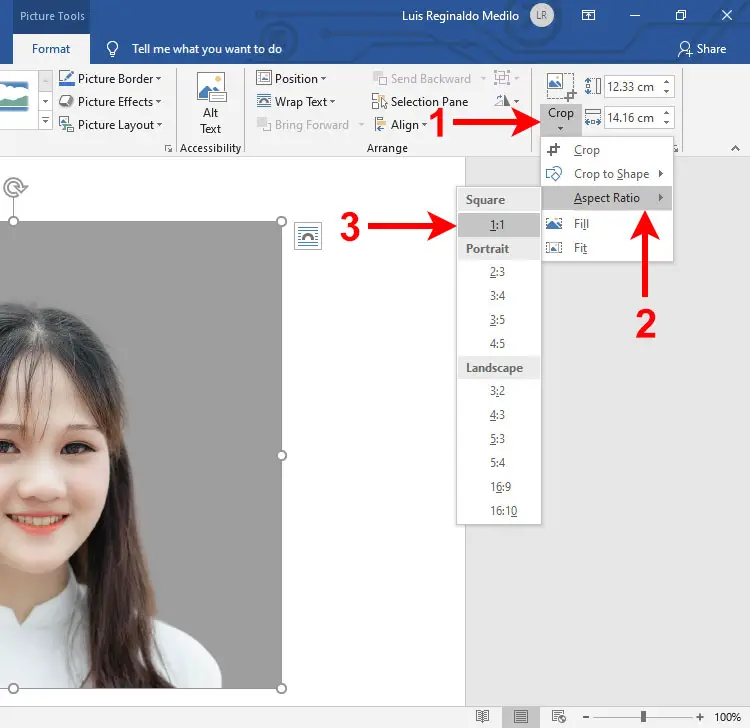
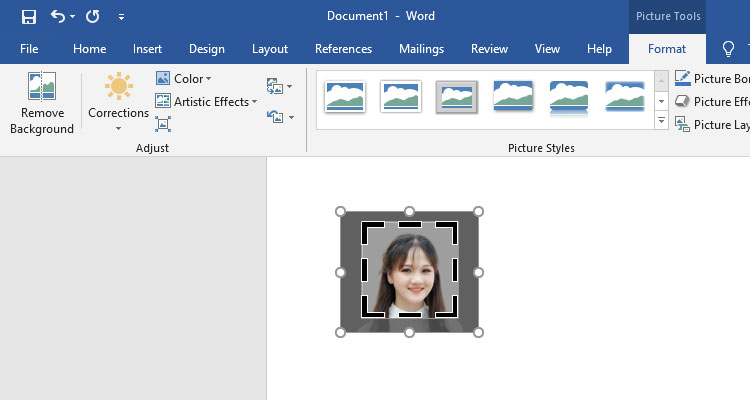
After the image is inserted into your Word document, click the Crop button under the Format tab on the main menu (if you can’t see the Format tab, just double-click the inserted photo).
On the dropdown menu, click Aspect Ratio and then click 1:1. This will make sure that the photo has a square shape with the same height and width.
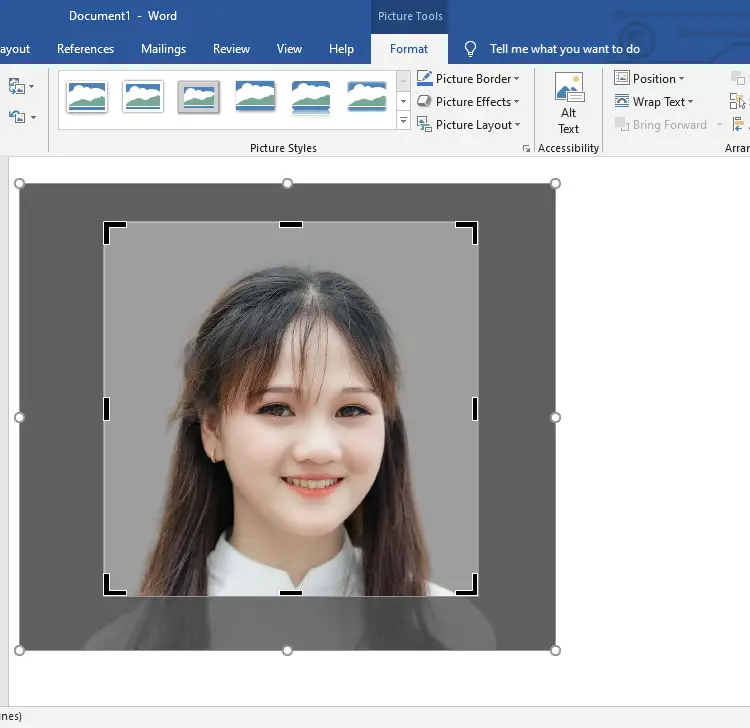
You’ll notice that the cropping feature of Word is activated. Crop the photo by resizing the canvas area which is bounded by thick black lines. Everything outside the canvas area will be cropped out in the 1×1 picture.
You can adjust the crop by moving the picture around by dragging it with your mouse. To resize the canvas area, drag the thick black line on the edge of the canvas and increase or decrease the size of the canvas area.
Make sure that the canvas area has a square shape by looking at the height and width dimensions next to the Crop button. If the height and width are not the same, just click Crop and then select Aspect Ratio and 1:1.
Once you’re satisfied with how your ID photo looks, you can now resize it to the 1×1 picture size.
To resize the photo to the 1×1 picture size, change both the height and width dimensions to 2.54 cm. Tap Enter to apply your changes. You can find these dimensions next to the Crop button under the Format tab.
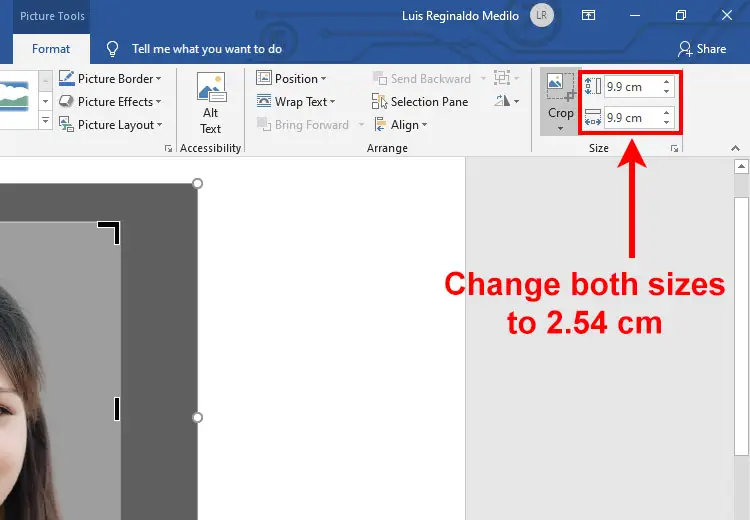
Your photo is now resized to 1×1 picture size. Complete the cropping by clicking the Crop button again, or by clicking anywhere outside the photo.
Congratulations! You have made a 1×1 picture using Microsoft Word. Print your new 1×1 ID photo by clicking File and Print, or by hitting Ctrl + P.
Don’t forget to save the document by clicking File and Save, or by hitting Ctrl + S.
Microsoft Word allows you to edit and customize your picture. Double-click the picture to activate the Format menu, and from there, you can edit your photo. Word has a “remove background” feature although it’s pretty basic and not as good as Remove.bg.
The following image editing options are available in Microsoft Word:
- Remove Background
- Corrections – Sharpen and soften an image or adjust brightness and contrast.
- Color – Recolor or change saturation and tone.
- Artistic Effects – Apply special effects to the picture.
- Picture Styles – Add a frame or drop shadow.
- Picture Border – Add colored border around the picture.
- Picture Effects
- Picture Layout
How to Save Your 1×1 Picture as JPEG or PNG
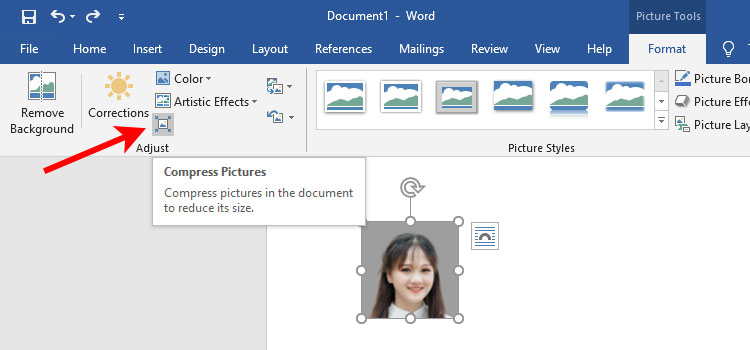
Perhaps you want to save your newly created 1×1 picture as an image file (JPEG or PNG) rather than a Microsoft Word document. You can do that, too.
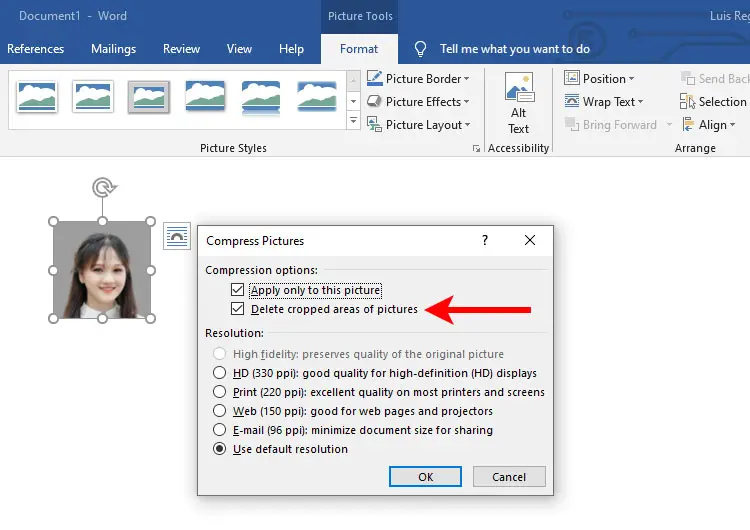
To save your picture as JPEG or PNG, double-click the picture to launch the Format menu and then click the Compress Pictures icon as shown on the screenshot below.
On the Compress Pictures dialog and under Compression Options, make sure that the “Delete cropped areas of pictures” box is checked.
You may choose to uncheck “Apply only to this picture” so that image compression will not be applied.
You can also select your desired image resolution (HD, print, web or e-mail). The default resolution is fine in most cases.
Click OK when you’re done.
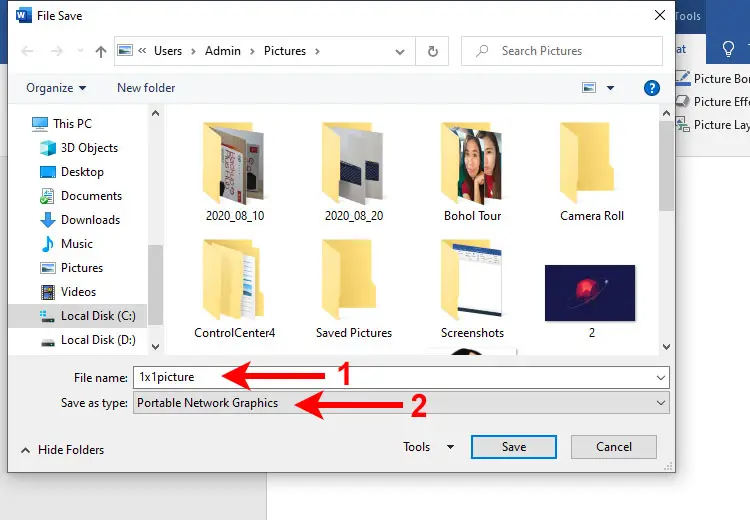
Next, right-click on the picture and on the context menu, click Save as Picture.
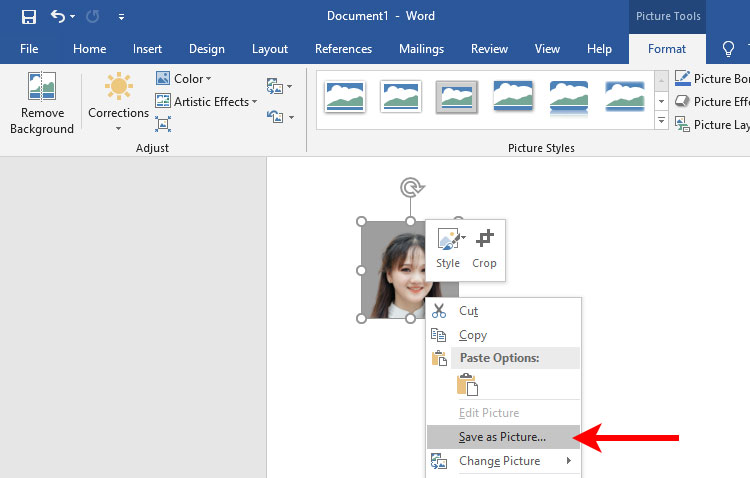
You can now save the picture to your computer. Enter the file name of your 1×1 picture and then select the file type. For the best image quality, choose either Portable Network Graphics (PNG) or JPEG File Interchange Format.
Finally, click Save to save the photo as an image file.
You can now attach the photo to your emails, website accounts, online applications, and many more. You can even insert it to another Word document so that you don’t have to make a new 1×1 picture every time you need one.
Final Thoughts
Microsoft Word is a versatile software that allows you to edit your photos aside from the usual documents. Although it’s not as powerful as Adobe Photoshop because it’s not a graphic editor, Microsoft Word can still do a good job with basic tasks such as creating a 1×1 ID picture from an ordinary smartphone photo.
Feel free to leave a comment if you have any questions or clarifications. If you want to know how to make a 2×2 picture, you may check out this article.
Puzzle Creator: (example: Mrs. Jones)
Enter your word list in the box below.
- Use a comma or press enter between words.
- Minimum word length: 3 letters
- Maximum word length: 16 letters
- Recommended number of words: 20
Level — Intermediate
· 18 x 12 grid
· Words hidden across, down, and diagonally
· No backwards words
· Medium font size
· Recommended for grades 2 — 4
Please note:
- There may be a limit to the number and lengths of words hidden. If you have too many words or your words are too long, they may be left out of the puzzle. Please check your puzzle carefully to make sure all of your words are there.
- Our word search generator uses a basic word filter to prevent the accidental, random creation of offensive words. When you create your puzzle, please check it over it carefully to be sure unintended words were not added by our random letter generator.
STW members are able to save their worksheets. You are not currently logged in and will not be able to save this file.

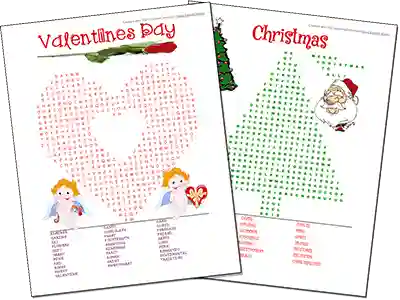
Sample Word Search Puzzle Generator Images
Below are two examples of beginner and intermediate Word Searches! The Word Search Maker creates the puzzle page as well as a solution page.


![]()
Download Article
![]()
Download Article
Word Art is a fun way to make text stand out with special effects. With Word Art, you can add color, shape, and style to text for a birthday card, a presentation, or a display. To create word art, you can use an online word art generator or a computer program. Word art can add variety and interest to any text in just a few short clicks.
-

1
Search for an online word art generator. Online word art generators are easy to find by searching “word art generator” in a search engine. Word art generators are often free and offer a variety of word art styles that you can apply to any text.
- Some word art generators offer more elaborate styles for a small fee. You can decide if you are happy to use the free styles offered or want to pay a little more for a particular style.
-
2
Choose a word art style. Most online word art generators will have a gallery of word art styles that you can choose from to create your word art. Look through the gallery and click on different styles so you can see which one you like.
- You may be given a variety of word art styles, from text that flashes to text in an elaborate font or a bright color.
- Some generators require you to type in the text you want to make into word art. For example, you may type in “Happy Birthday” into the text field. You can then click on a style to see how the style looks on the text.
Advertisement
-
3
Make your own custom word art. Some online word art generators let you make your own custom word art. You may be given the option of selecting the color, font, and animation of the text. You can choose to make the text a certain size and color as well as determine the shape of the text.[1]
- Click through the custom options for the text to select the ones you like. Have fun with the custom options and play around with different styles until you create a style that you like.
-
4
Apply the word art style to the text. Once you have a word art style that you like, type out the text and apply the style. Most online word art generators will have a text box where you can type the text and then click on a word art style to apply it.
- Look over the text once you have applied the word art. Make sure you are happy with it. If not, you can always switch to a different word art style in the gallery or adjust the custom word art style as you see fit.
-
5
Make a word art cloud. Many online word art generators allow you to create a word art cloud, where you cluster or arrange text together in a shape. Look for the word art cloud option on the generator. Often, the generator will create the cloud for you once you put in your preferences.
- You may choose a shape that reflects the intent of the word art. For example, if you are creating word art as a gift for a friend’s baby shower, you may choose a shape like a stork or a baby rattle for the word art cloud.
- You can also choose a shape that you like or that looks appealing to you. For example, you may choose a heart shape or an oval shape for the word art cloud.
-
6
Put the word art on an object or item, if desired. Some online word art generators give you the option of putting your word art on an object or item, such as a t-shirt or a mug. You can also make the word art into a print that you can give as a gift or frame in your home.[2]
- This option will likely cost you, as you will be paying for the cost of printing the word art on the object or item plus shipping.


Advertisement
-
1
Locate the Insert tab and then the word art section. Making word art with a computer program like Microsoft Word, Excel, and PowerPoint can be done in a few easy steps. Start by locating the Insert tab in the computer program. The Insert tab should appear on the main toolbar in the computer program. Once you open the Insert tab, you should see the word art section.[3]
- If you are using a newer version of a computer program like Microsoft Word, you can find the word art option in the Document Elements tab.
- Depending on the version you are using, word art may be called «Smartart» in Microsoft Word.
-
2
Look through the word art styles. Click on the word art section and scroll through the styles. There should be a gallery of different word art styles, from different font colors to different font styles like bold, outline, or highlight. Look through them until you find a style you like for the text.[4]
-
3
Make a custom word art style. If you do not see any word art styles that you like in the gallery or want to adjust an existing style, you can make your own word art style. Use the text options in the word art styles section to customize the text as you see fit. You can also add elements like Text Fill, Text Outline, and Text Effects to the text. This will allow you to add shadows, curves, outline, and fill in the text with specific colors.[5]
- To add a color to fill in the text, use the Text Fill option.
- To add a colored outline to the text, use the Text Outline option.
- To add a curve or shadow to the text, use the Text Effects option.
-
4
Choose a style and enter in your text. Click on a word art style and then start typing your desired text to see how it looks on the page. A placeholder text box may appear on the page where you can then type in your text to apply the word art style.[6]
- You can also type out the text first, such as “Congratulations!”, then choose a word art style and highlight the text to apply the style.
- You can include symbols in the word art as well by clicking the Insert tab and then choosing a symbol to include in the word art.
-
5
Rotate the word art, if desired. If you’d like to rotate the word art so it appears slanted across the page, select it by clicking on it. Then, drag the circular rotation handle at the top of the box to rotate the text as desired.[7]
- You can also flip the word art or rotate it 90 degrees by clicking on the Drawing Tools Format tab. Then, click Rotate in the Arrange group and select an option. You can rotate the text right 90 degrees, rotate the text left 90 degrees, flip it vertically, flip is horizontally, as well as other options.


Advertisement
Ask a Question
200 characters left
Include your email address to get a message when this question is answered.
Submit
Advertisement
Thanks for submitting a tip for review!
About This Article
Thanks to all authors for creating a page that has been read 31,605 times.
Is this article up to date?
I’m such a fan of Pinterest and find myself pinning my favorites quotes from time to time. I got to thinking how easy it really is to create your own free printable word art with free online editing software. Not everyone has access to Photoshop or Adobe Illustrator, or the skills to use them proficiently like many talented graphic artists.
I know the basics of Photoshop, and work with it from time to time to make inspiration boards, but most of the time, I turn to the free and very user friendly software programs provided by Picasa that I’ve mentioned in the past. Nope, I’m not getting paid to say, it, I just have been using these two for years and love what they can do! I use them often for my own photo editing and watermarking but they are equally great for creating your own artwork with fun fonts.
If you want to make your own free printable word art for your home in any color, style and font you love, it’s really easy if you follow a few simple steps.
")
.
Download and Install Your Favorite Fonts. The first step is to find fonts you like and install them on your computer. There are hundreds of free fonts available online if you simply search for them at sites like Dafont, Urban Fonts, Fonts2U, Fonts.com etc.
I’m a PC gal, so I I’m not the one to ask how to install fonts on a Mac (anyone have a link?), but with a PC here are some simple instructions. Once you’ve installed your fonts you can get to work creating your own word art, whether it’s your favorite quote or a bus roll of streets or places, your family rules, or a seasonal inspired creation.
Download Picasa. Many of you use Picasa already and sing its praises, but for those who don’t know, Picasa is free, and it will import and recognize all of the fonts on your computer.

Next, Grab a High Resolution .jpg You want a high resolution image to work with so when you print your art, the fonts are clear and crisp. If you have a snipping tool, you can simply snag a plain white image (say from Microsoft Word), import it into Picasa, and either export the file and resize it (which is more complicated) or simply use the “Edit in Picnik” tool to resize it. I find sizing your vertical image to 2000 pixels by 2500 pixels works well for 8” x 10” printable art. To make it easy, you can download this plain white high resolution image and start with that. (Right click on the blank image and save to your computer).
Start Creating. Once you have your high resolution plain white image, you open it in Picasa and begin your creation with the basic font tool.

You can also download and install dingbats which are decorative characters or ornaments attached to keyboard letters. Above I used the ‘BlackJack’ font and the ‘2 Peas Love Me’ dingbats to form the heart.
Let’s say you want to create a printable to remind you of your favorite things about the fall season. You can keep your background color white or you can change it to your color of choice. To change the background, choose “Auto Color” under Basic Fixes and then choose “Tint” under Effects. You can select any color background from that tool.
Next, get to work laying out your fonts, as seen below, with the Edit Text function. The nice thing about Picasa is you can increase or decrease the size of your font with one click and drag, and also tilt your words in any direction, whether it’s diagonal or vertical (like the ‘Scrabble’ tiles above).

Use whatever fonts or words appeal to you. Here’s just an example of a quick ‘Autumn Favorites’ printable I created in Picasa by using different fonts on my computer and changing up the colors for added variety.

We all have our favorite quotes we turn to for inspiration. Here are two of my favorites I recreated using the same tools in Picasa.  1. Roosevelt Quote: Kutsler Script, Nymphette dingbat. 2. Ziglar Quote: Matchbook and Honey Script fonts, Graduated Tint option in Picasa.
Another great thing I love about Picasa is the instant access you have to Picnik, the sister online photo editing software. For the Lewis Carroll quote below, I added a frame by importing the image into Picnik and then using the border tool.
*UPDATE: Picnik was closed in April of 2012 but you can use PicMonkey to do the same things show below.

Voila!

Afternoon Delight and Berhard Fashion fonts, Auto Color + Tint function in Picasa, frame border in Picnik.
Picnik also has a few cool tools and stickers in their gallery to play with. (use PicMonkey instead, Picnik is closed).

I used the basic triangle in different colors to create this colorful pennant art – a sweet idea for a child’s room.

Once you familiarize yourself with the tools, you can create any 8” x 10” word art you can imagine, in any color you like, from bus rolls to inspirational quotations to favorite scriptures, and print it at home on your printer. If you want something larger than 8” x 10” to frame, simply have your local print shop print the larger size for you.
Again, Picasa and Picnik didn’t pay me a thing, they have no clue who I am. I just happen like their free software, I’ve used them for years, and felt like sharing the creative possibilities with you today!
Have you ever created your own word art with Picasa or Picnik? Got any other tips you’d like to share?
.
.