
Download PC Repair Tool to quickly find & fix Windows errors automatically
To insert an image into a text in Microsoft Word 365 can be challenging, unlike PowerPoint, where an image can be easily inserted into a text. Most individuals will give up their thinking of inserting images into text in Word and try to do this procedure in some other software, but they do not have to do so; there is another way to insert an image into text in Word.
Open Microsoft Word.
Click the Insert tab on the menu bar.

On the Insert tab, click the SmartArt button in the Illustration group.
A Choose SmartArt Graphic dialog box will pop up.
Inside the dialog box on the left pane, click List.
On the List page, click the first one called Basic Block List, then Ok.
Five text boxes will appear in the word document; delete all except one.
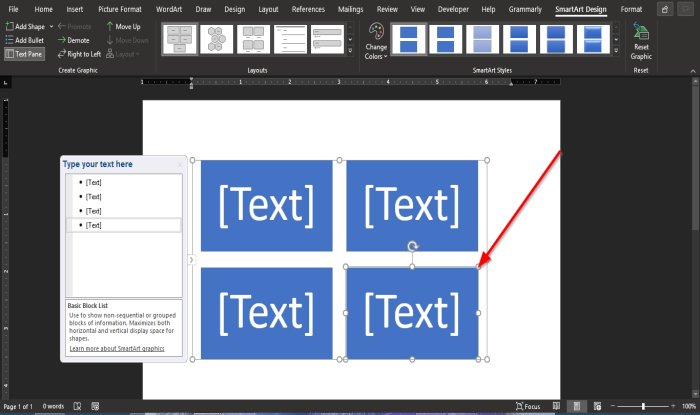
To delete the text box, click the textbox’s Resize Point and press the Delete key on the keyboard.
Now, enter a text into the textbox.
You can change the size or font of the text if you want.
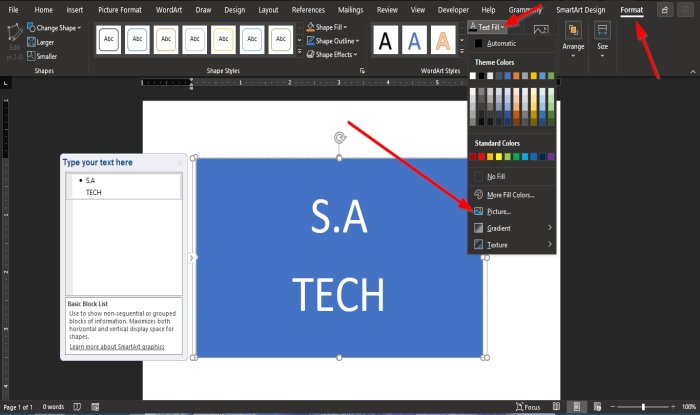
Then, click the Format tab that appeared on the menu bar.
On the Format tab, click the Text Fill button in the WordArt Styles group.
In the drop-down list, click Pictures.
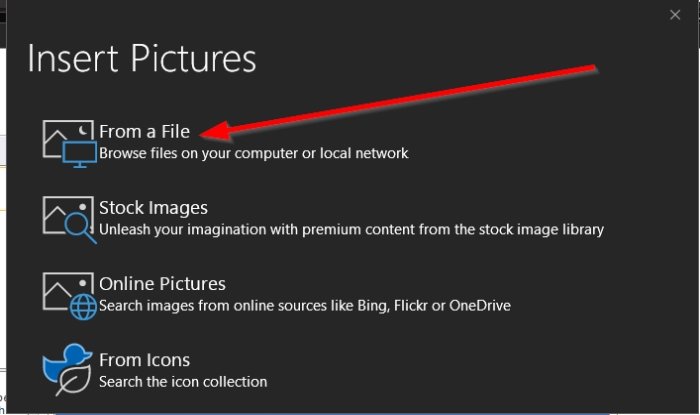
An Insert Pictures dialog box will appear.
Inside the dialog box, click From a File.
An Insert Picture dialog box will appear, select the file you want, and click Insert.
The picture is inserted in the text.
You can also change the background of the text box to the color that suits the image.
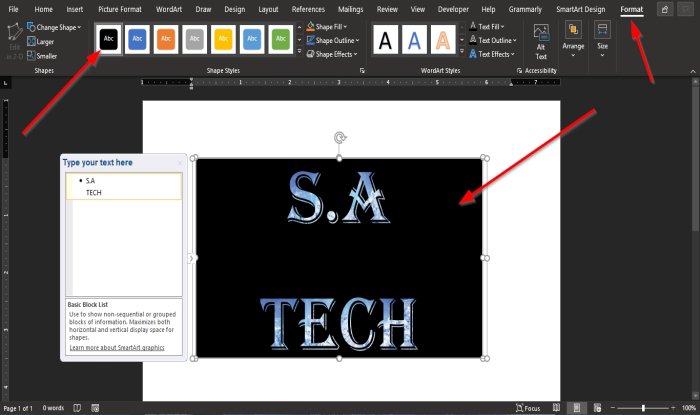
On the Format tab, go to the Shape Style group’s build-in outlines and select an Outline that matches the text containing the picture.
Once you select an Outline, you will notice that the color of the text box changes.
We hope this tutorial helps you understand how to insert an image into text in Word.
Read next: How to extract Text from an Image in Microsoft Word.

Shantel has studied Data Operations, Records Management, and Computer Information Systems. She is quite proficient in using Office software. Her goal is to become a Database Administrator or a System Administrator.
Hello,
I want to insert image in text-box using microsoft.office.interop.word. For
doing this I have created a simple console application. Through console application I am opening word document file and replacing some text inside the text box.
So I am able to replace the text in text-box but unable
to insert image in text-box. Is there any way to insert image in textbox. I am able to insert image in Table but I want to insert image in textbox.
I have tried but unable to find the solution.
Below is the code for same
using System;
using System.Collections.Generic;
using System.IO;
using System.Linq;
using System.Text;
using System.Threading.Tasks;
using Microsoft.Office.Interop.Word;
using System.Net;

using System.Data.SqlClient;

using System.Data;
using System.Configuration;
using System.Globalization;

using System.Runtime.InteropServices;

namespace PrintSticker
{

    class Program
    {

        public static Microsoft.Office.Interop.Word.Document aDoc = null;
        public static Microsoft.Office.Interop.Word.Application wordApp = new Microsoft.Office.Interop.Word.Application();
        public static object missing = System.Reflection.Missing.Value;

        private static void FindReplace(Microsoft.Office.Interop.Word.Document aDoc, Dictionary<string, string> lstPrintData)
        {

            try
            {

                int counter = 0;

                int intdctCount = 0;
                for (int j = 0; j < lstPrintData.Count; j++)
                {
                    // string Findtext = element.Key; ;
                    // string ReplaceText = element.Value;
                    if (intdctCount == lstPrintData.Count - 1)
                    {
                        break;
                    }
                    string Findtext = Convert.ToString(lstPrintData.Keys.ElementAt(intdctCount));
                    string ReplaceText = Convert.ToString(lstPrintData.Values.ElementAt(intdctCount));

                    var range = aDoc.Range();
                    range.Find.Execute(FindText: Findtext, Replace: WdReplace.wdReplaceAll, ReplaceWith: ReplaceText);
                    var shapes = aDoc.Shapes;


                    foreach (Microsoft.Office.Interop.Word.Shape shape in shapes)
                    {
                        string shapename = Convert.ToString(shape.Name);
                        string shapevalue = Convert.ToString(shape.TextFrame.TextRange.Text);


                        if (shapevalue != "r")
                        {
                            var initialText = shape.TextFrame.TextRange.Text;
                            if (initialText == Findtext + "r")
                            {
                                var resultingText = initialText.Replace(Findtext, ReplaceText);
                                shape.TextFrame.TextRange.Text = resultingText;
                                if (initialText == Findtext + "r")
                                {
                                    intdctCount++;
                                    break;
                                }
                            }
                            else if (initialText.Contains(Findtext))
                            {
                            ReagainReplace:
                                var resultingText = initialText.Replace(Findtext, ReplaceText);
                                shape.TextFrame.TextRange.Text = resultingText;
                                if (initialText.Contains(Findtext))
                                {
                                    if (intdctCount < lstPrintData.Count - 1)
                                    {
                                        intdctCount++;
                                        Findtext = Convert.ToString(lstPrintData.Keys.ElementAt(intdctCount));
                                        ReplaceText = Convert.ToString(lstPrintData.Values.ElementAt(intdctCount));

                                        initialText = resultingText;
                                        goto ReagainReplace;
                                        //break;
                                    }
                                    else
                                    {
                                        break;
                                    }
                                }
                                else
                                {
                                    break;
                                }
                            }
                            counter++;
                        }
                    }
                }


                Console.WriteLine(counter);
            }
            catch (Exception exc)
            {
                Console.WriteLine(exc.Message);

            }

        }

        static void Main(string[] args)
        {
            try
            {
                Console.WriteLine(DateTime.Now);

                object filename = @"D:USER DATANitinSticker.docx";

                if (File.Exists((string)filename))
                {

                    object readOnly = false;
                    object isVisible = false;
                    // make visible Word application
                    wordApp.Visible = false;
                    // open word template
                    aDoc = wordApp.Documents.Open(ref filename, ref missing,
                            ref readOnly, ref missing,
                            ref missing, ref missing,
                            ref missing, ref missing,
                            ref missing, ref missing,
                            ref missing, ref isVisible,
                            ref missing, ref missing,
                            ref missing, ref missing);
                    aDoc.Activate();

                    Dictionary<string, string> dictionary = new Dictionary<string, string>();


                    dictionary.Add("#FullName", "Mr.Nitin Jagtap");
                    dictionary.Add("#UCID", "UCH-908890");
                    dictionary.Add("#Age", "26");
                    dictionary.Add("#Sex", "M");
                    dictionary.Add("#FullAddress ", "Matoshri Niwas,Rajmudra Housing Society");
                    dictionary.Add("#Contact", "91-9503808004");
                    dictionary.Add("#Date", "18/08/1989");
                    dictionary.Add("#DoctorName", "Dr.Shivajirao Bhosale");
                    dictionary.Add("#OPDID", "UC/OPD/1703/1367");


                    FindReplace(aDoc, dictionary);

                    object DocNoParam = Type.Missing;
                    object SaveToFormat = Microsoft.Office.Interop.Word.WdSaveFormat.wdFormatPDF;
                    object outputFileName;

                    outputFileName = @"D:USER DATANitinSticker.pdf";

                    // Save word template in pdf format
                    aDoc.SaveAs(ref outputFileName, ref SaveToFormat,
                                            ref DocNoParam, ref DocNoParam,
                                            ref DocNoParam, ref DocNoParam,
                                            ref DocNoParam, ref DocNoParam,
                                            ref DocNoParam, ref DocNoParam,
                                            ref DocNoParam, ref DocNoParam,
                                            ref DocNoParam, ref DocNoParam,
                                            ref DocNoParam, ref DocNoParam);
                }

            }
            catch (Exception exc)
            {

                Console.Write(exc.Message);

            }
            finally
            {
                object saveChanges = WdSaveOptions.wdDoNotSaveChanges;
                ((_Document)aDoc).Close(ref saveChanges, ref missing, ref missing);
                wordApp.Quit();
                Marshal.ReleaseComObject(aDoc);
                Marshal.ReleaseComObject(wordApp);
                Console.WriteLine(DateTime.Now);
            }
        }
    }
}
I want output like below.

Could you please help me to sort out this issue.
Thanks,
Nitin
-
Edited by
Tuesday, March 28, 2017 8:47 AM
-
Moved by
CoolDadTx
Tuesday, March 28, 2017 2:00 PM
Office related
 Please Note:
This article is written for users of the following Microsoft Word versions: 97, 2000, 2002, and 2003. If you are using a later version (Word 2007 or later), this tip may not work for you. For a version of this tip written specifically for later versions of Word, click here: Wrapping Text around a Graphic in a Text Box.
![]()
Written by Allen Wyatt (last updated February 25, 2022)
This tip applies to Word 97, 2000, 2002, and 2003
Doris is trying to put together a newsletter and is using text boxes so she can flow the continuation of an article from the front page to a later page. She wants to use a graphic image with one of the articles, but can’t get Word to flow the text around the image within the text box.
The reason that this won’t work is because wrapping of text, in Word, is implemented through the interaction of two layers of content: the text layer and the drawing layer. When an object is on the drawing layer, information on the text layer can be wrapped around it. Any text within a text box cannot be wrapped around another object in the text box because both the text and the object are on the same layer—the drawing layer.
This means that if you still want to wrap text around the graphic, you’ll need to take a different approach to laying out your newsletter. For instance, you might use multiple text boxes, butted up next to each other, to give the appearance of the text flowing around the graphic.
If you want to stick with a single text box, you could insert a two- or three-column table inside the text box and put the graphic in one of the columns. You can then add text to the other column and it appears to be beside the graphic. You would, of course, need to experiment with the borders and shading of the table to make sure they don’t detract from the layout you are trying to achieve.
WordTips is your source for cost-effective Microsoft Word training.
(Microsoft Word is the most popular word processing software in the world.)
This tip (430) applies to Microsoft Word 97, 2000, 2002, and 2003. You can find a version of this tip for the ribbon interface of Word (Word 2007 and later) here: Wrapping Text around a Graphic in a Text Box.
Author Bio
With more than 50 non-fiction books and numerous magazine articles to his credit, Allen Wyatt is an internationally recognized author. He is president of Sharon Parq Associates, a computer and publishing services company. Learn more about Allen…
MORE FROM ALLEN
Find and Replace in Headers
Using Find and Replace is something quite routine in Excel, as it easily allows you to find and replace information in …
Discover More
Determining If a Number is Odd or Even
Need to know if a number in a macro is odd or even? It’s easy to figure out with the simple calculation shown in this tip.
Discover More
Turning Off ScreenTips
All those little ScreenTips bug you when moving your mouse pointer over different parts of Word’s interface? You can turn …
Discover More
![]()
Download Article
Step-by-step guide to inserting pictures in Word
![]()
Download Article
- Windows
- Mac
- Web App
- Video
- Q&A
- Tips
|
|
|
|
|
Whether you’re working on a hefty research project or a friendly holiday greeting card, adding images to your Word document can really add value to your project. Whether you want to insert a picture from your computer or find one online, it’s easy to add photos in Word. This wikiHow teaches you how to insert an image into a Microsoft Word document using Windows, a Mac, and the free web version of Word.
Things You Should Know
- Use the Insert tab on Windows, Mac, and the web app to add a picture.
- Select Pictures > This Device to use an image on your computer.
- Click the image to resize and reformat it.
-
1
Click the place in your document where you want to insert the picture. Word’s insertion cursor, a vertical blinking bar, will appear at this point. When you insert the image, its bottom-left corner will be at this point.
- This method works for all modern versions of Word beginning with Word 2016. You can also use it as a guide for earlier versions of Windows, although there will be fewer tools and features.
- Changing the background is done through a different method, using the Design tab.
-
2
Click the Insert tab. It’s near the top of Word between «Home» and «Draw» (or «Home» and «Design» in some versions).
Advertisement
-
3
Click the Pictures tool. It’s in the «Illustrations» section of the toolbar running along the top of Word. Some location options will appear. If you’re using Word 2019 or later, a menu will expand. If you’re using Word 2016 or earlier, your file browser will appear.
-
4
Select the type of image you want to insert. You can choose an image on your computer, a stock image from Microsoft, or an image from the internet.
- Word 2019 or later:
- Click This Device if the picture is on your computer.
- Click Stock Images to select a free stock image from Microsoft’s collection.
- Click Online Pictures to use Bing’s image search to find photos on the web.
- If the photo is on your OneDrive, select Online Pictures and click OneDrive at the bottom-left corner.
- Word 2016:
- If the picture is on your computer, simply navigate to it in the file browser.
- If you want to search for a photo online or insert one from Facebook, Flickr, or your OneDrive, close the file browser and click the Online Pictures icon next to the «Pictures» in the toolbar. You can then select an image from Bing image search, Flickr, or Facebook.
- If the picture is on your OneDrive, click Online Pictures instead of Pictures and click Browse next to «OneDrive.»
- Word 2019 or later:
-
5
Select the image you want to insert. When you find the picture, click it once to select it.
- If you’re selecting from stock images or online images, you can click multiple pictures to add more than one.
- If you’re choosing files from your computer and want to add more than one picture, hold the Ctrl button down as you click each image.
-
6
Click Insert. It’ll be near the bottom-right corner of the window no matter where you’ve selected your image(s). You’re done! Continue to the next steps for formatting information, or print the document when you’re ready.
-
7
Resize the picture. If you want to change the picture’s size, click it once to select it, and then drag any of the corner circles in or out.[1]
- You can also specify the size if you want. Double-click the picture to open the Picture Format tab at the top, and then set your desired measurements next to «Height» and «Width.»
-
8
Use the curved arrow at the top of the picture to rotate it. It’s above the dot at the top-center part of the picture. To rotate, place the mouse cursor over the curved arrow, and then click and drag the cursor left or right until you’re satisfied.
-
9
Double-click the picture to access more editing tools. This opens the «Picture Format» (2019 and later) or «Format» (2016) tab at the top of Word. On this tab, you can:
- In the «Arrange» panel in the top-right area, click Wrap Text to choose how to situate the picture in blocks of text. You can also set alignment preferences here. Wrapping the text is a good way to get your document formatted exactly the way you want.
- To crop the picture, click the Crop tool in the «Size» panel at the top-right corner.
- The «Adjust» panel near the top-left corner has additional tools for background removal, color effects, and corrections.
- To add a border or effect around the picture, select one of the «Picture Styles» at the center of the Format bar, or choose any of the other options in the section to have more control over the style.


Advertisement
-
1
Click the place in your document where you’d like to insert a picture. This places the cursor at that location.
-
2
Click the Insert tab. It’s at the top of Word between the «Home» and «Design» or «Home» and «Draw» tabs.
-
3
Click the Pictures icon. It’s on the toolbar that runs along the top of Word. Look for an icon of a green mountain with a yellow sun between «Tables» and «Shapes.»
-
4
Click Photo Browser or Picture from File. If you want to browse images in your Mac’s Photos app, use Photo Browser. To select an image file using Finder, choose Picture from File.
-
5
Insert the picture into the document. If you’re using the Photo Browser option, simply drag the photo into your document. If you’re using Picture from File, select the image and click Insert.
-
6
Resize the picture. If you want to increase or reduce the picture’s size, click the image to select it, and then do one of the following:
- To maintain the picture’s proportions so it doesn’t stretch or warp, hold down the Shift key as you drag any of the sizing handles (the circles) inward or outward.[2]
- To keep the image’s center in place as you resize, hold down the Option key as you drag the handles.
- You can also specify a size. Double-click the Picture to open the Picture Format tab, then enter your desired measurements next to «Height» and «Width.»
- To maintain the picture’s proportions so it doesn’t stretch or warp, hold down the Shift key as you drag any of the sizing handles (the circles) inward or outward.[2]
-
7
Drag the curved arrow at the top of the picture to rotate it. It’s above the dot at the top-center edge of the picture. Just place the mouse cursor over the curved arrow, and then click and drag it left or right until it’s correct.
-
8
Double-click the picture to access more editing tools. This opens the «Picture Format» tab at the top of Word, which has a bunch of editing features, including the ability to remove the background and add styles.
- Click Corrections near the top-left corner to correct lighting and color problems.
- Click Artistic Effects to play around with filters, and Transparency to make the picture more see-through.
- To crop the picture, click the Crop tool next to the height and width controls.
- Click Wrap Text to choose how to situate the picture in blocks of text, and use Align and Position to ensure correct placement.
- Click Quick Styles to choose pre-styled borders, shadows, and other options.


Advertisement
-
1
Click the place in your document where you’d like to insert a picture. This places the cursor at that location.
- If it’s your first time using Office Online on the web, go to https://www.office.com, sign in with your Microsoft account, and select Word to get started.
-
2
Click Insert. This opens the Insert tab.
-
3
Click Pictures. This opens a drop down options menu.
-
4
Select a picture type. There are four options to choose from:
- This Device — choose a picture on your computer
- OneDrive — choose an image from your OneDrive
- Stock Images — insert a stock image or sticker
- Bing Pictures — search Bing for an image
-
5
Select an image. If you choose the This Device option, you’ll be prompted to select an image from your computer. Click it to select it.
-
6
Click Open. This is in the bottom right corner of the image selection window. This will confirm your selected image and insert it into the document.
-
7
Resize the picture. If you want to change the picture’s size, click it once to select it, and then drag any of the corner circles in or out.
- You can also specify the size if you want. Double-click the picture to open the Picture tab at the top, and then set your desired measurements next to «Height» and «Width.»
-
8
Use the curved arrow at the top of the picture to rotate it. It’s above the dot at the top-center part of the picture. To rotate, place the mouse cursor over the curved arrow, and then click and drag the cursor left or right until you’re satisfied.
-
9
Double-click the picture to access more editing tools. This opens the «Picture» tab at the top of the Word web app. On this tab, you can:
- In the «Arrange» panel in the top-right area, click Wrap Text to choose how to situate the picture in blocks of text. You can also set alignment preferences here.
- To crop the picture, click the Crop tool in the «Image Size» panel at the top-right corner.
- To add a border or effect around the picture, select one of the «Picture Styles» at the center of the bar, or choose any of the other options in the section to have more control over the style.


Advertisement
Add New Question
-
Question
How do I take screenshots?

On a Mac, shift command 3 to screenshot the whole screen. If you want to take a screenshot of a certain area on the screen, press shift command 4. On a Windows PC, press control and print screen at the same time, then you can paste the image into Paint or Microsoft Word.
-
Question
When I insert several photos on an age in a Word document, the photos often won’t stay in place. How do I stop the photos from bumping each other around?
You can right-click the image, hold the cursor over the «Wrap Text» menu option, and select an option from the list that is NOT «In Line with Text» (usually selected by default), such as «Tight» or «Behind/In Front of Text.» Then you should be able to move the image freely around the page.
-
Question
How do I format images in a Word document?
Try double-tapping the photo. A photo format menu should come up on the right side.
See more answers
Ask a Question
200 characters left
Include your email address to get a message when this question is answered.
Submit
Advertisement
Video
-
Adding photos to your Word document increases its size.
-
Other photo modification features available in newer versions of Microsoft Word include the ability to add borders, cutout styles, shadows, beveled edges, glows, and drop shadows.
-
When you crop a picture, the actual cropped part of the picture is hidden, not removed; unless you check the «Delete Cropped Areas of Pictures» box in the «Compression Settings» dialog box. Any compressed pictures with their cropped areas deleted cannot be restored to their original appearance.
Show More Tips
Thanks for submitting a tip for review!
Advertisement
About This Article
Article SummaryX
1. Click the place you want to insert the image.
2. Click the Insert tab.
3. Click Pictures.
4. Choose a location.
5. Select the image and click Insert.
6. Double-click the picture to open editing and format tools.
Did this summary help you?
Thanks to all authors for creating a page that has been read 650,440 times.
Is this article up to date?
Table of Contents
- 1 How do I wrap text around a picture in a text box in Word?
- 2 How can you wrap an image with text?
- 3 Why does my typing disappear?
- 4 How do I keep comments visible in Excel?
- 5 What is the shortcut in Excel to hide comments?
- 6 How do I hide comments?
- 7 Can someone see if you hide their post?
How do I wrap text around a picture in a text box in Word?
Configure text wrapping around a picture or drawing object
- Select the picture or object.
- Go to Picture Format or Shape Format and select Arrange > Wrap Text. If the window is wide enough, Word displays Wrap Text directly on the Picture Format tab.
- Choose the wrapping options that you want to apply.
How do I wrap text around a text box?
Wrapping Text Around a Text Box or Frame
- Right-click on the text box. Word displays a Context menu.
- Choose Format Text Box from the Context menu. Word displays the Format Text Box dialog box.
- Click on the Layout tab (in Word 97 click on the Wrapping tab).
- Select a method of text wrapping in the Wrapping Style area of the dialog box.
- Click on OK.
How can you wrap an image with text?
To wrap text around an image:
- Select the image you want to wrap text around. The Format tab will appear on the right side of the Ribbon.
- On the Format tab, click the Wrap Text command in the Arrange group. Then select the desired text wrapping option.
- The text will wrap around the image.
How do you make sure Excel cells show all text?
Select the cells that you want to display all contents, and click Home > Wrap Text. Then the selected cells will be expanded to show all contents.
Why does my typing disappear?
Typing in Overtype mode can cause the letters in your Word documents to disappear. In this mode, anything you type replaces text instead of inserting new text. Word offers the option of disabling Overtype mode through its Options dialog box.
Why are my comments disappearing in Excel?
Try changing something other than a comment, closing and re-opening the file and checking that your change remains. For example, if you are editing a file that is an attachment to an email message, the file may be removed after you have edited it.
How to Show or Hide Excel Comments
- Right-click somewhere on the cell and select either show or hide the comment.
- If you want to show all the comments in the workbook, click the Review tab and then the Show All Comments button.
How do I make comments stay visible in Excel?
You can use Excel Options to hide comments and indicators:
- Click the File tab in the Ribbon and then click Options.
- Click the Advanced category in the left panel.
- In the right panel, scroll down to the Display section.
- In the area For cells with comments, show, check the No comments or indicators.
- Click OK.
Just type Alt-R (Alt, then R), and then the correct shortcut key (or “keyboard accelerator”). (Read more about Excel’s Alt shortcuts)….Alt-R Brings Up The Review Tab.
| Task | Alt Sequence |
|---|---|
| New Comment | Alt-R-C |
| Edit Comment | Alt-R-T |
| Delete Comment | Alt-R-D |
| Show/Hide Comment | Alt-R-H* |
How do I hide all comments?
- To display/hide all comments, on the Review tab, in the Comments group, click Show All Comments:
- To display an individual comment, click the cell that contains the comment, and then on the Review tab, in the Comments group, click Show/Hide Comment.
1. Hide the post or comment. To hide a comment, hover over the top-right hand “x” and click “Hide.” Now the post can only be seen by the person who wrote the comment and his or her friends. They’ll have no idea the post is hidden, and you can always click “Unhide” later if you like.
Does the person know if you hide a comment on Facebook?
Hiding the Facebook comment will keep it hidden from everyone except that person and their friends. They won’t know that the comment is hidden, so you can avoid potential fallout. Deleting the Facebook comment will erase it; no one will be able to see it.
Can someone see if you hide their post?
If you hide a post from your Timeline, your friend will not be notified that you hid the post.
Making edits to pictures can be simpler with applications like Microsoft Paint or Photoshop.
But these tools can feel like an unnecessary added stop when you want to do something that seems like it should be easy.
One such edit involves placing text on a picture.
Our tutorial below will show you how to put a picture behind text in a Word document.
How to Put an Image Behind Text in a Word Document
- Open the document.
- Click the Page Layout tab.
- Select the Watermark button.
- Click Custom Watermark.
- Choose Picture watermark and click Select Picture.
- Click the Scale dropdown menu and choose a size.
- Select Apply, then OK.
Our guide continues below with more information on putting a picture behind text in Word, including pictures of these steps.
Are you trying to write in small capital letters? Our apply small caps effect in Word article can show you where to find that option.
Some of the more creative and less-rigidly formatted documents that you will create in Microsoft Word could involve the combination of various types of media and document objects.
For example, you may need to know how to put a picture behind text when your document image needs some editing and you don’t want to use something like Photoshop or Microsoft Paint.
You can customize most of the elements of your Microsoft Word 2010 documents, including the background of the document.
Many people assume that they can only add text and images to their document as the actual body of that document, but you can also configure the background of the document. For instance, you can put an image behind text in Microsoft Word 2010 to set it as the background for whatever you are writing.
You can configure some of the settings for the image that is behind your text, allowing you to make it more transparent so that the top-level text is still able to be read. Continue reading to learn more about putting an image behind text in Word 2010.
If you also use Google Apps, then you may want to check our guide on how to put a picture on Google so that you can use it in those apps as well.
How to Insert a Background Image in Word 2010 (Guide with Pictures)
Whatever your reasoning might be for wanting to put an image behind your document text in Word 2010, it can create an interesting effect for the document. Whether you are using this background image like a watermark or because you think it improves the visual appearance of the document, the process for putting the image behind your text can be followed below.
Step 1: Open the Word 2010 document in which you want to insert the image behind your text.
Step 2: Click the Page Layout tab at the top of the window.

Step 3: Click the Watermark drop-down menu in the Page Background section of the ribbon at the top of the window, then click the Custom Watermark option.

Step 4: Select the Picture Watermark option at the top of the window, then click the Select Picture button to choose the image that you want to put behind your text in Word 2010.
You will be able to select the image from your computer, so it’s easiest to already have the picture saved to a folder on your computer that you can find easily.

Step 5: Click the drop-down menu to the right of Scale, then choose the size that you want the background image to be.
Step 6: Check or uncheck the box to the left of Washout if you want to make the image more transparent, which will help to make your overlaying text easier to read.
Step 7: When you have finished configuring the options for the image behind your text in Word 2010, click the OK button at the bottom of the window. Note that you can click the Apply button at the bottom of the window at any time to see how your changes will look in the document.
Our guide continues below with more information on working with text and image layers in Microsoft Word, such as if you only want to include a picture behind text on one page in your document.
How Do I Adjust Text Wrapping on the Page Layout Tab in My Word Document?
Some non-traditional layout options in a document will involve learning how to wrap text. This option is found on the Layout tab, in the Arrange group of the ribbon. It is also one of the picture tools located on the Format Shape tab that appears when you select your picture.
When you select the picture, Word displays the Wrap Text button, allowing you to click it. The options you will find on the dropdown menu include:
- In line with text
- Square
- Tight
- Through
- Top and Bottom
- Behind Text
- In front of text
You can also click the More Layout Options button at the bottom of the menu, which is going to open a Layout dialog box. This provides additional text wrapping options.
More Information on How to Put a Picture Behind Text in Word 2010
One other way that you can accomplish this task is to add a picture to your document, then place a text box on top of the picture.
You will need to add the picture, then insert a text box from the Insert menu. You can then click on the border of the text box to select the entire object, then click the arrow to the right of Bring Forward and choose the Bring in Front of Text option. This will move the picture behind the text so that you can achieve the desired effect.
The background color of a text box in Microsoft Word is going to have a white background by default.
You can switch this to a different color, or remove it entirely, by clicking inside the text box, selecting the Shape Format tab at the top of the window, then clicking Shape Fill and choosing a color there.
The No Fill option will remove the background entirely so that you can see the picture through the text box.
In newer versions of Microsoft Word, the Watermark option is found on the Design tab, in the Page Background section of the ribbon.
Any watermark that you add to your document is going to appear on each page of your document. If you only want to place an image behind text on one of your pages then you should utilize the picture and text box configuration that we mentioned earlier in this section.

Matthew Burleigh has been writing tech tutorials since 2008. His writing has appeared on dozens of different websites and been read over 50 million times.
After receiving his Bachelor’s and Master’s degrees in Computer Science he spent several years working in IT management for small businesses. However, he now works full time writing content online and creating websites.
His main writing topics include iPhones, Microsoft Office, Google Apps, Android, and Photoshop, but he has also written about many other tech topics as well.
Read his full bio here.
Современные тексты практически немыслимы без картинок. И если писать текст с помощью редактора Ворд (Word от Microsoft), то часто можно столкнуться с проблемой вставки в текст картинок. Иногда еще бывает нужно сделать обтекание картинки в Ворде, когда текст находится рядом с картинкой или расположен вокруг нее так, как будто обтекает ее.
Содержание:
1. Как скопировать картинку из Интернета
2. Вставка картинки в текст в Ворде
3. Картинка смотрится в тексте некрасиво
4. Отделение картинки от текста в Word
5. Изменение размера картинки
6. Обтекание картинки текстом в Ворде
7. Видео Обтекание картинки в Ворде: как вставить в текст, изменить размер и расположить слева от текста
Предположим, надо описать текстом (словами) картину известного художника Шишкина Ивана Ивановича «Утро в сосновом лесу», которую в просторечии называют «Три медведя». Как это сделать в Ворде?
Допустим, мы уже сделали описание картины в редакторе Microsoft Word, и теперь хотим в текст нашего описания поместить саму картину, то есть перенести картинку в текст. Начнем вставлять картину (рисунок) сразу после заголовка описания – это место для вставки рисунка мы выделяем с помощью мышки, то есть ставим туда курсор мышки (1 на рис. 1):
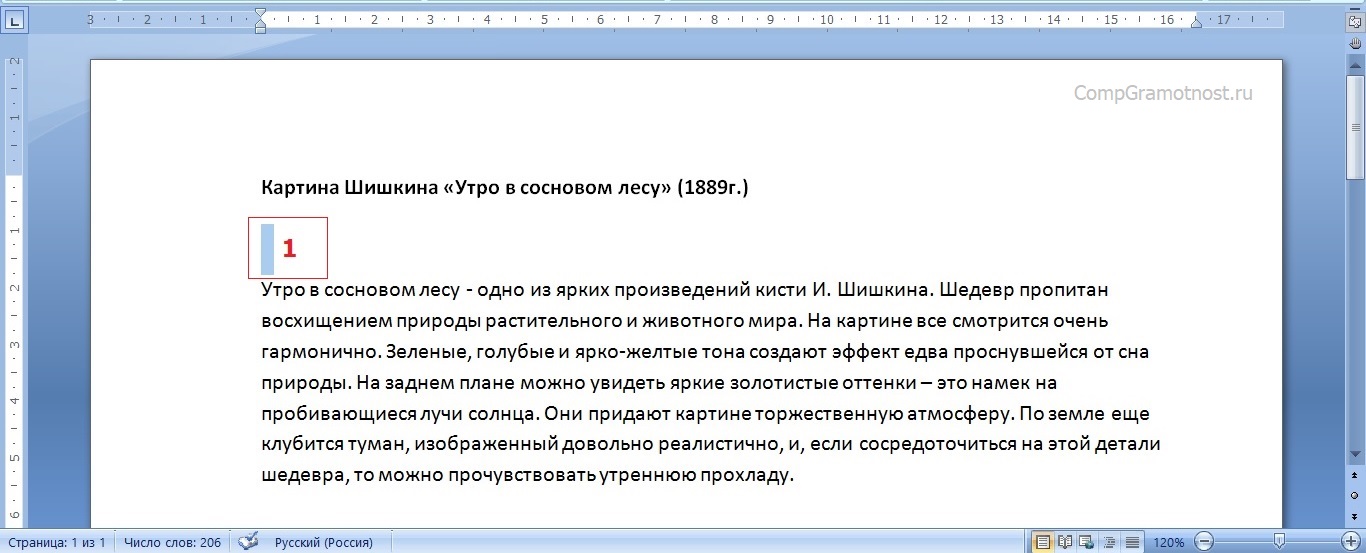
Рис. 1 (кликните по рисунку для увеличения). Выделяем в тексте место под заголовком статьи для вставки туда картинки (рисунка) из файла.
Как скопировать картинку из Интернета
В редакторе Word предусмотрена возможность вставлять рисунки из готовых файлов. Предположим, что вставляемый рисунок – картина Шишкина И.И. «Утро в сосновом лесу» находится на компьютере, на рабочем столе в папке «Картина Шишкина». Как там эта картина, этот рисунок оказались? Ну, например, мы нашли эту картину, этот рисунок в Интернете и сохранили его себе на компьютер, на рабочий стол.
Чтобы сохранить картинку из интернета на свой компьютер (свое устройство):
- Можно по картинке, найденной в интернете, кликнуть левой кнопкой мыши, чтобы она открылась в полном размере. Ничего страшного, если при этом картинка не меняет размер.
- Теперь, оставив курсор мышки на рисунке, надо нажать на ПКМ (правую кнопку мыши).
- Появится меню, в котором надо кликнуть опцию «Сохранить изображение как» или «Сохранить картинку как».
- Откроется окно «Сохранить как», в котором выбираем место, где хотим поместить картинку.
- Остается нажать кнопку «Сохранить».
Вставляемые рисунки в текст могут быть самые разные:
- рисунки (картинки) из Интернета,
- либо рисунки, нарисованные нами с помощью различных редакторов и сохраненные на компьютере,
- присланные картинки (рисунки) по электронной почте
- и т.п.
Главное, чтобы перед вставкой рисунка в текст, этот рисунок был сохранен на компьютере в виде файла. И тогда мы сможем его вставить в текст.
Вставка картинки в текст в Ворде
Теперь, когда мы выделили в тексте то место, куда должен быть вставлена картинка (рисунок), переходим к процедуре вставки. Вставка рисунка в текст делается следующим образом. Надо перейти в меню «Вставка» (1 на рис. 2) и кликнуть по иконке «Рисунок» (2 на рис. 2).
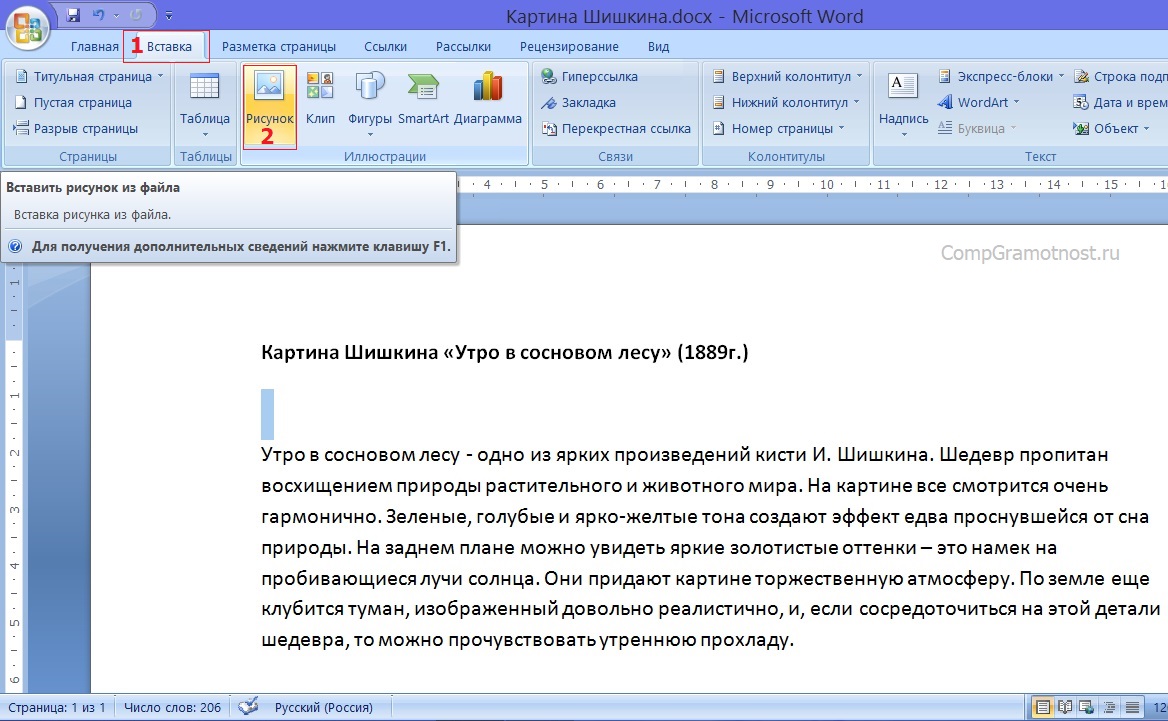
Рис. 2 (кликните по рисунку для увеличения). Переход к меню «Вставка» и клик по иконке «Рисунок».
Откроется окно «Вставка рисунка», в котором мы должны найти на компьютере рисунок для добавления в Ворд. В рассматриваемом примере рисунок хранится на Рабочем столе в папке «Картина Шишкина».
1 на рис. 3 – Находим эту папку,
2 – кликаем по ней левой кнопкой мышки для выделения,
3 на рис. 3 – после чего нажимаем на кнопку «Вставить».
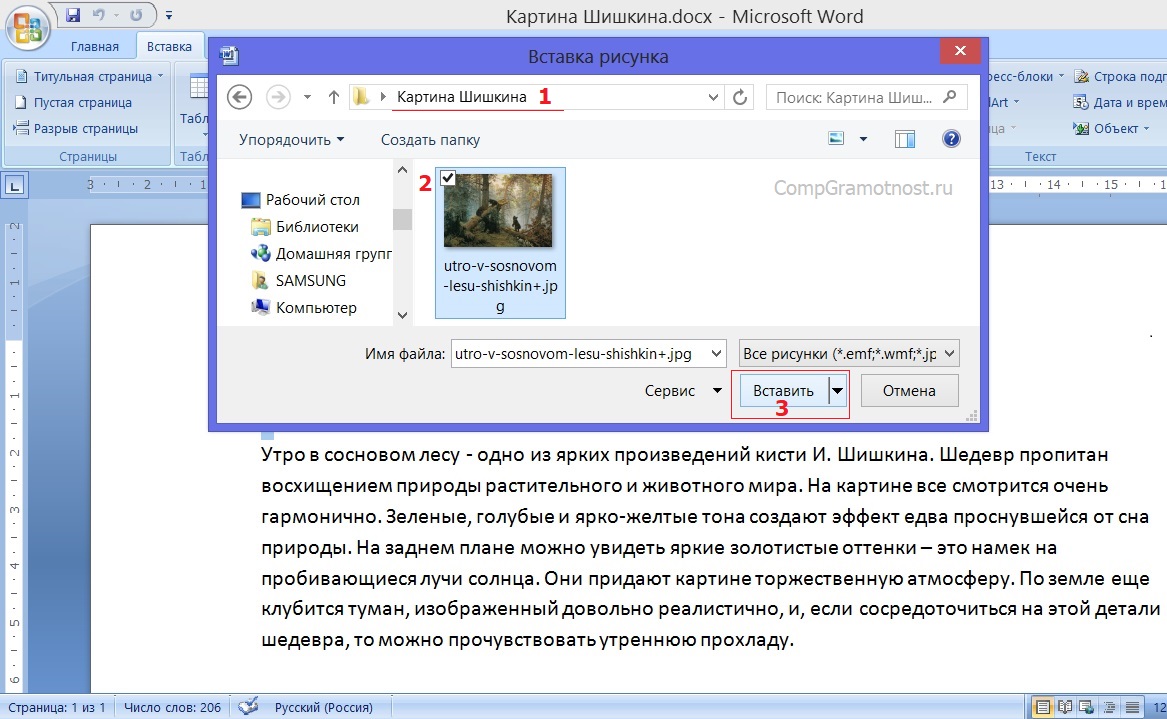
Рис. 3 (кликните по рис. для увеличения). Поиск вставляемого рисунка (картинки) на компьютере в окне «Вставка рисунка».
Картинка вставлена в вордовский текст некрасиво
После всех манипуляций, описанных выше, мы видим, что рисунок (он же «картинка») вставлен в текст сразу после заголовка и прямо перед первым абзацем (рис. 4).
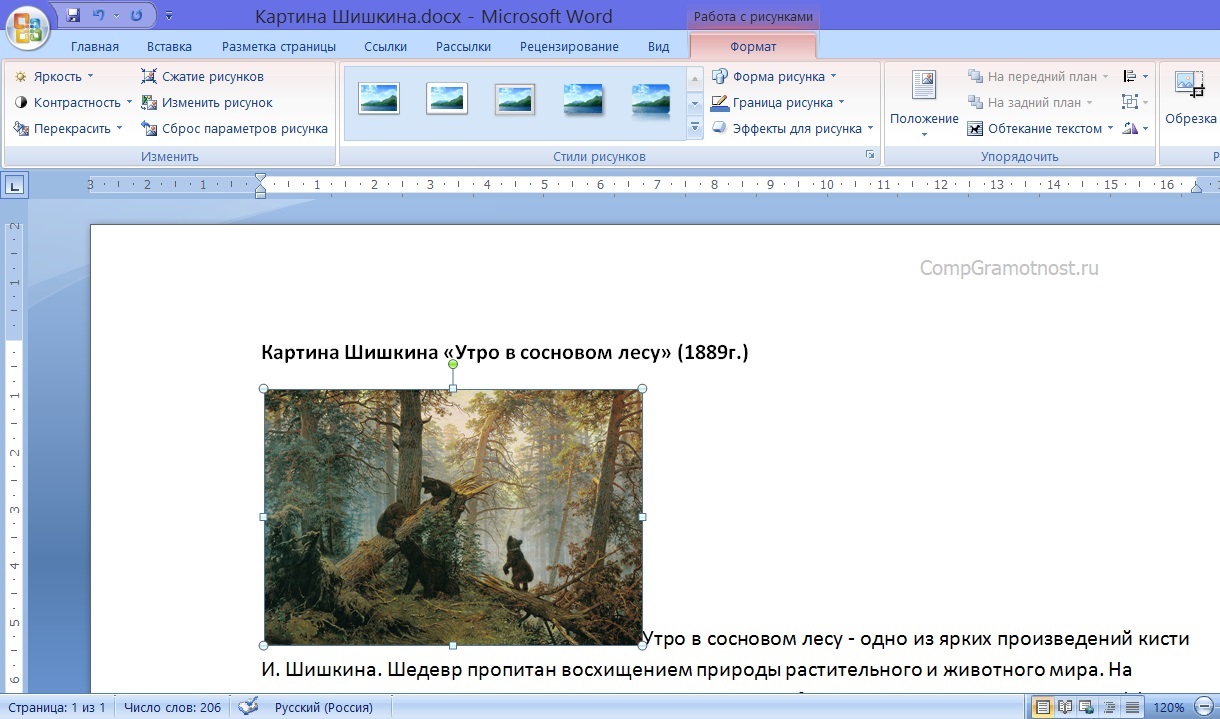
Рис. 4 (кликните по рис. для увеличения). Вид вставленной картинки сразу после завершения вставки рисунка в текст.
Скорее всего, нам не понравится то, что мы видим в получившемся тексте с картинкой. Текст первого абзаца начинается сразу после рисунка, причем этот текст идет от правого нижнего угла картинки, и буквально сцеплен с рисунком.
Почему так произошло? Потому что картинка в редакторе Word вставляется вместо одного символа текста, на место одного символа текста. И для Ворда этот рисунок является всего лишь одним единственным символом текста – так «воспринимает» Word картинку, что называется по умолчанию.
Если дальше ничего не предпринимать, а лишь пытаться редактировать текст, не трогая вставленную картинку, мы сможем немного облагородить полученный текст с рисунком.
Например, мы можем поставить курсор перед заглавной буквой «У», и затем раз 5-6 нажать на клавишу «Пробел». Между вставленной картинкой и началом абзаца появится некий промежуток, который выделен синим цветом для наглядности (1 на рис. 5).
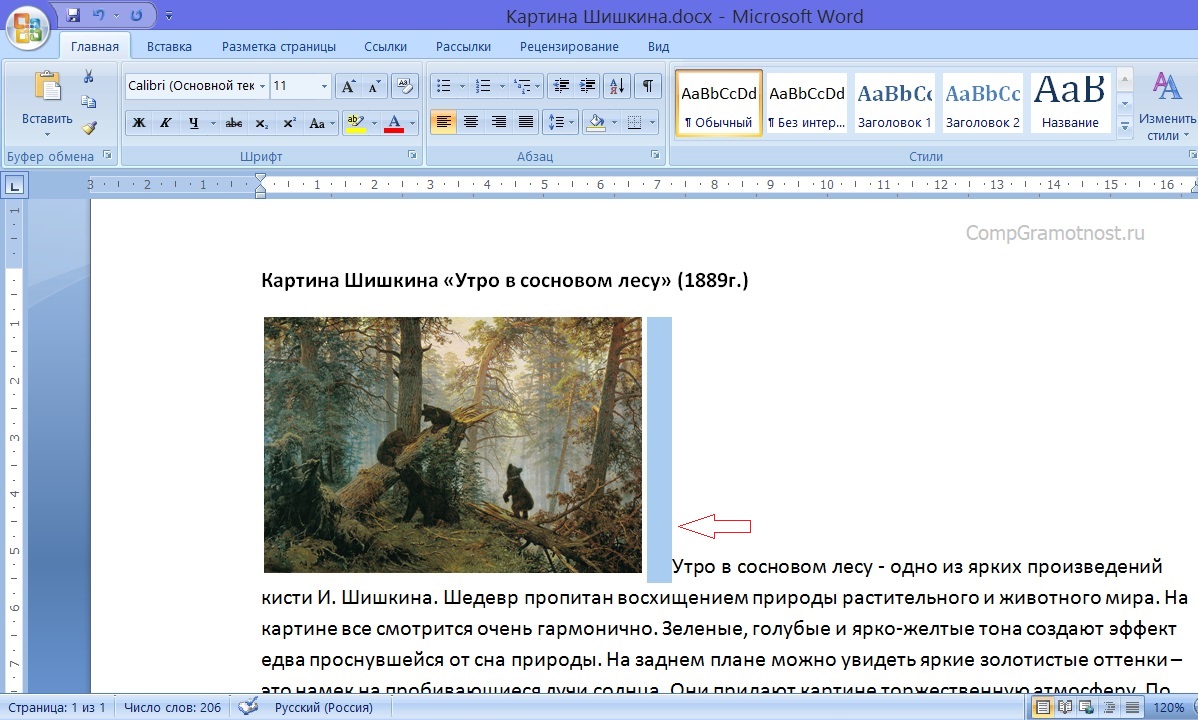
Рис. 5 (кликните по рис. для увеличения). Отделение вставленной картинки от текста пробелами.
Так, конечно, текст читается лучше, и рисунок вроде как отделяется от остального текста. Но все равно, ведь мы обычно видим в журналах, в книгах, в газетах картинки в тексте не в таком виде.
Нам обычно представляют рисунок отдельно от текста, либо текст как бы «обтекает» картинку, заполняя собой все свободное от картинки пространство на листе. А на свободном поле листа справа от рисунка мы видим только первую строку абзаца. Выше, на рисунках 4 и 5, справа от картинки мы видим пустоту. Так не делают…
Отделение картинки от текста в Ворде
Давайте попробуем для начала отделить рисунок от текста вообще. Для этого убираем все пробелы между картинкой буквой «У» в начале абзаца (то есть возвращаемся к виду, как показано на рис. 4).
Затем ставим курсор перед буквой «У» и нажимаем на клавишу «Enter» — текст абзаца начнется с новой строки, а рисунок останется на своем месте (рис. 6).
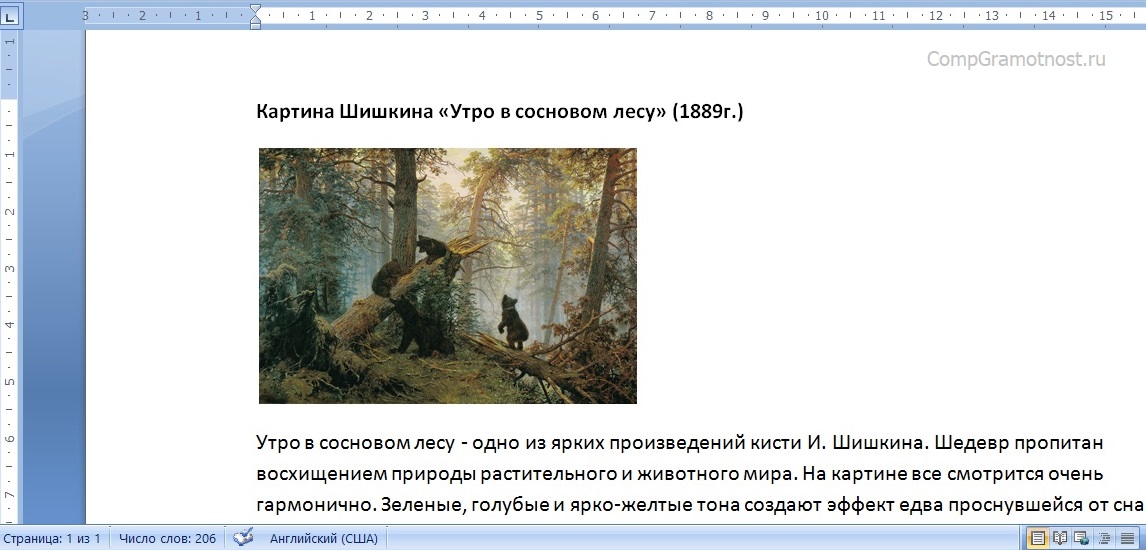
Рис. 6 (кликните по рис. для увеличения). Отделение вставленного рисунка от текста с помощью клавиши «Enter».
Что же, неплохо получилось, уже смотрится и читается значительно лучше. Правда, картинка расположена по-прежнему в левой части страницы, а справа от нее «зияющая пустота»!
Что делать? Можно оставить и так. А можно, например, поместить рисунок в центр страницы. Как это сделать? Нужно:
- выделить строку, в которой находится картинка, как мы обычно выделяем текст в Ворде – мы увидим, как рисунок «посинел», как обычно синеет выделяемые в редакторе Word текст (1 на рис. 7),
- а затем нажать на кнопку форматирования текста по центру (2 на рис. 7).
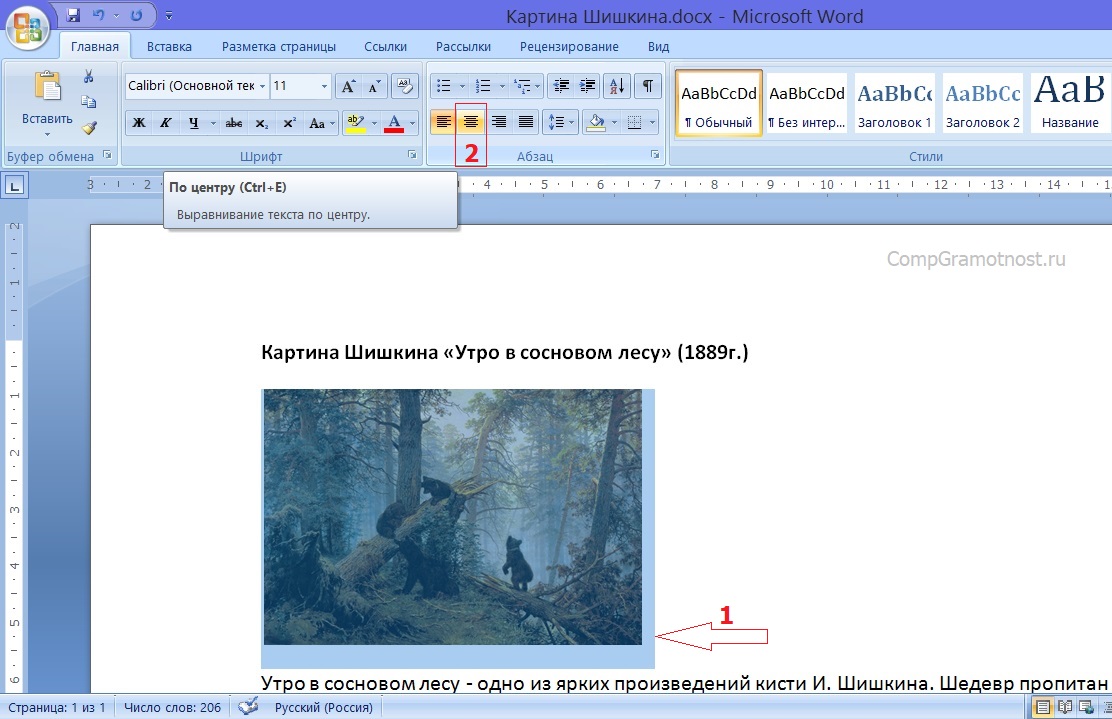
Рис. 7 (кликните по рис. для увеличения). Выделение строки с вставленной картинкой и последующее ее перемещение на середину строки (по центру)
И вот, случилось то, что мы хотели! Рисунок теперь размещен по центру страницы (рис. 8).
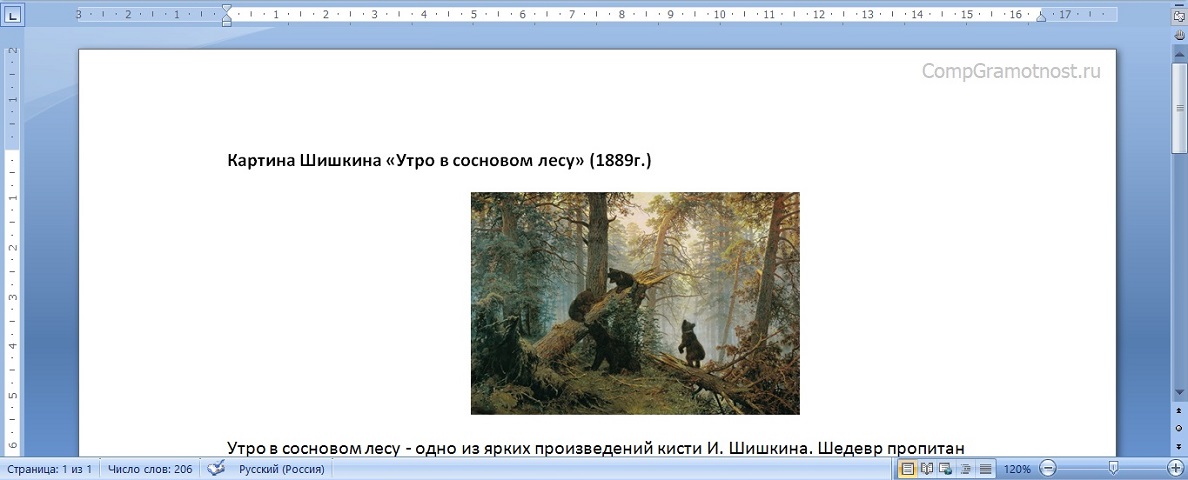
Рис. 8 (кликните по рис. для увеличения). Вставленная картинка размещена посредине страницы.
Получается, что со вставленной картинкой можно (и даже нужно!) работать как с обычным текстом. И тогда рисунок будет «подчиняться» нашим желаниям, становясь на то место, куда мы его хотим «определить»! В данном случае картинка расположится посредине строки над первым абзацем текста.
То есть, обладая умением форматировать текст, мы можем применить наши знания и опыт для такого же форматирования рисунков. Уже неплохо, правда, же?! Например, можно выделить картинку, как мы обычно выделяем текст, зацепить картинку левой кнопкой мышки и перетащить картинку в любое место нашего текста.
Скриншот данного действия (выделить рисунок, зацепить и переместить в любое другое место текста) я не делаю. Можете попробовать это сделать самостоятельно, чтобы ощутить «свою власть» над картинкой. Не такой он страшный, этот вставленный рисунок, как его малюют! С картинкой в тексте можно делать все (или почти все), что мы умеем делать с текстом, с отдельными словами текста и даже с отдельными буквами и символами текста!
Изменение размера картинки в Ворде
На рис. 8 видно, что рисунок вставлен в текст как-то «не к месту», что ли. Возможно, это ощущение создается из-за маленького размера картинки. А что если рисунок увеличить в размере?
Как увеличить или уменьшить размер вставленной в текст картинки? Для этого нужно:
- как обычно сначала выделить рисунок однократным кликом по ней левой кнопкой мышки – вокруг рисунка появится рамка с кружочками в углах и посредине каждой стороны, за которые можно рисунок «цеплять» и изменять его размеры,
- зацепить вставленный в текст рисунок за любой его угол и потянуть наружу для увеличения размера картинки или внутрь для уменьшения размера картинки.
По мере изменения размера рисунка он будет как бы «наползать» на текст (рис. 9), но это не страшно, поскольку это лишь процесс растягивания или сжатия картинки, а не окончательный результат.
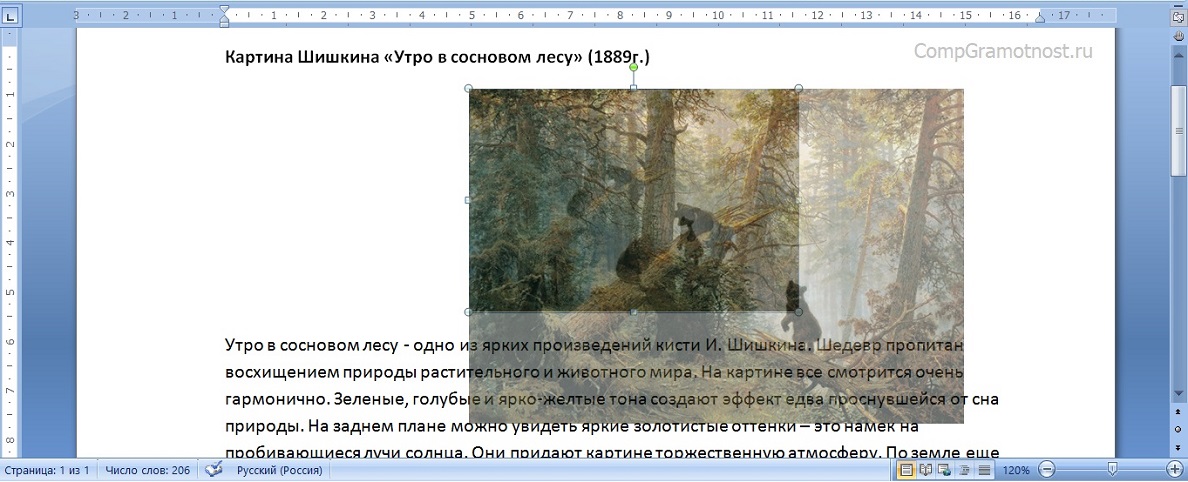
Рис. 9 (кликните по рис. для увеличения). Растягивание (увеличение размера) или сжатие (уменьшение размера) картинки, вставленной в текст.
После того, как мы отпустим левую кнопку мышки, рисунок станет того размера, каким мы его сделали. Остальной текст будет отодвинут от увеличившейся картинки или придвинут к уменьшившейся картинке. И так можно многократно менять размер рисунка, пока он не станет таким, каким мы его хотим видеть. Например, на рис. 10 рисунок расположен на всю ширину текста на странице.
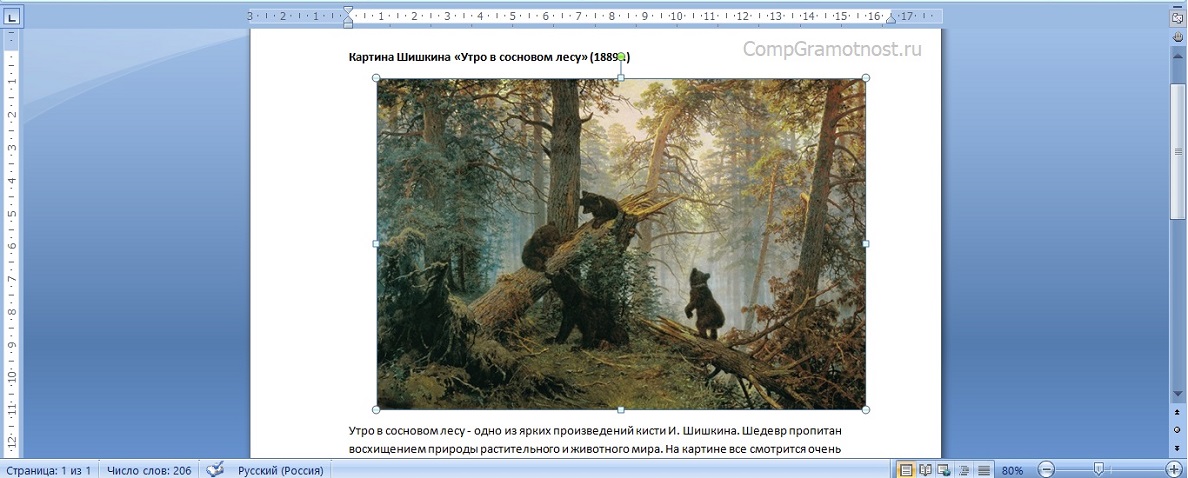
Рис. 10 (кликните по рис. для увеличения). Увеличение размера вставленной картинки (рисунка) в редакторе Microsoft Word.
Обтекание картинки текстом в Ворде
Вышеперечисленные манипуляции с текстом и картинкой, вставленной в текст, не позволили нам заполнить текстом правую часть листа, то есть, справа от вставленного рисунка. Мы лишь смогли отделить текст от картинки, а картинку увеличили в размере, чтобы заполнить «пустоту».
Но далеко не всегда подобное форматирование делает текст с рисунками привлекательным, читабельным. Давайте посмотрим, как все-таки можно «соединить» картинку и текст воедино так, чтобы было и красиво, и лист был бы равномерно заполнен.
Предлагаю вернуться к состоянию, показанному на рис. 4, когда у нас был вставленный рисунок, и сразу после него начинался первый абзац текста. Затем нужно:
- выделить рисунок кликом левой кнопки мышки по нему,
- после чего, не сдвигая курсор мышки с картинки, кликнуть уже правой кнопкой мышки,
- появится контекстное меню, которое показывает, что мы можем сделать с этим рисунком (а сделать мы можем много чего!)
- выбираем из меню опцию «Обтекание текстом» (1 на рис. 11),
- далее из появившегося меню вариантов обтекания картинки текстом выбираем «По контуру» (2 на рис. 11).
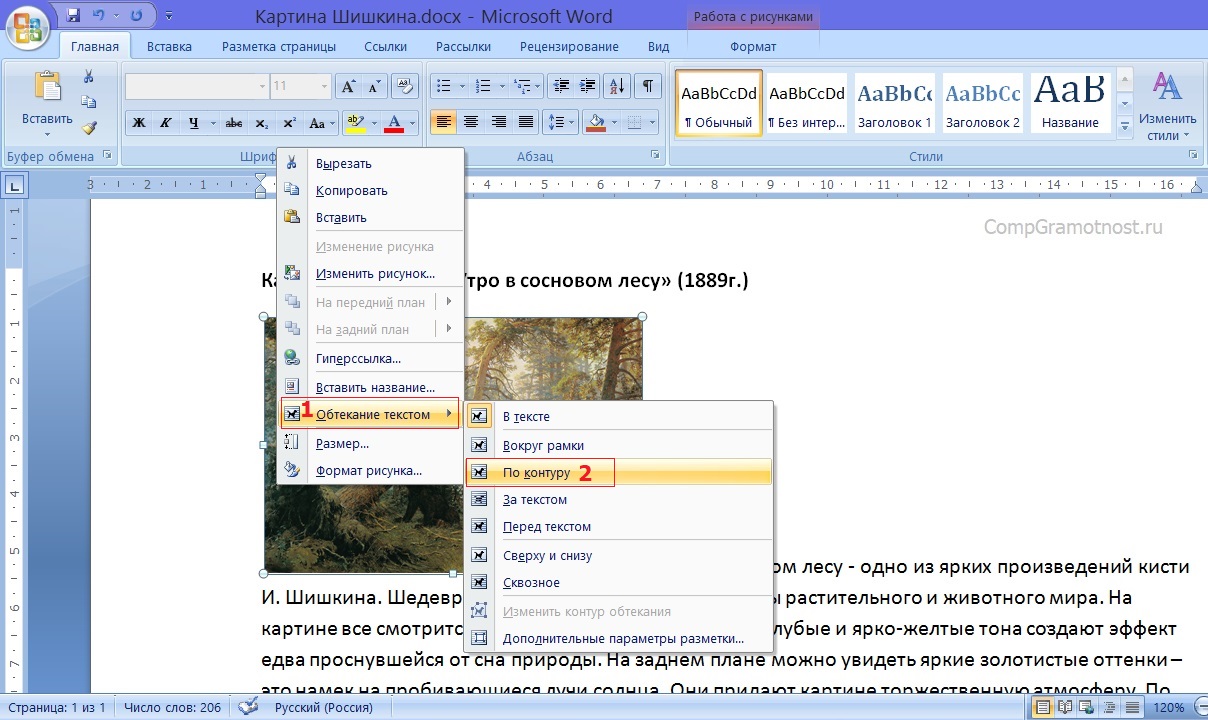
Рис. 11 (кликните по рис. для увеличения). Варианты обтекания текста вокруг картинки.
Именно такой вариант обтекания текста («по контуру») обеспечит нам расположение текста на свободном поле листа справа от рисунка (рис. 12). Что и требовалось сделать!

Рис. 12 (кликните по рис. для увеличения). Обтекание картинки в Ворде – расположение текста на свободном поле листа справа от вставленного рисунка (картинки).
Однако, в меню вариантов обтекания текстом рисунка (рис. 11) мы видим и другие варианты. Можете попробовать их самостоятельно, чтобы наглядно посмотреть, что получается с текстом и картинкой.
Например, вариант обтекания «Перед текстом» позволят «закрыть» рисунком часть текста. Текст будет размещен как бы под картинкой, его не будет видно. А вариант обтекания «За текстом», наоборот, размещает текста поверх рисунка. Текст будет, как бы, написан поверх картинки. Ну, и так далее, для разных случаев жизни, для разных вариантов совместного форматирования текста и рисунков, для форматирования текстов с картинками.
Остается только писать тексты и сопровождать их рисунками. Остальное сделает за нас текстовый редактор Microsoft Word, или как его иногда называют «текстовый процессор». Не совсем «текстовый», раз может работать и с картинками, не правда ли?!
Видео Обтекание картинки в Ворде: как вставить в текст, изменить размер и расположить слева от текста
Дополнительные материалы:
1. Как добавить таблицу в Word, чтобы сделать обтекание картинки текстом
2. Как убрать рамку вокруг текста и все остальное форматирование
3. Как открыть два окна в Ворд одновременно
4. Как поставить тире в программе Word?
5. Как заполнить анкету в Word
Получайте новые статьи по компьютерной грамотности на ваш почтовый ящик:
Необходимо подтвердить подписку в своей почте. Спасибо!

There are several reasons why you may want place text over an image in a Word document. Perhaps you want to place your company logo in the background of a document you’re writing for work, or maybe you need a “confidential” watermark on a document containing sensitive information. No matter the reason, you can do it easily in Microsoft Word.
Placing an Illustration Behind Regular Text
An illustration in Word refers to any of the objects you can insert from the “Illustrations” group on Word’s “Insert” tab. We’re going to be using a simple picture in our example here, but the same technique applies to any of these illustration types.

To get text to appear on top of an illustration, you change the text wrapping option on the illustration so that it appears behind your text.
RELATED: How to Wrap Text Around Pictures and Other Illustrations in Microsoft Word
If you haven’t already inserted your object into your Word document, go ahead and do that now. When you insert most of those illustration types—pictures, icons, SmartArt, charts, and screenshots—that object is placed in line with your text by default. The exceptions to this are 3D models and shapes, which are placed in front of text by default.
It doesn’t much matter since you’re going to be changing from that default to get the object behind your text, but do be aware that things might look a bit different to start with depending on what you’re inserting.
After inserting your object, click it to select it. You’ll notice a small icon at the top right corner.
This is the “Layout Options” icon. Go ahead and click that to pop up a small list of layout options. Select the “Behind Text” button under the “With Text Wrapping” section. Once you do, any text on the Word document that got moved around when inserting the image will go back to its original position.
Notice that when you select “Behind Text,” two more options become available. The “Move with text” option allows your graphic to move on the page as you add or delete text. The “Fix position on page” option keeps your graphic in the same place on the page as you add or delete text. It can be a little confusing how this works, but we’ve got a guide on positioning images and other objects in Word if you want to learn more.
RELATED: How to Position Images and Other Objects in Microsoft Word
At any rate, now that you’ve got that “Behind Text” option enabled, all your regular paragraph text appears in front of your object.
Inserting a Text Box Over an Image
There’s also another way to get text to appear in front of a picture or other object—a text box. When you create a text box, it works like any other illustration object. You can drag it around and have it show up in front of another object like an image. This technique is handy when you want to use anything other than regular paragraph text.
Go ahead and get your image or other illustration inserted first. To insert a text box, switch to the “Insert” tab and click the “Text Box” button. On the drop-down menu, choose the type of the text box you want. Here, we’re going with the “Simple Text Box” option.
After insertion, the text box is selected automatically so you can go ahead and type in your text. Then, drag it over your image. You’ll end up with something like this:
You’ll notice that there is a border around the box and the background of the text box is solid white. Let’s go ahead and remove the border and background fill.
Click the border of the text box. You’ll notice a new “Format” tab appears. Go ahead and click that tab. There are two options in the “Shape Style” section that we’re going to be using—“Shape Fill” and “Shape Outline.”
When you click the “Shape Fill” button, a drop-down menu with different colors and theme options appears. Click the “No Fill” option.
The background of your text box is now gone.
Next, click the “Shape Outline” button and choose the “No Outline” option from that drop-down menu.
Now, you’ll see that the border has been removed.
That’s all there is to it. The big advantage to this method is that you drag that text box around however you want to get your text lined up just right with your image.
READ NEXT
- › How to Place Images Behind or in Front of Text in Google Slides
- › How to Overlay Images in Microsoft Word
- › How to Mirror an Image in Microsoft Word
- › How to Add Blur or Transparency to an Image in Microsoft Word
- › How to Put Borders Around Images in Microsoft Word
- › Android’s Nearby Share Has (Unofficially) Arrived on Mac
- › Save Hundreds on Elegoo’s New PHECDA Laser Engraver Through Kickstarter
- › How to Get a Refund on the PlayStation Store