
What to do when the page numbering isn’t continuous in Word
What to Know
- To reset page numbers, go to Insert > Page Number > Remove Page Numbers. Do this for each section.
- To adjust page numbering, go to Insert > Page Number > Format Page Numbers. Make sure Start at is set to 1.
- To make page numbers continuous, go to Format Page Numbers and choose Continue from previous section.
This article explains how to fix page numbers in Word 2021, 2019, 2016, and Word for Microsoft 365.
How Do You Reset Page Numbers in Word?
If your page numbering if off in Word, the easiest solution is to remove the page numbers and start over. To remove page numbers in Word, click anywhere in the document, go to the Insert tab, then select Page Number > Remove Page Numbers. You can then adjust the numbering settings and add page numbers to your Word document as you please.
If you have section breaks, you might need to reset the page numbering for each section. Page number options are also available under the Header & Footer tab.
How Do I Fix Messed-Up Page Numbers in Word?
To adjust the numbering settings, go to the Insert tab, then select Page Number > Format Page Numbers.
From here, you can choose a number format and even include chapter information. Under Page numbering, make sure Start at is set to 1. Select OK to save changes.
To start numbering on the second page, set Start at to 0.
Why Is My Page Numbering Not Continuous in Word?
If you try to add or adjust page numbers manually, it can throw off the numbering for the whole document. Section breaks can also cause the page numbering to be inconsistent. Another possibility is you changed the page number format settings.
Go to the Home tab and select the Show/Hide icon (¶) in the Paragraph group to view section breaks.
How Do I Make Continuous Page Numbers in Word?
If you notice the page count starts over, it could be because you set up a section break with a different number scheme. You can remove the section break, but there’s an alternative. To make the page numbers continuous:
-
Click on the page with the incorrect number, then go to Insert > Page Number > Format Page Numbers.
-
Choose Continue from previous section. Select OK to save changes.
The section break will remain while keeping the page numbering consistent with the previous section. Repeat for each one to make the numbering sequential for the whole document.
How to Add Page Numbers to Different Sections in Word
If you want to break your document into sections with separately numbered pages, follow these steps:
-
Click in the body of the document where you want the new section to begin, then select the Layout tab.
-
Select Breaks and choose Next Page under Section Breaks.
-
Double-click in the header or footer (wherever the page number is) and deselect Link to Previous in the Navigation group.
-
In the new section, go to Insert > Page Number > Format Page Numbers.
-
Select Start at and set the value to 1. Select OK to save changes.
FAQ
-
How do I fix page numbers in a table of contents in Word?
After creating a table of contents in Word, you can customize the way it appears. Choose Update Table from the Table drop-down menu to update page numbers. You can also go to References > Table of Contents > Custom table of contents to customize your existing table of contents.
-
Why does my Page Number say page merge format in Word?
If you see { PAGE *MERGEFORMAT } instead of page numbering, you have field codes turned on in Word. Press the shortcut key combination ALT — F9 to display the field, or page numbers, instead of the field code.
Thanks for letting us know!
Get the Latest Tech News Delivered Every Day
Subscribe
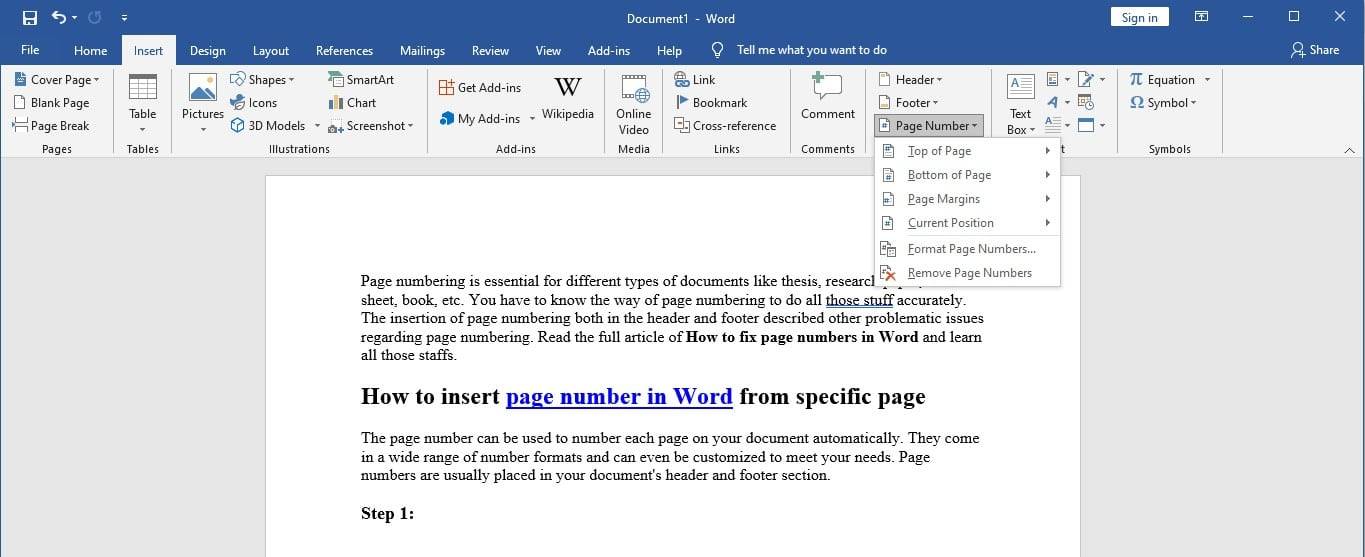
Page numbering is essential for different types of documents like a thesis, research papers, Lab sheets, books, etc. You have to know the way of page numbering to do all those stuff accurately. The insertion of page numbering both in the header and footer described other problematic issues regarding page numbering. Read the full article on How to fix page numbers in Word and learn all the staff.
How to insert page number in Word from specific page
The page number can be used to number each page on your document automatically. They come in a wide range of number formats and can even be customized to meet your needs. Page numbers are usually placed in your document’s header and footer sections.
Step 1:
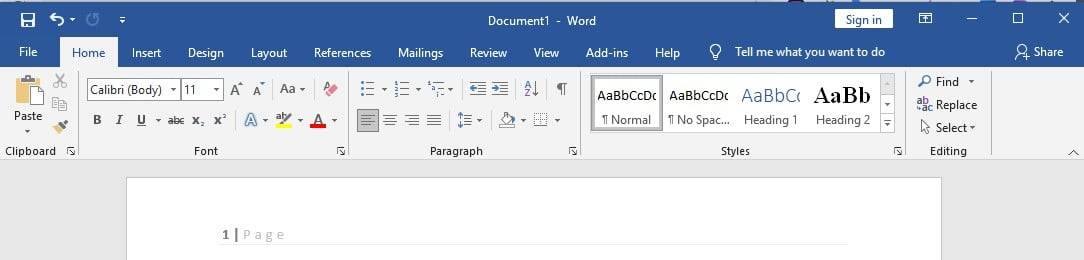
Navigate the insert tab then click the page number button. You will find a few different options designed to help you with different types of documents.
Step 2:
To add page numbers to an existing header, use “Top of the page” for footer use “Bottom of the page” for a specific position in a document use the “current position” command. Otherwise, choose one of the three options to create word page numbers from scratch. For example, we are choosing here the “Top of the page” option.

Step 3:
No matter what you select word gives you several different numbering styles to choose from. All you have to do is click the one you want. It will be added to your document.
However, there may have separate sections in your documents where you would like to start your numbering. There is a way to do this. You can even apply different styles to each section. All you have to do is insert a section break first. You can read a similar article on how to remove headings in Word.
In this example, let’s say we want to restart numbering on page1 on page 27.
Step 1:
At first, you have to place your cursor at the beginning of the section and then go to the layout tab.
Step 2:
Click the breaks button. You will see a few different types of section breaks. But the one we want is the “Next page.” Now we can adjust our page numbering by following steps.

Step 3:
At first double click the header of the footer to unlock it.
Step 4:
Then click the page number command and choose format page numbers from the menu. A dialogue box will appear where you can change your number format and add chapter numbers to your page.
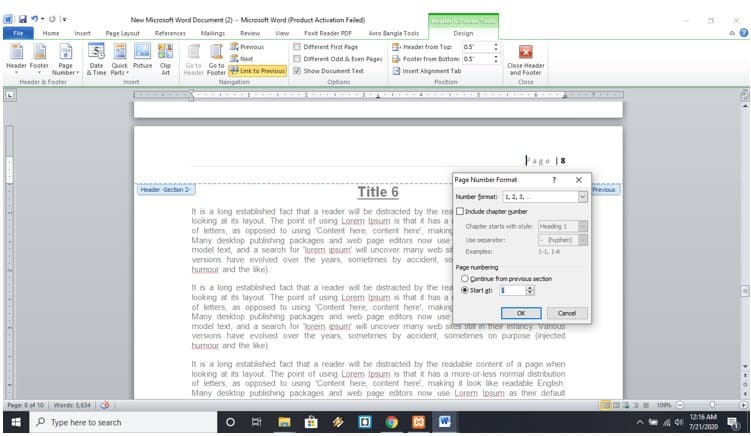
Step 5:
However, to restart your numbering, all you have to do is select the field that says start at. By default, Word will set it to restart at 1. But you can enter any number here. When it is done, click the OK button. You will see the changes in your documents.
Page numbers in Word not working
One of the reasons that page number does not work is -users don’t insert a page field. You have to insert a PAGE field by any of the steps written below,
- Select the insertion point in the header or footer and press the ALT+SHIFT+P buttons together. And complete the requirements.
- With the insertion point in the footer or header, select Page Number dropdown then click on the current position. Choose the Plain Number option.
- Inserts a footer building block from the gallery, which will be overwritten with the previous footer.
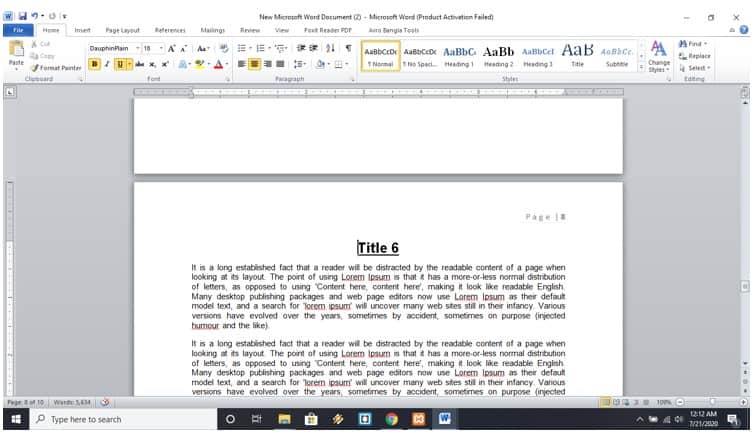
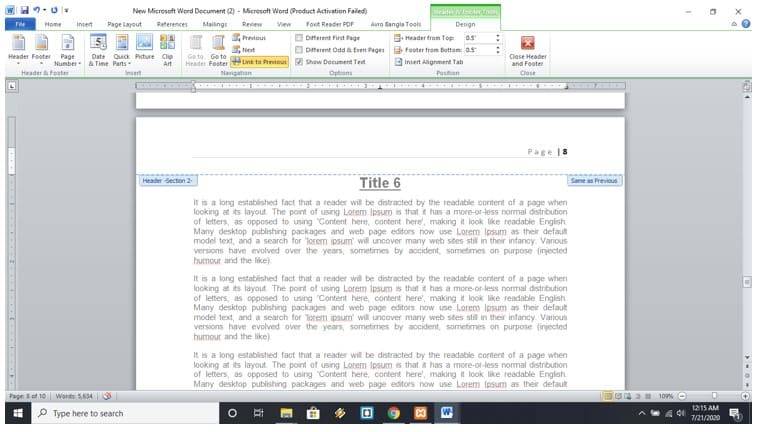
Resetting Word Page Numbers with Section Breaks
Sometimes it may occur that you added a page number manually. But because of different sections in the header and footer, page numbers may appear different and not continuous. So in this situation, what can you do?
Step 1:
Click the Insert tab in the top menu bar then click on the “Page Number” dropdown.
![]()
Step 2:
Click on “Format Page Number.” A dialogue box will appear. Click on the “Continue with previous” section. Click the “OK” button.
Now your problem is solved. Page number will continue according to a section break.
page numbers in footer not sequential
At first, let’s talk about how to set page numbering in the footer. To do that-
- Click on the Insert tab on the menu bar.
- Then click on “Page number.”
- Select “Bottom of page” then choose a numbering style.
Sometimes you may want to move some pages to another document. In that situation, a messed up situation emerges. You will find footer page numbering is not sequential. So what is the solution?
- As the previous click on the Insert tab from the menu bar.
- Click on “Page Number” dropdown. Select “Format Page Numbers.” A dialogue box will appear.
- Choose the “Continue from previous section” radio button. Keep on doing that on each section page.
- You will find that your whole document footer page number is sequential.
Solutions regarding page numbering are close to each other. We hope this article may help you design and use page numbering in your official documents. Thanks for reading.
-
Home
-
Tech Forum
-
Office Software
-
Word
Solved/Closed
Hello,
So far MS word worked fine. But now it is not showing up images. Also not even page numbers. Instead showing up {Page}. Please let me know why this happens? How to bring them out?
Related:
-
Page numbers not showing in word
-
Page number not showing in word
— Best answers -
Word page number not showing
— Best answers -
Word free for u
—
Guide -
Vim find word
—
Guide -
Backspace not working in word
—
Guide -
Pdf extension for word
—
Download — Other -
Tamil word to pdf converter
—
Word Forum
12 replies
In Word 2007 :
- File[Office Button] / Word Options / Advanced / Show Document content
- uncheck «show field codes instead of their values»
secretgreg
Dec 30, 2008 at 06:09 PM
Thank you very much. This was driving me nuts with the pictures not displaying.
mwaniki
Mar 3, 2009 at 09:15 AM
tthat mate this worked it was driving me bloody nuts .You are a gem minidiscguru
Similar discussions
Yeeeeeeeeeeeeeeeeeeeeeeeeeeeeeeesssssssssssssssssss
FINALLY I figured it out and why in the world Microsoft hasn’t told the world about this fix is….giving me a migrane
Anyway here are the steps
1)From your document click on the INSERT icon its at the top of your document (3rd from the left with File and Edit being the 1st and 2nd)
2) Click on FOOTER (its about 3/4 of the way at the top)
3) Click on EDIT FOOTER (2nd from the bottom)
4) Click on HEADER & FOOTER at the top of the page (same row as # 1 above but it is the last option)
5) MAGICALLY it gives you PAGE NUMBER (3rd from the right) so click on it (note – it gives you options to insert page number to left, middle. on right, etc.)
6) After you have chosen your PAGE NUMBER option then click on CLOSE HEADER AND FOOTER (to the right)
7) CONGRATULATIONS you are done!!!!
Now please leave comments confirming this fixed it for you
Take care and may God bless you
One man sharing his thoughts on WordPress.com
My organization is transitioning to Office 2016. I decided to try it with just two Windows 10 workstations initially, to detect any issues before a full transition. It was a good thing I did, because an exasperating bug popped up right away. I’ve exhaustively
tried to troubleshoot it on the web, and there is no fix — just a workaround, and that doesn’t work either.
The problem is with page numbering, and I know that this is not as isolated issue — this is a genuine bug that multiple parties have experienced and that Microsoft simply will not acknowledge unless you come up with $500. (Their «contact support»
feature in Word is a joke — all you ever get is a message saying «an error occurred — try again later.»)

To eliminate the obvious:
YES, I’ve tried deleting Built-in Building Blocks.dotx file from the personal profile and having Word re-create it.
NO, there are no add-ins to Word.
The full extent of Microsoft acknowledgement of this problem is
here. Can anyone actually fix this bug?
![]()
Download Article
Easily add page numbers to the header or footer in your Microsoft Word document
![]()
Download Article
- Inserting (PC & Mac)
- Formatting (PC & Mac)
- Inserting (Mobile)
- Video
- Expert Q&A
- Tips
|
|
|
|
|
Adding page numbers in Microsoft Word is easy! Whether you’re writing a 10-page essay or a thesis paper, there are a variety of ways to customize the page numbers. Use the Insert tab to quickly add page numbers. From there, you can change the formatting and numbering options. This wikiHow guide will show you how to add page numbers to your Microsoft Word document on Windows and macOS, as well as in the Word mobile app on your Android, iPhone, or iPad.
Things You Should Know
- On desktop or mobile, go to the Insert tab, then select «Page Number» to add page numbers.
- Double-click the page number to make changes to the font, color, or style.
- Double-click the header or footer, then go to Page Number > Format Page Numbers for additional options.
-
1
Click Insert. This is in the tab menu bar at the top of Word. Alternatively, double-click the top or bottom of the page to open the Header or Footer editing menu.
- Don’t forget to save your work as you go!
-
2
Click Page Number. This opens a pop-up menu for choosing where to place the page numbers.[1]
- In the Insert menu, Page Number is near the center.
- In the Header & Footer design tab, Page Number is on the left.
Advertisement
-
3
Choose a page number position. This can be in the header or footer, and located left, center, or right.
- You can also toggle the option to include the page count in the page numbering (e.g. 1 of 3).
- Selecting a page number position will open the “Header & Footer” tab.


Advertisement
-
1
Double-click a page number. This will select it and show a pop-up menu with options for changing the font, color, and style. This change will edit every page number automatically.
- You could even cross out the page numbers if that’s your style.
-
2
Start numbering on the second page. If you want the first page to have no numbering, and start at 1 on the second page, follow these steps:
- Double-click the header or footer to open the Header & Footer design tab.
- Check the “Different First Page” checkbox.
- Click Page Number then Format Page Numbers.
- Select “Start at” and change it to 0.
-
3
Restart page numbers by using page breaks. If you want to start a new numbering later in the document, you’ll need to use a page break.
- Place your cursor at the beginning of the page you want to restart the numbering on.
- Go to the Layout tab, then click Breaks.
- Select Next Page in the Breaks options menu.
- Double-click the header or footer in the second section. This will open the Header & Footer design tab.
- Click Page Number then Format Page Numbers.
- Select the radio button labeled «Start At,» then select «1» to restart the page count at 1.
-
4
Use «Format Page Numbers» for additional changes. This can be located by going to Insert > Page Number > Format Page Numbers. You can change:
- The number format. You can change this to Roman numerals, letters, or another style.
- The chapter number.
- The starting number.
-
5
Click Close Header and Footer. This will return you to editing the body of the document. Alternatively, press Esc to close the header and footer editor.


Advertisement
-
1
Open your Word document on your Android, iPhone, or iPad. It’s easy to use Word on your phone or tablet to insert page numbers into your document.
-
2
Tap the more button. While in Edit mode in the Word mobile app, tap the more button (three horizontal dots).
-
3
Tap Home. Then, select Insert to switch to the Insert menu.
-
4
Choose Page Numbers. Then, select the placement location for the numbers.
-
5
Format the page number. After selecting the placement, double-click the page number. Then, tap the text edit button (the icon with the letter A and a pen). You can change the font, size, color, and more!
-
6
Go to Headers and Footers. This is in the Insert menu. You can set a different first page, change how odd and even pages look, or remove the page numbers entirely.
- When working in Online mode, any changes made in the app will appear on your desktop version of Word.


Advertisement
Add New Question
-
Question
In the insert box, the page number icon is grayed out and not available for use. How do I activate it?

Kyle Smith is a wikiHow Technology Writer, learning and sharing information about the latest technology. He has presented his research at multiple engineering conferences and is the writer and editor of hundreds of online electronics repair guides. Kyle received a BS in Industrial Engineering from Cal Poly, San Luis Obispo.
wikiHow Technology Writer
Expert Answer
The page numbering feature isn’t available in certain layouts. Go to View and select Print Layout. If this doesn’t resolve the issue, try restarting and/or updating Microsoft Word.

Ask a Question
200 characters left
Include your email address to get a message when this question is answered.
Submit
Advertisement
Video
-
If you plan on creating a complex header or footer (like your name, or a title), try and add the page numbers first. They will be much easier to work with.
-
Looking for money-saving deals on Microsoft Office products? Check out our coupon site for tons of coupons and promo codes on your next subscription.
Thanks for submitting a tip for review!
Advertisement
About This Article
Article SummaryX
1. Click Insert.
2. Click Page Number.
3. Select a position.
4. Choose a style.
Did this summary help you?
Thanks to all authors for creating a page that has been read 423,920 times.
Is this article up to date?
- The page count begins with the very first page of your ETDR.
- Title page up to Table of Contents: Page numbering begins with «i» in lowercase Roman numerals (i, ii, iii) and is NOT displayed.
- Table of Contents page up to Chapter 1: Lowercase Roman numerals continue counting and ARE displayed.
- Starting at Chapter 1: Page numbering begins with “1” and is displayed in Arabic numbers (1, 2, 3) through the rest of the document.
- Section breaks are used to control page numbering. With Word Show/Hide turned on, they look like this: ======Section Break (Next Page)======
This system of page counting and displaying page numbers is built into the template and shouldn’t require any attention. As you work with your document, inadvertently deleting or modifying page-numbering components can cause some issues.
If page numbers do not display properly, select the solution you need and follow the steps below.
- Fix page numbers starting over at «1» in body of document
- Fix page numbers from beginning to Chapter 1
Fix page numbers starting over at “1” in body of document
If you see page numbers reverting back to “1” in the body of your document, it’s likely this is occurring at a section break. Follow these steps to correct the problem:
- Click anywhere on the page where the numbering is starting over at “1.” If you’re not in the Header and Footer view, select the Insert tab, click Footer and click Edit Footer.
- Put the cursor in the footer; DO NOT select the page number. Click Page Number and then Format Page Numbers.
- In the Format window, click Continue from previous section and then click OK.
Repeat these steps at each occurrence of a section break or when page numbers are reverting back to “1”.
Fix page numbers from beginning to Chapter 1
Follow these A, B, C, and D steps in order. Or, use the ETDR Request form to get help from an ETDR consultant (requires eID/password).
Step A. Check for required section breaks (at Table of Contents, Chapter 1).
- Open your document in Word. Click the Show/Hide button (it looks like a black Paragraph symbol) to turn on hidden formatting symbols.
- Just before the Table of Contents page, check for a section break. If a section break is present, skip to Step 4.
- If the Section Break is missing, place your cursor just in front of the “T” in “Table”. Click the Page Layout tab. In the Paragraph section, select Breaks. Under Section Breaks, select Next Page.
- Just before the start of Chapter 1, check for a section break. If the section break is present, skip to Step B below.
- If the section break is missing, place your cursor just after «Chapter 1 — » and in front of the first word in the title. Click the Page Layout tab. In the Paragraph section, select Breaks. Under Section Breaks, select Next Page.
Step B. Fix page numbers from title page to before Table of Contents.
- Place the cursor anywhere on the title page.
- On the Insert tab, select Footer and click on Edit Footer.
- If you see a page number in the footer (at the bottom of page), select the number and press the Delete key.
- With the cursor in the footer, click Page Number and then Format Page Numbers.
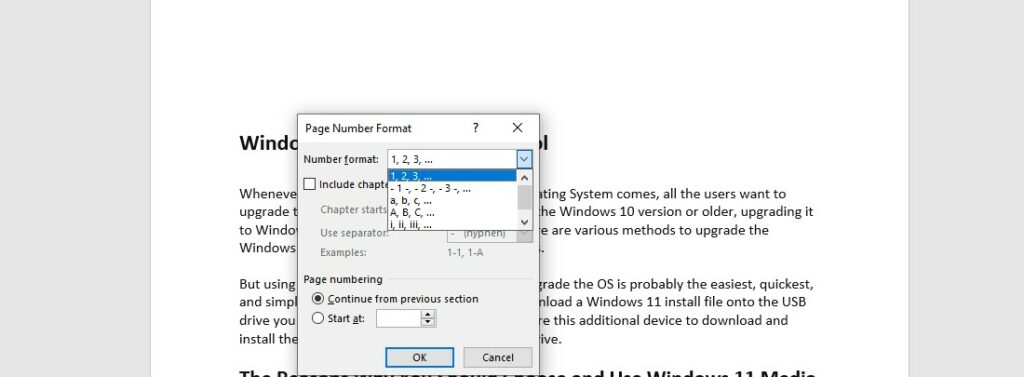
- In the Page Number Format window, set the Number format to i,ii,iii,… Under Page numbering, select Start at and set the number to “i.” Click OK.
Step C. Fix page numbers from Table of Contents to before Chapter 1.
- Scroll to the first page of your Table of Contents. If you’re not in the Header and Footer view, select the Insert tab, click Footer and click Edit Footer.
- If “Same as Previous” or “Link to Previous” is visible just above the footer, remove it by clicking Link to Previous in the Design tab’s Navigation section.
- Make sure the Design tab is still selected. With the cursor in the footer, click Page Number and then Format Page Numbers.
- In the Page Number Format window, set the Number format to i,ii,iii,… Under Page numbering, select Continue from previous section. Click OK.
- If no page number is displayed, insert it: Click Page Number, then Bottom of Page, then Plain Number 2 (centered) or Plain Number 3 (right-justified).
Step D. Fix page numbers from Chapter 1 on.
- Scroll to the first page of Chapter 1. If you’re not in the Header and Footer view, select the Insert tab, click Footer and click Edit Footer.
- If “Same as Previous” or “Link to Previous” is visible just above the footer, remove it by clicking Link to Previous in the Design tab’s Navigation section.
- With the cursor in the footer, click Page Number and then Format Page Numbers.
- In the Page Number Format window, set the Number format to 1,2,3,… Under Page numbering, select Start at and set the number to “1”. Click OK.
- If no page number is displayed, insert it: Click Page Number, then Bottom of Page, then Plain Number 2 (centered) or Plain Number 3 (right-justified).
- When you’re all done, on the Design tab, click Close Header and Footer.

on
December 14, 2020, 8:06 AM PST
How to avoid a disappearing page number in Microsoft Word
If you turn off page numbering for the first page of a Word document and then add a new section to page 2, the page number on page 2 disappears! Here’s how to get it back.
We may be compensated by vendors who appear on this page through methods such as affiliate links or sponsored partnerships. This may influence how and where their products appear on our site, but vendors cannot pay to influence the content of our reviews. For more info, visit our Terms of Use page.

Adding page numbers to a document is a frequent task and easy, as long as you don’t need anything beyond the basics. However, that’s not practical, is it? It seems like you always need something to be just a little different, and for better or worse, Word’s page-numbering feature can be a bit confusing. In this article, we step beyond the basics and consider a common but easily solved problem: The disappearing page number.
SEE: 60 Excel tips every user should master (TechRepublic)
I’m using Microsoft 365 on a Windows 10 64-bit system, but you can use earlier versions. For your convenience, you can download the demonstration .docx file. This page-numbering solution works in the browser, but the browser doesn’t display header/footer text, so previewing is necessary.
The basics: How to add a page number in Word
Let’s take a step backward, just in case you don’t know how to include a page number in a Word document. You can display a page number anywhere, but the header/footer area is the usual spot. In addition, Word offers a few helpful, built-in options, that take the guesswork out of basic page numbering. Let’s work through a quick example that displays the page number at the top-right of every page—no bells or whistles—just page numbers. Using a three-page document, similar to the demonstration file, do the following:
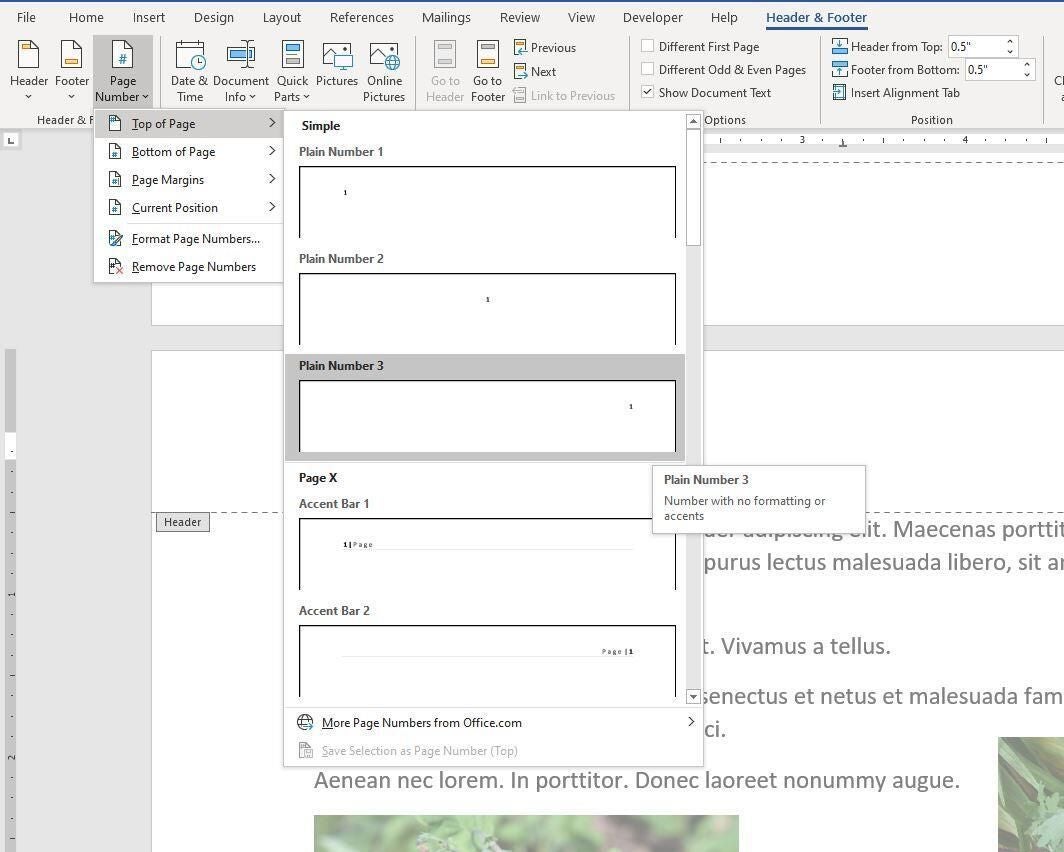
- On any page, click the Insert tab.
- In the Header & Footer group, click the Page Number dropdown and choose the third option—Plain Number 3 (Figure A)—to open the header section and insert the page numbering field. You’ll know the header is open when the rest of the document dims a bit and Word displays a dotted border with a Header tag. Also, there are several options that you’ll want to explore later.
- Double-click the Header tag to close the header.
Figure A
Each page is numbered, the first page is 1, the second is 2, and the third is 3—jut as you might expect. You might never need anything more than the basics. But it’s good to know that this feature is flexible if you do.
How to disable numbering for page 1
Probably the most common page-numbering scheme, beyond the basics is to not display a page number of the first page. It might be a title page, a cover letter, or something similar. To inhibit page numbering on the front page, do the following:
- Page numbering already exists, so we can skip those few first steps of entering the page number field. Double-click any page number to open the header.
- In the contextual Header & Footer tab, click the Different First Page option (Figure B) in the Options group.
- Double-click the Header tab to close the section.
Figure B

Page 1 won’t display a page number, but page 2 and 3 still do. If this is what you need, you’re done. If you want to restart page number at page 2, you have one more step.
How to restart page numbering
When you disable page numbering for the first page, you might also want to restart page numbering at page 2, so that the second page displays 1, instead of page 2, page 3 displays 2, and so on.
To reset the page numbering sequence, double-click the number that begins the new sequence. In this case, that’s 2 on page 2. Doing so will open the header section. To continue, do the following:
- Right-click 2—the current page number in the header section.
- Choose Format Page Numbers from the resulting submenu (Figure C).
- In the resulting dialog box, enter 1 in the Start At option in the Page Numbering section (Figure D).
- Double-click the Header tag to close the header section.
Figure C

Figure D

When you review the page numbers you’ll find that … oops … absolutely nothing changed! I did this on purpose to drive home the importance of sections. A section is a page or several pages that contain its own formatting. A single-page document is actually a single-paged section.
Now, let’s backtrack a little by adding a page section after page one as follows:
- Position your cursor at the top of the page that begins the new numbering sequence. If there’s text, position the cursor before the text (ignore anything in the header for now).
- Click the Layout tab.
- In the Page Setup group, click the Breaks dropdown and choose Next from the Section Breaks section (Figure E). Notice that the page number (2) disappears! What happened?
- Double-click the header for page 2.
- Uncheck the Different First Page option in the Options group on the Header & Footer contextual tab. Figure F shows the continuous page break (at the bottom of page 1) and the page number on page 2 is now 1. You must uncheck this option or Word treats page 2 as the new first page of the second (new) section and applies this option.
- Close the header by clicking the Header tag.
Figure E

Figure F
It’s easy to forget about the different header option and until you disable it for the new section, Word won’t return the page-numbering scheme you expect. Restarting the page number wasn’t the problem: The different header option was.
Stay tuned
Page numbering can be confusing, especially when Word doesn’t do what you expect, and you have no idea how to troubleshoot the problem. Over the next few months, I’ll share a few other page-numbering problems and their solutions.
Also See
-
How to become a software engineer: A cheat sheet
(TechRepublic) -
Zoom vs. Microsoft Teams, Google Meet, Cisco WebEx and Skype: Choosing the right video-conferencing apps for you (free PDF)
(TechRepublic) -
Hiring Kit: Application engineer
(TechRepublic Premium) -
Microsoft 365 (formerly Office 365) for business: Everything you need to know
(ZDNet) -
Must-read coverage: Programming languages and developer career resources
(TechRepublic on Flipboard)
-
Microsoft
-
Software
|
09-15-2020, 07:04 PM |
|||
|
|||
|
page numbering not working — predefined formats also missing Using WIN 10 Pro OS; Office 365 ProPlus ver 2002 build 12527.21104. Checked for updates and I’m current. In a document I click Insert tab > Page Number drop down > Top of Page (for example) — and no predefined pagination formats exist! Sub menu «More Page Numbers from Office.com» appears. Hover on this and «No Online Content Exists» appears. End of story. I’ve got to believe there is a setting under Options I cannot locate. I need someone else’s eyes to wake me up. Your help appreciated!
|


|
09-16-2020, 10:12 PM |
|||
|
|||
|
Charles,
|