
Insert Page X of Y
If you have a header or footer already, click or tap where you want to put the page number first.
-
Go to Insert > Page Number.
-
Do one of the following:
-
Select Current Position if you have a header or footer.
-
Select a location if you have no header or footer yet.
-
-
Scroll until you see Page X of Y and select a format.
-
Select Close Header and Footer, or double-click anywhere outside the header or footer area.
-
Double-click in the footer or header where you want page numbering.
-
Go to Header & Footer > Footer, and then scroll to find and select Semaphore.
-
Select Close Header and Footer or double-click anywhere outside of the header or footer areas to exit.
See also
Start page numbering later in your document
-
Go to Insert > Page Numbers
-
Select Include Page Count for an X of Y format.
-
Choose a location.
To remove page numbers, repeat these steps but choose Remove Page Numbers.
 Please Note:
This article is written for users of the following Microsoft Word versions: 2007, 2010, 2013, 2016, 2019, Word in Microsoft 365, and 2021. If you are using an earlier version (Word 2003 or earlier), this tip may not work for you. For a version of this tip written specifically for earlier versions of Word, click here: Inserting the Total Number of Pages in Your Document.
![]()
Written by Allen Wyatt (last updated January 14, 2023)
This tip applies to Word 2007, 2010, 2013, 2016, 2019, Word in Microsoft 365, and 2021
It is not unusual to put a page number in your headers or footers, and the different ways of accomplishing that task are covered in other issues of WordTips. You can also, however, insert a field that indicates the total number of pages in a document. This can be used in a header or footer or directly within the text of your document. To insert the total number of pages in your document, follow these steps:
- Position the insertion point where you want the total number of pages to appear.
- Make sure the Insert tab of the ribbon is selected.
- In the Text group, click Quick Parts. You’ll see a drop-down menu.
- Choose Field. Word displays the Field dialog box.
- In the Categories drop-down list, choose Document Information. (See Figure 1.)
- In the Field Names list choose NumPages. (If you don’t see NumPages in the list, check either the Numbering category or the (All) category in step 5.)
- Click on OK to close the dialog box and insert your field.
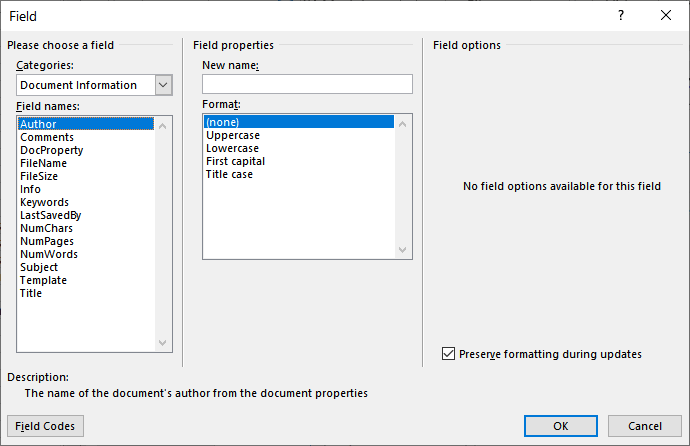
Figure 1. The Field dialog box.
WordTips is your source for cost-effective Microsoft Word training.
(Microsoft Word is the most popular word processing software in the world.)
This tip (980) applies to Microsoft Word 2007, 2010, 2013, 2016, 2019, Word in Microsoft 365, and 2021. You can find a version of this tip for the older menu interface of Word here: Inserting the Total Number of Pages in Your Document.
Author Bio
With more than 50 non-fiction books and numerous magazine articles to his credit, Allen Wyatt is an internationally recognized author. He is president of Sharon Parq Associates, a computer and publishing services company. Learn more about Allen…
MORE FROM ALLEN
Converting Endnotes to Regular Text
If you have a document with lots of endnotes, you may need them converted to regular text so that they can be used …
Discover More
Preventing Changes to Styles in Documents
Have you ever created a template only to have the styles within it changed as they were used within a document? Here are …
Discover More
Creating See-Through Text Boxes
When laying out your document, you may want to use a text box that appears to be positioned over your text, but to be …
Discover More

Learning Made Easy! Quickly teach yourself how to format, publish, and share your content using Word 2013. With Step by Step, you set the pace, building and practicing the skills you need, just when you need them! Check out Microsoft Word 2013 Step by Step today!
More WordTips (ribbon)
Inserting a Page Number Field
The PAGE field is used to indicate the current page number on which the field occurs. If you want to add this field to …
Discover More
Inserting the Current Month
Need to add the name of the current month to your document? Word includes a field that can make the addition easy, and it …
Discover More
Updating Fields in Locked Forms
Updating form fields in Word can be confusing, especially when the fields are locked in a form. This tips explains why …
Discover More
Subscribe
FREE SERVICE: Get tips like this every week in WordTips, a free productivity newsletter. Enter your address and click «Subscribe.»
View most recent newsletter.
Videos
Links and Sharing
You can easily include the total number of pages along with the current page number (E.g., Page 10 of 20).
When you insert page numbers in a document, you’re actually insert the { PAGE }
field.
Using the { NUMPAGES } field along with the { PAGE } field, you can
include the total number of pages with the page numbering.
To the total number of pages:
1. Place the insertion point where you want to place the count, in the
header or footer.
2. On the Insert tab, in the Text group, click Quick
Parts, and then click Field…:

3. To include the total number of pages, highlight NumPages
in the Field names list:

Attention! The brackets that surround fields are not the brackets on your keyboard. You
can use the Insert -> Field to insert a field, but a more direct way is to press Ctrl+F9.
This displays the special brackets with
a gray highlight for entering a field name.
To add the total number of pages to a header of footer, for example, press Ctrl+F9 and type
NUMPAGES within the brackets:
![]()
All string will be like this:
![]()
To display the result of the field code, press Alt+F9.
See also this tip in French:
Comment inclure le nombre total de pages avec le numéro de page actuel.
For a lengthy document, the total number of pages is important. It tells the reader how many more pages are left before reaching the end of the document.
Also, this information is useful when printing the document. You know when you have reached the end of the document.
MS Word has the ability to print the current page number and the total number of pages. You may have a Word document that:
- Already has the pages numbered
- Has no page numbering
We will show you in simple, step-by-step instructions how you can do this for both cases.
Let us begin.
Method #1: For Document with Page Numbering
This applies to a document where page numbers already appear, but not the total number of pages.
Step #1: Open a Word document
Open the Word document with existing page numbering.
Step #2: Select the page number
Double-click on the page number to select it.

Step #3: Remove page numbers
Once you have double-clicked, the ribbon will change.
You will be in the Design tab under Header and Footer Tools.

In the section Header & Footer, click on the Page Number icon.

A new menu will open.
Click on Remove Page Numbers.

This removes all page numbering from the document.
Step #4: Introduce page number with total number of pages
In the section Header & Footer, click on the Page Number icon again.

A new menu will open, click on Current Position.

Another menu will open.
Scroll down until you reach Page X of Y.

Click on Bold Numbers.
All menus will close.
Word will now show the current page number as well as the total number of pages.

In the top menu bar, click on Close Header and Footer icon to return to your document.

Method #2: For Document without Page Numbering
This method is for when your document has no page numbers yet.
Step #1: Open a Word document
Open the Word document where you want to introduce the total number of pages.
Step #2: Introduce page number with total number of pages
Click on the Insert tab in the top menu bar to change the ribbon.

In the section Header & Footer, click on the Page Number icon.

A new menu will open.
You have four choices for positioning the page numbers:
- Top of Page — Page numbering appears at the top of the pages
- Bottom of Page — Page numbering appears at the bottom of the pages
- Page Margins — Page numbering appears in the margins of the pages
- Current Position — Page numbering appears at the current position of the cursor.
Click on any one of the above choices.
In our example, we selected Top of Page.

Another menu will open.
Scroll down until you reach Page X of Y.

Click on Bold Numbers.
All menus will close.
Word will now show the current page number as well as the total number of pages.

In the top menu bar, click on Close Header and Footer icon to return to your document.

Conclusion
We have shown you two simple methods of introducing the total number of pages in a Word document.
Use the method most suitable for you.

Word includes a tool that allows you to view simple statistics about your document. These statistics include how many pages, words, characters, paragraphs, and lines are in your document. This is useful if you have to follow certain guidelines when writing your document.
To view these statistics, open the document in question and click the “Review” tab.

In the “Proofing” section, click “Word Count”.
The “Word Count” dialog box displays, as shown in the image at the beginning of this document. The number of pages and words can also be viewed on the status bar at the bottom of the Word window.
NOTE: The number of pages is only visible on the status bar when you are viewing your document in “Print Layout” view or “Draft” view (using the “View” tab).
If you don’t see the number of pages and words on the status bar, right-click on the status bar and select the items you want to view from the popup menu. Note that you can also view the line number for the line where the cursor is currently located.
The number of lines and pages may vary, depending on several factors, such as the margins in your document, the font and font size, and paragraph spacing, to name a few. For example, if you change to a smaller font size, there will be fewer lines and pages in your document than there would be with a larger font size. Even different printer drivers can result in a slightly different rendering of a font, thereby changing the number of lines and pages in your document.
Hidden text can also affect the line count reported on the “Word Count” dialog box. If the option to print hidden text is turned of, Word doesn’t count hidden text in the line count. If you want hidden text included in the line count, make sure you configure Word to print hidden text.
READ NEXT
- › How to Count Characters in Word
- › How to Check the Word Count in Microsoft Word
- › How to Count Characters in Microsoft Excel
- › How to Get Workbook Statistics in Microsoft Excel
- › How to Get a Paragraph Count for a Specific Paragraph Style in a Word Document
- › Spotify Is Shutting Down Its Free Online Game
- › Why Your Phone Charging Cable Needs a USB Condom
- › Android’s Nearby Share Has (Unofficially) Arrived on Mac
How-To Geek is where you turn when you want experts to explain technology. Since we launched in 2006, our articles have been read billions of times. Want to know more?
In this article, we will show you 2 quick and effective ways to count the total number of pages and words for multiple Word documents.
Now and then, while working on a long document, we are tend to split contents into several Word files, such as placing different chapters in multiple documents. Then when it comes to count the total number of pages and words, it can be a little tiresome, since you have to open each individual document and check the information.
Therefore, we list 2 quick methods to help save your precious time.
Method 1: Check Details in File Folder
In the text, we will give an example under the environment of Windows 7.
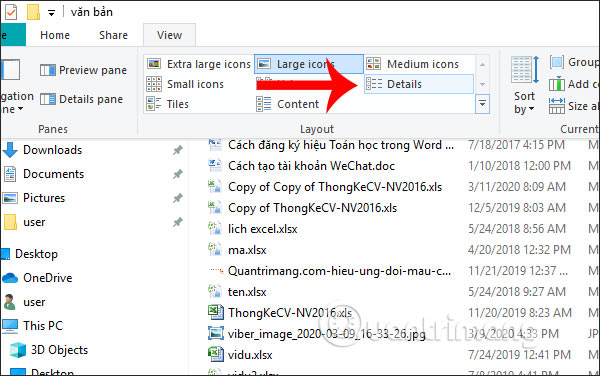
- First off, organize all documents to be checked in one file folder.
- Then open the file folder and click “More options” button next to “Change your view”.

- Next click “Details”.

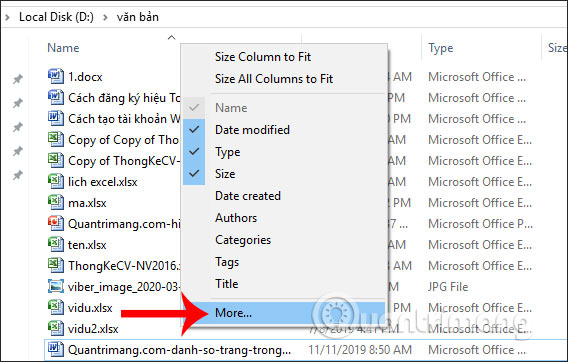
- Now right click on the header row and choose “More”.

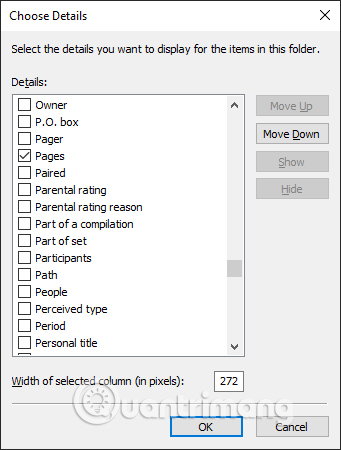
- In the “Choose Details” dialog box, check “Pages” and “Word count” boxes.
- Then click “OK”.


Now there will be 2 new columns, exhibiting the pages and words of each document. You just need to add these numbers together.
However, this method only provides you an approximate number of words in each file. Thus, to get a more accurate figure, you can choose method 2.
Method 2: Create a Macro
- Similarly, put all target documents in one file folder first.
- Then open Word and click “Developer” tab.
- Next click “Visual Basic” to open the VBA editor. Or you can simply press “Alt+ F11”.

- Now click “Normal” and “Insert”.
- Then choose “Module”.

- Next double click on the new module and paste the following codes on the editing area:


Sub GetAllPageNumbers()
  Dim objWordApplication As Word.Application
  Dim nPageNumber As Long
  Dim nWordNumber As Long
  Dim objFile As Variant
  Dim objFileSystem As Object
  Dim objFolders As Object

  nPageNumber = 0
  Set objWordApplication = New Word.Application
  Set objFileSystem = CreateObject("scripting.filesystemobject")
  Set objFolders = objFileSystem.getfolder("C:UsersTestDesktopfiles")

  For Each objFile In objFolders.Files
    '  Only process non-hidden files
    If (objFile.Attributes And 2) = 0 Then
      With objWordApplication
        .Documents.Open (objFile)
        nPageNumber = nPageNumber + .ActiveDocument.ComputeStatistics(wdStatisticPages)
        nWordNumber = nWordNumber + .ActiveDocument.ComputeStatistics(wdStatisticWords)
        .ActiveDocument.Close (False)
      End With
    End If
  Next objFile

  MsgBox ("pages:" & nPageNumber & " " & "words:" & nWordNumber)

  Set objFile = Nothing
  Set objFileSystem = Nothing
  Set objFolders = Nothing
  Set objWordApplication = Nothing
End Sub
- Lastly, click “Run”. Then you shall be greeted by a message box, indicating the page number and total words, such as below:


Note: The “C:UsersTestDesktopfiles” refers to the file folder location.
Watch Out Document Corruption
Since we have to deal with all kinds of reports every day, it’s advisable to back up some critical files in case they get corrupted because backup is always a vital part of the safety net to protect file integrity. However, the fact is that backups can also fail victim to corruption. And that’s when you will need a preeminent corrupted Word file recovery tool
Author Introduction:
Vera Chen is a data recovery expert in DataNumen, Inc., which is the world leader in data recovery technologies, including xlsx data problem repair tool and pdf repair software products. For more information visit www.datanumen.com
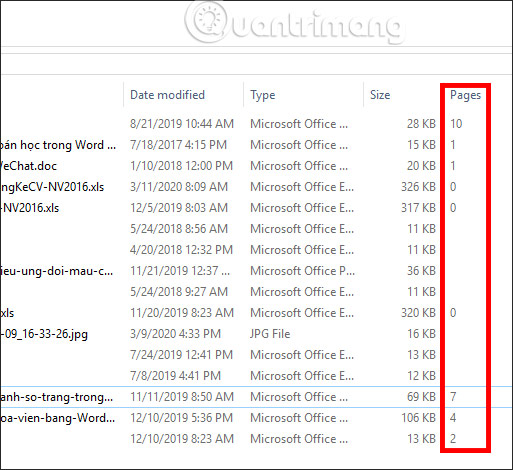
To count the number of Word pages, instead of having to completely open the Word file to check, we can see right in the Windows Explorer interface.
- How to quickly see the total number of pages of Word files?
- Delete pages in Word — Instructions on how to delete pages in Word
To count the number of Word pages, instead of having to completely open the Word file to check, we can see right in the Windows Explorer interface. Each Word file will display the page number at the bottom of the Word file footer.
However, there will be cases where you need to quickly see the number of file pages, or Word files with many pages and open files relatively time-consuming, so you need to see the page number of each document file. To see the number of pages displayed in the Windows Explorer interface is very simple, we just need to change the settings of Windows. The following article will guide you how to view page numbers quickly in Word.
Instructions for quick look at Word page numbers
Step 1:
At the folder where the document is stored on the computer, we click on the View item and select Details to switch to the view of the Word file with more details about the information.
Step 2:
Next, right-click anywhere in the content bar and select More in the displayed list.
Step 3:
Now display the interface with detailed information about the file, the file displayed on the system. The default is displayed on Windows Explorer including Name, file creation date, file type and file size. Now you will find the Pages section to select and then click OK to display more Pages column in Windows Explorer interface with document documents.
As a result, we will see the number of pages of Word document files immediately without having to open the file to view.
Read more
- How to Check a Word Count in Microsoft Word
- Count the number of characters in the paragraph
- How to delete white pages in Word is easy
- Count the number of characters, lines, and pages in Word 2003 2007 2010 2013
- How to add pages in Word
- MS Word — Lesson 14: Create Web Pages
- How to Convert Pages to Word
- How to style pages symmetrically on Word
- How to convert DAT file into a Word document
- How to Open a Pages File on PC or Mac


- You can add page numbers in Word to the header or footer sections of your document.
- Once you enable page numbers in the Insert menu, Word can automatically number all your pages.
- Page numbers can come in a variety of styles, sizes, and fonts.
Adding page numbers to long Microsoft Word documents takes just a few clicks. The pages are numbered automatically, so you don’t need to add them in one by one.
You can have page numbers at the top or bottom of the page, and there are a variety of styles to choose from (top-right corner, bottom-center, et cetera).
Here’s how to add page numbers in Word, using either a Mac or PC.
How to add page numbers in Word on macOS
1. In the Insert tab of an open document, click the Page Number icon.
Abbey White/Insider
2. Select Page Number.
Abbey White/Insider
3. Choose where you want the page numbers to appear, as well as an alignment style.
Abbey White/Insider
4. Uncheck the «Show number on first page» box if you don’t want the first page of your document to be numbered.
5. If you want to choose a different numbering style, click Format and choose from the list of options.
Abbey White/Insider
6. Once you’re finished, click OK. They’ll appear immediately. If you want to edit them, you can double-click them in the header or footer.
How to add page numbers in Word on Windows
1. In an open document, click Insert.
2. Choose Page Number.
Abigail Abesamis Demarest/Insider
3. Select a location — either header or footer — for page numbers from the drop-down menu, then scroll through the style options and click the one you like best.
Abigail Abesamis Demarest/Insider
4. If you don’t want the first page or title page of your document numbered, go to the Design tab and choose Different First Page.
5. Select Page Number followed by Format Page Numbers.
Abigail Abesamis Demarest/Insider
6. Click the circle next to «Start at:» and set the number to zero.
Abigail Abesamis Demarest/Insider
7. Select OK before choosing Close Header and Footer to finish editing.
Abigail Abesamis Demarest is a contributing writer for Insider based in New York. She loves a good glazed donut and nerdy deep dives into the science of food and how it’s made.
Read more
Read less