
Remove the page number from the first page
-
Go to Insert > Header or Footer > Edit Header or Edit Footer.
-
Select Different First Page.
Note:
Different first page can be applied to the first page of any section in your document, not just the very first page. -
In the header or footer area, you should see a label on the first page that says First Page Header. Select the page number and press Delete.
-
Select Close Header and Footer or press Esc to exit.
Tip: If you want your second page to start at 1 rather than 2, go to Insert > Page Number > Format Page Numbers, and set Start at under Page Numbering to 0, rather than 1.
Start page numbering on Page 3 — double-sided printing
If the first page of your document is a cover page, the second page is a table of contents, and you want the third page to show “Page 1”, see Start page numbering on Page 3 — double-sided printing.
Choose the scenario that most closely matches what you want to do:
You don’t want a page number to appear on your title page, but you want the second page to show «Page 2.»
-
Go to Insert > Header or Footer > Edit Header or Edit Footer.
-
Select Different First Page.

Note:
Different first page can be applied to the first page of any section in your document, not just the very first page. -
In the header or footer area, you should see a label on the first page that says First Page Header. Select the page number to highlight it and press Delete.
-
Select Close Header and Footer or press Esc to exit.

Start page numbering on Page 3 — double-sided printing
If the first page of your document is a cover page, the second page is a table of contents, and you want the third page to show “Page 1”, see Start page numbering on Page 3 — double-sided printing.
Remove the page number from the first page
-
Go to Insert > Header & Footer.
-
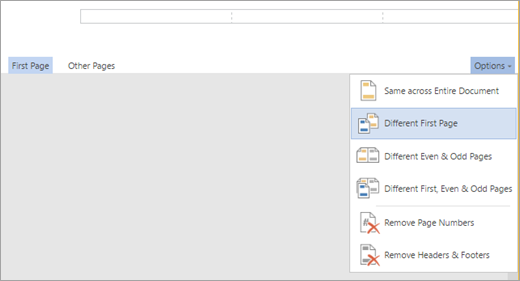
SelectOptions on the right side, and then select Different First Page.
-
Select Options again, and then select Remove Page Numbers.
-
To see your page numbers and confirm deletion of the number from the first page, go to View > Reading View.
-
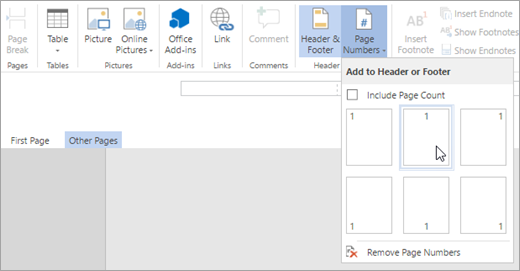
If all page numbers are deleted, go to Insert > Header & Footer and select Other Pages on the left side,. Go to Insert > Page Number and choose a number placement.
Usually, if you number the pages in a Microsoft Word document, you will number each of the pages sequentially starting from one. In some cases, such as long business reports or books with introductions or other special sections, you may want to use different page numbers in Word for different sections. You might also want to leave certain pages unnumbered, such as if you want to start page numbering on Page 3. This is all possible using Word’s built-in numbering feature.
Numbering Pages in Microsoft Word
It’s easy to add page numbers to a document in Microsoft Word. Simply click the «Insert» option on the ribbon menu, then click «Page Number.» Choose from one of the options to position the numbers where you want them, such as on the top or bottom of the page. Click «Page Number» again and click «Format Page Numbers» to choose font, size and other display settings.
Numbers will automatically appear where you placed them on each page.
Start Page Numbers Within Document
If you’re using a desktop edition of Microsoft Word, you can start with a page number other than one and start numbering anywhere in a document or a section.
To simply skip numbering on the first page, click the «Insert» tab in the ribbon menu, then click «Header» and «Edit Header.» In the «Header & Footer Tools» menu that appears, click the «Design» tab and check the box next to «Different First Page.»
If you want to otherwise start page numbering later in the document, you’ll want to insert a section break in the document before the section you want to number. To do this, go to the page where you want numbering to start and click «Layout» then click «Breaks» and «Next Page.» Double-click the header or footer where you want the page numbers to appear, and in the menu that pops up, uncheck the «Link to Previous» button, then click «Page Number» and pick the settings you want.
If you want to number multiple sections independently, create a section break for each one and uncheck «Link to Previous.»
Custom Page Numbers in Word
Once you have page numbers in sections where you want them or in the entire document in the Desktop version of Word, you can customize the numbering. Double click the header or footer where the numbers are, then click «Page Number» and «Format Page Numbers.»
Click the «Start at» drop-down and choose the number you want to start numbering. Repeat this for each section where you wan to customize the numbering.
If you want to delete page numbers for a particular section, double-click them on the header or footer of a page in that section and delete the numbers. The changes will apply to the entire section.
Using Word Online
If you’re using an online version of Word, your page number customization options are somewhat limited. You can skip numbering on the first page, but you can’t otherwise customize where numbering starts or what number comes first. If you need to make such changes, you may want to use a desktop version of Word or ask someone with the program to help you customize your document and send it back to you.
If you want to skip numbering the first page in Word online, click the «Insert» tab on the ribbon menu and then click «Header & Footer.» Click «Options,» then click «Different First Page.» Click the «Options» button again and click «Remove Page Numbers.»
If you need to add the numbers to the rest of the document, click the «Other Pages» button in the «Header & Footer» menu and then click «Insert» and «Page Number.»
Despite being a frequent user of Microsoft Word we often get stuck on little but very relevant options like showing the page numbers according to some selected or particular manner. In this guide, you will learn how to add page numbers, start page numbering later in your document like starting page numbering on page 2, page 3 or even on a particular page. You will also see how to change starting page number from one to another value and more.
Page numbers are usually applied to a document using options available under the “Insert” tab. It gives you the option to choose the arrangement of the page number on either footer or the header of the page among other places.
You can insert page numbers at the following page areas:
- Header (top of the page)
- Footer (bottom of the page)
- Page margins (sides)
- Current position (where the cursor is beating)
How to insert page number
Page numbering is an essential part of any Word document. Follow the given steps to add page numbers in a Word document.
Advertisement
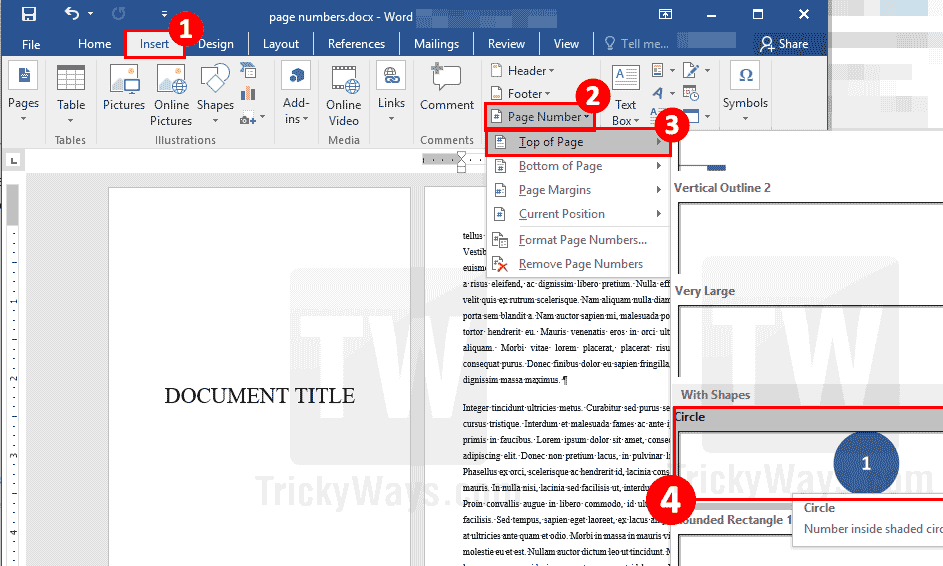
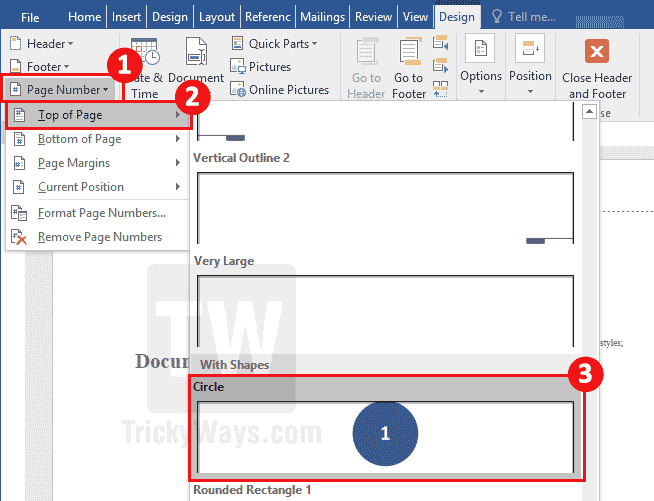
- Click the “Insert” tab at the top. Then click “Page Number” option in the “Header and Footer” group and then select page format and location. I’m choosing Top of page > Circle.

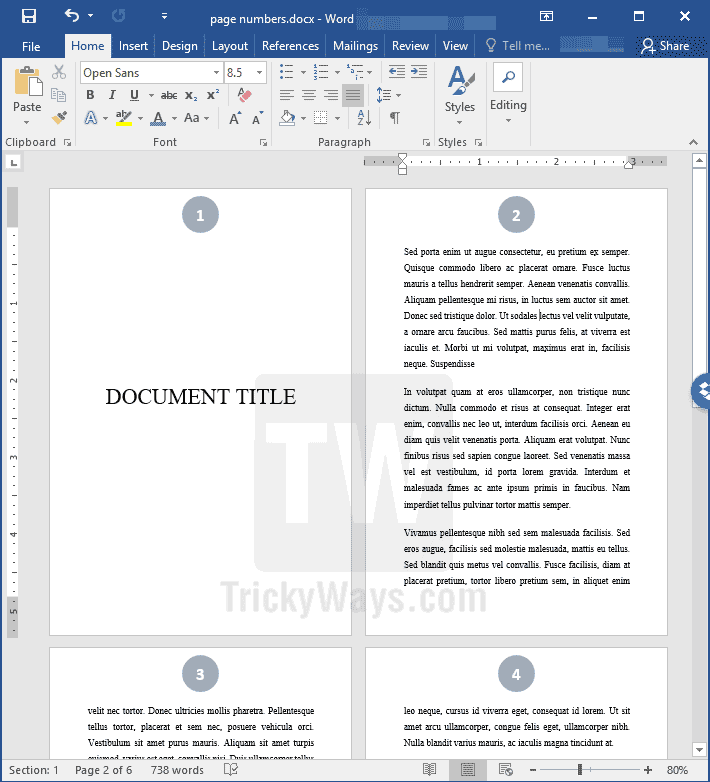
- See page numbers are added to the header area on each page automatically with the selected style applied. Your cursor is inside the header, to exit from page header and footer setup mode just presses the Esc key on the keyboard. You can hit the “Close Header and Footer” button on the top, or you can even double-click outside header/footer area to get out of editing mode.

Hide page number from the first page in MS Word
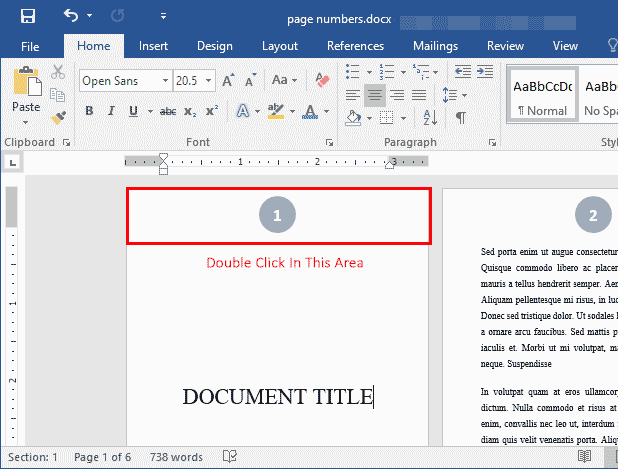
Usually, the first page of the document is the title pages. For the document title purpose, you might want to hide page number from the first page. If you want to do that follow these steps:
- Make sure you have already inserted page number in your document using above given steps.
- Double click the header or footer area where you have added page numbers, to see design options.

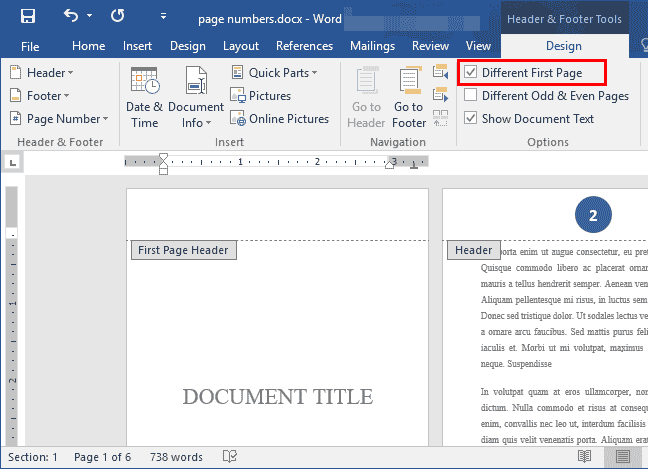
- Now, select “Different First Page” option check box. You will see the first page is different from the rest of the document.

Note: If you want to show the number “1” instead of “2” on the second page then you have to use Section Breaks. Continue reading below to learn more about that.
Apply different style to Even and Odd page numbers in Word
If the requirement is to make even pages distinct from the odd number pages, then this option is convenient.
- When you are modifying header or footer, click the check box that reads “Different Odd and Even Page” under Design tab.
- Suppose we want to add page numbers in the Footer on all even number pages. Click inside footer on any Even number page and then select “Page Number” > “Bottom of Page” and then select a Style from the list.
- Here you can see the results.


What are section breaks in MS Word?
We use section breaks to select a part of the document where we can apply selective formatting. The type of breaks used for explicit page numbering come under section breaks. As the name indicates, they make sections in the document for unique formatting options. They allow the user to select a particular length regarding pages of a document to apply formatting options like borders, page numbers or header, and footer options.
Start page numbering from a specific page in Word
Showing page numbers starting from a selected page or changing starting page number value might also be a requirement and this usually required when preparing documents with different chapters. You can use Microsoft Word “Breaks” option for this purpose. Follow these steps to perform this task.
Suppose, first two pages are for Document Title and Table of Contents and will be without page numbers. We want to start page numbering from the third page.
Here, we need to create two sections of pages in the document. Adding a Section Break after page 2 can do that. The first section will be page 1 and 2, and the 2nd part will be from page 3 to onward. This way both sections can have their separate page numbering in the Word document.
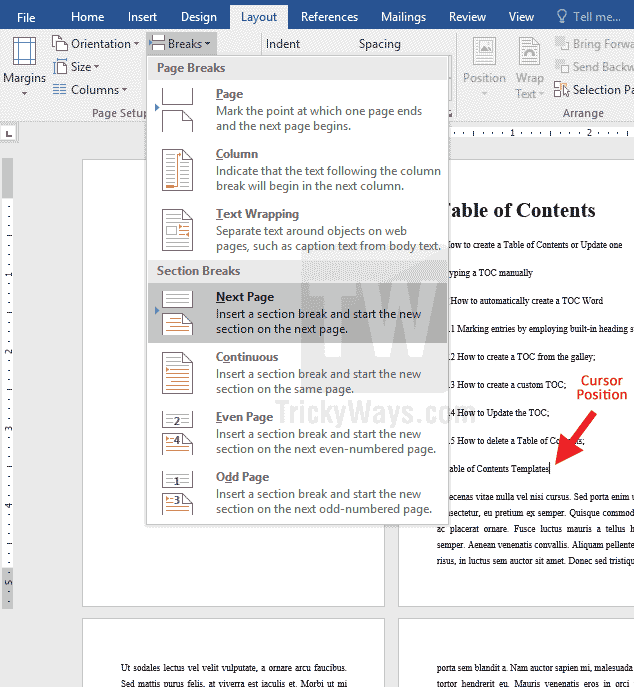
- Bring your cursor to the last line of the 2nd page. From the “Layout” tab go to “Breaks,” then further moving into “Section Breaks” select “Next Page.” This will take your pointer to the next page.

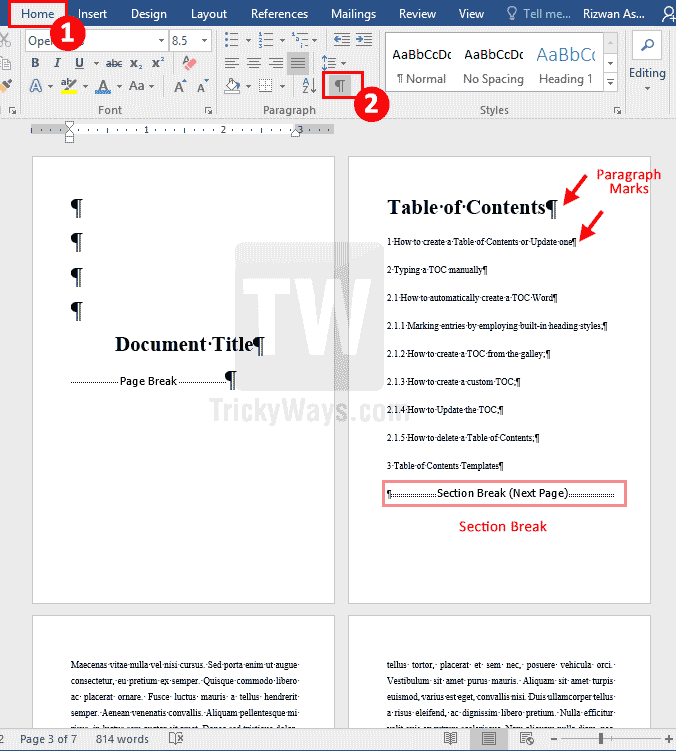
NOTE: You can’t see Section Breaks visually until you enable an option in MS Word. Go to Home tab and click on the symbol icon as shown in the screenshot. Now you can see the hidden marking and formatting symbols including page breaks.

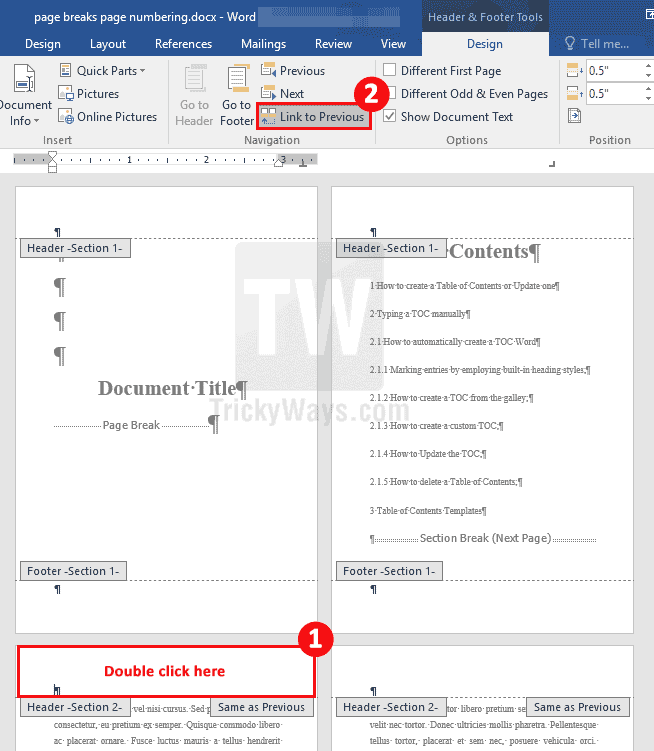
- Now move to the page 3 that is going to be the first page of the second section. Double click either on the footer or header area of your document.
When in editing mode, a “DESIGN” tab under “Header & Footer” section will appear.
Deselect “Link to Previous” by clicking on it. Doing so will disconnect the page from the previous section (1). Now this section (2) can have page number starting from “1”.

- Now choose the page number option from “Header & Footer” menu group and select the style location of the page numbers you want to add.

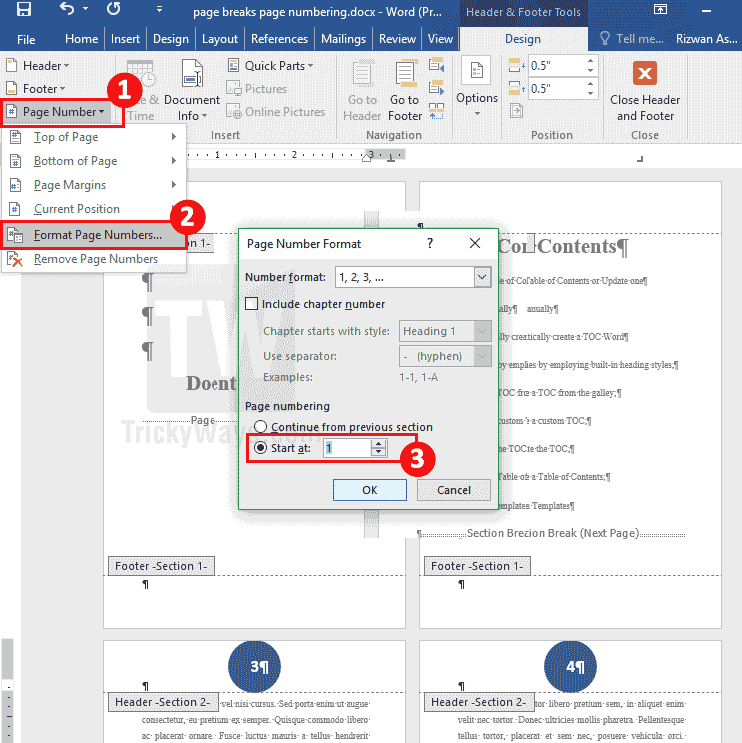
- If you want page number starting from some specific number value, then you can select it from “Format Page Numbers” section.
In “Format Page Numbers” option you can choose the Number format like 1, 2, 3… I, II, III, etc. Include chapter number with a character as a separator or even change the starting value of page numbering in Word.

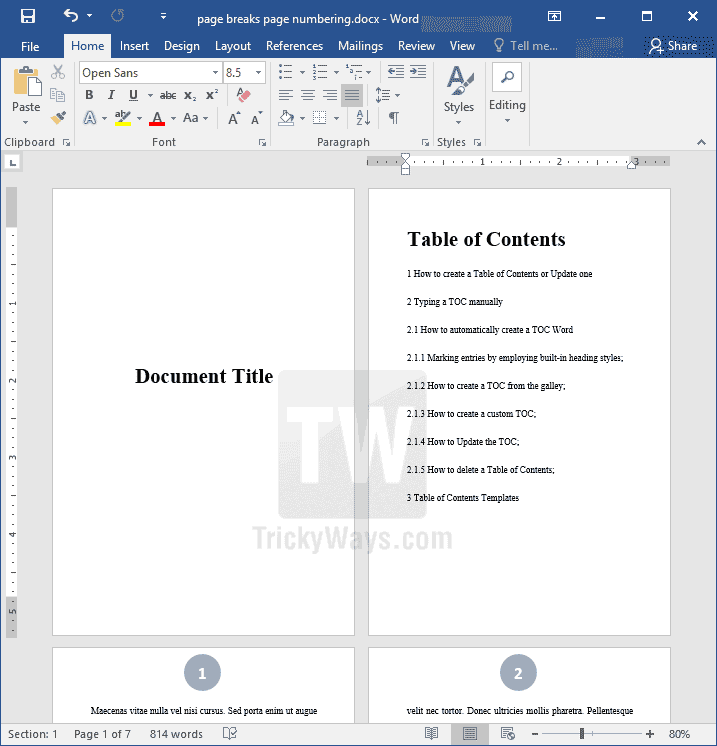
- Exit the “Header & Footer” menu once you have completed the task with all options selected. See the final results in the screenshot below.

Remove page numbers Word file
Double-click on the footer or header area of your Word document where page numbers appear. Click “Page Number” from “Header & Footer” group of options on the top and then select “Remove Page Number” option.
Remember, If you have different Section breaks in your Word file then you have to do this in all sections separately.
Is it possible to add specific page numbers without section breaks?
In formal documents, we need to add page numbers in different parts of the document that are not linking to previous. In such conditions using sections breaks is the most suitable and an easy way to do it. There are methods for adding page numbers on odd pages or even pages etc. but for a precise selection, section breaks seem to be the only viable option.
Apparently, it seems difficult to manage documents with specific page numbers and other selected formatting options. But having the idea from the given guideline would now definitely help you get out of it easily.
It is often helpful to number the pages in your Word document. But what should you do if the first page is a cover page, and the second contains the list of contents?
In that case, you would want to start the numbering from the third page onwards.
MS Word is highly flexible with page numbering. But you must divide your document into sections. This will allow you to number each section independently.
We will show you how to start page numbering from a specific page. We will use simple, step-by-step instructions.
Let us start.
Step #1: Open a Word Document
Open the Word document you want to start numbering.
Step #2: Create sections
Navigate to the last page after which you want to start the numbering.
(This will be page 2 or the list of contents in our example).
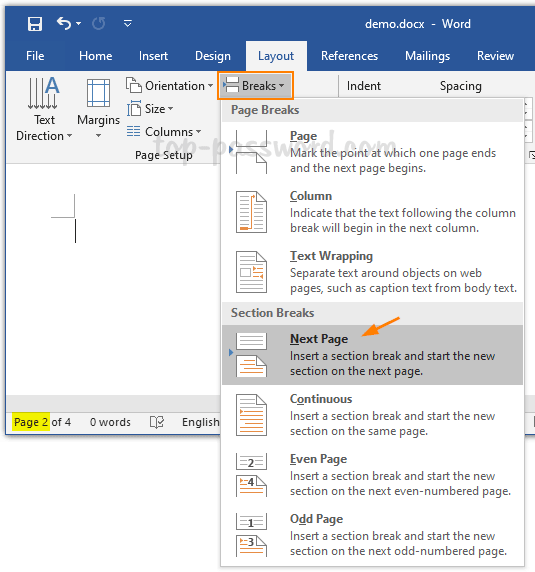
Click on the Layout tab in the top menu bar to change the ribbon.

In the section Page Setup, click on the Breaks icon.

This will open a menu for Page Breaks and Section Breaks.
Under Section Breaks, click on Next Page.

Word will insert a section break and start a new section on the next page.
The cursor will be on the starting page of the new section.
Step #3: De-link current section from previous sections
Double click within the footer section at the bottom of the page.

A new tab Header & Footer Tools will appear in the top menu bar.
The new tab will have a secondary tab Design under it.
Click on the Design tab.

In the section Navigation, click on the Link to Previous icon to deselect it.

Word has now de-linked the current section from the previous.
Step #4: Format page numbers
Click on the Insert tab in the top menu bar to change the ribbon.

In the section Header & Footer, click on the icon Page Number.

In the menu that opens, click on Format Page Numbers.

This opens a dialog box for Page Number Format.
On the right side of Number Format, you can select the type of page numbering you want.
If you have chapters in your document, you may click to select Include chapter numbers.
As we are starting to number a new section, Under Page numbering, click on Start at:, and type 1 in the box on the right. (This will deselect Continue from previous section).
Click on the OK tab at the bottom to exit the dialog box.

Step #5: Start page numbering
Click on the Insert tab in the top menu bar to change the ribbon.

In the section Header & Footer, click on the Page Number icon.
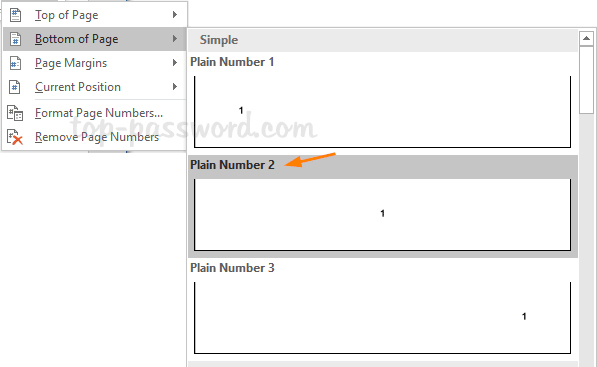
In the menu that opens, hover on Bottom of Page.

This opens a list of built-in Simple page numbers.
- Select Page Number 1 for page numbers to appear on the left side of the page.
- Select Page Number 2 for page numbers to appear in the center of the page.
- Select Page Number 3 for page numbers to appear on the right side of the page.

Let us select Page Number 1.
Word introduces the page numbering on the left side of the page.

At the top of your document, you will see a ‘Close’ option, which allows you to exit the Header and Footer setting and return to your document.

Conclusion
We have shown you how to start page numbering from a specific page in MS Word, in simple steps.
Follow these steps to number your pages as you want in your preferred format and sequence.
 This tutorial shows how to start page numbers on a specific page in Microsoft Word.
Do you need a refresher on page numbers? Please see “How to Add Page Numbers in Microsoft Word” or “How to Add Page Numbers in Word for Mac” to learn how to add and format page numbers, remove the page number from the first page, and start the second page with page number 1.
This tutorial is available as a YouTube video showing all the steps in real time.
Watch more than 200 other writing-related software tutorials on my YouTube channel.
The images below are from Word for Microsoft 365. These steps will also work in Word 2021, Word 2019, Word 2016, Word 2013, and Word for Mac (Word for Microsoft 365 for Mac). These steps don’t apply to Word for the web.
The following steps will work in documents with or without existing page numbers.
- Select the Home tab in the ribbon.

- Select the Show/Hide button to show your formatting marks.

- Select the Layout tab in the ribbon.

- Place your cursor at the beginning of the page where you want the page numbers to start.

- Select the Breaks button in the Page Setup group.

- Select the Next Page section break from the drop-down menu.

The section break should appear at the bottom of the previous page.

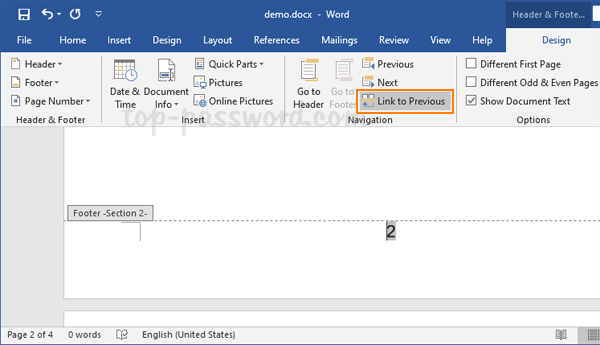
- Double-click in the header or footer area of the page where you want the page numbers to start. Double-clicking opens the Header & Footer tab, which only appears when the headers or footers are selected.

- Deselect the Link to Previous button to disconnect the headers or footers in the section you just created from the previous section.
When this button is deselected, its background color changes from dark gray to a light gray matching the rest of the ribbon.

- Select the Page Number button in the Header & Footer group.

- Select Format Page Numbers from the drop-down menu.

- (Optional) Select an option from the Number format menu in the Page Number Format dialog box if you want to use a different format than your existing page numbers.

- Select the Start at radio button.

- Enter the starting page number in the Start at text box.
You can enter a page number that does not physically exist in your document. For example, if your document is nine pages long, you can still start with page number 90.

- Select the OK button.

If you have existing page numbers, the section you just created should now start with the number you entered into the Page Number Format dialog box.

If you don’t have existing page numbers, continue to add them as shown in “How to Add Page Numbers in Microsoft Word.”
- Select the Close Header and Footer button.

- Reselect the Show/Hide button in the Home tab to hide your formatting marks (see figure 2).
Pro Tip: After inserting your new page numbers, remember to update your table of contents.
Related Resources
How to Insert Headers and Footers in Microsoft Word
How to Insert Section Breaks in Microsoft Word (PC & Mac)
How to Insert Page Breaks in Microsoft Word (PC & Mac)
Updated December 11, 2022
-
MiniTool
-
MiniTool News Center
- How to Add Page Numbers in Word (Start from a Specific Page)
By Alisa | Follow |
Last Updated September 16, 2022
![]()
You can add page numbers to Word document to better manage your text. This post offers a detailed guide for how to add page numbers in Word, how to insert page numbers starting from a specific page, how to remove page number in Microsoft Word, etc. To recover deleted or lost Word files or any other files, MiniTool Power Data Recovery is professional and easy-to-use.
To better manage pages in Microsoft Word document, you can add page numbers to Word to make it have a sequential order. As for how to add page numbers in Word, how to number pages in Word from a specific page, how to remove page numbers from Word file, you can check the detailed guide below.
Tip: If you mistakenly deleted or unexpectedly lost some Word files, you can use MiniTool Power Data Recovery – a clean and free data recovery tool – to easily recover deleted or lost files. This software allows you to recover any deleted or lost files from computer, memory card, USB drive, external hard drive, etc.
Free Download
How to Add Page Numbers in Word – 3 Steps
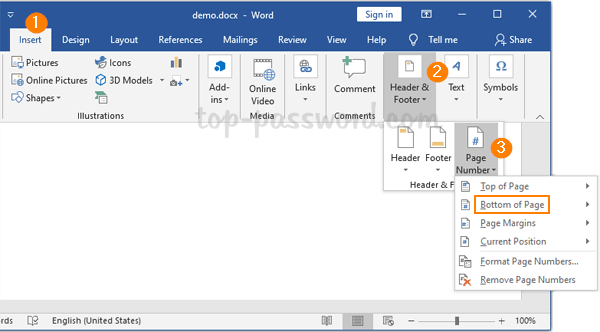
Step 1. To insert page numbers in Word document, you can open the target Word file, click Insert tab at the top Ribbon bar. Under Insert column, you can find and click Page Number button in Header & Footer section.
Step 2. A list of options will display that allows you to choose where you want to display the page numbers. You can hover your mouse to a preferred option from the first four options.
- Top of Page
- Bottom of Page
- Page Margins
- Current Position
- Format Page Numbers…
- Remove Page Numbers
After you choose an option, it will show different styles of page number in Word. You can click a preferred style and it will automatically add page numbers to all pages in the Word document. You can see the page numbers are shown in the area you have chosen. And it will open the Header & Footer Tools Design tab.
Step 3. If you don’t want to make any further changes, you can tap Close Header & Footer button on the Ribbon or double-click any area outside of the header or footer area to go back to your document.
How to Add Page Numbers in Word Starting from a Specific Page
What if you don’t want to start numbering from the first page or want to insert page numbers from a specific page like Page 2 or Page 3? Below is the instruction.
1. How to start numbering pages from Page 2 in Word:
Step 1. Put your mouse cursor at the header or footer area in Word document, and double-click mouse to open the Design tab of Header & Footer Tools. Alternatively, you can also click Insert -> Header or Footer -> Edit Header or Editor Footer to open Header & Footer Tools. Click Different First Page in Options section.
This will remove the page number on the first page in Word. You can then type a different text for the header or footer for the first page if you like.
Step 2. Then you can put your mouse to the second page, and click Insert -> Page Number -> Format Page Numbers. Under Page Numbering, you can set Start At to 0. This will add page numbers in Word starting from the second page.
Step 3. Click Page Number, select the location and style of page numbering to add page numbers in Word starting from Page 2.
2. How to insert page numbers starting from Page 3 or any other pages in Word:
Step 1. Go to the target page where you want to start adding page numbers. Click the first word or line to locate your mouse cursor. Then click Page Layout -> Breaks -> Next Page on the Ribbon.
Step 2. Then click the page you want to start to add page number and click Insert -> Page Numbers to choose a page number style.
Step 3. Highlight the page number of the page that you want to start adding page number, and unclick Link to Previous option at the top.
Step 4. Highlight that page number again and click Page Number -> Format Page Numbers. Set 1 at Start At under Page Numbering. And it will add page numbers in Word starting from the specific page and start from 1.
Step 5. At last, you can highlight the page number of the first page in the Word document and delete the page number. Then the page numbers before that specific page will be deleted.
Tip: If you want to number odd and even pages differently, you can click Different Odd & Even Pages option under Header & Footer Tools.
How to Remove Page Numbers in Word
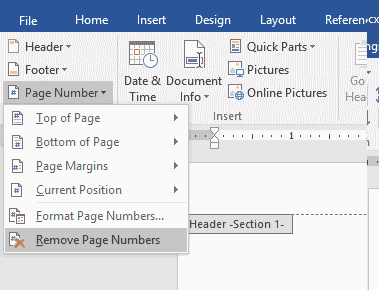
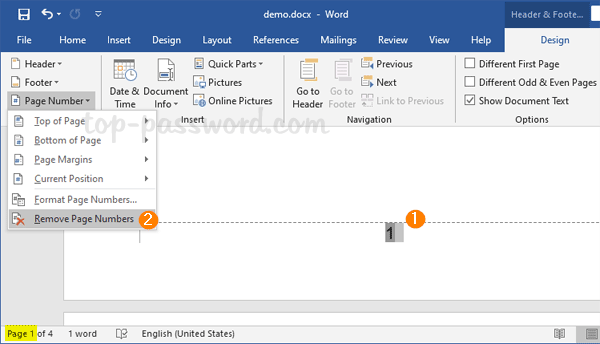
If you want to remove page numbers in Word, you can click Insert -> Page Number -> Remove Page Numbers. If some page numbers are not removed, you can double-click the header or footer area in Word pages and select the page number to delete it.
Bottom Line
If you want to add page numbers in Word, you can follow the guide above. To recover deleted or lost Word files or any other files, you can try MiniTool Power Data Recovery.
About The Author

Position: Columnist
Alisa is a professional English editor with 4-year experience. She loves writing and focuses on sharing detailed solutions and thoughts for computer problems, data recovery & backup, digital gadgets, tech news, etc. Through her articles, users can always easily get related problems solved and find what they want. In spare time, she likes basketball, badminton, tennis, cycling, running, and singing. She is very funny and energetic in life, and always brings friends lots of laughs.
Inserting page numbers into a Word document is easy, but adding page numbers from a specific page is a bit tricky. However, in this article, you can follow the simple steps below to insert a page number from a specific page in MS Word.
Steps to Start or Insert a Page Number from a Specific Page in Microsoft Word:
- If you want to insert page numbers wherever you like, first add as many pages as you want in the Word document.
- Click on the text beginning of the page (top left cursor position) in a word document where you want to start the page number.

- Then navigate to the Layout or Page Layout tab.
- Now click on the Breaks and then click on the Next Page under Section Page.

Learn Different Headers and Footers for any Different Pages in Microsoft Word
- Now double-click on the header or footer area (top or bottom area) of the word document (optional).
- A Header and Footer tools design tab will open after a double-click as explained in the above step (optional).
- Go to the Insert Tab.
- Then click on the Page number to expand its menu in the Header & Footer group.
- Select one of the page options from the Top of the Page, Bottom of the Page, and Current Position to insert the page number.

- After inserting the page number, on the Insert tab, in the Header and Footer group, click on the page to expand its menu, then click Format Page Numbers to open its dialogue box.
- On the format page numbers dialogue, click start at under page numbering and make sure the page number must be 1 in the box. lastly, click on OK.

- Though the page number cannot be started as we want. to start as we want, make sure the header and footer tools design tab are open (editing mode). Or, double-click on the header or footer area (top or bottom area) of the word document.
- Now click on the Link to Previous on the Design tab.

- Now the page number will only start from the page where you wanted to start. In this way, you can insert a page number from a specific page in MS Word
- After That, delete all the numbers of all the previous pages, just delete any one-page number. (If you do not want the numbers on the previous pages).
- Finally, the Page Number starts from a specific page as in the picture below.

Conclusion:
The steps described above will help you to start the page from where you like in any document. If you understand this well, you can easily learn even the 5 hardest things related to it. For example, you can apply captions, borders, watermarks, and columns to different pages in any style you like.
Where do we use starting the page numbers from a specific page in Word?
It is very important for us to start the page numbers where we like. It is very useful in materials like any book. In any book, it is necessary to start from the important content page without starting the page numbers from the first page.
Do you want to know how to number pages in Word starting on page 2 or 3 or from a specific page? Learn how to insert page number in Word from specific page.
Hi friends, how’s the book writing, research paper, or thesis work coming along?
Are you facing any issues while inserting page numbers in Word document? Do you want to learn how to insert page number in Word from specific page?
I have gone through this situation multiple times so I really understand your problem, but fret not, I am here to help you.

In today’s short guide, we are going to take a look at how to insert page numbers in Word starting from a specific page. So, without any further ado, let’s begin.
As we know, the page numbers are important for any kind of documents. But if you are writing a long thesis or a book then you can’t just have the cover page, acknowledgments, and other numbers the same way you number your page, we aren’t barbaric anymore.
Specifically, if your project (eBook, thesis, bigger essays, research papers, reports, or any series of Word documents) contains different chapters and sections then you will need to insert page numbers in Word starting from a specific page where it fits appropriately.
This is the main reason, we came up with this tutorial where are going to show you how to number pages in Microsoft word starting from a specific page.
So, in order to start page numbering from a specific page in Word 2010, 2013, or 2016, follow these exact steps:
Step (1): At first, go to the Microsoft Word page you wish to start numbering from.
Step (2): Now on the top ribbon, go to the Layout tab and then click on the Breaks option.
Step (3): From the drop-down list, select the Next Page option located under Section Break.

This action will create a section break and starts a new and fresh section on the Microsoft Word page you selected.
Step (4): Now go to the Insert tab and then click on the Page Number option.
Step (5): And from the drop-down list, select where you want the page number to be positioned (Top of Page or Bottom of Page) and which side (Left, Center, or Right) of the page according to your wish.

For example, here we are choosing the “Bottom of Page” and the Right side of the page.
Step (6): At this time, you will observe that all pages have been numbered, even those pages which we don’t want to. (Don’t worry, and follow the next steps.)
Step (7): Now, while the page numbering editor is still open, click on the Link to Previous option and ensure that nothing is highlighted.

Clicking on the “Link to Previous“ option will stop Microsoft Word from counting the page numbers automatically.
Step (8): Now, delete the page numbers from all the pages you don’t want to be numbered.
Step (9): Finally, go to the Insert tab and click on the Page Number and then select Format Page Numbers… option.

Step (10): Under the Page Numbering section, select Start at and type 1 in the box and then click on the OK button.

Now the page numbers will be added from the page you selected and wanted to display the page numbers. (For the example, a screenshot has been shown below)

That’s it! Thus, you can easily insert page numbers in Word from a specific page.
Conclusions
We hope this step by steps tutorial helped you in acing your thesis or research paper by suitably adding page numbers in Word starting from a specific page. Follow all these steps accurately and it will get the job done excellently.
It doesn’t matter whether you want to insert page number in Word 2010, insert page number in Word 2013, or insert page numbers in Word 2016, the process to add page number from a specific page in Word is precisely same. Also, if you were searching for “how to remove page numbers in Word from certain pages” then you can follow these exact steps.
We hope your question, how to number pages in Word starting on page 2 or how to insert page number in Word from page 3? has been answered perfectly. If you have any more questions or suggestions regarding how to insert page numbers in Word document, or you just want us to help you through anything else then feel free to let us know in the comments below.
If you find this guide how to insert page number in word from specific page useful for you then please share it with your friends on social media networks so that they can get benefited from it too.
You may also be interested in checking out:
- How to Create Drop Down List in Excel 2016 / 2013 / 2010
- Top 10 Most Popular Alternatives to Microsoft Office
- How to Extract Images from PDF Files in Windows 10
- How to Insert Picture into Excel Cell 2016 / 2013 / 2010
- How to Fix Spell Check Not Working in Word 2016 / 2013 / 2010
- How to Import Outlook Contacts into Gmail Account
- How to Remove Red Underline in Word 2013 / 2010 / 2007
- How to Insert Degree Symbol in Excel 2016 / 2013 / 2010
- How to Change Orientation of One Page in Word 2016 / 2013 / 2010
- How to Insert PDF into PowerPoint without Losing Quality
- How to Automatically Encrypt Your Office Document in Windows 10
What if you need to use different page number formats (1, 2,….or I, II, …. or A, B, C,….etc.) in different sections of a document? Many writers follow this convention of using Roman numerals in the initial few pages and continue with integer numbers for the rest of the pages of the document.
To achieve such page numbering style in MS Word, we need to use Section Breaks. Each document section can have unique page number format.
The following procedure shows how to insert Roman numerals on the Footer section of the first three pages of a document and then integers for the rest of the document.
THE PROCEDURE
Firstly, will divide the document into two sections by applying a Section Break. The first section will consist of the first three pages of the document.
To apply a section break
- Place mouse cursor at the bottom of the third page of the document.
- From the Ribbon, under the tab Page Layout, within the group Page Setup, click Breaks. A drop-down list appears.
- From the list, select option Next Page available under Section Breaks.
See the following image:

Word inserts a Section Break at the end of the third page. If you are unable to view the Section Break, click Ctrl+Shift+8. With a Section break, Word divides the document into two logical sections.
To enable the Footer section of the document
- Right-click at the bottom of the document and then click Edit Footer. Word enables the Footer section.
- Place cursor at the Footer section of the third page (where you are going to insert page number). Now, we are going to insert page number in the footer.
To insert page number
- On the Insert tab, within the group Header & Footer, click the Page Number drop-down and then point to Current Position. From the Current Position sub menu, select Plain Number (see below image). Word inserts a page number at the cursor position for the first three pages.
- Subsequently, change the page number format to Roman numbers.
- Select the page number that has been inserted.
- On the Insert tab, within the group Header & Footer group, click Page Number and then navigate to Format Page Numbers.
- On the Format Page Numbers dialog box, select Roman numerals from the Number Format drop-down list.
- Word replaces the integer numbers with Roman numerals as pages i, ii and iii.
See the following image:

3. Now, place cursor at the Footer section of the fourth page. Then, on the Insert tab, within the group Header & Footer, click the Page Number drop-down and then click Current Position drop-down list and select Plain Number format. Word will insert page number starting with number.
Note: If you do not want your cover page to have the page number, do the following:
- On the Page Layout tab, in the Page Setup group, click the arrow button on the right bottom corner. The Page Setup window appears.
- Select the Different First Page check box.
- Click OK.

About wordknowhowhttp://wordknowhow.comThis blog site was started to help people with Microsoft Word. I use Word a lot at work, and I understand that some features are difficult to use. There were no simplified instructions online to help me use these features. It is for this reason that this site exists; to make your life easier with Word.
Feel free to post your comments, queries, suggestions, etc. I will do my best to help you!
March 20, 2020 updated by
Leave a reply »
Office Word lets you add page numbers to all the pages in your document easily. But if your document has a cover page and you want to start page numbers on page 2 or 3, the steps are a bit complicated. In this tutorial we’ll walk you through the steps to insert page number in Microsoft Word 2019 / 2016 from specific page.
How to Insert Page Number in Word 2019 / 2016 from Specific Page
- Click the page you want to start numbering from. Go to the Layout tab on the Ribbon and click the Breaks button, then choose the “Next Page” option.

- Switch to the Insert page. Click the “Page Number” button in the “Header & Footer” section, and then choose where you’d like the page numbers to appear.

- Proceed to choose the numbering style you would like to use.

- Under the Design tab, click the “Link to Previous” button in the Navigation section and make sure it is not highlighted.

- Next, scroll to each page you don’t want numbered and delete the page number from the header or footer. To delete a page number, click the “Page Number” button in the “Header & Footer” section, and then select the “Remove Page Numbers” option.

- Finally, select the number which appears on the page you want to start numbering from, click the “Page Number” button and select “Format Page Numbers…”
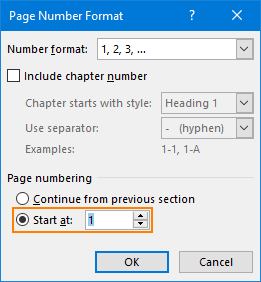
- In the Page Number Format window, choose to start page numbering at 1, and click OK.

- Click the “Close Header and Footer” button on the Ribbon and you’re done.

- Previous Post: How to See Command History from Previous PowerShell Sessions in Windows 10
- Next Post: How to Add or Change Slide Number in PowerPoint 2016 / 2019