
Manually configuring the pages in your Word document can be incredible frustrating. It is often difficult to get a page to end or begin at the exact point that you want, and it can be equally annoying when you need to add or remove full pages from an existing document.
Fortunately Word 2013 has an efficient way for you to add a full, blank page inside of your existing Word document. Our guide below will show you how to do this.
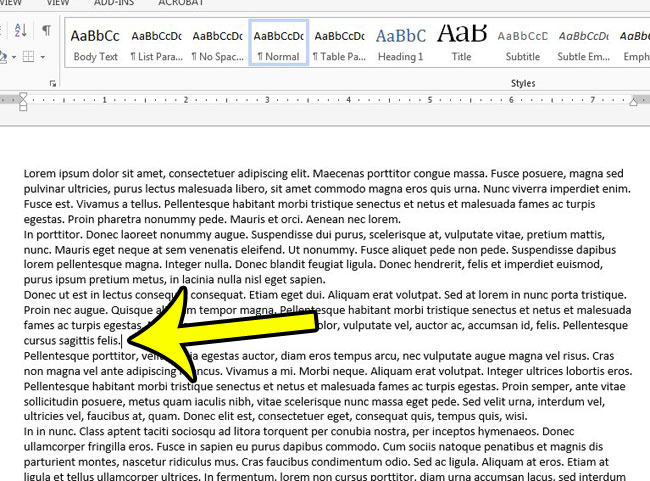
The steps below are going to add a full, blank page to your Word document. This page will be added at the point where your cursor is placed when you click the Blank Page button, so be sure that it is in the correct spot before doing so.
Step 1: Open your document in Word 2013.
Step 2: Click your mouse at the point in the document where you want to add the full blank page.
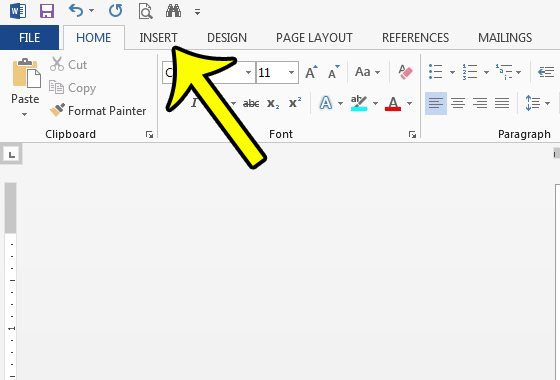
Step 3: Click the Insert tab at the top of the window.
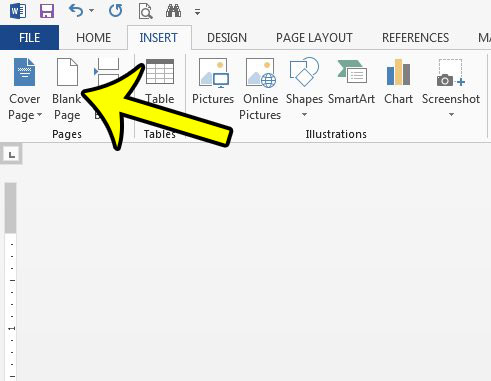
Step 4: Click the Blank Page button in the Pages section at the left side of the ribbon.
Summary – How to Insert a Blank Page in Word 2013
- Place your cursor where you wish to insert the blank page.
- Click the Insert tab.
- Click the Blank Page button.
Proofreading your document is very important when that document is going to be read and critiqued, but there are a lot of potential pitfalls that you might hope to avoid. Learn how to check for passive voice in your document so that you can automatically check for one of the more common grammar mistakes.

Kermit Matthews is a freelance writer based in Philadelphia, Pennsylvania with more than a decade of experience writing technology guides. He has a Bachelor’s and Master’s degree in Computer Science and has spent much of his professional career in IT management.
He specializes in writing content about iPhones, Android devices, Microsoft Office, and many other popular applications and devices.
Read his full bio here.
If you’re using Microsoft Word, you don’t want blank pages appearing in the middle of your document, or extra pages at the end.
These extra pages could be caused by tables, hitting the ENTER key too many times, unnecessary section breaks, unintentional page breaks, extra paragraph markers, and more.
You don’t want your Word document to look unprofessional because of this quirk, so in this article I’ll show you how to delete blank and extra pages in Word.
I will be using Microsoft Office 2016 in this tutorial, but you can follow along with any version, as pretty much the same thing applies to all versions.
How to Delete a Blank Page in the Middle of a Word Document
If you are working with a large word document and you are about to present it or print it, it’s a good idea to check for blank pages and an extra final page.
To do this, press CTRL + SHIFT + 8, or go to the Home tab and click the paragraph icon.

This key combination displays paragraph markers (¶) at the end of every paragraph and each blank line – basically, whenever you hit the ENTER key, and at the beginning of the extra blank page.
To remove these extra pages, highlight the paragraph markers with your mouse or trackpad and hit the DELETE button. If one of the markers remains there, remove it with the BACKSPACE key.
If you have the patience, you can also remove the blank page(s) by going to the blank pages and hitting the BACKSPACE key until the paragraph markers disappear.
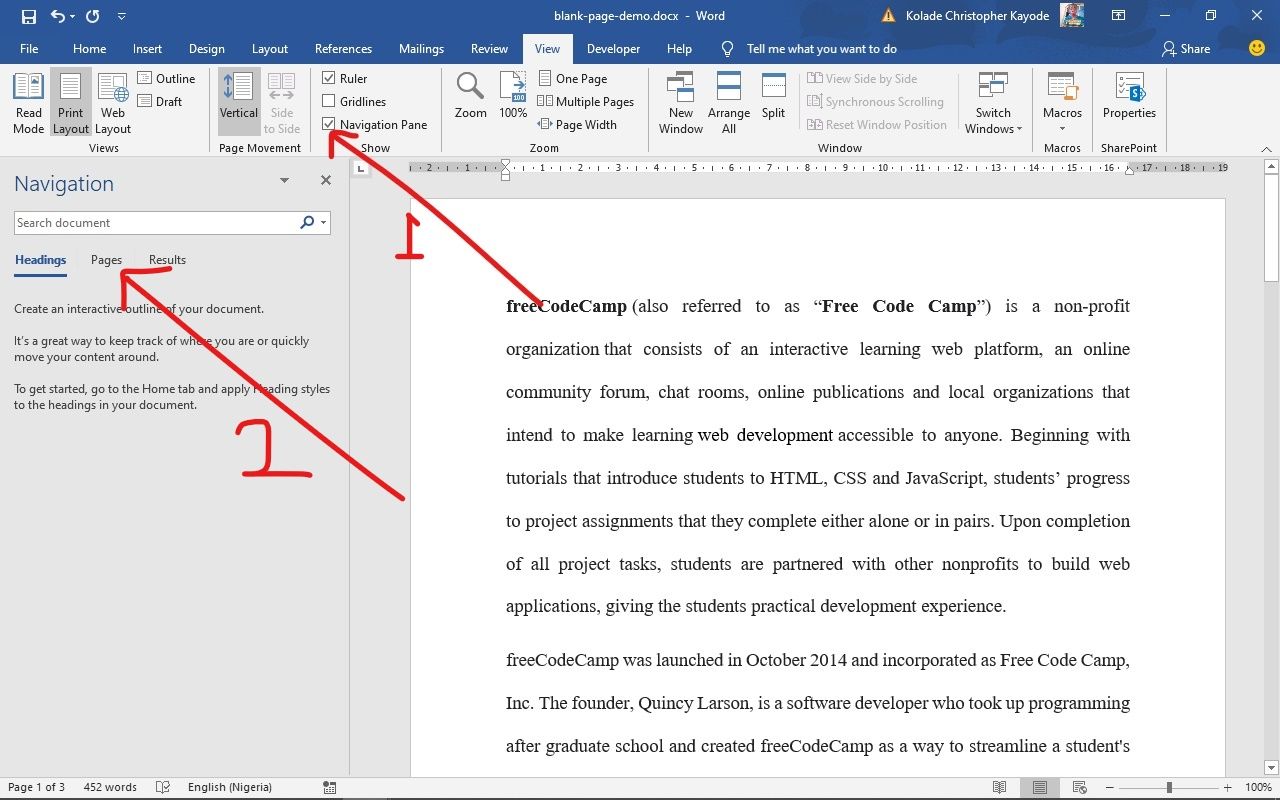
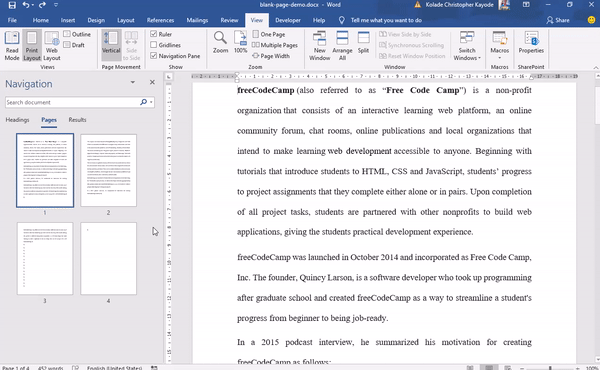
Step 1: To delete an extra blank page that might get added at the end of your document, click the View tab:

Step 2: Go to the Navigation Pane. This will display a sidebar containing 3 tabs – Headings, Pages, and Results. Click on Pages to display all the pages of the document in the sidebar.
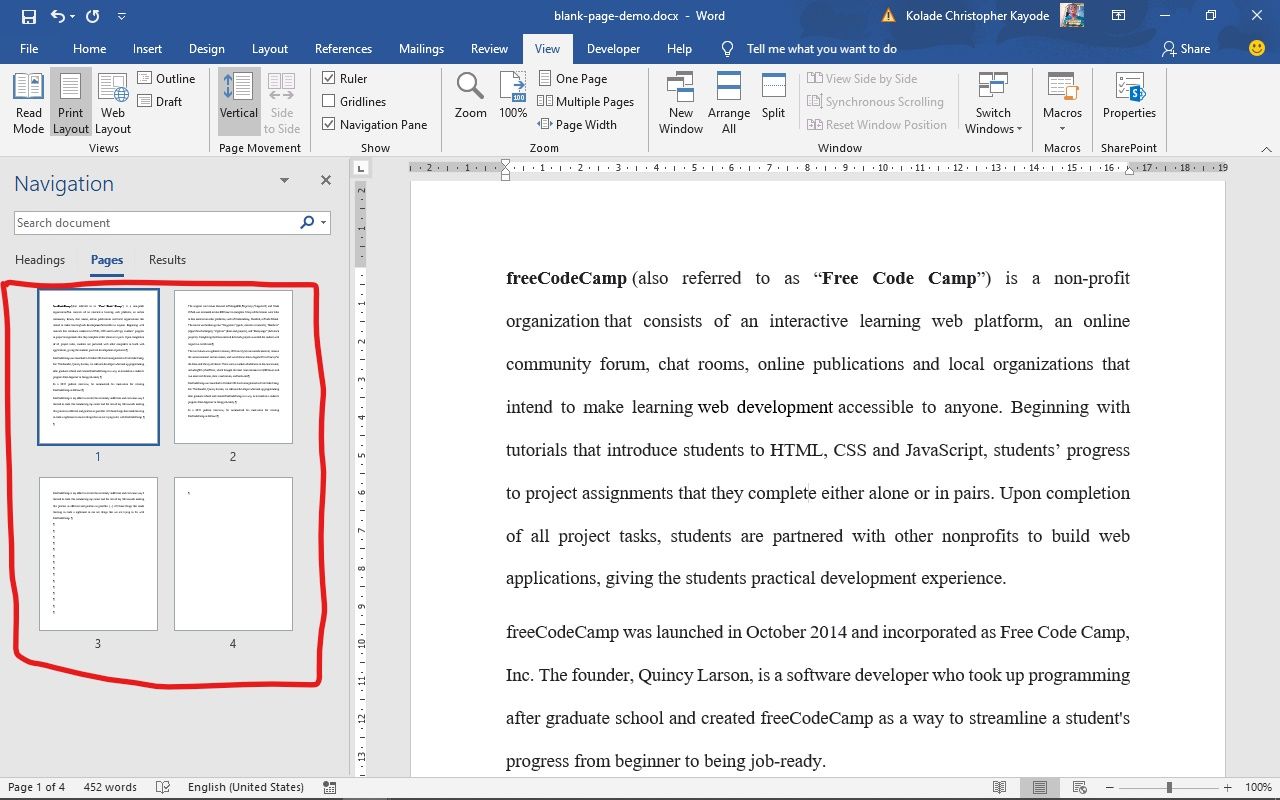
Step 3: The active page will be automatically selected. Click the extra blank page to select it and hit the DELETE button on your keyboard to remove it.
You can also remove this extra blank page by simply pressing the BACKSPACE key.
Conclusion
In this article, you learned how to remove blank pages in Word, so you can make your documents appear more professional.
Thank you for reading. If you find this article helpful, please share it with your friends and family.
Learn to code for free. freeCodeCamp’s open source curriculum has helped more than 40,000 people get jobs as developers. Get started
Table of Contents
- How do you center align vertically?
- How do you center vertically in Word on a Mac?
- How do I center the vertical alignment to the entire page in Word?
- How do you center words vertically in Word?
- Why can’t I Align Center in Word?
- What is the default vertical alignment for text in a Word document?
- Which are the two types of vertical alignment?
- What are the three types of vertical alignment?
- How do I show the vertical page on my status bar?
- What is vertical page position?
- What is screen layout of MS Word?
- What is the difference between draft view and print layout view?
- Why do we use print layout?
- What is the use of print layout?
- How do I use Print Layout?
- What is print layout?
- How do I print without changing the view in Word?
- How do I print a Web layout?
- How do I use Web layout in Word?
- How do I get rid of web layout in Word?
- How do I save a Web layout as a PDF?
- How do you save a Web page as a document?
- How do I download a webpage?
- How do I save in Adobe?
- Do you need Acrobat to save as PDF?
- How do I enable Save as PDF?
- How do I squeeze a PDF?
- How do you resize a PDF file?
- How do reduce file size?
How to Go to the Middle of the Page in Microsoft Word
How do you center align vertically?
Center Vertically – Using padding There are many ways to center an element vertically in CSS. A simple solution is to use top and bottom padding : I am vertically centered.
How do you center vertically in Word on a Mac?
On the Shape Format tab, click Format Pane. Click the Shape Options tab if it isn’t already selected. , and then click Text Box. Choose Top, Middle, or Bottom from the Vertical alignment drop-down list.
How do I center the vertical alignment to the entire page in Word?
Click the “Page Setup” button in the lower-right corner of the “Page Setup” section of the “Page Layout” tab. On the “Page Setup” dialog box, click the “Layout” tab. In the “Page” section, select “Center” from the “Vertical alignment” drop-down list. Your cover page text is now centered vertically on the page.
How do you center words vertically in Word?
Center the text vertically between the top and bottom margins
- Select the text that you want to center.
- On the Layout or Page Layout tab, click the Dialog Box Launcher.
- In the Vertical alignment box, click Center.
- In the Apply to box, click Selected text, and then click OK.
- Open the document you want to work in.
- Click anywhere on the page. If you want to go to the middle of the page at the location of a certain line, then click on that line.
- Click the “Center” button in the Paragraph group on the “Ribbon.”
Why can’t I Align Center in Word?
Select the text that you want to center, and then click Paragraph on the Format menu. On the Indents and Spacing tab, change the setting in the Alignment box to Centered, and then click OK. On the Indents and Spacing tab, change the setting in the Alignment box to Centered, and then click OK.
What is the default vertical alignment for text in a Word document?
Microsoft Word gives users the option to change the vertical alignment settings. Text can be aligned vertically in one of four ways: top-aligned, bottom-aligned, centered or justified. Top-aligned text is aligned so that the top line of text is flush with the top margin.
Which are the two types of vertical alignment?
Text can be aligned vertically in one of four ways: top-aligned, bottom-aligned, centered or justified. Top-aligned text is aligned so that the top line of text is flush with the top margin. Bottom-aligned text is aligned to do the same with the bottom margin.
What are the three types of vertical alignment?
Name three types of vertical alignments
- Top alignment.
- Center alignment.
- Bottom alignment.
How do I show the vertical page on my status bar?
How do I get the Vertical Page Position bar to appear on the status bar? Right click on the Status Bar and check in the left column against the Vertical Page Position item.
What is vertical page position?
Vertical Page Position (At) – Displays the vertical position of the cursor from the top of the document. Line Number (Line)– Lists the number of the line of text the cursor is currently located in. Action – Click Line to bring up the Go To dialog box. (Helpful when collaborating on documents.)
What is screen layout of MS Word?
View Buttons: Print Layout view: This displays pages exactly as they will appear when printed. Full Screen Reading view: This gives a full screen look of the document. Draft view: This formats text as it appears on the printed page with a few exceptions. For example, headers and footers aren’t shown.
What is the difference between draft view and print layout view?
In Print Layout view, physical pages and breaks are drawn. Draft view displays a document as continuous text; page breaks are denoted by dotted lines. Because repagination occurs almost instantly as you compose, this is an ideal view if you have an older, slower computer.
Why do we use print layout?
The major benefit with Print Layout is that you can see how your document will appear if printed, so you can better judge the margins, spacing, page breaks, and other visual elements and adjust any of them if necessary.
What is the use of print layout?
In Print Layout view, you get to see the entire page, just as it prints. Graphical images, columns, and all sorts of other fancy items show up on the page fully visible.
How do I use Print Layout?
Click the view icons in the bottom-right corner of your document window. The only view icons in the bottom-right corner of the document window are Read Mode, Print Layout, and web Layout. Click the View tab and then click the view you want to use, such as Print Layout or Draft view.
What is print layout?
Print Layout view is the one most closely related to what your document will look like when you actually print it. This is the viewing mode you should use if you want to always see what your document will look like.
How do I print without changing the view in Word?
Do one of the following:
- To preview your file, click Print Preview.
- To print your file and check or change the properties for your printer, click Print.
- To print your file without checking or changing the properties for your printer, click Quick Print.
How do I print a Web layout?
Follow these steps:
- Go to File | Print.
- Click the Options button.
- Under the Include With Document section, select the Background Colors And Images check box.
- Click OK.
- Make any other printing selections, and then click OK.
How do I use Web layout in Word?
In the Word Tool Ribbon is Views. Click on that then over on the left side of the Ribbon is the command box for Views. Your choices are Read Mode, Print Layout and Web Layout along with Outline and Draft. Click Web Layout and now your screen acts similar to a scalable website page.
How do I get rid of web layout in Word?
While the document is open in Full Screen Reading view, click View Options. Click Open Attachments in Full Screen to turn off the feature, and then click Close to return to Print Layout view.
How do I save a Web layout as a PDF?
To create a PDF from the currently open web page, choose Convert Web Page To PDF. Then select a location, type a filename, and click Save. To add a PDF of the currently open web page to another PDF, choose Add Web Page To Existing PDF. Then locate and select the existing PDF, and click Save.
How do you save a Web page as a document?
Convert Web Page to Word Document
- Save the Web Page as HTML. Navigate to the page you want to convert.
- Open the Web Page in Word. You should now have an .
- Save as DOCX. Go to the File Menu and choose Save as….
- Embed Images. If the document contains images those images might only be linked.
- Clean Up.
How do I download a webpage?
When using Chrome on an Android device, save a webpage for offline reading by opening the three-dot menu icon and tapping the download icon up top, which will download a version of the page for offline viewing. View any recent downloads by selecting the menu icon again and tapping Downloads.
How do I save in Adobe?
To save a copy of a PDF, choose File > Save As. In Acrobat Reader, choose File > Save As or File > Save As Other > Text. To save a copy of a PDF Portfolio, choose File >Save As Other > PDF Portfolio.
Do you need Acrobat to save as PDF?
Quickly convert Word to PDF online. Ensure that Acrobat is installed on your computer, otherwise, the Adobe PDF printer or the Save As Adobe PDF option won’t appear. Don’t have Acrobat? Try Acrobat for free.
How do I enable Save as PDF?
When you go into the Save As dialog open the Format: list near the bottom. You’ll find PDF listed as the last item in the Common Formats section at the beginning of the list. Alternatively, you can use File> Print then click the PDF button at the bottom of the dialog window & select Save as PDF.
How do I squeeze a PDF?
Follow these easy steps to compress large PDF files online: Click the Select a file button above, or drag & drop files into the drop zone. Select the PDF file you want to make smaller. After uploading, Acrobat automatically reduces the PDF file size.
How do you resize a PDF file?
How to Resize a PDF Online for Free
- Go to the ‘Compress PDF’ tool.
- Drag and drop your PDF into the red toolbox.
- Choose the ‘Basic Compression’ mode.
- The software will automatically shrink your file.
- Download your file. We’ll also show you the final compression rate here.
How do reduce file size?
You can experiment with the available compression options to find the one that best suits your needs.
- From the file menu, select “Reduce File Size”.
- Change the picture quality to one of the available options besides “High Fidelity”.
- Choose which images you want to apply the compression to and click “Ok”.
![]()
Download Article
![]()
Download Article
This wikiHow article teaches you how to remove stubborn blank pages from anywhere in your Word document. Blank pages in the middle of your document are usually the result of hidden extra paragraphs or page breaks. If the blank page is at the end, it could be the same situation—however, it’s also may be due to Word’s hidden end paragraph feature. You can get rid of blank pages by making paragraph and page breaks markers visible and editing or deleting them manually.
-

1
Go to the blank page in your document. If a strange blank page appears in the middle of your Word document, it’s likely due to an unintentional page break or extra paragraph markers that you can’t see.
-
2
Press Ctrl+⇧ Shift+8 on Windows or ⌘ Cmd+8 on Mac. This displays paragraph markers (¶) at the beginning of each blank line, as well as at the end of every paragraph. If there are any page breaks on this page, you’ll see them marked by dotted lines and the word «Page Break.»
Advertisement
-
3
Look for a small black square next to a paragraph marker. You’ll want to look for this on both the blank page and the page after it. If you see a paragraph marker with a black square beside it, the paragraph has the «Page break before» setting turned on. You’ll want to turn this off. To do so:
- Click the Home tab at the top of Word.
- Right-click the paragraph marker ¶ that has the corresponding black bullet point.
- Select Paragraph… on the menu.
- Click the Lines and Page Breaks tab.
- Remove the check next to «Page break before» (if there is one) and click OK.
-
4
Highlight the ¶ marks and/or Page Break lines with your mouse. If you see both (or more than one of each), highlight it all at once.
- Also check the page right before your blank one for extra page breaks and delete those as well.
- Don’t select paragraph markers that appear on lines that contain actual content.
-
5
Hit the Delete key. This should delete all the ¶ marks and page breaks, which should delete the blank page.
- If the blank page is still there, double-check the pages before for page breaks.
-
6
Press Ctrl+⇧ Shift+8 on Windows or ⌘ Cmd+8 on Mac again. This hides the paragraph markers again.


Advertisement
-
1
Go to the blank last page in your document. If a strange blank page appears at the end of your Word document, it could be due to Word’s hidden undeletable end paragraph.[1]
According to Microsoft, the most reliable way to get rid of that blank page is to make the hidden paragraph very small.- The undeletable hidden paragraph usually occurs when the content of your last real page (not the blank page) goes all the way to the bottom of that page.
-
2
Press Ctrl+⇧ Shift+8 on Windows or ⌘ Cmd+8 on Mac. This displays paragraph markers (¶) at the beginning of each blank line, as well as at the end of every paragraph. Since you have a blank page at the end of your document, you’ll see at least one paragraph marker on that page.
-
3
Delete all of the paragraph markers on the blank page (if there are multiple). If more than one paragraph marker appears on the blank page, deleting all of them will get usually get rid of the blank page. Try that first.
- If there’s only one paragraph marker at the top of the page, deleting it won’t help—continue with this method, if so.
-
4
Change the font size of the paragraph marker to 01. Here’s how:
- Click the Home tab if you’re not already there.
- Highlight the paragraph marker.
- Click the font size next to the font’s name.
- Replace it with 01 and press Enter or Return.
-
5
Press Ctrl+⇧ Shift+8 on Windows or ⌘ Cmd+8 on Mac again. This hides the paragraph markers again, which should delete the blank page at the end by fitting the hidden paragraph on the last page that contains content.
- If you still have a blank page after this, you can reduce the size of the bottom margin instead. To do this, click the Layout tab, select Margins, click Custom Margins, and change the bottom margin to 0.3 inches.


Advertisement
-
1
Click the File menu and choose Save as. If you still have a blank page at the end of your document after fixing hidden end paragraphs, you can omit the last page when saving your document as a PDF.
- This only works on the desktop version of Word—the web version doesn’t let you choose which pages to include in a PDF.
- If your file is synced to One Drive, you won’t see Save as. Click Save as copy instead.
- If the document must be in the Word format, you can convert the PDF back to the Word format after you save it as a PDF.
-
2
Select PDF as the file format. Depending on your version of Word, the file type menu may be in the upper-right corner of the page, or in the «Save as type» menu toward the bottom.
-
3
Click Options or More options. You’ll see one of these two options near the menu from which you selected PDF.
-
4
Click the radio option next to «Page(s).» This allows you to select a range of include in your PDF.
-
5
Enter the page range, minus the last page. Type «1» in the «From» box, and the last real page (before the blank page) into the «To» box.
-
6
Click Ok and then save the document. This saves your document as a PDF, minus the blank page(s) at the end.


Advertisement
Add New Question
-
Question
How can I delete an Excel page copied to Word?

You can usually highlight the entire pasted table and hit the Delete key. If that doesn’t work, try this: highlight the entire table, then right-click on it and select «Cut.»
-
Question
What if the methods described above still don’t work? What can I do then?
A far better and easier way is to save the doc as a pdf, delete the page from the pdf (which is super easy by clicking on «organize pages»), and then resave as a doc.
-
Question
How can I create a word document I can later fill in blanks such as names or other info in a contract?
If it’s for a printed document, just string underscores together to make the blanks for filling in.
See more answers
Ask a Question
200 characters left
Include your email address to get a message when this question is answered.
Submit
Advertisement
Thanks for submitting a tip for review!
About This Article
Article SummaryX
1. Open your document in Microsoft Word.
2. Press «Ctrl + Shift + 8» on Windows or «Command + 8» on Mac to display line break symbols in the document
3. Scroll down to the blank page.
4. Highlight any Page break or Paragraph symbols (¶) on the page.
5. Press «Delete«.
Did this summary help you?
Thanks to all authors for creating a page that has been read 2,352,145 times.
Is this article up to date?
MS Word is a very user-friendly as well as easy tool provided by Microsoft. It is easy to use and with the help of this, you can create documents and projects easily. It is efficient and easy to work with.
Inserting Blank Pages
Working in MS-Word for creating projects or making documents you will, need more than one page most of the time, and sometimes you need to add (insert) pages in between when you are modifying your document or project. It is easy to insert a page in between, or anywhere you need. We will learn step by step that how to insert a blank page in MS-Word with the help of images and instructions.
Insertion of pages at different positions:
A user needs to insert a page at different positions as per the requirement. So, basically, 3 common situations or conditions can arise like
- To insert a page at the start of a Word file,
- To insert a page in the middle of a Word file (i.e. between any two pages)
- And to insert a page in last or at the end of a Word file
Steps to follow for Inserting a blank Page at the start of a Word file:
Step 1: Open MS Word on your PC.
Step 2: Now, Open the document or create a new one in which you want to Insert a Blank page
Step 3: Now, choose where you want to insert a blank page. (For e.g: you want to Insert a page at the start of a Word File)
Step 4: Now, Go to the insert tab above. (marked in a circle)

Step 5: Now, if you want to insert a page in starting, then take your cursor to the start of the current First page. And Select the Blank Page option from the Pages section.

Step 6: Now, click on Blank Page to insert a Blank page in starting.

Step 7: So, a new page is inserted at the start of a document.
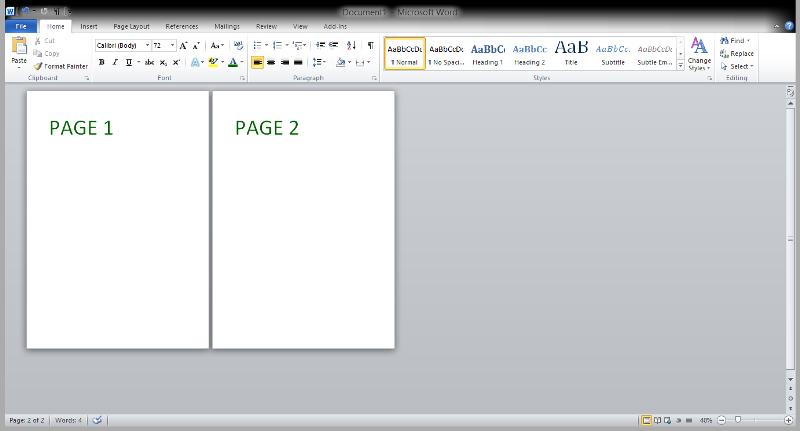
Steps to follow for Inserting a blank Page in the middle of a Word file (i.e. between any two pages):
Step 1 and Step 2 are the same as above.
Step 3: Now, if you want to insert a page in the middle of a document (For e.g.:- you want to Insert a page in between PAGE 1 And PAGE 2), then take your cursor to the end of the previous page where you want to insert a new page and Select Blank Page option from the Pages section.
Step 4: Page gets inserted as before

Step 5: So, a new page is inserted in the middle of a document.
Steps to follow for Inserting a blank Page at last or at end of a Word file:
Step 1 and Step 2 are the same as above.
Step 3: Now, if you want to insert a page at end of a document (For e.g.:- you want to Insert a page after PAGE 2), then take your cursor to the end of PAGE 2 where you want to insert a new page and Selects Blank Page option from the Pages section.
Step 4: New page gets inserted as before

Step 5: So, a new page is inserted at the last or at end of a document.
So, in this way, we can easily insert a new blank page at any required place.