
In Wordpad document click on File tab, then Page Setup to set the Left, Right, Top and Bottom margins, choose paper size, orientation and whether you want page numbers.
Contents
- 1 Where is Page Setup in WordPad?
- 2 How do I change margins in notepad?
- 3 Can we do formatting in WordPad?
- 4 How do you set margins?
- 5 How do I set margins on my computer?
- 6 How do I change the Page Setup on my printer?
- 7 How do I change page settings in Windows 10?
- 8 How do I change the language on WordPad?
- 9 How do I change the page layout in WordPad?
- 10 How do I change the page size in WordPad?
- 11 What Ribbon do you use to change margins?
- 12 How do you put page numbers on WordPad?
- 13 Where is the Format menu in WordPad?
- 14 How do you insert a Shape in WordPad?
- 15 How do you set 1 inch margins on Microsoft Word?
- 16 Why are my Microsoft Word margins messed up?
- 17 What should margins be set at?
- 18 What is margin in computer class 9?
- 19 How do you fix printer margins?
- 20 How do I change the width of my printer?
Where is Page Setup in WordPad?
- Launch WordPad on your computer and open or create a document.
- Click the “WordPad” icon in the top left corner of the WordPad window and select “Page setup” from the drop-down menu.
How do I change margins in notepad?
How Do I Set My Margins on Notepad?
- Launch Notepad by clicking “Start” and then “All Programs.” After that, click “Accessories,” and choose “Notepad.”
- Go to Notepad’s “File” menu, and choose “Page Setup” from the drop-down menu.
Can we do formatting in WordPad?
WordPad can format and print text, including font and bold, italic, colored, and centered text, and lacks functions such as a spell checker, thesaurus, and control of pagination. It does not support footnotes and endnotes.
How do you set margins?
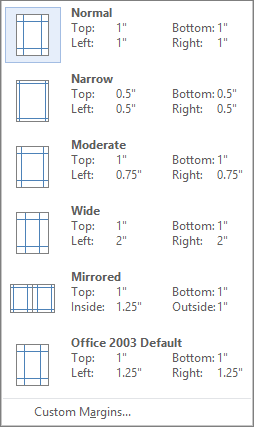
To change margins, click on the Margins button, found on the Page Layout tab. Word lists a number of pre-formatted options, but you can also make your own margins by selecting “Custom Margins,” found at the bottom of the Margins list. You can change each of the four margins in the dialog box that appears.
How do I set margins on my computer?
In the Ribbon bar, click the Layout or Page Layout tab, and then click the Margins option. Select one of the preset margin options or click Custom Margins to specify the margins you want the document to have. As shown below, the Top, Bottom, Left, and Right margins are set to one inch.
How do I change the Page Setup on my printer?
Right-click the page tab, below the drawing window, and then click Page Setup. Use the controls on the Print Setup and Page Size tabs to make changes to the printer paper and the drawing page view independently. A thumbnail preview on each tab shows how your drawing page view compares with the printer paper setup.
How do I change page settings in Windows 10?
To find the Page Setup box in some programs, click the little arrow next to the program’s Printer icon and choose Page Setup from the menu that drops down.
How do I change the language on WordPad?
Changing the Default Language
- Login to one of the workstations with your UTORid and password.
- Under the Start menu, scroll up to Microsoft Office icon and click on Microsoft Word.
- The program will now open on the desktop.
- Click on the Review tab.
- Under Language, click on Set Proofing Language.
How do I change the page layout in WordPad?
You can try the following procedures below: Open your document in WordPad. Click the File tab and then, select Page Setup. Select Landscape in the Orientation section and click “OK.”
How do I change the page size in WordPad?
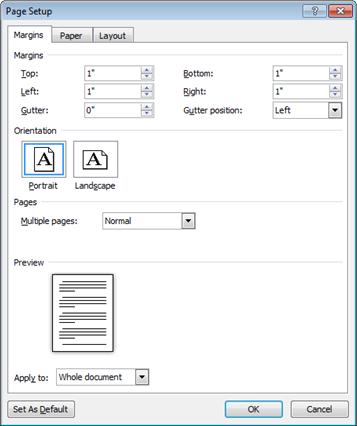
Open your document in WordPad, click the menu button and select “Page Setup” from the menu to display the Page Setup window. Change the “Left,” “Right,” “Top” and “Bottom” margins in the Margins section. Note that all margins are shown in inches. Change the paper size from the “Size” menu.
What Ribbon do you use to change margins?
Changing Page Margins
- Make sure the Layout tab of the ribbon (or Page Layout tab in older versions of Word) is displayed.
- Click the Margins tool in the Page Setup group.
- Click Custom Margins.
- Adjust the top, bottom, left, and right margins as desired.
- Make sure the Apply To drop-down list is set to Whole Document.
How do you put page numbers on WordPad?
On the Insert tab, in the “Header & Footer” group, click Page Number. Click Top of Page, Bottom of Page, or Page Margins, depending on where you want page numbers to appear in your document.
You can format documents in WordPad with various font and paragraph styles. To start WordPad Click Start Menu, then select Programs->Accessories->WordPad. Specify the page layout for a document, such as paper size and margin settings. Type, edit and delete text, as well as copy or move text from one place to another.
How do you insert a Shape in WordPad?
To insert a shape
On the ribbon menu, under the tab Insert, within the group illustrations, click icon Shapes. A drop-down list appears with various shapes. Click a shape, the mouse cursor changes to a ‘+’ sign. Draw the shape in your document.
How do you set 1 inch margins on Microsoft Word?
To set the top margin of all other pages to 1 inch:
- At least one line down from the top of Page 1, place cursor before or after any text in the order.
- Click Page Layout > Margins > Custom Margins.
- In the Page Setup Window, change the top margin to 1 inch.
- Select “This point forward” from the Apply to selection box.
- Click Ok.
Why are my Microsoft Word margins messed up?
If your document is in Print Layout view and the top and bottom margins appear to be cut off, the option for hiding margins has been switched on. Here’s how to switch it off: Point to the top or bottom of a page until the pointer becomes a double-pointed arrow, and then double-click.
What should margins be set at?
The top, bottom, and right margins are required to be 1 inch, but the left margin can either be 1 inch or 1.25 inches. All body text, tables, figures, appendices content, and any copies of published chapters must fit within the required 1-inch margins on all sides.
What is margin in computer class 9?
In typography, a margin is the area between the main content of a page and the page edges. The margin helps to define where a line of text begins and ends. When a page is justified the text is spread out to be flush with the left and right margins.
How do you fix printer margins?
Click “Margins” on the Page Layout tab, then select “Custom Margins” and use the up or down arrows to select the margins that you want. On some applications, click the “Page” tab and use the up or down arrows in the Margins field to set the margins for the document.
How do I change the width of my printer?
Click Start, point to Settings, and the click Printers. Right-click the appropriate printer, and then click Properties. Click the Paper tab, and then click the paper size you want to use in the Paper Size box. Click OK, and then close the Printers folder.
In Wordpad document click on File tab, then Page Setup to set the Left, Right, Top and Bottom margins, choose paper size, orientation and whether you want page numbers.
Contents
- 1 Where is Page Setup in WordPad?
- 2 How do you add a margin in WordPad?
- 3 How do I change the margins in Windows 10?
- 4 How do you set margins?
- 5 How do I set my margins to the wide setting?
- 6 Can you change the margins in Wordpad?
- 7 Which option is used to set the margin?
- 8 How do I put page numbers on Wordpad?
- 9 Why are my Microsoft Word margins messed up?
- 10 How do you change the border margins in Word 2010?
- 11 How do I change the margins on just one page?
- 12 How do you change the A4 size on WordPad?
- 13 How do I change margins in notepad?
- 14 How do I make two columns in WordPad?
- 15 How do you change top and bottom margins?
- 16 How do you set 1 inch margins on Microsoft Word?
- 17 What are page margins?
- 18 Can you change the margins of just one page in Word?
- 19 How do I change the border margins in Word?
- 20 How do you change margins on pages?
Where is Page Setup in WordPad?
- Launch WordPad on your computer and open or create a document.
- Click the “WordPad” icon in the top left corner of the WordPad window and select “Page setup” from the drop-down menu.
How do you add a margin in WordPad?
Change the Document Margins
Open your document in WordPad, click the menu button and select “Page Setup” from the menu to display the Page Setup window. Change the “Left,” “Right,” “Top” and “Bottom” margins in the Margins section. Note that all margins are shown in inches.
Select Layout > Margins. Select Custom Margins. In Margins, use the Up and Down arrows to enter the values you want. Select OK when done.
Change default margins
- Select Layout > Margins > Custom Margins.
- Set your margins.
- Select Set As Default.
- Confirm your selection.
How do you set margins?
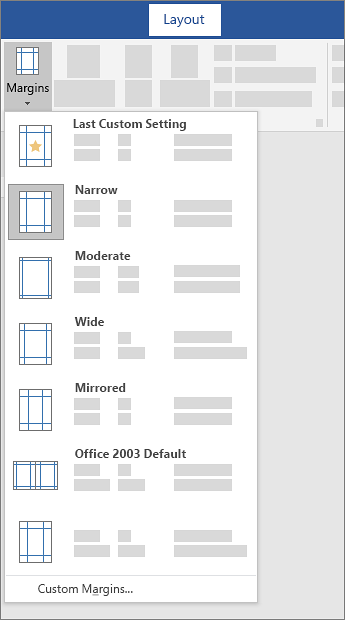
To change margins, click on the Margins button, found on the Page Layout tab. Word lists a number of pre-formatted options, but you can also make your own margins by selecting “Custom Margins,” found at the bottom of the Margins list. You can change each of the four margins in the dialog box that appears.
How do I set my margins to the wide setting?
The inside margins are the same width, and the outside margins are the same width.
- On the Page Layout tab, in the Page Setup group, click Margins >Mirrored.
- Click Margins > Custom Margins, and in the Inside and Outside boxes, enter the widths that you want.
Can you change the margins in Wordpad?
In Wordpad document click on File tab, then Page Setup to set the Left, Right, Top and Bottom margins, choose paper size, orientation and whether you want page numbers.
Which option is used to set the margin?
Setting margins in Microsoft Word and Excel
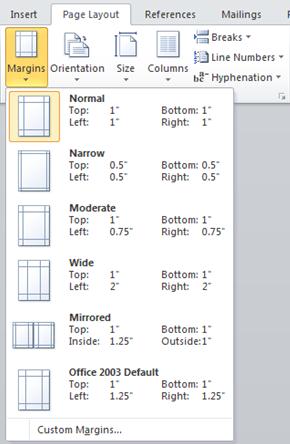
In the Ribbon bar, click the Layout or Page Layout tab, and then click the Margins option. Select one of the preset margin options or click Custom Margins to specify the margins you want the document to have.
How do I put page numbers on Wordpad?
Press the “Down” arrow key on your keyboard to scroll through the pages. Page numbers will be displayed at the bottom of each page.
Why are my Microsoft Word margins messed up?
If your document is in Print Layout view and the top and bottom margins appear to be cut off, the option for hiding margins has been switched on. Here’s how to switch it off: Point to the top or bottom of a page until the pointer becomes a double-pointed arrow, and then double-click.
How do you change the border margins in Word 2010?
Adjust Margins
- Step 1 − Open the document the margins of which need to be set.
- Step 2 − Click the Page Layout tab, and click the Margins button in the Page Setup group.
- Step 3 − You will have to display a Page Dialog Box as shown below where you can set top, left, right and bottom margins under the Margins Tab.
How do I change the margins on just one page?
3 Answers
- On the File menu, click Page Setup, and then click the Margins tab. Under Margins, select the options you want.
- To change the default margins, click Default after you select new margin settings.
- To change the margins for part of a document, select the text, and then set the margins you want.
How do you change the A4 size on WordPad?
How do I change the paper size of my document to A4?
- Click the Page Layout at the top of the window.
- Click Size under the Page Layout tab.
- Select A4 21cm x 29.7 cm.
How do I change margins in notepad?
How Do I Set My Margins on Notepad?
- Launch Notepad by clicking “Start” and then “All Programs.” After that, click “Accessories,” and choose “Notepad.”
- Go to Notepad’s “File” menu, and choose “Page Setup” from the drop-down menu.
How do I make two columns in WordPad?
Click Insert Object button in WordPad:
- Make sure Create New is selected, then scroll down and select Microsoft Word Document:
- Click OK, and a blank MS Word document will open:
- Go to the Layout tab, Page Setup group, and select the Columns button:
- Select the number of columns you want, and start typing.
How do you change top and bottom margins?
Changing Page Margins
- Make sure the Layout tab of the ribbon (or Page Layout tab in older versions of Word) is displayed.
- Click the Margins tool in the Page Setup group.
- Click Custom Margins.
- Adjust the top, bottom, left, and right margins as desired.
- Make sure the Apply To drop-down list is set to Whole Document.
How do you set 1 inch margins on Microsoft Word?
To set the top margin of all other pages to 1 inch:
- At least one line down from the top of Page 1, place cursor before or after any text in the order.
- Click Page Layout > Margins > Custom Margins.
- In the Page Setup Window, change the top margin to 1 inch.
- Select “This point forward” from the Apply to selection box.
- Click Ok.
What are page margins?
In typography, a margin is the area between the main content of a page and the page edges. The margin helps to define where a line of text begins and ends.The top and bottom margins of a page are also called “head” and “foot”, respectively.
Can you change the margins of just one page in Word?
Go to the Layout tab and click the Margins drop-down menu. Once the different preset margin formats are displayed, select one from the selection that suits your needs.You’ve just inserted section breaks to change the margin on one page in MS Word.
How do I change the border margins in Word?
On the Page Layout tab, click Page Borders in the Page Background group. On the Page Border tab, click Options. In the Border and Shading Options dialog box, change the default setting of 24 points in the Margin area to a new measurement.
How do you change margins on pages?
Set document margins in Pages on Mac
- Click. in the toolbar, then click the Document tab at the top of the sidebar.
- In the Document Margins section, click the arrows or enter values in the fields next to Top, Bottom, Left, and Right.

Try it!
Change margins in your document to change the layout and make sure everything fits.
Apply a predefined margin setting
-
Select Layout > Margins.

-
Select the margin measurements you want.
Note: If your document contains multiple sections, the new margins apply only to the selected sections.
Create a custom margin
-
Select Layout > Margins.
-
Select Custom Margins.
-
In Margins, use the Up and Down arrows to enter the values you want.
-
Select OK when done.
Change default margins
-
Select Layout > Margins > Custom Margins.
-
Set your margins.
-
Select Set As Default.
-
Confirm your selection.
Want more?
Set page margins in Word
Discover more Word training at LinkedIn Learning
Need more help?
Want more options?
Explore subscription benefits, browse training courses, learn how to secure your device, and more.
Communities help you ask and answer questions, give feedback, and hear from experts with rich knowledge.
Change margins
In Word, each page automatically has a one-inch margin. You can customize or choose predefined margin settings, set margins for facing pages, allow extra margin space to allow for document binding, and change how margins are measured.
-
Select Layout > Margins.
-
Select the margin configuration you want, or select Custom Margins to define your own margins.
Important:
Office 2010 is no longer supported. Upgrade to Microsoft 365 to work anywhere from any device and continue to receive support.
Upgrade now
What would you like to do?
-
On the Page Layout tab, in the Page Setup group, choose Margins and the Margins gallery appears.
-
Choose the margin type that you want to apply.
Note: If your document contains multiple sections, the new margin type will only be applied to the current section. To apply the new margin type to multiple sections, be sure to select each one.
3. Make your new margin settings the default for your template. Each new document based on that template will automatically use the new margin settings.
-
Choose Margins after you select a new margin, and then choose Custom Margins.
-
In the Page Setup dialog box, choose Set As Default.
-
On the Page Layout tab, in the Page Setup group, choose Margins and the Margins gallery appears.
-
At the bottom of the Margins gallery, choose Custom Margins.
-
In the Page Setup dialog box, enter new values for the margins.
More tips about margins
-
Change the margins for only a section of a document by selecting the text and entering the new margins in the Page Setup dialog box. In the Apply to box, click Selected text. Microsoft Word automatically inserts section breaks before and after the text with new margin settings.
-
Most printers require a minimum width for margin settings. If your settings are too narrow, Microsoft Word displays the message One or more margins are set outside the printable area of the page. Click Fix to automatically increase the margin width. If you ignore the message, Word will display another message asking whether you want to continue.
-
Minimum margin settings for printing depend on your printer, printer driver, and paper size. To learn about your minimum settings, check your printer manual.
Use mirror margins to set up facing pages for double-sided documents, such as books or magazines. When you choose mirror margins, the margins of the left page are a mirror image of those on the right page. The inside margins are the same width, and the outside margins are the same width.
-
On the Page Layout tab, in the Page Setup group, click Margins >Mirrored.
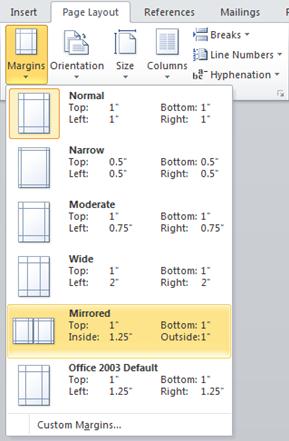
Note: To change margin widths, click Custom Margins at the bottom of the Margins gallery. Enter new values in the Inside and Outside boxes.
A gutter margin adds extra space to the side margin, top margin, or inside margins of a document that you plan to bind to help ensure that text isn’t obscured by binding.
1. Gutter margins for binding
2. Mirror margins for facing pages
To set the gutter margin
-
On the Page Layout tab, in the Page Setup group, click Margins.
-
Click Custom Margins.
-
In the Gutter box, enter a width for the gutter margin.
-
In the Gutter position box, click Left or Top.
Note: The Gutter position box is not available when you use the Mirror margins, 2 pages per sheet, or Book fold option. For those options, the gutter position is determined automatically.
Word can display lines in your document to represent text boundaries.
-
On the File tab, click Options.
-
Click Advanced, and then select the Show text boundaries check box under Show document content.
The page margins appear in your document as dotted lines.
Note: You can view page margins in either Print Layout view or Web Layout view, and the text boundaries don’t appear on the printed page.
Important:
Office 2007 is no longer supported. Upgrade to Microsoft 365 to work anywhere from any device and continue to receive support.
Upgrade now
What would you like to do?
Microsoft Word offers several page margin options. You can use the default page margins or specify your own.
-
Add margins for binding
A gutter margin adds extra space to the side margin, top margin, or inside margins of a document that you plan to bind to help ensure that text isn’t obscured by binding.
1. Gutter margins for binding
2. Mirror margins for facing pages
-
Set margins for facing pages
Use mirror margins to set up facing pages for double-sided documents, such as books or magazines. In this case, the margins of the left page are a mirror image of those of the right page. The inside margins are the same width, and the outside margins are the same width. -
Note: You can set gutter margins for a document that has mirror margins if the document needs extra space for binding.
-
Add a book fold
Using the Book fold option in the Page Setup dialog box, you can create a booklet. Use the same option to create a menu, invitation, event program, or any other type of document with a single center fold.

1. Word inserts a single, center book fold
After you set up a document as a booklet, work with it just as you would any document to insert text, graphics, and other visual elements.
-
Most printers require a minimum width for margin settings. If you try to set margins that are too narrow, Microsoft Word displays the message One or more margins are set outside the printable area of the page. Click Fix to automatically increase the margin width. If you ignore the message, Word will display another message asking whether you want to continue.
-
Minimum margin settings depend on your printer, printer driver, and paper size. To learn about your minimum margin settings, check the printer manual.
-
On the Page Layout tab, in the Page Setup group, click Margins.
-
Click the margin type that you want. For the most common margin width, click Normal.
Note: When you click the margin type that you want, your entire document automatically changes to the margin type that you have selected.
-
You can specify your own custom margin settings. Click Margins, click Custom Margins, and then in the Top, Bottom, Left, and Right boxes, enter new values for the margins.

-
To change the default margins, click Margins after you select a new margin, and then click Custom Margins. In the Page Setup dialog box, click the Default button, and then click Yes. The new default settings are saved in the template on which the document is based. Each new document based on that template automatically uses the new margin settings.
-
To restore the original margin settings, click Margins and then click Custom Margins. Change the margins for Top, Bottom, Left, and Right to 1″. Then click the Default button and click Yes.
-
To change the margins for part of a document, select the text, and then set the margins that you want by entering the new margins in the Page Setup dialog box. In the Apply to box, click Selected text. Microsoft Word automatically inserts section breaks before and after the text that has the new margin settings. If your document is already divided into sections, you can click in a section or select multiple sections and then change the margins.
-
Click the Microsoft Office Button
, and then click Word Options. -
Click Advanced, and then click the Show text boundaries check box under Show document content.
The page margins appear in your document as dotted lines.
 , and then click Word Options.
Note: You can view page margins in either Print Layout view or Web Layout view, and the text boundaries do not appear on the printed page.
When you choose mirror margins, the margins of the left page are a mirror image of those on the right page. The inside margins are the same width, and the outside margins are the same width.
-
On the Page Layout tab, in the Page Setup group, click Margins >Mirrored.
-
Click Margins > Custom Margins, and in the Inside and Outside boxes, enter the widths that you want.
A gutter margin setting adds extra space to the side margin or top margin of a document that you plan to bind. A gutter margin helps ensure that text isn’t obscured by the binding.
-
On the Page Layout tab, in the Page Setup group, click Margins >Custom Margins.
-
In the Multiple pages list, click Normal.
-
In the Gutter box, enter a width for the gutter margin.
-
In the Gutter position box, click Left or Top.
Note: The Gutter position box is not available when you use the Mirror margins, 2 pages per sheet, or Book fold option. For those options, the gutter position is determined automatically.
-
Click on the text box you created to highlight it.
-
Click on the Format tab in the ribbon.
-
Click the small button in the lower left of the Size group.
-
In the Format Text Box window, click the Text Box tab.
-
In the Internal margin section, you can customize the margins to your desired size.
-
Click OK.
If this article did not answer your question, you can chat with a Microsoft virtual agent or a person at any time.
Need more help?
Want more options?
Explore subscription benefits, browse training courses, learn how to secure your device, and more.
Communities help you ask and answer questions, give feedback, and hear from experts with rich knowledge.
Find solutions to common problems or get help from a support agent.
Microsoft Word is a fairly large investment for a business that doesn’t have a regular need for the application. For occasional, light use, Windows includes WordPad, which can open, edit and print Word documents. WordPad lacks some of the high-level features of Microsoft Word, but it handles basic character, paragraph and page formatting, including page margins, as ably as its Microsoft Office sibling.
-
Launch WordPad on your computer and open or create a document.
-
Click the «WordPad» icon in the top left corner of the WordPad window and select «Page setup» from the drop-down menu.
-
Select the value in the Left box in the Margins section of the Page Setup window and change it to the value you want to use for your document. The values are in inches.
-
Set the Right, Top and Bottom margins.
-
Click «OK» to set the margins. The changes take effect immediately.