
If you don’t want content reviewers to accidentally modify your document, you can make the document read only before sending it for review. Another method is to restrict formatting and editing.
Making your document a read-only file means that the document can be read or copied but not modified. If one of the reviewers tries to make changes to a read-only file, the changes can be saved only by giving the document a new name or saved to a new location.
Note: Making your document read only doesn’t prevent someone from making a new copy of the document and saving it with a different name or in a different place.
Restrict editing
You can restrict the editing of a document, so that the document opens in view-only mode.
-
Select File > Info.
-
Select Protect Document.

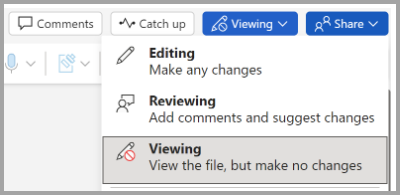
Change the viewing mode
You can switch from View only to other modes granted by the document owner (Editing, Reviewing).
-
Select the Viewing tab to open the options.
-
Select Editing or Reviewing.
Note: The only options that can be selected are the one(s) that the document owner has granted.
Restrict editing
-
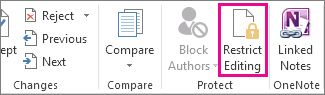
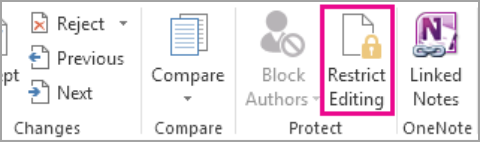
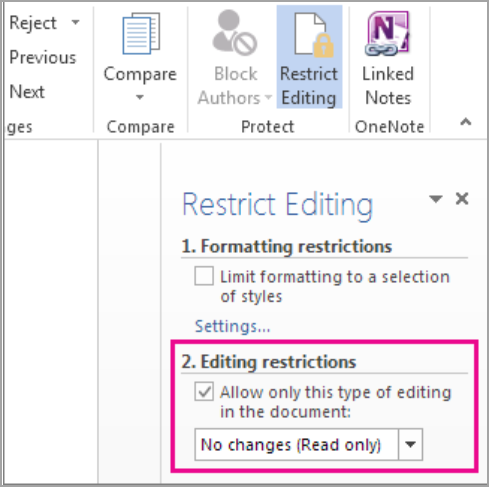
Click Review > Restrict Editing.

-
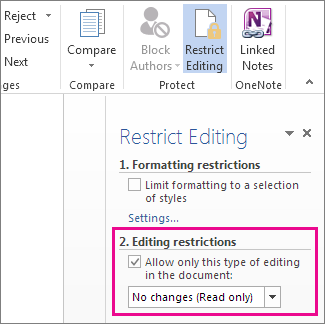
Under Editing restrictions, check Allow only this type of editing in the document, and make sure the list says No changes (Read only).
-
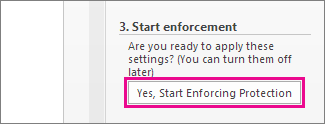
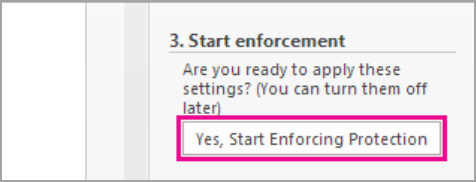
Click Yes, Start Enforcing Protection.
-
In the box that opens, type a password you’ll be able to remember, and then type the password again to confirm it.
The password’s optional. But if you don’t add a password, anyone can click Stop Protection and edit the document.
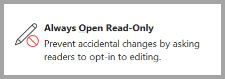
Set to ‘Always open as Read-Only’
1. Select File > Info > Protect Document.
2. Select Always open Read-Only.
Open a document shared as read only
When you open a document that is shared as Read Only, you have two options.
To open the document as read only
Select Yes
To open the document in editing mode
Select No
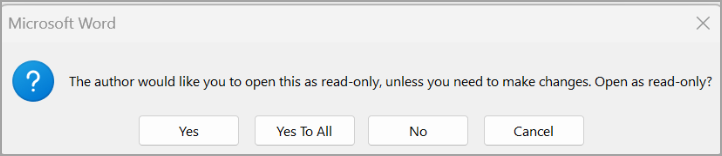
Note: You can close and reopen the document or save a copy of the document to open in edit mode.
Restrict Editing
-
Click Review > Protect > Restrict Editing.
-
Under Editing restrictions, select Allow only this type of editing in the document, and make sure the list says No changes (Read only).
-
Select Yes, Start Enforcing Protection.
-
In the box that opens, type a password you’ll be able to remember, and then type the password again to confirm it. The password is optional. But if you don’t add a password, anyone can select Stop Protection and edit the document.
See also
Add or remove protection in your document, workbook, or presentation
Save as read only
-
Click the Microsoft Office Button
, and then click Save or Save As if you have previously saved the document. -
Click Tools.
-
Click General Options.
-
Click the Read-only recommended check box.
-
Click OK.
-
Save the document. You might need to save it as another file name if you have already named the document.
 , and then click Save or Save As if you have previously saved the document.
Remove read only
-
Click the Microsoft Office Button
, and then click Save or Save As if you have previously saved the document. -
Click Tools.
-
Click General Options.
-
Clear the Read-only recommended check box.
-
Click OK.
-
Save the document. You might need to save it as another file name if you have already named the document.
Top of page
Restrict formatting and editing
You can stop content reviewers from accidentally modifying your document when you restrict formatting and editing.
-
On the Review tab, in the Protect group, click Protect Document.
-
Under Restrict Reviewing Options, click Restrict Formatting and Editing.
-
In the Restrict Formatting and Editing task pane, under Formatting restrictions, Editing restrictions, and Start enforcement, make the selections that meet your formatting and editing needs.
Unrestrict formatting and editing
-
On the Review tab, in the Protect group, click Protect Document.
-
To clear the check mark, click Restrict Formatting and Editing under Restrict Reviewing Options.
Top of page
Download PC Repair Tool to quickly find & fix Windows errors automatically
Office applications like Word periodically, and sometimes, without the consent of a user converts a file to ‘Read-only’ mode while it is being used. The change in default status can be annoying since the mode allows no editing. Nevertheless, you can fix this issue, here’s how!
Apart from you, if someone else has access to your PC then, chances are he/she has locked it accidentally or deliberately to prevent anyone from making changes to the contents of a file. If Microsoft Word documents are opening in Read-only mode on your Windows 11/10 PC, then here are the steps you need to take to fix the issue, then you can remove read-only mode in Word by following these methods:
- Disabling Edit Restrictions
- Unchecking ‘Open e-mail attachments and other uneditable files in reading view’.
- Changing Word File Properties
- Disabling the Preview Pane In File Explorer.
Let’s cover the methods described above in a bit of detail.
1] Disable Edit Restrictions
Open the Read-only Word document.
Go to the ‘Review’ tab and under it look for the option that reads ‘Restrict Editing’.
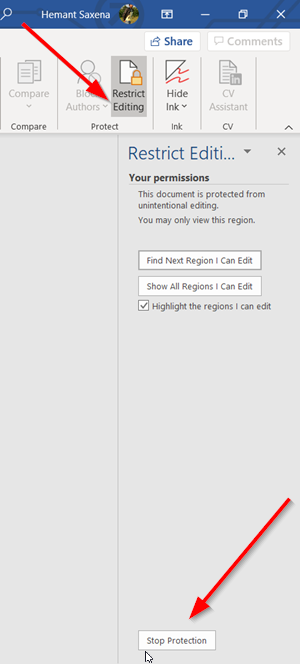
Click the tab. Then, in the new pane that opens, look for the ‘Stop protection’ button. It should be visible at the bottom of the pane. Hit the button.
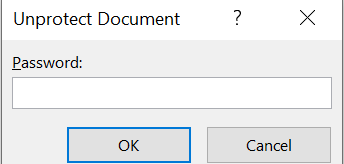
When prompted for the password, request the person who configured it to provide it to you.
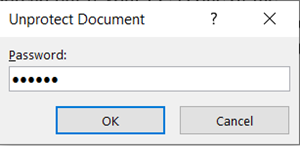
Enter the password to remove Read-only mode.
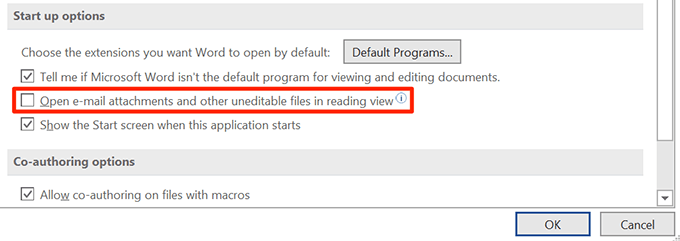
2] Uncheck ‘Open e-mail attachments and other uneditable files in reading view’
Sometimes when you receive a word file as an attachment and try to open it to edit it, you cannot do it since it opens in the ‘Read-only’ mode.
Open the Word file on your computer. Click the ‘File’ tab and go to ‘Options’.
In the Word Options window that opens, switch to the ‘General’ tab in the left sidebar.

Then, in the right-pane, scroll down and look for the option that reads as ‘Open e-mail attachments and other uneditable files in reading view’.
Uncheck the box marked against the option and hit the ‘OK’ button to save the changes.
Hereafter, any Word files you receive as email attachments should now open in regular mode letting you edit them however you want.
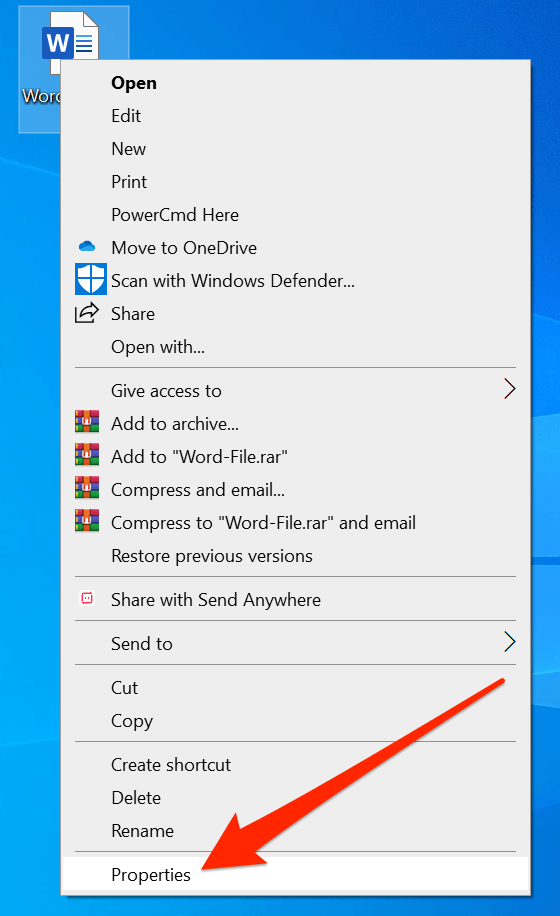
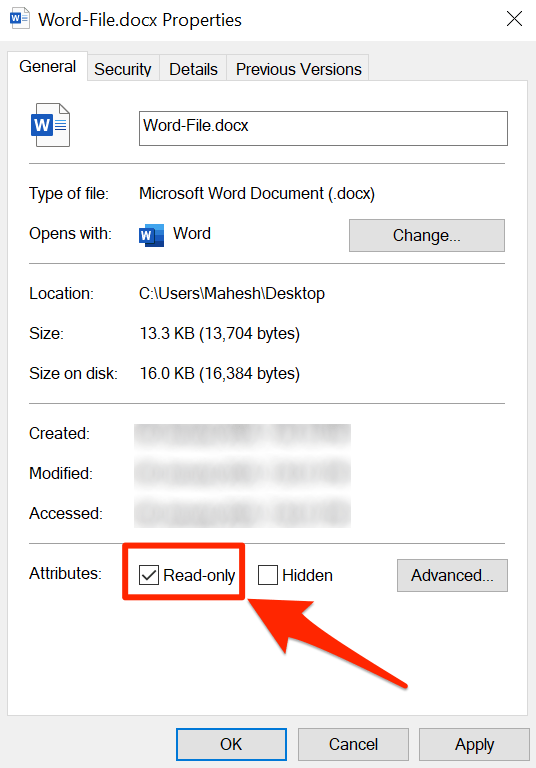
3] Change Word File Properties
Right-click the Word document that opens only in ‘Read-only’ mode and select ‘Properties’.
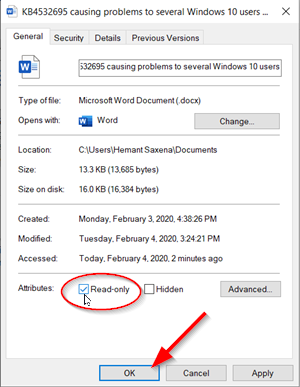
Un-check the box marked against ‘Read-only’ option.
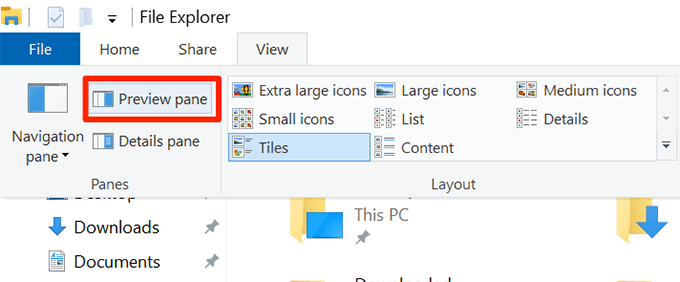
4] Disable the Preview Pane In File Explorer
This ahs helped some. See if it helps you; else reverse the changes.
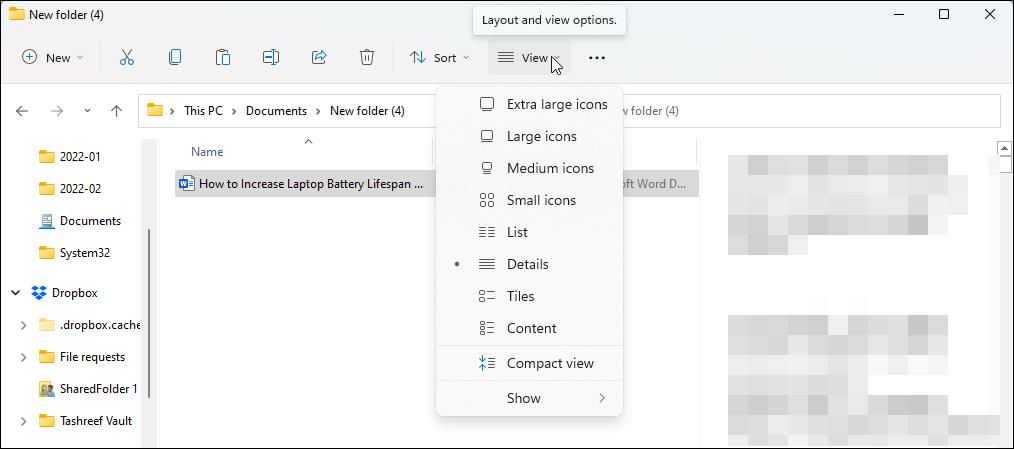
Go to ‘This PC’ section and click on the ‘View’ tab.
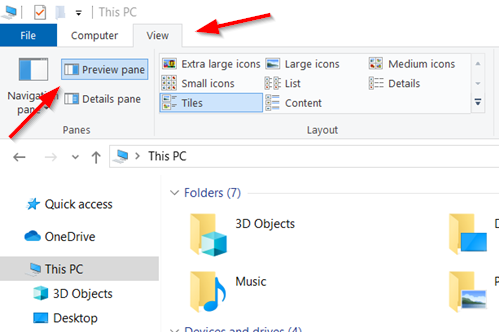
Now, simply select the option that says ‘Preview pane’ in the Panes section. This will disable the pane if it was enabled before.
That’s it!
A post-graduate in Biotechnology, Hemant switched gears to writing about Microsoft technologies and has been a contributor to TheWindowsClub since then. When he is not working, you can usually find him out traveling to different places or indulging himself in binge-watching.
Initially released in 1983, Microsoft Word has had our backs through time and decades. It is our go-to place for creating or editing documents. There are a couple of reasons for the enduring popularity of MS Word over all these years.
Microsoft has consistently continued to make this vital software better and more efficient. It allows us to edit our documents and collaborate on projects while developing new, innovative working methods. Even with its toughest rival around–Google Docs, Word still promises to remain a dominant force in word processing, especially in the professional sphere. MS Word is a crucial part of the Office 365 Suite and indeed a must-have app on Windows OS.

No matter how good a piece of software may be, it isn’t 100% immune to errors and glitches. Right? MS Word is opening docs in read-only mode? Unable to edit your files or access any of the additional tools and features? Well, it’s a common issue that can easily be fixed via simple troubleshooting.
So, if your MS Word documents are being automatically opened in the read-only mode, here are a few workarounds that you can try.
Also read: 63 Best MS Word Shortcut Keys To Increase Productivity
How to Fix MS Word Opens Files in Read-Only Mode
Solution 1: Review the Office Subscription Details
Has your Office subscription expired? If yes, then your documents will be automatically opened in read-only mode. To review your account subscription details, follow these quick steps:
Launch any preferred web browser on your Windows PC, Visit this link and sign in with your Microsoft account user ID and password.

Switch to the “Services and Subscriptions” section. Tap on the “Overview” tab. Under the “Overview” tab, you will find the respective account subscription details.
If your Office 365 subscription has expired, renew it right away to resolve the issue.
Also read: 5 Best Hidden Features Of MS Word
Solution 2: Configure the Settings
If your document contains any attachments, images, or media files, Word’s settings might hinder you from opening the file in normal view. Here’s how you can configure the settings in the MS Word app.
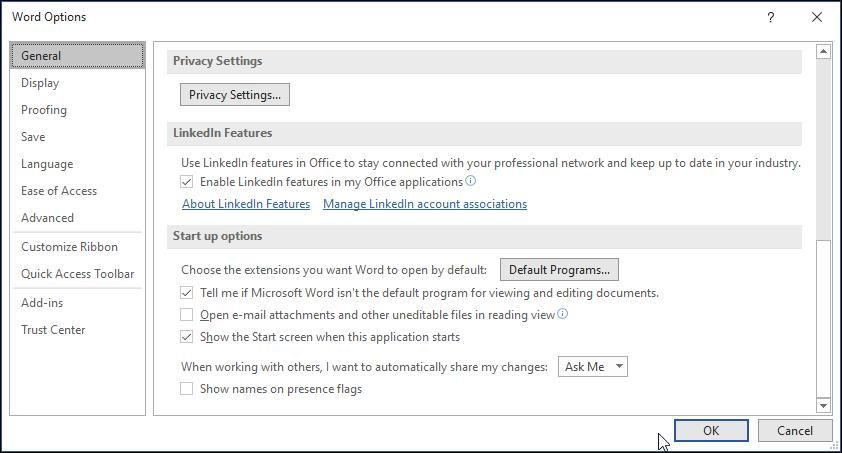
Launch MS Word on your device. Tap on File> Options.

Now, switch to the “General” tab. Uncheck the “Open e-mail attachments and other uneditable files in reading view” option.
After tweaking the setting, re-open the document and check if the issue was resolved.
Solution 3: Disable Protected View
The “Protected View” is an additional security feature on Word that protects your documents from malicious threats. If MS Word finds anything suspicious on your file, the documents will automatically be opened in read-only mode. To bypass this security feature, you can try disabling the protected view on Word.
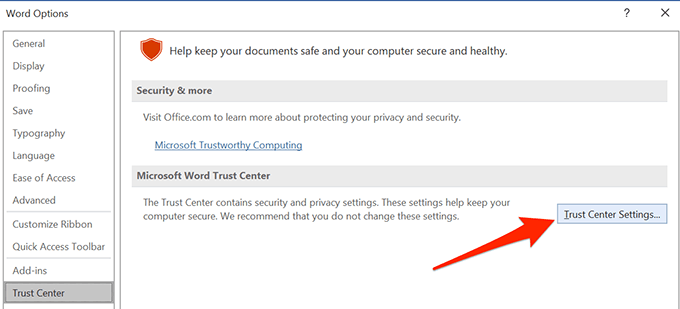
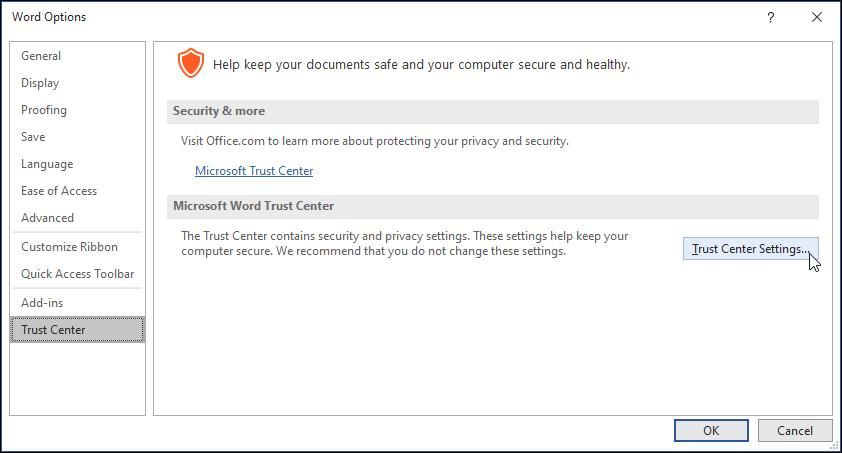
Launch Word and head to File> Options. Switch to the “Trust Center” section from the left menu pane. Tap on the “Trust Center Settings” button.

Switch to the “Protected View” section.

Uncheck all three options placed under the “Protected View” section. Tap on OK to save the recent changes.
Solution 4: Change Document Properties
Right-click on the MS Word file that is being opened in the read-only mode, and select “Properties”.

Switch to the “General” tab and then uncheck the “Read-only” option. Hit on the OK and Apply buttons to save changes.

Re-open the document and check if you are still encountering the “Microsoft Word is opening files in read-only mode” issue.
Also read: How to Convert Word to PDF on Windows 10, 8, 7 (4 Ways)
Solution 5: Launch MS Word in Safe Mode
If a third-party add-on is interrupting MS Word’s functioning, launching the app in Safe Mode might help. Here’s how you can open Microsoft Word in Safe Mode:
Launch Word and head to File> Options. Switch to the “Add-ins” tab from the left menu pane.
Tap on “Manage: Com Add-ins”.

Uncheck all the add-ins from the list and then tap on OK to launch Word in Safe Mode.
Solution 6: Repair the MS Word App
Tap on the Windows icon placed on the Taskbar and select “Settings”. Head to Apps> Installed Apps.
Scroll through the list of apps and look for “Microsoft 365”. Tap on the three-dot icon placed next to it and select “Advanced Options”.

Select “Quick Repair” and then tap on the “Repair” button to get started.
After repairing the MS Word app, re-open the document and check if the issue persists.
Also read: How to Add Grammarly to MS Word and Outlook
Conclusion
This wraps up our guide on how to fix the “Word opens docs in read-only mode” issue on Windows 11. You can use any of the above-listed workarounds to open your Word files on Windows without any restrictions.
Which solution did the trick for you? Feel free to share your thoughts in the comments section. You can also find us on Facebook, Twitter, YouTube, Instagram, Flipboard, and Pinterest.
![]()
Download Article
![]()
Download Article
Is your Word document opening in read-only mode? You’ll need to turn off this protected view mode before you can make changes to the file. Fortunately, this is really easy to do! This wikiHow article will walk you through changing a read-only Microsoft Word document into one that’s unlocked and ready to edit.
Things You Should Know
- Word files may be read-only due to Protected View, password protection, or file permissions in Windows or macOS.
- If you’re using Windows, right-click the file, select «Properties,» click the «Properties» tab, then remove the Read-only attribute.
- On a Mac, click the file, go to «File» > «Get Info» > «Sharing & Permissions,» and allow «Read & Write» permission.
-
1
Understand which documents are likely to be protected. Any Microsoft Word document which you download from the Internet (e.g., an email attachment or a file from a website) will have read-only protection assigned to it whenever you open it. You can disable this protection when first opening the document.
-
2
Open the Word document. Double-click the Word document for which you want to remove the read-only protection.
- If the Word document is currently open, close it and re-open it.
Advertisement
-
3
Look for a pale yellow banner. If you see a yellow banner with the phrase «Files from the Internet can contain viruses» written across the top of the Word document, your document qualifies to have its read-only status removed using this method.
- If you don’t see this banner even after closing and re-opening the Word document, try one of the other methods in this article.
-
4
Click Enable Editing. This button should be on the right side of the banner. Doing so will refresh the Word document and remove the read-only protection. You should now be able to edit the document.


Advertisement
-
1
Open the Word document. Double-click the Word document from which you want to remove the protection. It will open in Word.
-
2
Click the Review tab. This tab is in the upper-right corner of the Word window. Doing so opens the Review toolbar at the top of the Word window.
-
3
Click Restrict Editing. You’ll find this option on the far-right side of the Review toolbar. Clicking it prompts a pop-out menu to appear on the right side of the window.
-
4
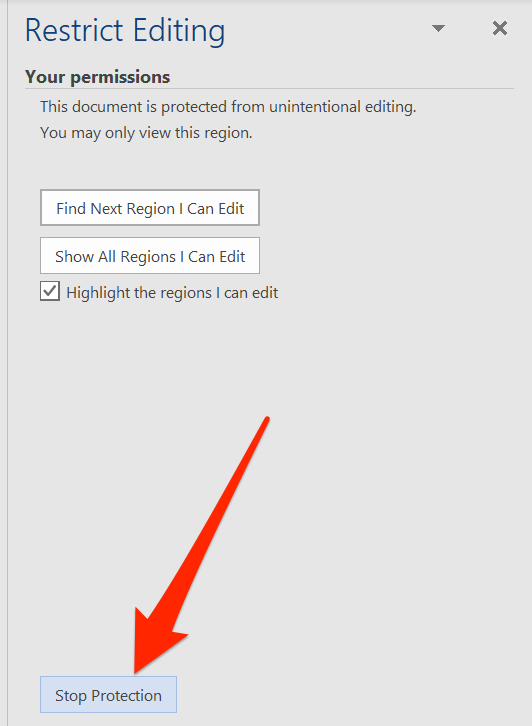
Click Stop Protection. It’s at the bottom of the pop-out menu. You should see a pop-up window appear at this point.
- If you or another user on your computer’s account created the protection without a password, clicking Stop Protection will automatically remove the protection.
-
5
Enter the password when prompted. Type the document’s password into the «Password» text box, then click OK. This will immediately remove the Word document’s read-only lock if the password is correct.
- If you don’t know the password, you’ll have to copy and paste the file’s contents instead.
-
6
Save your changes. Press Ctrl+S (Windows) or ⌘ Command+S (Mac) to do so. From now on, the file won’t be read-only protected unless you re-enable editing protection.


Advertisement
-
1
Go to the Word document. Find the folder in which the Word document is stored.
- If the file isn’t actually on your computer (e.g., it’s on a flash drive or a CD), move the file onto your computer before proceeding.
-
2
Open the Word file’s properties. This will vary depending on your computer’s operating system:
- Windows — Click once the Word file, right-click the Word file, and click Properties in the drop-down menu.
- Mac — Click the Word file, click the File menu item in the top-left side of your Mac’s screen, and click Get Info.
-
3
Find the «Permissions» section. On a Windows computer, you’ll find the proper options in the «Attributes» section near the bottom of the Properties window.
- On a Mac, you’ll have to click the Sharing & Permissions heading near the bottom of the window.
-
4
Disable the read-only protection. Again, this process will differ depending on whether you’re using Windows or a Mac:
- Windows — Uncheck the «Read-only» box near the bottom of the window, click Apply, and click OK.
-
Mac — Click the Read option to the right of your name, then click Read & Write in the menu which appears.
- You may first have to click the lock in the bottom-left corner of the Get Info window and then enter your Mac’s password before you can do this.
- If this option is greyed out, unchecked, or otherwise not set to «Read-only», you’ll have to try copying and pasting instead.
-
5
Try to edit the file. Open the Word document by double-clicking it, then try to edit it. Keep in mind that you may first have to remove the online read-only lock before doing so.


Advertisement
-
1
Understand how this works. If your primary goal is to edit the Word document, you can copy the Word document’s text and paste it into a new Word document and then save the new document onto your computer. While doing this won’t remove the read-only protection from the original document, it will create an editable copy.
-
2
Open the protected Word document. Double-click the Word document to do so.
-
3
Click anywhere on the document. This will place your mouse cursor on the document’s page.
-
4
Select the whole document. Press either Ctrl+A (Windows) or ⌘ Command+A (Mac) to do so. You should see the entire document become highlighted.
-
5
Copy the selected text. Press either Ctrl+C (Windows) or ⌘ Command+C (Mac). This will copy the document’s text to your computer’s clipboard.
-
6
Open a new Word document. Click File in the upper-left side of the Word window, click New on the left side of the window, and click Blank document to open a blank Word document.
- On a Mac, click the File menu item, then click New Blank Document at the top of the drop-down menu.
-
7
Paste in the copied text. Press either Ctrl+V (Windows) or ⌘ Command+V (Mac) to paste the locked Word document’s text into the blank document.
- This may take a few seconds if the original document was particularly large or contained images.
-
8
Save the document as a new file. Press Ctrl+S (Windows) or ⌘ Command+S (Mac), then enter your document’s name and click Save. You’ll be able to edit the document you just created like usual.


Advertisement
Add New Question
-
Question
My documents are in Microsoft Office as PDF files and they are read only. How do I turn read only off?

Save it as a new document, delete the old one, and rename the new one. This should allow you to edit it.
Ask a Question
200 characters left
Include your email address to get a message when this question is answered.
Submit
Advertisement
Video
-
Another way to remove the read-only protection from a Microsoft Word document is by converting the Word document into a PDF with the SmallPDF online converter, downloading the converted PDF, and then converting the PDF back into a Word document with SmallPDF.
Thanks for submitting a tip for review!
Advertisement
-
It’s much easier to copy the protected document’s text and paste it into a new document than it is to try to crack Microsoft’s security.
Advertisement
About This Article
Article SummaryX
1. Open the document in Word.
2. Click Enable Editing.
Did this summary help you?
Thanks to all authors for creating a page that has been read 978,826 times.
Is this article up to date?
When I open a file from a network folder, Word always opens it in readonly mode.
How to stop Office from doing this. I want it to just open it as normal and I don’t need office to do any security procedures.
Any idea how I can get this resolved?
![]()
Malvineous
2,4112 gold badges24 silver badges35 bronze badges
asked Oct 31, 2013 at 6:39
![]()
- Run the Office 2010 application with the problem. Notice that this procedure has to be done individually with each of the applications in MS Office suite (great!).
- Click on the Office button on the upper left-hand corner and select “Options”
- In the “Options” dialogue box, select “Trust Center” (on the left)
- Click on “Trust Center Settings” (on the right)
- Select “Protected View”
- Disable any of all the protected view options by unticking the check boxes.
- Click OK when done.
From http://quantumtunnel.wordpress.com/2012/11/21/microsoft-office-2010-issue-with-opening-files-as-read-only
P.S. Do you have write permissions?
answered Oct 31, 2013 at 8:17
![]()
TheSASTheSAS
9001 gold badge6 silver badges15 bronze badges
2
Go into Word Options there’s a check box under Start up options: Open e-mail attachments and other uneditable files in reading view. Uncheck the box and click OK. This should remove the readonly.
answered Feb 8, 2016 at 20:49
![]()
Try turning off the Preview Pane and Details Pane in the File Open dialog box from within the Office application. If you are opening the files directly from Windows Explorer, try turning off the Preview Pane in Windows Explorer as well.
There seems to be an issue with the Preview Pane issuing a temporary lock on the file in order to preview its contents. If the file is opened while this lock is in place, it will open in read-only mode. The problem is worse with larger files over slower network connections.
For more information, and other possible solutions/workarounds, visit The Definitive ‘Locked File’ Post.
answered May 6, 2015 at 20:53
![]()
mwolfe02mwolfe02
4651 gold badge7 silver badges17 bronze badges
I just went to file properties, and applied Read Only, and after that removed again (click apply to take effect). After that, the file started to open correctly.
answered Apr 5, 2016 at 10:05
![]()
If you’ve tried everything else and it’s still opening as Read-Only despite that box not being checked in the properties. Close all instances of MS Word and try again. That was the only thing that ended up working for me.
answered Dec 19, 2016 at 22:48
![]()
SamuelSamuel
1113 bronze badges
This post solved my problem, I think best is to try disabling the add-in, they may cause word to be opened in safe more, at least this happened in my case. Please read @DanielJackson’s answer in that post.
answered Mar 16, 2018 at 14:41
![]()
Not sure if this is the case for anyone else, as I have tried and failed several times using the above suggestions.
Only to realise that I opened the file which was in a compressed folder…
You might want to check that.
answered May 16, 2019 at 5:22
![]()
1
After dedicating hours of my life to trying every one of the above suggestions, I found the problem was not ‘read-only’ mode, but ‘read’ mode!
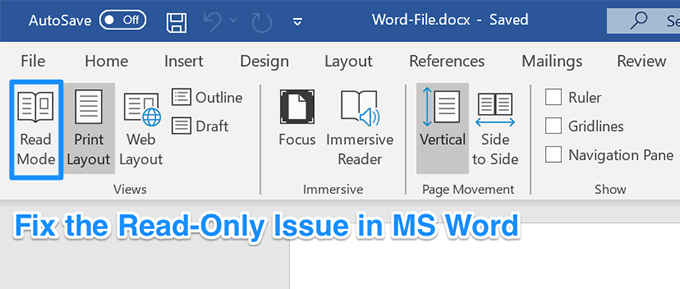
All I had to do was click on print layout (the open book icon) in the Status Bar on the footer of a Word page. Now feeling rather foolish; but am not too proud to tell the story in case others may be affected by the same (hopefully) temporary dumbness.
But thanks to all of the above contributors for their clear explanations. I have learned from them.
answered Jul 19, 2020 at 16:26
![]()
If the file was downloaded from the internet then right click on the file > Properties and then unblock it

If the file was opened directly from a network drive then check the file’s permissions
answered Oct 31, 2013 at 8:14
![]()
phuclvphuclv
25.2k13 gold badges107 silver badges224 bronze badges
1
I found that I had an Excel Add In (Asap Utilities) installed. I re-installed it and the problem (after a few minutes of opening, the files already opened in Excel became ‘Read Only) seems to have gone away.
answered Nov 21, 2020 at 9:16
![]()
I have just encountered this problem with Microsoft Excel. The error message was saying the problem comes from the sharing options. Lo and behold, when I right-clicked my problematic excel file, clicked on share with,and then clicked on my username, the problem has disappeared. Now I can happily modify and save my file. I have just found this solution so now I just hope it lasts through windows explorer/computer restart. I hope this simple solution works for others as well.
answered Sep 8, 2015 at 16:17
![]()
- Word >>> File
- In the “Options” dialogue box, select “Trust Center” (on the left)
- Click on “Trust Center Settings” (on the right)
THEN «Trusted Locations» - Where do you store your files? Add your file directories to the ‘Trusted Locations’ List
MicroSoft has default locations to store your files. If you store your data elsewhere on your PC or Network, then add the directories to «Trusted Locations’ List so that your files do not open as protected.
Keep all internet and Outlook attachment files protected under the «protected view» section
answered Dec 20, 2019 at 18:46
![]()
If word opens as ‘read only’ close it and go to task manager by alt + ctrl+dlt. then you will find a winword file under process even you close your word file. end this winword and re open your word file and it is not read only. This worked for me.
![]()
answered Feb 27, 2020 at 5:27
![]()
My antivirus (Avast) tricked me into accepting some sort of ransomware shield feature which took it upon itself to lock a bunch of my folders including My Documents. This caused the Read Only disaster. I went into Avast|Protection|RansomwareShield and disabled the whole stupid shield (which was also blocking — er…protecting — My Photos and a bunch of other folders). MS Word worked fine after that.
answered Dec 15, 2020 at 17:36
![]()
1
For me it was cured by turning off the ‘auto save’ feature … Why? Who knows, but it worked.
answered Nov 13, 2021 at 1:45
![]()
If you’ve opened a document in Word but you can’t edit it, it’s probably locked for editing by someone or by a feature. Learning how to remove read only from Word should help you edit these documents even though they’ve been marked as read-only and aren’t supposed to be edited.
There are various reasons as to why people restrict their documents from being edited. Maybe you yourself made the document read-only but you forgot it, or maybe someone has it locked to ensure no unauthorized users can modify the contents of it.
Regardless, if you’ve come across a document that you must edit but it’s in read-only mode, there are various methods to fix it and to be able to edit the document.
Also, be sure to check out our YouTube channel where we made a short video going over the fixes listed in this article.
Remove Read Only From Word By Disabling Edit Restrictions
We’ll start off by disabling the Word’s built-in feature that lets users restrict their documents from being modified. If you or someone has enabled this option for your current document, it is why you can’t edit it.
Disabling the option should fix it for you.
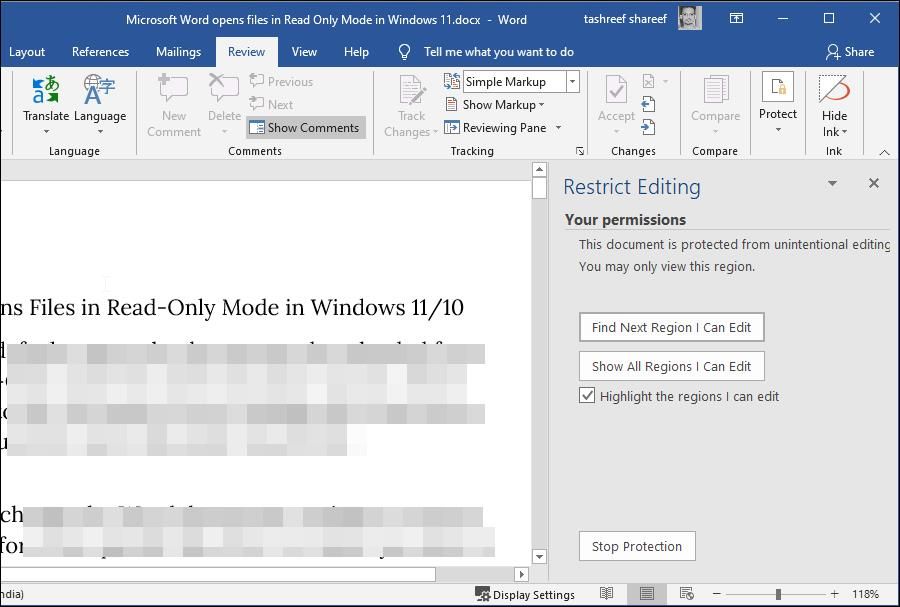
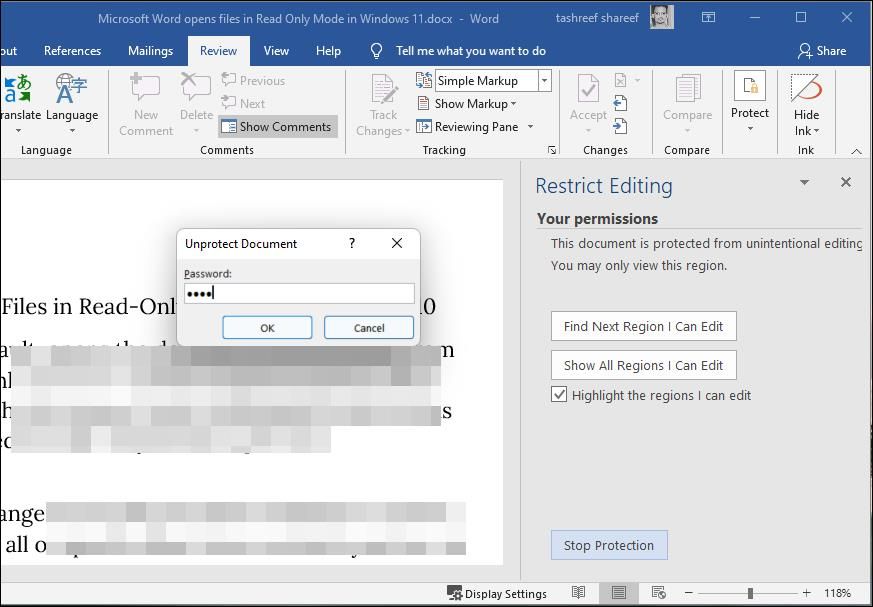
- Open your read-only document in the MS Word program.
- When it opens, find the tab that says Developer at the top and click on it.
- You’ll find several options to choose from on the following screen. Look towards to the Protect area at the top and click on the option that says Restrict Editing.
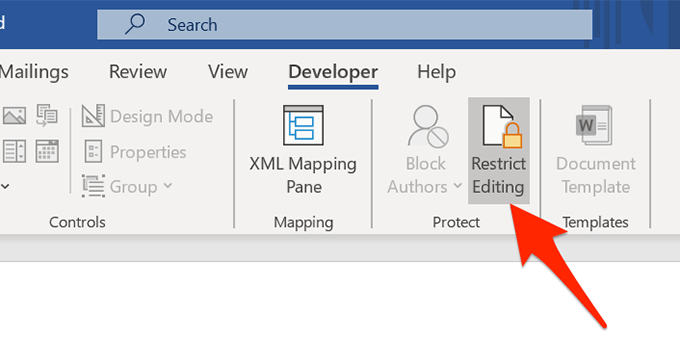
- A new pane will appear on the right-hand side. There’s a button at the bottom of this pane saying Stop Protection. Click on the button to remove read only from this Word document.
- If there was a password setup to restrict editing, you’ll need to enter it on the box shown on your screen. Then click on OK to unlock the document.
Your document is no longer in read-only mode and you can actually modify its contents as you wish.
Turn Off The Trust Center Options To Remove Word Opening In Read Only
Trust Center is a feature in Word that blocks certain documents from being fully opened with editing capabilities on your computer. You can disable the feature in the program and that should fix the read only issue you’re facing with your document.
- Launch the MS Word program on your machine.
- At the bottom-left corner of your screen, you’ll find an option that says Options. Click on it to open the standard Word settings menu.

- On the following screen, you’ll find an entry saying Trust Center in the left sidebar. Click on it to open the Trust Center settings.
- You’ll see a button saying Trust Center Settings on the right-hand side pane. Click on it to open the settings menu.
- There’ll be several options in the left sidebar of your screen. Find and select the one that says Protected View.
- On the right-hand side pane, you’ll see three checkboxes that are enabled. Untick each of these boxes to prevent Word from opening your documents in the protected view. Then click on OK at the bottom to save your changes.

- Launch your document in the program and you should be able to edit it.
Fix The Word Opening In Read Only For Email Attachments
MS Word actually has a number of features to protect you from various threats that are spread via Word files. One of these features opens your email attachments in the read-only mode so it can’t affect your computer negatively.
This may be the reason why your documents always open in the read-only mode. Turning this option off should fix the issue for you.
- Open MS Word on your computer.
- Click on the Options option at the lower-left corner and it’ll open the settings menu.
- Click on the General tab in the left sidebar if you aren’t already there. Then on the right-hand side menu, scroll down and find the option that says Open e-mail attachments and other uneditable files in reading view.
Untick the box for the option and click on OK to save the changes.
The Word files you’ve received as email attachments should now open in regular mode letting you edit them however you want.
Disable The Preview Pane In File Explorer
Preview pane in Explorer shows the previews of your files, and for it to do that, it sometimes locks-up your files and prevents you from editing them.
A quick solution to that is to simply turn off the pane.
- Open This PC from your desktop.
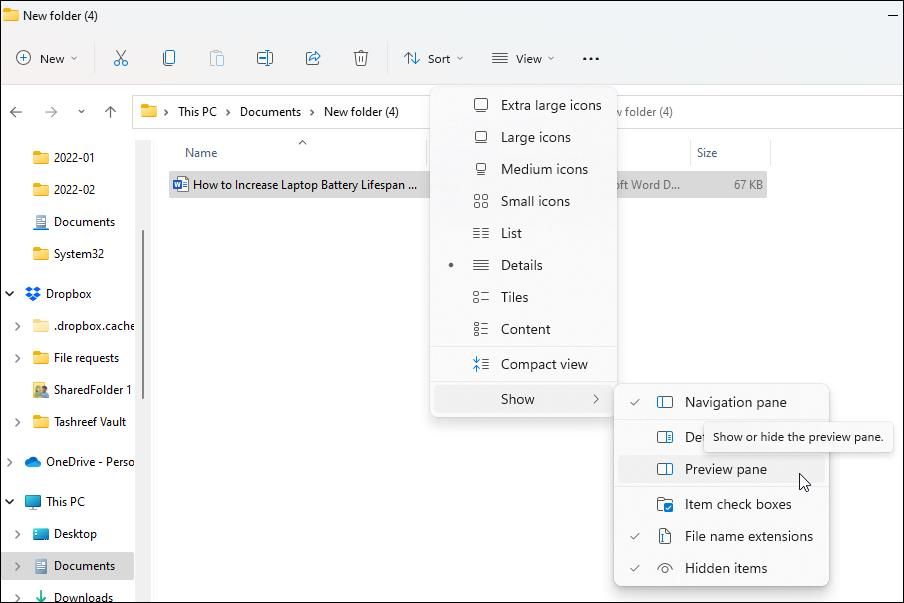
- Click on the View tab at the very top of your screen.
- Select the option that says Preview pane in the Panes section. It’ll disable the pane if it was enabled before.
You may now try opening your file in the program to see if it fixed the issue.
Toggle An Option In The Properties To Remove Read Only From Word
One of the possible ways to fix read only mode in Word is to change an attribute for your file.
- Right-click on your Word document and select Properties.
- Tick-mark Read-only and click on OK.
- Open the Properties menu again, untick the Read-only option, and hit OK.
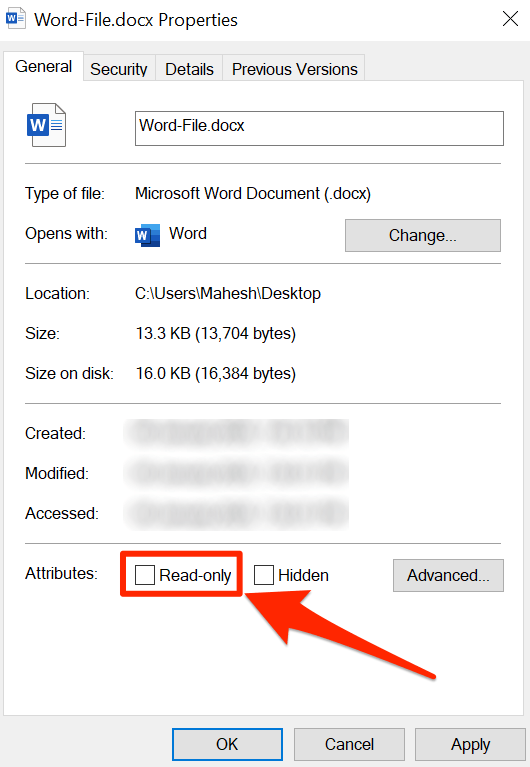
- Open the file in Word and it should let you edit it.
Extract The File Before Opening It In MS Word
If you’re trying to edit a Word file that’s inside an archived format such as RAR or ZIP, you’ll want to first extract the file from it to then edit it. Directly opening the file from an archive sometimes prevents you from editing it.
- Right-click on the archive and select Extract Here.
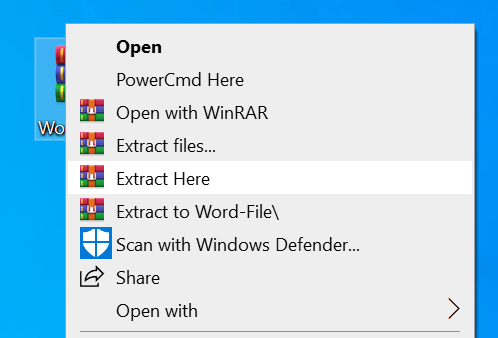
- Open the file in Word and you’ll be able to edit it.
-
MiniTool
-
MiniTool News Center
- Fix: Microsoft Word Opens Files in Read-Only Mode
By Shirley | Follow |
Last Updated February 10, 2023
![]()
Sometimes Microsoft Word opens files in read-only mode, which prevents you from editing the documents. This article from MiniTool mainly introduces several ways to solve the problem “Microsoft Word opens files in read-only mode”.
How to Fix Microsoft Word Opens Files in Read-Only Mode
Opening a word document in read-only mode will restrict the editing and modification of the original Office document, which is very inconvenient. Therefore, to edit and save the original files, you have to fix the issue “Microsoft Word opens files in read-only mode” using the following five methods.
Method 1: Change File Properties
The easiest way to fix “Microsoft Word opens files in read-only mode” is to change the document properties. Here is the detailed guidance.
Step 1: Right-click the file in read-only mode and select Properties.

Step 2: Under the General section, uncheck Read-only and click OK to save the change.

Step 3: Reopen the file, and the file read-only mode should be turned off.
Method 2: Turn off Protected View of Word Documents
Protected View is one of the most important security improvements in Office. Files are opened in read-only mode when Protected View is enabled. Protected View is more restrictive than read-only mode and does not allow you to edit the document. Here are the steps to disable this function:
Step 1: Open a read-only file. Click the File option in the upper left corner and then click Options.
Step 2: Under the Trust Center tab, click Trust Center Settings.

Step 3: Go to the Protected View tab and uncheck the three options of Protected View.

Step 4: Click OK to save the changes and reopen the Microsoft Word document without restriction.
Method 3: Change a Startup Option for Word Documents
When your e-mail attachments are opened in read-only mode, you may need to consider whether it is a file start-up option setting problem. Here are the steps to reset this option:
Step 1: Go to File > Options in a Microsoft Word document.
Step 2: Under the General tab, uncheck Open e-mail attachments and other uneditable files in reading view and click OK.

Method 4: Change Restrict Editing in Microsoft Word
The Restrict Editing feature in Microsoft Word enables you to use a password to protect Word documents from changes. To disable read-only mode in Word, please turn off this function through the guidance below (The premise is that you need to know the password for document protection):
Step 1: Open a read-only Word document.
Step 2: Select Review > Protect. Then click Restrict Editing.

Step 3: Click Stop Protection in the lower right corner.

Step 4: Type the password in the input box and click OK.

Step 5: The read-only mode in your Microsoft Word document should be disabled.
Related article: Easy Ways to Restrict Document Editing in Microsoft Office
Method 5: Turn off Preview Pane in File Explorer
There is a feature in the file explorer called the Preview pane which can preview the files without opening them. Turning on this feature may cause the files to be opened in read-only mode. Therefore, turning off this feature is also one of the effective ways to solve the problem “Files are read-only in Microsoft Word”. Here is the tutorial.
Step 1: Press Windows + E keyboard shortcut to open file explorer.
Step 2: Click View and make sure the Preview pane is turned off (It is turned off by default. If it is turned on, it will be highlighted. Clicking the highlighted button will turn it off).

Related articles:
- How to Fix the “Windows 10 Preview Pane Not Working” issue?
- How To Lock & Protect A Word Document Effectively
Final Words
To sum up, this article lists five ways to solve the problem “Microsoft Word opens files in read-only mode”. If you encounter this problem, please follow the steps in the article to try to solve it. If you have found a better way, welcome to share it in the comment area below.
About The Author

Position: Columnist
Shirley graduated from English major and is currently an editor of MiniTool Team. She likes browsing and writing IT-related articles, and is committed to becoming a professional IT problem solver. The topic of her articles are generally about data recovery, data backup, and computer disk management, as well as other IT issues. In spare time, she likes watching movies, hiking and fishing.
If Word keeps locking you out of your own documents, here are some tricks you can try on Windows.

Microsoft Word, by default, opens the documents downloaded from the internet in Read-Only mode for added security reasons. Other times, it can be due to the document owner adding edit restrictions to the document to be used in read-only mode to prevent modifications.
In any case, you can change the edit restrictions in Microsoft Word to stop the documents from opening in read-only mode. Here we show you how to disable document protection, change file attributes and turn off the built-in safety features to remove the read-only status on MS Word documents.
1. Disable Read-Only Mode in File Properties

In Windows, you can mark files as read-only to discourage other users from modifying the original content of the file. If the read-only file attribute is turned on, you can open and read the file but cannot delete, overwrite or edit the original content.
If your document opens in read-only mode, check the file properties and turn off the read-only mode file attribute to allow modifications in MS Word.
- Right-click on the file you want to change file attributes for and select Properties.
- In the Properties window, open the General tab.
- In the Attributes section, uncheck the Read-only option.
- Click Apply and OK to save the changes.
- Now the document will not open in read-only mode in MS Word.
2. Turn Off Edit Restrictions for Microsoft Word Documents
Document owners can use the built-in Restrict Editing feature in Microsoft Word to prevent unauthorized users from making unintended modifications. The Restrict Editing mode uses password or user authentication as the file protection method.
So, if there is a file restriction, you will need to have access to the password or be an authenticated owner to remove the editing restrictions.
To remove Editing Restrictions for a Word document:
- Open the read-only document in MS Word.
- Next, open the Review at the top.

- In the Protect section, click on Restrict Editing.

- In the right pane, click the Stop Protection button.

- If the document is password protected, it will ask you to enter the password. Punch in the password and click OK.

That should remove all the editing restrictions and allow you to modify the Word document.
3. Turn Off Protected View for Word
Protected View is part of Microsoft’s Trust Center, where you can manage the security and privacy settings for the Microsoft Office programs. When enabled, Protected View opens documents in read-only mode and disables most editing functions.
MS Word, by default, uses Protected View to protect the user from malicious internet files disguised as genuine Word documents. However, if you trust the read-only document to be genuine, you can disable Protected View temporarily in MS Word to edit your document.
To disable Protected View in MS Word:
- Open the MS Word program.
- Click on File and then select Options.
- It will open the Word Options window. In the left pane, open the Trust Center tab.

- Next, click on Trust Center Settings under the Microsoft Word Trust Center section.
- In the left pane, click on the Protected View tab.

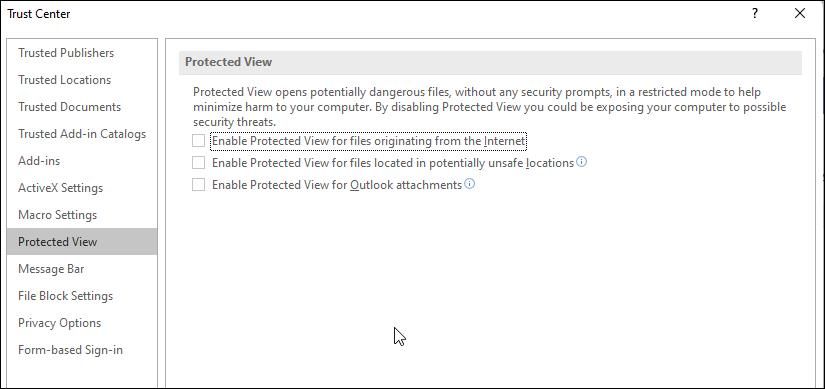
- In the right pane, uncheck the following options: Enable Protected View for files originating from the internet, followed by Enable Protected View for files located in potentially unsafe locations, and then Enable Protected View for Outlook attachments
- Click OK to save the changes and open the Word document. It will now open without any restrictions.
4. Turn Off «Open E-mail Attachments in Reading View»
You can configure MS Word’s startup options to open e-mail attachments and other uneditable files in reading view. This is a security feature to help prevent malicious email attachments and other documents that originated from the internet from infecting your computer.
However, it can also prevent you from editing legitimate documents by opening them in read-only mode. Try to disable this option to see if that helps you resolve the problem.
- Launch the MS Word program on your PC.
- Click on File and select Options.
- In the General tab, scroll down to Start up options.
- Next, uncheck the Open e-mail attachments and other uneditable files in the reading view option.
- Click OK to save the changes.
- If you open an attachment file in MS Word, it should now open in default mode.
5. Disable the Preview Pane in File Explorer
When enabled, the Preview pane shows the preview of your selected files in File Explorer. However, to do so, File Explorer may end up locking your file resulting in read-only mode in MS Word.
Try turning off the Preview pane in File Explorer to fix the problem.
Disable Preview pane in Windows 11:
- Press Win + E to open File Explorer.

- In File Explorer, click the View drop-down.

- Then, go to Show and unselect Preview pane.
Disable Preview pane in Windows 10:
- Open File Explorer.
- Next, open the View tab at the top of your screen.
- Click on the Preview pane to disable the option.
6. Check If Your Antivirus Is Blocking Documents
Similar to MS Word, third-party antivirus includes built-in safety features to stop users from opening potentially dangerous files downloaded from the Internet.
However, your antivirus can also block genuine files and prevent them from opening default mode in MS Word. If you have a third-party antivirus, check if it is causing Word files to open in read-only mode.
You can disable your antivirus temporarily to determine if it is causing the issue. Once disabled, open the Word file and check if it opens in default mode with editing privileges.
If so, check your antivirus program for application or process exclusion settings, including the Ransomware shield setting. If the issue persists, consider switching to less intrusive antivirus software.
7. Online Repair Your Microsoft Office App
MS Office features a built-in repair option to fix issues that may be preventing the program from working correctly. If you determine the problem to have occurred due to a software glitch, run the repair tool to fix any issues with the app.
- Press Win + R to open Run.
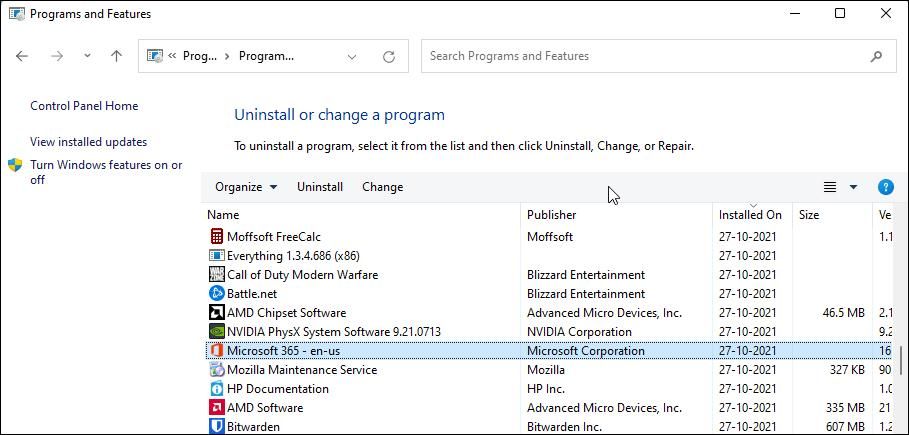
- Type control and click OK to open Control Panel.
- In Control Panel, go to Programs > Programs and Features.

- Select the Microsoft Office app from the list and click Change. Click Yes when prompted by User Account Control.

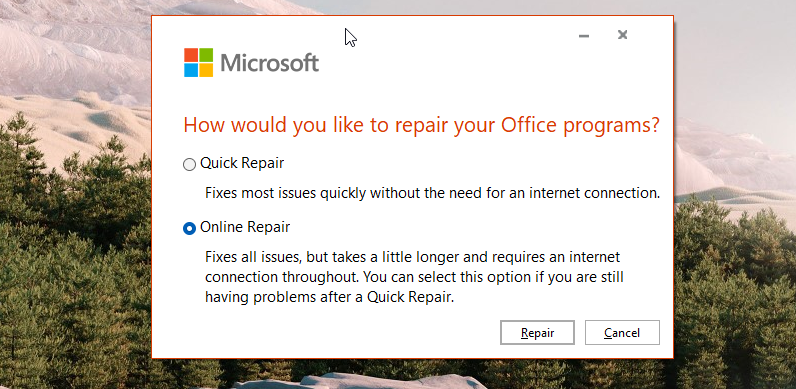
- Select Online Repair and click the Repair button. This requires an active Internet connection to download necessary Office files and fix any issues.
- Click Repair once more to confirm the action. The repair process may take some time, so wait until complete.
- Once done, restart your PC and check for any improvements.
Fix Microsoft Word Opening Documents in Read-Only Mode
Microsoft Office is among the most targeted platform by the threat actors to carry out attacks through malware. To mitigate these attacks and protect user data, Microsoft Office applications use several safety features to prevent users from opening malicious files.
However, these safety features can also block genuine files and open them in read-only mode. If you trust the file source, you can disable these safety features in MS Word settings and open the documents in default mode.
You may have modified a Word document accidentally while browsing it. How annoying! In this post, I’ll introduce a smart way to avoid troubles – you can open a Word document as copy or read-only. Do not need to worry about changing the content unexpectedly by yourself or other people who use your PC.
1. Start MS Word, and click Open Other Documents in the left pane.

2. Next click Open in the new interface, and hit Browse in the right pane.

3. The Open dialog box will display, select the specified one in your PC and click the drop down arrow next to Open button. Now you can choose from “Open Read-Only” or “Open as Copy“.

4. Here are the examples for “Open Read-Only” and “Open as Copy” and you can see the open mode will be shown in title of Word document.


Copyright Statement: Regarding all of the posts by this website, any copy or use shall get the written permission or authorization from Myofficetricks.