
If you don’t want content reviewers to accidentally modify your document, you can make the document read only before sending it for review. Another method is to restrict formatting and editing.
Making your document a read-only file means that the document can be read or copied but not modified. If one of the reviewers tries to make changes to a read-only file, the changes can be saved only by giving the document a new name or saved to a new location.
Note: Making your document read only doesn’t prevent someone from making a new copy of the document and saving it with a different name or in a different place.
Restrict editing
You can restrict the editing of a document, so that the document opens in view-only mode.
-
Select File > Info.
-
Select Protect Document.

Change the viewing mode
You can switch from View only to other modes granted by the document owner (Editing, Reviewing).
-
Select the Viewing tab to open the options.
-
Select Editing or Reviewing.
Note: The only options that can be selected are the one(s) that the document owner has granted.
Restrict editing
-
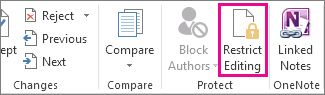
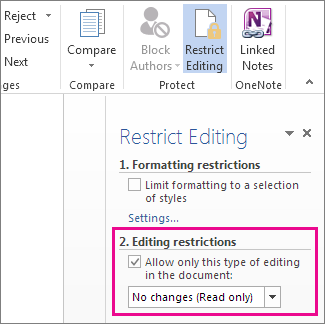
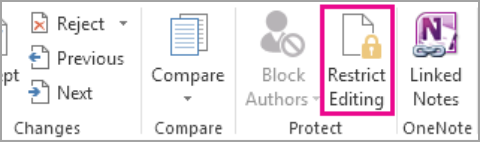
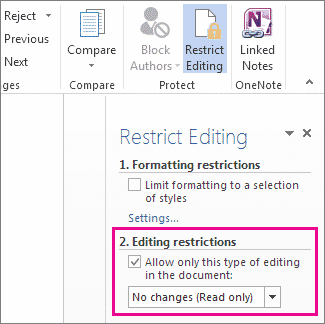
Click Review > Restrict Editing.

-
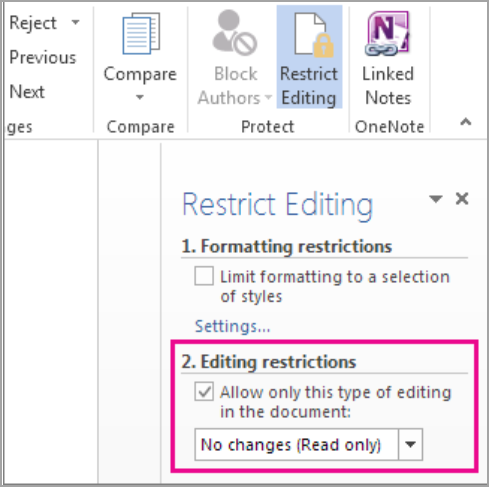
Under Editing restrictions, check Allow only this type of editing in the document, and make sure the list says No changes (Read only).
-
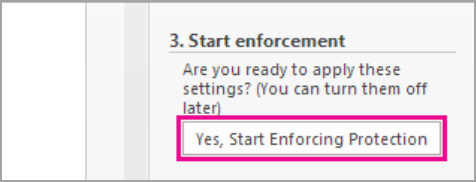
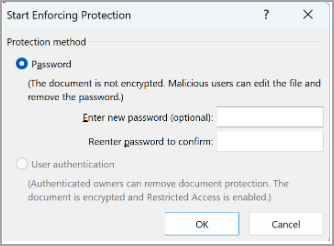
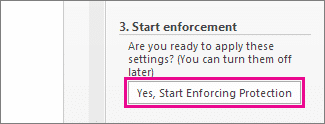
Click Yes, Start Enforcing Protection.
-
In the box that opens, type a password you’ll be able to remember, and then type the password again to confirm it.
The password’s optional. But if you don’t add a password, anyone can click Stop Protection and edit the document.

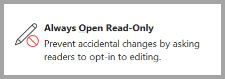
Set to ‘Always open as Read-Only’
1. Select File > Info > Protect Document.
2. Select Always open Read-Only.
Open a document shared as read only
When you open a document that is shared as Read Only, you have two options.
To open the document as read only
Select Yes
To open the document in editing mode
Select No
Note: You can close and reopen the document or save a copy of the document to open in edit mode.
Restrict Editing
-
Click Review > Protect > Restrict Editing.
-
Under Editing restrictions, select Allow only this type of editing in the document, and make sure the list says No changes (Read only).
-
Select Yes, Start Enforcing Protection.
-
In the box that opens, type a password you’ll be able to remember, and then type the password again to confirm it. The password is optional. But if you don’t add a password, anyone can select Stop Protection and edit the document.
See also
Add or remove protection in your document, workbook, or presentation
Save as read only
-
Click the Microsoft Office Button
, and then click Save or Save As if you have previously saved the document. -
Click Tools.
-
Click General Options.
-
Click the Read-only recommended check box.
-
Click OK.
-
Save the document. You might need to save it as another file name if you have already named the document.
 , and then click Save or Save As if you have previously saved the document.
Remove read only
-
Click the Microsoft Office Button
, and then click Save or Save As if you have previously saved the document. -
Click Tools.
-
Click General Options.
-
Clear the Read-only recommended check box.
-
Click OK.
-
Save the document. You might need to save it as another file name if you have already named the document.
Top of page
Restrict formatting and editing
You can stop content reviewers from accidentally modifying your document when you restrict formatting and editing.
-
On the Review tab, in the Protect group, click Protect Document.
-
Under Restrict Reviewing Options, click Restrict Formatting and Editing.
-
In the Restrict Formatting and Editing task pane, under Formatting restrictions, Editing restrictions, and Start enforcement, make the selections that meet your formatting and editing needs.
Unrestrict formatting and editing
-
On the Review tab, in the Protect group, click Protect Document.
-
To clear the check mark, click Restrict Formatting and Editing under Restrict Reviewing Options.
Top of page
![]()
Download Article
![]()
Download Article
Is your Word document opening in read-only mode? You’ll need to turn off this protected view mode before you can make changes to the file. Fortunately, this is really easy to do! This wikiHow article will walk you through changing a read-only Microsoft Word document into one that’s unlocked and ready to edit.
Things You Should Know
- Word files may be read-only due to Protected View, password protection, or file permissions in Windows or macOS.
- If you’re using Windows, right-click the file, select «Properties,» click the «Properties» tab, then remove the Read-only attribute.
- On a Mac, click the file, go to «File» > «Get Info» > «Sharing & Permissions,» and allow «Read & Write» permission.
-
1
Understand which documents are likely to be protected. Any Microsoft Word document which you download from the Internet (e.g., an email attachment or a file from a website) will have read-only protection assigned to it whenever you open it. You can disable this protection when first opening the document.
-
2
Open the Word document. Double-click the Word document for which you want to remove the read-only protection.
- If the Word document is currently open, close it and re-open it.
Advertisement
-
3
Look for a pale yellow banner. If you see a yellow banner with the phrase «Files from the Internet can contain viruses» written across the top of the Word document, your document qualifies to have its read-only status removed using this method.
- If you don’t see this banner even after closing and re-opening the Word document, try one of the other methods in this article.
-
4
Click Enable Editing. This button should be on the right side of the banner. Doing so will refresh the Word document and remove the read-only protection. You should now be able to edit the document.


Advertisement
-
1
Open the Word document. Double-click the Word document from which you want to remove the protection. It will open in Word.
-
2
Click the Review tab. This tab is in the upper-right corner of the Word window. Doing so opens the Review toolbar at the top of the Word window.
-
3
Click Restrict Editing. You’ll find this option on the far-right side of the Review toolbar. Clicking it prompts a pop-out menu to appear on the right side of the window.
-
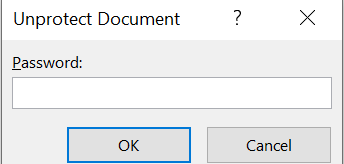
4
Click Stop Protection. It’s at the bottom of the pop-out menu. You should see a pop-up window appear at this point.
- If you or another user on your computer’s account created the protection without a password, clicking Stop Protection will automatically remove the protection.
-
5
Enter the password when prompted. Type the document’s password into the «Password» text box, then click OK. This will immediately remove the Word document’s read-only lock if the password is correct.
- If you don’t know the password, you’ll have to copy and paste the file’s contents instead.
-
6
Save your changes. Press Ctrl+S (Windows) or ⌘ Command+S (Mac) to do so. From now on, the file won’t be read-only protected unless you re-enable editing protection.


Advertisement
-
1
Go to the Word document. Find the folder in which the Word document is stored.
- If the file isn’t actually on your computer (e.g., it’s on a flash drive or a CD), move the file onto your computer before proceeding.
-
2
Open the Word file’s properties. This will vary depending on your computer’s operating system:
- Windows — Click once the Word file, right-click the Word file, and click Properties in the drop-down menu.
- Mac — Click the Word file, click the File menu item in the top-left side of your Mac’s screen, and click Get Info.
-
3
Find the «Permissions» section. On a Windows computer, you’ll find the proper options in the «Attributes» section near the bottom of the Properties window.
- On a Mac, you’ll have to click the Sharing & Permissions heading near the bottom of the window.
-
4
Disable the read-only protection. Again, this process will differ depending on whether you’re using Windows or a Mac:
- Windows — Uncheck the «Read-only» box near the bottom of the window, click Apply, and click OK.
-
Mac — Click the Read option to the right of your name, then click Read & Write in the menu which appears.
- You may first have to click the lock in the bottom-left corner of the Get Info window and then enter your Mac’s password before you can do this.
- If this option is greyed out, unchecked, or otherwise not set to «Read-only», you’ll have to try copying and pasting instead.
-
5
Try to edit the file. Open the Word document by double-clicking it, then try to edit it. Keep in mind that you may first have to remove the online read-only lock before doing so.


Advertisement
-
1
Understand how this works. If your primary goal is to edit the Word document, you can copy the Word document’s text and paste it into a new Word document and then save the new document onto your computer. While doing this won’t remove the read-only protection from the original document, it will create an editable copy.
-
2
Open the protected Word document. Double-click the Word document to do so.
-
3
Click anywhere on the document. This will place your mouse cursor on the document’s page.
-
4
Select the whole document. Press either Ctrl+A (Windows) or ⌘ Command+A (Mac) to do so. You should see the entire document become highlighted.
-
5
Copy the selected text. Press either Ctrl+C (Windows) or ⌘ Command+C (Mac). This will copy the document’s text to your computer’s clipboard.
-
6
Open a new Word document. Click File in the upper-left side of the Word window, click New on the left side of the window, and click Blank document to open a blank Word document.
- On a Mac, click the File menu item, then click New Blank Document at the top of the drop-down menu.
-
7
Paste in the copied text. Press either Ctrl+V (Windows) or ⌘ Command+V (Mac) to paste the locked Word document’s text into the blank document.
- This may take a few seconds if the original document was particularly large or contained images.
-
8
Save the document as a new file. Press Ctrl+S (Windows) or ⌘ Command+S (Mac), then enter your document’s name and click Save. You’ll be able to edit the document you just created like usual.


Advertisement
Add New Question
-
Question
My documents are in Microsoft Office as PDF files and they are read only. How do I turn read only off?

Save it as a new document, delete the old one, and rename the new one. This should allow you to edit it.
Ask a Question
200 characters left
Include your email address to get a message when this question is answered.
Submit
Advertisement
Video
-
Another way to remove the read-only protection from a Microsoft Word document is by converting the Word document into a PDF with the SmallPDF online converter, downloading the converted PDF, and then converting the PDF back into a Word document with SmallPDF.
Thanks for submitting a tip for review!
Advertisement
-
It’s much easier to copy the protected document’s text and paste it into a new document than it is to try to crack Microsoft’s security.
Advertisement
About This Article
Article SummaryX
1. Open the document in Word.
2. Click Enable Editing.
Did this summary help you?
Thanks to all authors for creating a page that has been read 978,826 times.
Is this article up to date?
Содержание
- 0.1 Метод 1 Как отключить защиту онлайн-документа
- 0.2 Метод 2 Как отключить защиту документа с паролем
- 0.3 Метод 3 С помощью свойств документа
- 0.4 Метод 4 С помощью копирования и вставки
- 1 Советы
- 2 Предупреждения
Допустим, вы подготовили документ и хотите отдать читателям, причем знаете, что он пойдёт «гулять по рукам».
Как сделать так, чтобы его никто из читателей не смог подправить?
Есть несколько способов защиты документа от правок.
Расскажу один из них.
- Набираете текст в Word’е.
- Нажимаете на F12, или выбираете пункт «Сохранить как…» из меню «Файл»
- Выбираете папку для записи и указываете имя документа.
- Далее кликаете на слове «Сервис» и выбираете пункт «Общие параметры»

- Открывается диалог, в котором указываем пароль на запись. Правильно поле называется «пароль разрешения записи».
- Нажимаем «ОК»

- Вас ещё раз попросят ввести пароль. Вводите, нажимаете «OK». Возвращаетесь в диалог «Сохранить как…»
- Щёлкаете на «OK», файл сохраняется на диск.
Теперь документ можете смело раздавать читателям — никто из них никаких правок в ваш текст не внесёт.
Опубликован: 24 мая 2016, 12:16
Ваш комментарий к статье:
Адрес заметки:

Причины поставить защиту на документ могут быть самыми разными. Возможно, Вы захотите сделать так, чтобы документ открывался в режиме только для чтения без запроса пароля. Мы покажем Вам несколько различных способов сделать это.
Первый способ – ограничить возможность редактирования документа с защитой паролем. В одной из статей мы рассказываем о двух методах установить пароль на открытие документа. В диалоговом окне Общие параметры (General Options) можно настроить запрос пароля для открытия и/или редактирования документа. Если Вы введёте пароль в поле Пароль разрешения записи (Password to modify), но оставите пустым поле Пароль для открытия файла (Password to open), то пользователь сможет, не вводя пароль, открыть документ в режиме только для чтения. Для редактирования документа пользователю потребуется ввести пароль.

После того, как Вы нажмёте ОК в диалоговом окне Общие параметры (General Options), появится диалоговое окно Подтверждение пароля (Confirm Password). Введите пароль еще раз и нажмите ОК. Вы вернетесь к диалоговому окну Сохранение документа (Save as). Нажмите кнопку Сохранить (Save), чтобы сохранить документ с защитой от редактирования.

При открытии документа появляется диалоговое окно Пароль (Password). Вам предлагается выбор: либо ввести пароль и получить возможность редактировать документ, либо открыть его в режиме только для чтения. Пользователь, не знающий пароля, сможет открыть документ только для чтения, нажав кнопку Только чтение (Read Only). Просматривать документ сможет любой, а редактировать только тот, кто знает пароль.

Второй способ создать такой документ – использовать ограничение редактирования. Мы уже рассказывали об ограничении форматирования и редактирования в отдельной статье. Сейчас же мы будем использовать ограничение форматирования по-другому.
Откройте документ, который нужно сделать доступным только для чтения, и перейдите на вкладку Рецензирование (Review).

В разделе Защитить (Protect) нажмите Ограничить редактирование (Restrict Editing).

Замечание: Если размер окна недостаточно широк для отображения двух кнопок в разделе Защитить (Protect), то нужно нажать кнопку Защитить (Protect) и в выпадающем меню выбрать Ограничить редактирование (Restrict Editing).

В правой части окна Word откроется соответствующая панель. В разделе Ограничения на редактирование (Editing restictions) поставьте галочку напротив опции Разрешить только указанный способ редактирования документа (Allow only this type of editing in the document).

В выпадающем списке ниже выберите Ввод данных в поля форм (Filling in forms).

Нажмите кнопку Да, включить защиту (Yes, Start Enforcing Protection) в нижней части панели.

В диалоговом окне Включить защиту (Start Enforcing Protection) в поле Новый пароль (Enter new password) введите пароль. Затем введите тот же пароль в поле Подтверждение пароля (Reenter password to confirm) и нажмите ОК.

Чтобы закрыть панель Ограничить редактирование (Restrict Editing) нажмите Х в верхнем правом углу панели.

В следующий раз этот документ откроется в режиме только для чтения.

Чтобы снова открыть документ в привычном режиме, на вкладке Вид (View) нажмите Изменить документ (Edit Document).

Теперь документ показан в привычном режиме просмотра, но Вам по-прежнему нужно отключить защиту. Для этого снова откройте вкладку Рецензирование (Review) и в разделе Защитить (Protect) нажмите Ограничить редактирование (Restrict Editing). В нижней части открывшейся панели нажмите Отключить защиту (Stop Protection).

В поле Пароль (Password) диалогового окне Снятие защиты (Unprotect Document) введите пароль и нажмите ОК. Снова сохраните файл.

Существует ещё один способ сделать документ Word доступным только для чтения – изменить атрибут файла в Windows (не в Word). Для этого запустите Проводник Windows и откройте папку, содержащую файл, который Вы хотите сделать доступным только для чтения. Выделите этот файл, кликните по нему правой кнопкой мыши и в контекстном меню нажмите Свойства (Properties).

В открывшемся диалоговом окне нас интересует вкладка Общие (General). В разделе Атрибуты (Attributes) поставьте галочку для параметра Только чтение (Read-only). Нажмите ОК.

Теперь этот файл будет открываться в режиме только для чтения, как показано на картинке в начале статьи. Однако такой способ не даёт гарантии, что документ будет открыт в режиме только для чтения. Любой желающий может отключить этот параметр в Проводнике Windows так же легко, как Вы включили его.
Урок подготовлен для Вас командой сайта office-guru.ru
Источник: /> Перевел: Антон Андронов
Правила перепечаткиЕще больше уроков по Microsoft Word
Оцените качество статьи. Нам важно ваше мнение:
Метод 1 Как отключить защиту онлайн-документа
-
Узнайте, какие документы будут защищены. Большинство документов Microsoft Word, которые вы скачиваете из интернета (например, вложение к электронному письму или файл на веб-сайте), будет иметь атрибут «Только для чтения». Такую защиту можно отключить, когда вы впервые откроете документ.
- Откройте документ Word.
Дважды щелкните по нужному документу Word.
- Если документ Word открыт, закройте его и снова откройте.
- Найдите бледно-желтую полосу с фразой.
Если в верхней части документа Word вы видите желтую полосу с фразой «Файлы из интернета могут содержать вирусы», с помощью этого метода можно удалить атрибут «Только для чтения».
- Если вы не видите эту фразу даже после того, как закрыли и снова открыли документ, воспользуйтесь другим методом, описанным в этой статье.
-
Нажмите Редактировать. Эта кнопка находится справа на желтой полосе. Так вы удалите атрибут «Только для чтения» и сможете отредактировать документ.
Метод 2 Как отключить защиту документа с паролем
-
Откройте документ Word. Дважды щелкните по нужному документу Word.
-
Нажмите на вкладку Рецензирование. Она находится в верхнем правом углу окна Word. Откроется панель инструментов «Рецензирование» в верхней части окна Word.
-
Нажмите Ограничить редактирование. Вы найдете эту опцию в правой части панели инструментов «Рецензирование». В правой части окна появится всплывающее меню.
- Щелкните по Выключить защиту.
Эта опция находится в нижней части меню. Откроется всплывающее окно.
- Если документ не защищен паролем, защита будет отключена, как только вы нажмете «Выключить защиту».
- Введите пароль, когда появится запрос.
Введите пароль к документу в текстовом поле «Пароль», а затем нажмите «ОК». Атрибут «Только для чтения» будет удален.
- Если вы не знаете пароль, скопируйте и вставьте содержимое документа.
-
Сохраните внесенные изменения. Для этого нажмите ^ Ctrl+S (Windows) или ⌘ Command+S (Mac). Теперь документ можно редактировать.
Метод 3 С помощью свойств документа
- Перейдите к документу Word.
Найдите папку с нужным документом.
- Если файл хранится не на компьютере (например, документ находится на USB-накопителе или компакт-диске), скопируйте его на компьютер.
- Откройте свойства документа Word.
Ваши действия зависят от операционной системы:
- в Windows щелкните правой кнопкой мыши по файлу Word и нажмите «Свойства» в меню;
- в Mac OS X щелкните по файлу Word, откройте меню «Файл» (в левой верхней части экрана) и нажмите «Свойства».
- Найдите разрешения файла.
На компьютере с Windows они находится в разделе «Атрибуты» в нижней части окна «Свойства».
- В Mac OS X щелкните по «Общий доступ и права доступа» в нижней части окна.
- Удалите атрибут «Только для чтения».
Ваши действия зависят от системы:
- В Windows уберите флажок у «Только для чтения» в нижней части окна, а затем нажмите «Применить» > «ОК».
- В Mac OS X нажмите «Чтение» справа от своего имени, а затем нажмите «Чтение и запись» в меню.
- Возможно, вам придется щелкнуть по значку в виде замка в левом нижнем углу окна, а затем ввести пароль.
- Если эта опция выделена серым цветом или возле нее нет флажка, попробуйте скопировать и вставить содержимое документа.
- Отредактируйте документ.
Дважды щелкните по документу, чтобы открыть его, а затем отредактируйте его. Возможно, сначала вам придется
удалить защиту с онлайн-документа
.
Метод 4 С помощью копирования и вставки
-
Поймите суть этого метода. Если вам нужно отредактировать документ Word, скопируйте его содержимое и вставьте в новый документ Word, а затем сохраните новый документ на компьютере. Так вы не снимите защиту с исходного документа, но получите его копию, которую можно редактировать.
-
Откройте защищенный документ Word. Для этого дважды щелкните по нему.
-
Щелкните в любом месте документа. Курсор мыши отобразится на странице документа.
-
Выберите все содержимое документа. Для этого нажмите ^ Ctrl+A (Windows) или ⌘ Command+A (Mac). Будет выделено все содержимое документа.
-
Скопируйте выделенный текст. Нажмите ^ Ctrl+C (Windows) или ⌘ Command+C (Mac). Содержимое документа скопируется в буфер обмена компьютера.
- Создайте новый документ Word.
Нажмите «Файл» в левой верхней части окна Word, нажмите «Создать» в левой части окна, а затем щелкните по «Новый документ», чтобы открыть пустой документ.
- В Mac OS X нажмите «Файл» > «Новый документ».
- Вставьте скопированный текст.
Нажмите
^ Ctrl
+
V
(Windows) или
⌘ Command
+
V
(Mac), чтобы вставить текст защищенного документа в новый документ.
- Это может занять несколько секунд, если исходный документ большой или содержит изображения.
-
Сохраните документ как новый файл. Нажмите ^ Ctrl+S (Windows) или ⌘ Command+S (Mac), введите имя файла и нажмите «Сохранить». Теперь созданный документ можно отредактировать.
Советы
- Еще один способ удаления атрибута «Только для чтения»: преобразуйте документ Word в формат PDF с помощью онлайн-конвертера SmallPDF, скачайте PDF-файл, а затем преобразуйте PDF-файл в документ Word с помощью SmallPDF.
Предупреждения
- Гораздо проще скопировать текст защищенного документа и вставить его в новый документ, чем пытаться взломать защиту.
Информация о статье
Категории: Офисные программы
На других языках:
English: Remove the ‘Read Only’ Status on MS Word Documents, Español: eliminar el estado de Solo Lectura de documentos en MS Word, Italiano: Rimuovere l’Attributo ‘Sola Lettura’ a un Documento Microsoft Word, Português: Remover o Status de «Somente Leitura» nos Documentos do MS Word, Bahasa Indonesia: Menghilangkan Status ‘Read Only’ pada Dokumen MS Word, Deutsch: Den Status «Nur lesen» in Word Dokumenten entfernen, Français: enlever l’attribut Lecture seule d’un document Microsoft Word, Nederlands: De Alleen lezen status van een Word document verwijderen, 中文: 在微软Word文档程序中移除“只读”状态, ไทย: ยกเลิกสถานะ ‘Read Only’ ของเอกสาร MS Word, العربية: إزالة حالة «للقراءة فقط» في مستندات مايكروسوفت وورد, Tiếng Việt: Loại bỏ thuộc tính «Read only» trên tập tin MS Word, 한국어: 워드 문서의 읽기 전용 해제하는 법
- Печать
- Править
- Написать благодарственное письмо авторам
Эту страницу просматривали 48 330 раза.
Была ли эта статья полезной?
Дано : документ формата Word или Excel.
Проблема : при открытии данного документа появляется сообщение:
Автор документа предпочитает, чтобы другие пользователи открывали его только для чтения. Открыть документ только для чтения?(The author would like you to open file as read-only unless you need to make changes. Open as read-only?)
Данная настройка («Рекомендовать для чтения») задается при сохранении документа.
Чтобы ее убрать, необходимо пересохранить документ следующим образом:
1) Нажимаем Файл (File) — Сохранить как (Save as) — выбираем место сохранения.
2) В открывшемся окне нажимаем кнопку
Сервис (Tools) и выбираем пункт
Общие параметры (General Options):
3) В открывшемся окне нужно снять «галку» у параметра
Рекомендовать доступ только для чтения (Read-only recommended):
4) Теперь сохраняем документ.
После этого при открытии пересохраненного документа сообщение появляться не будет.
И наоборот, если Вы хотите таким образом защитить документ, то установите данный параметр при сохранении. Здесь же можно задать пароль на открытие документа.
Если Вам понравилась статья, пожалуйста, поставьте лайк, сделайте репост или оставьте комментарий. Если у Вас есть какие-либо замечания, также пишите комментарии.
If you’ve opened a document in Word but you can’t edit it, it’s probably locked for editing by someone or by a feature. Learning how to remove read only from Word should help you edit these documents even though they’ve been marked as read-only and aren’t supposed to be edited.
There are various reasons as to why people restrict their documents from being edited. Maybe you yourself made the document read-only but you forgot it, or maybe someone has it locked to ensure no unauthorized users can modify the contents of it.
Regardless, if you’ve come across a document that you must edit but it’s in read-only mode, there are various methods to fix it and to be able to edit the document.
Also, be sure to check out our YouTube channel where we made a short video going over the fixes listed in this article.
Remove Read Only From Word By Disabling Edit Restrictions
We’ll start off by disabling the Word’s built-in feature that lets users restrict their documents from being modified. If you or someone has enabled this option for your current document, it is why you can’t edit it.
Disabling the option should fix it for you.
- Open your read-only document in the MS Word program.
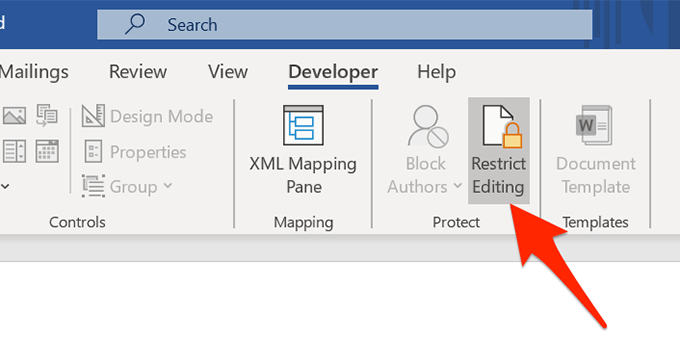
- When it opens, find the tab that says Developer at the top and click on it.
- You’ll find several options to choose from on the following screen. Look towards to the Protect area at the top and click on the option that says Restrict Editing.
- A new pane will appear on the right-hand side. There’s a button at the bottom of this pane saying Stop Protection. Click on the button to remove read only from this Word document.
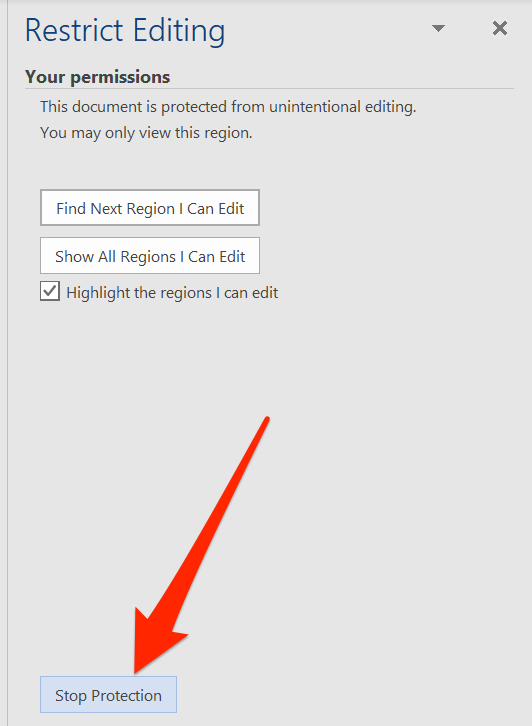
- If there was a password setup to restrict editing, you’ll need to enter it on the box shown on your screen. Then click on OK to unlock the document.
Your document is no longer in read-only mode and you can actually modify its contents as you wish.
Turn Off The Trust Center Options To Remove Word Opening In Read Only
Trust Center is a feature in Word that blocks certain documents from being fully opened with editing capabilities on your computer. You can disable the feature in the program and that should fix the read only issue you’re facing with your document.
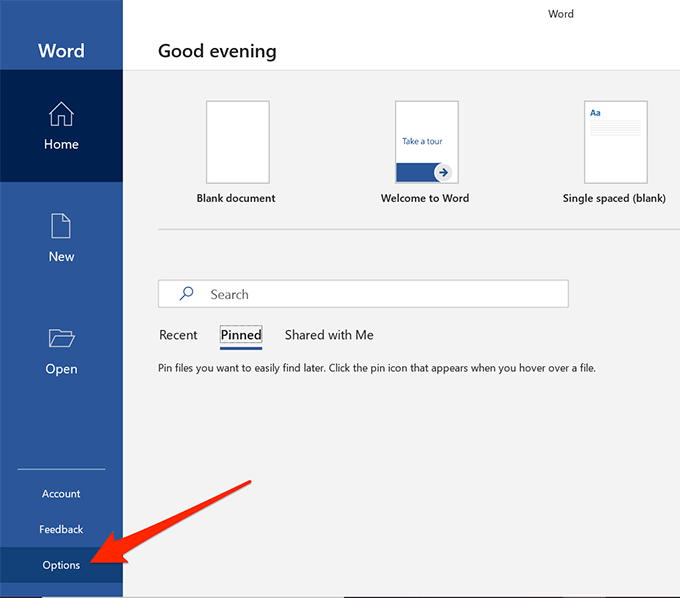
- Launch the MS Word program on your machine.
- At the bottom-left corner of your screen, you’ll find an option that says Options. Click on it to open the standard Word settings menu.

- On the following screen, you’ll find an entry saying Trust Center in the left sidebar. Click on it to open the Trust Center settings.
- You’ll see a button saying Trust Center Settings on the right-hand side pane. Click on it to open the settings menu.
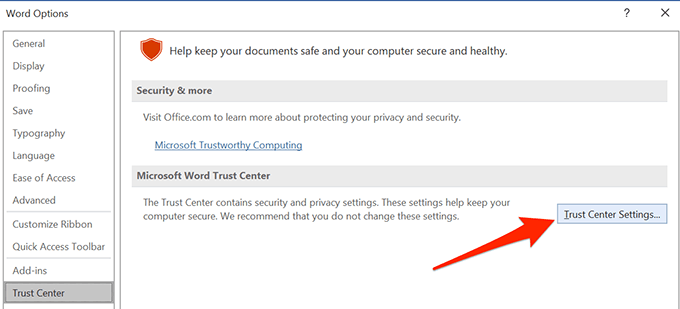
- There’ll be several options in the left sidebar of your screen. Find and select the one that says Protected View.
- On the right-hand side pane, you’ll see three checkboxes that are enabled. Untick each of these boxes to prevent Word from opening your documents in the protected view. Then click on OK at the bottom to save your changes.

- Launch your document in the program and you should be able to edit it.
Fix The Word Opening In Read Only For Email Attachments
MS Word actually has a number of features to protect you from various threats that are spread via Word files. One of these features opens your email attachments in the read-only mode so it can’t affect your computer negatively.
This may be the reason why your documents always open in the read-only mode. Turning this option off should fix the issue for you.
- Open MS Word on your computer.
- Click on the Options option at the lower-left corner and it’ll open the settings menu.
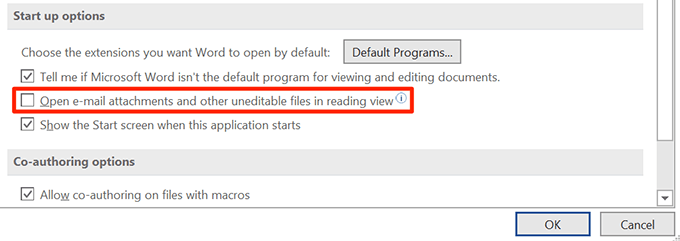
- Click on the General tab in the left sidebar if you aren’t already there. Then on the right-hand side menu, scroll down and find the option that says Open e-mail attachments and other uneditable files in reading view.
Untick the box for the option and click on OK to save the changes.
The Word files you’ve received as email attachments should now open in regular mode letting you edit them however you want.
Disable The Preview Pane In File Explorer
Preview pane in Explorer shows the previews of your files, and for it to do that, it sometimes locks-up your files and prevents you from editing them.
A quick solution to that is to simply turn off the pane.
- Open This PC from your desktop.
- Click on the View tab at the very top of your screen.
- Select the option that says Preview pane in the Panes section. It’ll disable the pane if it was enabled before.
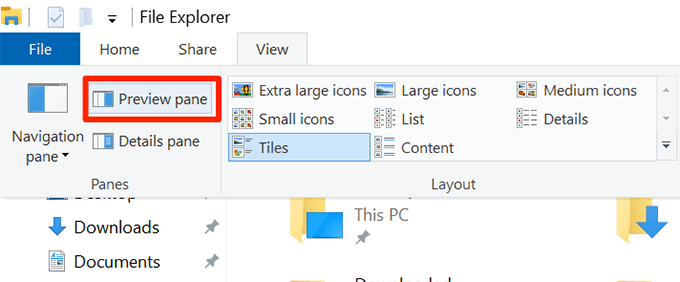
You may now try opening your file in the program to see if it fixed the issue.
Toggle An Option In The Properties To Remove Read Only From Word
One of the possible ways to fix read only mode in Word is to change an attribute for your file.
- Right-click on your Word document and select Properties.
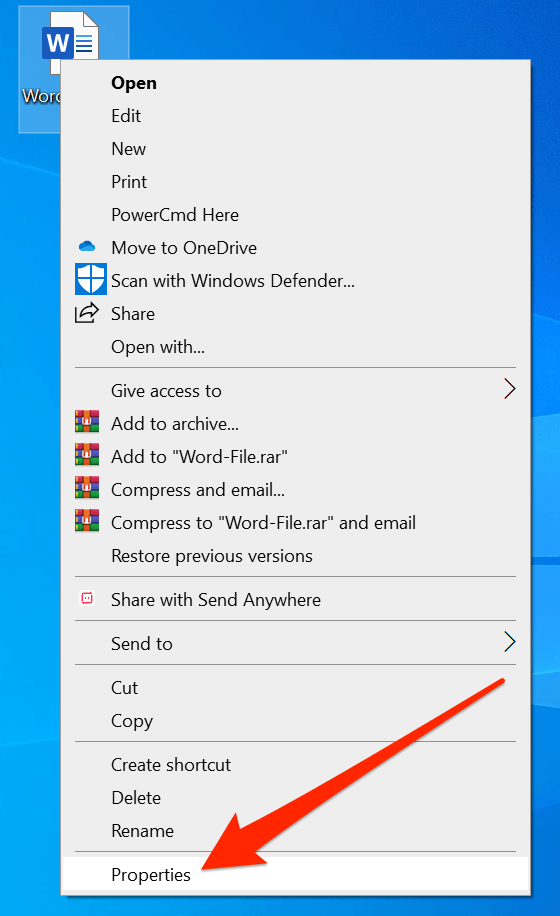
- Tick-mark Read-only and click on OK.
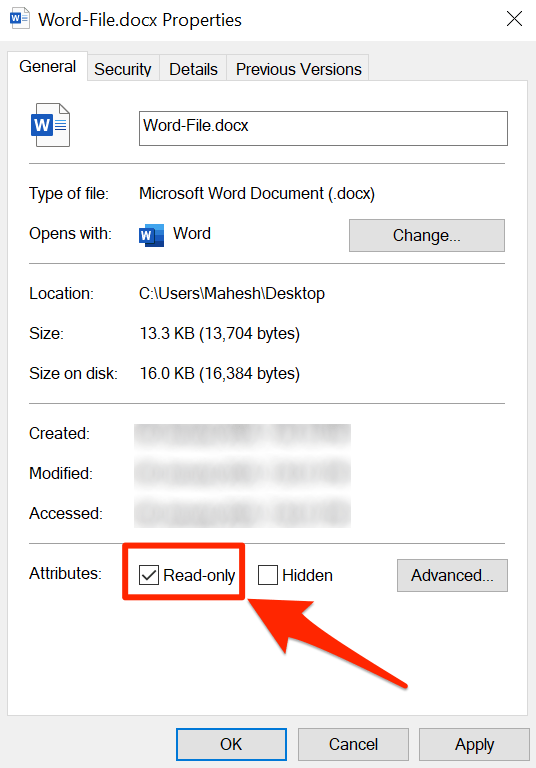
- Open the Properties menu again, untick the Read-only option, and hit OK.
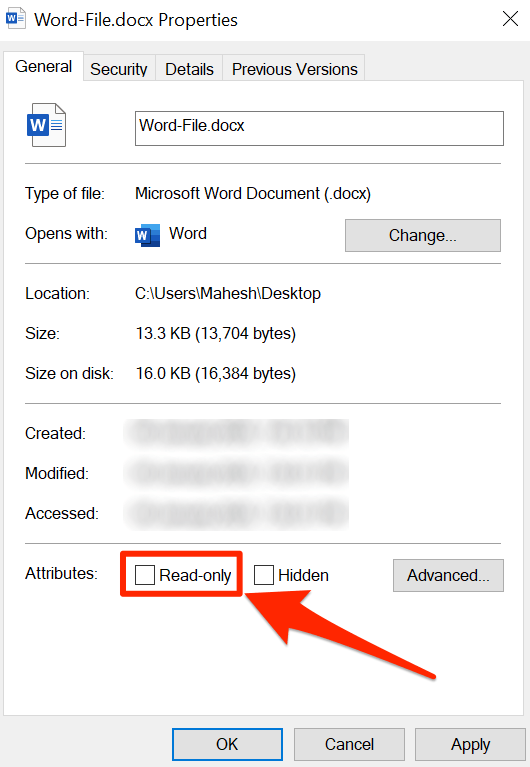
- Open the file in Word and it should let you edit it.
Extract The File Before Opening It In MS Word
If you’re trying to edit a Word file that’s inside an archived format such as RAR or ZIP, you’ll want to first extract the file from it to then edit it. Directly opening the file from an archive sometimes prevents you from editing it.
- Right-click on the archive and select Extract Here.
- Open the file in Word and you’ll be able to edit it.
There are situations where documents are made and require reviews from various users but not modification. This is why the need to make a Microsoft Word document read-only arises from time to time. The creator sends it to reviewers in that format not to risk any changes being made to the document.
Making the document read-onlymeans that it can only be read or copied. If someone wants to make any changes to the file in this state, they can only give the document a new name or save it to a different location.
Here are a few ways that a Word document can be made read-only;
Restrict editing
- Select Review > Restrict Editing.
- When you get to Editing Restrictions, check to Allow only this type of editing in the document and ensure that the list says No Changes(Read-Only)
- Select Yes, Start Enforcing Protection.
- When a box opens, type a password that you will be able to recall then type the password again to confirm it. This is optional but if you don’t add a password anyone reading the document can select Stop Protection and edit the document.
Save as Read-only
- Select the Microsoft Office Button image
, and then select Save or Save As if you have recently saved the document.
- Select Tools.
- Select General Options.
- Select the Read-only recommended check box.
- Select OK.
- Save the document. It is advisable to save it as another file name if you have already named the document.
Restrict formatting and editing
This method serves as a way to prevent users and reviewers from editing the document.
- When you get to the Review tab, in the Protect group, select Protect Document.
- Under Restrict Reviewing Options, select Restrict Formatting and Editing.
- In the Restrict Formatting and Editing task pane, under Formatting restrictions, Editing restrictions and Start enforcement, make the selections that are desirable to your formatting and editing needs.
To free formatting and editing;
- When you get to the Review tab, in the Protect group, select Protect Document.
- To clear the check mark, select Restrict Formatting and Editing under Restrict reviewing options.
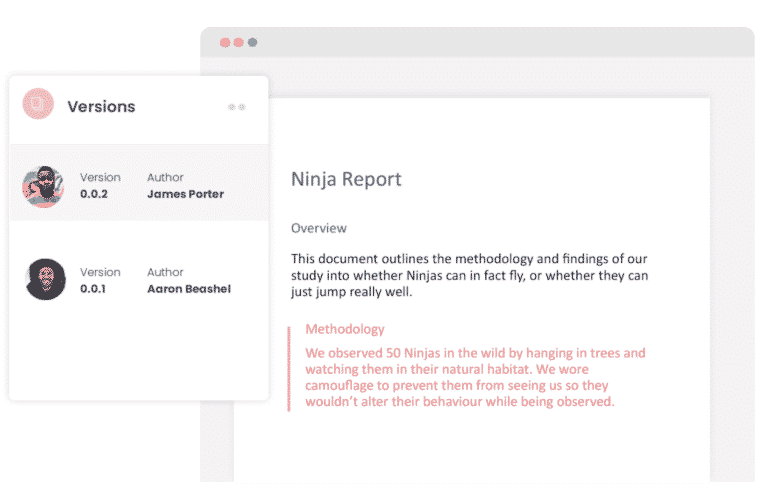
What if there was an easier way to facilitate collaboration and track changes on Microsoft Word?
As one is using Microsoft Word, it is of the essence that all changes and edits made are tracked. Without this, multiple users are unable to identify changes that have been made, who made them and when which can cause frustration.
This is the major reason why Microsoft introduced the Track Changes feature to Word. It is helpful when one remembers to turn it on. Sometimes, one can forget only to realize this at the end of the document. It is confusing because at that point it is hard to recall the changes that were made prior. This can cause time wastage. Some will be easy to find and others won’t be.
Microsoft’s Tracked Changes feature only tracks edits made by those who permit. Another editor can easily make changes and they will not be able to be tracked because they were not aware of this. It becomes a huge inconvenience if you can’t control or monitor every change that is made.
Luckily, Simul Docs, a collaboration tool, provides simple, effective solutions for Microsoft Word and is readily available. It tracks these changes automatically because it was built with all these inconveniences in mind. Anyone can make changes and they will be available for you and all the other users to review.
Each change comes with a Decline option so that one can decline any suggested changes that aren’t suitable. Similarly, you can accept the ones you like.
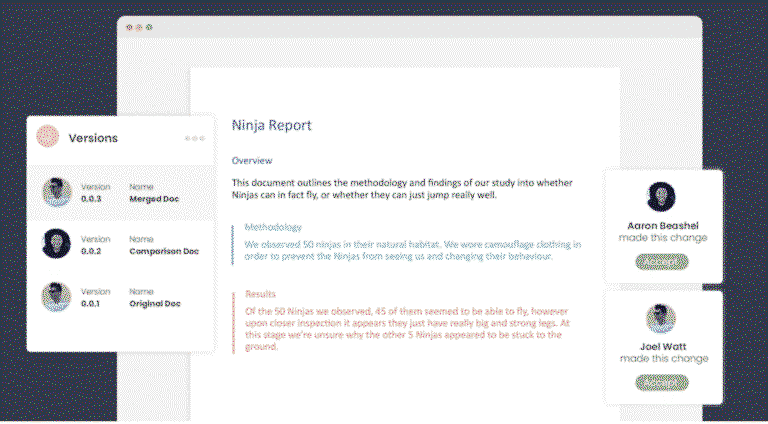
Fellow users can also have comments or notes left alongside their changes and a conversation thread can also be created to discuss the most suitable way to make changes to the document. This is how collaboration is facilitated. You can type short messages between team members while having everything in the same place. This can be done for additional information too.
Once you are done exchanging notes and editing the document, Simul provides all the channels available for it to be converted into the desired format and sent through the preferred channels.
Save your document as a Word file or PDF, that’s easy.
Share it via a direct link, email or a cloud system such as GoogleDrive, OneDrive, Dropbox and more.
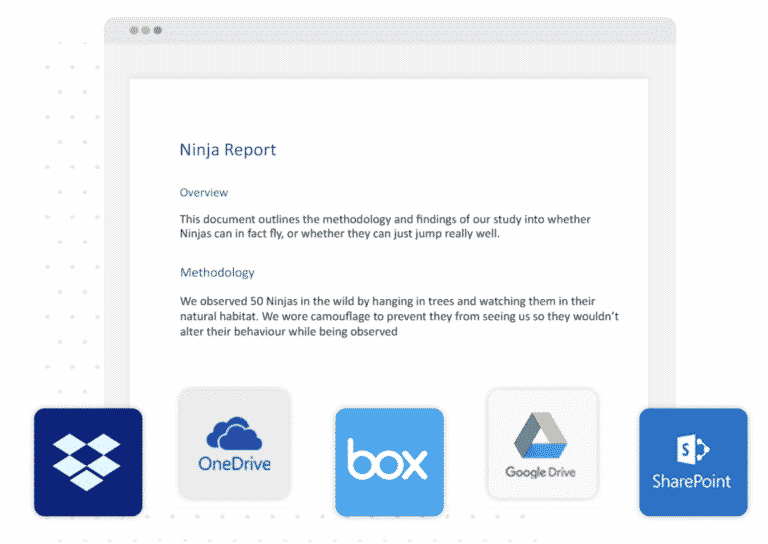
Easy collaboration isn’t a myth. It can be easily and readily accessible. Make your Word experience more effective today. Work with Simul Docs for a better work experience.
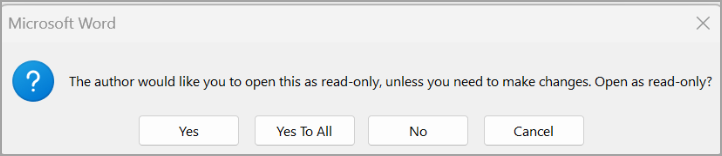
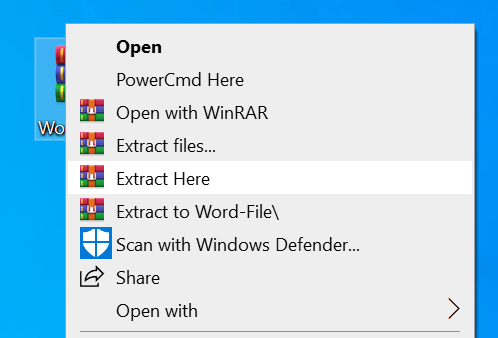
I’ve some documents on a network share that are password protected.
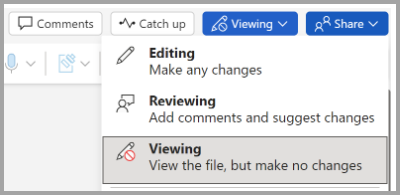
I need to open those files, make some temporary changes and then print them. Since I don’t want those changes to be saved, I’m used to opening the files as read-only (image 1) to avoid accidental saves.

Since a few days ago an Office update seems to have made it so that when you open a file as read only all editing is disabled, and there’s a dropdown on the top right of the ribbon, between the share and feedback buttons, that has all the options greyed except for viewing (image 2, except the first two options are disabled).

Does anyone know of a way to revert this change and allow temporary editing of read-only files?
Extra info:
- This is not an issue with the documents. Already tested it with old
documents that used to work fine, but that now also open with editing
disabled. - This is not an issue with protected view. I have protected view
completely disabled. - The documents are not blocked in the file system because of being
downloaded from the internet (they are always created and kept on a
network share). - The files have no read-only or similar file system properties. I’ve
full access to them. - Word version is Microsoft® Word for Microsoft 365 MSO (version 2211
Build 16. 0. 15831. 20098) 64-bit and Windows version is Windows 10 Pro 22H2 build 19045.2364.
Thank you for your help.
What we know so far about this issue:
- I’ve been able to confirm with others that this is not an isolated issue and is the new default behaviour in the most recent word versions.
- The new behaviour was added on a mid December 2022 update for Office.
- Filling forms in the documents is also blocked.
- It seems like this change was only made to docx files, so saving the file as a dotx (word template) works as a temporary solution.