
Word for Microsoft 365 Word for Microsoft 365 for Mac Word for the web Word 2021 Word 2021 for Mac Word 2019 Word 2019 for Mac Word 2016 Word 2016 for Mac Word 2013 Word 2010 Word for Mac 2011 More…Less
You can control the vertical space between the lines of text in your document by setting the line spacing. Or, you can change the vertical space between paragraphs in your document by setting the spacing before or spacing after paragraphs. You can also choose to keep lines of text together or keep paragraphs together on a page.
Change the line spacing in an entire document
-
Go to Design > Paragraph Spacing.
-
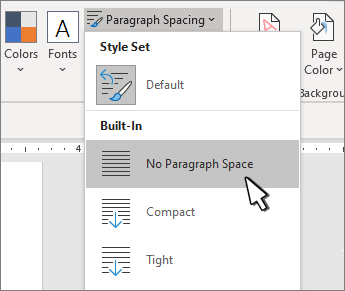
Choose an option. To single space your document, select No Paragraph Space.
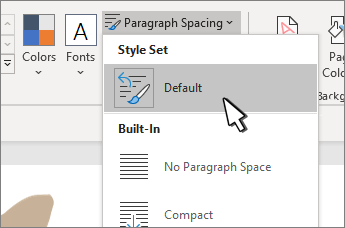
To return to the original settings later, go to Design > Paragraph Spacing and choose the option under Style Set. This may be Default or the name of style you’re currently using.
Change the line spacing in a portion of the document
-
Select one or more paragraphs to update. Press Ctrl + A to select all.
-
Go to Home > Line and Paragraph Spacing

-
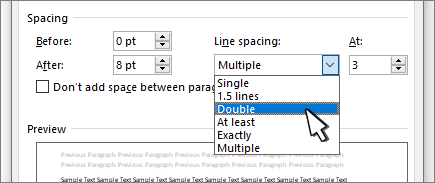
Select Line Spacing Options and choose an option in the Line spacing box.
-
Adjust the Before and After settings to change spacing between paragraphs.
-
Select OK.

For more info, see Adjust indents and spacing.
Change the line spacing in an entire document
-
Go to Design > Paragraph Spacing.
-
Choose the option you want. If you want to single space your document, choose No Paragraph Space.

This overrides the settings of the style you’re currently using. If you decide later to return to the original settings, go to Design > Paragraph Spacing and choose the option under Style Set. The option might be Default, as shown above, or it will show the name of style you’re currently using.
Change the line spacing in a portion of the document
-
Select the paragraphs you want to change.
-
Go to Home > Line and Paragraph Spacing.
-
Choose the number of line spaces you want or select Line Spacing Options, and then select the options you want under Spacing.
-
To change the spacing before or after each of the paragraphs in the text you selected, click the arrow next to Before or After and enter the amount of space that you want.
-
Select OK.

-
Select the paragraph whose lines you want to keep together.
-
Go to Format > Paragraph >Line and Page Breaks.
-
Select Keep lines together.
-
Select the first of the two paragraphs that you want to keep together.
Tip: If you want to keep more than two paragraphs together, select all but the last paragraph.
-
Go to Format > Paragraph.
-
Go to Line and Page Breaks.
-
Select Keep with next.
-
Select OK.
-
Select the paragraphs you want to change, or press Ctrl+A to select everything.
-
Go to Home > Line Spacing.
-
Choose the number of line spaces you want, or select Line Spacing Options and then select the options you want in the Paragraph dialog box under Spacing:
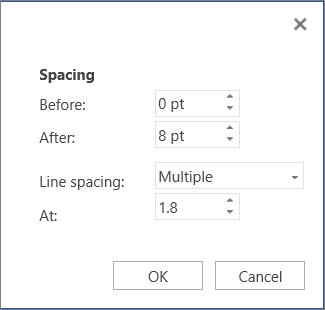
Tip: If you want to change the spacing before or after the selected paragraphs, select the arrows in the Before or After boxes, or type a number directly.
Need more help?
Quickly single-space your entire document using the Paragraph Spacing button on the Design tab.
Single-space your document
-
Select the top of the document.
-
Go to Design > Paragraph Spacing.
-
Choose No Paragraph Space.
This overrides the settings of the style set you’re currently using. To return to the original settings:
-
Go to Design > Paragraph Spacing.
-
Select Default or the style name you’re currently using.
Single-space part of a document
-
Select the paragraphs you want to change.
-
Go to Home > Line and Paragraph Spacing
. -
Choose 1.0
Single-space your document
-
Go to Design > Paragraph Spacing.
-
Choose No Paragraph Space.
This overrides the settings of the style set you’re currently using. To return to the original settings:
-
Go to Design > Paragraph Spacing.
-
Select Default or the style name you’re currently using.
Single-space part of a document
-
Select the paragraphs you want to change.
-
Go to Home > Line and Paragraph Spacing
. -
Choose 1.0
-
Select the paragraphs you want to change.
-
Go to Home > Line and Paragraph Spacing
. -
Choose 1.0
Word for the web does not have a way to change the default. This changes the settings only for this document.
Asked by: Francesca Schmitt
Score: 4.7/5
(28 votes)
Single-space part of a document
- Select the paragraphs you want to change.
- Go to Home > Line and Paragraph Spacing .
- Choose 1.0.
How do I set single line spacing in Word 2016?
Setting the line spacing
- Click the Home tab.
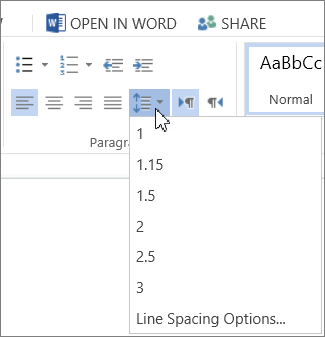
- In the Paragraph group, click the Line Spacing command button. A menu appears.
- Choose a new line spacing value. The line spacing is set for the current paragraph or all selected paragraphs. Word adds the extra space below each line of text.
Is 1.5 single spacing in Word?
In the Paragraph dialog box, select one of the options from the dropdown menu under “Line spacing.” You can select single-, 1.5-, or double-spacing, or you can select “Multiple” and set your own custom line spacing. To apply your selected line spacing, select “OK.”
What is 1.5 spacing Word?
The lines in all Word documents are single-spaced by default, which is appropriate for letters and most documents. But you can easily change your document line spacing to double or 1.5 lines to allow extra space between every line. This is useful when you want to make notes on a printed document.
What is the shortcut key for 1.5 line spacing?
Pressing Ctrl+5 changes to 1.5 line spacing.
24 related questions found
What is single line spacing in Word 2010?
Word sets line spacing at 1.15 as its standard, or default. Supposedly, that extra . 15 lines of text makes text more readable than using single spacing, or 1.0. In double spacing, or the line spacing value 2.0, one line of text appears with one blank line below it.
What is the default line spacing?
The default line spacing in Word is 1.15. By default, paragraphs are followed by a blank line and headings have a space above them. , and then choose Line Spacing Options.
What is a line spacing in Word?
Line spacing is the distance between lines of text. Loose line spacing can make text much more readable, while tight line spacing can fit more text in a space. To change the line spacing, select the lines you want to change. Then go to the Home tab and find the line spacing button in the Paragraph section.
What are the 4 alignment options?
There are four main alignments: left, right, center, and justified.
What are the types of line spacing?
Generally, you can choose between four types of line spacing in Word: single spacing; 1.5 times spacing; double spacing or a custom amount, in which the numbers refer to the size of the space, relative to the size of a line.
How do I remove space between lines in Word?
Click or tap anywhere in the paragraph you want to change, or press Ctrl+A to select all text. Click Home > Line Spacing. Select the line spacing you want. If you want more exact spacing, select Line Spacing Options.
How do I change 1.5 line spacing in Word?
To format line spacing:
- Click Format on the menu bar.
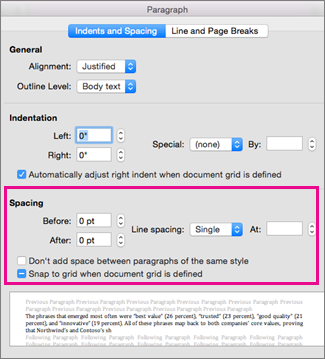
- Select Paragraph. The Paragraph dialog box appears.
- Click the Indents and Spacing tab.
- In the line spacing drop-down menu, you can select single, 1.5, or double spacing. The default is single spacing.
- Click OK.
What is the difference between line spacing and paragraph spacing?
Line spacing determines the amount of vertical space between lines of text in a paragraph. … Paragraph spacing determines the amount of space above or below a paragraph.
How do I change the spacing between lines in Word 2013?
To format line spacing:
- Select the text you want to format. Selecting text to format.
- On the Home tab, click the Line and Paragraph Spacing command. A drop-down menu will appear.
- Move the mouse over the various options. …
- The line spacing will change in the document.
Why is line spacing not working in Word?
Under the “Indents and Spacing” tab, deselect “Don’t add space to paragraphs of the same style”. … If this does not work, check the options within the “Lines ans Page Break” tab in the “Paragraph” window, and deselect unnecessary options.
How do I adjust line spacing in Word 2010?
Click the Line and Paragraph Spacing command in the Paragraph group on the Home tab. Select the desired spacing option from the drop-down menu. From the drop-down menu, you can also select Line Spacing Options to open the Paragraph dialog box. From here, you can adjust the line spacing with even more precision.
How do you change to single space in Microsoft Word 2010?
How to type (create,Change TO) single spacing word 2010? Select the double spaced text, then in the “Paragraph” section click on the “Line & Paragraph Spacing” button drop down arrow and choose 1.0 spacing. Also “Ctrl key + 1 will also change the spacing from double to single.
How do I set line spacing?
Change the line spacing in a portion of the document
- Select one or more paragraphs to update. …
- Go to Home > Line and Paragraph Spacing.
- Select Line Spacing Options and choose an option in the Line spacing box.
- Adjust the Before and After settings to change spacing between paragraphs.
- Select OK.
What is a 1 inch margin in CM?
Note: Be careful, 1 cm = 0.3937 inch and 1 inch = 2.54 cm. By default, Word uses 1-inch margins and 2.5 cm.
How do I remove the space between lines in Word 2007?
Select the text you want to format. Click the Line spacing command in the Paragraph group on the Home tab.
…
The Paragraph dialog box appears.
- Use the Line spacing drop-down menu to select a spacing option.
- Modify the before and after points to adjust line spacing as needed.
- Click OK.
Why is my spacing off in Word?
Select the text that you want to change. On the Home tab, click the Font Dialog Box Launcher, and then click the Advanced tab. Note: If you’re using Word 2007 the tab is called Character Spacing. In the Spacing box, click Expanded or Condensed, and then specify how much space you want in the By box.
How do you remove space between lines in Word 2016?
Set your cursor to the location of the paragraph spacing. Click on the Line and Paragraph Spacing icon in the Home Ribbon. Select «Remove Extra Space» to remove the extra space. This has to be done in each document unless you adjust your default settings.
How much is single line spacing?
Line spacing is the space between each line in a paragraph. Word allows you to customize the line spacing to be single spaced (one line high), double spaced (two lines high), or any other amount you want. The default spacing in Word is 1.08 lines, which is slightly larger than single spaced.
What is double line spacing?
In text formatting, a double space means sentences contain a full blank line (the equivalent of the full height of a line of text) between the rows of words. … For example, when a teacher wants an essay double spaced, you’ll need to adjust your spacing settings, so the text in the essay is double spaced.
Is line spacing 2.0 the same as double spacing?
A 2.0 value will mean double spacing. Remember that the double spacing will take place from whatever part in the text your cursor is positioned.
While you might have experience changing the formatting for your Word documents to meet the requirements for your school or job, you might encounter a situation where you need to use different settings.
Microsoft Word is full of different tools and menus that let you customize your document, and line spacing is something that you can adjust.
Our tutorial below will show you how to single space in Word, even if you have already written and edited the entire document.
How to Make a Word Single Space Document
- Open the document.
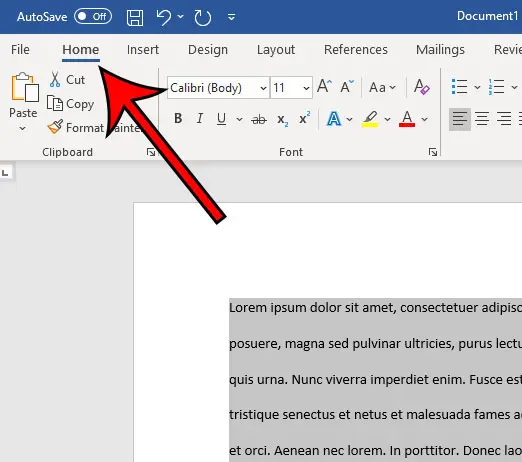
- Click inside the document and press Ctrl + A to select everything.
- Select the Home tab at the top of the window.
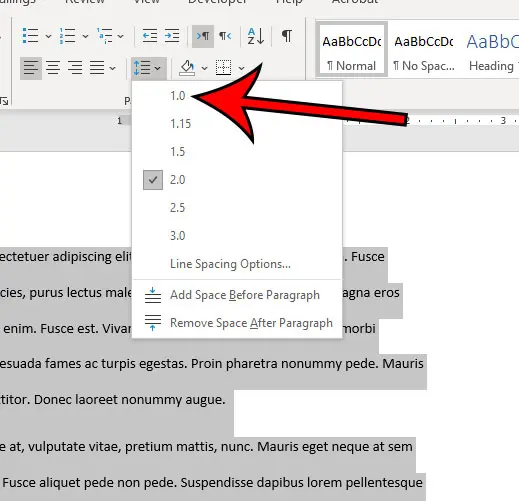
- Click the Line and Paragraph Spacing button.
- Choose the 1.0 option.
Our guide continues below with additional information on how to make a document single space instead of double space in Microsoft Word, including pictures of these steps.
Last update on 2023-04-13 / Affiliate links / Images from Amazon Product Advertising API
| As an Amazon Associate, I earn from qualifying purchases.
Document spacing can impact several things, including the number of pages in the document. Microsoft Word includes several different options from which you can select to control the amount of space between the lines in your document.
Many schools and organizations have their own rules and preferences when it comes to the amount of line spacing that you have in your documents. Often they want you to use double spacing, but it’s entirely possible that they might want single spacing to reduce the number of pages in documents.
A document in Microsoft Word can have a lot of different formatting options, including the amount of space between lines.
If your current document is double spaced, or if it appears to have more or less spacing than the single spacing you need, you may be looking for a way to adjust that.
You can make a Microsoft Word single space document by opening the document, selecting all of the text, choosing the Home tab, clicking the Line and Paragraph Spacing button, then choosing the 1.0 option from the drop down menu.
Our guide below will show you how to single space in Word by selecting all of the text in the document and adjusting the line spacing setting.
You can also check out our tutorial on how to select all in Word if you would like to know more about using that option.
How to Use Single Spacing in Word for Office 365 (Guide with Pictures)
The steps in this article were performed in the Microsoft Word for Office 365 version of the application but will work in most other versions as well.
Step 1: Open your document in Microsoft Word.
Step 2: Click inside the document, then press Ctrl + A on your keyboard to select everything.
If this is a new, blank document, you can skip this step.

Step 3: Select the Home tab at the top of the window.
Step 4: Click the Line & Paragraph Spacing button in the Paragraph section of the ribbon.
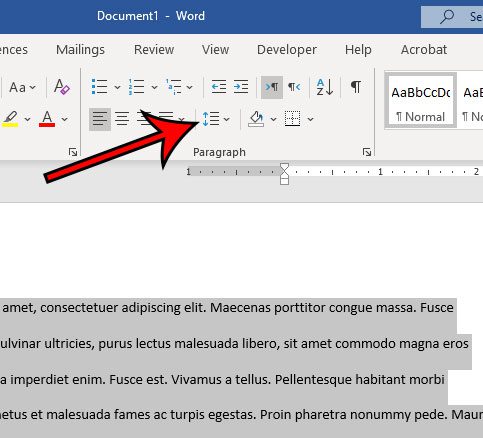
Step 5: Choose the 1.0 option from the dropdown menu to switch the document to single spacing.
Note that there is a Line Spacing Options button at the bottom of that dropdown menu.
If you select that option, you will be able to customize your document spacing further and set a new default spacing option if you would like.
Our tutorial continues below with additional discussion about how to make a document single spaced in Word.
You can also read our article on how to double space in Word for additional information about Microsoft Word line spacing.
How to Change Default Line Spacing in Microsoft Word
While you can change line spacing in every document that you create or edit in Microsoft Word, you might not want to adjust spacing every time.
But if your Word Normal template is defaulting to double spacing and you need to have single spacing more often, then constantly switching the line spaces can not only be tedious, it can be something that you forget to do.
Fortunately, among all of the different formatting adjustments that you can make for your document, there is a way to set the default line spacing.
- Open Microsoft Word.
- Select the Home tab.
- Click Line and Paragraph Spacing.
- Choose Line Spacing Options.
- Click the Line spacing drop down.
- Select your default line spacing preference.
- Click Set as Default.
- Choose All documents based on the Normal template.
- Click OK.
Now any new documents that you create in Microsoft Word that use the Normal template will have the line spacing that you just chose.
this will not affect the line spacing in any of your existing documents.
More Information on How to Apply Single Line Spacing in Word
While we have focused on changing the line spacing setting in an MS Word document, for the entire document, you can also format a document so that only some of it is single spaced.
Rather than selecting the whole document, simply use your mouse to select the part of the document for which you want to change the spacing, then follow the steps above to apply a new line spacing setting to that selection.
Another thing that you can adjust that relates to line spacing is the paragraph space setting. This affects the amount of line spacing that appears before and after your paragraphs.
You can find the paragraph spacing settings by clicking the Home tab, then clicking the small Paragraph Settings button at the bottom-right corner of the Paragraph group in the ribbon. This will open the Paragraph dialog box.
There you can select line spacing options in the “Spacing” section so that you can choose the amount of space before and after a paragraph, as well as determine the line spacing type.
Frequently Asked Questions About How to Make a Document Single Spaced in Word
How do I get to the paragraph spacing menu in Word?
While this document has focused on using the Line and Paragraph Spacing drop down menu to change document spacing, you might want to adjust some other spacing options, too.
if you select the Home tab, then click the Paragraph Spacing button at the bottom-right of the Paragraph group, it will open a Paragraph dialog box.
At the top of the Paragraph dialog box, you will see Indents and Spacing, as well as Line and Page Breaks tabs.
Here you can customize the spacing before and after your paragraphs, as well as select line spacing options.
What is the Set as Default button at the bottom of the Paragraph dialog box?
If you have made a lot of changes in this dialog box and want them to apply to new documents that you create in the future, you have the option of using these settings as the default for future documents.
Simply click the Set as Default button at the bottom of the Paragraph menu, then confirm that you want to make this change.
Can I have single spaced text in just part of my Microsoft Word document?
Yes, you can have a mixture of different types of spacing in a single document.
Simply follow the steps above, but rather than selecting the entire document, select only the part of the document that you want to single space.
Then when you click the Line and Paragraph Spacing button in the Paragraph group and choose the 1.0 option, it will only affect the part of the document that’s currently highlighted.

Matthew Burleigh has been writing tech tutorials since 2008. His writing has appeared on dozens of different websites and been read over 50 million times.
After receiving his Bachelor’s and Master’s degrees in Computer Science he spent several years working in IT management for small businesses. However, he now works full time writing content online and creating websites.
His main writing topics include iPhones, Microsoft Office, Google Apps, Android, and Photoshop, but he has also written about many other tech topics as well.
Read his full bio here.
Lesson 9: Line and Paragraph Spacing
/en/word/indents-and-tabs/content/
Introduction
As you design your document and make formatting decisions, you will need to consider line and paragraph spacing. You can increase spacing to improve readability and reduce it to fit more text on the page.
Optional: Download our practice document.
Watch the video below to learn how to adjust line and paragraph spacing in your document.
Line spacing
Line spacing is the space between each line in a paragraph. Word allows you to customize the line spacing to be single spaced (one line high), double spaced (two lines high), or any other amount you want. The default spacing in Word is 1.08 lines, which is slightly larger than single spaced.
In the images below, you can compare different types of line spacing. From left to right, these images show default line spacing, single spacing, and double spacing.

Line spacing is also known as leading (pronounced to rhyme with wedding).
To format line spacing:
- Select the text you want to format.

- On the Home tab, click the Line and Paragraph Spacing command, then select the desired line spacing.

- The line spacing will change in the document.


Adjusting line spacing
Your line spacing options aren’t limited to the ones in the Line and Paragraph Spacing menu. To adjust spacing with more precision, select Line Spacing Options from the menu to access the Paragraph dialog box. You’ll then have a few additional options you can use to customize spacing.
- Exactly: When you choose this option, the line spacing is measured in points, just like font size. For example, if you’re using 12-point text, you could use 15-point spacing.
- At least: Like the the Exactly option, this lets you choose how many points of spacing you want. However, if you have different sizes of text on the same line, the spacing will expand to fit the larger text.
- Multiple: This option lets you type the number of lines of spacing you want. For example, choosing Multiple and changing the spacing to 1.2 will make the text slightly more spread out than single-spaced text. If you want the lines to be closer together, you can choose a smaller value, like 0.9.


Paragraph spacing
Just as you can format spacing between lines in your document, you can adjust spacing before and after paragraphs. This is useful for separating paragraphs, headings, and subheadings.
To format paragraph spacing:
In our example, we’ll increase the space before each paragraph to separate them a bit more. This will make it a little easier to read.
- Select the paragraph or paragraphs you want to format.

- On the Home tab, click the Line and Paragraph Spacing command. Click Add Space Before Paragraph or Remove Space After Paragraph from the drop-down menu. In our example, we’ll select Add Space Before Paragraph.

- The paragraph spacing will change in the document.


From the drop-down menu, you can also select Line Spacing Options to open the Paragraph dialog box. From here, you can control how much space there is before and after the paragraph.

You can use Word’s convenient Set as Default feature to save all of the formatting changes you’ve made and automatically apply them to new documents. To learn how to do this, read our article on Changing Your Default Settings in Word.
Challenge!
- Open our practice document.
- Select the the date and the address block. This starts with April 13, 2016, and ends with Trenton, NJ 08601.
- Change the spacing before the paragraph to 12 pt and the spacing after the paragraph to 30 pt.
- Select the body of the letter. This starts with I am exceedingly and ends with your consideration.
- Change the line spacing to 1.15.
- When you’re finished, your page should look like this:


/en/word/lists/content/