
Создание нового экземпляра приложения Word из кода VBA Excel или подключение к открытому для работы с документами. Функции CreateObject и GetObject.
Работа с Word из кода VBA Excel
Часть 1. Управление приложением Word
[Часть 1] [Часть 2] [Часть 3] [Часть 4] [Часть 5] [Часть 6]
Создание объекта Word.Application
Экземпляр приложения Word необходим для того, чтобы с его помощью создавать новые документы или открывать существующие для редактирования из кода VBA Excel.
Создать новый экземпляр объекта Word.Application можно при помощи раннего или позднего связывания, используя при позднем связывании функцию CreateObject. Подключиться к открытому экземпляру приложения Word можно только при помощи позднего связывания, используя функцию GetObject.
Раннее связывание приложения Word
Создание нового экземпляра Word.Application и присвоение ссылки на него переменной myWord:
|
‘Создание экземпляра приложения Word ‘с ранней привязкой одной строкой Dim myWord As New Word.Application ‘Создание экземпляра приложения Word ‘с ранней привязкой двумя строками Dim myWord As Word.Application Set myWord = New Word.Application |
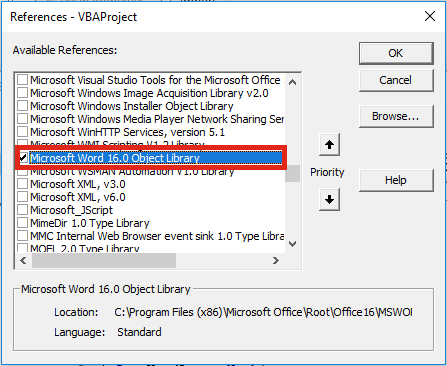
Для раннего связывания переменной с объектом Word.Application необходимо подключить в редакторе VBA Excel ссылку на библиотеку Microsoft Word Object Library, если она не подключена. Подключается ссылка в окне «References VBAproject», перейти в которое можно через главное меню редактора: Tools–>References…

Раннее связывание позволяет при написании кода использовать лист подсказок для выбора и вставки свойств и методов привязанных объектов (Auto List Members). Если проект VBA Excel создается на заказ, то, после его завершения, раннее связывание следует заменить на позднее, так как на компьютере пользователя может не оказаться нужной библиотеки, и код работать не будет.
Позднее связывание приложения Word
Создание нового экземпляра Word.Application с помощью функции CreateObject и присвоение ссылки на него переменной myWord:
|
Dim myWord As Object Set myWord = CreateObject(«Word.Application») |
Присвоение переменной myWord ссылки на открытый экземпляр приложения Word с помощью функции GetObject:
|
Dim myWord As Object Set myWord = GetObject(, «Word.Application») |
Если открытого приложения Word нет, выполнение функции GetObject приведет к ошибке. Чтобы ее избежать, следует предусмотреть создание нового экземпляра Word.Application с помощью функции CreateObject, если открытое приложение не будет найдено (смотрите пример 3).
В программы VBA Excel, работающие с Word, следует включать обработчик ошибок.
Закрытие объекта Word.Application
Новый экземпляр приложения Word открывается в фоновом режиме. Если необходимо его отобразить на экране перед завершением программы, используйте следующий код:
|
‘отображаем приложение Word myWord.Visible = True ‘освобождаем переменную от ссылки Set myWord = Nothing |
Если перед завершением процедуры VBA Excel необходимо приложение Word закрыть, используйте метод Quit:
|
‘закрываем приложение Word myWord.Quit ‘освобождаем переменную от ссылки Set myWord = Nothing |
Если переменная не содержит ссылку на приложение (myWord = Nothing), метод Quit возвратит ошибку. Чтобы этого не произошло, перед применением метода Quit необходимо проверить наличие ссылки в переменной myWord (смотрите пример 3).
Пример 1
Создаем новый экземпляр объекта Word.Application с ранним связыванием и отображаем его на экране:
|
Sub Primer1() Dim myWord As New Word.Application ‘———- ‘блок операторов для создания, открытия ‘и редактирования документов Word ‘———- myWord.Visible = True Set myWord = Nothing End Sub |
Запустите код примера 1 на выполнение. Вы увидите появившийся на панели задач ярлык приложения Word. Перейдите на него и закройте приложение вручную.
Пример 2
Создаем новый экземпляр объекта Word.Application с поздним связыванием, отображаем его на экране, останавливаем программу и наблюдаем закрытие приложения методом Quit:
|
Sub Primer2() Dim myWord As Object Set myWord = CreateObject(«Word.Application») ‘———- ‘блок операторов для создания, открытия ‘и редактирования документов Word ‘———- myWord.Visible = True MsgBox «Остановка программы» myWord.Quit Set myWord = Nothing End Sub |
Запустите код примера 2 на выполнение. Закройте информационное окно MsgBox и смотрите, как исчезнет с панели задач ярлык приложения Word, созданного перед остановкой кода.
Пример 3
Пытаемся создать ссылку на открытый экземпляр приложения Word с помощью функции GetObject, а если открытого экземпляра нет, создаем новый с помощью функции CreateObject:
|
1 2 3 4 5 6 7 8 9 10 11 12 13 14 15 16 17 18 19 20 21 22 23 24 |
Sub Primer3() Dim myWord As Object On Error Resume Next Set myWord = GetObject(, «Word.Application») If myWord Is Nothing Then Set myWord = CreateObject(«Word.Application») End If On Error GoTo Instr ‘———- ‘блок операторов для создания, открытия ‘и редактирования документов Word ‘———- myWord.Visible = True Set myWord = Nothing Exit Sub Instr: If Err.Description <> «» Then MsgBox «Произошла ошибка: « & Err.Description End If If Not myWord Is Nothing Then myWord.Quit Set myWord = Nothing End If End Sub |
Строка On Error Resume Next передаст управление следующему оператору, если открытого экземпляра программы Word не существует, и выполнение функции GetObject приведет к ошибке. В этом случае будет создан новый экземпляр Word.Application с помощью функции CreateObject.
В код добавлен обработчик ошибок On Error GoTo Instr, который поможет корректно завершить программу при возникновении ошибки. А также он позволит во время тестирования не наплодить большое количество ненужных экземпляров приложения Word. Проверяйте их наличие по Диспетчеру задач (Ctrl+Shift+Esc) и удаляйте лишние.
Строка Exit Sub завершит процедуру, если она прошла без ошибок. В случае возникновения ошибки, будет выполнен код после метки Instr:.
In this article, we will see how to access the various word objects using VBA in Excel and insert data from Excel to Word. This has many practical applications such as when you have to fill out a form multiple times with data from Excel or when you have to create a Word document with the same structure but different data each time and so on.
Before we go through individual controls, first let us have a look at how to access a Word document in Excel.
Step 1: Get the name and path of the Word Document that you need to modify. We will use the GetOpenFilename command for that.
fileName = Application.GetOpenFilename(, , "Select the word Document")Step 2: Check to see if Word is already running on the system.
Set oApp = GetObject(, "Word.Application")If Word is not running already, then start it
If Err.Number &amp;amp;amp;amp;amp;lt;&amp;amp;amp;amp;amp;gt; 0 Then Set oApp = CreateObject("Word.Application") End If
Step 3: Assign the selected Word file to a Word object so that we can access it.Set oDoc = oApp.Documents.Open(fileName) oApp.Visible = TrueNow that we know how to access to the Word document, let us see how to access the various controls in Word. In each of the below examples, we will need to add the above code.
Example 1: Bookmarks
In this example, we will see how to insert data from Excel after a bookmark in Word. Let us assume you have a bookmark named “Table1” in Word, where you be inserting a table from Excel. So, for simplicity, we will name that range in Excel as “Table1”.
Step 1: Access the bookmark
Set oBkMrk = oApp.ActiveDocument.Bookmarks("Table1")Step 2: Get the location where you want to insert the data
Set objRange = oBkMrk.Range.Characters.last ‘Position of the last character of the bookmark objRange.Start = objRange.Start + 1 ‘We need to start pasting from the next character
Step 3: Copy the table and paste it at that locationRange(“Table1”).Copy objRange.PasteExcelTable False, False, FalseThe PasteExcelTable method takes 3 arguments: LinkedToExcel, WordFormatting, RTF. We have set them all to False. Once you run the code, the Word Document will look like this
Example 2: Text boxes
In Word, the only way to assign a name to a shape is by using VBA (in contrast to Excel where this can be done using the formula bar). Secondly, Word does not force shapes to have unique names. So, accessing a text box by its name is not a very good option. The approach we will follow is referring to shapes by their index position.
Note: We are referring to text box created using drawing controls (Insert tab)
In this example we will loop through all the text boxes in Word and modify their text.Step 1: So, first loop through all the shapes in the Word document using the .Shapes collection
Step 2: Check if the shape is a textbox
Step 3: Manipulate the .TextFrame.TextRange.Text property, to copy text from Excel.Dim str As String Dim i As Integer i = 1 For Each shp In oDoc.Shapes If shp.Type = msoTextBox Then str = ThisWorkbook.Sheets("Sheet1").Cells(i, 1).Value shp.TextFrame.TextRange.Text = str i = i + 1 End If NextHere the excel values we are using are in column A, and i is used as the counter to directly access column A rows from the Excel. This is how the output will look:
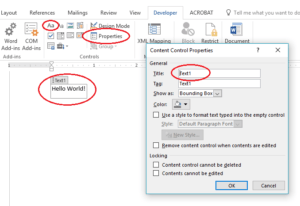
Example 3: Content control Text box from Developer tab
For this we will be using the Title property of a textbox to access it. The title can be set using the properties option of a textbox from the Developer Tab. The code is very similar to that in example 2
For Each cc In oDoc.ContentControls If cc.Title = "Text1" Then cc.Range.Text = "Hello World!" Exit For End If Next ccFor multiple textboxes, you can match the title of the text box to the corresponding range in Excel and easily loop through.
Example 4: Headers and Footers
This code will add Headers and Footers on all the pages of Section 1 of the Word Document. The text can easily be taken from an Excel file.
With oDoc.Sections(1) .Headers.Item(1).Range.Text = "Header text" .Footers.Item(1).Range.Text = "Footer text" End WithHere is how the header and footer will look like.
And here’s all the above code put together for easy reference:Sub copyToWord() Dim oApp As Object 'Word.Application Dim oDoc As Object 'Word.Document Dim sDocName As String Dim path As String Dim fileName As String Dim noOfFields As Integer Dim varName As String Dim wb fileName = Application.GetOpenFilename(, , "Select the word Document") Set wb = ThisWorkbook On Error Resume Next Set oApp = GetObject(, "Word.Application") 'See if word is already running If Err.Number &amp;amp;amp;amp;amp;amp;amp;amp;amp;lt;&amp;amp;amp;amp;amp;amp;amp;amp;amp;gt; 0 Then 'Word isn't running so start it Set oApp = CreateObject("Word.Application") End If On Error GoTo Error_Handler_Exit Set oDoc = oApp.Documents.Open(fileName) oApp.Visible = True 'Bookmarks Set oBkMrk = oApp.ActiveDocument.Bookmarks("Table1") Set objRange = oBkMrk.Range.Characters.last objRange.Start = objRange.Start + 1 Range("Table1").Copy objRange.PasteExcelTable False, False, False 'Textbox Dim str As String Dim i i = 1 For Each shp In oDoc.Shapes If shp.Type = msoTextBox Then str = ThisWorkbook.Sheets("Sheet1").Cells(i, 1).Value shp.TextFrame.TextRange.Text = str i = i + 1 End If Next 'Textbox Content Control For Each cc In oDoc.ContentControls If cc.Title = "Text1" Then cc.Range.Text = "Hello World!" Exit For End If Next cc 'Headers and Footers With oDoc.Sections(1) .Headers.Item(1).Range.Text = "Header goes here" .Footers.Item(1).Range.Text = "Footer goes here" End With oDoc.Save Error_Handler_Exit: On Error Resume Next Set oDoc = Nothing Set oApp = Nothing Exit Sub Error_Handler: MsgBox "The following error has occured." &amp;amp;amp;amp;amp;amp;amp;amp;amp;amp; vbCrLf &amp;amp;amp;amp;amp;amp;amp;amp;amp;amp; vbCrLf &amp;amp;amp;amp;amp;amp;amp;amp;amp;amp; _ "Error Number: " &amp;amp;amp;amp;amp;amp;amp;amp;amp;amp; Err.Number &amp;amp;amp;amp;amp;amp;amp;amp;amp;amp; vbCrLf &amp;amp;amp;amp;amp;amp;amp;amp;amp;amp; _ "Error Source: UpdateDoc" &amp;amp;amp;amp;amp;amp;amp;amp;amp;amp; vbCrLf &amp;amp;amp;amp;amp;amp;amp;amp;amp;amp; _ "Error Description: " &amp;amp;amp;amp;amp;amp;amp;amp;amp;amp; Err.Description, _ vbCritical, "An Error has Occured!" Resume Error_Handler_Exit End Sub


Using Excel VBA to read and write Microsoft Word documents
These examples are written and tested in Excel 2003.
Create, Write and Close Word Document
Read and Append
Create, Write and Close Word Document
The following code illustrates the use of Excel VBA to create a Microsoft Word Document and save it to disk.
This script will create a document in your My Documents folder.
'In Tools > References, add reference to "Microsoft Word XX.X Object Library" before running.
Option Explicit

Sub CreateNewWordDoc()

    Dim wdApp As Word.Application
    Dim wdDoc As Word.Document
    Set wdApp = CreateObject("Word.Application")
    Dim myFile As String

    'Alternatively, we can use Late Binding
    'Dim wdApp As Object
    'Dim wdDoc As Object
    'Set wdApp = CreateObject("word.Application")

    wdApp.Visible = True
    Set wdDoc = wdApp.Documents.Add

    ' define a place to put file
    myFile = Environ("UserProfile") & "My Documents" & "MyWordDoc.docx"

    ' or like this
    myFile = Environ("UserProfile") & "Documents" & "MyWordDoc.docx"

    ' have to wrap name in quotes here because directory contains a space
    If Dir("""&myFile&""") <> "" Then
        ' kill = delete existing file
        Kill """&myFile&"""
    End If

    With wdDoc
        .Content.InsertAfter "Hello World"
        .Content.InsertParagraphAfter
        .SaveAs myFile
        .Close
    End With

    wdApp.Quit
    Set wdDoc = Nothing
    Set wdApp = Nothing

End Sub
Some VBA Vocabulary
Option Explicit
When Option Explicit On or Option Explicit appears in a file, you must explicitly declare all variables by using the Dim or ReDim statements. If you try to use an undeclared variable name, an error occurs at compile time. The Option Explicit Off statement allows implicit declaration of variables. This statement
reduces risk of error by mis-typing variable names.
Word.Application
Represents the Microsoft Word application. The Application object includes properties and methods that return top-level objects.
To use Automation to control Word from another application, use the Microsoft Visual Basic CreateObject or GetObject function to return a Word Application object.
Word.Document
Represents a Word document. The Document object is a member of the Documents collection. The Documents collection contains all the Document objects that are currently open in Word.
InsertAfter
Inserts the specified text at the end of a range or selection. After this method is applied, the range or selection expands to include the new text.
Kill Deletes files from a disk.
DirThe Microsoft Excel DIR function returns the first filename that matches the pathname and attributes specified. To retrieve additional filenames that match pathname and attributes, call DIR again with no arguments.
Early and Late Binding
An object is early bound when it is assigned to a variable declared to be of a specific object type. By contrast, an object is late bound when it is assigned to a variable declared to be of type Object. Objects of this type can hold references to any object, but lack many of the advantages of early-bound objects
Early binding: The first step in using early binding is to ensure that the compiler «knows» about the object to which you want to bind. If you are working with a Excel or Word, then the controls in the toolbox are all known, or intrinsic, objects, and you can create references to them without any concern.
Late Binding: With late binding, the code does not make an explicit reference to the type of object when the variable is declared. Instead, it will simply use the «Object» type.
Read and Append to a Microsoft Word Document
The following code illustrates the use of Excel VBA to read and appaend to a Microsoft Word Document.
This script will trad a document in your My Documents folder.
'In Tools > References, add reference to "Microsoft Word XX.X Object Library" before running.
Option Explicit

Sub CreateNewWordDoc()

    Dim wdApp As Word.Application
    Dim wdDoc As Word.Document
    Set wdApp = CreateObject("Word.Application")
    Dim myFile As String

    'Alternatively, we can use Late Binding
    'Dim wdApp As Object
    'Dim wdDoc As Object
    'Set wdApp = CreateObject("word.Application")

    myFile = Environ("UserProfile") & "/My Documents/" & "MyWordDoc.docx"
    Set wdDoc = wdApp.Documents.Open(myFile)
    wdApp.Visible = True

    With wdDoc

        .Content.InsertAfter "Hello World"
        .Content.InsertParagraphAfter

    End With

End Sub
This post is the second in a series about controlling other applications from Excel using VBA. In the first part we looked at the basics of how to reference other applications using Early Binding or Late Binding. In this post, we will look at how we can automate Word from Excel even though we don’t know any VBA code for Word… yet. The process we will use for this is as follows:
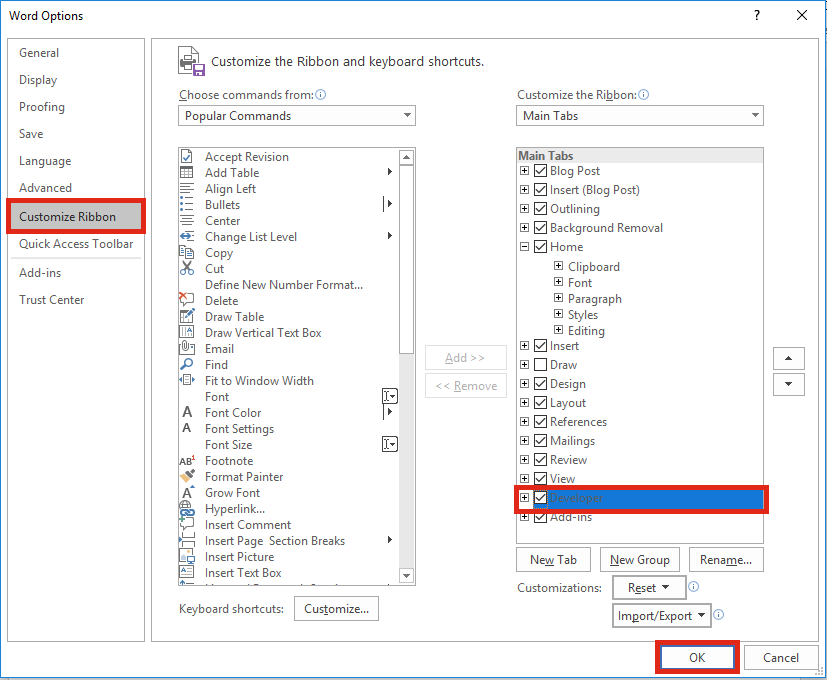
- Enable the Word Developer menu
- Record a Word macro
- Add the code to Excel VBA and amend
- Record macros in Excel if necessary
- Repeat the previous steps until macro complete
I am not an Excel VBA expert (I’m more of an Excel VBA tinkerer), and I am certainly not a Word VBA expert. The process I am about to show you may not create the most efficient code, but I know this process works, because I have used it myself to automate lots tasks using Microsoft Word.
Enable the Word Developer menu
If you have enabled the Excel Developer menu it is the same process in Word.
In Word: File -> Options -> Customize Ribbon
Then tick the Developer Ribbon option, OK.
Record a Word Macro
The key to the success of this method is taking small sections of code and building up a complex macro bit by bit. Using the Word Macro Recorder is again, similar to the Excel Macro recorder.
Click on: Developer -> Record Macro

For the example in this post, we will create a macro which will open a new Word document, then copy a chart from Excel and paste it into that Word document. We will tackle this one stage at a time. Firstly, lets create the macro to open a new word document.
Click – Developer -> Record Macro. The Record Macro window will open.
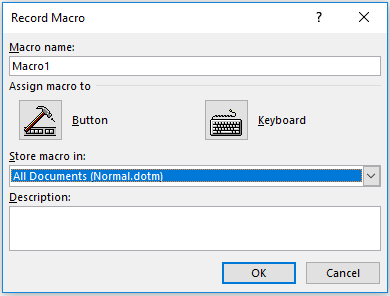
Make a note of the “Store macro in” option, as we will need to know where to find the recorded code later. Normal.dotm is fine for now. Click OK – the Macro Recorder is now running.
Open a new Word Document – File -> New -> Blank Document
Stop the Macro from recording – Developer -> Stop Recording

We can now view the code for opening a new Word Document in the Visual Basic Editor. Click: Developer -> Visual Basic.

Find the location of your recorded code in the Visual Basic Editor. In this example: Normal -> Modules -> NewMacros.
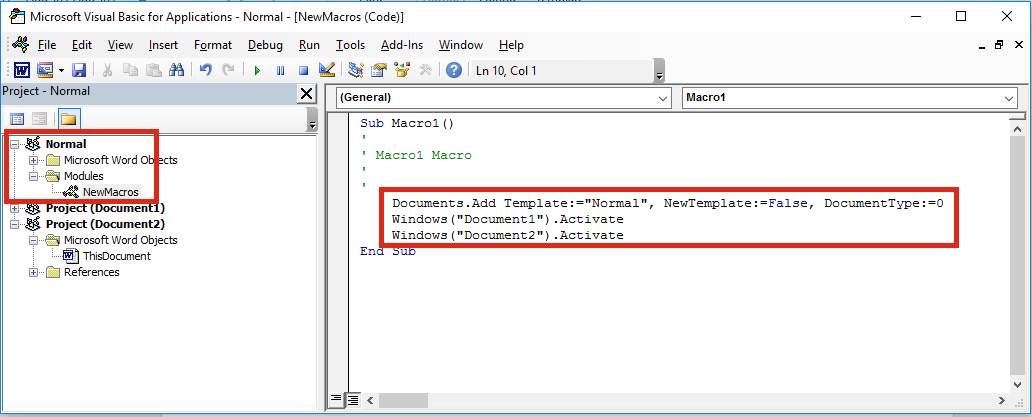
Your code should look like the following. It may be slightly different, but not significantly.
Sub Macro1()
'
' Macro1 Macro
'
'
    Documents.Add Template:="Normal", NewTemplate:=False, DocumentType:=0
    Windows("Document1").Activate
    Windows("Document2").Activate
End Sub
Add the code to Excel VBA and amend
Let’s head back to the Excel VBA Editor and use the Early Binding method to control to Microsoft Word. In the Visual Basic Editor click Tools -> References select Microsoft Word x.xx Object Library. Then click OK.
As we are using Early Binding we need to declare the Application as a variable as follows:
Dim WordApp As Word.Application
Set WordApp = New Word.Application
Now copy and paste the code from the Word VBA Editor into the Excel VBA Editor.
The Word VBA code started with Documents.Add, all we have to do is add our application variable to the front of that line of code. Now becomes WordApp.Documents.Add . . .
Often, Selecting and Activating Objects is not required in VBA code, so I have not copied those statements into the code below.
Sub CreateWordDocument()

'Connect using Early Binding.
'Remember to set the reference to the Word Object Library
'In VBE Editor Tools -> References -> Microsoft Word x.xx Object Library
Dim WordApp As Word.Application
Set WordApp = New Word.Application

WordApp.Documents.Add Template:="Normal", NewTemplate:=False, DocumentType:=0
WordApp.Visible = True 'New Apps will be hidden by default, so make visible

Set WordApp = Nothing 'release the memory

End Sub
A point to note, when an application is opened with VBA, it is normally opened in the background. To make the Word document visible I have added the following code:
WordApp.Visible = True
Record macros in Excel (if necessary)
If we want to copy Excel content into a Word document, we will need to copy that content using Excel VBA. We can use the Macro Recorder in Excel to obtain the VBA code for copying, then we can use the Word Macro Recorder to obtain the VBA code for pasting.
Macro Recording from Excel – selecting a worksheet and copying chart
Sheets("Sheet1").Select
ActiveSheet.ChartObjects("Chart 1").Activate
ActiveChart.ChartArea.Copy
Macro Recording from Word – pasting a chart into a document
Selection.PasteSpecial Link:=False, DataType:=wdPasteEnhancedMetafile, _
        Placement:=wdInLine, DisplayAsIcon:=False
We can add both Macro recordings into our Excel macro. Remember to add WordApp. at the start of each statement of Word VBA code.
Sub CreateWordDocument()

'Connect using Early Binding.
'Remember to set the reference to the Word Object Library
'In VBE Editor Tools -> References -> Microsoft Word x.xx Object Library
Dim WordApp As Word.Application
Set WordApp = New Word.Application

WordApp.Documents.Add Template:="Normal", NewTemplate:=False, DocumentType:=0
WordApp.Visible = True 'New Apps will be hidden by default, so make visible

'code copied from Excel Macro recorder
Sheets("Sheet1").Select
Selection.ChartObjects("Chart 1").ChartArea.Copy

'code copied from Word Macro recorder with WordApp. added to the front.
WordApp.Selection.PasteSpecial Link:=False, DataType:=wdPasteEnhancedMetafile, _
        Placement:=wdInLine, DisplayAsIcon:=False

Set WordApp = Nothing 'release the memory

End Sub
This code is not particularly efficient; it contains a few unnecessary sections code. However… it works!
Repeat the previous steps until macro complete
By repeating the same steps above; recording short actions, then transferring the code into Excel, we can slowly build up much more complex Macros. The key is to keep the actions short, if you do too many actions with the Macro Recorder, code starts to look long and scary.
If you’ve you tried to use the Macro Recorder before you will know that this is not as easy as it seems. And this simple tutorial may make you think it is easy, when it’s not. Sometimes, it can be quite frustrating trying to find out where the issues and errors are. The key to success is recording very short actions, such as those below and copying them into the Visual Basic Editor.
'Pressing the Enter Key to move to a new line in Word
WordApp.Selection.TypeParagraph

'Turn on/off Bold Text
WordApp.Selection.Font.Bold = wdToggle

'Change Font Size
WordApp.Selection.Font.Size = 16

'Type some text
WordApp.Selection.TypeText Text:="Here is some text"
You will soon build up a standard library of code that you can use to control Word for most basic tasks.
In recorded VBA code from Word, the word “Selection” in the code often refers to the document itself. It is possible to make the code a little bit more efficient by declaring the document as a variable. If we were opening a specific document, we could include this at the start, just below the declaration of the application.
'Declare a specific document as a variable
Dim WordDocument As Object
Set WordDocument = WordApp.Documents.Open(sourceFileName)
Or, if we created a new document we could include the following below the declaration of the application variable.
'Delcare a new document as a variable
Dim WordDocument As Object
Set WordDocument = WordApp.Documents.Add Template:="Normal", _
NewTemplate:=False, DocumentType:=0
If we have created the document as a variable we can then reference the specific document. This code:
WordApp.Selection.TypeParagraph
Would become this code:
WordDocument.TypeParagraph
Or this code:
WordApp.Selection.TypeText Text:="Here is some text"
Would become this code:
WordDocument.TypeText Text:="Here is some text"
This method is much better, as it doesn’t rely on the Selection of the user being in the right place.
Conclusion
We have seen in this post that it is possible to create complex Macros to automate Word from Excel using VBA. By understanding how to declare variables for the application and documents we can create much more robust macros, even without knowing a lot of VBA code.
Related Posts:
- 5 quick ways to embed a Word document in Excel
- Controlling Powerpoint from Excel using VBA
- Edit links in Word using VBA
- How to link Excel to Word

About the author
Hey, I’m Mark, and I run Excel Off The Grid.
My parents tell me that at the age of 7 I declared I was going to become a qualified accountant. I was either psychic or had no imagination, as that is exactly what happened. However, it wasn’t until I was 35 that my journey really began.
In 2015, I started a new job, for which I was regularly working after 10pm. As a result, I rarely saw my children during the week. So, I started searching for the secrets to automating Excel. I discovered that by building a small number of simple tools, I could combine them together in different ways to automate nearly all my regular tasks. This meant I could work less hours (and I got pay raises!). Today, I teach these techniques to other professionals in our training program so they too can spend less time at work (and more time with their children and doing the things they love).
Do you need help adapting this post to your needs?
I’m guessing the examples in this post don’t exactly match your situation. We all use Excel differently, so it’s impossible to write a post that will meet everybody’s needs. By taking the time to understand the techniques and principles in this post (and elsewhere on this site), you should be able to adapt it to your needs.
But, if you’re still struggling you should:
- Read other blogs, or watch YouTube videos on the same topic. You will benefit much more by discovering your own solutions.
- Ask the ‘Excel Ninja’ in your office. It’s amazing what things other people know.
- Ask a question in a forum like Mr Excel, or the Microsoft Answers Community. Remember, the people on these forums are generally giving their time for free. So take care to craft your question, make sure it’s clear and concise. List all the things you’ve tried, and provide screenshots, code segments and example workbooks.
- Use Excel Rescue, who are my consultancy partner. They help by providing solutions to smaller Excel problems.
What next?
Don’t go yet, there is plenty more to learn on Excel Off The Grid. Check out the latest posts:
Automate Microsoft Word from Excel, using VBA
———————————————————————
Contents:
Automating an Office Application
Practical Examples of Automating Word from Excel
———————————————————————
Automation is a process by which one application communicates with or controls another application. This can be done in two ways: Early Binding and Late Binding. Binding is a process where you assign an object to an object variable. In this chapter, we explain «the Process of Automating an Office Application«, followed by «Examples of Automating Word from Excel«.
Automating an Office Application
Automation Process
Automation is a process by which one application communicates with or controls another application. This can be done in two ways: Early Binding and Late Binding. Binding is a process where you assign an object to an object variable.
When you use vba in an Office Application, say Word, a reference to the Word Object Library is set by default. When you Automate to work with Word objects from another application, say Excel, you can add a reference to the Word object library in Excel (your host application) by clicking Tools-References in VBE, which will enable using Word’s predefined constants. This is a must when you automate using Early Binding (explained below). Once this reference is added, a new instance of Word application can be created by using the New keyword.
Exposing the object library of the other application (viz. Word) by which its object model can be accessed by the host application (viz. Excel), means that the Word’s predefined constants are recognized when you add a reference to the Word Object Library in Excel.
Early Binding and Late Binding in Automation
In Early Binding, the object variable is declared as a specific object type ie. specific to the application which is being automated, and this makes an object early bound. In Early Binding the object library of the other application is exposed early, during design-time, in the host application. This Binding is done manually by adding a reference to the Object Library of the other application (viz. Word), in the host application (viz. Excel) by clicking «Tools» from the menu bar in VBE.
In Late Binding, the object variable is declared as an Object Type which can be a reference to any object, and this makes an object late bound. In Late Binding, the object library is not exposed during design-time, but the binding happens during run-time using the CreateObject or the GetObject functions. CreateObject creates a new instance of Word and GetObject returns an already running instance of the Word object. In Late Binding, you need not add a reference to the Word object library in Excel (your host application), in this case you will not be able to use the Word’s predefined constants and will need to replace them by their numerical values in your code.
Adding a reference to the Object Library
In Early Binding the object library is exposed during design-time and this is done manually. To add a reference to the Word library in Excel (Office 2007), click «Tools» from the menu bar in VBE, click the «References» option, and in the dialog box which opens select «Microsoft Word 12.0 Object Library» in the «Available References» list. Note that the library name would be «Microsoft Word 9.0 Object Library» in Office version 2000 ie. the name will vary for different Office versions. This is one disadvantage of using early binding because you will need to adjust per the Office version being used in your desktop viz. running a code programmed in say Office 2007, in a machine which is using an earlier version of Office might give an error because the specific object library would not be installed in that machine. Therefore in cases where the programmer is not aware at design-time as to which Office version will be used by the client to run the procedure, Late Binding should be used. Or you can also early bind to the earliest version of the application which can be expected to be used by the client viz. set a reference to the library for Excel 95 for autmotaing Excel. Running a procedure in an Office version later than in which a reference to the library is set, should be compatible.
Built-in Constants and their Numerical Values
We have explained above that the Word’s predefined constants are recognized when you add a reference to the Word library in Excel. It may be noted that replacing the Word’s built-in constants viz. wdSaveChanges, by their numerical values viz. -1 (wdSaveChanges has a numerical value of -1) will run the code without adding a reference to the Word library and in this case the procedures will work across various Office versions. To determine the values of these built-in constants, while the reference to the relevant object library has been added: (i) search in the Object Browser by typing the constant in the Search Text drop down list (in the top pane) and click on the Search button (with binoculars); or (ii) type the constant preceded by a question mark (viz. ?wdStyleNormal) and then press Enter, in the Immediate Window in VBE.
Early Binding vs. Late Binding
In Early Binding you must manually add a reference to the Word library in your Excel project at design-time. It is generally preferable to use Early Binding because the code runs faster than in Late Binding where the binding is done while the code runs. Also, in Early Binding the programmer will have access to the Word’s object model and its built-in (pre-defined) constants, and this will facilitate checking syntax errors and the use of «intellisense» ie. after typing a keyword followed by a dot you get a pop-up list of the keyword’s supported properties and methods which can be inserted by selecting the required one. However, one significant advantage of Late Binding is that it will not be dependant on the Office version being used, as explained above.
The Getobject function and CreateObject function
The Getobject function. Syntax: GetObject([file_path_file_name] [, class]). The function has two optional arguments. The first argument specifies the file to open — the file name and full filepath should be given. In case the first argument is omitted, it is required to give the second argument which specifies the class or object type to work with. Omitting the first argument in the Getobject function will return an instance of the application. The function will give an error if the application is not already running.
CreateObject function. Syntax: CreateObject(ApplicationName_Class_of_Object,[servername]). This function starts the application and creates the object, for example, CreateObject(«Word.Application») will create an instance of the Word Application. The second argument of servername is optional which refers to the network server where to create the object and omitting this will create the object in the local machine.
Example of using Early Binding:
Variable declared as a specific object type ie. specific to the application which is being automated:
Dim applWord As Word.Application
When you use vba in an Office Application, say Word, a reference to the Word Object Library is set by default. When you Automate to work with Word objects from another application, say Excel, you can add a reference to the Word library in Excel (your host application) by clicking Tools-References in VBE, which will enable using Word’s predefined constants. This is a must when you automate using Early Binding. Once this reference is added, a new instance of Word application can be created by using the New keyword.
Set applWord = New Word.Application
Using built-in constants of the other application, ex. wdStyleNormal
applWord.Styles(wdStyleNormal).Font.Name = «Arial»
Examples of using Late Binding:
Variable declared as Object Type, which can be a reference to any object:
Dim applWord As Object
If an instance of an existing Word object is not available, CreateObject creates a new instance of Word:
Set applWord = CreateObject(«Word.Application»)
Variable declared as Object Type, which can be a reference to any object:
Dim applWord As Object
If an instance of an existing Word object is available, GetObject returns an already running instance of the Word object:
Set applWord = GetObject(, «Word.Application»)
Practical Examples of Automating Word from Excel
Example 1: Create a new word document, set page setup properties, add paragraphs, reference paragraphs by index number, format the paragraphs, with options of saving the new document in the default or a specific folder, using Early Binding.
Refer Image 1:
———————————————

———————————————
Sub Automate_Word_from_Excel_1()
‘Automate Word from Excel, using Early Binding: You must add a reference to the Word Object Library in Excel (your host application) by clicking Tools-References in VBE, which will enable using Word’s predefined constants. Once this reference is added, a new instance of Word application can be created by using the New keyword.
‘This example shows how to create a new word document, set page setup properties, add paragraphs, reference paragraphs by index number, format the paragraphs, with options of saving the new document in the default or a specific folder, using Early Binding.
‘variables declared as a specific object type ie. specific to the application which is being automated:
Dim applWord As Word.Application
Dim docWord As Word.Document
Dim paraWord As Word.Paragraph
‘Set the Application object variable to create a new instance of Word:
Set applWord = New Word.Application
‘make the Word window visible:
applWord.Visible = True
‘maximize Word window:
applWord.WindowState = wdWindowStateMaximize
‘add a new word document:
Set docWord = applWord.Documents.Add
‘to save document in the default folder:
docWord.SaveAs fileName:=«newDoc1.docx»
‘to save document in a specific folder:
‘DocWord.SaveAs fileName:=«C:UsersAmit TandonDocumentsExcelTips&TricksExcel VBAnewDoc1.docx»
‘set Page Setup properties — Page Orientation, Page Size & Margins:
With docWord.PageSetup
.LineNumbering.Active = True
.Orientation = wdOrientPortrait
.TopMargin = applWord.InchesToPoints(1)
.BottomMargin = applWord.InchesToPoints(0.75)
.LeftMargin = applWord.InchesToPoints(0.75)
.RightMargin = applWord.InchesToPoints(0.85)
.PageWidth = applWord.InchesToPoints(8)
.PageHeight = applWord.InchesToPoints(11)
.Gutter = applWord.InchesToPoints(0.25)
.GutterPos = wdGutterPosLeft
End With
‘The Selection Property returns the the selected area in the document or if nothing is selected it represents the insertion point.
With applWord.Selection
.Font.Name = «Arial»
.Font.Size = 12
.Font.Bold = True
.Font.Color = wdColorRed
.ParagraphFormat.Alignment = wdAlignParagraphCenter
‘set spacing after this paragraph, in points:
.ParagraphFormat.SpaceAfter = 10
End With
‘use the TypeText Method to insert text into the new word document.
applWord.Selection.TypeText Text:=«Title of New Document»
‘use Paragraphs.Add Method to add a new paragraph mark at the end of the document:
docWord.Paragraphs.Add
‘Set the paragraph object to the new para added. Paragraphs(IndexNumber) is used to return the Paragraph object. Use the Count property to determine the number of paragraphs (ie. determine the last para added) in the collection of Paragraph objects. You can also use the Paragraphs.Last Property to return the last para viz. Set paraWord = docWord.Paragraphs.Last.
Set paraWord = docWord.Paragraphs(docWord.Paragraphs.count)
paraWord.Range.Text = «I bring to your notice that the bill for the month of September, 2011 for my mobile number 1234567, seems to be incorrect. I have apparantly been overcharged because there are some calls which are reflected in the bill which have not actually been made by me.»
‘format the new paragraph:
With paraWord.Range
.ParagraphFormat.Alignment = wdAlignParagraphJustify
.ParagraphFormat.LineSpacingRule = wdLineSpaceSingle
.ParagraphFormat.LeftIndent = applWord.InchesToPoints(0.25)
.ParagraphFormat.FirstLineIndent = applWord.InchesToPoints(0.5)
.ParagraphFormat.SpaceAfter = 10
With .Font
.Name = «TimesNewRoman»
.Size = 10
.Bold = False
.Color = wdColorBlue
End With
End With
docWord.Paragraphs.Add
Set paraWord = docWord.Paragraphs(docWord.Paragraphs.count)
paraWord.Range.Text = «I hereby request you to kindly rectify as above and send me the correct bill so that I can pay at the earliest. Thanking you in anticipation of a quick response.»
With paraWord.Range
.ParagraphFormat.Alignment = wdAlignParagraphJustify
.ParagraphFormat.LineSpacingRule = wdLineSpaceDouble
.ParagraphFormat.LeftIndent = applWord.InchesToPoints(0.75)
.ParagraphFormat.FirstLineIndent = applWord.InchesToPoints(1)
.ParagraphFormat.SpaceAfter = 10
With .Font
.Name = «Verdana»
.Size = 10
.Bold = False
.Color = wdColorGreen
End With
End With
‘Save and close the active word document.
docWord.Close SaveChanges:=wdSaveChanges
‘quit the word application:
applWord.Quit
‘clear the object variables:
Set docWord = Nothing
Set applWord = Nothing
Set paraWord = Nothing
End Sub
Example 2: Automate using Early Binding — Create a new word document and insert a letter with multiple paras, using built-in word styles.
Refer Image 2:
———————————————

———————————————
Sub Automate_Word_from_Excel_2()
‘Automate Word from Excel, using Early Binding: You must add a reference to the Word Object Library in Excel (your host application) by clicking Tools-References in VBE, which will enable using Word’s predefined constants. Once this reference is added, a new instance of Word application can be created by using the New keyword.
‘This example (Automate using Early Binding) shows how to create a new word document and insert a letter with multiple paras, using built-in word styles.
‘variables declared as a specific object type ie. specific to the application which is being automated:
Dim applWord As Word.Application
Dim docWord As Word.Document
‘Set the Application object variable to create a new instance of Word:
Set applWord = New Word.Application
‘make the Word window visible:
applWord.Visible = True
‘maximize Word window:
applWord.WindowState = wdWindowStateMaximize
‘add a new word document:
Set docWord = applWord.Documents.Add
‘to save document in the default folder:
docWord.SaveAs fileName:=«newDoc1.docx»
With docWord
‘A built-in or user-defined style is returned by using Styles(index). Index can be mentioned as the user-defined style name, or a WdBuiltinStyle constant or index number. You can set style properties like Font, as follows.
‘Set styles for the new word document:
With .Styles(wdStyleHeading1)
.Font.Name = «Verdana»
.Font.Size = 13
.Font.Color = wdColorRed
.Font.Bold = True
.ParagraphFormat.Alignment = wdAlignParagraphCenter
End With
With .Styles(wdStyleHeading2)
.Font.Name = «TimesNewRoman»
.Font.Size = 12
.Font.Color = wdColorBlue
.Font.Bold = True
With .Styles(wdStyleNormal)
.Font.Name = «Arial»
.Font.Size = 10
.Font.Color = wdColorBlue
.ParagraphFormat.LineSpacingRule = wdLineSpaceSingle
End With
With .Styles(wdStyleBodyText)
.Font.Name = «Arial»
.Font.Size = 10
.Font.Color = wdColorGreen
.ParagraphFormat.Alignment = wdAlignParagraphJustify
.ParagraphFormat.LineSpacingRule = wdLineSpaceSingle
.ParagraphFormat.FirstLineIndent = applWord.InchesToPoints(0.5)
End With
‘Use the Range.InsertParagraphAfter Method to insert a paragraph mark. The insertion is made after the specified range. The range expands to increase the new paragraph, after applying this method.
‘Use the Range.InsertAfter Method to insert text at the end of a range.
.Range(0).Style = .Styles(wdStyleHeading1)
.Content.InsertAfter «Request for Mobile Bill Correction»
‘Insert paragraph marks at the end of the document. A Range object is returned by the Content property.
.Content.InsertParagraphAfter
.Content.InsertParagraphAfter
‘set style starting from range after the Heading 1:
.Range(.Characters.count — 2).Style = .Styles(wdStyleHeading2)
‘Insert text, use Chr(11) to add new line:
.Content.InsertAfter «The Billing Department» & Chr(11) & «M/s MobilePhone Company» & Chr(11) & «London Office» & Chr(11) & «UK.»
.Content.InsertParagraphAfter
.Content.InsertParagraphAfter
‘use the Paragraphs.Last Property to return the last para in the document:
.Paragraphs.Last.Style = .Styles(wdStyleNormal)
.Content.InsertAfter vbTab & «Subject: Correction of Bill for my Mobile Number 1234567.»
‘Insert paragraph mark at the end of the document. A Range object is returned by the Content property.
.Content.InsertParagraphAfter
.Paragraphs.Last.Style = .Styles(wdStyleNormal)
.Content.InsertAfter «Dear Sir,»
.Content.InsertParagraphAfter
.Paragraphs.Last.Style = .Styles(wdStyleBodyText)
.Content.InsertAfter «I bring to your notice that the bill for the month of September, 2011 for my mobile number 1234567, seems to be incorrect. I have apparantly been overcharged because there are some calls which are reflected in the bill which have not actually been made by me.»
.Content.InsertParagraphAfter
.Paragraphs.Last.Style = .Styles(wdStyleBodyText)
.Content.InsertAfter «I hereby request you to kindly rectify as above and send me the correct bill so that I can pay at the earliest. Thanking you in anticipation of a quick response.»
.Content.InsertParagraphAfter
.Content.InsertParagraphAfter
.Paragraphs.Last.Style = .Styles(wdStyleNormal)
.Content.InsertAfter «Yours Sincerely,»
.Content.InsertParagraphAfter
.Content.InsertParagraphAfter
.Paragraphs.Last.Style = .Styles(wdStyleNormal)
.Content.InsertAfter «Alan Croft»
.Content.InsertParagraphAfter
End With
‘close and save the document:
docWord.Close SaveChanges:=wdSaveChanges
‘quit the word application:
applWord.Quit
‘clear the object variables:
Set docWord = Nothing
Set applWord = Nothing
End Sub
Example 3: Open an Existing word doc, insert text, format doc and save, and then close & quit application, using Late Binding.
Sub Automate_Word_from_Excel_3()
‘Automate Word from Excel, using Late Binding. You need not add a reference to the Word library in Excel (your host application), in this case you will not be able to use the Word’s predefined constants and will need to replace them by their numerical values in your code.
‘This example shows how to open an existing word doc, insert text, format doc and save, and then close & quit application, using Late Binding.
‘Variables declared as Object type, which can be a reference to any object. Variables cannot be declared as a specific object type (ie. specific to the application which is being automated) using Word.Application or Word.Document, because a reference to the Word library has not been added.
Dim applWord As Object
Dim docWord As Object
‘set the Application object variable to create a new instance of Word:
Set applWord = CreateObject(«Word.Application»)
‘make the Word window visible:
applWord.Visible = True
‘maximize Word window:
‘replaced the Word’s built-in constant wdWindowStateMaximize with its numerical value 1.
applWord.WindowState = 1
‘opens an existing word document from a defined folder:
Set docWord = applWord.Documents.Open(«C:UsersAmit TandonDocumentsFriends.docx»)
‘Insert paragraph mark at the end of the document. A Range object is returned by the Content property.
docWord.Content.InsertParagraphAfter
‘insert text at the end of the document:
docWord.Content.InsertAfter «Inserted text at the end of document on » & Now
‘A built-in or user-defined style is returned by using Styles(index). Index can be mentioned as the user-defined style name, or a WdBuiltinStyle constant or index number. You can set style properties like Font, as follows.
‘Set style in the new word document: Note that the Word’s predefined constants wdStyleNormal and wdColorRed are not recognized because reference to the Word library has not been added. In this case the following code will not run and the style cannot be set with the following code:
‘docWord.Styles(wdStyleNormal).Font.Color = wdColorRed
‘Set style for the word document:
‘replaced the Word’s built-in constants wdStyleNormal and wdColorRed with their numerical values -1 and 255.
docWord.Styles(-1).Font.Name = «Arial»
docWord.Styles(-1).Font.Size = 10
docWord.Styles(-1).Font.Color = 255
‘close and save the document:
‘replaced the Word’s built-in constant wdSaveChanges with its numerical value -1.
docWord.Close SaveChanges:=-1
‘quit the word application:
applWord.Quit
‘clear the object variables:
Set docWord = Nothing
Set applWord = Nothing
End Sub
Example 4: Automate using Late Binding — Create a new word document, insert a letter by sourcing data from an excel worksheet, using built-in word styles.
For live code of this example, click to download excel file.
Sub Automate_Word_from_Excel_4()
‘Automate Word from Excel, using Late Binding. You need not add a reference to the Word library in Excel (your host application), in this case you will not be able to use the Word’s predefined constants and will need to replace them by their numerical values in your code.
‘This example (Automate using Late Binding) shows how to create a new word document, insert a letter by sourcing data from an excel worksheet, using built-in word styles. This method is particularly useful for making letters with similar content being addressed and emailed to multiple addresses.
‘Variables declared as Object type, which can be a reference to any object. Variables cannot be declared as a specific object type (ie. specific to the application which is being automated) using Word.Application or Word.Document, because a reference to the Word library has not been added.
Dim applWord As Object
Dim docWord As Object
Dim ws As Worksheet
Set ws = ActiveWorkbook.Sheets(«Sheet3»)
‘Create a new instance of the Word application, if an existing Word object is not available.
‘Set the Application object as follows:
On Error Resume Next
Set applWord = GetObject(, «Word.Application»)
‘if an instance of an existing Word object is not available, an error will occur (Err.Number = 0 means no error):
If Err.Number <> 0 Then
Set applWord = CreateObject(«Word.Application»)
End If
‘disable error handling:
On Error GoTo 0
‘make the Word window visible:
applWord.Visible = True
‘maximize Word window:
‘replaced the Word’s built-in constant wdWindowStateMaximize with its numerical value 1.
applWord.WindowState = 1
‘add a new word document:
Set docWord = applWord.Documents.Add
‘to save document in the default folder:
docWord.SaveAs fileName:=«newDoc1.docx»
With docWord
‘A built-in or user-defined style is returned by using Styles(index). Index can be mentioned as the user-defined style name, or a WdBuiltinStyle constant or index number. You can set style properties like Font, as follows.
‘Set styles for the new word document:
‘replaced the Word’s built-in constant wdStyleHeading1 with its numerical value -2.
With .Styles(-2)
.Font.Name = «Verdana»
.Font.Size = 13
‘replaced the Word’s built-in constant wdColorRed with its numerical value 255.
.Font.Color = 255
.Font.Bold = True
‘replaced the Word’s built-in constant wdAlignParagraphCenter with its numerical value 1.
.ParagraphFormat.Alignment = 1
‘replaced the Word’s built-in constant wdStyleHeading2 with its numerical value -3.
With .Styles(-3)
.Font.Name = «TimesNewRoman»
.Font.Size = 12
‘replaced the Word’s built-in constant wdColorBlue with its numerical value 16711680.
.Font.Color = 16711680
.Font.Bold = True
‘replaced the Word’s built-in constant wdStyleNormal with its numerical value -1.
With .Styles(-1)
.Font.Name = «Arial»
.Font.Size = 10
‘replaced the Word’s built-in constant wdColorBlue with its numerical value 16711680.
.Font.Color = 16711680
‘replaced the Word’s built-in constant wdLineSpaceSingle with its numerical value 0.
.ParagraphFormat.LineSpacingRule = 0
‘replaced the Word’s built-in constant wdStyleBodyText with its numerical value -67 .
With .Styles(-67)
.Font.Name = «Arial»
.Font.Size = 10
‘replaced the Word’s built-in constant wdColorGreen with its numerical value 32768.
.Font.Color = 32768
‘replaced the Word’s built-in constant wdAlignParagraphJustify with its numerical value 3.
.ParagraphFormat.Alignment = 3
‘replaced the Word’s built-in constant wdLineSpaceSingle with its numerical value 0.
.ParagraphFormat.LineSpacingRule = 0
.ParagraphFormat.FirstLineIndent = applWord.InchesToPoints(0.5)
End With
‘Use the Range.InsertParagraphAfter Method to insert a paragraph mark. The insertion is made after the specified range. The range expands to increase the new paragraph, after applying this method.
‘Use the Range.InsertAfter Method to insert text at the end of a range.
‘replaced the Word’s built-in constant wdStyleHeading1 with its numerical value -2.
.Range(0).Style = .Styles(-2)
.Content.InsertAfter «Request for Mobile Bill Correction»
‘Insert paragraph marks at the end of the document. A Range object is returned by the Content property.
.Content.InsertParagraphAfter
.Content.InsertParagraphAfter
‘set style starting from range after the Heading 1:
‘replaced the Word’s built-in constant wdStyleHeading2 with its numerical value -3.
.Range(.Characters.count — 2).Style = .Styles(-3)
‘Insert text, use Chr(11) to add new line:
.Content.InsertAfter ws.Range(«A7») & Chr(11) & ws.Range(«B7») & Chr(11) & ws.Range(«C7») & Chr(11) & ws.Range(«D7») & Chr(11) & ws.Range(«E7») & Chr(11) & ws.Range(«F7»)
.Content.InsertParagraphAfter
.Content.InsertParagraphAfter
‘use the Paragraphs.Last Property to return the last para in the document:
‘replaced the Word’s built-in constant wdStyleNormal with its numerical value -1.
.Paragraphs.Last.Style = .Styles(-1)
.Content.InsertAfter vbTab & ws.Range(«A1»)
‘Insert paragraph mark at the end of the document. A Range object is returned by the Content property.
.Content.InsertParagraphAfter
‘replaced the Word’s built-in constant wdStyleNormal with its numerical value -1.
.Paragraphs.Last.Style = .Styles(-1)
.Content.InsertAfter «Dear Sir,»
.Content.InsertParagraphAfter
‘replaced the Word’s built-in constant wdStyleBodyText with its numerical value -67 .
.Paragraphs.Last.Style = .Styles(-67)
.Content.InsertAfter ws.Range(«A3»)
.Content.InsertParagraphAfter
‘replaced the Word’s built-in constant wdStyleBodyText with its numerical value -67 .
.Paragraphs.Last.Style = .Styles(-67)
.Content.InsertAfter ws.Range(«A5»)
.Content.InsertParagraphAfter
.Content.InsertParagraphAfter
‘replaced the Word’s built-in constant wdStyleNormal with its numerical value -1.
.Paragraphs.Last.Style = .Styles(-1)
.Content.InsertAfter «Yours Sincerely,»
.Content.InsertParagraphAfter
.Content.InsertParagraphAfter
‘replaced the Word’s built-in constant wdStyleNormal with its numerical value -1.
.Paragraphs.Last.Style = .Styles(-1)
.Content.InsertAfter «Alan Croft»
.Content.InsertParagraphAfter
End With
‘close and save the document:
‘replaced the Word’s built-in constant wdSaveChanges with its numerical value -1.
docWord.Close SaveChanges:=-1
‘quit the word application:
applWord.Quit
‘clear the object variables:
Set docWord = Nothing
Set applWord = Nothing
End Sub