
Change the numbering in a numbered list
- Double-click the numbers in the list. The text won’t appear selected.
- Right-click the number you want to change.
- Click Set Numbering Value.
- In the Set value to: box, use the arrows to change the value to the number you want.
Contents
- 1 How do you fix automatic numbering in Word?
- 2 How do I fix multilevel numbering in Word?
- 3 Why is numbering not continuing in Word?
- 4 How do I start numbering from 2.1 in Word?
- 5 How do I get 1.1 Numbering in Word?
- 6 What is multi level numbering?
- 7 What is the difference between Heading 1 and Heading 2 in Word?
- 8 How do I change the numbering format in Word?
- 9 How do I reset heading numbering in Word?
- 10 How do you restart numbering styles?
- 11 How do you update the heading 2 style to match the formatting?
- 12 How do I make heading 3 in Word?
- 13 How do I align a list of numbers in Word?
- 14 Why is there an indent after 10?
- 15 How do you fix bullets in Word?
How do you fix automatic numbering in Word?
Go to File > Options > Proofing. Select AutoCorrect Options, and then select the AutoFormat As You Type tab. Select or clear Automatic bulleted lists or Automatic numbered lists.
How do I fix multilevel numbering in Word?
How to fix Multilevel list in Word
- Select the first heading level and then from the Word Main menu, under the tab Home, within the group Paragraph, click the Multilevel List icon.
- From the drop-down list, click option Define New Multilevel List.
Why is numbering not continuing in Word?
Well, you can try all you want, but sometimes Restart Numbering is grayed out! To fix it, just select the previous number’s paragraph…the whole thing, including the paragraph return at the end. Hit the Format Painter, then select the “bad” paragraph, including the paragraph return at the end.
How do I start numbering from 2.1 in Word?
If you just need the chapter number included in captions, on the On the Home Ribbon, in the Paragraph Group, click the Multilevel List icon and select the one with the words Chapter 1 in it from the List Library section. If you need subsections numbered (for example, 2.1, 2.2, 2.12, etc.)
How do I get 1.1 Numbering in Word?
Click the Home tab, then click the Multilevel List icon. – This opens the List Library. 2. From the drop-down list, select: 1 Heading 1, 1.1 Heading 2, 1.1.
What is multi level numbering?
Multilevel lists allow you to create an outline with multiple levels. In fact, you can turn any bulleted or numbered list into a multilevel list by placing the insertion point at the beginning of a line and pressing the Tab key to change the level for that line.
What is the difference between Heading 1 and Heading 2 in Word?
Usually, the topic heading at the top of your page will be Heading 1. The headings of sections within the document will have Heading 2 styles.Next, give each section of the document a meaningful heading. Assign each of these a Heading 2 style.
How do I change the numbering format in Word?
Define a new number format
- Select the text or numbered list you want to change.
- On the Home tab, in the Paragraph group, click the arrow next to Numbered List.
- To change the style, click the down arrow next to Number style and choose numbers, letters, or another chronological format.
How do I reset heading numbering in Word?
Add a new header and apply Heading 1. Right-click the number and choose Restart at 1 from the resulting submenu (Figure G). As you can see in Figure H, Word retains the number for the original list and restarts it for the new list.
How do you restart numbering styles?
To restart a numbered list: If you want to restart the numbering of a list, Word has a Restart at 1 option. It can be applied to numeric and alphabetical lists. Right-click the list item you want to restart the numbering for, then select Restart at 1 from the menu that appears.
How do you update the heading 2 style to match the formatting?
Alter the Heading to the format you want. Highlight the Heading and right-click on Heading 2 from the Styles Group. Select “Update Heading to match selection” ● Every Heading 2 in the document will update to the new format! Yes, really!
How do I make heading 3 in Word?
When you have the selection where you want to insert a Heading 3 style paragraph, press CTRL+SHIFT+s to display the Apply Styles dialog and in the Style Name control type Heading 3 and then click on Apply. Likewise for Heading 4. Headings 1 and 2 are displayed in the Quick Styles gallery and Styles pane by default.
How do I align a list of numbers in Word?
RECOMMENDED FOR YOU
- Create the numbered list.
- Select the list items you want to realign.
- You’ll find the Numbering tool in the Paragraph group on the Home tab.
- In the resulting dialog box, choose Right from the Alignment drop-down list.
- Click OK.
Why is there an indent after 10?
Re: Numbered List Indents After 10. It happens because Verdana is slightly wider than the default font. The numbers all fit within the tab position with the narrower font, but the two-digit numbers won’t fit when you switch to the wider Verdana font.
How do you fix bullets in Word?
Change bullet indents
- Select the bullets in the list by clicking a bullet.
- Right-click, and then click Adjust List Indents.
 Please Note:
This article is written for users of the following Microsoft Word versions: 97, 2000, 2002, and 2003. If you are using a later version (Word 2007 or later), this tip may not work for you. For a version of this tip written specifically for later versions of Word, click here: Continuing Your Numbering.
![]()
Written by Allen Wyatt (last updated September 15, 2018)
This tip applies to Word 97, 2000, 2002, and 2003
You can take advantage of a nifty Word feature that allows you to easily pick up numbering where you previously left off. This is great for numbered lists that are interspersed with paragraphs that have a different format. In general, the feature is accessed as follows:
- Enter the first portion of your numbered list and format it. For example, if your list has 17 items, and there is a heading after item 4, then you would enter the first four items in the numbered list.
- Enter the heading or paragraph that interrupts the list.
- Enter the rest of your numbered list and format it. The list should begin with 1 again.
- Right-click on the first paragraph after the list interruption. A Context menu appears.
- Choose Bullets and Numbering from the Context menu. Word displays the Bullets and Numbering dialog box, with the Numbered tab selected. (See Figure 1.)
- Choose Continue Previous List at the bottom of the dialog box.
- Click on OK. The dialog box disappears and the list numbering is modified.
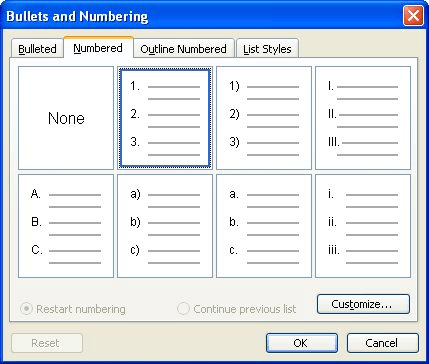
Figure 1. The Numbered tab of the Bullets and Numbering dialog box.
WordTips is your source for cost-effective Microsoft Word training.
(Microsoft Word is the most popular word processing software in the world.)
This tip (53) applies to Microsoft Word 97, 2000, 2002, and 2003. You can find a version of this tip for the ribbon interface of Word (Word 2007 and later) here: Continuing Your Numbering.
Author Bio
With more than 50 non-fiction books and numerous magazine articles to his credit, Allen Wyatt is an internationally recognized author. He is president of Sharon Parq Associates, a computer and publishing services company. Learn more about Allen…
MORE FROM ALLEN
Resizing a Text Box
Text boxes allow you to «segment» information in your document and lay it out differently. You can easily resize these …
Discover More
Hiding Fonts
Windows makes it easy to manage the fonts installed on your system. One of the lesser-known options is one that allows …
Discover More
Creating an AutoText List
The AUTOTEXTLIST field is one of those esoteric fields that you may know nothing about. The cool thing it does is it …
Discover More

Comprehensive VBA Guide Visual Basic for Applications (VBA) is the language used for writing macros in all Office programs. This complete guide shows both professionals and novices how to master VBA in order to customize the entire Office suite for their needs. Check out Mastering VBA for Office 2010 today!
More WordTips (menu)
Stubborn Highlighting
When you make extensive edits to a document and those edits include changing the formatting of numbered or bulleted …
Discover More
Understanding and Creating Lists
There are two types of common lists you can use in a document: bulleted lists and numbered lists. This tip explains the …
Discover More
Converting Automatic Numbering to Manual Numbering
The automatic numbering that Word lets you apply to paragraphs in your document can create some great looking content, …
Discover More
Subscribe
FREE SERVICE: Get tips like this every week in WordTips, a free productivity newsletter. Enter your address and click «Subscribe.»
View most recent newsletter.
Videos
Links and Sharing
What to do when the page numbering isn’t continuous in Word
What to Know
- To reset page numbers, go to Insert > Page Number > Remove Page Numbers. Do this for each section.
- To adjust page numbering, go to Insert > Page Number > Format Page Numbers. Make sure Start at is set to 1.
- To make page numbers continuous, go to Format Page Numbers and choose Continue from previous section.
This article explains how to fix page numbers in Word 2021, 2019, 2016, and Word for Microsoft 365.
How Do You Reset Page Numbers in Word?
If your page numbering if off in Word, the easiest solution is to remove the page numbers and start over. To remove page numbers in Word, click anywhere in the document, go to the Insert tab, then select Page Number > Remove Page Numbers. You can then adjust the numbering settings and add page numbers to your Word document as you please.
If you have section breaks, you might need to reset the page numbering for each section. Page number options are also available under the Header & Footer tab.
How Do I Fix Messed-Up Page Numbers in Word?
To adjust the numbering settings, go to the Insert tab, then select Page Number > Format Page Numbers.
From here, you can choose a number format and even include chapter information. Under Page numbering, make sure Start at is set to 1. Select OK to save changes.
To start numbering on the second page, set Start at to 0.
Why Is My Page Numbering Not Continuous in Word?
If you try to add or adjust page numbers manually, it can throw off the numbering for the whole document. Section breaks can also cause the page numbering to be inconsistent. Another possibility is you changed the page number format settings.
Go to the Home tab and select the Show/Hide icon (¶) in the Paragraph group to view section breaks.
How Do I Make Continuous Page Numbers in Word?
If you notice the page count starts over, it could be because you set up a section break with a different number scheme. You can remove the section break, but there’s an alternative. To make the page numbers continuous:
-
Click on the page with the incorrect number, then go to Insert > Page Number > Format Page Numbers.
-
Choose Continue from previous section. Select OK to save changes.
The section break will remain while keeping the page numbering consistent with the previous section. Repeat for each one to make the numbering sequential for the whole document.
How to Add Page Numbers to Different Sections in Word
If you want to break your document into sections with separately numbered pages, follow these steps:
-
Click in the body of the document where you want the new section to begin, then select the Layout tab.
-
Select Breaks and choose Next Page under Section Breaks.
-
Double-click in the header or footer (wherever the page number is) and deselect Link to Previous in the Navigation group.
-
In the new section, go to Insert > Page Number > Format Page Numbers.
-
Select Start at and set the value to 1. Select OK to save changes.
FAQ
-
How do I fix page numbers in a table of contents in Word?
After creating a table of contents in Word, you can customize the way it appears. Choose Update Table from the Table drop-down menu to update page numbers. You can also go to References > Table of Contents > Custom table of contents to customize your existing table of contents.
-
Why does my Page Number say page merge format in Word?
If you see { PAGE *MERGEFORMAT } instead of page numbering, you have field codes turned on in Word. Press the shortcut key combination ALT — F9 to display the field, or page numbers, instead of the field code.
Thanks for letting us know!
Get the Latest Tech News Delivered Every Day
Subscribe
Restart each list manually
Restart each list manually by right-clicking its first item and choosing Restart at 1 from the shortcut menu. Wait until the document is finished before you restart numbering, because otherwise, the numbers may walk as you insert further lists.
Restarting lists manually is seldom a satisfactory solution, but if your goal is simply to get the document printed with steps numbered correctly, it may be enough.
Restarting a list manually (Restart at 1) places a restart marker in the first paragraph of the list. If you copy or move this paragraph, the restart marker goes with it. So if you restart a list, then copy the first paragraph and paste it later in the document to create a new list, the numbering on the first list changes from “restart” to “continue,” continuing the numbering of the previous list. You’ll have to insert a new restart marker at the beginning of that list to preserve the correct numbering.
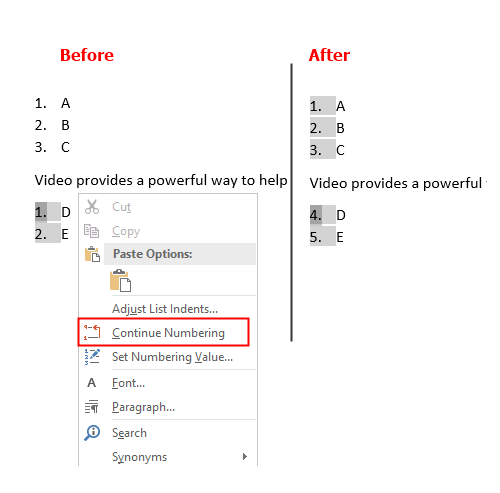
Continue Numbering
Some of your numbered list items might be separated by elements such as charts, explanatory paragraphs, or sidebars. When you click the Numbering button, if Word doesn’t automatically continue with the next numbered step in your process, you can continue numbers in an existing numbered list by right-clicking the first incorrect number in a numbered list and then click Continue Numbering.
Set Numbering Value
You can also force the Word to start a numbered list with a specific number. Right-click the first incorrect number and select Set Numbering Value to display the “Set Number Value dialog box”, which will allow to choose one of the following:
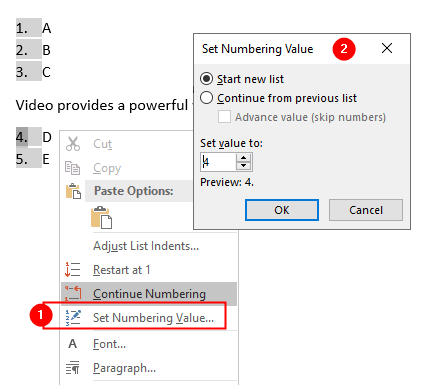
- Start a new list
Restart numbering from 1. - Continue from the previous list
Assign the next number used in the last numbered list (at any point of the document). - Set value to
Choose a number to set your list to start at.
Click on the OK button to commit the change.
More Tutorials on Word Lists:
- Bullets and Numbering
- Create and Customize Bulleted List
- Create and Customize a Numbered List
- Fix Numbering Problems in Numbered Lists
- Multilevel Lists
- Define new Multilevel list dialog box
- Define Multilevel List with “ListNum field list name”
List Numbering using SEQ Fields
Sort Paragraphs or Lists Alphabetically
Automated numbered lists are a feature a lot of us take for granted in Microsoft Word…. They usually work seamlessly and automatically, but sometimes these lists can work against us: restarting a list of numbers at 1 when we mean to continue our list, or picking up formatting that we can’t seem to shake, like creating all bold numbers in spite of unbold text. Don’t despair; these little inconveniences are remarkably simple to fix.
Exercise File
To follow along, you may download the exercise file: NumberedLists
This file contains a fascinating list of silly words laid out in series of numbers lists. Let’s take a look at our options.
Continuing or Restarting Numbered lists
Look at the second section of words, starting with “Brouhaha.” It is clear that this list should not be starting over; it should be a continuation of the previous list. This is a simple fix.
- Right click on top of the number 1 next to the word Brouhaha.
- Select Continue Numbering

This will pick up the value from the previous numbered list. What if the opposite happens? Word guesses that you would like to continue numbering, but you actually intend to start over? Easy peasy! Follow the same process, but this time select Restart at 1.

Additionally, occasionally when you insert a numbered list, you will see a lightening bolt appear with a dropdown arrow. This is just another way to access the same feature, a shortcut inserted by Word that will allow you to make the decision whether to continue numbering or restart at 1.

Change Number Values
There is also an option in this menu to Set Numbering Value. This option is for those times when you need a special number, perhaps one that is out of sequence with the rest of your numbered list.

Formatting Numbered Lists
Sometimes you create a lovely numbered list, and for whatever reason, Word picks up on formatting from a previous line of text, making all the numbers bold, or a previously used color.

On the exercise document, look at the third section. Someone used a blue bold font for the text above the numbered list, and Word assumed that this should apply to the numbers on the list. To fix this, let’s take a closer look at that right click menu.
- Right click on top of the first blue number, next to “Taradiddle”
- Attached to the numbering options in a separate section is the ability to change the formatting: to remove the bold formatting and recolor the text.
- Note: sometimes these options appear above the numbering options, sometimes they are below.

Sub Points
Creating Sub Points
In the last section, numbers 4 and 5 should be sub points of number 3. To demote them to sub point click to the left of “Our Friends,” and hit tab on your keyboard. Do the same for “Our Neighbors.”
This has created sub points, and Word assumed that you would like to indicate sub points with lowercase alphabet:

If the alphabet isn’t your goal, you can always click into the text in the line of a or b, go the numbered list dropdown in the Paragraph group of the Home tab, and select a different format. Maybe Roman numerals?

Promoting Sub Points
By the way, how do you change your mind and promote a sub point back to being a main point? Well, you could use the Decrease Indent (left arrow) in the Paragraph group…

But you all know I am a fan of shortcuts, and my favorite one for this purpose is shift + tab.
Thoughts?
Have numbered lists caused you trouble in the past? Will any of these tips help you going forward? I would love to hear from you!
Congratulations, Power Users!
Congratulations to our newest Power Users! For the full gallery, and more information about the WSU Microsoft Office Power User Program, please visit: wichita.edu/poweruser