
You can make all of your line spacing changes in the Paragraph dialog box. Here’s how:
-
Select the list. The bullets won’t appear selected.

-
Click Home>Paragraph Dialog Box Launcher.
-
On the Indents and Spacing tab, under Spacing, clear the check from Don’t add space between paragraphs of the same style.

If all you want to do is add more space between bullets and text in the list, you’re done! Or …
-
Change the spacing between every single line by staying on Indents and Spacing> Spacing> Line spacing and choosing Single, 1.5 lines, or Double for a full double-space between lines.
If you want to increase or decrease the amount of space between items in a bulleted or numbered list, do this:
-
Select the entire bulleted list.
-
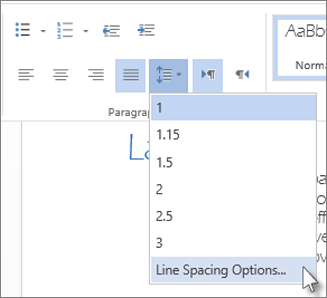
Click Home, and then click Paragraph>Line Spacing.
-
Choose the number of line spaces you want from the drop-down menu, or create custom line spacing by choosing Line Spacing Options.
You can make all of your line spacing changes in the Paragraph dialog box. Here’s how:
-
Select the list. The bullets won’t appear selected.
-
Click Home>Paragraph Dialog Box Launcher.
-
On the Indents and Spacing tab, under Spacing, clear the check from Don’t add space between paragraphs of the same style.
If all you want to do is add more space between bullets and text in the list, you’re done! Or …
-
Change the spacing between every single line by staying on Indents and Spacing> Spacing> Line spacing and choosing Single, 1.5 lines, or Double for a full double-space between lines.
If you want to increase or decrease the amount of space between items in a bulleted or numbered list, do this:
-
Select the entire bulleted list.
-
Click Home, and then click Paragraph>Line Spacing.
-
Choose the number of line spaces you want from the drop-down menu, or create custom line spacing by choosing Line Spacing Options.

There are several ways to adjust line spacing in Microsoft Word. Today’s tutorial explains the basic method using the ribbon and a more advanced method using the Paragraph dialog box.
See the Quick Tip at the bottom of this tutorial to learn how to single-space an entire document from the Paragraph dialog box.
This tutorial is available as a YouTube video showing all the steps in real time.
Watch more than 150 other document software tutorials on my YouTube channel.
The images below are from Word for Microsoft 365.The steps are the same in Word 2021, Word 2019, and Word 2016, and similar for Word 2013 and Word 2010. However, your interface may look slightly different in those older versions of the software.
Basic Method: Adjust Line Spacing from the Ribbon
- Select the Home tab in the ribbon.

- (Optional Step) Select the Show/Hide button in the Paragraph group to show paragraph break symbols and other formatting that may affect line spacing.

- Select the text with the line spacing that needs to be changed.

- Select the Line and Paragraph Spacing button in the Paragraph group.

- Select an option from the drop-down menu:
A. Numbers 1.0 through 3.0 add space between lines.
B. Add Space Before Paragraph adds space before paragraphs but not before the lines within them.
C. Remove Space After Paragraph removes space after paragraphs but not after the lines within them.
These three options are based on your current font size with 1.0 being the equivalent of single-spacing.

Your changes will be applied immediately.

Note that you can apply the individual line spacing (the numbers 1.0 through 3.0) and the paragraph spacing to the same text to further customize your results.
- (Optional Step) Select the Show/Hide button again to hide paragraph symbols and other formatting (see figure 2).
Now, let’s move on to an advanced method offering additional spacing options.
Advanced Method: Adjust Line Spacing from the Paragraph Dialog Box
- Select the Home tab in the ribbon (see figure 1).
- (Optional Step) Select the Show/Hide button in the Paragraph group to show paragraph break symbols and other formatting that may affect line spacing (see figure 2).
- Select the text with the line spacing that needs to be changed (see figure 3).
Pro Tip: PC users can press Ctrl + A to select the entire document if all the line spacing needs to be changed. However, this includes items you may not want to alter, including headings, tables, table titles, figure captions, tables of contents, footnotes, endnotes, and reference lists.
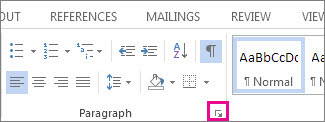
- Select the dialog box launcher in the Paragraph group.

- Make changes in the Spacing section of the Paragraph dialog box:
A. The Before and After boxes represent the spaces before and after paragraphs measured in points with one point being 1/72 of an inch tall. Use the increment arrows to choose a whole number or enter a number with a decimal (e.g., 2.75) directly into the box.
B. The Line spacing drop-down menu offers six options:
1. Single—Creates single-spacing based on your current font size.
2. 1.5 Lines—Creates a space and a half as large as your current font size.
3. Double—Creates double-spacing based on your current font size.
4. At Least—Determines the minimum amount of space between lines based on the number of points entered in the At box.
5. Exactly—Creates space between lines based on the number of points entered in the At box.
6. Multiple—Creates spacing multiplied by the number entered in the At box. For example, if you enter four in the At box, your spacing will be four times as large as your current single-spacing.
C. Don’t add space between paragraphs of the same style—For many users, this will remove spaces between all paragraphs because general documents commonly have only one paragraph style.

Note that the Preview box updates as you make adjustments in the Spacing section.
- Select the OK button to close the Paragraph dialog box.

- (Optional Step) Select the Show/Hide button again to hide paragraph symbols and other formatting (see figure 2).
Quick Tip: Single-Space an Entire Document from the Paragraph Dialog Box
- Select the Home tab in the ribbon (see figure 1).
- Select the entire document. (PC users can press Ctrl + A.)
- Select the dialog box launcher in the Paragraph group (see figure 7).
- Enter 0 in the Before box in the Paragraph dialog box (see figure 8).
- Enter 0 in the After box in the Paragraph dialog box (see figure 8).
- Select Single in the Line spacing drop-down menu (see figure 8).
- Select the OK button (see figure 9).
Related Resources
How to Adjust Letter Spacing in Microsoft Word (PC & Mac)
How to Adjust the Space between Words in Microsoft Word
How to Adjust Page Margins in Microsoft Word
Updated June 25, 2022

on
April 23, 2018, 7:54 AM PDT
How to control spacing and alignment in a numbered list in Microsoft Word
Modifying results in Word’s numbered list feature isn’t as intuitive as many users would like. Here are some tips for using settings to control spacing and alignment in a numbered list.
We may be compensated by vendors who appear on this page through methods such as affiliate links or sponsored partnerships. This may influence how and where their products appear on our site, but vendors cannot pay to influence the content of our reviews. For more info, visit our Terms of Use page.

Word’s numbered list feature is easy to use but modifying the results isn’t always as intuitive as you might like. As is often the case with Office, knowing the right setting to use and where to find it is the key. In this article, we’ll take a basic look at Word’s numbering feature and then move on to two common problems–indents and alignment–that are easy to solve if you know where to look and how to alter the setting to get the results you want.
It’s important to remember that the numbered list settings might not be what you expect because Word applies the last numbering style selected. Keep this in mind as you work through the examples, and don’t worry if your settings don’t match those in the article. The concepts are the same even if your settings don’t match mine.
I’m using Word 2016 (desktop) on a Windows 10 64-bit system, but this article applies to earlier versions. 365’s browser edition displays numbered lists and offers a few basic settings. However, you can’t apply either option discussed in this article using the browser. For your convenience, you can download the sample demonstration .docx or .doc file.
The basics
Adding a numbered list is simple, and often you won’t need to alter a thing. There are two ways to add a numbered list. You can use the Numbering option as a simple toggle as follows:
- Position the cursor where you want to start your list.
- Click the Numbering option in the Paragraph group. Word adds 1. and positions the cursor a bit to the right.
- Enter your first list item and press Enter to wrap to the next line. Word enters 2. and positions the cursor to the right waiting for the next list item (Figure A).
- Repeat steps 2 and 3 as many times as needed to complete the list.
- At this point, you can press Enter once and then click the Numbering option or press Enter twice to disable the numbering feature.
Figure A

Word adds the sequential numbers to the left of each item for you.
You can also generate a numbered list from an existing list. Select the list and click Numbering; Word adds sequential numbers, beginning with 1, to the complete list all at once, as shown in Figure B.
Figure B

Generate the numbers after the fact.
Creating a numbered list is simple and most users catch on right away. One more thought before we move on–use numbered lists correctly. A numbered list, by its nature implies that the number of items or the order of those items has meaning. A list of simple facts, where neither order nor number have meaning is a bulleted list, not a numbered list. You can turn what might otherwise be a bulleted list by forcing a number into the mix, as I’ve done with our example list. Remove the word Seven from the title and you have a bulleted list!
SEE: 10 all-purpose keyboard shortcuts to boost your Word efficiency (free PDF) (TechRepublic)
Line indents and spacing
After adding a numbered list, you probably notice a few things:
- Word indents the list a quarter of an inch to the right of the left margin.
- There’s a half inch between the number and the first character in the item.
- That half inch is composed of a Tab character, not spaces. (This is less obvious than the first two.)
You can change all three settings, but they aren’t on the Numbering option’s dropdown, where you might expect them. To access these options, right-click the numbers (not the list) and choose Adjust List Indents from the resulting submenu, as shown in Figure C. In the resulting dialog, adjust the appropriate settings. For example, in Figure D, you can see that I’ve transposed the first two settings. Figure E shows the new settings in place. If the ruler is enabled, you can also see that the left tab the feature uses moved accordingly.
Figure C
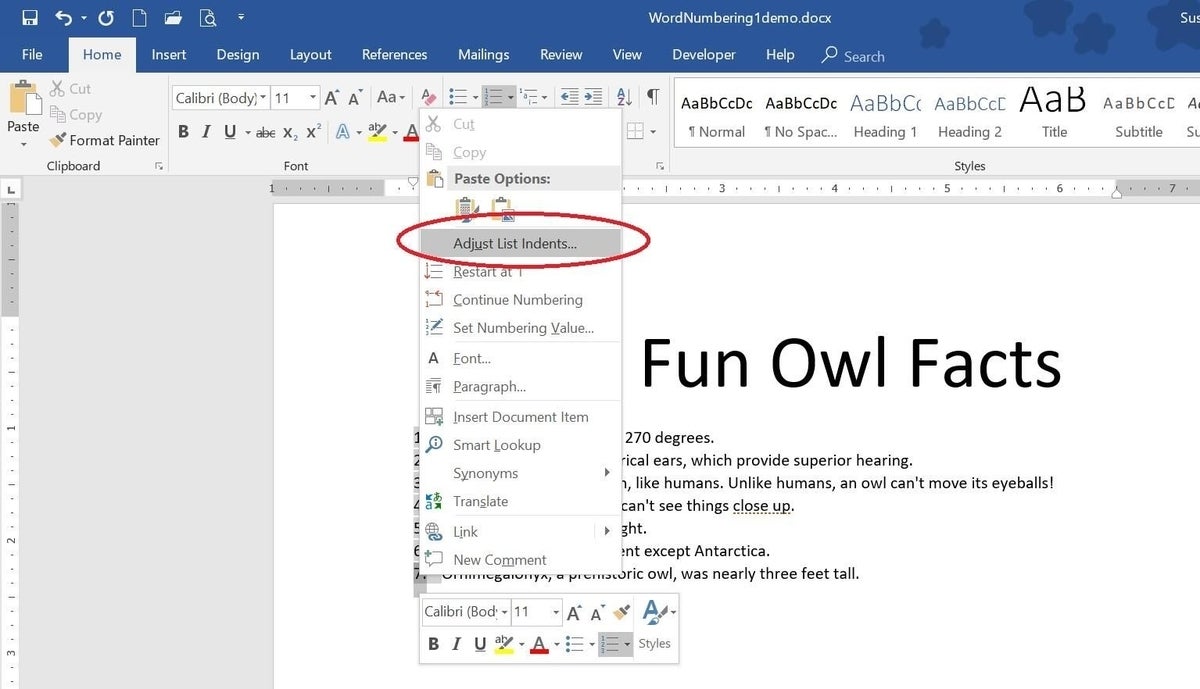
Modify the default list indent settings.
Figure D

Modify the settings.
Figure E

The new list is closer to the left margin and there’s less space between each number and the item.
You could change the Follow number with option (Figure D) from a Tab character to spaces, but I don’t recommend doing so unless you have a specific reason for doing so–and you seldom will. If you choose Nothing from this setting, Word ignores the Text indent setting.
SEE: Microsoft Teams: The right collaboration platform for your organization? (free PDF) (TechRepublic)
Alignment
After adding a few more facts, as shown in Figure F, you might notice something new–the two-digit numbers don’t align with the previous one-digit numbers. You could leave the list as is, but most likely you’ll want to adjust it. Leaving it as is makes the reader uncomfortable; it’s simply not as readable as it should be. We expect numbers to align using the period character or the right-most digit if there’s no punctuation.
Figure F

Word doesn’t align the numbers as expected.
Fortunately, the alignment setting is easier to find than indent and spacing settings; you’ll create a right-aligned number format as follows:
- Click anywhere inside the list.
- From the Numbering dropdown (in the Paragraph group), choose Define New Number Format (at the bottom).
- In the resulting dialog, change the Alignment setting from Left to Right, as shown in Figure G.
- Click OK to see the newly aligned list shown in Figure H.
Figure G

Change the Alignment setting.
Figure H

Word aligns the numbers as expected.
Stay tuned
Numbering basics are easy, but numbered lists can be much more complex. Over the next few months, we’ll look at some common numbering problems and their solutions.
Send me your question about Office
I answer readers’ questions when I can, but there’s no guarantee. Don’t send files unless requested; initial requests for help that arrive with attached files will be deleted unread. You can send screenshots of your data to help clarify your question. When contacting me, be as specific as possible. For example, “Please troubleshoot my workbook and fix what’s wrong” probably won’t get a response, but “Can you tell me why this formula isn’t returning the expected results?” might. Please mention the app and version that you’re using. I’m not reimbursed by TechRepublic for my time or expertise when helping readers, nor do I ask for a fee from readers I help. You can contact me at susansalesharkins@gmail.com.
Also see:
- How to use Excel’s Data Model to turn related data into meaningful information (TechRepublic)
- 5 ways to modify and customize styles in Microsoft Word (TechRepublic)
- How to use COUNTIFS() to compare multiple data sets (TechRepublic)
- Office Q&A: An easy Word Replace trick for a big problem and exposing duplicate records in Excel (TechRepublic)
- How to use Excel formulas to compare multi-column lists (TechRepublic)
-
Microsoft
-
Software
In this article, there are 4 quick ways to enlarge the space between the lines in bulleted or numbered list in Word.
There must be a lot of times when you will create bulleted or numbered list in your file. And by default, the line spacing of the list is set in “Single”. Then what if you want to increase the space between 2 list items? A larger space surely can make the list look clear in the eye. So today, we will share 4 methods on fixing this very problem.
Method 1: Press “Shift+ Enter”
- Firstly, place your cursor at the end of one list item.
- Then press “Shift+ Enter”. And you shall see there is a larger space between the first list item and the second. Repeat the action several times until you finish all the items in one list.


Method 2: Use “Separate List” Option
- For example, if you want to widen the space between the first item and the second one, you should position the insertion pointer within the second item.
- Then right click on it.
- On the list menu, choose “Separate List”.


Here is the result:
Notes:
- Always remember to right click on the second list item if you need to enlarge the blank above it.
- Don’t right click on the first item, for you will only have the “Separate List” option grayed out.
- Never select multiple list items at one time but a single one instead. Otherwise, the “Separate List” option shall gray out, too.


Method 3: Change Line Spacing
It’d quite easy to figure out that changing line spacing to a larger value can address the issue.
- First of all, select the entire list.
- Then right click.
- Now choose “Paragraph” on the menu.

- Next in the “Paragraph” dialog box, choose a line spacing value larger than single.
- Finally, click “OK”.


Method 4: Use Word Macro
- First of all, click “Developer” tab then the “Visual Basic” to open VBA editor.

- Next, you need to insert a new module by clicking the “Normal” first.
- Then click “Insert” and “Module” next.

- Now double click on the newly created module to enter editing space.
- Paste the following codes there:


Sub ChangeListSpaceTo1pt5()
  Selection.Paragraphs.LineSpacingRule = wdLineSpace1pt5
End Sub

Sub ChangeListSpaceToDouble()
  Selection.Paragraphs.LineSpacingRule = wdLineSpaceDouble
End Sub
- The first macro changes the line spacing to 1.5 lines and the second to double lines. You can choose one accordingly. Then place cursor inside the code lines.
- Click “Run”.


Feel No Fear when File Gets Corrupted
Once files especially important ones get compromised, panic is often the reflex. After all, we can’t blame people on being worried. However, here is the thing people should know that most of damaged documents are highly fixable. And all you need is a Word data corruption fix tool which shall hand you back your data.
Author Introduction:
Vera Chen is a data recovery expert in DataNumen, Inc., which is the world leader in data recovery technologies, including Excel xlsx data error repair tool and pdf repair software products. For more information visit www.datanumen.com