
Word for Microsoft 365 Word 2021 Word 2019 Word 2016 Word 2013 Word 2010 Word 2007 More…Less
You can apply a numbering scheme to the headings in your document by using multilevel-list templates and built-in heading styles in Word (Heading 1, Heading 2, and so on).
Important: Make sure you’re using built-in heading styles in your document.
You can number headings so that top-level headings (Heading 1) are numbered 1, 2, 3, for example, and second-level headings (Heading 2) are numbered 1.1, 1.2, 1.3.
-
Open your document that uses built-in heading styles, and select the first Heading 1.
-
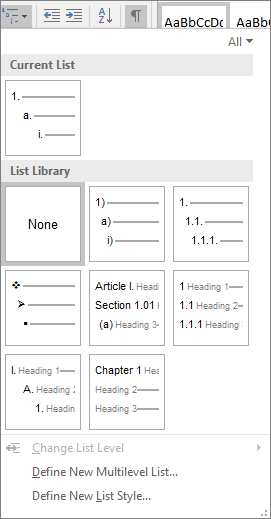
On the Home tab, in the Paragraph group, choose Multilevel List.

-
Under List Library, choose the numbering style you would like to use in your document.
Note: Depending on the type of documentation you’ve prepared, you might choose a template that includes the word «Heading» in the example.
Need more help?
Some document types or requirements need headings numbering. It’s easy to add numbering for one level of headings in the Word document. Word works with the numbering for any style in the same way. See how to work with lists in Word:

Alternatively, you can add numbering to the heading style to automate your work.
However, if you need to add multilevel numbering for the headings, you have to know some tricks on how to do that:

Add numbering to the heading style
All style changes, such as adding numbering to a heading style, are made in the Modify Style dialog box.
1. To open the Modify Style dialog, do one of the following:
- On the Home tab, in the Styles group, right-click on the style (for example, Heading 1) and choose Modify… in the popup menu:

- On the Home tab, in the Styles group, click the dialog box launcher:

On the Styles pane, right-click on the style (for example, Heading 1) and choose Modify… in the popup menu:

- Right-click on the text with the needed style (for example, Heading 1) or some text you want to apply this style, then click the Styles list in the Mini Toolbar.
In the Style gallery, right-click on the style and choose Modify… in the popup menu:


2. In the Modify Style dialog box, click the Format button and then choose Numbering…:

3. In the Numbering and Bullets dialog box, choose the numbering format you prefer, or click the Define New Number Format… button to create a custom numbering:

In the Define New Number Format dialog box:

- The Number style list specifies the numbering style: Arabic numerals; uppercase and lowercase Roman numerals; uppercase and lowercase alphabet letters; word series (1st, One, and First), etc. See examples in the Customizing numbered lists tip.
- The Font… button opens the standard Font dialog box that allows selecting the specific font or font attributes (such as bold, italic, and underline) and the point size for the numbers.
- The Number format field offers to type the characters you want to come before each number (if needed). For this example, the word Part:

- In the Alignment list, choose the distance from the left, centered, or right margin that Word places the number.

For example:
Add multilevel numbering to the heading style
To create a multilevel list for headings, do the following:
1. On the Home tab, in the Paragraph group, click the Multilevel List button:

2. Do one of the following:
- To create a pre-defined multilevel list for headings, click the arrow next to the Multilevel List button and choose any of the pre-defined styles for headings:

- To create a custom multilevel list for headings, click the arrow next to the Multilevel List button and choose Define New Multilevel List…:

In the Define new Multilevel list dialog box, click the More>> button in the lower-left corner:


Word displays an extra panel at the right of the dialog box, so you see the full dialog box:

To link this numbered list level to a particular style, select the style in the Link level to style drop-down list:

Make other changes for the custom list levels (see how to customize multilevel lists for more details).
For example:

After applying the heading styles:
- The Styles Gallery will look like this:

- You can see the numbered list for headings:


Note: To modify the numbering or numbering format, you need to modify this custom multilevel list (see how to customize the multilevel list), not the numbering in the heading style (like described in the Add numbering to the heading style).
This tutorial shows how to add heading numbers in Microsoft Word. The heading numbers can include labels such as “Article,” “Section,” and “Chapter.”
We will also look at how to modify the numbers and labels attached to each heading level. For example, you may want to change “Article I” to “Proposal 1.”
Quick Links:
- How to Add Heading Numbers
- How to Modify Heading Numbers
This tutorial’s companion video shows all the steps in real time.
Watch more than 200 other writing-related software tutorials on my YouTube channel.
The images below are from Word for Microsoft 365. These steps also apply to Word for Microsoft 365 for Mac (a.k.a., Word for Mac), Word 2021, Word 2019, Word 2016, and Word 2013.
How to Add Numbers to Headings
Important Notes
- This process is for existing headings created with Word’s built-in heading styles.
- You don’t have to have every heading complete. However, the first Heading 1 level should already be inserted.
- If you are new to working with headings or need a refresher, please see “How to Create and Customize Headings in Microsoft Word.”
- Select the Heading 1 in your document.

- Select the Home tab in the ribbon.

- Select the Multilevel List button in the Paragraph group.

- Select a style from the List Library. Remember that you can modify these styles, so choose the one that is closest to the format you want.
Pro Tip: Hover over each option to see a larger example.

Your headings should now feature the multilevel list numbers.

These steps assume you have already added numbers to your headings, as shown in the section above.
Important Note: Word’s Multilevel List function includes many advanced options. This section features the options I believe are the most useful for the majority of people.
- Select the first numbered heading in your document.
- Select the Home tab in the ribbon (see figure 2).
- Select the Multilevel List button in the Paragraph group (see figure 3).
- Select Define New Multilevel List from the drop-down menu.

- Select a level in the Click level to modify menu in the Define new Multilevel List dialog box.

-
- Type the words, symbols, or punctuation before or after the number in the gray shading in the Enter formatting for number text box.
Important Note: Don’t delete or alter the number in the gray shading. If you delete or alter the number in the gray shading, the automatic numbering will stop functioning.
Pro Tip: If you add words, symbols, or punctuation after the number, also add a space after the final character so that a space appears before the heading text.

- (Optional) Choose a new number style from the Number style for this level menu.

- (Optional) Select the Font button to change the font, style, size, color, and other appearance options.

- (Optional) Adjust the number position as necessary.

- Select the More button.

- (Optional) Enter a different number in the Start at text box if you don’t want the level to start with the current number.

- (Optional) Select Space, Tab character, or Nothing from the Follow number with menu. For most users, Space will be the best option. (The Tab character can put too much space between the number and label and the heading text.)

- Select the next heading level that you want to modify in the Click level to modify text box (see figure 8).
- Repeat steps 6 through 13, as necessary.
- Select the OK button.

Your heading numbers should now be modified.

Related Resources
How to Add Heading Numbers to Table Titles and Figure Captions in Microsoft Word (PC & Mac)
How to Create Run-In Headings in Microsoft Word (Indented & Left-Aligned)
How to Create a Custom Heading Style in Microsoft Word
How to Create a Custom Heading Style in Microsoft Word for Mac
Updated March 18, 2023
Multilevel numbering in Word is the #1 headache for many people working with large documents.
Believe it or not, it’s not complicated. It just takes somebody to lead the way and point out the pitfalls you need to avoid.
Today that pleasure falls to me!
Before I start, grab your free multilevel numbering troubleshooting guide that shows you the steps to get multilevel numbering working properly first time, every time, together with answers to over 20 FAQs and plenty of real client examples constructed step by step to help you fix what isn’t working with your numbering.

1. What Multi-level Numbering Looks Like
Often used in the legal profession or in large corporate documents, multilevel numbering creates a logical hierarchy and easy navigation within the document. The headings can also be summarised later on in a table of contents. Here is a simple example:

2. How to Set Up Multilevel Numbering
Here is the correct process:
1. Select the text that you want to number (this can be a section of text or the whole document).

2. Select the Home tab.
3. Click the multilevel numbering icon in the Paragraph group.
![]()
4. You can either select an existing layout from the list to use as a starting point, or you can create a new numbering system from scratch. As you hover over each thumbnail image, Word provides a larger image of the numbering system.
5. Choose Define New Multilevel List to display the control dialog.

The dialog box can be broken down as follows:
Step #1 Click level to modify
In the top left is a list of levels. As you select each level, the settings in the rest of the dialog box changes.
Level 1 is the highest level, i.e. the main headings such as chapter or section titles.
Level 2 is subordinate to level 1.
Level 3 is subordinate to level 2.

Step #2 Enter formatting for number
This is where the level number is constructed. If you include a previous level number, it will be displayed with a grey background, as will the number for the current level.
Type anything you wish to put in between the numbers such as dots, dashes, brackets etc.
Clear any text in the ‘Enter formatting for this number’ box.
Step #3 Include level number from
When creating a subordinate level (or child level), you can first specify the level number of the parent.
For example, for section 3.2
- ‘3’ is the parent level (level 1) and
- ‘2’ is the child level (level 2)

Step #4 Number style for this level
Each level can have its own number style. It may be a standalone style, e.g. 1, 2, 3 or a, b, c or continue on from a higher level, e.g. 1.1.1 or 1.a.i.
- When creating 1.1 numbering, this option is 1, 2, 3.
- When creating 1.a numbering, this option is a, b, c

Step #5 Font
Set the font formatting for the selected level, if you want.

Step #6 Position
What position from the left margin do you want items for each level of numbering. For example, level 1 items may be 0cm from the left margin, level 2, 1cm from the left margin and level 3, 2cm from the left margin.
Here’s what they mean:
- The Aligned At determines how far from the left margin the number appears.
- The Text indent at figure determines how far from the left margin the text following the number is.

6. Click OK to save all the settings and close the dialog box.
The text you selected in step 1 now looks like this.

The next part is where the magic happens …
3. How to Apply Multilevel Numbering
Once you have created your numbering system:
1. Position the cursor at the beginning of a line.

2. Press the TAB key to move the text down a level (demote).

3. Press the SHIFT and TAB keys together to move the text up a level (promote).

If you prefer, you can also click the indent icon to demote and the outdent icon to promote between levels.
![]()
4. How to Change Multilevel Settings
Once you have created your numbering system:
1. Reselect all text that is using the multilevel numbering.
2. Click the multilevel numbering icon and select Define New Multilevel List (yes, you choose this option even if you are modifying an existing multilevel list).

The original settings that you defined are redisplayed.
3. In the top-left box select the level that you wish to change, then change your settings.
4. Repeat for the other settings.
5. Click OK to save the settings. Your numbered list should now reflect your new settings.
5. Linking Multilevel Numbering to Styles
Each level of a multilevel numbering system can be linked to a style. This means that as you apply styles throughout the document, the numbering is applied appropriately and automatically. You can either use the built-in Heading 1, Heading 2, Heading 3 styles or use your own custom styles.
1. In the Numbering dialog box, click the MORE button in the bottom-left corner to expand the dialog box.
2. Select level to modify in the top-left box.
3. Open the Link level to style drop-down list and choose the style you wish to connect to the numbering level.

4. Click OK.
5. In the document, apply the Heading 1, Heading 2, Heading 3 styles where needed.
It’s a good idea to create a body text style and apply that where appropriate, so that the body text does not inadvertently get caught up in the multi-level numbering.
6. Select the whole document (or the portion of the document where you want to apply your numbered sections).
7. Click the icon in the Paragraph group (Home tab).
8. Select your custom numbering style from the gallery. The thumbnail image should show the linked styles.

6. How to Use Styles to Set Number Levels
1. Select all the text that you wish to apply the same number level to. Alternatively, if you wish to go line by line, you can place the cursor anywhere in a line of text.
2. In the Styles gallery, click the style that corresponds to the number level you wish to apply. For example, to apply the top level numbering click Heading 1 and for the third level numbering click Heading 3 (assuming those are the styles you assigned).
The numbering and all the numbering settings will be applied to the selected text or the paragraph in which the cursor was positioned.

And that, my friend, is how you do multilevel numbering in Word with no loose ends.
How to set up a dual-multilevel numbering system in Word
7. Two resources to help you
1. Grab your free multilevel numbering troubleshooting guide.

2. Watch over my shoulder as I set up multilevel numbering from scratch.

8. What next?
I hope you found plenty of value in this post. I’d love to hear your biggest takeaway in the comments below together with any questions you may have.
Have a fantastic day.


About the author
Jason Morrell
Jason loves to simplify the hard stuff, cut the fluff and share what actually works. Things that make a difference. Things that slash hours from your daily work tasks. He runs a software training business in Queensland, Australia, lives on the Gold Coast with his wife and 4 kids and often talks about himself in the third person!
SHARE

on
March 30, 2010, 6:52 AM PDT
10 steps to creating a numbered heading style in Word
If you want to incorporate automatic numbering in your document headings, the quickest and most foolproof route is to create a custom style.
You have two choices when faced with the task of numbering headings in a Word document. You can enter the numbers manually and hope nothing changes — lots of luck with that one. Or you can opt for the more efficient solution and create and apply a numbered style. Unfortunately, that can get you into even more trouble, if you don’t know what you’re doing. To avoid surprises, follow these 10 steps to add a numbering scheme to a style.
Note: This article is also available as a PDF download.
1: Start with a new, blank document
If possible, open a new document to create your numbered style. Working with an existing document and all its in-use styles can be troublesome. It can be done, but changing styles that are already in use almost always has far-reaching repercussions. Admittedly, this advice isn’t always practical, but it’s the best way to start if you can.
2: Use what you have
You could create a new set of styles, but for our purposes, Word’s existing heading styles, Heading 1, Heading 2, and so on, provide a good foundation. Most everything you need is built in and can be easily modified. If heading styles are already in use and you must work in a production document, you’ll have to create new styles.
3: Open the main heading
The existing heading styles (Heading 1, Heading 2, and so on) are based on the Normal style. All you have to do is add a numbering scheme to the top heading style and watch the settings trickle down. Always begin with the main level heading. In this case, that’s Heading 1. To edit Heading 1, do the following:
- Open the Styles And Formatting task pane by choosing Styles And Formatting from the Format menu or clicking the Styles And Formatting tool on the Formatting toolbar.
- Right-click Heading 1 in the Pick Formatting To Apply list and choose Modify, as shown in Figure A.
- In the Modify Style dialog box, shown in Figure B, choose Numbering from the Format button’s list.
- Click the Outline Numbering tab in the Bullets And Numbering dialog box.
- Choose the predefined scheme that’s most similar to what you want. For instance, if you want sublevels indented, choose the indented form; similarly, if you don’t want sublevels indented, choose the flush left form, as shown in Figure C. Try to make the best choice right now because changing your mind later will present so many problems that starting over will be easier.
- If Reset is enabled, click it now to remove residual settings.
Figure A
Open the style to add numbering.
Figure B
Choose Numbering to open the Bullets And Numbering dialog box.
Figure C
Start with the numbering scheme that’s closest to what you need.
4: Modify Heading 1
At this point, you’re ready to modify the Heading 1 style. First, click Customize. The resulting Customize Outline Numbered List dialog, shown in Figure D, is the heart of this technique. This is where you’ll define the numbering scheme for Heading 1 as follows:
- In the Levels control, Word offers nine numbering levels. Select 1 and click the More button, if necessary to display more options. (This button with display Less if already clicked.)
- From the Number Style drop-down list, choose a style, if you don’t care for the default.
- In the Level Format control, add the components you want to appear along with the heading number. Figure E shows the word Section and a colon character with the number.
- At the bottom of the dialog box, make sure Heading 1 is the Link Level To Style setting. (Since you began by modifying this style, it should be the default.)
- Change the Follow Number With setting to Space.
- Give the new numbering scheme a descriptive name, such as NumberedHeadings. Always name your new schemes to avoid confusion.
Figure D
This dialog presents all of the settings you’ll need to add numbers.
Figure E
You can add text to your numbering scheme.
Do not click OK — you still have to define the numbering style for the sublevels.
5: Modify first sublevel
You just added a numbering scheme to the main heading style, Heading 1. Beginning with Heading 2, add the scheme to the sublevel headings, as follows:
- Select 2 in the Level control.
- Choose a Number Style and make any necessary changes in the Number Format control.
- The Link Level To Style setting should be Heading 2.
- Change the Follow Number With setting to Space.
- Check the Restart Numbering After option, if you want sublevel numbers to start at 1. In most cases, you’ll want to set the After option to the previous heading, as shown in Figure F. Doing so forces Word to start renumbering Heading 2 paragraphs after each new Heading 1 paragraph. In other words, when Heading 1 updates to 2, the sublevel number will start over at 1, generating 2.1, 2.2, 2.3, and so on.
Figure F
Choose to restart numbering in subsections.
Do not click OK yet — you’re still not done.
6: Indent sublevel 2
Right now, all eight sublevels are aligned with the left margin. It makes sense that you’ll want to indent at least a few subheadings. To indent sublevel 2, simply change the Aligned At setting in the Number Position section. For instance, Figure G shows this setting at .25.
Figure G
Indent sublevels, if you like.
You’re still not ready to click OK!
7: Format remaining sublevels
For most documents, you’ll need only a few levels, but Word offers nine. Format several, even if you don’t think you’ll use them. Simply select the appropriate number in the Level control and repeat the steps outlined above, updating the settings as necessary. When you’ve formatted all your number levels, click OK — finally!
8: Don’t update
Once you’re back in the Modify Style dialog box, don’t be in a hurry to click OK. First, uncheck the Automatically Update option (at the bottom right). You don’t want Word to automatically update any styles in your numbering scheme. Once you’ve unchecked this option (if necessary), click OK.
9: Number as you go
When creating the document, you can assign styles as you enter new text. Simply position the cursor at the beginning of a new line and choose the appropriate style from the Styles control on the Formatting toolbar. For the main heading, choose Section 1: Heading 1, as shown in Figure H.
Figure H
Choose the header style before entering heading text.
Word will insert the appropriate number and components, as shown in Figure I. Simply type the heading text and press [Enter]. Figure J shows a Heading 2 sublevel, 1.1. If you add a second sublevel, as shown in Figure K, Word again generates the appropriate sublevel number, 1.2.
Figure I
Word generates the appropriate main heading number.
Figure J
The first sublevel heading displays the section number, 1, and the sublevel number, 1.
Figure K
Word generates the sublevel number 2 but doesn’t update the main section number.
10: Put it to use after the fact
Sometimes, text comes before the formatting. In this case, you simply select the heading text and choose the numbered style from the Styles control. When you do, Word automatically inserts the formatted number. Figure L shows selected text after assigning the Heading 2 style.
Figure L
You can also select text and assign a numbered heading style.
-
Software