How to number lines and paragraphs in Microsoft Word and format the numbers with a different font, size or color.
When you’re discussing a speech or other document ‘in progress’ you might want to number the lines or paragraphs for easy reference “Please change paragraphs 6, 7, 21 and 27”. Sure, these days there’s a lot of linking and online collaboration but there’s still a place for line or paragraph numbering.
Line numbering will give you left hand line numbering like this:

Line numbering is simple. Paragraph numbering is done indirectly. As usual in Microsoft Office, there’s complications and surprising pitfalls. Office-Watch.com doesn’t just give you the simple ‘Microsoft approved’ answer but digs deeper.
Line Numbering
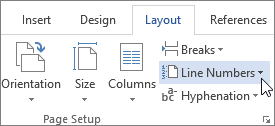
Line numbering is simple in Word. Go to Layout tab click on the small arrow at bottom right of the Page Setup section to reach the Page Setup dialog then Layout | Line Numbers. This dialog and option hasn’t changed for many versions of Word.

In Word the Layout tab has a Line Numbers pull down.

The full Line Numbering dialog has options for continuous line numbers or numbering for each page or section also the start number and increments. ‘From text’ controls the distance between the numbering and the document text.
Line numbering can be applied on a per-paragraph basis to selected paragraphs or the entire document. (Strictly speaking you can have line numbering for a single line but the results aren’t helpful – try for yourself).
Stop or Suspend Line Numbering
The line numbering can be stopped at any time or suspended for selected paragraphs via Line Numbering | Suppress for Current Paragraph or Paragraph dialog | Line and Page Breaks | Formatting exceptions | Suppress line numbers.
Change the look for line numbers
You can change the look of just the line numbers using the ‘Line Number’ style.

Line Number is one of those annoying hidden Word styles. It doesn’t show up in the ‘In use’ or ‘In current document’ style lists even when it’s being used in the document. You have to choose ‘All Styles’ to see the Line Number style and modify it.
Curiously, line numbering itself isn’t a formatting option in Paragraph styles. At least we can’t find it.
You can use a style to suppress line numbering at Format Paragraph | Line and Page Breaks | Formatting Exceptions | Suppress Line Numbers.
However styles can’t enable the line numbering in the first place. That’s a curious omission since Microsoft developers themselves should be aware of one common use for line numbering – in samples of computer code. These samples are usually formatted with a special style (fixed space font, indent and a special color) to which automatic line numbering would be very useful.
Paragraph numbering
Since there’s line numbering in Word, you’d expect to also find a paragraph numbering option. It’s common to find draft documents with paragraphs numbered so that people can refer to each by that number (“We mention government oversight in paragraphs 6, 7, 9 and 12”).
There’s no direct option for paragraph numbering in Word that works similarly to the line numbering feature.
The workaround is to use numbered lists instead. It’s not a good workaround but it’s what Microsoft leaves us with.
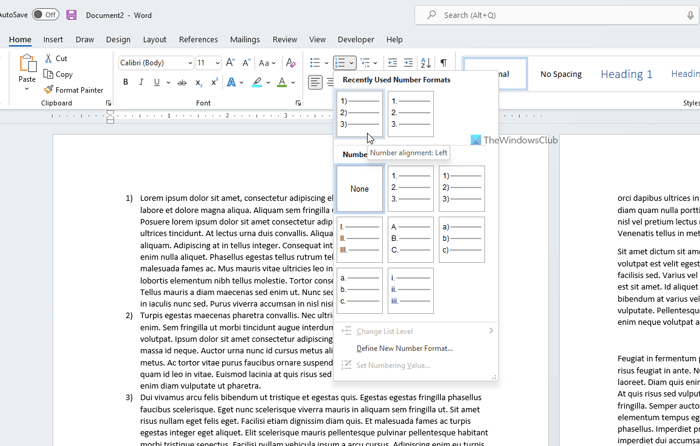
Select the paragraphs then choose Numbering to make a numbered list.

Unfortunately, the defaults for this also mess up the formatting of your document.

If the document already has numbers or lists, making this choice will override that formatting (we did say this is a workaround).
To fix the formatting, change the position of the numbers to put them in the margin as a hanging indent. You can do that by dragging the ruler markers to the left.

Or in the Format Paragraph dialog box, a Before Text indent plus a Hanging indent both of the same value.

You can create or modify a style to do this and turn on/off quickly.
Change look of Paragraph numbering
Paragraph numbering is formatted with the List Paragraph style. Or select one of the numbers so the whole column of numbers is selected, then change the formatting

Wish List
As usual, there’s features missing from Word’s numbering options that really should be present in such a long standing product. We mention these to save you the trouble of looking for options that Microsoft left out.
We’ve already mentioned there’s no real paragraph numbering option that numbers the paragraphs without changing the formatting of the document. This omission alone makes us wonder about Microsoft’s customer research and decision making process. There are plenty of ‘use cases’ for numbered paragraphs, especially in the legal profession.
Sometimes line/paragraph numbering should be on the right of the page. On the right it’s less obtrusive and would be more appropriate for ‘right-to-left’ languages.
For longer documents, it could be useful to show the line/paragraph number range in the header/footer for example “ Page 7 Paras 23-28 “ .
Do you have a document where you need to number the paragraphs? Maybe you want the numbers as reference points or are simply required to include them. We’ll show you how to number paragraphs in Microsoft Word.
Word offers a feature to number the lines in a document. But when it comes to numbering paragraphs, there isn’t a built-in feature or handy tool. However, by using the Numbered List feature and making some tweaks to the formatting, you can add paragraph numbers.
Add Paragraph Numbers in Word
Inserting paragraph numbers using the Numbered List feature works just like when you use the feature to add list items.
Select your paragraphs by dragging your cursor through them and head to the Home tab. To apply the default number style, click “Numbering” in the Paragraph section of the ribbon.
To use a different number format, click the arrow next to the Numbering button and select an option.
Now you have basic numbering for your paragraphs. However, this does make your paragraphs look a bit like a list. So let’s look at the different ways to format them based on your needs.
RELATED: How to Set Paragraph Formatting in Word
Format the Numbered List Indents
You have a couple of ways to format the numbers in the list as well as the paragraphs they represent. You can use the Adjust List Indents feature or the ruler. Let’s look at both.
Adjust the List Indents
Select the numbers in the list, right-click, and pick “Adjust List Indents” from the shortcut menu.
This handy little box gives you a variety of ways to format the numbered paragraphs.
Number Position: This setting moves the numbers inward or outward from the left margin and does not affect the position of the paragraphs. Enter the number of inches or use the arrows to increase or decrease them in smaller increments.
Text Indent: This setting adjusts the paragraph spacing from the left and affects the overflow of lines. Here again, enter the number of inches or use the arrows to increase or decrease the measurement.
Follow Number With: This setting determines what displays between the number and the first word in the paragraph. You can choose from Tab Character, Space, or Nothing. If you select Tab Character, you can optionally add the tab stop at a certain spot.
You can adjust one setting or experiment with more to get the exact appearance you want.
RELATED: How to Control Line and Paragraph Spacing in Microsoft Word
Use the Ruler
If using the Adjust List Indents tools doesn’t give you the desired results, you can also manually move the numbers and paragraphs using the ruler at the top.
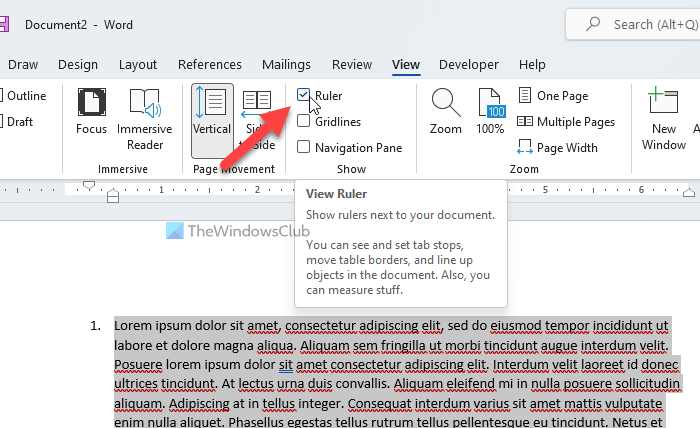
To display the ruler, go to the View tab and check the box for Ruler in the Show section of the ribbon.
Here are a couple of ways to use the ruler to adjust the indents.
Drag the numbers out of the margin: If you don’t want the numbers directly in the document but in the margin area instead, this is doable.
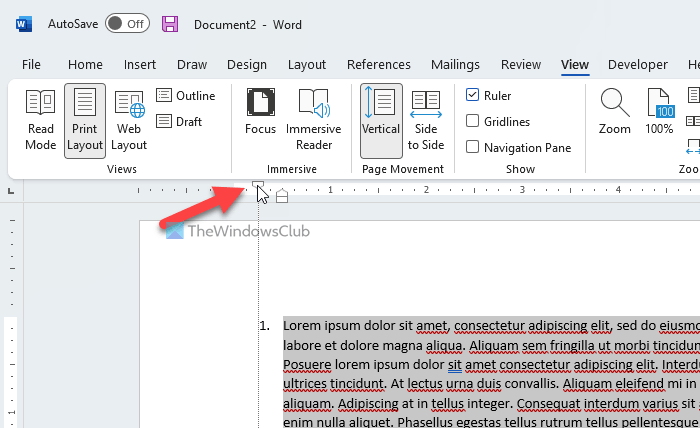
Select the paragraphs and then drag the First Line Indent indicator (top triangle) to the left. You’ll see a line display as you do this. Release when you are happy with the location.
Drag the numbers and move the paragraphs: If you prefer to move everything so that the numbers are outside the margin and the paragraphs are lined closer to the left, this is also a good option.
Select the paragraphs and then drag the Left Indent indicator (bottom rectangle) to the left. Again, you’ll see the line as you do this. Release when you see the position you want.
Numbering paragraphs may be something you want or something that is required for your document. Either way, you can add those numbers and then adjust the formatting per your preference.
RELATED: How to Use Rulers in Microsoft Word
READ NEXT
- › Discord Direct Message Won’t Go Away? Here’s the Fix
- › How to Get a Refund on the PlayStation Store
- › The New Winamp Is Here, but It’s Not What You’d Expect
- › Windows 11 Has a New Photo Gallery in the File Explorer
- › Android’s Nearby Share Has (Unofficially) Arrived on Mac
- › Save Hundreds on Elegoo’s New PHECDA Laser Engraver Through Kickstarter
Word for Microsoft 365 Word 2021 Word 2019 Word 2016 Word 2013 Word 2010 Word 2007 More…Less
Word can automatically count the lines in a document and display the appropriate number beside each line of text. This is useful when you need to refer to specific lines in a document, such as a script or a legal contract.

By default, Word numbers every line in a document (except those in tables, footnotes, endnotes, text boxes, and headers and footers). However, you can choose which line numbers to display. For example, you can display line numbers in all or part of the document. Or you can display line numbers at intervals, such as every tenth line (10, 20, 30, and so on).
What do you want to do?
-
Add line numbers
-
Remove line numbers
Add line numbers
You can add line numbers to all or part of a document. To view line numbers, you must be in Print Layout view (click the View tab to check).
Notes:
-
A table is counted as one line.
-
A figure is counted as one line.
-
A text box is counted as one line if it is positioned inline with the text on the page. If text on the page wraps around the text box, the lines of text on the page are counted. Lines of text inside a text box are not counted.
Add line numbers to an entire document
-
On the Layout tab, in the Page Setup group, click Line Numbers.
Note: If your document is divided into sections and you want to add line numbers to the entire document, you first need to select the document. Click Select in the Editing group on the Home tab, and then click Select All. Or press CTRL+A.
-
Do one of the following:
-
To number consecutively throughout the document, click Continuous.
-
To start with number 1 on each page, click Restart Each Page.
-
To start with number 1 after each section break, click Restart Each Section.
-
For more advanced line numbering options, such as numbering at different intervals, click Line Numbering Options, and then click Line Numbers on the Layout tab.
-
Add line numbers to a section or to multiple sections
-
Click in a section or select multiple sections.
-
On the Layout tab, in the Page Setup group, click Line Numbers.
-
Click Line Numbering Options, and then click the Layout tab.
-
In the Apply to list, click Selected sections.
-
Click Line Numbers.
-
Select the Add line numbering check box, and then select the options that you want.
Top of Page
Remove line numbers
You can remove line numbers from the entire document, from a section, or from a paragraph.
-
Click in the document, or click in the section or paragraph from which you want to remove line numbers. If you want to remove line numbers from multiple sections, select the sections.
-
On the Layout tab, in the Page Setup group, click Line Numbers.
-
Do one of the following:
-
To remove line numbers from the entire document or section, click None.
-
To remove line numbers from a single paragraph, click Suppress for Current Paragraph.
-
Top of Page
What do you want to do?
-
Add line numbers
-
Remove line numbers
Add line numbers
You can add line numbers to all or part of a document. To view line numbers, you must be in Print Layout view (click the View tab to check).
Notes:
-
A table is counted as one line.
-
A figure is counted as one line.
-
A text box is counted as one line if it is positioned inline with the text on the page. If text on the page wraps around the text box, the lines of text on the page are counted. Lines of text inside a text box are not counted.
Add line numbers to an entire document
-
On the Page Layout tab, in the Page Setup group, click Line Numbers.
Note: If your document is divided into sections and you want to add line numbers to the entire document, you first need to select the document. Click Select in the Editing group on the Home tab, and then click Select All. Or press CTRL+A.
-
Do one of the following:
-
To number consecutively throughout the document, click Continuous.
-
To start with number 1 on each page, click Restart Each Page.
-
To start with number 1 after each section break, click Restart Each Section.
-
For more advanced line numbering options, such as numbering at different intervals, click Line Numbering Options, and then click Line Numbers on the Layout tab.
-
Add line numbers to a section or to multiple sections
-
Click in a section or select multiple sections.
-
On the Page Layout tab, in the Page Setup group, click Line Numbers.
-
Click Line Numbering Options, and then click the Layout tab.
-
In the Apply to list, click Selected sections.
-
Click Line Numbers.
-
Select the Add line numbering check box, and then select the options that you want.
Top of Page
Remove line numbers
You can remove line numbers from the entire document, from a section, or from a paragraph.
-
Click in the document, or click in the section or paragraph from which you want to remove line numbers. If you want to remove line numbers from multiple sections, select the sections.
-
On the Page Layout tab, in the Page Setup group, click Line Numbers.
-
Do one of the following:
-
To remove line numbers from the entire document or section, click None.
-
To remove line numbers from a single paragraph, click Suppress for Current Paragraph.
-
Top of Page
Need more help?
paragraph numbering in word
Word’s automatic paragraph numbering feature is a great time-saver when it works. But, once a numbering sequence gets messed up, it seems impossible to get it back on track. Here are a few tricks for making your automatic paragraph numbering in Word behave.
How to Automatically Number Paragraphs in Word
If you’re not already familiar with Microsoft Word’s paragraph numbering feature, it’s located on the Home tab in the Paragraph section.
- The left-most button is for bullets.
- The one in the middle is for single-level numbering.
- The one on the right is for multi-level numbering.
Use the Multi-Level Option for More Flexibility
Even if I’m numbering just one level of the paragraph, I always use the multi-level style instead of single-level numbering. Multi-level gives me more options for formatting. And it even allows me to save my own numbering schemes for future use.
Three Ways Paragraph Numbering Goes Off Track
I typically see three problems with paragraph numbering getting off track, all of which can be cured with a simple right-click.
1. Most people really don’t like Word’s default indentation for automatic numbering. Fixing it is simple: Just right-click on one of the numbers and choose Adjust List Indents. Depending on whether you’re using single-level or multi-level numbering, you’ll get a dialog box that’ll allow you to set the indentation for the number itself and the following text. If you’re using the multi-level paragraph numbering style, you can also set the alignment of the number to right versus left if that’s what you prefer. In multi-level numbering, you can also reset the alignment of the first level of the numbering scheme, then instruct Word to increment the indentation for the remaining levels by a consistent measurement.
2. The numbers themselves somehow get out of sequence. When this happens, right-click and choose either Continue Numbering (if you want to connect your current paragraph to the previous list to continue that sequence) or Set Numbering Value (if you need to deliberately start at a specific number). This trick also comes in handy if you need to insert an unnumbered paragraph in the middle and then pick the number sequence back up in a subsequent paragraph.
Occasionally, however, some paragraph numbers just don’t respond to the Continue Numbering command. Here’s what I do as a fallback position. I place my cursor somewhere within a paragraph in the sequence I want to continue, and then on the Home tab click the Format Painter button. Notice that the mouse cursor is now a paintbrush. That means it’s copied the formatting of the paragraph that my cursor is currently sitting in, and now it’s looking to paste it elsewhere. So once I click into the offending paragraph, then it continues numbering.
3. You need to add more space between paragraphs. You probably want a little space between each paragraph, which, unfortunately, is not the default. To fix this, select all your numbered paragraphs, right-click, and choose Paragraph. In the Paragraph dialog box, set a bit of space after each paragraph. Be sure to uncheck the “Don’t add space between paragraphs of the same style” box to ensure that spacing is honored. Once you click OK, your numbered paragraphs should be correctly spaced.
Click here to read more of Deborah’s Microsoft Office tips.
Updated March 31, 2021.
llustration ©iStockPhoto.com
If you want to number your paragraphs in Word, Google Docs, and Word Online, here is how you can do that. Although it is easy to create bullet points or numbered lists in those tools, you can make use of the same thing to add numbers to paragraphs. This article explains how you can do that and customize the number as per your requirements.

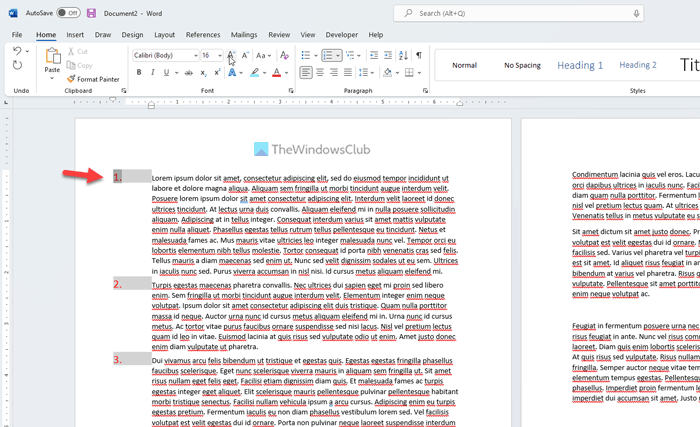
The basic thing of this guide is to add a numbered list and customize the list as per your requirements. Once you create a numbered list with the desired paragraphs, you will be able to change the corresponding setting such as position, color, font, size, etc. In simple terms, you need to customize the paragraphs in such a way it must not look like a numbered list.
Note: Here, we have shown the steps in Microsoft Word. However, you can do the same in Google Docs and Word Online. As some options may be placed in a different location, we have included some specific steps for specific apps for your convenience.
To number paragraphs in Microsoft Word follow these steps:
- Select the paragraphs in your document.
- Click on the Numbering option.
- Switch to the View tab.
- Tick the Ruler checkbox.
- Click on the First Line Indent option.
- Move it towards the left.
- Double-click on the numbered list to select.
- Change font, size, color, etc.
To learn more about these steps, continue reading.
First, you need to open the document and select the paragraphs you want to number. Then, click on the Numbering option to add the numbered list.
By default, the numbered list should not be enough for you. That is why you need to customize it to make it look different. In other words, it will stay a numbered list, but the appearance will be different than a typical numbered list.
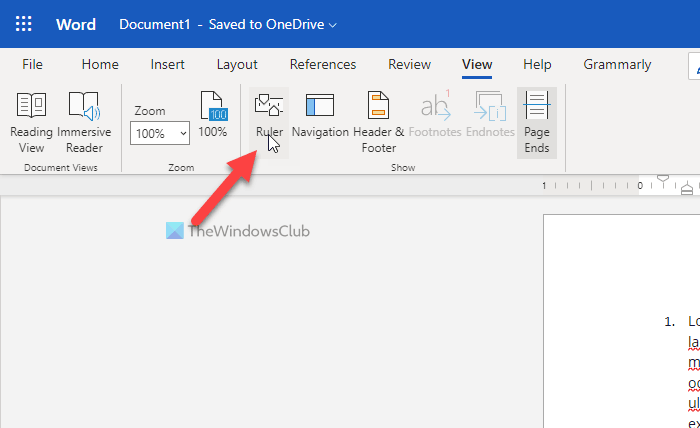
For that, you need to change the position of the numbers. To do so, switch to the View tab and tick the Ruler checkbox.
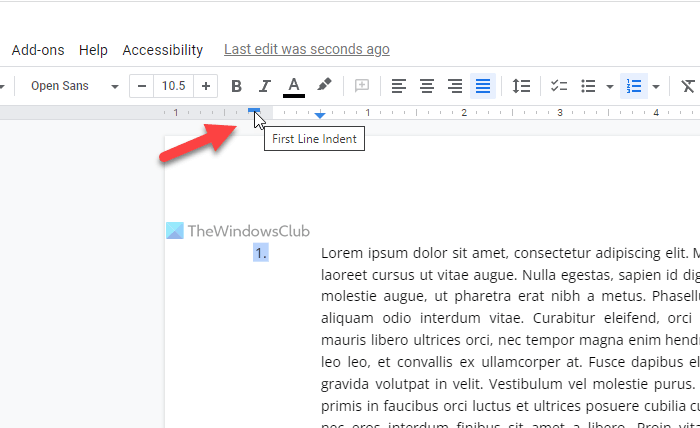
Then, click on the First Line Indent button and move it towards the left side of the page.
It will create a gap between the numbers and paragraphs. However, you can also use the Left Indent button to move the paragraphs toward the right side as well. However, it will move the entire page instead of the numbered list.
If the positioning is done, you can double-click on the numbers and change the font, size, color, etc. Although it is not possible to apply bold or italic, you can certainly change the font family, font size, color, etc., within moments.
If you use Google Docs, you don’t need to go to any View tab since Google Docs enables the Ruler by default. Therefore, you can find the First Line Indent and Left Indent options by default in the same position as Word.
However, if you use Word Online, you might need to go to the View tab and select the Ruler option to display the ruler.
Following that, the steps are the same. You can change the position and customize it as you like.
How do I get paragraph numbers in Word?
To get paragraph numbers in Word, you can use the Numbering functionality. Whether it is in Word, Google Docs, or Word Online, the steps are the same. You need to add the numbered list, change the position and customize it as per your requirements. It is possible to change the font family, color, and size.
How do I number a multilevel paragraph in Word?
To create a multilevel numbered list and number a multilevel paragraph in Word, you need to follow the same steps. In the beginning, create the first set of numbered lists. Then, you can choose the sub-paragraphs and add another numbered list. For your information, you can create multiple lists under one numbered list.
That’s all! Hope this guide helped.
Read Next:
- How to Edit, Update, Remove a Table of Contents in Word
- How to mirror an Image in Microsoft Word.


