
In this article, there will be 3 methods for you to count the number of words for sections in your Word document.
It’s easy to get the total number of words of a document. But there is no function in Word to tell us the number of words of a section. And given to the fact that we prefer to put contents of the same topic in one section, such as organizing a chapter while writing a book, it’s necessary for us to come up with workarounds to get the section count.  Following are 3 approaches which require you running a macro.
Method 1: Count the Number of Words for Current Section
- Firstly, place cursor inside a target section.
- Then you need to open VBA editor in Word. Click “Developer” and then the “Visual Basic” command. In case you can’t find “Developer” in the Ribbon, then press “Alt+ F11” instead.
- Next click “Normal” project in the left column.
- Then click “Insert” tab.
- On that drop-down menu, choose “Module”.

- Open new module by double click.
- Now in the open module, paste bellowing codes:

Sub CountWordsOfCurrentSection()
  MsgBox ("There are " & Selection.Sections(1).Range.ComputeStatistics(wdStatisticWords) _
         & " words in current section.")
End Sub
- Lastly, click “Run” or press “F5” to execute codes.


You will receive a message box, showing the total number of current section, such as below:
Method 2: Count the Number of Words for a Specific Section
Let’s say you have been working on a book and setting each chapter as an individual section. Then to know how many words you’ve written in a chapter, you can utilize this method.
- Follow above steps to install and run a macro.
- Just replace macro with this one:
Sub CountWordsOfSpecificSection()
  Dim strSecNum As String
  Dim objDoc As Document

  Application.ScreenUpdating = False

  Set objDoc = ActiveDocument
  strSecNum = InputBox("Enter a section number here:", "Enter Section Number")
  MsgBox ("There are " & objDoc.Sections(strSecNum).Range.ComputeStatistics(wdStatisticWords) _
          & " words in section " & strSecNum & ".")
  Application.ScreenUpdating = True
End Sub
- And running it, there will be an input box. In the “Enter Section Number” box, input the section number and click “OK” to move on.


The result is shown on a message box.
Method 3: Count the Number of Words for All Sections in a Document
As the subtitle suggests, this way shall get you total number of words of each section in a document and list them on a message box.
- First of all, open target document.
- Still, you have to repeat steps in method 1 to install and run the macro.
- And this time, change with this macro:
Sub CountWordsOfEachSectionInDoc()
  Dim objDoc As Document
  Dim nNumberOfSection As Long
  Dim strText As String

  Application.ScreenUpdating = False
  Set objDoc = ActiveDocument
  nNumberOfSection = objDoc.Sections.Count

  For nNumberOfSection = 1 To nNumberOfSection
    strText = strText & "There are " & objDoc.Sections(nNumberOfSection) _
              .Range.ComputeStatistics(wdStatisticWords) & " words in section " & nNumberOfSection & "; " _
              & vbNewLine
  Next nNumberOfSection

  MsgBox strText

  Application.ScreenUpdating = True
End Sub
Here is the possible outcome:
Save Valuable Data
While dealing with all kinds of documents, you have to keep in mind the safety of them. Since you can never tell when the next data loss shall happen, it’s suggested to back up important files. Besides, it’s always good to obtain a tool that can recover doc, if any.
Author Introduction:
Vera Chen is a data recovery expert in DataNumen, Inc., which is the world leader in data recovery technologies, including xls repair and pdf repair software products. For more information visit www.datanumen.com
I know what you’re thinking: “What’s there to learn about the word count in Microsoft Word? The number is right there at the bottom of the screen!” And that is true. Unless you’ve changed your default settings, the count always appears in the left-hand side of the status bar below your document. But Word’s word count tool can do more than provide the total number of words.
This tutorial shows you (1) how to count words in specific sections and (2) how to open the Word Count dialog box to see additional statistics such as character counts with and without spaces, as well as how to exclude textboxes, footnotes, and endnotes from the count.
And don’t miss the bonus section featuring keyboard shortcuts for selecting text in Word and other Windows applications.
This tutorial is available as a YouTube video showing all the steps in real time.
Watch more than 150 other writing-related software tutorials on my YouTube channel.
The images below are from Word for Microsoft 365. These steps also apply to Word 2021, Word 2019, Word 2016, Word 2013, Word 2010, and most earlier versions of Word. However, your interface may look slightly different in older versions.
How to View the Word Count for Specific Sections
To view the number of words in a specific sentence, paragraph, page, or section, select only that text. (See the bonus section below featuring Windows keyboard shortcuts for selecting text.)

The word count in the status bar at the bottom left-hand corner of your screen will then update to say “[#] of [#] words.” Once you deselect the text, the count will return to the total for the entire document.

Text Selection Keyboard Shortcuts for Windows
If you want to select multiple sections of text in different locations in the document, press Ctrl as you make the selections. While pressing Ctrl, the text in between your selections shouldn’t be selected.
Here are six Windows keyboard shortcuts that make automatic selections:
Select everything from the cursor to the end of the paragraph:
Ctrl + Shift + Down Arrow
Select everything from the cursor to the beginning of the paragraph:
Ctrl + Shift + Up Arrow
Select everything from the cursor to the end of the screen:
Ctrl +Shift + Alt + PgDn (Page Down)
Select everything from the cursor to the beginning of the screen:
Ctrl + Shift + Alt + PgUp (Page Up)
Select everything from the cursor to the end of the document:
Ctrl + Shift + End
Select everything from the cursor to the beginning of the document:
Ctrl + Shift + Home
How to View the Word Count Dialog Box and Exclude Textboxes, Footnotes, and Endnotes
To open the Word Count dialog box, select the word count in the status bar or press Ctrl + Shift + G on your keyboard.

The Word Count dialog box shows the number of pages, words, characters with and without spaces, paragraphs, and lines in your document.

Note that the lines statistic in the Word Count dialog box represents the number of individual lines with letters or numbers in them, not the number of sentences. The number of lines in your document will be affected by your font size (i.e., the bigger the font, the more lines you will have.)
Uncheck “Include textboxes, footnotes and endnotes” if you want to exclude everything in those sections from the word count. The count will update immediately.

Further Reading: How to Delete Extra Spaces in Microsoft Word
Updated February 25, 2022
 Please Note:
This article is written for users of the following Microsoft Word versions: 2007 and 2010. If you are using an earlier version (Word 2003 or earlier), this tip may not work for you. For a version of this tip written specifically for earlier versions of Word, click here: Word Count for a Section.
![]()
Written by Allen Wyatt (last updated October 8, 2018)
This tip applies to Word 2007 and 2010
One of the benefits of fields is that you can insert dynamic information within your document. When the field is updated, it is replaced with whatever information is current relative to the field in use. For instance, you can use the NumWords field to insert the number of words in the document. When the field is updated, it is replaced with however many words are then in the document.
If you want to find out the number of words in a section, and have it dynamically placed in a document, then you are out of luck. There is no field that will return this information. You can find it out manually by selecting the text in the section and then choosing the Word Count tool, but that obviously doesn’t satisfy the desire to have a value that can be inserted into your document and automatically updated.
This means that you will need to rely on a macro to get the desired word count. If you just want to know the number of words in each section of your document, the following macro can be helpful.
Sub WordCount()
    Dim NumSec As Integer
    Dim S As Integer
    Dim Summary As String

    NumSec = ActiveDocument.Sections.Count
    Summary = "Word Count" & vbCrLf

    For S = 1 To NumSec
        Summary = Summary & "Section " & S & ": " _
          & ActiveDocument.Sections(S).Range.Words.Count _
          & vbCrLf
    Next

    Summary = Summary & "Document: " & _
      ActiveDocument.Range.Words.Count
    MsgBox Summary
End Sub
This simply steps through each section, determines the word count in that section, and displays the summary information in a message box. This does not provide a way to dynamically insert the information in the document, but it does provide an illustration of how you can find the word count of a single section.
A variation on the technique allows you to automatically insert the word count for a specific section at the location of a bookmark within your document. Let’s say that you have a bookmarked called «WordCount» that you have defined. This bookmark specifies the place where you want the number of words in the second section of your document. The following macro will determine the word count for the specified section, and then insert the text at the location of the bookmark.
Sub InsertWordCount()
    Dim oRange As Word.Range
    Dim sBookmarkName As String
    Dim sTemp As String

    sBookmarkName = "WordCount"
    With ActiveDocument
        sTemp = Format(.Sections(2).Range.Words.Count, "0")
        Set oRange = .Bookmarks(sBookmarkName).Range
        oRange.Delete
        oRange.InsertAfter Text:=sTemp
        .Bookmarks.Add Name:=sBookmarkName, Range:=oRange
    End With
End Sub
The macro could be easily called from other macros, such as one that runs when the document is opened, saved, or printed. That way the word count would be updated at all the normal times when a field is automatically updated.
WordTips is your source for cost-effective Microsoft Word training.
(Microsoft Word is the most popular word processing software in the world.)
This tip (11098) applies to Microsoft Word 2007 and 2010. You can find a version of this tip for the older menu interface of Word here: Word Count for a Section.
Author Bio
With more than 50 non-fiction books and numerous magazine articles to his credit, Allen Wyatt is an internationally recognized author. He is president of Sharon Parq Associates, a computer and publishing services company. Learn more about Allen…
MORE FROM ALLEN
Selecting a Line of Text
Many word processing programs include commands that allow you to select a line of text. Word doesn’t, but you can use the …
Discover More
Specifying a Browser in a Hyperlink
Excel allows you to easily add hyperlinks to a worksheet. Click on it, and the target of the link is opened in a browser …
Discover More
Creating Custom Underlines
Word provides a wide assortment of underlines that you can apply to your text. If the assortment isn’t wide enough for …
Discover More
Word count refers to the total number of words in a document. Counting your words might seem very obvious because as you type, you can see your count increase with each character on the status bar. However, sometimes your word count might come with specific details, such as ‘Endnotes and footnotes are not included in the counting.’ Some professors might require you to exclude these and will look out for them as they grade your work.
This article will be a guide on how to count only the words in a specific section.
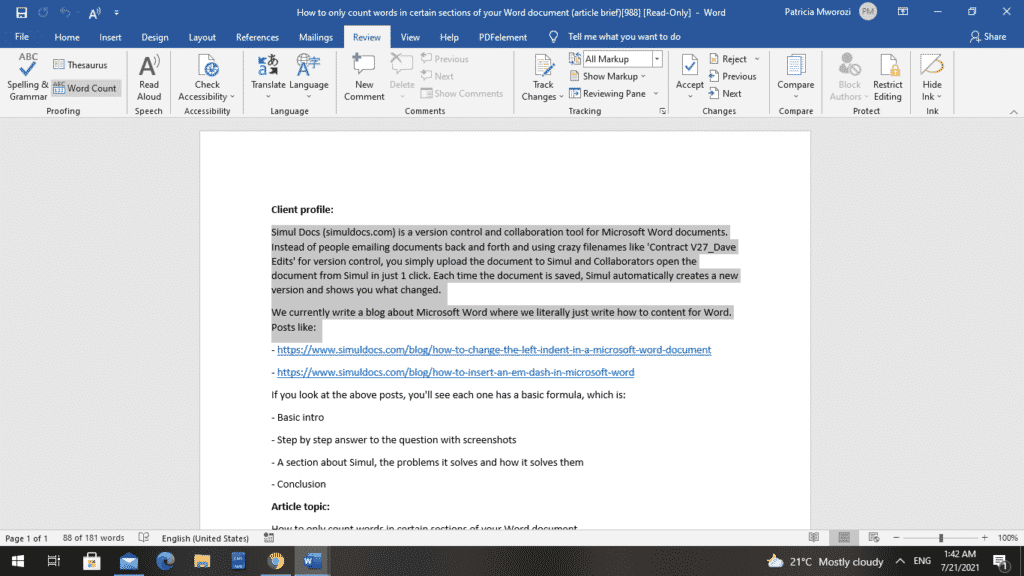
1. Select that portion of the text with your mouse or keyboard
Highlight the entire text or section you want to count.
2. Select the ‘Review’ tab on the ribbon
Go to ‘Review’ on the ribbon. When you select it, you will see ‘Word Count’ in the top left under ‘Thesaurus.’
3. Open the Word Count dialog box to see how many words are in that section.
It is important to note that Word Count can include or exclude footnotes, endnotes, and text boxes. However, it is an ‘all or nothing’ kind of feature. Either you include all footnotes, endnotes and textboxes, or none.
A dialog box will appear.
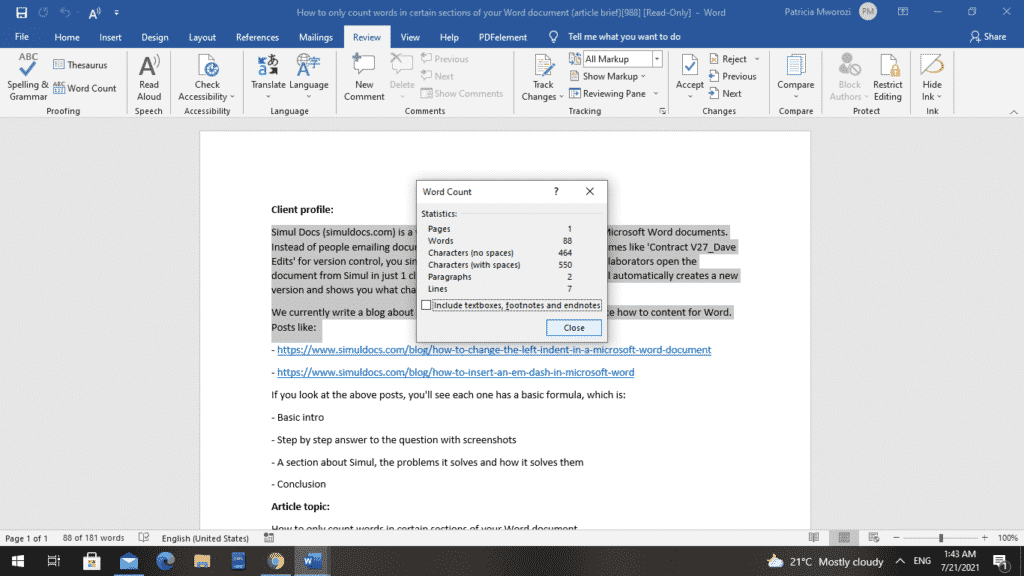
At the bottom, you will see a box next to ‘Include text boxes, footnotes, and endnotes.’ If it is checked, uncheck it.
Above it, you will see statistics with numbers next to them: pages, words, characters (no spaces), characters (spaces), paragraphs, lines.
Now you know how many words are in that particular section.
Are you a student looking for an easy and convenient way to do group projects without having to physically meet your groupmates or keep exchanging documents one after the other, as you make edits?
You do not know which document you worked on most recently. You are wasting time re-typing all your work, copying and pasting. With group projects, a groupmate might reformat your paper into a format that probably cannot open on your phone or laptop. All these barriers are very exhausting.
Simul Docs is the solution for you.
The first step is downloading Simul Docs then you can get started.
After writing your first draft in Microsoft Word, upload it to Simul Docs. This will automatically make it the first version. Now, another colleague can open it and make their edits. This will create another version different from the first.
Whenever another person opens a version and makes edits, a new version is created with the latest changes.
Sometimes, you might be in a rush and forget to turn on tracked changes so your modifications can be updated. You have nothing to worry about. Simul Docs automatically records these edits regardless of your online or offline status.
Since it is a collaboration, a bonus feature is the ability to add comments to the document. If you want a colleague to review the changes by a specific time, or any other instructions, you can let them know in the comment section. Later on, these comments can be removed after your groupmates have seen and executed the instructions.
Additionally, you and your groupmates can work on the document at the same time. There’s no need to lazy around waiting for someone else to make edits. You might do your part in time, and the last person ends up costing the group credit because they work slowly. You can save time by working on a document at once, and Simul Docs keeps each version separately.
Let us say another co-worker is supposed to include their input, but they do not have Simul Docs. Maybe they are not tech-savvy. All you have to do is download the document or forward it by email. Alternatively, you can upload it to any storage software like one drive, and once their changes have been made, they can forward it to you once again, and you can open it in Simul Docs.
Once all the necessary edits have been made, you can save the final version containing all the modifications with one click.
As you can see, with Simul Docs, you do not need many documents open to work on a single assignment or have to be in the exact location as your groupmates.
You and your groupmates can work on the same document from the comfort of your homes or workplaces.
Simul is the most convenient collaborative tool yet. Centralising your written project avoids mishaps like losing your work or losing its original format.
Visit simuldocs.com and simplify group edits today.
![]()
Download Article
![]()
Download Article
Are you looking for an easy way to check the word count in your Microsoft Word document? Word has an easy-to-use, built-in tool that keeps track of your word count in each of its versions, including desktop, mobile or online. This wikiHow article will teach you how to view the word count for a section of text or your entire document in Microsoft Word.
-

1
Launch Microsoft Word. This can be done by double clicking on the Word icon on your desktop, in your Taskbar (Windows) or Dock (Mac). If you don’t see an icon, click on the ‘Start» menu in the lower left of your PC’s screen. Click on the ‘All Programs» drop down and select Microsoft Word.[1]
- On Mac, click on the Launchpad (a gray rocketship) icon in your dock. Type ‘Word’ in the search bar at the top of the screen.
-
2
Navigate to an existing document. To open a document, go to the File menu, and then click on Open. A dialog box will appear with a list of available documents.[2]
Advertisement
-
3
Select a document. In the dialog box, navigate to the document you wish to open. Select the document, and once it’s highlighted, click on Open in the lower right of the dialog box.
-
4
Select Tools. Once your document is open, select the Tools menu at the top center of the window.[3]
- This step only applies to a MAC OS.
-
5
Scroll to Word Count. In the Tools menu dropdown, click on «Word Count.»
- If you’re not using a Mac, you won’t see any Tools heading at the top. In this case, go to the Review tab at the top of your document. Once there, you’ll see «Word Count» on the left-hand side of the section.
-
6
Review your word count. A box will open displaying the number of words, as well as the number of characters, paragraphs, lines and pages, contained in your document.
- In many documents, the word count is displayed live on the left side of the bottom bar of the document window. Click on this word count to get additional information, such as the number of pages and characters.


Advertisement
-
1
Place your cursor at the beginning of the text you wish to count. Click on the beginning of the sentence, paragraph or section of text for which you want a word count.
-
2
Highlight the section of text. Drag your cursor to the end of the text section, which should now be highlighted in blue.
-
3
Click on the Tools menu. Select the Tools menu at the top center of the document window.
-
4
Click on Word Count. Select Word Count from the Tools menu dropdown. A box displaying the number of words, characters, lines, pages and paragraphs will appear on the screen.
- The word count for a selected portion of text will usually be displayed in the bottom bar of your document.


Advertisement
-
1
Launch the Microsoft Word mobile app. On your smartphone or tablet, tap on the Word app to launch it.
-
2
Open a document. The app will usually open the last document you were working on. If not, you will see a list of recently-opened files. Tap on the file you wish to work on.
-
3
Tap the Edit menu. Once your document is open, tap on the Edit menu (a capital «A» with a pencil icon) on top center of your screen. The Edit menu will open in the bottom half of your screen.
- In Word for iPad, simply tap on the «Review» menu at the top center of the tablet’s screen.
-
4
Tap on «Home.» Home is located on the left side of the Edit menu bar. This will open a pop-up menu.
-
5
Tap on «Review.» The Review menu is near the bottom of the Edit menu pop-up.
-
6
Tap on «Word Count.» Word Count is near the bottom of the Review menu. When you tap it, the number of words, characters and pages in your document will be displayed.
- In Word for iPad, word count is an icon, several lines with the numbers «123» displayed in the upper left, in the main menu bar under the Review menu.
- Highlight a section of text by tapping on it with your fingers, then tap on Word Count to display the number of words in the highlighted portion of your document.


Advertisement
-
1
Launch Word online. Navigate to office.live.com and log in with your Microsoft ID and password or choose to use the free version.
-
2
Open a document. On the left side of your screen, select a recent document.
- If you don’t see the document you want to edit, select Open from One Drive or Open from Dropbox in the lower left corner of the window.
-
3
Review the word count. Once you have an open document, check the bottom left, side of the document. The word count automatically appears in the lower scroll bar.


Advertisement
Add New Question
-
Question
How do I select the area to word count in Word 2016?

Highlight the passage; it should show the word count.
-
Question
When I am in the header area, Word will not show me a word count. What can I do?
Select all of the words in the header and the word count for the words you highlighted will be displayed in the word count box on the status bar.
-
Question
I don’t see Word Count in the lower left corner. Why not?
Right click on the status bar and click on «Word Count» so that it has a tick next to it.
See more answers
Ask a Question
200 characters left
Include your email address to get a message when this question is answered.
Submit
Advertisement
-
On Word for PC/Mac, make sure the Microsoft Word window is fully maximized. Otherwise, the window can be moved within your viewable area, and the Word Count in the lower portion of the document could be hidden.
-
To ensure the word count is always visible in your documents, select View from the Preferences menu in the upper left corner of your Mac or PC. The check the box to the left of «Live Word Count.»
Thanks for submitting a tip for review!
Advertisement
About This Article
Article SummaryX
1. Open the document.
2. Find the word count at the bottom-left corner.
3. Click the word count for more info.
4. Highlight a section to see the word count for that section.
Did this summary help you?
Thanks to all authors for creating a page that has been read 919,360 times.